Development of a car physics engine for games - Master Project
←
→
Page content transcription
If your browser does not render page correctly, please read the page content below
Master Project

Development of a car physics
     engine for games

      (Photo courtesy of Need for Speed Most Wanted – BMW M3)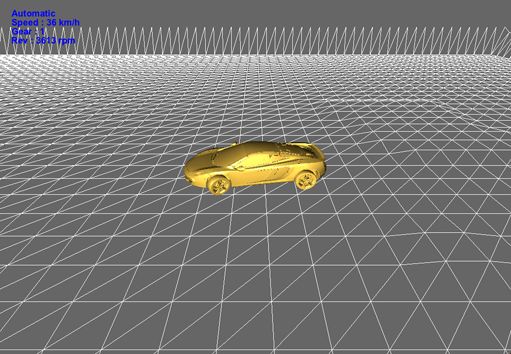
Development of a car physics engine for games   2

Abstract

Car racing games are a lot of fun. You can drive high-powered vehicles that
you could not possibly afford in real life. Between the speed, the power, and
the fiery crashes, you can create many exciting game scenarios using cars.
Whether you are developing a car racing game based on realistic physics or a
car racing game based on liberal physics, it is important to have a robust car
physics engine for your game.

This project is useful as it could be widely used in various fields such as
games, animations, and simulations depending on the configurations of the
physics engine. Last but not least, it helps you understand the physics that
underlies the dynamics of cars.
Development of a car physics engine for games   3

Acknowledgements

I would like to express my gratitude towards the course leader Dr. Hammadi
Nait-Charif for his support and inputs throughout the academic year.

I thank Jon Macey for his patient and kind support he provided throughout
the year.

Also thanks to Mathieu Sanchez and other professors for their support
throughout the course.
Development of a car physics engine for games        4

Contents

  1. Introduction                                                                    5
  2. Related Work                                                                    6
  3. Forces                                                                          8
     3.1  Aerodynamic Drag                                                           8
     3.2  Rolling Resistance                                                         9
     3.3  Gravity                                                                    9
     3.4  Traction                                                                   9
     3.5  Updating the position of the car                                           10
  4. Engine Torque                                                                   12
     4.1  Gears and Wheel Torque                                                     13
     4.2  Gear Shifting and Automatic Transmission                                   14
  5. Cornering                                                                       15
  6. Implementing Car Physics Engine (Part 1)                                        19
  7. Weight Transfer and Suspension System                                           23
     7.1    Weight Transfer                                                          23
     7.2    Suspension System                                                        26
         7.2.1 Springs                                                               26
         7.2.2 Linkages                                                              27
         7.2.3 Camber Angle                                                          29
        7.2.4 Different Types of Terrain                                             30
  8. Implementing Car Physics Engine (Part 2)                                        31
  9. Projectiles and Collision Response from Wall                                    38
 10. Implementing Collision Response                                                 41
 11. Car Physics Engine Structure                                                    47
 12. Result and Analysis                                                             49
 13. Conclusion                                                                      51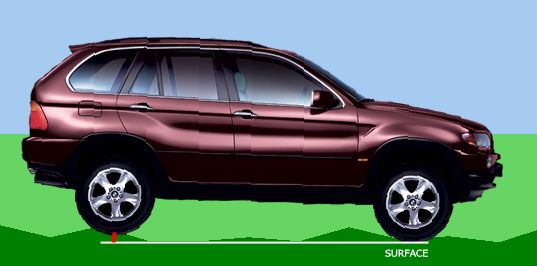
Development of a car physics engine for games   5

Chapter 1: Introduction

This thesis documents the design and implementation of an efficient yet
pleasant car physics engine for games, which includes acceleration, braking,
cornering, weight transfer, suspension system, and collision responses. With
the physics engine, we can simulate various interesting visual effects such as
cornering at high speed and drifting.

In chapter 2, some examples of available car physics engine are mentioned.
Chapter 3 explains the forces acting on a car and how to calculate them. In
chapter 4, engine torque, wheel torque, gear, and the transmission system
are introduced. In chapter 5, the physics of cornering as well as the
approximation of the lateral forces on each wheel are illustrated. Chapter 6
documents the conceptual design for the first part of the car physics engine.
Chapter 7 covered the concept of weight transfer and suspension system,
which helps add sophisticated effects to the car. Chapter 8 demonstrates the
implementation of the second part of the car physics engine using the
knowledge from chapter 7. Chapter 9 shows the implementation of projectiles
and collision responses from wall. Chapter 10 covered the implementation of
collision response from two moving cars. Chapter 11 documents the structure
of the car physics engine. Chapter 12 presents results and gives an idea over
potential applications. The results are evaluated in chapter 13 where
limitations and future work are briefly discussed.
Development of a car physics engine for games   6

Chapter 2: Related Work

Car physics engine is a big topic especially in the field of games. There are
many car physics simulation software available. However, most of the high
quality racing simulators is not for free or free for non-commercial use only.

Racer (2000) is a free car simulation engine (for non-commercial use), using
real car physics and motion formulae from actual engineering documents to
get a realistic feeling. It uses OpenGL for rendering and produces
commercial-quality moving image. The engine supports 2-8 wheels vehicles
with 6 degrees of freedom for the chassis movement and 15 degrees of
freedom in a total car (wheels, engine, clutch etc).

CarX (2008) is a commercial high quality car physics engine using real cars to
reconcile the behavior of vehicles in the game with real life. The engine
supports different types of suspension (McPherson, double wishbone, and
dependent) and different types of car from small cars to trucks with a large
number of wheels. It supports different gear types, which are FWD, RWD,
and 4WD. Another interesting feature of CarX is that it simulates visual
deformation of tires. It also supports different surfaces (asphalt, snow, ice,
sand, grass, and earth).

Development of a car physics engine for games   7

GTR and Need for Speed are examples of successful car racing games. In
GTR player experiences authentic racing experiences where cars and circuits
behave, as they would do in real life. Need for speed, on the other hand, is an
arcade game rather than a simulation game. It, therefore, relies more on
liberal physics rather than realistic physics.
Development of a car physics engine for games           8

Chapter 3: Forces

To simulate cars in game, we need to compute the forces acting on a car.
Longitudinal, lateral, and vertical forces should be handled separately.
Longitudinal forces operate in the direction of the car body (or in exact
opposite direction). These are wheel force, braking force, rolling resistance,
and drag (air resistance). Together these forces control the acceleration or
deceleration of the car. Lateral forces, which are caused by sideways friction
on the wheels, allow the car to turn. The force of gravity (vertical), which acts
both normal to the inclined surface, as well as parallel to the slope, also
influences the car.

3.1 Aerodynamic drag
When the car is in motion, an aerodynamic drag will develop that will resist
the motion of the car. Drag force is proportional to the square of the velocity
and the formula to calculate the force is as follows.

     Fdrag = -Cdrag * V * |V|                                                         (3-1)

Where V is the velocity vector and Cdrag is a constant, which is proportional to
the frontal area of the car.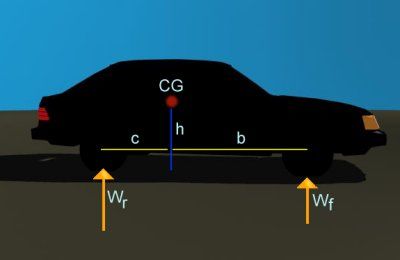
Development of a car physics engine for games           9

3.2 Rolling resistance
Rolling resistance is caused by friction between the rubber and road surfaces
as the wheels roll along and is proportional to the velocity.

      Frr = -Crr * V                                                                   (3-2)

Where V is the velocity vector and Crr is a constant

3.3 Gravity
Gravity pulls the car towards the earth. The parallel component of
gravitational force, Fg = mgsinθ (θ is the angle of the slope), can pull the car
either forwards or backwards depending on whether the car is pointing uphill
or downhill.

3.4 Traction
The engine generates torque, which when applied to the wheels causes them
to rotate. Friction between the tires and the ground resists this motion,
resulting in a force applied to the tires in the direction opposite to the
rotation of the tires.

      Ftraction = Twheel / Rwheel                                                      (3-3)

Where Ftraction is the force applied to the tires, Twheel is the torque applied to
the wheels, and Rwheel is the wheel radius. I will discuss how to calculate the
torque applied to the wheels in the “Engine torque” section. The lateral forces
will be discussed in the “Cornering” section.
Development of a car physics engine for games 10
3.5 Updating the position of the car
To determine the position of the car first we must find the net force on the
car. The total longitudinal force is the vector sum of these four forces.
Flong = Ftraction + Fdrag + Frr + Fg (3-4)
When braking, a braking force replaces the traction force, which is oriented
in the opposite direction. A simple model of braking is as follows.
Fbraking = - u * Cbraking (3-5)
Where u is a unit vector in the direction of the car’s heading and Cbraking is a
constant.
The acceleration of the car is determined by the net force on the car and the
car’s mass via Newton’s second law.
a=F/M (3-6)
The car’s velocity is determined by integrating the acceleration over time
using the numerical method for numerical integration.
Vnew = V + dt * a (3-7)
Where dt is the time increment in seconds between subsequent calls on the
physics engine.
The car’s position is in turn determined by integrating the velocity over time.
Pnew = P + dt * v (3-8)Development of a car physics engine for games 11 With these forces, we can simulate car acceleration fairly accurately. Together they also determined the top speed of the car since as the velocity of the car increases the resistance forces also increases. At some point the resistance forces and the engine force cancel each other out and the car has reached its top speed.
Development of a car physics engine for games 12
Chapter 4: Engine Torque
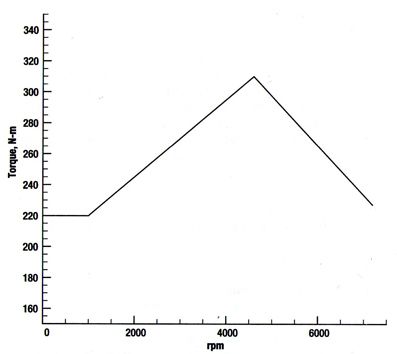
When the engine runs, it generates a certain amount of torque. The torque
that an engine delivers depend on the speed at which the engine is turning,
usually expressed in terms of revolutions per minute, or rpm. The
relationship torque versus rpm is usually provided as a curve known as a
torque curve. A torque curve of the 2004 Porsche Boxster S is shown in
Figure 4-1.
Figure 4-1. Torque curve for the 2004 Boxster S
The figure shows the maximum torque the engine can deliver at a given rpm.
The actual torques that engine delivers depends on the throttle position and
is a fraction between 0 and 1. The curve is defined in a specific range since
any higher (above the so-called “redline”) will damage the engine.Development of a car physics engine for games 13
The angular velocity of the engine in rad/s is obtained by multiplying
the engine turnover rate by 2π and dividing by 60.
ωe = 2π Ωe / 60 (4-1)
For game programming purposes, we can approximate the torque curve as a
series of straight lines. The torque curve for the Boxster S as shown in figure
3-1, for example, can be approximate by three straight lines.
Figure 4-2. Simplified torque curve for the 2004 Boxster S
4.1 Gears and Wheel Torque
The torque applied to the wheels is not the same as the engine torque
because the engine torque passes through a transmission before it is applied
to the wheels. The gear ratio between two gears is the ratio of the gear
diameters. Car transmission will typically have between three and six
forward gears and one reverse gear. There is also an additional set of gearsDevelopment of a car physics engine for games 14
between the transmission and the wheels known as the differential and the
gear ratio of this gearset is called the final drive ratio. The wheel toque can
be obtained using the following equation.
Tw = Te * gk * G (4-2)
Where Te is the engine torque, gk is the gear ratio of whatever gear the car is
in and G is the final drive ratio.
The relationship between the engine turnover rate and the wheel angular
velocity is as follows.
ωw = 2π Ωe / (60*gk*G) (4-3)
If we assume that the tires roll on the ground without slipping, the
translational velocity of the car can be related to the engine turnover rate as
follows.
V = rwωw = rw * 2π Ωe / (60*gk*G) (4-4)
4.2 Gear Shifting and Automatic transmission
Lower gear results in a greater acceleration but gear shifting is necessary as
the velocity of the car is a function of the engine turn over rate and gear
ratios, and every car has a limit to how fast the engine can turn over. There
are two types of transmission – manual transmission and automatic
transmission. To simulate automatic transmission in the game, we could just
specify an engine turnover rate in which the transmission would shift.Development of a car physics engine for games 15
Chapter 5: Cornering
Turning at low speeds, the wheel normally rolls in the direction they are
pointed at. In high-speed turns, the wheels can be heading in one direction
while their movement is still in another direction. This means there is a
velocity component that is at right angle to the wheels causing them to being
pushed sideways. The angle between the car’s orientation and the car’s
velocity vector is known as the side slip angle (beta).
Figure 5-1. Side slip angle (beta).
In high speed cornering, the tires develop lateral forces also known as the
cornering force. This force depends on the slip angle (alpha), which is the
angle between the tire’s heading and its direction of travel, and the weight on
that tire.Development of a car physics engine for games 16
Figure 5-2. Slip angle (alpha).
At low slip angles, the cornering force can be determined as follows.
Fcornering = Ca * alpha (5-1)
Where Ca is known as the cornering stiffness.
The slip angles for the front wheels and rear wheels are given by the
following equations.
αfront = arctan((Vlat + ω * b) / Vlong)) – σ * sgn(Vlong)
αfront = arctan((Vlat - ω * c) / Vlong)) (5-2)
Where ω is the angular speed of the car, σ is the steering angle, Vlat is the
velocity in the lateral direction, Vlong is the velocity in the longitudinal
direction, b is the distance from CG to the front axle, c is the distance from
CG to the rear axle, and c is the sign function that extracts the sign of a real
number.Development of a car physics engine for games 17
For high slip angles, the relationship between slip angle and cornering force
is not linear but described by curve diagrams such as the following.
Figure 5-3. Slip angle VS lateral force
The lateral force depends on the load of the tire. In order to find lateral forces
at different loads, we could assume that the lateral force is linear with load
and create a normalized lateral force diagram by dividing the lateral force by
5KN. Lateral force can, therefore, be determined as follows.
Flat = Ca * alpha
Flat = Capped Flat to a defined maximum normalized friction force
(diameter of friction circle)
Flat = Flat * load
Flat = Flat * 0.5 (in case the wheel slip) (5-3)
The lateral force also introduce a torque which causes the car body to turn,
which can be calculated as follows.
Torque = cos (σ) * Flat, front * b – Flat, rear * c (5-4)Development of a car physics engine for games 18 Where σ is the steering angle, b is the distance from CG to the front axle, and c is the distance from CG to the rear axle. Dividing the torque by the inertia, we obtain the angular acceleration. Integrating the angular acceleration over time, we get the angular velocity. We then integrate the angular velocity again to obtain the angular position of the car.
Development of a car physics engine for games   19

Chapter 6: Implementing car physics engine (part 1)

This chapter demonstrates how to implement car physics engine using the
knowledge from chapter 3-5 (ignoring the suspension system and the height
map for a moment). The pseudo code of the engine is as follows.
   1. Transform velocity in world reference frame to velocity in car
      reference frame (Vx = Vlong, Vz = Vlong). Convention for car reference
      frame: x – pointing to the front, z – pointing to the right
   2. Compute the slip angles for front and rear wheels (equation 5.2)
   3. Compute Flat = Ca * slip angle (do for both rear and front wheels)
   4. Cap Flat to maximum normalized frictional force (do for both rear and
      front wheels)
   5. Multiply Flat by the load (do for both rear and front wheels) to obtain
      the cornering forces.
   6. Compute the engine turn over rate Ωe = Vx 60*gk*G / (2π * rw)
   7. Clamp the engine turn over rate from 6 to the defined redline
   8. If use automatic transmission call automaticTransmission() function
      to shift the gear
   9. Compute the constant that define the torque curve line from the
      engine turn over rate
  10. From 9, compute the maximum engine torque, Te
  11. Compute the maximum torque applied to the wheel Tw = Te * gk * G
  12. Multiply the maximum torque with the fraction of the throttle
     position to get the actual torque applied to the wheel (Ftraction - The
     traction force)
Development of a car physics engine for games 20
13. If the player is braking replace the traction force from 12 to a defined
braking force
14. If the car is in reverse gear replace the traction force from 12 to a
defined reverse force
15. Compute rolling resistance Frr, x = - Crr * Vx and Frr,z = - Crr * Vz
16. Compute drag resistance Fdrag, x = - Cdrag * Vx * |Vx| and Fdrag, z = -
Cdrag * Vz * |Vz|
17. Compute total resistance (Fresistance) = rolling resistance + drag
resistance
18. Sum the force on the car body
Fx = Ftraction + Flat, front * sin (σ) * Fresistance, x
Fz = Flat, rear + Flat, front * cos (σ) * Fresistance, z
19. Compute the torque on the car body
Torque = cos (σ) * Flat, front * b – Flat, rear * c
20. Compute the acceleration
a=F/M
21. Compute the angular acceleration
α = Torque/Inertia
22. Transform the acceleration from car reference frame to world
reference frame
23. Integrate the acceleration to get the velocity (in world reference
frame)
Vwc += dt * a
24. Integrate the velocity to get the new position in world coordinate
Pwc += dt * Vwc
25. Move the camera to follow the car.Development of a car physics engine for games 21
26. Integrate the angular acceleration to get the angular velocity
ω += dt * α
27. Integrate the angular velocity to get the angular orientation
Yaw angle += dt * ω
28. Obtain the rotation rate of the wheels by dividing the car speed with
the wheel radius
Wheel rotation rate = car speed / wheel radius
29. Re-render the car
Car Physics Engine (Part 1)Development of a car physics engine for games 22
In sum, the physics engine first transforms the world reference frame to
velocity in car reference frame. It then computes the force and torque on the
car body. Finally, it computes the new position and the new angular
orientation of the car and re-render the car.
The pseudo code of automatic transmission function is as follows.
1. Define the rpm when the transmission would shift
2. Compute the maximum velocity for each gear before the gear shift
Vmax = rwheel * 2 π * Ωe / (60 * gk * G)
3. If Vx is more than the maximum velocity of the current gear, shift the
gear up and return
4. If the car is in gear one, do nothing and return
5. If Vx is less than the maximum velocity of the lower gear (maximum
velocity of (current gear -1)), shift the gear down and return
Automatic TransmissionDevelopment of a car physics engine for games 23
Chapter 7: Weight Transfer and Suspension System
7.1 Weight Transfer
An important effect that happens during a turn is that weight is shifted to
the outside wheel. The effect of dynamic weight transfer also happens when
accelerating or braking. When braking hard the car will nosedive. During
acceleration, the car leans back. The effect of weight transfer dramatically
improves the visual effects and adds a lot of realism to driving games. The
weight distribution also affects the cornering force as shown in equation 5-3
of chapter 5. Additionally, it affects the compression of the suspension
system. For a stationary vehicle, the total weight of the car is distributed
over the front and rear wheels as follows.
Wf = (c / L) * W
Wr = (b / L) * W (7-1)
Where b is the distance from CG to front axle, c is the distance from CG to
rear axle, and L is the wheelbase (b + c)
Figure 7-1. The distribution of the weight of the carDevelopment of a car physics engine for games 24
During acceleration the weight of the car is thrown backwards. This cause
the front wheels have less weight to bear.
Figure 7-2. Acceleration – rear weight transfer
Conversely, forward weight transfer occurs during deceleration.
Figure 7-3. Deceleration – forward weight transfer
The formula to determine the weight transfer as a result of lateral force is as
follows.
Weight transfer = (h / L) * M * |a| (7-2)
Where h is the height of the CG, M is the car’s mass, and a is the
acceleration.Development of a car physics engine for games 25
When a car is cornering at speed, the car’s weight transfer from inside wheel
to the outside wheel. There is weight transfer due to lateral acceleration as
well as weight transfer introduced by body roll. The weight transfer due to
lateral acceleration is determined as follows.
Weight transfer = (Lateral acceleration / g) * weight * Height of CG /
Track width (7-3)
Body rolls also introduce weight transfer thus reduction of total grip. The
following drawing shows a car’s body roll when cornering. (The outside
wheels are on the left and the inside wheels are on the right.)
Figure 7-4. Body roll due to cornering
The amount of weight transfer due to body roll is determined as follows.
Weight transfer = (Height of CG * sin (body roll angle)/ Track width) *
weight (7-4)
Although the weight transfer due to body roll is not a great amount compare
with the weight transfer due to lateral acceleration especially for car with
long track width, its influence should not be ignored.Development of a car physics engine for games 26
There is another weight transfer that occurs when a car is moving on an
incline terrain or a road that has noises. In this case, we could use equation
6-4 for weight transfer in the lateral direction as an approximation. For
weight transfer in the longitudinal direction, it is determined as follows.
Weight transfer = (Height of CG * sin (body roll angle)/ Car length) *
weight (7-5)
7.2 Suspension System
7.2.1 Springs
Suspension is a system of springs, shock absorber, and linkages that connects
a car to its wheels and allows relative motion between the two. Implementing
the suspension system adds a lot of realism to the dynamics of the car. The
suspension system of a car is very complicated. For game programming
purposes, we could just assume that a spring connects each wheel to the car
body as shown in the figure 7-5.
Figure 7-5. A simple suspension systemDevelopment of a car physics engine for games 27
The springs apply equal and opposite force to each object. It force follows
Hook’s law and is a function of the stretched or compressed length of the
spring relative to the rest length of the spring and the spring constant of the
spring. The spring constant is a quantity that relates the force exerted by the
spring to its deflection. The spring equation of Hook’s law is as follows.
Fs = Ks (L – r) (7-6)
Where Fs is the spring force, Ks is the spring constant, L is the stretched or
compressed length of the spring, and r is the rest length of the spring.
The force exerted on each wheels can be determined using equations in
section 7.1
7.2.2 Linkages
The system of linkages of a suspension keeps the vehicle occupant
comfortable and well isolated from road noise, bump, and variations, etc.
For game programming purposes, we could just assume that a moveable link
connects each wheel to the spring as shown in the figure 7-6.
Figure 7-6. A link connects a wheel to a springDevelopment of a car physics engine for games 28
To simulate the dynamics of the linkages, first we determine the surface of
the terrain with the road noise removed. After that, we determine the height
of the road noise affecting each wheel. Finally, we move the links according to
these heights. But they will not be moved upward more than the specified
value. In this way, the orientation of the car’s body is changing minimally.
Figure 7-7 illustrates the algorithm of simulating the dynamics.
Figure 7-7. The dynamics of a linkages
In the figure, the white line shows the surface of the terrain with the road
noise removed and the red line shows the height of the road noise. In this
case, the rear wheels will be moved upward to the body of the car in order to
maintain orientation of the car’s body as much as possible.Development of a car physics engine for games 29
7.2.3 Camber angle
Camber angle is the angle that the vertical axis of the wheel makes with the
road surface. Negative camber is when the top of the wheel leans to the
centre of the car. Positive camber is when the top of the wheel leans out.
Considerable changes in camber angle are effect under condition of
accelerating and braking. On acceleration or braking, the suspension
produces positive camber to the undriven wheels and negative camber to the
driven wheels as shown in figure 7-8. The magnitude of the camber angle
depends on the magnitude of the car’s acceleration. Under constant velocity,
the wheels tend toward their static position. For game programming
purposes, we could defined a maximum camber angle and compute the
current camber from the percentage of the longitudinal weight transfer times
the maximum camber angle.
Figure 7-8. Camber angle and chassis dynamicsDevelopment of a car physics engine for games 30 7.2.4 Different types of terrain A racing game usually comprises more than one type of terrain. To simulate types of terrain in the car physics engine, we can specify the region for each type of terrain. A type of terrain has two attributes, which are rolling resistance coefficient and maximum height variation. For road, the maximum height variation is set as zero and the rolling resistance coefficient is set to a low value, whereas for tracks made of mud, the maximum height variation is set to a low value and the rolling resistance coefficient is set to a high value. The car moves slower in terrain where the rolling resistance coefficient is set to a higher value. The maximum height variation controls the roughness of the road surface. The car physics engine generates a random number between zero and the maximum height variation and add this number to the height that a wheel lies on. It then repeats this process for the three other wheels. In this way, it simulates the roughness of the terrain that the car moves on.
Development of a car physics engine for games   31

Chapter 8: Implementing car physics engine (part 2)

This chapter demonstrates how to implement car suspension using the
knowledge from chapter 7. The pseudo code of the engine is as follows.

      1. Compute weight on front and rear axle
              WfrontAxle = (c / L) * Weight
           WrearAxle = (b / L) * Weight
      2. Compute weight transfer due to acceleration
              Wtransfer, acc = (h / L) * M * ax
      3. Update weight on front and rear axle
           Wfront += Wtransfer, acc
              Wrear -= Wtransfer, acc
      4. Compute weight transfer due to lateral force
              Wtransfer, lat, rear = (az / G) * Wrear * h / Track width
              Wtransfer, lat, front = (az / G) * Wfront* h / Track width
              Wtransfer, lat = Wtransfer, lat, rear   +   Wtransfer, lat, front
      5. Update weight on each wheel
           Wrear, right -= Wtransfer, lat, rear
              Wrear, left += Wtransfer, lat, rear
              Wfront, rear -= Wtransfer, lat, front
              Wfront, left += Wtransfer, lat, front
      6. Compute the body roll angle
              Body roll angle = sgn(az) * (Wtransfer, lat / Weight) * max body roll
      angle
      7. Compute the camber angle
              Camber angle = |(Wtransfer, long / Weight) * max camber angle |
Development of a car physics engine for games 32
8. Compute weight transfer due to body roll
Wtransfer, roll = (sgn(az) * h * sin(|roll angle|) / track width) *
weight
9. Update weight on each wheel
Wrear, right -= Wtransfer, roll / 2
Wrear, left += Wtransfer, roll / 2
Wfront, rear -= Wtransfer, roll / 2
Wfront, left += Wtransfer, roll / 2
10. Compute the position of the bottom of the wheels relative to CG
11. Compute the orientation vectors from the vectors in 10
RL_FR = normalize (FR_wheelPos – RL_wheelPos)
RR_FL = normalize (FL_wheelPos – RR_wheelPos)
RL_FL= normalize (FL_wheelPos – RL_wheelPos)
RL_RR = normalize (RR_wheelPos – RL_wheelPos)
RR_FR = normalize (FR_wheelPos – RR_wheelPos)
12. Rotate the vectors in 10 by the yaw angle and add the CG
position to get the wheels bottom positions
13. Update the bottom position of each wheel by height value from
the height mapDevelopment of a car physics engine for games 33
14. Compute the roll angle both longitudinal (x) and lateral (z)
dx = max(maxRear-minFront,minRear-maxFront)
dz = max(maxRight-minLeft,minLeft-maxRight)
angleX = arcsin(|dx|/ car length)
angleZ = arcsin(|dz|/ track width)
Where maxRear is the maximum height of the rear wheels
maxFront is the maximum height of the front wheels
maxRight is the maximum height of the right wheels
maxLeft is the maximum height of the left wheels
minRear is the minimum height of the rear wheels
minFront is the minimum height of the front wheels
minRight is the minimum height of the right wheels
minLeft is the minimum height of the left wheels
15. Compute the weight transfer in the lateral and longitudinal
direction
WeightTransferX = (sgn(dx) * h * sin(angleX) / car length)*weight
WeightTransferZ = (sgn(dz) * h * sin(angleX) / car width)*weight
16. Update weight on each wheel
WeightfrontAxle += WeightTransferX
WeightrearAxle -= WeightTransferX
Wrear, right -= Wtransfer, x / 2 + Wtransfer, z / 2
Wfront, right += Wtransfer, x / 2 + Wtransfer, z / 2
Wfront, left += Wtransfer, x / 2 + Wtransfer, z/ 2
Wrear, left -= Wtransfer, x / 2 + Wtransfer, z / 2Development of a car physics engine for games 34
17. Compute the car body positions
RR_bodyPos = RR_wheelPos + vector (0,lengthRear0, 0)
FR_bodyPos = FR_wheelPos + vector (0,lengthFront0, 0)
FL_bodyPos = FL_wheelPos + vector (0,lengthFront0, 0)
RL_bodyPos = RL_wheelPos + vector (0,lengthRear0, 0)
Where lengthRear0 and lengthFront0 are the lest length of the
spring of the rear and front wheels respectively
18. Compute the distance that the springs are compressed
Spring lengthrear, right = Wrear, right / Krear
Spring lengthfront, right = Wfront, right / Kfront
Spring lengthfront, left = Wfront, left / Kfront
Spring lengthrear, left = Wrear, left / Krear
19. From the compressed length of the springs in 18, update the
positions of the car body
RR_bodyPos.y -= Spring lengthrear, right
FR_bodyPos.y -= Spring lengthfront, right
FL_bodyPos.y -= Spring lengthfront, length
RL_bodyPos.y -= Spring lengthrear, left
20. Compute the road noise and update the positions of the car body
accordingly.
21. Compute the positions of the car body relative to CM
RR_bodyRel = RR_bodyPos – CM_Pos
FR_bodyRel = FR_bodyPos – CM_Pos
FL_bodyRel = FL_bodyPos – CM_Pos
RL_bodyRel = RL_bodyPos – CM_PosDevelopment of a car physics engine for games 35
22. From positions of the car body in 21, compute the orientation
vectors.
23. From the orientation vectors in 11 and the orientation vectors in
22, compute the transformation matrix using the function
matrixFrom2Vector()
23. Re-render the car
In sum, the physics engine first determines the weight distribution on each
wheel. It then computes the length of the compressed springs and the
positions of the car body. Finally, it computes the transformation matrix of
the car and passes it to the render module to re-render the car.
The pseudo code of the matrixFrom2Vector() function, which computes the
rotation matrix from 2 vectors, is as follows.
1. matrixFrom2Vector(a, b) // a = source vector, b = destination vector
2. Use a x b as the rotation axis
3. Derive cosine of the rotation angle, c, from the dot product of a and b
4. Derive sine of the rotation angle, s, from 1- c^2
5. If C is 1 or -1 return the identity matrix
6. Compute t = 1- c
7. Compute x = normalized axis x coordinate
8. Compute y = normalized axis y coordinate
9. Compute z = normalized axis z coordinate
10. Compute the transformation matrix
t*x*x + c t*x*y - z*s t*x*z + y*s
t*x*y + z*s t*y*y + c t*y*z - x*s
t*x*z - y*s t*y*z + x*s t*z*z + c
11. Return the transformation matrix
matrixFrom2VectorDevelopment of a car physics engine for games 36
The car is divided into 5 parts, the body and the four wheels; each has its own
transformation matrix. The pseudo code of the getBodyMatrix() function,
which computes the transformation of the car body, is as follows.
1. Roll the car according to the body roll angle (around x-axis)
2. Then rotate the car according to the yaw angle (around y-axis)
3. Then multiply the output by the rotation matrix from the suspension
system
4. Finally translate the car to the CM position and return the final
transformation matrix
getBodyMatrix()
The pseudo code of the getRearRightWheelMatrix() function, which computes
the transformation of the rear right wheel matrix, is as follows.
1. Revolve the wheel (around z-axis)
2. Then rotate the wheel according to the camber angle (around x-axis)
3. Then rotate the wheel according to the yaw angle of the car (around y-
axis)
4. Then multiply the output by the rotation matrix from the suspension
system
5. Then translate the car to the CM position
6. From the compressed spring length information, compute the vector
from CM to the wheel and named it relToVec
7. Rotate relToVec according to the yaw angle of the car
8. Multiply relToVec by the rotation matrix from the suspension system
9. Create a translation matrix of relToVec and named it
rotMatrix_translate_rel_car
10. Multiply the output by rotMatrix_translate_rel_car and return it as the
final transformation matrixDevelopment of a car physics engine for games 37
The rotation matrices of the other wheels is determined is a similar fashion
The pseudo code of the chassis() function, which simulates the dynamics of
the linkages due to road noise, is as follows.
1. From the position of the four wheels of the car and the data from the
height map, compute the vector on the terrain in the lateral
direction of the car with the most gradual slope.
2. Repeat 1 but for the longitudinal direction.
3. From 1 and 2, construct a plane and compute the height of the road
noise affecting the wheels.
4. Move the links according to the height of the road noise.
5. Clamp the movement of the link to the defined value.
Chassis()Development of a car physics engine for games 38
Chapter 9: Projectiles and collision response from wall
In chapter 8, we ignore collision detection with wall. To check the collision
between the car and a wall we have to obtain the height of the terrain that
the four wheels lie on. If the slope of the terrain that one of the four wheels
lie on is higher than a defined threshold and the maximum height difference
of the terrain that the wheels lies on is higher than a defined threshold, then
the car collide with the wall. If the car collides with the wall, the velocity is
multiplied by a negative value as shown in equation 9-1 before determining
the position of the car by integrating the velocity.
Velocity (in world reference) *= -0.8 (9-1)
In a certain type of terrain, using the suspension system in chapter 8, the car
body may cut through the terrain as shown in figure 9-1. This is because
some of the four wheels should not lie on the ground.
Figure 9-1. Car body cut through the terrainDevelopment of a car physics engine for games 39
To fix this issue, we find the highest point on the terrain from the rear left
wheel to the front left wheel (highest left) and the highest point of the terrain
from the rear right wheel to the front right wheel (highest right). We draw a
vector from the rear left wheel to the highest left and another vector from the
rear right wheel to the highest right and choose the steeper as the orientation
vector. From the orientation vector, we could compute the appropriate
transformation matrix using the same algorithm as shown in chapter 8.
Thus, the corrected car orientation is shown in figure 9-2.
Figure 9-2. Corrected car body orientation
The easiest way to determine when the car is travelling through the air in a
projectile motion is to keep track the orientation of the body and if the front
of the car drop to a defined angle compare to the front of the car in the
previous frame, then the car starts to travel in a projectile motion. If the
speed of the car is higher than a defined value, then use the orientation of the
car in the previous frame; otherwise use the orientation of the car in the
current frame. Set the current velocity of the car as the initial velocity of the
car.Development of a car physics engine for games 40
To update the position of the car in a projectile motion, the x and z
components of the car’s velocity is assume to be constant. The y component of
the car’s velocity is determined using equation 9-2.
Velocity Y += time step * - g (9-2)
Where g is the local gravitational field ≈
9.8
To determine the orientation of the car in a projectile motion, first we
compute the moment of force around the car’s center of mass from the weight
on the four wheels. The moment of force in the longitudinal and lateral
directions are handled separately. Once we have the moment of force, we
could determine the angular acceleration, and thus the transformation
matrix. The car stops travelling in a projectile motion if one of the wheels
touches the ground.Development of a car physics engine for games 41
Chapter 10: Implementing Collision Response
This chapter addresses what happens when two cars run into each other. For
game applications, speed is a major issue, and very accurate collision
detection can be slow. For the sake of speed and simplicity, a bounding
sphere scheme along with bounding box and vertex edge and vertex face
collision detection schemes are used in this master project. Here, bodies that
are colliding are treated as rigid irrespective of their construction and
material. There is a method to deal with collision response known as penalty
method. In penalty methods the force at impact is represented by a
temporary spring that gets compressed between the objects at the point of
impact. This spring compresses over a very short time and applies equal and
opposite forces to the colliding bodies to simulate collision response. However,
this method is not as accurate as the analytic method. Therefore, the
treatment of collision response in this project is based on classical Newtonian
impact principles. By formulating and solving Newtonian dynamical
equations, we will end up with a formula for J that takes into account both
linear and angular effects, which you can then use to find the linear and
angular velocities of each body immediately after impact as follows.
J = -Vr (e+1)/{1/m1 + 1/m2 + n dot [(r1 x n)/I1] x r1 + n dot [(r2 x n)/I2] x r2 }
V1+ = V1- + (Jn)/m1
V2+ = V2- + (-Jn)/m2
ω1+ = ω1- + (r1 x Jn) / Icg
ω2+ = ω2- + (r2 x -Jn) / Icg (10-1)Development of a car physics engine for games 42
Where Vr is the relative velocity along the line of action at the impact point p,
n is a unit vector along the line of action at the impact point pointing out
from body 1, e is the coefficient of restitution, I is the moment of inertia
tensor, r is the vector from the body’s center of gravity to the impact point, m
refers to mass, v refers to velocity subscript 1 refers to body 1, subscripts 2
refers to body 2, subscript – refers to the instant just before impact, and
subscripts + refers to the instant just after impact.
Figure 10-1. Two colliding cars
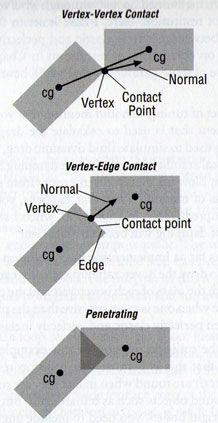
To determine whether or not there is a collision, we need to consider two
factors. First, we need to check whether they are close enough, within
numerical tolerances, to be considered in colliding contact. Then we have to
do another check on the relative normal velocity. A collision occurs when they
are in contact and the points are moving toward each other. The types of
contact that will be checked for are vertex-vertex and vertex-edge contact as
shown in figure 10-2. In edge-vertex collisions the normal is perpendicular to
the edge that is involved in the collision. In vertex-vertex collisions, however,
the normal is ambiguous, so we could approximate using the line connecting
the centers of gravity of the car as the normal.Development of a car physics engine for games 43
Figure 10-2. Types of Collision
The pseudo code for the collision response module is as follows.
1. Compute the vector from the CM of the car to the center of the car
(before multiplying the transformation matrix).
2. Multiply the vector from 1 by the transformation matrix and add the
position of the center of the car to get the center of the bounding
sphere.
3. Compute the radius of the bounding sphere, which is half the length
of the car.
4. Compute the position of the bounding box vertices relative to the CM
of the car (before multiplying the transformation matrix).
5. Multiply the vectors from 4 by the transformation matrix and add the
position of the center of the car to get the vertices of the bounding
box.Development of a car physics engine for games 44
6. Compute the edges of the bounding box from the vertices of the
bounding box.
7. Repeat process 1-6 for another car.
8. If the bounding circles are not colliding, exit the module.
9. Check for vertex-vertex collisions, by iterating through each vertex in
the list of the first car, comparing it each vertex in the list of another
car.
10. Begin vertex-vertex loop
11. Compute the collision normal vector
collisionNormal = (car1.CMPosition – car2.CMPosition). normalize()
12. Compute the collision point relative to CM
Car1.collisionPoint = CollisionPoint – car1.CMPosition
Car2.collisionPoint = CollisionPoint – car2.CMPosition
13. Compute the velocity at the point of collision, which is the sum of the
velocity of the CM and the tangential velocity.
V1 = Car1.CMVelocity + Car1.angularVelocity X
Car1.collisionPoint
V2 = Car2.CMVelocity + Car2.angularVelocity X
Car2.collisionPoint
14. Compute the relative velocity Vr = V1 – V2
15. If the points are within a specified distance from each other and they
are moving toward each other (dot product of Vr and collisionNormal <
0), then a collision occurs.
16. End vertex-vertex loop
17. If vertex-vertex check fails, then check for vertex–edge collision by
iterating through each vertex in the list of the first car to see whether
it is in contact with each edge in the list of another car.Development of a car physics engine for games 45
18. Begin vertex-edge loop. Figure 10-2 illustrates the geometry.
19. Compute the unit vector pointing along the edge.
u = (edge vertex 2 – edge vertex 1).normalize()
20. Compute the vector from the first vertex on the edge to the vertex under
consideration.
p = vertexList1[i] – edge vertex 1
21. Compute the distance from the first edge vertex, along the edge, to the
point upon which the vertex projects.
proj = p.dot(u) * u
22. Compute the minimum distance from the vertex to the edge.
Dist = (p X u).magnitude()
23. Compute the collision point relative to CM.
Car1.collisionPoint = vertexList1[i] – car1.CMPosition
Car2.collisionPoint = vertexList1[i] – car2.CMPosition
23. Compute the collision normal vector by taking the result of the cross
product of u and p and crossing it with u.
collisionNormal = ((u X p) X u).normalize()
24. Compute the velocity at the point of collision, which is the sum of the
velocity of the CM and the tangential velocity.
V1 = Car1.CMVelocity + Car1.angularVelocity X Car1.collisionPoint
V2 = Car2.CMVelocity + Car2.angularVelocity X Car2.collisionPoint
25. Compute the relative velocity Vr = V1 – V2
26. Compute the relative normal velocity Vrn = dot product of Vr and
collisionNormal
27. If 0 < proj.magnitude()Development of a car physics engine for games 46
28. If vertex-vertex check fails, then it goes on to check for penetration by
iterating through each vertex in the list of the first car to see whether it lies
within the boundsF of the edge of another car.
29. Begin check for
i penetration loop.
30. Perform a standard
g point-in-polygon check using the vector dot product
to determine whether
u any vertex of one polygon lies within the bounds of the
other polygon. r
p = vertexList1[i]
e – edge vertex 1
dot = dot product of p and edge
If dot is less than90, it indicates a penetration.
31. End penetration- loop.
32. If there is a collision
2 or a penetration, then determine the linear and
angular velocities. of each car immediately after the impact using equation
10-1.
F
i
Figure 10-3. Vertex-Edge CheckDevelopment of a car physics engine for games 47
Chapter 11: Car physics engine structure
The following figure shows the class diagram of the car physics engine
describing the system’s classes, their attributes, and operations. (Only some
of the attributes and operation are listed)
Figure 11-1. Class diagramDevelopment of a car physics engine for games 48 MainWindow is the main window, which contains a GLWindow widget. The GLWindow contains the drawing element, handles the collision response between two cars, and processes the keyboard input to control the cars. Car is the class that loads the car mesh, compute the car physics, and send the rotation matrices to the GLWindow to re-render the car. Terrain loads the model of the terrain, and calculates the height from a given position. It also contains an array of TerrainType objects, which define the properties of the terrains. Edge is the data structure use for vertex-edge collision detection. MyMath contains important function for mathematical calculations such as matrixFrom2Vector, which computes a rotation matrix require to rotate a source vector to a destination vector.
Development of a car physics engine for games 49
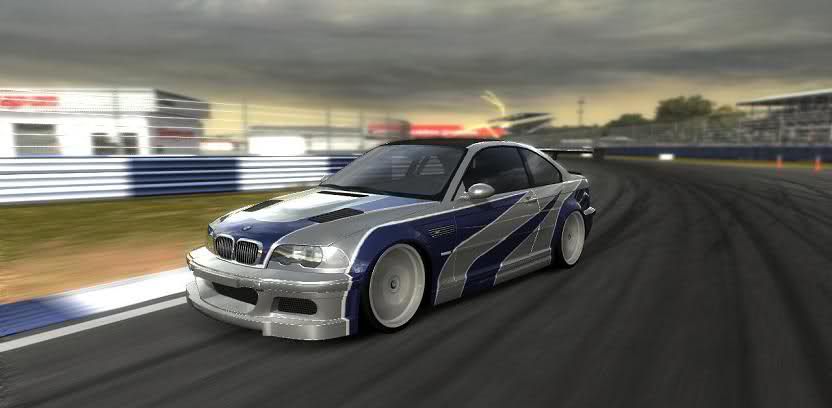
Chapter 12: Result and Analysis
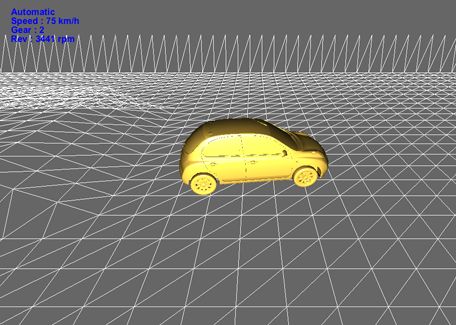
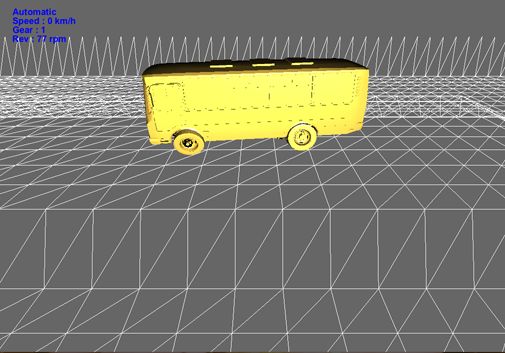
To demonstrate the capability of the car physics engine, three different types
of car (a sport car, a supermini, and a minibus) have been used to test the
engine. Each car has been configured with different parameters such as
mass, height of CM from the ground, car’s size, cornering stiffness,
suspension stiffness, and gear ratios. Driving the car gently and vigorously,
the engine is able to simulate the physics of cornering at low speed, cornering
at high speed, oversteering, understeering, and drifting pretty accurate. The
suspension seems to look quite realistic and the user also feels the effect of
weight transfer from handling the car. The speed of simulation is good even
though the high-resolution models are being used.
Figure 12-1. McLaren MP4-12CDevelopment of a car physics engine for games 50 Figure 12-2. Nissan Micra Figure 12-3. A minibus
Development of a car physics engine for games   51

Chapter 13: Conclusion

A commercial grade car physics engine involves many areas of physics to
achieve realistic results. This thesis only shows some techniques to simulate
the dynamics of a car. While some calculations in the engine are only
approximation and some do not rely on real physics, it produces good visual
results and supports many types of car. The following is a list of known issues
and limitations to the current system.

  • With simple suspension system, the engine only supports cars with four
    wheels.

  • The engine uses simple analytical methods rather than real physics to
    determine when will cars lift off the ground and how they land on the
     ground. Thus, it provides realistic result only to a certain extent.

  • The collision response between two cars is not yet fully implement and
     the engine does not support collision response for multiple cars.

As mentioned earlier that car physics engine is a big topic. Some features can
be improved and there are many more features that can be added to achieve
more realism. Here is a list of some features that can be added.

  • Improve the suspension, which can be achieved by adding more degrees
     of freedom for the chassis movement as well as adding dampers.

  • Add different types of suspension such as McPherson, double wishbone,
     and dependent.
Development of a car physics engine for games 52 • Modify the engine to support motorcycles and cars with more than four wheels. • Treat wheels as soft bodies to simulate the visual deformation of tires. • Modify the transmission module to support different gear types, which are FWD, RWD, and 4WD. • Add more properties for the terrain to support different surfaces such as asphalt, snow, ice, sand, grass, and earth. • The engine should be improved to be more heavily based on real car physics rather than simple approximations but at the same time does not cut back on realism in the interest of fun.
Development of a car physics engine for games         53

Bibliography

  •   David, M., 2002. Physics for Game Developers. California: O’Reilly.

  •   Ian, M., 2010. Game Physics Engine Development. 2nd ed. Burlington: Morgan Kaufmann.

  •   David, M., 2010. Game Physic. 2nd ed. Burlington: Morgan Kaufmann.

  •   Grant, P. 2005. Physics for Game Programmers. New york: Springer.

  •   Chris, H. 1996. Physics the Next Frontier. Game Developer. October/November, 12-20.

  •   Chris, H. 1997. Physics Part 2 Angular Effects. Game Developer. December/January, 14-22.

  •   Chris, H. 1997. Physics Part 3 Collision Responses. Game Developer. March 11-18.

  •   Chris, H. 1997. Physics Part 4 The Third Dimension. Game Developer. March 15-26.

  •   Glenn, F. 2006. Physics in 3D. Available from: http://gafferongames.com/game-physics/physics-in-3d/
      [Accessed 9 June 2012]

  •   Marco, M. 2003. Car Physics for Games. Available from:
      http://www.asawicki.info/Mirror/Car%20Physics%20for%20Games/Car%20Physics%20for%20Games.
      html [Accessed 8 June 2012]

  •   Autozine Technical School. 1998. Handling. Available from:
      http://www.autozine.org/technical_school/handling/tech_handling_3.htm [Accessed 10 June 2012]

  •   Drivingfast.net. 2012. Weight Transfer & Grip. Available from: http://www.drivingfast.net/car-
      control/weight-transfers.htm#.UCDglkKsxUQ [Accessed 10 June 2012]

  •   Midas.com. 2012. Steer suspension. CG image. Midas. Available from:
      http://midas.com/Portals/0/AutoEd_Images/16_Steer_Suspension_IMG2.png [Accessed 14 August
      2012]

  •   Mgf.ultimatemg.com. 2012. Suspension Geometry/Tracking Available from:
      http://www.mgf.ultimatemg.com/group2/suspension/tracking.htm [Accessed 12 August2012]
Development of a car physics engine for games 54
• Racer. 2000. Dolphinity Racer – Car and Racing Simulator. Available from http://www.racer.nl
[Accessed 12 June 2012]
• Car X Technology. 2008. CarX – Car Physics Engine, car physics middle ware for AAA racing
simulation games. Available from http://www.carx-tech.com [Accessed 13 June 2012]
• StrategyInformer. 2012. GTR 2 PC Review, GTR 2 player reviews. Available from
http://www.strategyinformer.com/pc/gtr2/review.html [Accessed 12 August2012]You can also read