ECS with HAProxy Load Balancer - Abstract - Dell Technologies
←
→
Page content transcription
If your browser does not render page correctly, please read the page content below

Technical White Paper

 ECS with HAProxy Load Balancer
                         Abstract
                         This document provides a technical deployment reference of the Dell EMC™
                         ECS™ with HAProxy load balancer.

                         April 2021

H15785.4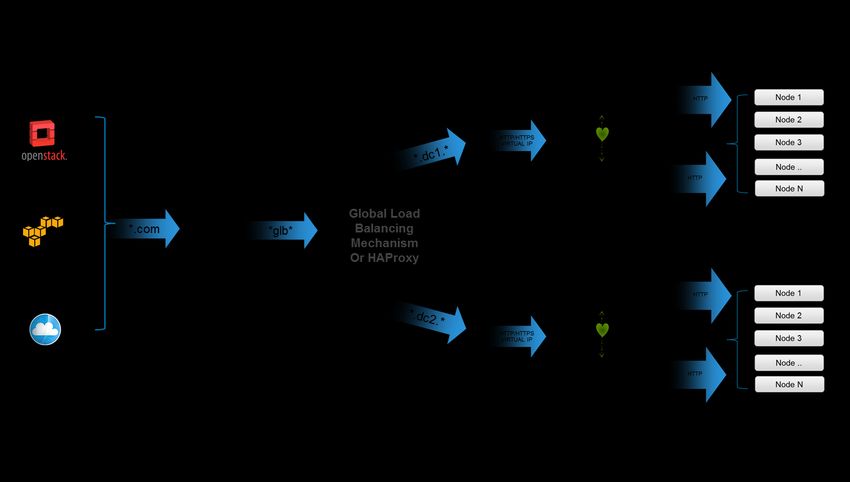
Revisions

Revisions
                 Date                       Description
                 January 2017               Initial release
                 November 2017              Modified based on input from HAProxy
                 April 2021                 Update for HAProxy 2.1 with http head in Chapter 5.3.1

Acknowledgments
               Author: Zhu, Jarvis

               Support: Kraft, Chris

The information in this publication is provided “as is.” Dell Inc. makes no representations or warranties of any kind with respect to the information in this
publication, and specifically disclaims implied warranties of merchantability or fitness for a particular purpose.

Use, copying, and distribution of any software described in this publication requires an applicable software license.

Copyright ©2017-2021. Dell Inc. or its subsidiaries. All Rights Reserved. Dell, EMC, and other trademarks are trademarks of Dell Inc. or its subsidiaries.
Other trademarks may be the property of their respective owners. Published in the USA [4/28/2021] [Document Type] [H15785.4]

Dell believes the information in this document is accurate as of its publication date. The information is subject to change without notice.

This document may contain language from third party content that is not under Dell's control and is not consistent with Dell's current guidelines for Dell's
own content. When such third-party content is updated by the relevant third parties, this document will be revised accordingly.

2         ECS with HAProxy Load Balancer | H15785.4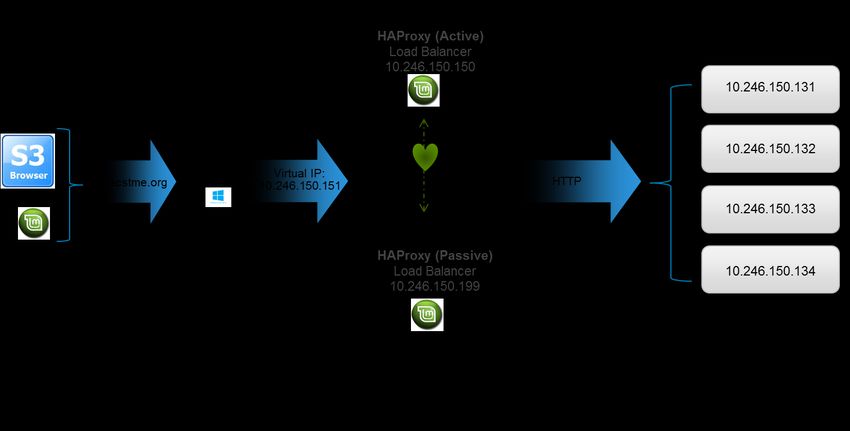
Table of contents

Table of contents
    Revisions.............................................................................................................................................................................2
    Acknowledgements .............................................................................................................................................................2
    Table of contents ................................................................................................................................................................3
    Executive summary .............................................................................................................................................................4
    1     Introduction ...................................................................................................................................................................5
          1.1      Audience .............................................................................................................................................................5
          1.2      Scope ..................................................................................................................................................................5
    2     ECS Overview ..............................................................................................................................................................6
    3     HAProxy Overview .......................................................................................................................................................7
    4     ECS with HAProxy Deployments .................................................................................................................................8
          4.1      Single ..................................................................................................................................................................8
          4.2      Highly Available (Redundancy) ..........................................................................................................................8
          4.3      Global Load Balancing .......................................................................................................................................9
    5     Example Deployments of ECS with HAProxy setup ..................................................................................................11
          5.1      Installation .........................................................................................................................................................11
          5.1.1 Server ...............................................................................................................................................................11
          5.1.2 HAProxy ............................................................................................................................................................12
          5.2      Domain Name System (DNS) ...........................................................................................................................12
          5.3      HAProxy Configuration for Single Setup ..........................................................................................................14
          5.3.1 HTTP ................................................................................................................................................................14
          5.3.2 HTTPS ..............................................................................................................................................................21
          5.3.3 NFS ...................................................................................................................................................................29
          5.3.4 Monitoring .........................................................................................................................................................33
          5.4      Example of ECS with Redundant HAProxy Setup ...........................................................................................34
          5.4.1 Virtual IP ...........................................................................................................................................................34
          5.4.2 Keepalived ........................................................................................................................................................35
          5.4.3 Redundant HAProxy and DNS .........................................................................................................................37
          5.4.4 Validation ..........................................................................................................................................................38
    6     Best Practices.............................................................................................................................................................39
    7     Conclusion ..................................................................................................................................................................40
    A     Other Configuration Examples ...................................................................................................................................41
          A.1      HTTP/HTTPS Configuration Definitions ...........................................................................................................41
          A.2      NFS Configuration Definitions ..........................................................................................................................43

3            ECS with HAProxy Load Balancer | H15785.4
Executive summary

Executive summary
           ECS is the third generation object platform from Dell EMC. It is designed for traditional and next-generation
           applications. It is known for its flexible deployment, resiliency and simplicity. ECS is a consortium of software,
           hardware nodes with disks and switches seamlessly working together to provide access to object storage
           data. In an optimal configuration, a load balancer is recommended to distribute the load across the nodes
           within ECS and ECS clusters in different locations. ECS has not specific requirement for a particular load
           balancer. HAProxy provides one choice and is an open source; reliable and free load balancing software
           solution. It provides a low-cost option for customers who desire to utilize a load balancer with ECS.

4      ECS with HAProxy Load Balancer | H15785.4
Introduction

1              Introduction
               This white paper is a reference guide into deploying HA Proxy load balancer with ECS. It provides example
               configurations and highlights best practices when utilizing HAProxy load balancer with ECS.

1.1            Audience
               This document is targeted for customers and Dell EMC personnel interested in a reference deployment of
               ECS with HAProxy load balancer.

1.2            Scope
               This whitepaper is meant to be a reference deployment guide for customers who would like to use HAProxy
               with their ECS deployment. Its intent is to provide a “reference” or an example for customers to deploy ECS
               with HAProxy. Load balancing is optional and not part of ECS except for CAS. A quick overview of ECS
               object access will be covered in this whitepaper. For a more in-depth overview of ECS Architecture and
               description of how ECS handles and processes object and file access, refer to ECS Architecture and
               Overview whitepaper.

5       ECS with HAProxy Load Balancer | H15785.4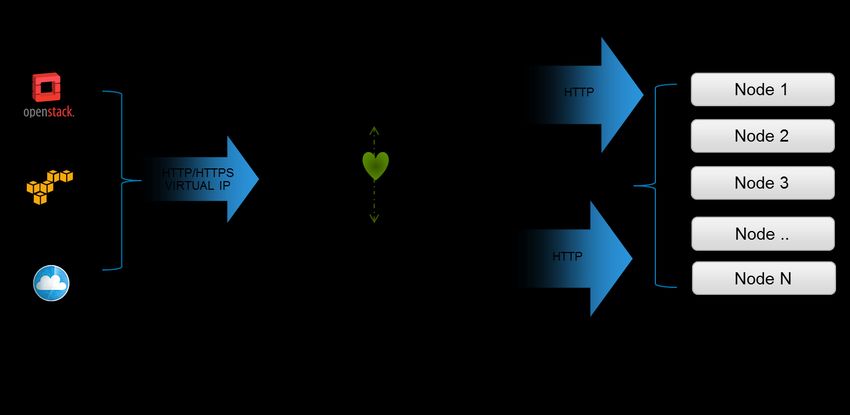
ECS Overview

2         ECS Overview
          ECS provides object and file storage. Object access via S3, Atmos, and Swift on ECS storage platform is
          achieved via REST APIs. Objects are written, retrieved, updated and deleted via HTTP or HTTPS calls of
          GET, POST, PUT, DELETE, and HEAD. For file access, ECS provides NFS version 3 natively. Each of the
          protocols supported communicate to ECS via specified ports as highlighted in Table 1. ECS also supports
          CAS protocol; however, a load balancer is not required since the Centera SDK has a built-in load balancer.

          Table 1 Ports assignments per ECS protocol.

                 ECS      Transport Protocol
                                                  Port
               Protocol   or Daemon Service
                          HTTP                    9020
                 S3
                          HTTPS                   9021
                          HTTP                    9022
                Atmos
                          HTTPS                   9023
                          HTTP                    9024
                Swift
                          HTTPS                   9025
                          mountd,nfsd             2049
                 NFS      portmap                 111
                          lockd                   10000

          These ports are important when configuring ECS with HAProxy. In order to access objects using the above
          protocols, certain firewall ports need to be opened. For more information on ECS ports refer to the ECS
          Security Configuration Guide.

6     ECS with HAProxy Load Balancer | H15785.4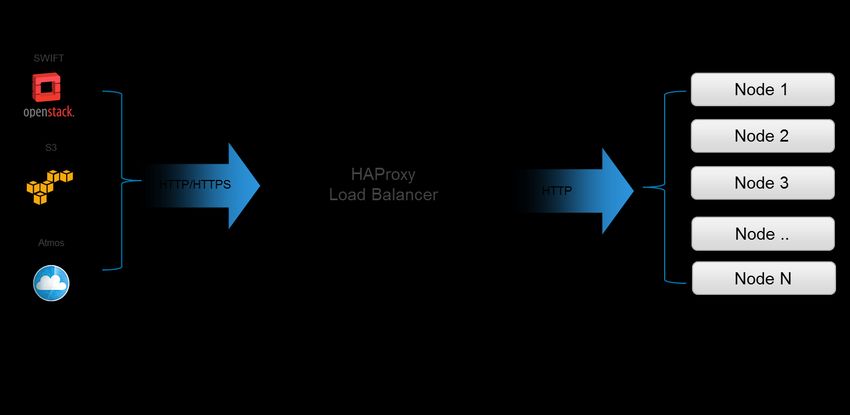
HAProxy Overview

3         HAProxy Overview
          HAProxy, an open source TCP/HTTP load balancer software, is available for free and source can be
          downloaded from the HA Proxy site (http://www.haproxy.org). It runs on most Unix platforms such as Linux,
          Solaris, FreeBSD, OpenBSD and AIX. What makes HAProxy desirable is that it is free, easy to install, setup
          and maintain.

          HAProxy supports both Layer 4 (tcp) and Layer 7 (http) load balancing modes. Layer 4 allows all data traffic
          to be forwarded directly to backend servers streamlining user requests. In Layer 7 mode, HAProxy can
          evaluate the HTTP headers and forward to backend servers based on content of user request. Support of
          both modes makes HAProxy a good low cost option for customers.

          In addition to Layer 4 and 7 load balancing modes, HAProxy has support for the following:

              •    Access Control List (ACL) – allows forwarding traffic based on a certain pattern in content of user
                   request
              •    Load Balancing Algorithms – options available include:
                       o Round-Robin – default algorithm which selects servers in a rotating basis.
                       o Least Connect – selects servers based on the least number of connections
                       o Source – selects servers based on a hash of the source IP such as the user IP address to
                           ensure request goes to the same server until something changes in the hash (i.e. one
                           backend server goes down) .
                       o Sticky Sessions – enables persistence in order for applications to connect to same backend
                           server to process requests.
              •    Health Check – used to check if a backend is available and if not, then it is automatically removed
                   from the rotation to process requests until it is restored or becomes healthy.
              •    Monitoring –statistics relating to HAProxy can be monitored and viewed through a web interface.

          For further information on HAProxy, refer to the HAProxy site. Also available from this site is a community
          forum to ask questions and documentation that can provide further details specific to HAProxy.

7     ECS with HAProxy Load Balancer | H15785.4
ECS with HAProxy Deployments
4 ECS with HAProxy Deployments
There are various ways to deploy ECS with HAProxy such as single, highly available or global. In all
deployments, HAProxy defines in its configuration file a “frontend” indicating how requests should be
forwarded to a pool of servers or ECS nodes defined as the “backend”. If the frontend is defined to be in http
mode, the HTTP headers are analyzed and forwarded based on the content of request. If in “tcp” mode,
HTTP headers will not be evaluated and requests are forwarded directly to pool of backend nodes for
handling. A load balancing algorithm would define how incoming requests is distributed among the ECS
nodes. As previously mentioned, HAProxy provides round-robin, least connect and source load balancing
algorithms. Either a domain name system (DNS) addresses or virtual IPs of HAProxy load balancer are
presented to clients.
The example images of HAProxy with ECS in this section only highlight object access. For NFS, it is
recommended that a load balancer be used for high availability purposes only and not for balancing load
across the ECS nodes. More detailed information on how to employ HAProxy with ECS when using NFS is
described in a later section of this whitepaper.
4.1 Single
In a single HAProxy deployment, the frontend points to the IP address of the HAProxy endpoints and the
backend points to the IP addresses of the ECS nodes at specified ports depending on object protocol. Figure
1 illustrates an example of a single deployment. This is the simplest of configurations; however, the single
load balancer is also a single point of failure and not recommended in production environments.
Figure 1 ECS with a single HAProxy
4.2 Highly Available (Redundancy)
In order to not have a single point of failure, it is best practice to setup HAProxy in a “highly available”
configuration by setting up two HAProxy load balancers. This provides redundancy such that in case of
failure another load balancer is available to handle requests. A mechanism such as Linux’s “keepalived”
utility can do health checks between the load balancers to inform HAProxy when one of the load balancers is
not available. In a highly available setup, there are two ways to configure the redundant HAProxy load
balancers:
8 ECS with HAProxy Load Balancer | H15785.4ECS with HAProxy Deployments
• Active/Passive – one HAProxy load balancer act as a primary and the other will only be activated
when the primary load balancer fails or is unresponsive.
• Active/Active – both HAProxy load balancers are active and either one can process client requests.
As long as one of the load balancers is up and available, requests will be handled.
There are advantages and disadvantages of each method that should be considered. Since both load
balancers are available for use in the active/active setup, the performance level will be higher than in an
active/passive setup. However, in an active/passive, there is a consistent performance level when one fails
whereas in active/active when one fails, performance level will drop by half as perceived by clients. If certain
“levels of service” are expected, then consistency is an important criterion to consider. Upsizing the servers
hosting the HAProxy in an active/passive setup can improve performance; however, it may not be as cost-
effective. Understanding the tradeoffs and requirements is important in developing a deployment best suited
for your needs. Figure 2 provides an example of redundant HAProxy load balancers in front of a pool of ECS
Nodes with a virtual IP presented to clients.
Figure 2 ECS with redundant HAProxy load balancers for high availability
4.3 Global Load Balancing
When there are two or more geographically dispersed ECS sites supporting the same namespace(s), a
mechanism to load balance across the nodes between sites is recommended especially in three or more sites
where it becomes key for taking advantage of ECS storage efficiency achieved via ECS XOR feature.
Another advantage is when one site is unavailable; requests will automatically be forwarded to surviving
site(s) providing disaster recovery and high availability. Global load balancing can be achieved by either
using DNS, network routing (i.e. OSPF: Open Shortest Path First, BGP: Border Gateway Protocol, etc), a
global server load balancer (GLSB) or combination of these techniques. Figure 3 provides an example of
client requests being sent to a Domain Name System (DNS) which have an entry for a global load balancing
mechanism or HAProxy load balancer which also can be setup to be redundant. The global load balancing
techniques used would forward requests to a pool of HAProxy load balancers that will forward requests to a
pool of ECS nodes within a replication group.
9 ECS with HAProxy Load Balancer | H15785.4ECS with HAProxy Deployments
Figure 3 Global load balancing with HAProxy in a geo-replicated ECS deployment
When considering a global load balancing mechanism, it is important to understand that ECS reads check the
owner of the object to validate if it has the latest copy locally. If data is not local in the site cache or the site is
not the owner of object, then it would need to retrieve the data from site that owns the object. Thus when
architecting a global load balancing solution, it is advised to send or direct the read requests to the owning
site if possible. This may depend on the workflow and application.
10 ECS with HAProxy Load Balancer | H15785.4Example Deployments of ECS with HAProxy setup
5 Example Deployments of ECS with HAProxy setup
An example of how to setup ECS with HAProxy is detailed in the following sections. Although the different
ways to deploy ECS with HAProxy described previously will not be fully covered in this whitepaper, it does
provide a base in which the reader can enhance the deployment to implement further. In this example,
information on how to configure HAProxy for load balancing object access and NFS access in a single
deployment are described. For object access, “http mode” is used and for NFS “tcp mode” is used. Virtual
machines running Mint version 17.1, an Ubuntu variant, was used as the server to host HAProxy. DNS
installed on a Windows Server was used to map the HAProxy IP addresses to various names.
5.1 Installation
Components configured in this example to employ ECS with HAProxy include a server to host HAProxy
running a Linux Operating system, HAProxy software package, Domain Name System (DNS) and an ECS
U300 appliance with ECS 3.6.1 installed. Linux and Windows client servers were used to validate the
HAProxy with ECS deployment for both object and file access. S3 Browser and Cyberduck was used to
validate the setup of ECS with HAProxy and a regular Linux mount command was used to test NFS. Figure 4
illustrates the components in this example.
Figure 4 Single HAProxy
5.1.1 Server
A physical server (bare metal) or a virtual machine can be used to install HAProxy. The server should be
sized (CPU, memory, network cards, etc.) based upon the following criteria:
• Workload or amount of traffic expected
• If using physical server or virtual machines
• Deploying multiple instances of HAProxy in active/passive or active/active mode.
• Expected service level agreements
A Unix operating system would also need to be installed on the server or virtual machine. Refer to the
HAProxy site to get minimum server requirements and supported operating system.
11 ECS with HAProxy Load Balancer | H15785.4Example Deployments of ECS with HAProxy setup
5.1.2 HAProxy
The HAProxy load balancer software package (source) and documentation are available from HAProxy site:
http://www.haproxy.org. HAProxy pre-built packages can also be found on the web in the form of Personal
Package Archives (PPA) such as the one for Ubuntu or Debian at site http://haproxy.debian.net. An example
of how to download and install HAProxy 1.7 on Ubuntu is described below and shown in Figure 5. In the
example, the following are conducted:
1. Get and install “software-properties-common” which contains the binaries, manual pages, and
libraries to add a repository and other commands.
2. Add to repository Personal Package Archive (PPA) “vbernat/haproxy1-7”
3. Get updates
4. Get and install HAProxy
# apt-get install software-properties-common
# add-apt-repository ppa:vbernat/haproxy-1.7
# apt-get update
# apt-get install haproxy
Figure 5 HAProxy 1.7 install on mint version 17.1 (Ubuntu )
Depending on the Unix operating system installed, the commands above will differ. If pre-built packages are
not available for the operating system or server being used, the source can be downloaded from HAProxy site
and compiled accordingly.
5.2 Domain Name System (DNS)
In this example a DNS is setup on a Windows server and accessible from the server hosting HAProxy. Table
2 shows the DNS entries created. Adding DNS entries allows mapping of “names” to IP addresses. In this
example, DNS is used as a mechanism for translating the object protocol (S3, Atmos, or Swift) the client is
using and allows HAProxy to direct request to the appropriate pool of ECS nodes based on protocol name.
The advantage of this approach is that HAProxy runs all three protocols on the standard HTTP port 80. The
names associated with each object protocol will be mapped to one IP address associated with the HAProxy
and translate it to a pool of ECS nodes. An “A-record “ is created in DNS which maps a name to the IP
address of HAProxy and CNAME provides an alias for each protocol.
12 ECS with HAProxy Load Balancer | H15785.4Example Deployments of ECS with HAProxy setup
Table 2 DNS Entries Example
DNS Record Record Type Record Data Comments
HAProxy external IP Address and also used for
S3 protocol access (os=object store)
os.ecstme.org A 10.246.150.199
Used for S3 virtually hosted buckets, i.e.
*.os.ecstme.org CNAME os.ecstme.org
mybucket.os.ecstme.org
atmos.ecstme.org CNAME os.ecstme.org Endpoint for clients using the Atmos
swift.ecstme.org CNAME os.ecstme.org Endpoint for clients using the Swift protocol
From the Windows Server, start up the DNS Manager and add DNS entries of “New Host” for A-Record and
“New Alias” in your domain zone as described in above table. Sample screenshots of this are shown in Figure
6 and Figure 7,
Figure 6 A-Record screenshot
13 ECS with HAProxy Load Balancer | H15785.4Example Deployments of ECS with HAProxy setup
Figure 7 - DNS Alias (CNAME) screenshot
5.3 HAProxy Configuration for Single Setup
A configuration file is used to define how HAProxy should be configured to proxy requests to a pool of
servers. The HAProxy configuration file haproxy.cfg located in /etc/haproxy directory is modified to define the
following:
• Frontend – consists of a set of IP addresses and port used by clients to access HAProxy server, the
mode (tcp or http), ACLs (optional), and backend rules based on ACL conditions.
• Backend – specifies options for load balancer algorithm to use, a list of ECS nodes and ports, the
mode (tcp or http), and whether to perform health checks.
Frontend and backend definitions are explained in this section for http, https and NFS in addition to definitions
to enable web monitoring. There are default global values defined in haproxy.cfg such as timeout for client
and server, error files for different types of errors, stats timeout, mode, etc. These values are not modified in
this example; however some of the parameters such as mode and log are overridden in the frontend and
backend definitions for NFS.
5.3.1 HTTP
The sample or default /etc/haproxy.cfg file contains some parameters for global and defaults. The “global”
section contains definitions that applies to the entire HAProxy process such as logging, default ciphers, etc.
For this example, no additional changes will be needed in this section. In the “defaults” section as shown in
Figure 8, the mode, timeouts, type of balance, options, etc can be added or modified. In this example the
defaults labeled HTTP, the default timeouts are modified and additional parameters are added such as
balance, to specify the load balancer algorithm type to “leastconn” and option for forwardfor to set the X-
14 ECS with HAProxy Load Balancer | H15785.4Example Deployments of ECS with HAProxy setup
Forwarded-For header with the source IP. By Using “leastconn” as the load balancer algorithm forwards
requests to ECS nodes that has the least amount of active connections.
defaults HTTP
log global
mode http
option httplog
option dontlognull
timeout connect 5s
timeout client 50s
timeout server 50s
timeout http-request 10s
timeout http-keepalive 10s
option forwardfor
balance leastconn
Figure 8 Defaults defintions
Next append the frontend block shown in Figure 9 to /etc/haproxy/haproxy.cfg file. In defaults section, the
mode is http so a mode is not specifically added in the frontend block shown in Figure 9. The first line in the
frontend block “http-in” tells HAProxy to listen for requests on port 80 on all interfaces. It also defines ACLS
named “host_s3”, “host_atmos”, and “host_swift” such that it extracts the HTTP header “host” and if the path
of the user header request matches “os.ecstme.org, atmos.ecstme.org, or swift.ecstme.org” it will re-direct the
request to appropriate protocol backend defined by the “use_backend” line. The “-i” flag ignores case during
matching, and “-m dom” indicates domain matching such that the input string delimited with dots matches the
specified pattern in this case os.ecstme.org, atmos.ecstme.org, and swift.ecstme.org.
frontend http-in
bind *:80
# Define the hostnames
acl host_s3 hdr(host) -i -m dom os.ecstme.org
acl host_atmos hdr(host) -i -m dom atmos.ecstme.org
acl host_swift hdr(host) -i -m dom swift.ecstme.org
# Route to backend
use_backend swift_backend if host_swift
use_backend atmos_backend if host_atmos
use_backend s3_backend if host_s3
Figure 9 Frontend definitions
15 ECS with HAProxy Load Balancer | H15785.4Example Deployments of ECS with HAProxy setup
Further append the haproxy.cfg file with the backend definitions of “os.ecstme.org”, “swift.ecstme.org”, and
“atmos.ecstme.org” specified in the frontend as shown in Figure 10. Each object protocol goes thru a certain
port thus all S3 requests for http go thru port 9020, Atmos, thru port 9022, and Swift thru 9024. So for each
protocol backend, a list of ECS nodes IP addresses and ports are specified in “server” line. For the
s3_backend and swift_backend, “check” is added at the end of the line to perform health checks on ECS
services on each node using “S3 ping” or “Swift healthcheck” as specified in “option httpchk”. The “check”
specified for atmos_backend will only check if the ECS node is down since this protocol does not yet have
support for the “ping operation” to check the ECS services.
backend os.ecstme.org
# Use the s3 Ping extension to make sure ECS services on node
# are alive.
option httpchk GET /?ping "HTTP/1.1\r\nHost: haproxy"
# List of data nodes. S3 runs on port 9020.
server hop-u300-12-01 10.246.150.131:9020 check
server hop-u300-12-02 10.246.150.132:9020 check
server hop-u300-12-03 10.246.150.133:9020 check
server hop-u300-12-04 10.246.150.134:9020 check
backend atmos_backend
# List of data nodes. Atmos runs on port 9022
server hop-u300-12-01 10.246.150.131:9022 check
server hop-u300-12-02 10.246.150.132:9022 check
server hop-u300-12-03 10.246.150.133:9022 check
server hop-u300-12-04 10.246.150.134:9022 check
backend swift_backend
# Use the Swift healthcheck to check the ECS services on node.
option httpchk HEAD /healthcheck HTTP/1.0
# List of data nodes. Swift runs on port 9024
server hop-u300-12-01 10.246.150.131:9024 check
server hop-u300-12-02 10.246.150.132:9024 check
server hop-u300-12-03 10.246.150.133:9024 check
server hop-u300-12-04 10.246.150.134:9024 check
Figure 10 Backend definitions
16 ECS with HAProxy Load Balancer | H15785.4Example Deployments of ECS with HAProxy setup
For another example of how to implement the frontend and backend is of this example is described in
Appendix A of this whitepaper.
After the haproxy.cfg has been modified, check the validity of the configuration file. If configuration file is
valid, then restart haproxy to put in effect the load balancing directives in haproxy.cfg. Figure 11 exhibits how
to check and restart HAProxy.
# haproxy -f haproxy.cfg -c
Configuration file is valid
Figure 11 Command to restart HAProxy.
# service haproxy restart
To have HAProxy automatically start after a reboot, edit /etc/default/haproxy file and add ENABLED=1 as
shown in Figure 12.
# Defaults file for HAProxy
1.
#
# This is sourced by both, the initscript and the systemd unit
file, so do not
# treat it as a shell script fragment.
ENABLED=1
Figure 12 Set ENABLED=1 in /etc/default/haproxy
17 ECS with HAProxy Load Balancer | H15785.4Example Deployments of ECS with HAProxy setup
To validate your HAProxy configuration, install S3 Browser or Cyberduck and set the IP or name of HAProxy.
Figure 13 provides an example of the settings for S3 Browser. Since http is being tested, verify that the S3
Browser has the “Use secure transfer (SSL/TLS)” box unchecked.
Figure 13 S3 Browser Settings Example Using HAProxy
18 ECS with HAProxy Load Balancer | H15785.4Example Deployments of ECS with HAProxy setup
Cyberduck can also be utilized to test both S3 and Swift. In this example, ECS Swift (HTTP) profile provided
in the ECS community page https://community.emc.com/docs/DOC-27683 was used. From Cyberduck, open
a new connection specifying “swift.ecstme.org” and port 80 for the server settings and providing the Swift
credentials (e.g. namespace:user and password set for Swift user) as shown in Figure 14.
Figure 14 Cyberduck with swift settings
To validate S3 virtually hosted style addressing scheme, a base URL (i.e. os.ecstme.org) would need to be
specified in ECS via the ECS portal and S3curl utility can be used as a check. Figure 15 shows an example
of how to install S3curl onto a Linux machine which requires retrieving the utility from github and unzipping the
bundle. The unzip will create an s3curl directory which contains the files needed to use the utility.
# wget https://github.com/rtdp/s3curl/archive/master.zip
# unzip master.zip
Figure 15 Install of S3Curl utility on Linux
# service haproxy restart
19 ECS with HAProxy Load Balancer | H15785.4Example Deployments of ECS with HAProxy setup
Create an “.s3curl” configuration file in the home directory which contains the ECS user id, secret keys, and
ECS endpoints. After editing the file as shown in Figure 16, modify the permissions of the “.s3curl”
configuration file to 600.
%awsSecretAccessKeys = (
# ECS account
ecsid => {
id => 'user1',
key => 'xaHTZWMPlvNFeMeKdQhH+FZJ8eLB8+qFC/W0dhzk',
},
@endpoints = ('10.246.150.179',
'10.246.150.180',
'10.246.150.181',
'10.246.150.182',
'os.ecstme.org',)
);
Figure 16 S3curl configuration file
Execute the s3curl command located in s3curl directory with the virtual host style addressing as illustrated in
Figure 17. In this example, the bucket name is prepended to the base URL of os.ecstme.org.
# cd s3curl-master
# ./s3curl.pl --id ecsid -- http://testb.os.ecstme.org | xmllint --format -
Figure 17 S3curl command
A snippet output after running this command is pictured in Figure 18 and shows a bucket listing of a bucket
named “testb”
testb
1000
false
false
foo1M_0
2017-05-31T16:59:33.898Z
"1d0bc7dd91164422eb8961e58f4c458b"
1048576
...
Figure 18 Snippet output of running s3curl.pl
20 ECS with HAProxy Load Balancer | H15785.4Example Deployments of ECS with HAProxy setup
HAProxy starting from 2.1 will forward http headers in small capital letter (etag) to be more compliant with
http/2 protocol, this was not the same in 1.x versions (ETag) which will cause issue with using with Isilion
cloud pool. It is needed to change the configure file like “h1-case-adjust & option h1-case-adjust-bogus-client”
in the new version.
global
…
h1-case-adjust etag ETag
defaults HTTP
…
option h1-case-adjust-bogus-client
5.3.2 HTTPS
Developing trust between two entities is established via Secure Socket Layer (SSL) and SSL certificates. The
purpose of SSL and certificates is encryption and identification to ensure that communication exchange
between two parties is secure and trustworthy. For identification of who to trust, a certificate would need to be
generated and installed on HAProxy or ECS nodes. Certificates usually will contain information about the
owner of the certificate (i.e. company, organization, city, state, email address of owner), duration of validity,
resource location (i.e. Fully Qualified Domain Name or common name), public key, and hash. The certificate
generated can be signed by either:
• Certificate Authority (CA) – trusted organizations that can verify the identity and validity of the entity
requesting the certificate.
• Self-signed - authenticated by the system where the certificate resides.
As a best practice, using a Certificate Authority to sign certificate is preferred over issuing self-signed
certificates. Almost all client systems come with a list of trusted root CA certificates that will automatically
validate your CA-signed certificate. If you opt to use a self-signed certificate, that certificate will need to be
installed on all client systems as a “trusted” certificate. If your organization has an internal Certificate
Authority, you can use that CA to sign your certificates; just make sure that any client systems have your CA’s
root certificate installed. Also, utilizing HAPrxoy to offload and terminate SSL is a best practice in order to not
add extra load on ECS nodes to establish SSL sessions. Thus, the certificate generated in this example is to
be installed on HAProxy load balancer. Some organizations have security policies that specify that the
connection to ECS must be encrypted all the way to ECS. In those cases you will need to terminate SSL on
the ECS appliance itself. If SSL termination is required on ECS nodes, then use Layer 4 (tcp) load balancing
mode to pass through the SSL traffic to ECS nodes for handling. In this scenario, the certificates would need
to be installed on ECS. For information on how to generate certificates for ECS Nodes, refer to ECS System
and Administration Guide.
5.3.2.1 Certificate Generation for HAProxy Load Balancer Example
OpenSSL is used in this example to generate the certificates. Note that you do not need to generate the
certificates on ECS; any system with suitable tools like OpenSSL can generate certificates. By default,
OpenSSL is installed on most Linux releases. General steps to create a certificate for HAProxy using
OpenSSL include:
1. Generate a private key.
2. Modify configuration file to add Subject Alternative Names (SANs).
3. Create a certificate request to submit to CA or generate a self-signed certificate.
4. Combine the private key and certificate and place in HAProxy directory.
21 ECS with HAProxy Load Balancer | H15785.4Example Deployments of ECS with HAProxy setup
When generating certificates, the hostname of where the certificate will be used needs to be specified. For
compatibility with the S3 protocol, the Common Name (CN) on the certificate should point to the wildcard DNS
entry used by S3 since S3 is the only protocol that utilizes virtually hosted-style URL buckets where the
bucket name is in the hostname. There can only be one wildcard entry on an SSL certificate and it must be
under the CN. If specifying IP Addresses or other DNS entries for Atmos and Swift protocols, Subject
Alternative Names (SANs) should be registered on the certificate. Some organizations do not allow the use of
wildcard certificates. In this case, you will need to make sure that all of your S3 applications use “path-style”
access so they can use the base hostname of S3 (e.g. os.ecstme.org) instead of the default method of adding
the bucket to the hostname (e.g. bucket.os.ecstme.org).
Step 1: Generate a Private Key
A private key is required for self-signed and CA requests certificates. This key will be combined with the
certificate generated. An example of how to generate the private key is shown in Figure 19. Permissions are
also changed on the key generated to safeguard from accidentally modification or deletion.
# openssl genrsa -des3 -out server.key 2048
Generating RSA private key, 2048 bit long modulus
............................................................+++
.......+++
e is 65537 (0x10001)
Enter pass phrase for server.key:
Verifying - Enter pass phrase for server.key:
# chmod 0400 server.key
Figure 19 Create private key using OpenSSL
Step 2: Modify the Configuration File with SANs
OpenSSL does not allow passing of SANs through the command line so a configuration file is created to
define them. A sample configuration file for openssl can be used as a reference and is located in
/usr/lib/ssl/openssl.cnf. Copy the openssl.cnf file to a temporary directory where certificates will be generated
and placed as pictured in Figure 20.
# cp /usr/lib/ssl/openssl.cnf request.conf
Figure 20 Copying of openssl configuration file
22 ECS with HAProxy Load Balancer | H15785.4Example Deployments of ECS with HAProxy setup
Edit the request.conf file to include the SAN by adding the IP addresses or DNS entries mapping of the
HAProxy server. Figure 21 is an example of the SAN setting for both DNS entries and IP addresses.
[ alternate_names ]
DNS.1 = os.ecstme.org
DNS.2 = atmos.ecstme.org
DNS.3 = swift.ecstme.org
IP.1 = 10.246.150.199
Figure 21 SANs setting in configuration file
In the [ req ] section, add the following lines if not present in the configuration file as shown in Figure 22.
x509_extensions = v3_ca # The extentions to add to the self-signed
cert
req_extensions = v3_ca # For cert signing req
Figure 22 Indicate parameter(s) for extensions
In the [ v3_ca ] section, add the following lines as shown in Figure 23. This indicates that there are alternate
names provided.
[ v3_ca ]
subjectAltName = @alternate_names
basicConstraints = CA:FALSE
keyUsage = nonRepudiation, digitalSignature, keyEncipherment
extendedKeyUsage = serverAuth
Figure 23 Specify [ v3_ca ] parameters for SAN
Also in [ v3_ca ] section, if creating a certificate signing request, comment out “authorityKeyIdentifier” as
illustrated in Figure 24. No need to comment out for self-signed certificates.
#authorityKeyIdentifier=keyid:always,issuer
Figure 24 comment out authorityKeyIdentifier paramteter in [ v3_ca ]
Finally in section [ CA_default ], uncomment or add the copy_extension line as pictured in Figure 25.
copy_extension=copy
Figure 25 Parameter to add at [ CA_default ] section
23 ECS with HAProxy Load Balancer | H15785.4Example Deployments of ECS with HAProxy setup
Step 3a: Creation of a Certificate Signing Request for CA Submission
Figure 26 provides an example openssl command of how to create a certificate signing request. The
command requires the private key, “server.key” created in Step 1, and the modified configuration file,
request.conf containing the subject alternate names as described in Step 2. Several user inputs are expected
such as location and organization information, email address and Common Name. As previously mentioned,
the Common Name should be set to the wildcard DNS entry used by S3 which is “*.os.ecstme.org” in this
example.
# openssl req -new -key server.key -config request.conf -out server.csr
Enter pass phrase for server.key:
You are about to be asked to enter information that will be
incorporated into your certificate request. What you are about to enter
is what is called a Distinguished Name or a DN. There are quite a few
fields but you can leave some blank
For some fields there will be a default value,
If you enter '.', the field will be left blank.
-----
Country Name (2 letter code) [AU]:
State or Province Name (full name) [Some-State]:
Locality Name (eg, city) []:
Organization Name (eg, company) [Internet Widgits Pty Ltd]:
Organizational Unit Name (eg, section) []:
Common Name (e.g. server FQDN or YOUR name) []: *.os.ecstme.org
Email Address []:
Please enter the following 'extra' attributes
to be sent with your certificate request
A challenge password []:
An optional company name []:
Figure 26 Command to generate a certificate signing request
24 ECS with HAProxy Load Balancer | H15785.4Example Deployments of ECS with HAProxy setup
Step 3b: Creation of a Self-Signed Certificate
The command to create self-signed certificates is similar to certificate request except for “-x509” option
added. Figure 27 provides an example command to generate the self-signed certificate. Also, the Common
Name is set to “*.os.ecstme.org” for the S3 wildcard DNS entry. The validity of this certificate by default is
one month, if more days are desired, specify command with “-days (i.e.” –days 366”).
# openssl req -x509 -new -key server.key -config request.conf -out
server.crt
Enter pass phrase for server.key:
You are about to be asked to enter information that will be
incorporated into your certificate request. What you are about to
enter is what is called a Distinguished Name or a DN. There are quite
a few fields but you can leave some blank
For some fields there will be a default value,
If you enter '.', the field will be left blank.
-----
Country Name (2 letter code) [AU]:
State or Province Name (full name) [Some-State]:
Locality Name (eg, city) []:
Organization Name (eg, company) [Internet Widgits Pty Ltd]:
Organizational Unit Name (eg, section) []:
Common Name (e.g. server FQDN or YOUR name) []: *.os.ecstme.org
Email Address []:
Please enter the following 'extra' attributes
to be sent with your certificate request
A challenge password []:
An optional company name []:
Figure 27 Command for creation of self-signed certificate
25 ECS with HAProxy Load Balancer | H15785.4Example Deployments of ECS with HAProxy setup
Step 3c: Validation of SANs in Certificate Request and Self Signed Certificate
In either certificate generation, user inputs and the Subject Alternate Names provided are included in the
certificate. An openssl command to output certificate in text format is highlighted in Figure 28 and Figure 29
for each type of certificates.
# openssl req -in server.csr -text -noout
Certificate Request:
Data:
Version: 0 (0x0)
Subject: C=US, ST=CA, L=SJ, O=Dell, OU=TME,
CN=*.os.ecstme.org/emailAddress=example@dell.com
Subject Public Key Info:
Public Key Algorithm: rsaEncryption
Public-Key: (2048 bit)
Modulus:
00:ca:02:a9:4f:88:eb:9b:bf:07:b5:e7:a5:03:c7:
59:2d:e1:53:1e:df:fa:9d:6b:cd:4a:22:10:01:ed:
ca:92:66:28:f3:dc:b3:1c:8f:dd:1c:7c:b2:f0:4c:
18:63:ff:0e:47:00:35:6f:f8:ae:9b:19:88:2d:f3:
f7:de:ed:7b:bc:20:41:ff:d8:c2:28:00:65:a1:38:
71:66:10:f1:3f:39:23:f7:40:65:9d:f5:3f:85:33:
b0:d3:b3:6a:32:2f:cc:48:50:2e:57:ec:28:19:f2:
85:01:d1:32:9c:51:df:2d:5f:0c:93:97:ad:cd:48:
1d:fe:50:5d:cc:44:03:15:48:20:cb:cf:b6:77:a4:
8c:11:71:57:68:34:9c:b8:3b:30:2e:0e:17:3e:78:
34:f4:66:bc:1c:99:9c:bb:ae:50:7f:89:53:f4:1f:
b2:7b:21:9c:34:42:01:66:eb:42:47:9d:af:ab:91:
6e:16:49:3c:cc:d4:51:14:96:1e:98:cc:c0:08:d1:
a8:71:a4:ab:aa:c6:a5:c4:b7:91:74:20:de:bf:e2:
71:b8:65:23:3e:3f:f5:21:c7:10:c3:d5:21:0a:52:
c6:a6:89:c7:ec:6e:ee:0f:78:58:3f:28:1a:92:b0:
40:a9:a8:a2:84:74:e0:72:b4:3e:c4:19:0c:d4:31:
6d:37
Exponent: 65537 (0x10001)
Attributes:
Requested Extensions:
X509v3 Subject Alternative Name:
DNS:os.ecstme.org, DNS:atmos.ecstme.org,
DNS:swift.ecstme.org, IP Address:10.246.150.199
X509v3 Key Usage:
Digital Signature, Non Repudiation, Key Encipherment
X509v3 Extended Key Usage:
TLS Web Server Authentication
X509v3 Subject Key Identifier:
Figure 28 Text Output of certificate request
26 ECS with HAProxy Load Balancer | H15785.4Example Deployments of ECS with HAProxy setup
# openssl x509 -in server.crt -noout -text
Certificate:
Data:
Version: 3 (0x2)
Serial Number: 12752130309296882435 (0xb0f8aaf3df220303)
Signature Algorithm: sha256WithRSAEncryption
Issuer: C=US, ST=CA, L=SJ, O=Dell, OU=TME,
CN=*.os.ecstme.org/emailAddress=example@dell.com
Validity
Not Before: Dec 22 00:37:35 2016 GMT
Not After : Jan 21 00:37:35 2017 GMT
Subject: C=US, ST=CA, L=SJ, O=Dell, OU=TME,
CN=*.os.ecstme.org/emailAddress=example@dell.com
Subject Public Key Info:
Public Key Algorithm: rsaEncryption
Public-Key: (2048 bit)
Modulus:
00:ca:02:a9:4f:88:eb:9b:bf:07:b5:e7:a5:03:c7:
59:2d:e1:53:1e:df:fa:9d:6b:cd:4a:22:10:01:ed:
ca:92:66:28:f3:dc:b3:1c:8f:dd:1c:7c:b2:f0:4c:
18:63:ff:0e:47:00:35:6f:f8:ae:9b:19:88:2d:f3:
f7:de:ed:7b:bc:20:41:ff:d8:c2:28:00:65:a1:38:
71:66:10:f1:3f:39:23:f7:40:65:9d:f5:3f:85:33:
b0:d3:b3:6a:32:2f:cc:48:50:2e:57:ec:28:19:f2:
.. .. .. .. .. .. .. .. .. .. .. .. .. .. ..
.. .. .. .. .. .. .. .. .. .. .. .. .. .. ..
.. .. .. .. .. .. .. .. .. .. .. .. .. .. ..
Exponent: 65537 (0x10001)
X509v3 extensions:
X509v3 Subject Alternative Name:
DNS:os.ecstme.org, DNS:atmos.ecstme.org,
DNS:swift.ecstme.org, IP Address:10.246.150.199
X509v3 Key Usage:
Digital Signature, Non Repudiation, Key
Encipherment
X509v3 Extended Key Usage:
TLS Web Server Authentication
X509v3 Subject Key Identifier:
A6:60:1C:05:50:ED:09:7D:BB:6D:1A:87:1D:43:C0:A9:B2:D3:79:7B
X509v3 Authority Key Identifier:
keyid:A6:60:1C:05:50:ED:09:7D:BB:6D:1A:87:1D:43:C0:A9:B2:D3:79:7B
Figure 29 Self-signed certificate output after generation
27 ECS with HAProxy Load Balancer | H15785.4Example Deployments of ECS with HAProxy setup
Step 4: Combining the Private Key with Certificate File
After the certificate files have been created, HAProxy requires the private key to be combined with the
certificate file. If your certificate was signed by a CA, the intermediate CA files and certificate chain file would
need to also be appended to the certificate signing request prior to combining with the private key. Figure 30
illustrates how to extract the private key by removing the password, concatenate it with a self-signed
certificate file to generate a combined file and then placing the combined file in HAProxy directory.
# openssl rsa -in server.key -out server_unsec.key
Enter pass phrase for server.key:
# cat server.crt server_unsec.key > combined.pem
# rm server_unsec.key
# chown root:root combined.pem
# cp combined.pem /etc/haproxy/
Figure 30 commands for combining the private key with certificate
Once the certificate generation has been completed, the frontend definition in HAProxy configuration file,
“haproxy.cfg”, for https can be defined. Figure 31 provides an example of a frontend for handling https
request. In this example the, SSL is terminated at the HAProxy load balancer and thus certificates will not
need to be created for the ECS nodes and the same backend using the non-SSL ports of the ECS nodes will
be used as previously defined in the http section. Check the validity of the configuration file and restart
haproxy service to put in effect the load balancing directives defined for “https-in”.
frontend https-in
bind *:443 ssl crt /etc/haproxy/combined.pem
reqadd X-Forwarded-Proto:\ https
# Define the hostnames
acl host_s3 hdr(host) -i -m dom os.ecstme.org
acl host_atmos hdr(host) -i -m dom atmos.ecstme.org
acl host_swift hdr(host) -i -m dom swift.ecstme.org
acl host_s3_ip hdr(host) -i -m dom 10.246.150.199
# Route to backend
use_backend swift_backend if host_swift
use_backend atmos_backend if host_atmos
use_backend s3_backend if host_s3
use_backend s3_backend if host_s3_ip
Figure 31 Frontend definitions for HTTPS
28 ECS with HAProxy Load Balancer | H15785.4Example Deployments of ECS with HAProxy setup
S3Browser can be used to validate that “https” traffic and SSL certificates are going thru HAProxy. For S3
Browser, edit the account and place a checkmark in “Use secure transfer (SSL/TLS) box as pictured in Figure
32.
Figure 32 S3 Browser Options to Enable HTTPS
5.3.3 NFS
ECS NFS implementation utilizes server-side metadata caching and the cache exists locally on each node.
Thus, it is important that NFS requests are handled by the same backend ECS node and a load balancer is
used predominately for high availability purposes for NFS. If one of the ECS nodes currently serving NFS
request fails, then HAProxy will redirect requests to another ECS node.
The Linux server that is hosting HAProxy should not be running “rpcbind” otherwise there will be a conflict
when setting up HAProxy to forward NFS requests to ECS. If “rpcbind” is installed by default in the operating
system, disable or remove.
Similar to the HTTP default definitions, there will be a set of defaults specifically for NFS requests as shown in
Figure 33. The defaults will apply to all sections defined below the defaults NFS section. Thus in the
defaults section, the mode, timeouts and balance algorithm for NFS are defined. For NFS, tcp mode or Layer
4 is used such that traffic is directly passed thru to the ECS Nodes for handling. Also, the load balance
algorithm “source” is used. With load balance of source, backend server is selected based on a hash of the
29 ECS with HAProxy Load Balancer | H15785.4Example Deployments of ECS with HAProxy setup
source IP such as the user IP address to ensure request goes to the same server until something changes in
the hash (ie. one backend server goes down).
defaults NFS
mode tcp
log global
option tcplog
timeout client 1m
timeout server 1m
timeout connect 4s
balance source
Figure 33 Defaults for NFS requests
HAProxy will listen for requests on ports 2049, 111, and 10000 where NFS service and daemons such as
nfsd, mountd, nlockmgr and portmapper are listening to on the ECS nodes. As shown in the example
directives in Figure 34, there is a frontend and backend handler defined for each port. The backend defines
the list of ECS nodes with the appropriate port. It is assumed that ECS has been configured to support file
and the exports and user and group mappings have been configured appropriately for NFS. The HAProxy IP
or hostname should be added to the exports hosts in ECS. Each backend server definitions has a check to
conduct availability checks on each backend server. If the server check fails, then requests will be forwarded
to another backend server on the list.
frontend nfs-in1
bind *:2049
use_backend nfs_backend1
frontend nfs-in2
bind *:111
use_backend nfs_backend2
frontend nfs-in3
bind *:10000
use_backend nfs_backend3
backend nfs_backend1
server hop-u300-12-01 10.246.150.131:2049 check
server hop-u300-12-02 10.246.150.132:2049 check
server hop-u300-12-03 10.246.150.133:2049 check
server hop-u300-12-04 10.246.150.134:2049 check
backend nfs_backend2
server hop-u300-12-01 10.246.150.131:111 check
server hop-u300-12-02 10.246.150.132:111 check
server hop-u300-12-03 10.246.150.133:111 check
server hop-u300-12-04 10.246.150.134:111 check
Figure 34 Frontend
backend and backend definitions for NFS
nfs_backend3
server hop-u300-12-01 10.246.150.131:10000 check
server hop-u300-12-02 10.246.150.132:10000 check
server hop-u300-12-03 10.246.150.133:10000 check
30 ECS with HAProxy server hop-u300-12-04
Load Balancer | H15785.4 10.246.150.134:10000 checkExample Deployments of ECS with HAProxy setup
The configuration file should be checked using the “haproxy –f haproxcy.cfg –c” command and the HAProxy
service would need to be restarted using command “service haproxy restart” to pick up the changes to the
haproxy.cfg. If using HAProxy version 1.7.10 or later, refer to Appendix A for another example that simplifies
the frontend and backend definitions to handle NFS requests and provides an approach that improves this
example by implementing stick tables.
As mentioned previously, ECS should have the File exports and user mappings configured prior to mount as
pictured in Figure 35 and Figure 36 respectively. Then from an NFS client, another server different from
HAProxy server, issue a mount command specifying the IP or name of HAProxy, port 2049 and NFS version
3. Figure 37 shows the example “mount” command and output of “df” command to illustrate the success of
the mount. There should be an equivalent user in the Linux client with the same userid (506, in this example)
specified as in ECS to access data as shown in Figure 38.
Figure 35 Example of File Export Settings in ECS
31 ECS with HAProxy Load Balancer | H15785.4Example Deployments of ECS with HAProxy setup
Figure 36 Example of User Mapping Settings in ECS
c1-vm ~ # mount -o user,vers=3,proto=tcp,port=2049 os.ecstme.org:/u300-12-
ns/b1 /mnt
c1-vm ~ # df
Filesystem 1K-blocks Used Available Use%
Mounted on
udev 2008548 4 2008544 1% /dev
tmpfs 404824 1212 403612 1% /run
/dev/sda1 98952796 5615160 88288088 6% /
none 4 0 4 0%
/sys/fs/cgroup
Figure 37 "Mount" and "df" command
none 5120 0 5120 0%
/run/lock
none 2024116 856 2023260 1%
user1@c1-vm:~$ id
/run/shm
uid=506(user1) gid=1002(user1) groups=1002(user1)
none 102400 16 102384 1%
/run/user
user1@c1-vm:~$ ls /mnt
os.ecstme.org:/u300-12-ns/b1 351063244800 275818496 350787426304 1% /mnt
ECS_-_Beauty_FL.jpg foo1 foo10000 foo1_11 foo1_442 foo1_8 foo2
perfMon1BytesSentRec.gif report-267335281_overview.pdf
foo foo1_0 foo1_10 foo1_4 foo1_7 foo1_933
haproxy.cfg report-266278156_10K_1000.pdf treport1.csv
user1@c1-vm:~$
Figure 38 Output of user ID on linux
32 ECS with HAProxy Load Balancer | H15785.4Example Deployments of ECS with HAProxy setup
5.3.4 Monitoring
HAProxy provides a web monitoring capability that shows how much bandwidth is used, which backend ECS
nodes are up or down, how many clients are connected, the number of bytes in and out, errors, warnings and
much more. Monitoring information is also available to be exported in comma separated value (CSV) format.
Tools can take advantage of this feature to provide a more enhanced experience such as adding graphs,
charts and trending views. To set this up, the following lines shown in Figure 39 would need to be added to
end of the haproxy.cfg file.
# Web monitoring
listen HAProxy_Stats
bind 10.246.150.199:1936
mode http
stats enable
stats uri /
stats hide-version
stats auth stats:password
Figure 39 HAProxy definitions for eeb monitoring.
An example of HAProxy web monitoring page is pictured in Figure 40 below. When accessing the Web
Monitoring page, the username and password is indicated by the “stats auth” line which in this example is
“stats:password”.
Figure 40 HAProxy web monitoring page
33 ECS with HAProxy Load Balancer | H15785.4Example Deployments of ECS with HAProxy setup
5.4 Example of ECS with Redundant HAProxy Setup
The ECS with single HAProxy example in previous section can be extended to add another HAProxy to
create a redundant HAProxy setup. In this example, another virtual machine with Mint operating system and
HAProxy load balancer was configured. The “keepalived” utility was installed on both HAProxy servers to do
health checks between the two HAProxy load balancers. The redundant HAProxy load balancers were
configured in an active/passive mode. A virtual IP initially maps to a primary HAProxy and if the primary load
balancer fails, then the virtual IP will point to the IP of secondary load balancer until the primary load balancer
comes up again. Figure 41 illustrates the setup for the redundant HAProxy load balancers environment
described in this example.
Figure 41 ECS with Redundant HAProxy Setup Example
5.4.1 Virtual IP
On each of the load balancer servers which is hosted on a virtual machine with Mint installed, modify the
“net.ipv4.ip_nonlocal_bind” to 1 in the kernel file /etc/sysctl.conf to allow HAProxy to bind to a shared IP
address which is 10.246.150.151 in this example. With an editor, such as “vi”, add the line shown in Figure
42.
net.ipv4.ip_nonlocal_bind=1
Figure 42 Add to "/etc/sysctl.conf"
34 ECS with HAProxy Load Balancer | H15785.4You can also read