Engineered " (13 mm) and " (19 mm) platforms Installation Guide - Mercier Wood flooring
←
→
Page content transcription
If your browser does not render page correctly, please read the page content below

VERSION 05-2021
Engineered ½” (13 mm)
and ¾” (19 mm) platforms
Installation Guide
Engineered ½” (13 mm)
                                                                                                 and ¾” (19 mm) platforms
                                                                                                 Installation Guide

    It is important to read the Installation Guide,                                    For questions about installation, please contact
    Maintenance Guide, and Mercier Warranty before                                     your authorized Mercier dealer or Mercier’s
    installing your prefinished wood floor. Failure to follow                          Technical Service at 1-866-448-1785 or
    the installation instructions may void your warranty.                              technicalservice@mercierwoodflooring.com.

Product description ____________________________________________________________________

Mercier prefinished Engineered ½” (12.7 mm) and ¾” (19 mm) wood flooring consist of a hardwood surface glued to
premium hardwood plywood. They are specially designed for installation in all situations, including in basements and over
radiant heating systems1 and concrete subfloors.

Prefinished flooring is factory finished under controlled, optimal conditions. The flooring is ready to install and occupants
are not required to leave the premises.

Recommended use ____________________________________________________________________

                                Installation sites                                    Radiant heating systems

                                                                                      Engineered flooring is recommended for use over
                                • 1st story : Yes
                                                                                      radiant heating systems, except for Hickory.

                                • Ground floor : Yes

                                • Basement : Yes

Owner and installer responsibilities _______________________________________________________

Prior to installation, the installer and owner must                           Once a board has been installed, it is considered to have been
ensure the installation site and subfloor comply with the                     accepted by the installer and the owner, even if the owner is
conditions specified in this guide.                                           not present during installation.

The installer and owner should inspect the flooring                           Depending on the site and the type of installation2, flooring
before installation to ensure the grade, color, gloss, and                    orders should include 3% to 5% extra to compensate for cut
quality are consistent with the product purchased.                            loss.

Mercier products meet stringent quality requirements                          Mercier Wood Flooring only replaces products with a defect
and top industry standards. The industry standard                             rate that exceeds 5% (excluding the 3% to 5% cut loss).
margin of error for natural imperfections and                                 Mercier cannot be held liable for improper installation or
manufacturing and grade selection defects is 5%.                              poor judgement by an installer. It does not cover labor or
                                                                              installation costs.
If the installer has doubts about a board’s grade
selection or manufacturing or finish quality and cannot
install it in an inconspicuous location or eliminate the
imperfection, he should not install it.

See Technical Bulletin #5 at mercierwoodflooring.com for specifications for use over radiant heating systems.
1

Diagonal installation results in increased cut loss of up to 7% to 9%.
2

Engineered ½” (13 mm) or ¾” (19 mm) Installation Guide | Version 1, 05-2021                 1-866-448-1785 | www.mercierwoodflooring.com
                                                                                                                                               2
Warning!
Authentic grade Mercier flooring has specific characteristics that may be apparent at purchase or appear over time,
including:
• Cracked or sagging finish around character marks
• Open knots and holes (including worm holes)
• Splits and checks
• Character marks that may become more prominent
• Open markings that may sag
Recommended materials and tools _______________________________________________________
This is not an exhaustive list of the tools that may be needed to install your Engineered wood floor. You will need additional
equipment depending on the type of installation you choose. See Additional equipment below. Mercier Wood Flooring is not
responsible for damage caused by improper use of tools.
1. Vacuum or broom 7. Hammer and tapping block
2. Mitre saw 8. Levelling compound and sander
3. Measuring tape 9. Slip tongue and wood glue (as needed)
4. Chalk line 10. Mercier Touch-Up Kit
5. Square 11. Mercier Maintenance Kit
6. Handsaw
Additional equipment for glued installation Additional equipment for nailed or glued installation
• Waterless, urethane-based adhesive • Hardwood flooring nailer or stapler
Recommended adhesives: (pneumatic or manual)
- Finitec AcoustiTECH AD-532+ / AD-844 MS • Drill and 3/32” (2.38 mm) bit
- Titebond 811 Advantage • Nail punch and spiral finishing nails between
- Bostik’s BEST, EFA+, or BST 1 ½” (38 mm) and 2 ½” (63 mm) in length,
• Trowel recommended by the manufacturer of the adhesive depending on the thickness of the floor
• 3M blue masking tape or equivalent • Floor screws
• Guide strips and concrete nails
(to support and attach the first row) See Technical Bulletin #9 for recommended
• 100 lb. to 150 lb. (45 kg to 68 kg) roller fasteners at mercierwoodflooring.com
• Urethane-based adhesive cleaner
• AcoustiTECH Leed 3.3 acoustical membrane* Additional equipment for floating installation
(or equivalent with a maximum thickness of 5 mm,
≥ 2 psi, and 25% compression or a maximum thickness Recommended adhesive and membrane:
of 5 mm to 8 mm, ≥ 5 psi, and 25% compression) • PVA Type II wood glue
• AcoustiTECH VP acoustical membrane*
*Using a thicker membrane or one with greater (or equivalent with a maximum thickness
compression can result in increased vertical movement. of 3.5 mm, ≥ 5 psi, and 25% compression)
Preparing the installation site ____________________________________________________________
Installing prefinished wood flooring should be the last step in your project. Before the flooring is delivered, inspect the
installation site to make sure:
• The concrete, plaster, paint, and subfloor are completely dry.
• Any heating, ventilation, or air conditioning systems are functional and running.
• The building is kept within normal ambient conditions for at least one (1) week before laying the floor, at a temperature
of about 20 °C (68 °F) and a relative humidity of about 45%.
Engineered ½” (13 mm) or ¾” (19 mm) Installation Guide | Version 1, 05-2021 1-866-448-1785 | www.mercierwoodflooring.com
3The installer should check the moisture content of the subfloor (plywood or OSB) and flooring at various locations using a
moisture meter for wood.
The moisture content of the subfloor should not exceed 12%. The difference between the moisture content of the subfloor
and the flooring must not exceed the internal moisture content of the flooring by more than 4%. The internal moisture
content of the flooring should be between 6% and 9%.
For boards wider than 4” (102 mm), the difference between the moisture content of the subfloor and the flooring must
not exceed the moisture content of the flooring by more than 2%. The internal moisture content of the flooring should be
between 6% and 9%.
If the humidity of the subfloor or the difference between the flooring and the subfloor is outside recommended levels, heat,
ventilate, and dehumidify the site further and delay delivery and installation until recommended levels have been reached.
If the subfloor is a concrete slab, allow a minimum 30-day drying period for a reliable moisture-level test. Measurements
should not exceed 4% using a concrete moisture meter. If there is moisture, test using calcium chloride. The moisture
content measured with the calcium chloride test should not exceed 3 lb. per 1,000 sq. ft. over 24 hours.
Acclimation __________________________________________________________________________
Once the recommended conditions have been reached, store the flooring at the installation site. Allow the flooring to
acclimate for at least 24 hours before installation. Make sure the wood is at the same temperature as the installation site
(about 20 °C (68 °F)). Never store flooring in unsuitable locations such as sheds or unheated garages.
Subfloor preparation and levelling ________________________________________________________
• The subfloor must be structurally sound and securely fastened to the joists with floor screws to prevent movement of the
plywood panels, which could cause creaking.
• The subfloor must be flat and level, the maximum tolerance is 3/16” (5 mm) over a distance of 10’ (3 m). If necessary, fill
or sand any unevenness, depression or bulge in the subfloor.
• The surface of the subfloor must be free of defects. Remove minor imperfections with a sander.
• The surface must be clean and free of all contaminants, including grease, dust, oil, nails, staples, etc. Remove staples,
drive in protruding nails, and remove dirt and dust with a vacuum cleaner.
For installation on a concrete subfloor, make sure the concrete is not low density (below 3,000 psi) or brittle.
For installation on a wood subfloor, make sure the structure meets the following requirements:
• ¾” (19 mm) plywood or oriented strand board (OSB) for joists spaced 19 3/16” (488 mm) or less on centre
• Minimum 5/8” (16 mm) plywood panels for joists spaced 16” (406 mm) or less on centre.
Engineered ½” (13 mm) or ¾” (19 mm) Installation Guide | Version 1, 05-2021 1-866-448-1785 | www.mercierwoodflooring.com
4Recommended installation method _______________________________________________________
• Plan your project by making a sketch.
• Determine your start point.
• Determine the direction of the flooring. We strongly recommend installing flooring at a 45- or 90-degree angle with
respect to the floor joists on wood subfloors.
• Use a protective surface under tools and the floor nailer during installation.
• Before you begin, cut the bottoms of door moldings to insert flooring under them.
• Leave space for the wood to expand as a result of humidity changes. The expansion gaps will be hidden by the
baseboard and/or quarter round, which should be nailed to the wall, not the floor.
• Pick boards from at least 3 boxes at a time to ensure consistency.
• Vacuum frequently during installation to remove sawdust and dirt.
Installation __________________________________________________________________________
Glued installation
For Engineered ½” (13 mm) and ¾” (19 mm) flooring. Warning!
During installation,
Mercier Engineered wood floor can be glued directly to concrete or wood subfloors in immediately wipe up
basements, ground floor and above. any adhesive from
the floor surface with
If you are using an acoustical membrane, it must be glued to the subfloor before installing adhesive cleaner.
the flooring.
How to install flooring
• Use a chalk line to snap a guide line parallel to the starting wall at a distance of ¼” (6 mm) more than the width of
the boards (e.g., 3 ½” (76 mm) for flooring that is 3 ¼” (83 mm) wide). Flooring in the area between the wall and the
guide line should be installed last.
• Make sure your line is straight and square.
• Lay out 4 or 5 rows of boards that match in terms of joints and color. Cut boards with imperfections or install them in
less visible areas.
• Nail the guide strips along the start line. The first row of boards will butt up against them.
• Use the trowel to apply adhesive at a 45-degree angle outward from the start line. It is important to use the trowel
recommended by the manufacturer in order to apply the correct amount of adhesive.
• Install the first board along the guide line, with the groove towards you and the tongue towards the wall. Always leave a
¼” (6 mm) gap on either side of each row for expansion.
• Lay the floor in small sections to prevent the adhesive from drying.
• Install the remaining boards in the row from left to right.
• The last board in the row should be cut. Offcuts that are at least 6” (152 mm) long can be used to start the next row.
For subsequent rows, insert the tongue into the groove and push it as close as possible to the adjacent board, being
careful not to touch the adhesive. You may need to use a tapping block to get the tongue into the groove.
• Use blue masking tape every 5 or 6 rows to ensure the flooring stays in place.
• Use a 100 lb. to 150 lb. (45 kg to 68 kg) roller to apply pressure to installed sections while the adhesive is still active
(45 to 60 minutes). Cover the roller to avoid damaging the floor.
• Repeat these steps for the entire floor.
• For best results, stagger joints 6” to 8” (152 mm to 203 mm) between rows and alternate board lengths.
• Once the rest of the floor is finished, remove the guide strips and install flooring in the remaining space.
• You may have to rip the last row lengthwise to allow a ½” (13 mm) expansion gap.
• Wait 24 hours before replacing furniture and allowing traffic on the floor.
Engineered ½” (13 mm) or ¾” (19 mm) Installation Guide | Version 1, 05-2021 1-866-448-1785 | www.mercierwoodflooring.com
5Nailed or stapled installation
For Engineered ½” (13 mm) and ¾” (19 mm) flooring.
Mercier Engineered wood floor can be nailed or stapled directly to wood subfloors in basements, ground floors and above.
Using a nailer
• Practice using your floor nailer on a scrap piece of flooring. Follow the manufacturer’s instructions and safety guidelines.
• Clean the plate under the nailer frequently to avoid damaging the finish.
• Adjust the pressure on the compressor and check it regularly.
How to install flooring
• Use a chalk line to snap a guide line parallel to the starting wall at a distance of ½” (13 mm) more than the width of
the boards (e.g., 3 ¾” (95 mm) for flooring that is 3 ¼” (83 mm) wide). Flooring in the area between the wall and the
guide line should be installed last.
• Make sure your line is straight and square.
• Lay out 4 or 5 rows of boards that match in terms of joints and color.
• Cut boards with imperfections or place them in less visible areas.
• Use spacers or shims between the edge of the flooring and the walls to leave enough room for the wood to expand due to
changes in humidity.
• Install the first board along the guide line, with the tongue towards you and the groove towards the wall.
• Always leave a ¼” (6 mm) gap on either side of each row for expansion.
• Nail the first row by hand. Drill holes at a right angle to the top of the board as close as possible to the wall and fasten
with spiral finishing nails. Drive in the nail heads with a nail punch. Drill holes in the tongue at a 45-degree angle and
drive in spiral nails. (see image 1)
• The last board in each row should be cut. Offcuts that are at least 6” (152 mm) long can be used to start the next row.
• Use a manual or pneumatic nailer for subsequent rows. Boards should be nailed every 4” to 6” (102 mm to 152 mm)
and 2” (51 mm) from either end. Each board must be secured with at least two nails. Do not nail closer than 2”
(51 mm) from the ends to avoid splitting the tongue. See the Fastener Selection Chart below from Technical Bulletin #9
for full details.
Fastener Selection Chart
Fastener’s Spacing
Platforms and “L” or “T” Distance
Widths “U” staples minimum between
thicknesses nails from ends
length fasteners
3 ¼” (83 mm)
Engineered ½” 4” to 6”
5” (127 mm) 18 ga to 20 ga 18 ga 1 ¼” (32 mm) 2” (51 mm)
(13 mm) (102 to 152 mm)
6 ½” (165 mm)
Engineered ¾” 4” to 6”
5” (127 mm) 15 ga to 17 ga 15 ga to 17 ga 1 ½” (38 mm) 2” (51 mm)
(19 mm) (102 to 152 mm)
Engineered ¾” 6 ½” (165 mm) Not 4” to 5”
15 ga to 17 ga 1 ½” (38 mm) 2” (51 mm)
(19 mm) 8 1/ 8” (206 mm) recommended (102 to 127 mm)
Engineered 3/8” 4” to 6”
3 ¼” (83 mm) 18 ga to 20 ga 18 ga 1” (25 mm) 2” (51 mm)
(10 mm) (102 to 152 mm)
• Fasteners must be installed at a 45-degree angle. (see image 2)
• You may need to use a tapping block to fit the boards together. NEVER use a hammer or a sledgehammer directly on the boards.
• For best results, stagger joints 6” to 8” (152 mm to 203 mm) between rows and alternate board lengths.
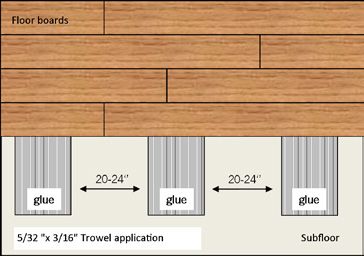
• The use of urethane-based glue is recommended in addition to nailing for flooring that is 6 ½” (165 mm) and 8 ½”
(206 mm) wide. Apply a trowel width of adhesive perpendicular to the direction of the flooring every 20” (508 mm) or so.
(see image 3)
• The last rows of boards should be installed in the same manner as the first.
• You may have to rip the last row lengthwise to allow a ½” (13 mm) expansion gap.
Engineered ½” (13 mm) or ¾” (19 mm) Installation Guide | Version 1, 05-2021 1-866-448-1785 | www.mercierwoodflooring.com
6Image 1 Image 2 Image 3
Correct Too low Too high
Warning!
Split or broken tongues can cause creaking. When working with harder
woods, it’s important to pay close attention to the pressure on the
compressor.
Floating installation
For Engineered ½” (13 mm) and ¾” (19 mm) flooring.
With the exception of 6 ½” (165 mm) x ½” (13 mm) Hickory, Mercier Engineered wood floors can be installed as a floating
floor on concrete and wood subfloors in basements and on ground floors and above, as long as you follow the installation
instructions.
How to install flooring
• The floor should not be attached to any surface. Expansion gaps are required for all fixed elements. See Table 1 below
for the recommended expansion gap based on the dimensions of the room.
Table 1
Expansion gap Maximum room width Maximum room length
½” (13 mm) 26’ (8 m) 52’ (16 m)
¾” (19 mm) 40’ (12 m) 80’ (24 m)
• When the room dimensions exceed the above values, use a T-molding.
• Install the acoustical membrane over the entire subfloor in the opposite direction to the flooring (see the installation
instructions for the acoustical membrane).
• The first rows of flooring are the most important. They must be straight and all joints must fit perfectly.
• Install the first board along the line, with the tongue towards you and the groove towards the wall. Always leave a
¼” (6 mm) expansion gap on either side of each row for expansion. If the walls aren’t square, use wedges or shims
between the flooring and the wall in order to keep an expansion gap.
• Carefully apply a smooth, even ribbon of glue at least 1/16” (1.6 mm), but not exceeding 1/8” (3 mm) on the bottom of
the groove only.
Warning!
It is very important to follow the gluing instructions. If the glue is applied incorrectly or you don’t apply enough, the
joint could separate. Too much glue will make the job unnecessarily difficult. You should never apply glue to the tongue
and groove at the end of the board.
Engineered ½” (13 mm) or ¾” (19 mm) Installation Guide | Version 1, 05-2021 1-866-448-1785 | www.mercierwoodflooring.com
7• Install the remaining boards in the row from left to right.
• Wipe off any excess glue immediately with a dry cloth.
• The last board in each row should be cut. Offcuts that are at least 6” (152 mm) long can be used to start the next row.
• Continue in this manner for the entire floor.
• You may need to use a tapping block to fit the boards together.
• For best results, stagger joints 6” to 8” (152 mm to 203 mm) between rows and alternate board lengths.
• It is sometimes necessary to use blue 3M tape to hold the flooring in place while the glue dries.
• Rip the last row of boards to width and allow for an expansion gap.
Installation over a radiant heating system __________________________________________________
Suitable for a nailed, stapled or floating installation. Refer to the radiant heating system manufacturer’s recommendations
for more information. With the exception of Hickory, Engineered flooring may be used over a radiant heating system in
basements, ground floors, and subsequent storeys by following these instructions. See Technical Bulletin #5 on flooring over
radiant heating systems at mercierwoodflooring.com for more information.
Precautions and recommendations:
Engineered flooring MUST be attached to the subfloor when used with radiant heating systems.
• The system must be tested and turned on a few weeks before installing the floor.
• Turn the system off during installation.
• Floors with radiant heating systems should not exceed 27 °C (80 °F) while in use.
• Visible or exposed pipes must be covered with 3/8” (10 mm) plywood or a layer of concrete to ensure uniform heat
distribution.
• When turning radiant heating on or off at the beginning or end of a season, gradually increase or decrease the
temperature to limit stress on the wood.
You may need to install stair nosings, T-moldings, quarter-rounds, Warning!
or reducers. These moldings are available in the same colors We recommend pre-drilling pilot holes in the
and species as your Mercier floor, and are available from your moldings to avoid splitting them.
authorized Mercier dealer. Order them at the same time as your
flooring. When installing moldings such as baseboard and
quarter round, make sure to attach them to the
Before installing the flooring, we recommend selecting boards wall, not the wood floor, to allow for movement.
that blend well with your moldings to avoid sharp contrasts in the
floor’s appearance. Always leave the recommended space for
expansion.
Inspection, finishing, and maintenance ____________________________________________________
When installation is complete, vacuum the floor and clean it with Mercier Cleaner according to the instructions. NEVER use
large amounts of water to clean a hardwood floor.
Use the Mercier Touch-Up Kit to fill and conceal small nail holes. For more information, see Technical Bulletin #7 on the
Touch-Up Kit at mercierwoodflooring.com.
Engineered ½” (13 mm) or ¾” (19 mm) Installation Guide | Version 1, 05-2021 1-866-448-1785 | www.mercierwoodflooring.com
8You can also read