Guide to 3D Printing at Georgina Public Library - Questions? Welcome to the Wonderful World of 3D Printing! Creating your ideas at the library ...
←
→
Page content transcription
If your browser does not render page correctly, please read the page content below

Guide to 3D Printing at Georgina Public Library

Welcome to the Wonderful World of 3D Printing!
       Creating your ideas at the library.
 Here are some instructions to get you started.

                 Questions?
      Contact: eServices at 905-476-5762

                                                  1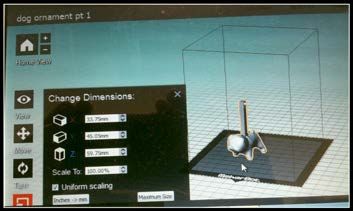
Table of Contents

What is 3D printing? ................................................. 3
What Can You Make? ................................................ 3
Pre-Designed Models ................................................ 4
Designing Your Own Model ....................................... 4
Getting Your Design Print-Ready ............................... 4
Using MakerWare .................................................. 5-6
Settings .................................................................. 7-8
Rules & Regulations .................................................. 9
Expectations.............................................................. 9
Finished Model ....................................................... 10
Painting MakerBot PLA Filament ............................. 10
Additional Resources .............................................. 10

                                                                                  2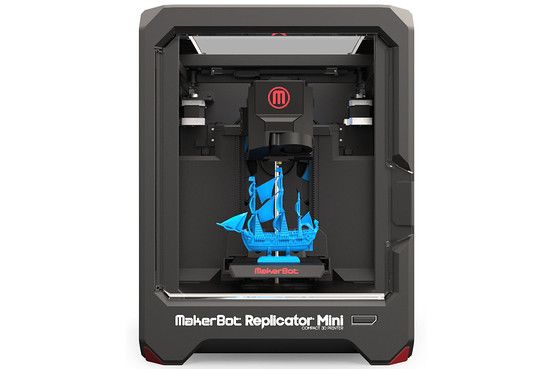
What is 3D printing?

 Georgina Public Library has a MakerBot Replicator Mini
 Desktop 3D printer that makes three dimensional objects
 from a digital model.

 The printer uses a manufacturing process to build objects
 layer by layer from a 3D design file, using a polylactic acid
 filament, a renewable bioplastic with a corn starch base,
 designed to prevent peeling, curling, or sliding.

What Can You M ake?

 Anything from board game pieces, and pet toys to small scale
 replicas of real-life buildings or objects. It is limited only by the
 size of the build space which is 4” L x 4”W x 4 ” H .

 Here are just some of the objects that we have
 printed so far.

                                                                         3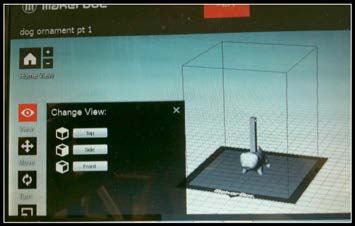
Pre-Designed Models

   If you are new to 3D printing, this is a great place to start.
   There are many pre-designed models available for free online.
   Try Thingiverse (thingiverse.com). It has thousands of objects
    to choose from and they are free to download.
   Wherever you get your model from, be sure to select one
   that has a .STL or .THING file format as this is required by the
   M a k e r B o t p rinter.

Designing Your Own Model

   For the more advanced user, you can design your own object with
   the use of 3D design software. There are a number of free websites
   that will allow you to do this, such as:

       Tinkercad – tinkercad.com
       SketchUp – sketchup.com (requires download & STL plugin)
       Autodesk 123D Design - 123dapp.com/design

   All of the websites mentioned above have tutorials that teach
   you how to use their software.

Getting Your Design Print-Ready

   Slicing
   Before the file can be transferred to the printer it must first be
   “sliced”; this process determines the amount of material needed
   and the time it will take. This can be done using the MakerWare
   Desktop software available on our library computers.

                                                                        4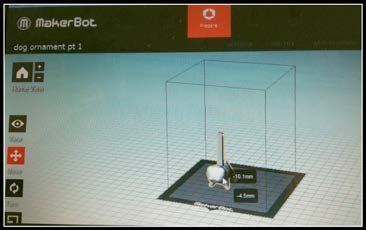
Using MakerWare

Open MakerWare Desktop. Click Add and select a .STL. or .thing
file you have created or downloaded from Thingiverse.

 View
                                  This mode allows you to rotate
                                  your view around the object.
                                  With the View button selected,
                                  click on the object and drag
                                  the mouse to change your
                                  view. If you would like to view
                                  your object from the top, side
                                  or front, click the small arrow
                                  beside the View button to
                                  access those commands.

 Move
                                  This mode allows you to move
                                  the object around the build
                                  plate. With the Move button
                                  selected, click on the object
                                  and drag the mouse to
                                  maneuver the object around
                                  the build plate. Advanced
                                  options are available by clicking
                                  the small arrow beside the
                                  Move button. These options
                                  allow you to change the
                                  position of the object using set
                                  values.

                                                                      5
Turn
        This mode allows you to
        rotate the object. With the Turn
        button selected, click on the
        object and drag the mouse to
        rotate the object around the
        build plate. If you need to
        rotate the object along the X
        axis (horizontal) or Y axis
        (vertical), open the advanced
        options with the small arrows
        next to the Turn button. Once
        you are done rotating the
        object, make sure you click on
        Lay Flat to ensure the object is
        sitting flat on the build plate.

Scale
        Scale allows you to scale the
        size of your model. With the
        Scale button selected, click on
        the object and drag the
        mouse to increase/decrease
        the size of the object.
        Advanced options can be
        accessed with the small arrow
        next to the Scale button. These
        options allow you to change
        each dimension individually. To
        ensure your object stays
        uniform (maintains proportions),
        click on Uniform Scaling.

                                           6
Save to the Library
The “save to library” gives you an option to save your object as a
.STL or .thing file. STL files can be opened with many different
programs whereas .thing files allow you to continue editing
multiple objects on the build plate independently.
Settings
Click on the Settings icon at the top of the screen.
• Material: MakerBot PLA
• Resolution: Specify the quality
of your build. A higher resolution
will produce a better quality
object but will increase the build
times significantly.
• Raft: Used to create base
support for the object. Rafts
can easily be removed after
the object has been
completed.
• Supports: Used to create a support structure for objects that
have overhanging parts. These supports can be removed after
completion. Removing multiple supports can be time consuming
depending on the complexity of your object, but can be necessary
to maintain the shape of your design.
7• Advanced Options: This opens up a menu with more detailed
options. These options may set automatically depending on what
resolution you choose.
• Infill is the how solid the inside of your object is. A higher
percentage will increase the time and material needed.
• Shells are the outer layers of the object. The more shells
you have, the stronger it is.
• Layer Height sets the thickness of each layer. The MakerBot
Replicator Mini can print between 2 mm and 4mm.
After saving your settings, click on
Export Print File to get the
estimated build time & weight.
Cancel the export window and
save your file as .STL or .thing.
Files can be saved to the computer’s
desktop and sent as an attachment in
an email to library staff at:
3dprinter@georgina.ca
In the body of your email, please include: your full name; what colour
you would like (if a colour is not chosen, we will choose for you); the
infill percentage (100% infill is completely solid; and 0% infill is hollow—
our default is 10%); and the maximum you want to spend on your print
(we will email you if the estimate is higher).
Once you send your email, come to the service desk. If the library is not
busy, and staff has time to print your object, they may do so. If not, we
will print the object when we can and notify you by phone or email that
it is ready for pick up.
8Rules & Regulations
1. Maximum print time is 3 hours.
2. Last print job of the day must finish 30 minutes before closing.
3. We print each print job in one colour only.
We print using colour currently in the printer.
We will have in future, clear or white filament, only.
4. Cost of printing: $1 plus $0.10 per gram + HST
5. No illegal, dangerous or otherwise inappropriate materials will
be printed.
6. Users must not infringe copyright when using the printer.
7. Users must be a library card holder with Georgina Public Library.
8. All print jobs must be approved by a staff member.
9. Users must sign an acceptable use agreement.
Expectations
Please note that not all designs will be perfectly smooth and some
may not work out at all, particularly those objects that have
overhangs (areas with no support beneath them).
Georgina Public Library staff
members are not experts in
3D model design; we are here
to provide support and learn
along with you. There are,
Example of a project that did not turn out
however, many resources
as expected.
The printing process halted in the middle
available online
of the run, leaving the lion incomplete.
to help you get started.
9Finished Model
When your 3D model is finished you will be notified by email. The email
will include the cost of the print job. Bring a copy of the email with you
when you come to the circulation desk to pay for the print job and
pick up your object.
Clean up of the 3D model (removal of rafts and supports) is the user’s
responsibility.
Tools that you may need for this task include: tweezers, pliers, scissors,
files, sandpaper and an X-acto knife.
Painting MakerBot PLA Filament
MakerBot PLA Filament is easily painted with cellulose spray paints or
oil paints, though acrylic paints are considered to be the best choice. For
optimal safety, use child-friendly paints.
For the most even colors and longest lasting effect, prime the surface
with a non-toxic, water-based acrylic paint designed for use on plastic,
metal, and resin.
Approach the object you’re painting in sections. Start with a light coat,
and add more paint with subsequent coats. Save detailing until the end.
Maintain a light hand at all times; clumped brushes and the unexpected
blobs they can make may ruin a great piece.
Let your first layer of paint dry before painting more embellishments or
additions.
Additional Resources
1) How the MakerBot Replicator 2 works:
www.youtube.com/watch?v=pQv89fiir4U
2) Makerbot Replicator Mini time lapse: making a tree
www.youtube.com/watch?v=1_j2zuwjGnY
We hope you will have fun finding or designing objects to print!
10You can also read