HOW TO: Install Rivendell 2.0.2 on Ubuntu 11.04 - Wayne Merricks 02/07/2011
←
→
Page content transcription
If your browser does not render page correctly, please read the page content below
HOW TO: Install Rivendell
  2.0.2 on Ubuntu 11.04
        Wayne Merricks 02/07/2011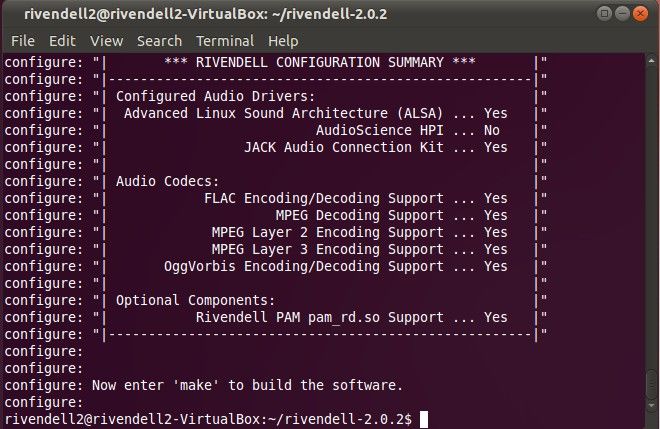
Purpose of this Guide

With the introduction of Rivendell 2.0.2, using RRABuntu to keep things simple wasn't an option
(at the time of writing). On top of this, you can't use PulseAudio due to how the Rivendell daemons
have direct ALSA access to the sound card by default.

This is actually a good thing to do in a studio environment as you don't want other things interfering
with the sound card and ending up with an Ubuntu beep or Youtube video live on air when it wasn't
intended.

However what if you are a home studio or you already have several Rivendell machines, wouldn't it
be nice to be able to record and edit audio in your nice sound proof studios/rooms instead of having
yet another PC?

In order to do this you need to get 3 very different components working together; JACK, Pulse
Audio and Rivendell.

So we will be going through how to do exactly that:

   1.   Install JACK 2
   2.   Get PulseAudio to work with JACK
   3.   Install Rivendell 2.0.2
   4.   Get Rivendell to work with JACK

There are quite a few excellent guides around but unfortunately for me I found that the “idiot's
guide” version did not exist and being a world class idiot it took me a long time to piece together
the required information and then to work out the things that went wrong.

I also tried to make the setup as bullet proof as possible (with my limited knowledge) so that once
all the hard work is done a “normal” person/user can just get the work done without worrying about
what all this JACK and Pulse rubbish is all about.

Credit where it is due

As already mentioned this guide builds on the excellent work of many other people and hopefully
brings it all together in an easy to understand way. I'd like to give particular thanks to the
following:
    • Paravel Systems / The Rivendell Devs
    • Frederick Henderson-Meier for info on Rivendell Installs, JACK and some very helpful
       startup scripts
    • James Harrison for clear info on installing Rivendell 2.0.2 from source
    • Kris Occhipinti for the video about Pulse and JACK
    • The patient and helpful guys over on the Rivendell Dev mailing list especially, Tim Camp,
       Jay Ashworth, Andy and Mark Turner for helping me through the final headache in the
       setup.
    • The Arch Linux Wiki for the info that finally got Pulse playing with JACK in an easy way
    • and any others that I might have forgotten along the way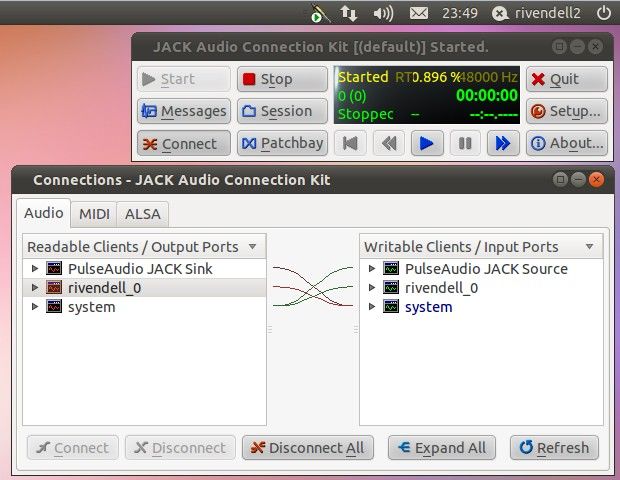
Before you get started

You will need to have installed Ubuntu 11.04 and it should be fully up to date (this should also work
on Ubuntu 10.04). The default user should NOT be called Rivendell. Call it rivendell2 if you're
boring like me or something completely different such as “flyingcircus.”

This will work with Unity but I prefer Gnome 2 just because I'm used to it (and I still find Unity a
bit too clicky).

This also works in a VM using Virtual Box although I wouldn't recommend it for production (I'm
using the VM for the screenshots etc used in the guide).

A Note on Realtime Kernels

I didn't bother installing a real time kernel in Ubuntu 11.04. Normally for professional audio usage
you want to install a kernel that is tuned for low latency so that audio is played with as small a delay
as possible.

However Ubuntu haven't been releasing real time kernels for Natty (11.04) unless you install from
PPAs (as far as my understanding goes). Also there is a benchmarks table located on the Ubuntu
Wiki which shows that the difference between the real time kernels and the normal generic kernel is
actually not a great deal (approx 3ms on RT vs up to 12ms on the Generic).

As such I was happy sticking with the generic kernel but if you're more seriously into audio
production than me you may want to look into KXStudio or Ubuntu Studio as there should be more
info around there.
Time to get stuck in... (at last)
So you should be sitting at your brand new but fully updated Ubuntu 11.04 desktop with nothing
much going on.
1. Check that your sound is actually working. If you heard the start up sound then that is good
enough otherwise start blasting out your favourite Youtube video after all you might not get
the chance to legitimately play YMCA for a valid reason ever again!
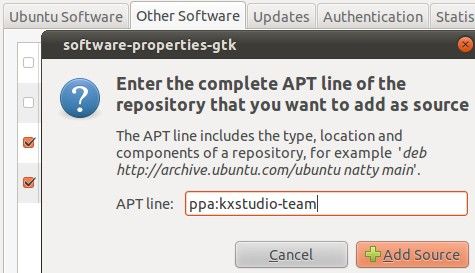
2. Add the KX-Studio PPA to your system:
• This may be an unnecessary step but the PPA contains a newer version of Jack
amongst other things so I used it.
• Fire up the Ubuntu Software Centre and go to edit → Software Sources
• Select the Other Software Tab → Click Add and enter “ppa:kxstudio-team” (without
the quotes) then click Add Source.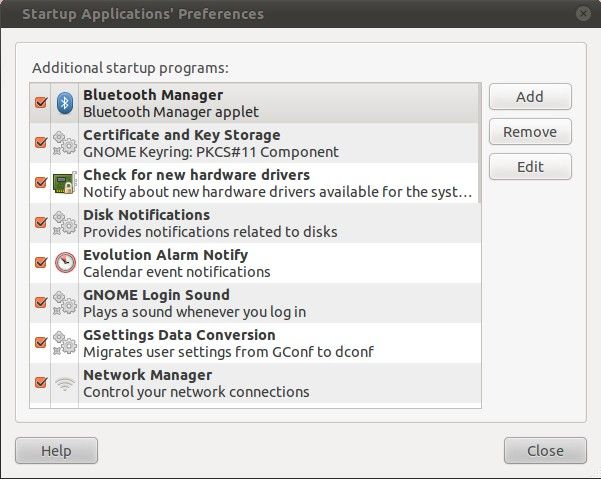
3. Now its time to open up the dreaded terminal (cue the dun dun duuuunnn!)
     • Type (or paste) in the following (it should be one big line):

           sudo apt-get install libcdparanoia-dev libflac++-dev libflac-dev
           libsamplerate0-dev libid3tag0-dev libid3-3.8.3-dev libcurl4-gnutls-
           dev libsndfile1-dev libpam0g-dev libsoundtouch1-dev alsa-source
           libtwolame-dev libmp3lame-dev libmad0-dev libqt3-mt-mysql qt3-dev-
           tools qt3-dev-tools-compat qt4-dev-tools libjack-dev libjack0.100.0-
           dev jackd qjackctl jackeq jack-rack jack-capture libasound2-dev
           mysql-client polymer qt3-qtconfig patchage

           This installs a whole bunch of stuff most of which are pre-requisites before you can
           compile Rivendell 2.0.2. JACK 2 gets installed in amongst this lot, patchage
           however is optional as its just a different way of viewing JACK connections (but it
           looks pretty).

      •    This will download about 167MB (at the time of writing) by installing 166 new
           packages and upgrading 1:

      •    Y to continue then go make some tea.

4. Now to make PulseAudio compatible with JACK.

   NB: You can simply select “Enable D-Bus interface” under QJackCtl which will makes
   PulseAudio work but I had trouble with this and Rivendell so although it seems like you're
   making quick progress it comes back to haunt you later if you go this route.

       •   So we need to install some JACK modules for PulseAudio. Fire up Synaptic
           (System → Administration → Synaptic Package Manager)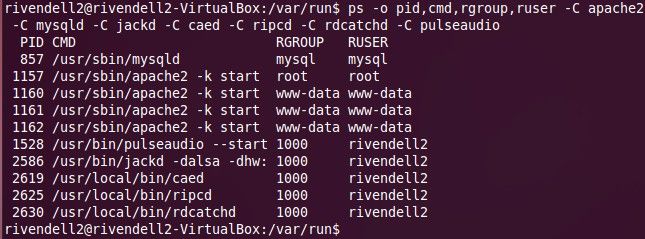
•   Get rid of the welcome box and in search type: “pulseaudio-module-jack”

           You should see something like whats above. Click the first result → Mark for
           Installation and then click the Apply button.

           On the summary box that pops up, click apply again and wait for it to install then
           close Synaptic.

5. We now need to setup a bunch of scripts so that PulseAudio will connect to JACK when its
   available (and revert back to its own devices if it isn't).
      • Create a new folder called scripts in your home folder (/home/scripts or ~/scripts if
          your fancy)
      • You need to make 4 new text files so fire up gedit (Applications → Accessories →
          Text Editor)
      • Script 1: “pulse-jack-pre-start.sh”
              #!/bin/bash
              pacmd suspend true

           This script suspends pulse audio so that JACK can startup. Save it into your newly
           minted script directory.

       •   Script 2: “pulse-jack-post-start.sh”
              #!/bin/bash
              pactl load-module module-jack-sink channels=2
              pactl load-module module-jack-source channels=2
              pacmd set-default-sink jack_out
              pacmd set-default-source jack_in

           This script loads the PulseAudio module for JACK playout (sink) with 2 Channels.
           Then the same for JACK recording (source). The final two lines make PulseAudio
           redirect to JACK playout and record (rather than trying to use the sound card directly
           I guess). Again save this to the scripts directory.

       •   Script 3: “pulse-jack-pre-stop.sh”
              #!/bin/bash
              SINKID=$(pactl list | grep -B 1 "Name: module-jack-sink" | grep
                 Module | sed 's/[^0-9]//g')
              SOURCEID=$(pactl list | grep -B 1 "Name: module-jack-source" |
                 grep Module | sed 's/[^0-9]//g')
              pactl unload-module $SINKID
              pactl unload-module $SOURCEID
              sleep 5
           As far as I understand, this is grabbing the ids of the sink and source modules and
           then unloading them from PulseAudio. Please note the tabbed lines belong to the
           line above.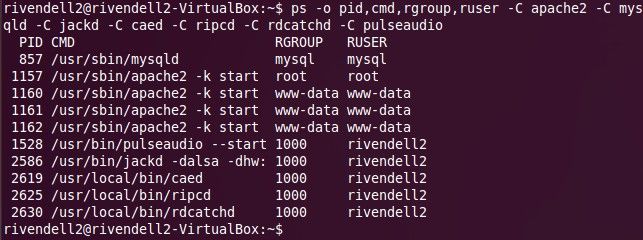
•   Script 4: “pulse-jack-post-stop.sh”
             #!/bin/bash
             pacmd suspend false

          This final script (phew) makes PulseAudio resume control of the sound card after
          JACK shuts down. In my case this is only ever going to happen when the computer
          shuts down but you may have other reasons for wanting to kill off JACK.

6. Now you need to make those 4 scripts executable. You can do this in a terminal (chmod
   +x ~/scripts/*.sh) or if you prefer the clicking method open up the scripts directory
   and highlight all 4 files. Then right click one and go to properties.

   Tick Execute (make sure the Tick is in the box, the first click just seemed to highlight it).
   Then click close.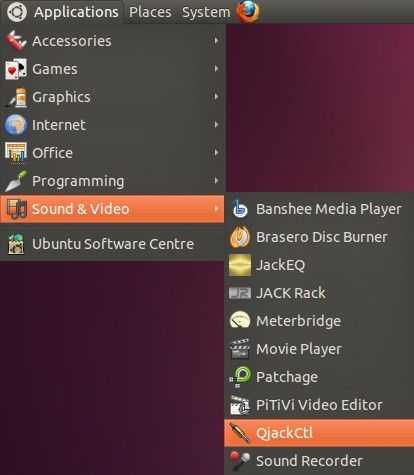
7. Time to configure JACK, click Applications → Sound and Video → QJackCtl

8. Say hello to your new friend, the JACK GUI:

   There are a whole bunch of settings in here that we can tweak to make our lives easier so
   that is exactly what we're going to do.
•   Click Setup and marvel at the mass of information in front of you. Thankfully all of
    this page can be left as the defaults however you will be interested in the following
    settings:

    These 3 settings have an effect on the latency you will experience (you can see an
    estimate in the bottom right corner of this screen).

    The eagle eyed amongst you will have spotted that I have changed the sample rate to
    48000 (which will match my sound card) and the periods to 4. Why 4? Well that is
    the default setting in the rivendell config file which we will get to much later. Also
    everything sounded OK when I was finished so why change it?

    If you are trying for a low latency setup you will want to tweak the frames and
    periods to make the latency as low as possible. However be careful as too low a
    latency will give you lots of VRUNs (JACK speak for audio drop outs). Having said
    this I have had a few VRUNs every now and then in my Virtual Machine but I've yet
    to even notice the drop out.

    This group of settings is left to you to experiment with. For now leave it as is (or as
    mine above and continue).

•   We now need to make JACK use the scripts we setup earlier (step 6). Under the
    options tab tick the 4 scripting boxes and match up the scripts to the boxes:

    Just in case thats difficult to read from top to bottom is pre-start, post-start, pre-stop
    and finally post-stop.

•   Now some final options under the misc tab:

    Tick, Start JACK audio server on application startup, Enable system tray icon and
    Start minimized to system tray. Once done, click OK and you've finished with
    JACK. One down, 2 to go!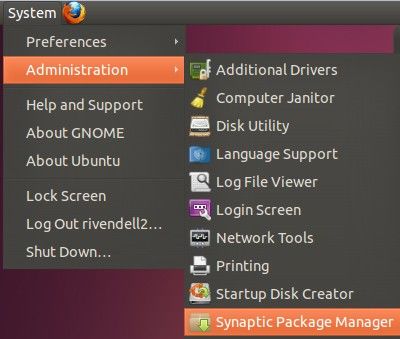
9. Time to test JACK and pulse.
      • Click the quit button on QJackCtl. Then open it again from Applications → Sound
          and Video → QJackCtl
      • You should see a JACK system tray icon with hopefully a green arrow:

          If you don't see this quit click the icon and quit JACK again. Now open a terminal
          and type “pulseaudio -k” to kill off PulseAudio. It will load itself back up
          almost instantly (normally 2 seconds ish max). Then load JACK again and you
          should be good to go.

          Click the JACK icon and you'll see:

          The thing to note here is that it says Started and that the Start button is greyed out.
          This means JACK is working.

          Click on Connect and if Pulse and JACK are talking you should get:

          As you can see there are lines/connections between PulseAudio and System.
          Readable clients are things that produce sound, writable are ones that play out sound.
          The nice thing about JACK is you can take any sound producer and route it to any
          sound consumer. It doesn't have to be direct to a speaker it could be to another
          program such as Rivendell or Audacity or many many others. You can even take the
          left output and pipe that somewhere completely different than the right output.
• To check if it works you need to play a sound, if you have nothing to hand, head
back to Youtube although I don't recommend playing YMCA again people might
start talking. Why not reacquaint yourselves with the sublime vocals of The Wurzels
Some of you might be wondering how you can tell if Pulse is using JACK. Well
while the sound is playing, click PulseAudio JACK Sink and on the writable side,
click System. Then click Disconnect. If the sound stops, click Connect and it will
come back.
Welcome to the wonderful world of Pulse and JACK working in “perfect harmony.”
10. At this point if you have a fancy HPI (Audio Science) sound card. You need to install the
drivers from the Audio Science website. I don't have one of these so I can't help you there.
11. Time to get down and dirty with Rivendell. Fire up your browser and download Rivendell
2.0.2: http://rivendellaudio.org/ftpdocs/rivendell/rivendell-2.0.2.tar.gz
Don't bother saving it (unless you want to use it later somewhere else). Simply choose the
default “Open with archive manager” as we need to extract it anyway.
12. Once downloaded drag the entire rivendell-2.0.2 directory into your home directory. Inside
the newly extracted directory is an INSTALL, README and UPGRADE file. The
INSTALL file contains all the information needed to install Rivendell yourself if you ever
feel adventurous in the future.
For now we'll just jump back to the terminal and start compiling Rivendell.
In your terminal type:
• “cd ~/rivendell-2.0.2” ← changes to the rivendell 2 directory
• “./configure –libexecdir=/usr/local/libexec” ← sets some
compile variables. I believe this is for the new import/export web services in
Rivendell 2, but I don't fully understand how this works yet.The above command will spew out a bunch of stuff to the terminal ending with:
As you can see you should have support for pretty much everything (including
Audioscience HPI if you have a card and if you installed the driver).
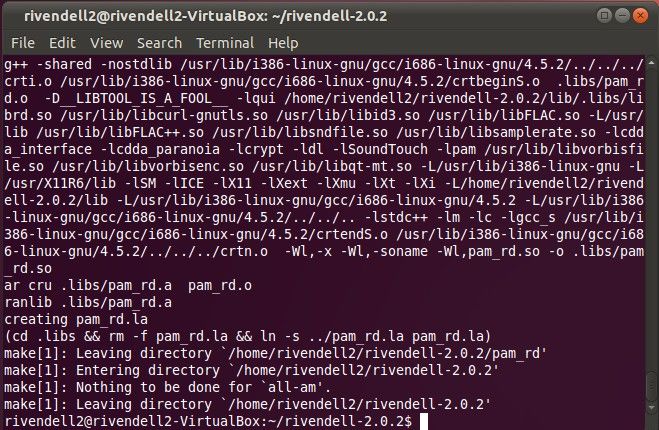
• As the friendly terminal says, now type “make”
This will spew out even more scary stuff for absolutely ages. It took my VM about
20minutes to get through this lot. Time for another cup of tea!
• Once that has finally finished you should see something like:• Now we install Rivendell 2.0.2 by typing “sudo make install”
Again more terminal ranting but thankfully only 30 seconds or less to wait while it
copies things around and does its own setup.
13. Technically Rivendell is now installed however we need to copy some shortcuts around (so
you don't have to type in rdairplay all the time), make some security groups and finally
tweak Rivendell so it works with JACK.
14. Copying Shortcuts:
• sudo cp debian/*.desktop /usr/share/applications/
• sudo cp debian/*.xpm /usr/share/pixmaps/
• If you look in Applications → Sound and Video you should now see a bunch of
Rivendell shortcuts (but don't click them yet you'll get errors)
15. By default Rivendell uses some ugly fonts in Ubuntu and also uses a basic QT theme so lets
fix that:
• sudo rm -rf /etc/fonts/conf.d/70-no-bitmaps.conf ← Turn off
No-Bitmap fonts
• sudo ln -s /etc/fonts/conf.avail/70-force-bitmaps.conf
/etc/fonts/conf.d ← Turn on Bitmap fonts (yeah I know its a bit weird how
that works)
• sudo fc-cache -f -v ← rebuild the font cache
• Under System → Preferences → Qt3 Configuration, change:
Select GUI Style to Polymer. Then click File → Save, then File → Exit
NB: This screen shot already has Polymer applied, I forgot to get a screen shot in all
its default ugly glory.
16. Now we need to setup a Rivendell system user, then add the currently logged in user to the
audio group:
• sudo addgroup rivendell
• sudo adduser `whoami` rivendell
• sudo adduser `whoami` audio (please note ` is not an apostrophe '. Its the
character near escape on UK keyboards).
17. Next up, we need to create a file called /etc/rd.conf based on the template in our rivendell
download directory:
• sudo gedit ~/rivendell-2.0.2/conf/rd.conf-sample ← we need
to save this to /etc later hence sudo.
• Change line 11 from “AudioOwner=rivendell” to “AudioOwner=Your
username” in my case that was “AudioOwner=rivendell2” because I'm
boring.• Change line 22 from “Password=letmein” to something more secure as this will
be the root access to your Rivendell database (you will need this password later so
remember it).
• Move line 93 down to become line 94. Replace the blank line 93 with
“SampleRate=48000” (or whatever sample rate your sound card uses from step 8
in JACK).
• On line 127 you should see “; [JackSession]” unfortunately a few details here
don't seem to work for me (maybe its just Ubuntu or maybe I did something wrong).
Namely instead of starting “Source1=rivendell_1” it should start at
“rivendell_0” and also “Destination1=alsa_pcm” should be “system”
not “alsa_pcm”
To keep things simple delete everything you see from line 127 to the end of the file
(line 162). Replace it with the following:
[JackSession]
Source1=rivendell_0:playout_0L
Destination1=system:playback_1
Source2=rivendell_0:playout_0R
Destination2=system:playback_2
Keep going until you have all your sound card outputs sorted. Source3 would be
rivendell_0:playout_1L, 4 … playout_1R etc etc.
Then append your sound card inputs starting from:
Source3=system:capture_1
Destination3=rivendell_0:record_0L
Source4=system:capture_2
Destination4=rivendell_0:record_0R
Obviously change Source3 to whatever number you got up to from the playout
section. The VM I'm using only has a simple 2 in, 2 out card emulated so its nothing
fancy. If you had 4 ins and 4 outs. Playout would go from Source 1 – 4, then
Record from Source 5 – 8 (I hope that makes sense).
• When you're finished File → Save As “/etc/rd.conf” (which is why we used sudo
gedit, see it all makes sense now).18. Rivendell makes use of asound.conf, I think this is only when JACK isn't around but I'm
probably wrong so lets sort that out now:
• sudo rdalsaconfig
For some reason I have what appears to be two duplicate entries here. Simply add
them by selecting and pressing the down arrow button to move them into the Active
category. I'll move both but this is something to check later on if you can't get sound
at the end of the guide (it worked for me as long as I had one or both of the cards
active).
• Click save once the card(s) that you need is(are) active
19. Now for some fun with Apache (no not the one from YMCA). Rivendell 2 uses Apache for
its import/export web services. As previously mentioned I'm not entirely sure how to use it
but it seems like a good deal as you can import audio using a server rather than tying up a
studio machine if you wish to set it up like that. For now we'll just install it as a standalone
system.
• sudo apt-get install apache2 ← install apache2
• sudo cp ~/rivendell-2.0.2/conf/rd-bin.conf
/etc/apache2/conf.d/ ← copy the Rivendell config to the apache config
directory
• sudo service apache2 restart ← restart apache2 so it picks up the
Rivendell settings
20. Now to setup /var/snd so that Rivendell can store audio there:
• sudo mkdir /var/snd
• sudo chown `whoami`:rivendell -R /var/snd21. Almost done now, just need MySQL so Rivendell has a database to use:
• sudo apt-get install mysql-server ← install MySQL server
• After the download you get a purple screen asking for your MySQL password...
remember the password from Step 17? Well now is the time to use it.
• Load up rdadmin either from a terminal or Applications → Sound and Video →
rdadmin
At this point enter root and your password from earlier. If you typed the password
correctly you will see:
At the rdadmin login box, use the username “admin” with no password:
When that loads up just quit out of it for now. We still have work to do
unfortunately.
22. At this point a lot of the daemons and other services will be running with a mix of local
users and root. Some will auto start and some won't, we also can't guarantee the order that
they will start. So time to restart and see what the damage is.23. So after the restart, load QJackCtl (Applications → Sound and Video → QJackCtl) then fire
up your trusty terminal and paste in the following:
“ps -o pid,cmd,rgroup,ruser -C apache2 -C mysqld -C jackd -C
caed -C ripcd -C rdcatchd -C pulseaudio”
You should see something like this:
As you can see we have mysqld (the MySQL server), apache2 (web server), PulseAudio and
JACK running.
So we have a problem as the Rivendell services haven't started. We're missing caed, ripcd
and rdcatchd.
24. So we need to fix that, type in “service rivendell start” and you should get the
following error:
As you can probably tell, it is complaining that either jackd.pid doesn't exist or the whole
directory /var/run/rivendell doesn't exist.
• Type “cd /var/run/rivendell” and you'll see straight away that it doesn't
exist so we need to make that directory.
• “sudo mkdir /var/run/rivendell”
• We also need to change the owner of this directory so we can use it so “sudo
chown `whoami`:rivendell /var/run/rivendell”
• Now try to start the rivendell service again “service rivendell start”
• As you can see no obvious errors but lets check to make sure everything has started:
• Type: “ps -o pid,cmd,rgroup,ruser -C apache2 -C mysqld -C
jackd -C caed -C ripcd -C rdcatchd -C pulseaudio”• Excellent it looks like everything is working, time for some testing.
25. Open up QJackCtl (by clicking on the icon near the clock) and click the Connect button to
see what hass been connected in JACK:
• Problem... Rivendell has started but its not showing up in JACK.
• If you like you can fire up RDAirplay and try and play the test sound (hint: it won't
work).
• Load up RDAdmin (Applications → Sound and Video → rdadmin), login (admin
with no password by default).• Click on Manage Hosts → Edit → Audio Resources and scroll down to the Audio
Adapters section:
Well that is odd, Rivendell thinks there is no sound card.
• Time for some investigation, if you go back to QJackCtl and click on Messages, you
should see something like:
After a lot of Googling you might realise that JACK has one simple peculiarity.
Everything that uses JACK must be ran as the same user otherwise you get errors
like what you see above.But that makes no sense as we have manually started everything ourselves, we
loaded QJackCtl and ran “service rivendell start”, you can even check it
in the terminal with our “ps -o pid,cmd,rgroup,ruser -C apache2 -C
mysqld -C jackd -C caed -C ripcd -C rdcatchd -C
pulseaudio” command:
• Notice how pulseaudio, jackd, caed, ripcd, rdcatchd are all run as the same group and
user (1000 and rivendell2). So this makes even less sense than it did already....
which is never a good thing.26. At this point I did a lot of random digging around (for much longer than I care to admit) and
got lucky. Rivendell stores its executables in /usr/local/bin and while rooting around in
there I noticed the following:
• cd /usr/local/bin
• ls -l (the letter L not the number 1)
• For reasons I didn't understand at the time, caed, rdcatchd and ripcd are all in red.
While everything else is the normal green (executable).
As it turns out, a permission of rws means the program is executable but it will
always run as the root user which is bad because to get JACK, PulseAudio and
Rivendell to work they both need to run as the same currently logged in user
• Thankfully this is very easy to fix, “sudo chown root:root caed
rdcatchd ripcd”• If you “ls -l” again you will see they are now a nice green colour and also rwx
instead of rws.
27. So lets stop the rivendell daemons and start them again to see if things are working:
• service rivendell stop
• service rivendell start (you can use restart instead of both of these steps
but because of the odd rws thing I thought it was best to completely close the old
instance and start from fresh).
28. Time to check QJackCtl → Connect
At last!!! 22 Pages and you've finally got something that looks like it works
NB: If rivendell_0 hasn't automatically connected to system, double check for typos in
your /etc/rd.conf under the JackSession section. Its obvious if this has happened because
you will have more error messages in your JACK messages window along the lines of “can't
connect unknown source”
29. Lets fire up rdairplay to check it really does work (Applications → Sound and Video →
rdairplay). You'll only have the test tone in place so play that and fiddle with the
connect/disconnect buttons from rivendell to system and you will hear the sound cutting out.
30. Now that you have a working system you've probably realised that starting everything
manually every time is a bad thing so lets start automating things.
First some housekeeping, we need to stop the rivendell daemons starting up as root (which
they will because there is a script inside /etc/init.d/rivendell that does exactly that).
Then every time the PC starts up to make Rivendell and JACK work we have to do the
following:
• Create a /var/run/rivendell directory
• Change the permissions on this directory to the current user and the group rivendell
• Load QJackCtl
• Load the Rivendell daemons31. Stopping the rivendell daemons running as root:
• sudo cp /etc/init.d/rivendell ~/scripts/rivendell-init-
backup ← copy the Rivendell deamon script to our home directory as a backup
• sudo update-rc.d -f rivendell remove ← removes the rivendell init
script from the daemon startup list
• sudo rm /etc/init.d/rivendell ← deletes the rivendell script from init.d
(hence the backup from earlier)
Hopefully your terminal looks a bit like the above and as you can see there is no
rivendell script left in /etc/init.d
32. Creating var/run/rivendell at boot:
• We need to make our own init.d script in order to achieve this, I won't bore you with
the details but if you want to learn more about init scripts check out the following
web page: http://www.debian-administration.org/articles/28
• Fire up “sudo gedit /etc/init.d/rivendell_run_dir” and paste in
the following:
#! /bin/sh
# /etc/init.d/rivendell_run_dir
#
# Simple script to create the /var/run/rivendell directory
# and then change ownership to the rivendell user
#
# Responds to start and stop calls
case "$1" in
start)
echo "Creating /var/run/rivendell"
mkdir /var/run/rivendell
# CHANGE THE NEXT LINE to your own username
chown rivendell2:rivendell /var/run/rivendell
;;
stop)
# There is actually nothing to do here but we'll say
bye anyway
echo "rivendell_run_dir exiting"
;;
*)
echo "Usage: /etc/init.d/rivendell_run_dir {start|
stop}"
exit 1
;;
esac
exit 0• Remember to edit “chown rivendell2:rivendell
/var/run/rivendell” replacing rivendell2 with your username.
• Save and exit gedit.
• sudo chmod +x /etc/init.d/rivendell_run_dir ← make the script
executable
• The reason I use an init script to do this is I was unsure if a user script would let you
make and chown this directory because you need sudo rights for it. You obviously
don't want your script to prompt you for your sudo password every time it boots up
hence using init.
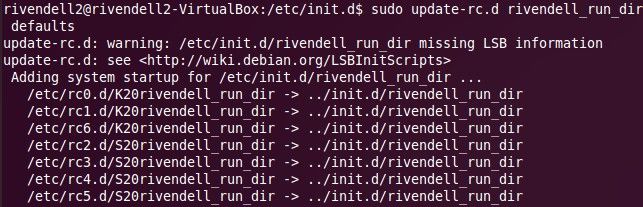
• sudo update-rc.d rivendell_run_dir defaults ← makes the
system run this script as a service (it will respond to system startup/shutdown events
by doing this)
You can ignore the warnings, it is because the script doesn't comply fully with init.d
conventions. Figuring this out was more time than I had to spare but if someone
wants to make a better script I'm all for it.33. Starting QJackCtl automatically, this is really easy and no need for the terminal for once:
• System → Preferences → Startup Applications
• Click Add and type in the following:
• Click Add on this box and then close the startup application GUI... nice and easy.34. Load the Rivendell daemons. Once again things are not always straight forward. We can't
use the Startup Applications GUI directly because we need to make sure jackd is working
before we start Rivendell. This means another script but using init.d introduces other
complications so we'll just make a “normal” user script (I'm not a Linux expert but this is the
simplest way I could think of doing it).
• Fire up gedit (Applications → Accessories → Text Editor) and paste in the
following:
#!/bin/bash
#
#######################################################################
# Rivendell Startup Script #
#######################################################################
# This script will start the Rivendell daemons caed, ripcd and #
# rdcatchd as soon as jackd has started. #
# It is designed to be used as a "startup application" in the normal #
# Ubuntu Startup Manager app. #
# You must make sure that /var/run/rivendell has been created before #
# this script runs otherwise the Rivendell daemons will crash on #
# startup. #
# #
# This is heavily based on the excellent work by Frederick #
# Henderson-Meier over on #
# http://frederick.henderson-meier.org/ and the default rivendell #
# init.d script #
# Without the shameless cannibalisation of his script for Rivendell #
# 1.7, I wouldn't have been able to get this going. #
# #
#######################################################################
# Global Vars
DAEMONS="caed ripcd rdcatchd"
echo "This script will start: " $DAEMONS " once jackd has started"
# Turn off exiting on non-zero values for the duration of our loop
set +e
echo "Waiting for JACK"
JACKDSTARTED=$(ps --no-headers -o comm -C jackd)
SECONDSWAITING=0
while [ -z $JACKDSTARTED ]; do
echo "Waiting for the Jack Audio System to start before starting”
echo “the Rivendell daemons - Now waiting $SECONDSWAITING Seconds"
sleep 1
let SECONDSWAITING=$SECONDSWAITING+1
JACKDSTARTED=$(ps --no-headers -o comm -C jackd)
done
echo "JACK started"
# Give the Jack Audio System time to start.
sleep 5
# Turn back on exiting on non-zero values.
set -e
echo "Launching daemons"
for daemon in $DAEMONS; do
if test -x /usr/local/bin/$daemon ; then
echo "Starting: " $daemon
/usr/local/bin/$daemonelse
echo $daemon " not installed"
exit 5
fi
done
echo "Successfully launched, exiting..."
exit 0
• Save this file in your scripts directory, I called it “rivendell-start-
daemons-after-jack.sh” but it doesn't really matter what you call it.
• Make the script executable by “chmod +x ~/scripts/rivendell-start-
daemons-after-jack.sh” or right click the file → properties → permissions
→ tick “Allow executing file as program”
• Now you can add this file to the Startup Applications GUI in the same way you
added QJackCtl:
• At this point reboot your PC and if you haven't made any mistakes everything will
work!35. What you should see after doing the above and rebooting:
36. A quick look at the same setup in patchage (remember that):

Room for Improvement:

OK I'm sorry, I know I've waffled on for 28 pages but there are a couple of things I think need
improving that are important to mention.
   1. /etc/init.d/rivendell_run_dir script – Probably should get this fully compliant with init
      conventions but that is beyond my knowledge for the moment.
   2. Find a better way to start the Rivendell daemons after jack. At the moment the daemons
      won't respond to service requests like they would in the original init.d script. As far as I can
      tell this doesn't make any real difference as the default script just kills the daemons anyway
      but it would be nice to respond properly.

      I don't actually think its possible to do this as a user script but I'm probably wrong.
   3. You might want to untick “Confirm application close” under QJackCtl → Setup → Misc as
      the confirm box seems to make me have to press shutdown twice before Ubuntu will go
      away.
   4. Also if you want a slightly prettier QJackCtl, remember to tick “Draw connection and
      patchbay lines as Bezier curves” under Setup → Display.
You can also read