Introduction to Organic Gardening - Appalachian ...
←
→
Page content transcription
If your browser does not render page correctly, please read the page content below
Introduction to
    Organic
   Gardening

       1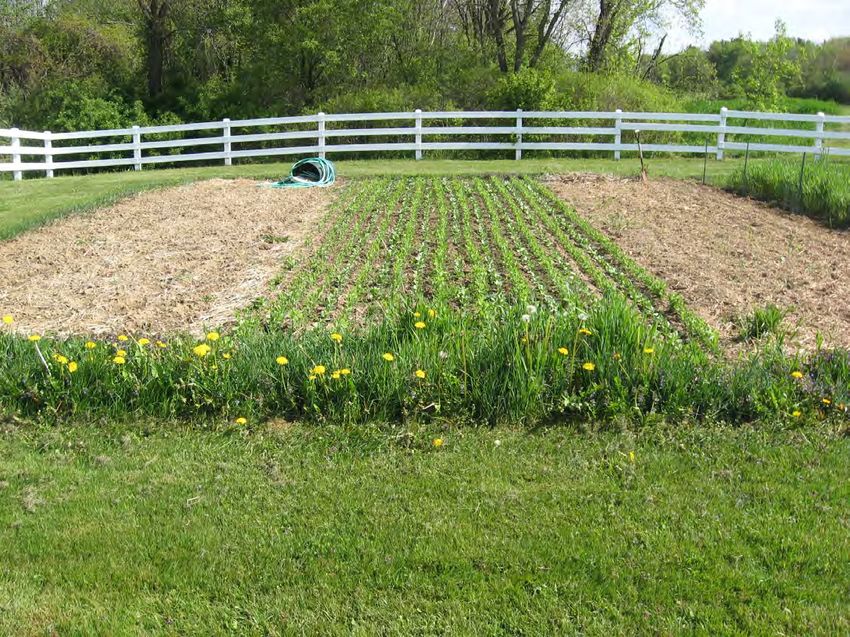
What is this
This book is intended as a crash course to organic gardening— in no way is it a comprehensive manual. Our
hope is that this will serve as a guide to help you get started and to point you in the direction of additional
resources.
In this book you will find guides to:
Understanding soil
Planning your garden
Techniques for maintaining a healthy garden organically
Common beneficial insects and harmful pests and diseases
When and how to plant different crops
If you are an educator please use this book as a starting point for tailoring to your audience’s needs—
children, low literacy adults, brand new gardeners, etc. We hope that you will find it useful for creating addi-
tional educational material.
The material provided is intended for educational purposes and not for profit.
The glory of gardening: hands in the dirt, head in the sun, heart with nature.
To nurture a garden is to feed not just on the body, but the soul.
-Alfred Austin
Edited in 2019 by Chelsea Goulding
Edited in 2018 by Adam Watson
Edited in 2015 by Denise & Tom Peterson
with assistance from AmeriCorps VISTA Brian Serway
This manual was written in 2013 in collaboration between
Appalachian Sustainable Development and
Feeding America Southwest Virginia
by AmeriCorps VISTAs Heather Jeffreys and Megan Pintus
We are grateful for support from Grow Appalachia for this endeavor
For more information about the Grow Your Own Program, please contact
ASD at 1096 Ole Berry Road, Suite 100, Abingdon, VA 24212 276-623-1121
2
Chapter 1: Understanding Soil & Garden Preparation
                    Understanding Soil                              pg. 4
                    Soil Structure/Understanding Elements in Soil   pg. 6
                    Balancing Soil pH                               pg. 7
Table of Contents
                    Garden Design                                   pg. 8
                    Compost Overview                                pg. 9
                    Solutions to Common Compost Issues              pg. 10
               Chapter 2: Organic Techniques for a Healthy Garden
                    Transplants: The How To                         pg. 12
                    Succession Planting                             pg. 14
                    Crop Rotation                                   pg. 15
                    Season Extension                                pg. 16
                    Understanding Plant Diseases                    pg. 17
                    Common Plant Diseases                           pg. 18
                    Disease Prevention Techniques                   pg. 20
                    Organic Insecticides and Pesticides             pg. 21
                    Fungicides                                      pg. 23
                    Organic Weed Control                            pg. 24
                    System Management: Prevention and Control       pg. 26
                    Safe Spraying                                   pg. 27
                    Cover Crops                                     pg. 28
               Chapter 3: Insects and Pests
                    Beneficial Insects                              pg. 30
                    Individual Pest Profiles                        pg. 32-48
               Chapter 4: Plant Profiles
                    Individual Plant Profiles                       pg. 49-73
               Chapter 5: Seeking Seed, Storing and Resources
                    Seeking Seed                                    pg. 74
                    What To Buy & Where                             pg. 76
                    Sources for Seed                                pg. 77
                    Seed & Plant Spacing                            pg. 78
                    When To Plant                                   pg. 79

                                                3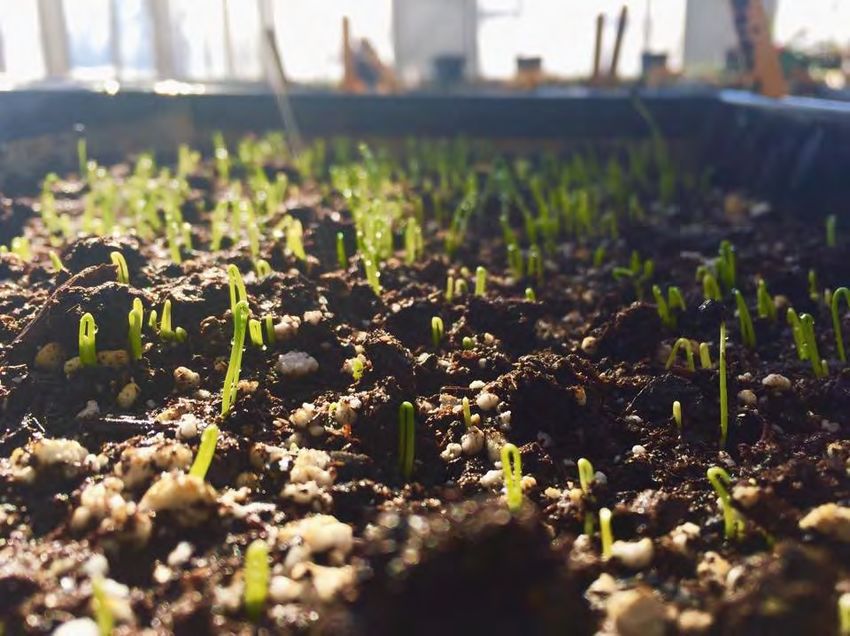
Understanding Soil
                           Before you DIG, Call 811
Soil Testing
When is the best time to test your soil ?
Take a soil sample before initiating any new planting. Sampling well
in advance of planting will allow time for applied soil amendments to
begin making the desired adjustments in soil pH or nutrient levels. If
an established area exhibits abnormal growth or plant discoloration,
take a soil sample right away. For areas recently limed or fertilized,
delay sampling at least six to eight weeks.                            Figure 1. Land Sections

How often should I test?
Once every 3 to 4 years.

Where should I sample?
To obtain an accurate soil sample, divide your landscape into areas
of unique use, for example; vegetable garden, lawn, or perennial
flower bed. Or by location such as: top of hill or lowland, or test
areas of different soil colors and textures. Sample unique areas
individually.                                                       Figure 2. Soil Segments

Why should I sample different areas?
If one area of your landscape seems healthy and another area has bare or yellow areas or yields poorly, soil
sampling may help to diagnose a problem. However, it should be pointed out that other factors may have a
greater influence on plant growth that will not be accounted for by a soil test. These include soil drainage,
soil compaction, insects, diseases, rainfall, and other factors.

How do I take a representative soil sample?
1. Open a hole with a shovel, spade or trowel from the surface to 6 inches deep. Set that soil aside.
2. With your shovel or trowel remove a 1 inch thick slice from the smooth side of the open hole.
3. With the slice of soil on the blade of the shovel, remove the sides of the slice with a trowel, knife or your
     hands to create a ribbon of soil 2 inches wide and 1 inch thick of the proper depth. Place the ribbon into a
     clean container such as a bucket.
4. Remove any surface mat of grass and any rocks.
5.   Continue to take additional soil samples from the uniform landscape area (at lease 6 different times). Mix
     your sample thoroughly together. Fill the sample box to be sent to Soil Testing Laboratory.
                                                        4
How do I submit my soil sample?
1. Obtain free Soil Sample boxes and Soil Sample Information Sheets from your
local Cooperative Extension office, certain agribusinesses, and garden
centers. Use permanent ink or pencil to fill out forms and label boxes.
2. Fill the sample box completely with soil and label it with your name, address,
and sample identifier. Your sample identifier helps identify where you took
your sample.
Figure 3. Soil Sample Box
3. To get the most value from your soil test, take the time to fill in the blanks on
the Information Sheet provided as completely and accurately as possible.
4. Fold the Information Sheet and slide it between cardboard top of soil sample
box. Tape all sides of box so soil doesn’t sift out.
What will the results tell me?
Soil samples from the Virginia Tech Soil
Testing Laboratory are usually analyzed
within one week of the time they are re-
ceived. However, in early spring, pro-
cessing the sample and mailing your re-
sults may take two weeks due to the large
number of samples sent in by farmers at
this time.
The Soil Testing Laboratory will provide
you with information on the availability of
nutrients in your soil. The test measures
and makes recommendations for the fol-
lowing major nutrients: P (phosphorus); K
(potassium); Ca (Calcium); Mg
(Magnesium) and five micronutrients. In
addition, the routine test determines the Figure 4. Soil Texture
soil pH and makes recommendations on how to raise or lower soil pH. Soil pH is a measurement of the acidity or
alkalinity of a soil. On the pH scale, 7.0 is neutral. Below 7.0 is acidic, and above 7.0 is basic or alkaline.
When testing is complete, a report is mailed to you and an electronic copy is available at the Agriculture Extension
Agent for your county or city. Supplemental notes are also sent with the report. The notes explain the technical
terms used in the report and provide extra details on fertilizer application schedules for specific kinds of plants.
Feel free to contact your Extension Agent for more help on sampling, interpreting soil test results, and under-
standing how to implement them. The phone number for your local Extension office appears on the upper left of
your report.
5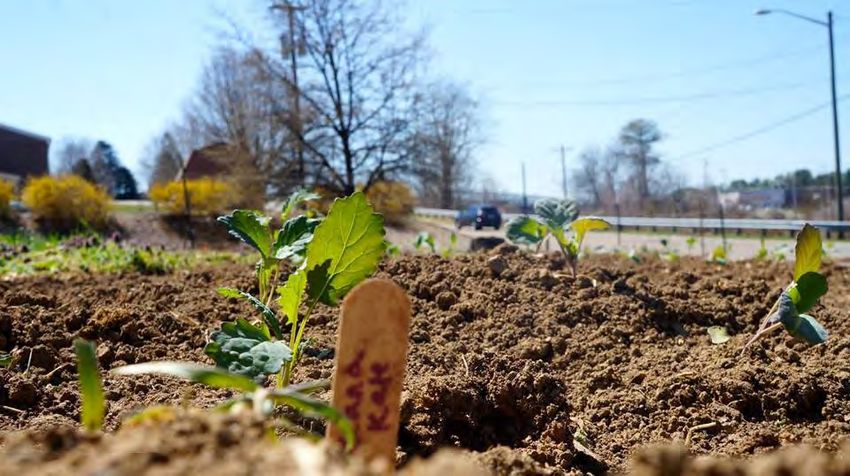
Soil Structure
The Physical Nature of Soil revolves around how porous your soil is or how compacted it can get.
The ideal garden soil is a sandy loam that is half solid and half porous—a structural balance which allows for
water and insects to move around. Soils are a combination of three basic “particles.”
Sand - These particles are the largest of the three; tiny rocks. Sandy soils will drain very easily, but this can be
a problem, leaving your plants too parched. Amend sandy soils by adding organic matter, like compost!
Silt - These particles are jagged like sand but smaller. Holds nutrients well like clay but drains better, like
sand.
Clay - These particles are miniscule and flat, with a tendency to pack together tightly. As a result, clay retains
water and nutrients well. Clay soils can be some of the best soils if you can loosen them up. Clay can be
changed by adding a lot of organic matter such as compost. Peat moss can lighten a clay soil but can lower
the pH. Good for acid loving plants such as blueberries.
Most soils are a combination of these sized particles. Soil that is considered “loamy” will have nearly equal
parts of sand and silt with a smaller portion of clay. For more detailed information about your garden soils
visit your local USDA service center. They can help you find soil maps for any location.

     Understanding Elements
pH: The measure of how acidic or alkaline (basic) a substance is. Soil acidity or alkalinity influences how
easily plant’s roots can absorb nutrients from soil.
Phosphorus (P) & Potassium (K): Two of the most important nutrients we add in our gardens—they are
essential for strong root growth and producing fruits and flowers. (They’re the “P” and the “K” on fertilizer
labels with the three “NPK” letters.)
Nitrogen: The “N” in NPK; the nutrient that makes plants grow BIG. Soil Labs don’t generally test for nitrogen
because is changes so quickly it really can’t be tested, but they do test “percentage of organic matter” as an
indicator of how much N your soils have.
Percentage of Organic Matter: A measure of the richness of your soil; high levels mean happy plants and
lots of beneficial life in your dirt.
Calcium: Every plant needs calcium to grow. As a soil amendment, calcium helps to maintain chemical
balance in the soil, reducing soil salinity, and improving water penetration.

                                                         6
Balancing Soil pH
Factors:
The pH, or acidity, of soil is one of the most important
factors affecting the growth of your garden plants. A pH
between 6.5 and 7.0 is ideal for a wide range of crops. The
best way to know your soil's pH is to do a soil test. Do not
assume that a friend or neighbor's garden pH is the same
as yours because soil types can change dramatically even
over a small distance. Test your garden soil and make
changes to pH as determined by the test.
Correcting acidic soil:
If your soil is too acidic, a low pH, you must add alkaline
material, a process commonly called liming. The most
common liming material is ground limestone. The best
time to apply lime to the garden is in the autumn to allow
time for it to act on the soil pH before the next growing
season. Follow recommendations from your soil test but a
rule of thumb for slightly acidic soils is to apply 5 pounds
of lime per 100 square feet to raise pH by one point.                   Figure 5. Nutrients and pH

Applying wood ashes is similar to adding lime and can change an
acidic soil more basic. Because it has a very fine particle size,
wood ash is a fast-acting liming material. USE WITH CAUTION,
because over applying wood ash can create serious soil
imbalances. Limit applications to 25 pounds per 1,000 square
feet, and apply ashes only once every 2 to 3 years in any
particular area. At this rate, your soil will get the benefits of the
trace minerals without adverse effects on pH. If you are using
wood ashes, reduce your lime recommendation by half.
                                                                          Figure 6. Adding wood ash

Correcting alkaline or basic soil:
If your soil is too alkaline, add a source of acidity. The most common material to add is powdered
elemental sulfur. As a rule of thumb, add 1 pound of sulfur per 100 square feet to lower pH 1 point. But as
with lime, the correct amount will depend on your soil type and its initial pH. Testing your soil and
following lab recommendations is the best approach if you want to lower the pH of an entire bed or area of
your yard. Incorporating ample organic matter (such as shredded leaves) , or applying thick layers of peat
moss, is an environmentally friendly option to lower your pH as well.

                                                         7
Garden Design
               BEFORE YOU DIG CALL 811! Don’t want to hit a gas or electric line!

What do you want to eat/grow/see/do? Fun things? An herb spiral? A butterfly garden?

Graph paper is great for sketching and mapping.

While this is an exercise in creativity, it is also an exercise in planning. There is only a certain amount of
nutrients in the soil, and a certain amount of water, so plants that are too close together will not grow well.
Healthy plants should have enough space. Plants have different space requirements. See guidelines for
particular crops.

Check chapter 5 for links to online garden planners, plant spacing guides, and more! There is also information
on how much of what vegetables to grow to feed a family. On the following page is the design plan we used
to design our first garden for the Grow Your Own program. It is in the style of 8 blocks, all housing a different
family (related vegetables) in each block. You will notice arrows—these designate crop rotation by season.

 Garden Planning is crucial! The above photo is of the garden planner software in action at
                                    www.growveg.com

                                                        8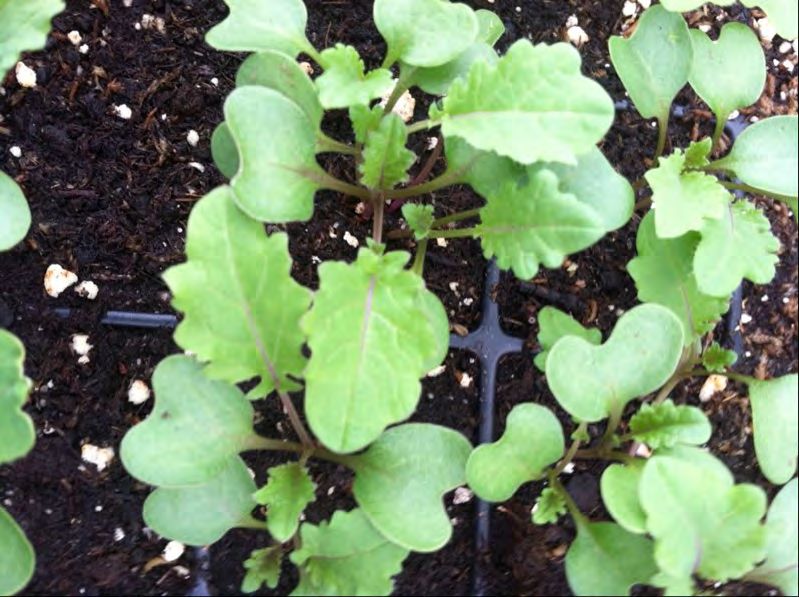
Compost: An Overview
What is compost?
Compost is one of the most valuable resources for your garden. It is created when
organic matter—such as leaves you rake, grass, kitchen waste, and debris from your
garden– is broken down by bacteria and fungi.
Why is it important?
Compost improves the structure of your soil
Compost reduces soil erosion and water runoff. Plant roots penetrate compost rich
soil easier and hold the soil in place.
*IMPORTANT*
Compost provides food for earthworms, soil insects, and beneficial microorganisms
Virginia commonly has clay
Compost assists the soil in holding nutrients—reducing your need for chemicals
based soil. Adding compost
Compost promotes healthy plants that are less susceptible to disease and insect will improve soil structure
pests by creating more air space
Compost recycles wastes that otherwise might go to landfills and variety of soil particles.
The term tilth refers to your
How do I make compost? soil structure.
1. Begin with an area that is at least 3’ wide and 3’ long. Cover area with thick
layer of cardboard.
2. Place 3-6 inches of straw on top of cardboard.
3. Add about 9 inches of dry leaves or other old dead plant material
4. Add 3-9 inches of fresh plant material, kitchen waste, or manure to
contribute nitrogen
5. Chop or shred all materials before adding them to speed the compost
process
6. Moisten the pile as you add leaves and other dry material (similar to a wrung out sponge)
7. Mix the materials thoroughly and add material as available—it should heat up in a few days
8. Turn the pile regularly (once every two weeks) to increase oxygen flow
9. The pile should reach 140 degrees in order to kill most weeds and insects
Green Matter (Nitrogen) Brown Matter (Carbon) What NOT to add
Kitchen scraps, grass clippings, fresh Dry leaves, hay, corn and flower stalks, Diseased plants, dog or cat manure,
plants, weeds, manure dried vines treated material, meat or dairy or fish
products, glossy paper
9
Solutions to Common
                       Compost Problems
1. My compost is wet , soggy, or slimy.
       Three factors are usually to blame: poor aeration, too much moisture, or not enough nitrogen-rich material
       in the pile. A pile burdened with materials that mat down when wet, such as hay or grass, can become too
       dense and suffocate your heap- especially if left uncovered during rainy spells. Aerobic bacteria—the tiny
       microorganisms that make compost cook—cannot live in such an oxygen-poor environment. Instead use
       anaerobic bacteria, which doesn’t require air to thrive. These microbes will eventually make compost, but
       they work much more slowly than aerobic bacteria and the compost will be slimy and soggy during the long
       (about 2 or 3 years) process. This kind of anaerobic pile makes a great home for sow bugs, pill bugs, and
       earwigs. Weed seeds are more likely to survive in this kind of pile because it does not get hot enough to kill
       the weed seed.
       THE FIX:
       If relentlessly wet weather is part of the problem, place a loose-fitting lid or tarp over the pile. Turn the pile
       over and fluff it up thoroughly. If you have some "hot," nitrogen-rich ingredients (like shellfish shells) and
       fibrous, non-matting ingredients (like shredded corn cobs or sawdust), add them to help get things cooking.
       Your pile should heat up within a few days, after which you can keep it cooking by turning it every week or
       two.

2. My compost is dry and dusty
       THE FIX:
       Here's a rule of thumb you can rely on: your compost ingredients should feel about as wet as a damp sponge
       when they're in the pile. Put an oscillating sprinkler on top of your dry compost pile and run it for an
       hour—this will moisten the materials better than running an open hose on top. After sprinkling, check the
       center of the pile to be sure it's moist—sometimes you'll need to turn the pile and water the layers as you go.
       Turning and watering your dormant pile should bring it to life quickly. If it doesn't heat up, it might lack
       nitrogen-rich materials. If that's the case, tear the whole thing apart, add some manure or bloodmeal to get it
       going, and pile it up again. And once the pile does start cooking, don't let it dry out again. As they multiply,
       those tiny microorganisms use up a lot of water. You may have to water your compost almost as often as you
       water your roses during a heat wave!

3. There are bugs in my compost
       Pill bugs and sow bugs are small crustaceans (not insects) that live on decaying organic refuse. If you turn
       over the top layer of your compost pile and see thousands of tiny, grey, creatures that look like armadillos
       with seven pairs of legs each, you have discovered a nest of these bugs. (Pill bugs roll up into a ball when
       threatened and sow bugs don't; other than that, there isn't much difference between them.) Sow bugs won't
       harm your compost—in fact, they're actually helping to break it down. But if you don't remove them from
       the finished mixture before you spread it on the garden, you might find them snipping off the emerging roots
       and leaves of your beans, beets, and other seedlings.
THE FIX:
       To get these bugs out of your compost, raise the heap's temperature to above 120°F. (You can use a regular
       old meat thermometer wrapped in plastic.) Turn the pile over and rebuild it, watering it well as you go. If it
       contains lots of leaves or straw, mix in a nitrogen source like blood meal, manure, or shellfish shells. It should
                                                           10
       start heating soon, and when it does, those bugs will  depart for a more comfortable place.
To keep your pile cooking, turn it at least every 2 weeks; more often if possible. But what if your finished
compost is infested with sow or pill bugs and you want to use it where seedlings are growing? Do you have to
start all over again? No. Spread the compost in a thin layer on a tarp in direct sunlight and leave it there to
dry. The bugs will bail out quickly.
4. Plants are growing in my compost
Even a hot compost pile doesn't always heat up enough to kill all the weed seeds it contains. The heat causes
weed seeds or even volunteer vegetables (a plant that grows on its own, rather than being deliberately
planted by a farmer or gardener) to sprout.
5. My compost smells bad
If your pile emits the sharp, nose-twisting stench of ammonia, it contains too much nitrogen-rich material
(raw manure containing lots of urine is the likely culprit); it may also be too wet to allow aerobic bacteria to
thrive. If it just "smells rotten" and lots of flies are hanging around it, you've most likely added large loads of
kitchen scraps or canning wastes to the pile without chopping or mixing them in thoroughly. In either case,
you should remake the heap to bring your stinky compost under control.
THE FIX:
If you have added manure and stable bedding to your pile, mix in some absorbent and slow-working materials
such as chopped straw or shredded tree leaves. The pile should start to heat up quickly, and once it gets
going, it will smell just as sweet as compost can. If kitchen scraps, canning waste, or similar large amounts of
mucky stuff are producing offensive odors, turn the pile without adding anything, and be sure to break up all
the mucky stuff and mix it in well as you go. In the future, you can avoid this unpleasant task by first finely
chopping up such material and mixing it thoroughly into the heap, where it won't come back to haunt you.
6. Raccoons are eating my compost
Actually, raccoons (...or opossums or dogs or skunks or rats or bears or...) do not eat compost; they tear up
the pile to get at any fresh, edible kitchen garbage (especially if you risked adding "forbidden" meat scraps or
fat) that you recently buried.
THE FIX:
Mixing kitchen garbage with soil or wood ashes before burying it (in the hot center of your pile) might
discourage animals from trying to reach the hidden goods to begin with. But once such scavengers have got
ten used to visiting your heap for a free meal, your best bet is to build or buy a covered bin (go for an
off-the- ground model, such as the Compost Tumbler, if you can) to keep the garbage hounds away.
7. I can't turn my compost pile
Most experts will tell you that a hot compost pile should be turned at least twice a month and as often as
twice a week to keep it cooking away at that ideal 150°F. Too few of us have the time and energy to work
that hard and often on composting. You may also not have enough materials on hand all at once to build a
hot pile, which needs to be about 3 by 3 by 3 feet to start with.
THE FIX:
You can still create this valuable soil amendment without turning. Simply build your "cold" pile right to start
with, and you'll avoid many. Build the pile in layers—alternating "brown" (carbon-rich materials like leaves
and straw) and "green" (nitrogen-rich materials like grass clippings and garbage) components, mixing them
together as you go. Try to include some finished compost or rich topsoil in the mix to introduce those
all-important beneficial bacteria to the pile. And remember to water your pile well as you build it. Keep the
moisture content as even as possible (if it dries out, give the compost a soaking with the sprinkler). That's it.
11Transplants: The How To True Leaf
Why?
Planting transplants gives you a head start on weeds and mature earlier than they would
from seed. It is space efficient, as you are only placing out healthy plants—no need to fill in
blank spots with seed later or thin crowded plants.
How?
Temperature: Starting seeds in flats and pots does require attention and care. Seeds need
heat to germinate. In general seeds need between 68-86 degrees. This varies with plant
species, so check online. Using a heating mat to place flats on is ideal, but a warm room in
your house can work too.
Light: Our common vegetable plants do not need light to germinate, but as soon as
seedlings emerge move them to a bright sunny location and keep warm. In Abingdon, VA,
sunlight is available for less than 10 hours a day until January 18th, so consider starting your
seeds when ample sun will be available. Do not move seedlings outside until they have been
hardened off correctly. Seed Leaf
Seedlings will get leggy if they do not have enough light. A grow light helps, but a sunny
window can work depending on light levels and if your house faces south. Pay attention and
experiment. Keep flats moist, and evenly watered. Seedlings are very fragile, and do not like
extremes or fluctuations. Keep moisture, light, and temperature levels steady.
Tips:
Avoid touching the stem as it is weaker at this stage—handle transplants by lifting out the
plant with a spoon or other tool. Some people start many seedlings in one big flat, then
move them once they have sprouted to their own individual “cells”
Transplants should not be planted outside until they have at least one set of true leaves—
see the photos at right. The first leaves that come up when the seedling emerged were in
the seed to start — they are the food the plant comes equipped with, true leaves are the
first leaves the plant creates after the seed leaf.
And you must harden off plants before planting in the garden. These tender creatures have
been in a greenhouse environment and are not equipped for the wild outdoors. Before
transplanting, take plants outside during the day for several hours, for two or three days.
This will toughen them up and prepare them for wind and fluctuating temperatures. You can
also move them from the indoors into an unheated glass or plastic structure outside, such as
a cold frame, to transition them.
12Transplants
Continued
Root Bound
The young plant on the left stayed in it’s cell too long. This is known as becoming “root
bound”. The young plant roots ran out of nutrients and circled around looking for food. This
can weaken plants and set them back. Usually they can recover, but some plants are more Root bound plant
sensitive.
If this happens, gently pull apart and “tease” the roots when planting outside, this alerts the
plant that there is more room to spread out.
When to Transplant
NEVER set out transplants in the heat of the day—like noon for example. They will sizzle in
the hot sun! Also, not hardening off correctly or rough handling at planting time leads to
transplant shock. Handle these plants gently and avoid touching the stems, and lift the
whole “cell” — the roots and the soil out together, bringing as much of the soil with you
into the new planting space.
Biodegradable pots are made of materials such as peat moss, composted cow manure, and
coconut husks. The benefit is that the pot can be planted directly into the garden when your
Soil blocks are another
transplant is ready, as it will easily break down. The cons are these pots are expensive,
transplanting method.
fragile, and plants can become root bound.
Instead of each plant having
its own plastic cell, each
plant has a cube of soil. This
allows for plants to be “air-
pruned” when they hit the
edge of the soil block. This
avoids root binding.
Most common way to start
plants is in plastic .
Figure 8. Seedlings breaking through soil
13Succession Planting:
Some veggies have large windows of growing time (Beans for instance can grow from May to September) so
succession planting can begin, where new seeds are sewn every 2 weeks. This allows for lengthy waves of
harvests of the same crop, rather than getting all of your veggies all at once!
Planting an early spring, late spring, summer, fall, and winter garden is another form of succession — rotating
between cool, warm, hot, and cold crops produces more food and more options year-round. An example of
seasonal succession plating could be: peas in the early spring, peppers in spring throughout summer, broccoli
in the fall, and then salad greens for winter.
Tips:
For ultimate succession planting, start crops in flats while other crops are still in the ground. That way when
the initial crop is ready for harvest, there are transplants waiting to fill that row. This avoids wasted garden
space. Having new transplants ready to go directly into the garden bed saves about 6 weeks of prime growing
season. Rotating between food crops and cover crops is a great way to enrich the garden soil with nutrients
in-between plantings and minimize soil erosion.
*Succession planting is a form of intensive gardening that can be tough on soil—more and more plants are
sucking up nutrients. Be sure to put back nutrients in between crops—add compost, fertilizer, or grow cover
crops/green manures in between food crops that take a lot of nutrients. Rotate legume crops in and out as
well, as legumes fix nitrogen in the soil.*
14Crop Rotation:
What is crop rotation?
Crop rotation is a systematic approach to deciding which crop to plant where from one year to the next.
Continually planting the same crop in the same place each year can reduce the success of vegetable crops
due to diminished soil nutrients and residual plant diseases and insects.
Balancing Soil Fertility
Different crops have different nutrient requirements and affect soil balance differently. Some, like corn and
tomatoes, are heavy feeders that quickly deplete the soil’s nitrogen and phosphorus. Thus, planting corn in
the same spot year after year, will deplete nitrogen and
The goal of crop rotation is to help
phosphorus from the soil more quickly than other parts of the
manage soil fertility and to avoid or
garden. By moving corn to a new section of the garden each year,
reduce problems with
phosphorus and nitrogen can be added back to the soil with either
soil borne diseases and
cover crop, fertilizer, or compost.
soil dwelling insects.
The general rule for balancing out soil nutrients is to avoid
planting the same general category of crop (root, legume, and leafy/fruiting) successively in the same place.
It's best to follow nitrogen-fixing legumes such as peas or beans with nitrogen-loving leaf or fruiting crops
such as lettuce or tomatoes. Then, follow the heavy feeding crops with light-feeding root crops.
Disease and Pest Prevention
Crop rotation can help in overall management of diseases and pests
because crops in the same botanical family tend to suffer from the
same pest and disease problems. For example, Colorado potato
beetles like to eat potato plants, but they also enjoy feasting on
tomato leaves and eggplant foliage. Since these beetles overwinter
in the soil, avoid planting eggplant where tomatoes were last season.
Likewise, several serious bacterial and fungal diseases overwinter in
plant debris in the soil. Keep in mind that cover crops can be
included in a rotation plan to discourage specific types of pests and
to improve soil.
Figure 8. Types of Vegetables
15Season Extension: Row Cover & Cold Frame
In the heart of winter, plant growth slows to a minimum. Here are some ways to extend the
growing season to keep those healthy veggies on the menu well into winter!
Row Cover
Row cover is light-weight cloth used primarily to protect plants from the undesired effects of
cold and wind, as well as insects. There are multiple sizes which range from light at 0.6 oz to
heavy at 1.8 oz. Row cover can be held up and off of plants by using half-circles of 9 gauge
wire that can be purchased from Southern States Cooperative. Row Cover can be ordered
from Seven Springs or Johnny’s Selected Seeds.
How to use it effectively
First frost is generally around October 5th. Pay attention to frost warnings. Be mindful to
cover plants consistently at night when temperatures dip into the mid 30’s F. If there is a
freeze
warning, make sure to keep covered during the day to trap any available heat.
In October, you’ll need to uncover these crops during the day—we are still getting sun and
These are Cloches—individual
some heat. REMEMBER—plants should not touch top of cover—the tips of your plants will
glass or plastic houses that trap
freeze this way.
heat. You can use milk jugs as
In November and December, you can leave the cover on the whole time. A row cover is not
well. These heat up FAST in the
giving you an entirely new climate or growing condition—it is simply a way to tack on a few
sun!
weeks to the beginning and end of a normal season, and provide more overwintering
protection for growth on old plants to start up again in early spring. Seal edges (burying is
best) to trap heat and keep out pests.
Cold Frame: A cold frame is a four-sided frame of boards with a removable glass or plastic
top. The frame is placed on the ground and is used to house, protect, and harden off
seedlings and small plants without artificial heat. It acts like an unheated green house.
How to use if effectively: The best site for your cold frame is a south-facing, sunny spot with
good drainage and some protection from the wind. Ideally, the site should get full sun from
midmorning to midafternoon. You can set up a cold frame permanently in your garden, or Row Cover
make one that you put away when you're not using it.
The key to using a cold frame successfully is paying attention to the temperature—and the
trick is keeping it cool rather than warm. The temperature inside the cold frame should stay
below 75°F for summer plants and below 60°F for plants that normally grow in spring and fall.
The way to keep temperatures cool inside a cold frame is to lift the lid. A good rule of thumb:
When outdoor temperatures are above 40°F, prop open the lid 6 inches; when the outdoor
temps clear 50°F, remove the lid. Be sure to restore the lid in late afternoon to trap the heat
inside for the cool night.
On frigid nights, the plants inside the cold frame may need a little extra protection to keep Cold Frame
from freezing. Most heat escapes through the glass, so pile insulation on top. You can use old
blankets, straw, newspaper or whatever is handy. Snow insulates well, too, but brush heavy
snow off the glass so it doesn't break.
16Understanding Plant Diseases
Starting your seeds for success:
A healthy garden requires both healthy soil and healthy plants. And one of the most important times in the
life of a garden plant is in its first few weeks of life. Here are some keys for growing healthy seedlings:
Start with good seed. Seeds lose vigor and strength over time. Some seeds remain viable for many years,
but others are only good for a year (or less). It is best to start with new seed, but if you wish to store
seed, keep it in a cool, dark ,dry place (many seed savers store seed in the freezer).
Sow seeds in well prepared garden soil or in clean containers filled with a quality potting soil. Different
seeds have different needs for good germination, so do your homework and know each plant’s
preference for temperature, depth of seeding, water needs and sunlight. Try your best to give each plant
its ideal growing conditions, particularly in the first few weeks of life.
Once seedlings are growing, thin your stand to provide the ideal spacing for individual plants and to
reduce competition for sunlight, soil nutrients and water. Proper plant spacing is an important way to
reduce disease in your garden.
If growing seedlings in a greenhouse, be careful to provide adequate moisture for young plants, but not
to over-water – watering is a delicate balance, plants need water, but too much can lead to fungal
disease problems. Using a fan to provide better airflow can minimize the chances for disease to set in and
can strengthen to stems of growing seedlings. In general you will need to water less on cloudy days and
more on sunny days.
Managing Plant Disease in the Garden
A healthy garden requires both healthy soil and healthy plants. Attentive management of soil and plants will
help to reduce plant diseases in the garden, but we live and grow in a warm, humid region of the country –
the perfect conditions for many diseases, particularly those caused by fungi.
Soil: Liberal use of compost in the garden, a well-planned crop rotation, soil testing and cover cropping are
all important to creating and maintaining a healthy soil. Healthy plants will naturally be more resistant to
disease pressure, and healthy plants grow from healthy soil. Do not underestimate the value of building
healthy soil.
Plants: The best way to reduce disease pressure on plants is to reduce plant stress. Make sure you plants
have the soil nutrition they need, know the ideal spacing for each garden crop, provide water to growing
plants when needed and try to protect plants from weather stress when you are able. These simple steps will
go a long way towards growing a healthy garden, but there are many common plant diseases out there and
even the best gardeners are bound to encounter disease at some point during the season.
Learning when to best take action against plant diseases in the garden is a vital part of organic gardening.
17Common Plant Diseases
Plant Diseases:
A healthy soil is teeming with micro-organisms, fungi and bacteria – most of
which are vital to crop growth and health. However there are also fungi,
bacteria and viruses whose job it is to break down and return plant matter
back into the soil – many of these are what we call plant diseases when they
act upon living plants. A plant that is stressed or malnourished will be a ripe
target for diseases, but given the right conditions, healthy plants can be
affected as well.
There are far too many garden plant diseases to list in this manual, but
knowing the most common ones and some techniques to ward them off can
help to ensure a good harvest. If you have questions about the health of
your plants, ask Grow Your Own staff or your County Cooperative Extension
agent – for best results, ask sooner rather than later!
Fungal Diseases:
Some of our most common (and most treatable) garden diseases are caused Tomato Blight
by fungi (relatives of mushrooms). Fungus thrives on warm, wet conditions
to spread and fungal spores can live in garden soil for many years.
Additionally, many fungal spores (think seeds) can travel for miles on the
wind, so it is very unlikely that any of us will completely eliminate fungal
diseases from our gardens.
How to Prevent fungal disease:
A healthy garden requires both healthy soil and healthy plants. A rich, living
soil will out-compete many fungal diseases and a healthy plant will resist
diseases much better than a stressed or struggling plant. Powdery Mildew
That being said, early action against disease is important for a bountiful
harvest. These simple steps can help to reduce the spread of fungal diseases
in your garden:
Maintain good air flow in your garden by following recommended plant
spacing and keeping weeds at bay.
Keep soil borne fungus off your plants by mulching with grass clipping or
straw (this also maintains good soil moisture which reduces plant stress).
Wet leaves are a common source of fungal infection – try to keep leaves dry
by watering the base of the plant rather than the leaves.
Some fungal spores survive even a hot compost pile, so remove infected
plant material from your garden to reduce future spread of the disease.
Anthracnose
18Common Plant Diseases,
Some Common Fungal Diseases:
Early Blight (tomatoes): Perhaps the most common of garden diseases, EB is marked by yellowing leaves (that
soon dry up and die) starting from the bottom of the plant and working its way up. Often EB will move up the
plant so quickly that the harvest can be severely reduced.
Compost around the base of the plant and thick straw mulch can help slow the infection of EB. Removal of all
leaves and suckers up to 8” above the soil will help to promote beneficial air flow around the plant. Weekly
sprays of Serenade (a biological fungicide) starting at first fruit set will also help keep the disease in check.
Powdery Mildew: Mildews are primarily a disease of squash, cucumbers and melons. Marked by a powdery
white coating on the leaves of the plant, PM can spread quickly and ravage even a strong plant. Try to avoid
overhead watering, particularly in the evening. If you see the disease, Green Cure is an effective spray for
slowing its spread.
Anthracnose: This is a disease caused by many different fungi. It causes sunken, soft, and watery spots on
fruits, particularly tomatoes and peppers. Maintain good air flow around plants and keep plant leaves dry as
often as possible. If you see signs of Anthracnose, remove any diseased fruits and spray with copper to slow
the spread of the disease.
as plants begin to set flowers. Note the yellow surrounding the dark spots.
Other Diseases:
There are a wide range of diseases affecting garden plants from wilts and leaf spots, and from bacterial to
viral diseases. The most important aspect to dealing with disease is speed – the faster you catch a disease,
the easier it is to manage. If you feel that something about one of your plants doesn’t look right, let someone
know as soon as you can, so the correct action can be taken quickly and effectively.
Blossom-end Rot: This fruiting plant malady is not actually a disease, but a physical response to variations
in soil moisture and air temperature – certain conditions that restrict the uptake of calcium from the soil,
causing a black scab to form on the blossom end of affected fruits. This condition does not spread, but it can
be minimized by mulching young plants with straw to keep soil temperatures and moisture levels even. This
generally only affect the early fruits and later fruit sets will be fine.
19Disease Prevention
Techniques
Why Do Crops Get Diseased?
A healthy garden requires both healthy soil and healthy plants. Generally a diseased crop means that
something is out of balance – it could be unbalanced soil fertility, too much water, an insect problem,
physical damage to crops, or the disease could have been brought in from outside sources (diseased
transplants, tobacco use in the garden or carried in by wind). Some diseases, like early blight in tomatoes,
are so common they are difficult to avoid.
Prevention Techniques:
The best time to deal with a crop disease is before you see any signs.
Take a soil test, balance out your soil fertility, use proper crop spacing, practice crop rotation, control weeds
and insects, time your plantings to avoid weather that can harm your plants and spend time just looking at
your crops so you can see changes and growth patterns. These simple steps will go a long way towards
preventing disease in your crops.
The chart below (Plant Disease Triangle) shows that you need three things for disease to show up – first you
need the disease itself (pathogen – fungi, viruses and bacteria are the most common); second you need the
proper host plant; and third you need the right conditions for the disease to spread. If you can stop any of
these three factors, you will not see disease problems. Here are a few examples:
1) If your garden has a history of a certain disease (say, Tobacco Mosaic Virus in peppers), you might
consider selecting pepper varieties that show resistance to that disease – information you can find in
many seed catalogs or from Cooperative Extension.
2) If you know that fungal diseases thrive on wet leaves, you might consider drip irrigation on crops to avoid
wetting the leaves when watering.
3) Bacterial Wilt is a common disease in cucumbers and
melons. It is spread by cucumber beetles (and
some other insects), so controlling your cucumber
beetles will reduce your risk of the disease in your
garden.
The more you can learn about garden diseases, the
better you can prepare your garden to avoid them.
20Organic Insecticides and
Pesticides
What are Organic Pesticides?
A healthy garden requires both healthy soil and healthy plants, but sometimes pests will get the better of
even the healthiest of gardens. In these cases there are a variety of products that can help reduce the
numbers of pests and help the gardener still see a healthy harvest.
Organic pesticides are generally derived from natural sources, and while they are very effective against their
target insects, they break down quickly in garden so there is little risk of accidental exposure. Many organic
insecticides are “pest specific” meaning that they are only effective against a particular pest and will not
harm the many beneficial insects (or other animals – birds, toads, pets, etc.) in the garden.
As with all garden sprays, organic pesticides should only be used when needed. Proper fertility, garden
maintenance, plant spacing and weed control will help encourage strong plants that do not attract pests
(stressed plants will often release chemical signals that attract pests).
Tips:
Get to know the insects in your garden – many insects are beneficial, meaning that they are working towards
the health of the garden either by pollinating flowers or by actively eating pest insects. Before you spray
anything, check to make sure if the insects you see are friend or foe!
Pay attention to pests you are attempting to control. For example, spraying for beetles before you see them
doesn’t really help—most pesticides that work on beetles kill on contact—you need to spray the bug itself to
have an effect.
Read labels to understand how a spray works and can be used most effectively.
USE CAUTION!
With any spray, be careful about the time of day. Spraying when the sun is at its hottest can burn plants—
the spray droplets will heat up on the leaves and potentially cause burning.
Try not to spray when bees and other pollinators are active – a healthy garden needs its beneficial
insects. As day becomes dusk, after the sun has set, is one of the best times to spray to reduce harm to
beneficial insects.
If you are not seeing the control you want, please check in with Grow Your Own staff – there may be
other products that can help or other solutions to the pest problem.
21Organic Insecticides and Pesticides,
continued
Which do we recommend?
Bt is derived from bacteria and is very effective to control caterpillar pests. As it must
be eaten by the caterpillar to be effective, Bt has very little effect on the rest of the
garden ecosystem and, in fact, is completely harmless to mammals (people, dogs, cats,
etc.). Bt is used primarily to control cabbage worms in broccoli, kale, cabbage and
Brussels sprouts.
Spinosad is also a bacterial insecticide, but is listed for a wider range of pests
including caterpillars, potato beetle larvae, corn borers, some beetles, thrips and spider
mites. Like Bt, Spinosad is harmless to birds and mammals.
Insecticidal Soaps are fatty acid soaps that smother soft bodied insects like aphids,
thrips, whiteflies, mites and young leafhoppers. It is a “contact” insecticide, meaning
that it must make direct contact with the pest to be effective.
Neem Oil is an oil derived from the Neem tree. It is unique in that it has both
insecticidal and fungicidal properties. Like soaps, neem oil is effective against soft
bodied insects (not adult beetles or true bugs). Used on aphids in tomato and pepper
crops, it will also help guard against early blight.
Pyganic is a broad spectrum contact insecticide, meaning that it will affect most any
insect that gets sprayed, including beneficial insects and bees. Pyganic is best used in a
targeted way (spraying a specific pest) to reduce damage to beneficial insects in the
garden – use only when other means have failed. Derived from natural poisons in
chrysanthemum flowers, Pyganic will break down quickly in the garden, but when fresh,
it is dangerous to both birds and mammals – use with care!
Sluggo is a mineral-based bait for controlling slugs and snails. It is safe to use and has
some fertility benefit when it breaks down.
22Organic Fungicides
What are Organic Fungicides?
A healthy garden requires both healthy soil and healthy plants, but
sometimes diseases will get the better of even the healthiest of gardens. In
these cases there are a variety of products that can help stop or slow the *Remember*
effects of disease and help the gardener still see a healthy harvest.
All the sprays and
Organic fungicides fall into two categories: biological fungicides and mineral
amendments we use in the
fungicides.
Biological fungicides are living strains of fungi and/or bacteria that kill or Grow Your Own program are
out-compete the disease organisms when sprayed on the leaf surface of approved for use in organic
plants. These are generally very safe to use and are best used in a agriculture to help promote
preventative manner – before you start to see disease symptoms. the health of our gardens and
Mineral fungicides attack disease organisms directly, killing them or those who eat from them.
stopping their ability to spread. Copper and sulfur are the two most common Other organic fungicides are
mineral fungicides. These must be applied with care because it is not healthy
available – please check with
for humans to breathe these minerals directly – fruits and vegetables
sprayed with mineral fungicides should be washed before eating. Grow Your Own staff if you
need help finding a product
As with all garden sprays, organic fungicides should only be used when
needed. Proper soil fertility, crop rotation, garden maintenance, plant for your needs.
spacing and weed control will help encourage strong garden plants that can
stand up to disease.
Which do we recommend?
Serenade is a biological fungicide that works best as a preventative spray. For tomatoes, we recom-
mend weekly applications of Serenade starting when plants set their first fruits. Most seasons, this
spray plan will ensure a healthy crop of tomatoes by greatly slowing the development and spread of
early blight.
Cueva Copper is a liquid form of copper octanoate that is effective against a wide range of fungal dis-
eases including tomato blights (early and late), anthracnose, bacterial spot, powdery mildew, apple
rust, fireblight, and many others. As large amounts of copper can be bad for soil health, copper sprays
should only be used when disease is present or weather conditions are right for severe disease devel-
opment. Talk with a Grow Your Own staffer before using copper sprays.
Green Cure is a mineral fungicide that works well for stopping the development of powdery mildew on
squash, cucumber and melon plants. Potassium Bicarbonate is the active ingredient and it should be
sprayed weekly as soon as you see signs of the disease.
Neem Oil is more commonly used as a pesticide, but it also has fungicidal properties. If you need to
spray a crop for aphids, thrips or whiteflies, using neem oil would have the added benefit of warding
off disease development.
23Organic Weed Control
Why Control Weeds?
Weeds compete with crops for water, soil nutrients and sunlight. In general, weeds are much more
aggressive and successful at fighting for these needed elements,
and cultivated plants suffer with poorer health and lower yields.
What is our favorite weed
Plants that are weak from weed competition are also more prone
to diseases and insect damage. control method?
MULCH!
Weeds can severely impede air circulation around crops. This can
Mimic the
create very humid conditions that promote fungal growth and plant
diseases. forest floor and its layers.
Block out light, cut down on weed
Unmanaged weeds can provide habitat and a food source for many germination, and minimize water
crop pests. On the other hand, carefully selected plant species, evaporation. By protecting the soil
grown among your crops, can provide food and shelter for a wide
surface, you need to weed and
variety of beneficial and predatory insects.
water less.
When Should I Control Weeds?
The sooner the better! Weeds are easiest to knock back when they are small (preferably before you even
see them).
Do not allow weeds to go to seed! This is difficult, but many weeds create thousands of seeds on each
plant creating a weed seed bank in your soil that can last for decades.
When mulching, lay your mulch as soon as possible after tillage or cultivation to discourage weed growth.
Even tiny weed seedlings can find their way through a thick mulch if you let them sprout before mulching.
Remember that each time the soil is disturbed (planting, cultivating, tilling), new weed seeds are
encouraged to germinate. Always hoe as shallowly as possible.
24Organic Weed Control,
How Do I Control Weeds?
Hand Hoeing – the best weed control for gardens. The best hoes allow the user to stand up
straight while hoeing, reducing back strain. Also a hoe that slices with a sharpened edge
works best. Stirrup hoes, Swan-neck hoes and collinear hoes are some common types. You
are unlikely to find good quality cultivating hoes at local hardware stores – GYO can help
you locate a good source.
Wheel Hoes – cultivating blades mounted on a set of wheeled handles. The blades are
generally wider than hand hoes and allow the farmer to quickly cultivate pathways and
between rows of crops. Again, must be kept sharp to be most effective.
Rototillers – For weed control, shallow cultivating with a rototiller (either walk behind or
tractor pulled) can be very effective.
Mowing – For tall weeds or “green” pathways, blade mowers and string trimmers can keep
the growth short, reducing crop competition and maintaining good airflow. Be careful that
flying bits of weeds do not damage or blemish crops.
Organic Mulches – Organic mulches (leaves, straw, grass clippings, newspaper, etc.) do not
only suppress weeds, but also help to cool the soil and keep the soil moist beneath crops.
Apply as soon as possible after disturbing the soil for maximum weed control. Mulches can
also keep crops clean, by reducing soil splashing during rains. They are also a great source
of organic matter for soil health.
Plastic Mulches – create a barrier to weeds, but also to water – should be used together with
drip irrigation. Also warms the soil, helping the growth of warm weather crops in the
spring.
Hand Weeding – often necessary when weeds “get away” or when weeds grow up through
and around mulches. Be careful to disturb crop roots as little as possible.
Flame Weeding – uses a propane torch to destroy the cell structure of young weeds, killing
them without disturbing the soil. These can also damage garden crops – use with great
25Prevention and Control:
When is a Problem a Problem?
Your garden is part of the larger living system. It does not exist in a
vacuum, a blank space where just the things we intentionally planted
spring forth to live alone. The earth is composed of many interlocking
ecosystems that all combine into a working whole. Ecosystems fluctuate,
go in and out of balance, change, develop and grow. And every creature,
cockroaches included, has its place.
Plants have been around for a long time; adapting to changes and
conditions and so have insects, bacteria, viruses and microbes. As
gardeners, we strive for healthy plants, those that can defend
themselves from pests and disease. We seek to create a balance.
However, sometimes systems get out of balance. Systems can naturally
correct themselves without our intervention, but sometimes the scale is
tipped too far in one direction and stepping in with sprays, traps, or
other methods to reduce pest populations are necessary. BUT
everything we do will effect something else in the system in addition to
the problem (a pest) we are trying to correct, from threatening honey
bees or birds, to changing the bacterial composition of the soil.
Depending on severity of damage, amount of pests present, we will
choose different control methods.
To effectively intervene in a system, it is useful to know how a pest Spend time with your plants.
functions. This requires a basic understanding of lifecycles and when Interrupting lifecycles works—
damage occurs. turning over leaves, crushing
Do the larvae cause damage or adults? Where and when do the pests lay eggs, or knocking them into
their eggs? What plants do they effect? Do they over-winter (wait out soapy water prevents the next
the cold until next season to feast again) in old crop debris or in the soil? generation from hatching.
Adults insects lay thousands of
eggs during their short
lifetimes, so any adults killed
reduced the next population
significantly.
26Safe Spraying
Sprays and insects:
Some of the sprays recommended in this manual are “pest specific” meaning they will not
harm bees or lady bugs but rather a certain pest. But other sprays we mention, such as
pyganic can do a great deal of damage to beneficial insects such as bees ,wasps, and
butterflies. Some sprays must touch the pest directly, while others will be effective as the
pest crawls around. Know the pest in question, try physical control methods before
attempting chemical controls. But if you must spray, take caution!
Spray with Caution!
Even organic pesticides and fungicides can harm you if breathed or swallowed.
READ THE LABEL of anything you spray.
Use the right amount of chemical to water ratio’s.
Keep all chemicals out of reach of children!
Wear protective clothing; long sleeves and pants.
Use gloves, dust masks and eye protection.
Wash your clothes, hands, and face after spraying!
Be aware of pets and children in the garden during and after spraying.
What to Avoid:
— Avoid drift. Drift refers to chemical particles ending up where you did not intend—instead
of coating your tomato plants, the particles blow in the wind to neighboring habitats.
Besides being harmful to humans and the environment in general, drift is bad for
beneficial insects and can destroy their habitats.
— Avoid spraying on windy days!
— Avoid spraying when it is about to rain, as all your hard work will be washed off.
Avoid spraying in mid day; water droplets can magnify sunlight, burning plants.
Avoid spraying in mid day to protect beneficial insects. Spraying in the dusk of the day
after sunset assures that sprays will dry before bees land on plants.
27Cover Crops: An Overview
What are cover crops?
Cover crops can be legumes or grasses planted prior to, or following, a harvested crop primarily for seasonal
soil protection and nutrient recovery. Cover crops protect soil from erosion and
recover/recycle phosphorus in the root zone. They are grown for one year or less.
Why should you grow cover crops?
Control wind and water erosion during periods when the harvest crop doesn’t create adequate soil cover
and reduce surface runoff
-Add diversity to your garden and create habitats for beneficial insects
-Improve soil health and structure by breaking up soil and recovering phosphorus and other nutrients in the
root zone by plant uptake
-Add organic matter when tilled or chopped into the garden
-Increase Nitrogen through legumes for healthy plant growth
How much of a cover crop do you seed?
The cover crop needs to be dense enough to protect the soil surface. The key is to distribute seed evenly
over bare soil areas. Timely planting is important to minimize the time between crop harvest and cover crop
panting. Seed catalogues will tell you how much to plant per 100 square feet.
Which cover crop to choose?
Soil protection that will die in winter – Oats, Cowpeas, Sorghum, Millet
Soil protection that will NOT die in winter—Barley, Wheat, Rye
Builds Nitrogen— Leguminous crops; Sweet Clover, Crimson Clover, Soybeans, Summer Alfalfa—all of these
need to be mowed and tilled into soil
Smothers weeds— Buckwheat, Sorghum
Breaking hard soils— Daikon Radish, Sweet clover
28You can also read