Tray-It-Forward 2020 A Guide to Starting Your Own Garden at Home - Kearsarge Food Hub
←
→
Page content transcription
If your browser does not render page correctly, please read the page content below
Tray-It-Forward 2020
A Guide to Starting Your Own Garden at
Home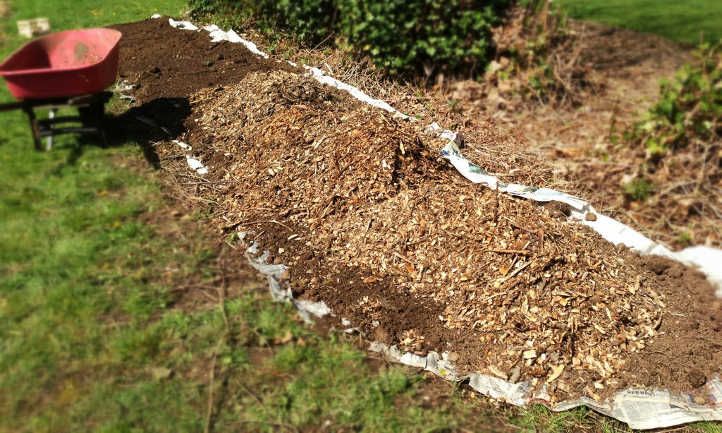
How to Prepare a Garden
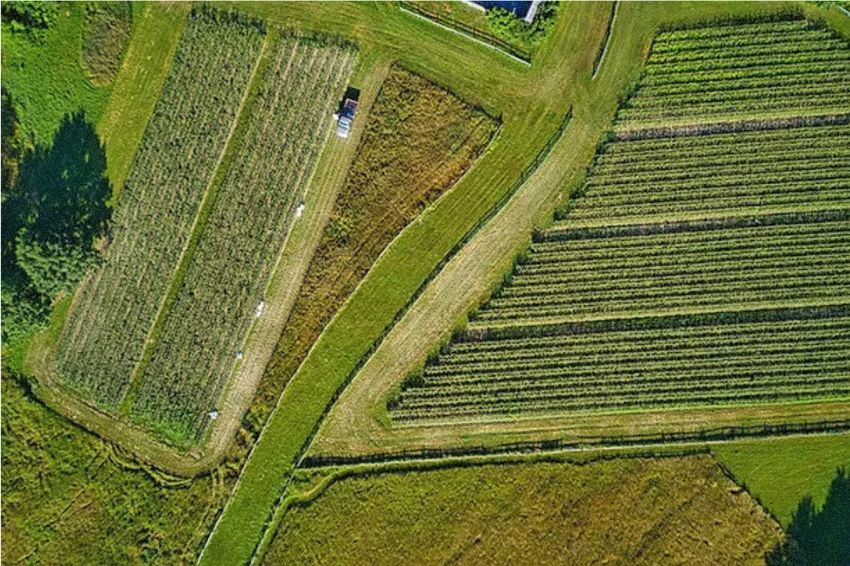
Site selection:
Find a sunny spot that is receiving 8-hours of full sunlight. If
you are unable to find a spot with direct sunlight consider
growing more shade tolerant crops, such as greens, lettuce,
and spinach. Try to avoid low lying areas or areas that tend
to accumulate rainwater because plant roots need oxygen.
Avoid planting around the perimeter of old houses or
buildings. Before 1978, there was no regulation on lead
paint. If there are any paint chips in the surrounding soil it
would contaminate the soil. Make sure that your vegetable
garden is easily accessible for both you and the watering
system.
Choose the Garden Format:
We have prepared a garden plan that includes all of the
crops that you received in your Tray-It-Forward bundle. We
hope that this plan will help you create a healthy garden
space that you will be proud to harvest from. This garden
will be broken up into three different sections: A Sicilian
Garden, a Roots and Greens Garden, and a Brassicas and
Squash Garden, as seen on the next page.
Potential Layout for Your Garden!
BOX 1. Sicilian Garden                BOX 3. Brassicas and Squash
Tomato 'Early Girl'      x1               Yellow Squash                x1
Tomato 'Mariana'         x2               Winter Squash ‘Delicata’    x1 or 2
Tomato 'Sun Gold'        x1               Broccoli                    x2
Tomato 'Celebrity'       x1               Red Cabbage                 x2
Tomato 'Sweet Million'   x1               Green Beans                 x5 or 6
Pepper 'Lady Bell'       x2               Marigold                    x1
Basil 'Genovese'         x2               Dill                        x2
Cilantro                 x1
Oregano                  x1
Verbena ‘Imagination’    x1        Test the Soil:
                                   Test the soil for pH if you are able too; vegetables grow best
                                   in a pH of 6.5-6.8. The soils in New Hampshire tend to be
                                   more acidic (pH 5.0-6.0). To raise the pH, add lime or wood
      BOX 2. Roots and Greens      ash. To lower the pH, add organic materials such as
Kale 'Red Russian'       x1        compost.
Kale 'Winterbor'         x1
Cucumber                 x2 or 3
Lettuce Mix              x3
                                   Prepare Ground for Planting:
Zucchini                 x1        Most vegetable gardens start out as a lawn and, therefore,
Beets 'Red Ace'          x1 or 2   grass and any weeds will need to be removed. There are two
Onion 'Sweet Spanish'    x2        simple and effective ways to remove perennial weeds and
Onion ‘Red’              x1
                                   grasses: tillage and mulching. These are both most effective
Alyssum 'White'          x1
                                   in the early spring before the grass starts to grow again, or
Alyssum 'Mix'            x1
                                   after it has been cut very short. Pests from the lawn (insects)
                                   may live in the garden that is immediately planted after the
                                   lawn is tilled. It is best to start the tilling process the fall of
                                   the previous season. The extra time would allow for the
grasses and weeds to die and the insects would be less          Mulching:
intrusive. You can till the soil in the same year you want to
plant if you start before the grass begins to grow.

Tillage:

                                                                     Mulching technique using newspaper, mulch, and dirt.

                                                                You can remove weeds through mulching. Mulching will
                                                                cover all weeds, preventing them from receiving sunlight.
   The Double Digging Technique (Courtesy of UMN Extension)     The grasses and weeds have root systems that allow them to
                                                                grow back easily and invade your garden. However, if you
You can remove the weeds by hand or with the use of             mulch on top of this growth, these harmful weeds will turn
equipment. A shovel, spade or metal rake can be used for a      into an organic layer. Mulching requires that you add a thick
small plot, using the double digging method. This method        layer of compost and soil to block out sunlight reaching the
can be time consuming for larger plots but will work well in    plot for a period of several weeks to a few months to turn
the plan we have prepared for you! Plan to till the soil        the lawn and weeds into soil. Ideally, this would be done in
approximately 2-3 weeks before you start planting, this will    the fall to allow a whole winter for the material to break
ensure that all weeds and grass has been killed.                down, but we can also do it in spring as long as we can add a
                                                                good layer of soil and compost.
After laying out the shape of the bed loosen the grass with a
fork (do not dig it out or remove it). Add some worm tea,
                                                                  How to Cultivate and Care for
coffee grounds and fresh compost. Then add a 1-inch layer
of wood chips and shredded leaves. If you have access to
                                                                  Your Plants
green material like freshly cut clover or freshly cut grass add   BOX 1. Sicilian Garden
a layer on top of the leaves. Soak the layers with water as
you build it up. When you do this in spring, you’ll need to         Plants in this box like sunshine and heat. Tomatoes and
add a layer of soil and compost to block the light from           Peppers are both in the same family, and Basil is an excellent
reaching the layer of grass and to provide a growing medium                 companion crop to grow with Tomatoes
for our plants. Add a six inch layer of soil mixed with
compost (50/50) and top it off with a thin layer of compost.      Tomatoes (Includes ‘Early Girl’, ‘Mariana’ (paste
Now add a layer of wet newspaper over the whole bed               tomato), ‘Sun Gold’, ‘Celebrity’ and ‘Sweet
(about 4 sheets of newspaper). Top it off with a layer of
                                                                  Million’):
straw.
                                                                  Planting: Tomatoes can develop roots on their stem – they
Now you are ready to plant into the soil by making a small
                                                                  benefit from being planted deeply. Dig a hole that is 2x the
opening in the newspaper layer.
                                                                  size of the root ball (the part that is in the container). Make
                                                                  sure that the hole is deep, so about 4 inches of the plant is
Cover the soil:                                                   above ground. You can trim off lower leaves that will be
Mother Nature does not like to be naked! Always keep your         under the soil. Next, gently fill in the hole with the
soil covered. In fall you can plant a crop like Oats that will    surrounding soil. Make gentle indents at the base of the
die in winter and leave you with a nice mulch cover. Use          plant. Theses indents remove any air pockets in the soil.
shredded leaves or straw to cover the soil if you do not have     Next, you want to take your tomato cage and place it, so the
plants in the ground.                                             plant is in the center. Now, water your plant and be sure to
                                                                  create a little puddle of water around the plant.
                                                                  (Tomatoes can be “indeterminant” – they grow like a vine
                                                                  and you need to stake them or let them grow in a tomato
                                                                  cage, or “determinant” – they grow like a low shrubby bush.)
Spacing: Plant each tomato plant 18 inches apart. Fertilizer/Compost: Peppers prefers soil that is slightly
acidic, with a pH of 5.5-6.5. Add compost to the soil about 1
Watering: Make sure that you water frequently and keep
week before planting seedlings.
the soil moist.
Harvest: Peppers are ready to harvest once they reach your
Fertilizer/Compost: Prefers soil with a pH of 5.8 – 7.
desired color/size. Peppers will change from green to
Tomatoes are heavy feeders. Add half a cup of organic
red/orange as they ripen. The more peppers ripen, the
fertilizer every 2 weeks.
sweeter they become. They will also have higher levels of
Harvest: Tomatoes will be ready to harvest when the fruit is vitamin C as they ripen.
a deep red.
Storage: Peppers can be refrigerated in plastic bags for just
Storage: Tomatoes should be stored at room temperature over a week.
in a place away from sunlight. They have optimal flavor
when not refrigerated but should be refrigerated if not used
Basil
within a week of harvest.
Basil is a great companion for tomatoes. They also like warm
weather and they tend to keep insects away. Many recipes
Peppers (Includes Lunchbox and Lady Bell)
include both basil and tomatoes, so you can harvest them
Planting: Wait to plant peppers outdoors until nighttime together.
temperatures reach around 60°F. Place them in a hole about
Spacing: Seeds/seedlings should be planted approximately 8
two times the diameter of the root ball. Fill in the hole with
inches apart. Plant them on the sunny side of the tomato
dirt, making sure to compress the dirt around the base of
plants so they are not shaded out.
the plant to remove air pockets. Water plants right after
transplanting. Once pepper plants begin to grow, they may Watering: Soil should remain moist to the touch, as basil
need cages/poles to help support the weight of the plant. likes moisture.
Spacing: Plant each pepper plant 12 inches apart. Fertilizer/Compost: Compost soil prior to planting basil.
Basil can be fed organic fertilizer every 1-2 weeks.
Watering: Add 1-2 inches of water to pepper plants every
week. Peppers are sensitive to heat, so warmer summers Harvest: Harvest as soon as plants are 6-8 inches tall.
may require daily watering. Harvest leaves regularly to encourage plant growth. Leavesare their juiciest in the morning. Pinch off the flowers that Cilantro
form at the top of the pant to encourage more leafy growth.
Planting: Remove plant from planter. Don’t split the plants
Storage: In addition to being used fresh or in pesto, basil can apart – there are meant to be multiple plants in the soil cell.
be frozen or dried in a well-ventilated area. Place in a hole larger than the root ball, cover and firmly
press on soil around base of the plant, and water. Cilantro
Oregano will go to seed quickly, do not worry! Cilantro will sprout
new plants throughout the growing season!
Oregano is a great companion plant for any vegetable
garden. Spacing: Provide cilantro with 8 inches of space from
surrounding plants.
Planting: Plant after last frost. Remove plant from planter.
Place in a hole larger than the root ball, cover and firmly Watering: Water seedlings weekly. Once plants become
press on soil around base of the plant, and water. Trim established water less frequently, over watering could harm
oregano regularly to prevent it from becoming leggy. the plant.
Spacing: Give oregano approximately 12 inches of space Fertilizer/Compost: Fertilize once or twice per season with
from surrounding plants. nitrogen rich fertilizer.
Watering: Oregano requires less water than other herbs, Harvest: Harvest as needed. Cilantro seeds are also known
water when soil feels dry to the touch. Oregano prefers to as coriander, a popular cooking spice. Let cilantro go to seed
be watered thoroughly and infrequently. to harvest coriander.
Fertilizer/Compost: Compost and manure soil prior to Storage: Cilantro and coriander can be dried or frozen. To
planting. dry, hang cilantro in a sunny location. To dry coriander,
place seed heads in a paper bag and hang it in a sunny
Harvest: Harvest as needed. Leaves often have the most location as well.
flavor before the plant flowers.
Storage: Oregano can be frozen or dried. To dry, leave in a
dry location that receives sunlight, such as your windowsill.BOX 2. Roots and Greens. Beets
This box will have root crops and greens. These plants Planting: Ensure that the soil that you are growing your
require a good deep soil and compost, but not a great deal beets into is free of rocks, this will ensure even growth! Like
of fertilizer. The onions, beets, and lettuce can be planted onions, create small indentations every 6 inches and place
early in the season – they can tolerate some frost. bulbs about an inch below the surface. Cover in dirt and
then water.
Onions (Includes Red and Sweet Spanish) Spacing: Provide beets with approximately 4 inches of space
Planting: Create small indentations in the soil every 3 between each bulb.
inches. Plant onion bulbs about an inch into the soil. Watering: Beets require moist soil. Water heavily once a
Mulching between rows with straw or grass clippings will week.
help retain moisture and fend of weeds.
Fertilizer/Compost: Beets prefer soil that has a pH of 6.0-
Spacing: Plant onions approximately 3 inches apart from 7.0. Avoid using fertilizers/compost with high levels of
each other. nitrogen. This will create a lot of foliage and small bulbs.
Watering: Make sure to water the plants regularly and keep Harvest: Beets will be mature about 2 months after planting.
the soil moist. Harvest beets when they are golf ball sized or larger.
Fertilizer/Compost: Add manure prior to planting onions. Storage: Beets can be stored 5-7 days in a refrigerator. Beets
When planting, add nitrogen rich fertilizer. Apply nitrogen can also be stored in a root cellar environment for longer
rich fertilizer every few weeks to raise larger onions. term storage. Make sure to clean dirt off the roots and cut
Harvest: Plants will be ready about 100 days from sowing the greens off the tops. The greens can be eaten as well.
seeds. Bend tops down. Pull the bulbs and cover with foliage
to avoid them getting sun burned. Allow the onions to cure Lettuce Mix
in the garden for a week. Bring the onions inside and have
them cure in a warm dry place. Cut the tops of the onions Planting: Lettuce does not compete well with weeds.
leaving about 1 inch above the bulb. Planting lettuce close together will help to fight against
weeds! Seedlings can be transplanted once they have 4-6
Storage: Store in a cool dry location.leaves. Remove lettuce from planters and transplant them Remove root ball from planter and transplant into a hole
into a hole larger than the root ball. Add soil and press firmly larger than the root ball and cover the soil until it reaches
around the base of the plant to remove air pockets. Water the base of the leaves. Compact the soil around the base of
gingerly and your lettuce is ready to grow! the plant and water thoroughly.
Spacing: Place lettuce plants approximately 6 inches apart Spacing: Place plants 12 inches apart.
from each other.
Watering: Thoroughly water the plants when first planted
Watering: Keep plants well-watered during the growing and continue watering through the season. The soil should
season. be moist but not soggy and saturated.
Fertilizer/Compost: Add compost one week prior to Fertilizer/Compost: Kale prefers soil with a pH of 6.5-6.8.
planting/transplanting. Add nitrogen rich compost 3 weeks Nitrogen rich compost should be added to soil prior to
after transplanting. planting. When planting, add 1.5 cups of organic fertilizer or
blood meal for every 25 feet of garden. Continuous feed
Harvest: Pick lettuce early to avoid having it become bitter
plant food should be added regularly.
and tough. Harvest loose-leaf any time the leaves are large
enough. Cut about half an inch above the soil and let then Harvest: Pick the outer leaves when they reach 6-8 inches
regrow for multiple harvests. long about 55-60 days after planting. Leave the central bud
to continue to grow.
Harvest butterheads anytime the heads are large enough.
Cut butterheads below the crown. Storage: In a plastic bags or containers in the refrigerator,
you can add a moist paper towel to help keep the plants
Storage: In a plastic bags or containers in the refrigerator,
fresh. Steamed and chopped broccoli keeps well in a freezer.
you can add a moist paper towel to help keep the plants
fresh.
Cucumber
Kale (Includes Red Russian and Winterbor):
Planting: Cucumbers are susceptible to frost damage and
Planting: Kale is tolerant to cooler temperatures and can be should be transplanted a few weeks after the last frost. They
planted in the early spring and even in the fall. Kale is said to like warmth and will reach maturity faster in
have a better taste when matured in colder temperatures. warmer/sunnier locations. Like previous plants, removefrom planter and place into a hole larger than the root ball, Storage: Since cucumbers are mostly water, retaining
firmly press soil around base of the plant, and then water. moisture is very important. Wrap cucumbers in plastic wrap
Don’t split the plants apart – there are supposed to be 2 and refrigerate. Cucumbers should last 10 days like this.
plants in the soil cell. Do not disturb the roots. Cucumbers
are prone to transplant shock.
Zucchini
Spacing: Provide 24 inches of space around the cucumber Planting: Like previous plants, remove from planter and
plant, allotting room for the plant to trail out into place into a hole larger than the root ball, firmly press soil
surrounding yard or around the base of other plants. The around base of the plant, and then water. Don’t split the
ground cover of the cucumber vine will prevent water from plants apart – there are supposed to be 2 plants per cell.
evaporating out of the soil. Zucchinis can also be grown on hills, which will provide more
space for vines to grow.
Watering: Water frequently, about a gallon of water per
week is recommended. Hotter days may require more Spacing: Plant seedlings 2 to 3 feet apart. Zucchini can be
water. planted on mounds as well. Place seedling at the top of a
mound, allowing the plants to grow downhill.
Fertilizer/Compost: Cucumbers prefer fertile soil, add
compost and manure before transplanting, ensuring that Watering: Water frequently, particularly once plant starts
compost is mixed about 6 inches into the soil. Side dress producing fruit. Water deeply at least once a week, allowing
manure if needed. soil to pool about an inch of water.
Harvest: Make sure to harvest cucumbers before they Fertilizer/Compost: Zucchini are heavy feeders. Add
become too large, as they may become bitter. Cucumbers compost to soil prior to planting/transplanting. Fertilize
can range 6-10 inches based on what they are being used occasionally after harvest begins. Misshapen fruit could be
for. Cucumbers also grow quickly and should be harvested indicators of not enough water/fertilizer.
every couple of days. Consistently harvest cucumbers to Harvest: Harvest when zucchini is about 8 inches in length.
ensure that the plant will continue to produce. Leaving Smaller fruit will have an overall better taste. Consistently
cucumbers on a vine will prevent the plant from producing. check zucchini during the growing season. Cut vine to leave
an inch of stem on the fruit. Consistent harvesting willensure a larger overall yield. Can be stored unwashed in a Fertilizer/Compost: Winter squash are heavy feeders. Add
refrigerator for over 10 days. compost to soil prior to planting/transplanting. Fertilize
occasionally after harvest begins. Misshapen fruit could be
Storage: When stored in a cool place (50°F- 60°F) zucchini
indicators of not enough water/fertilizer.
can last for 4-6 months.
Harvest: Harvest once the fruit is matured (about 75 days).
The skin will be dull and hard to puncture with your
BOX 3. Brassicas and Winter Squash.
fingernail. To harvest cut stem with shears. Leave a 2-3-inch
Winter squash will need space for the vines – make sure you stem on the fruit.
have space behind the box where vines can run over a lawn Storage: Leave in the sun to allow for the skin to harden.
or open area. The front of the box is designed for plants in Store in a cool dry place.
the brassica family (broccoli, kale, cabbage etc.). The dill in
this bed attracts pollinators and predatory insects to keep
cabbage moths at bay. Red Cabbage
Planting: Make sure that cabbage is planted in soil that
Winter Squash (‘Delicata’) drains well. Poor draining soil will cause the roots to become
Planting: Like previous plants, remove from planter and water bound, causing the head of cabbage to split. Like
place into a hole larger than the root ball, firmly press soil lettuce, transplant into a hole that is deep enough to have
around base of the plant, and then water. Don’t split the the leaves show.
plants apart – there are supposed to be 2 plants per cell. Spacing: Space the cabbage plants 18 inches apart as this
Squash can also be grown on hills, which will provide more will allow for air to circulate around the plant, which reduces
space for vines to grow. disease and insect problems.
Spacing: Space acorn squash approximately 24 inches apart. Watering: Make sure to keep your garden well-watered.
Watering: Keep soil well-watered, squash need about 1-2 Make sure that your garden soil is loose and well drained.
inches of rain or water every week during the growing Fertilizer/Compost: Prefer soils with a pH of 6.5-7.5. They
season. The soil should be moist. also prefer heavy fertilization. This can be done by adding
compost/manure to soil. Add a balanced organic fertilizer 2weeks after transplanting, and a nitrogen rich fertilizer 3 after harvest begins. Misshapen fruit could be indicators of
weeks later. not enough water/fertilizer
Harvest: The inner heads will be ready to harvest in about Harvest: Harvest when squash is yellow in color with a
90-100 days. glossy appearance. Cut or twist squash off plant, avoiding
denting or scratching of fruit as this will shorten shelf life.
Storage: Can be refrigerated fresh for upwards of 1-2 weeks.
If kept in cool, root cellar conditions, cabbage can store for Storage: When stored in a cool place (50°F-60°F) squash can
up to 3 months. Making sauerkraut with cabbage is easy, last for 4-6 months.
healthy and helps to store them for a long time
Green Beans
Summer Squash
Planting: Be careful when transplanting green beans into
Planting: Like previous plants, remove from planter and your garden as they have a fragile root structure. Don’t split
place into a hole larger than the root ball, firmly press soil the plants apart – there are supposed to be 1 or 2 plants per
around base of the plant, and then water. Don’t split the cell. Firmly press on soil around the base of the plant and
plants apart – there are supposed to be 2 plants per cell. water.
Squash can also be grown on hills, which will provide more
Like tomatoes, beans are also indeterminate or determinate.
space for vines to grow.
They can be grown as pole beans or bush beans depending
Spacing: Plant seedlings 2 to 3 feet apart. Squash can be on your preference and gardening space. Indeterminate will
planted on mounds as well. Place seedling at the top of a often provide a consistent yield throughout the season while
mound, allowing the plants to grow downhill. determinate will provide a larger yield towards the end of
the season.
Watering: Water frequently, particularly once plant starts
producing fruit. Water deeply at least once a week, allowing Spacing: Green beans should have approximately 8 inches
soil to pool about an inch of water. between plants.
Fertilizer/Compost: Squash are heavy feeders. Add compost Watering: Gently water the seeds once they have been
to soil prior to planting/transplanting. Fertilize occasionally planted. Continue to water through-out the season. Bushbeans will not produce blossoms if they do not receive blood meal for every 25 feet of garden. Continuous feed
enough water plant food should be added regularly.
Fertilizer/Compost: Bush beans prefers soil with a pH of 6.0 Harvest: Pick the broccoli head when it is well formed
to 7.0. Avoid fertilizers with nitrogen, as this will cause before it starts to flower. The broccoli will continue to
dense foliage with few bean pods. produce smaller side heads hat you can continue to harvest
all season long.
Harvest: Beans should be harvested when green and pods
break when bent. Storage: In a plastic bags or containers in the refrigerator,
you can add a moist paper towel to help keep the plants
Storage: Beans can be stored for about a week fresh. Store
fresh.
refrigerated in a plastic bag/container.
Dill
Broccoli
Planting: Remove root ball from planter. There are multiple
Planting: Remove root ball from planter. Transplant into a plants in each cell – no need to separate the plants.
hole larger than the root ball and cover the soil until it Transplant into a hole larger than the root ball and cover the
reaches the base of the leaves. Compact the soil around the soil until it reaches the base of the leaves. Compact the soil
base of the plant and water thoroughly. Warm temperatures around the base of the plant and water thoroughly.
will stunt the growth of broccoli, so an earlier planting is
preferred. Spacing: Provide 8 inches between dill plants.
Spacing: Place plants 18 inches apart. Watering: Water daily, make sure the soil stays moist.
Watering: Thoroughly water the plants when first planted Fertilizer/Compost: Dill prefers soil with a
and continue watering through the season. The soil should neutral/moderately acidic pH. Add compost to ensure soil
be moist but not soggy and saturated. contains healthy amounts of organic material.
Fertilizer/Compost: Broccoli prefers soil with a pH of 6.5- Harvest: Pick fresh leaves as needed from the dill plants.
6.8. Nitrogen rich compost should be added to soil prior to Storage: Leaves can be dried or used when fresh. Store
planting. When planting, add 1.5 cups of organic fertilizer or seeds in an air-tight container in a dark cupboard. Use the
flower heads for pickles.Companion Flowers Compact the soil around the base of the plant and water
thoroughly.
Add color and diversity to the garden by adding
Spacing: Provide 6 inches between alyssum and surrounding
flowers. These varieties of flowers attract beneficial
plants.
insects to help maintain a balance in the garden.
Watering: Water when soil feels dry to the touch or on
sunny days. Do not water in direct sunlight as water will
Verbena ‘Imagination’: burn the blossoms.
Planting: Remove root ball from planter. Transplant into a Fertilizer/Compost: Work in organic material prior to
hole larger than the root ball and cover the soil until it planting.
reaches the base of the leaves. Compact the soil around the
base of the plant and water thoroughly.
Marigold
Spacing: Provide 12 inches of space around verbena.
Planting: Remove root ball from planter. Transplant into a
Watering: Water when soil feels dry to the touch or on hole larger than the root ball and cover the soil until it
sunny days. Do not water in direct sunlight as water will reaches the base of the leaves. Compact the soil around the
burn the blossoms. base of the plant and water thoroughly.
Fertilizer/Compost: Work in organic material prior to Spacing: Provide 8 inches of space between marigold and
planting. surrounding plants.
Watering: Water when soil feels dry to the touch or on
Alyssum (Includes ‘Mix’ and ‘White’) sunny days. Do not water in direct sunlight as water will
Planting: Remove root ball from planter. Don’t split the burn the blossoms.
plants apart – there are meant to be multiple plants in the Fertilizer/Compost: Work in slow release fertilizer prior to
soil cell. Transplant into a hole larger than the root ball and planting or fertilize every time you water with a fertilizer
cover the soil until it reaches the base of the leaves. supplement.You can also read