INTUIT LACERTE QUICK START GUIDE - GruntWorx
←
→
Page content transcription
If your browser does not render page correctly, please read the page content below
INTUIT LACERTE QUICK START GUIDE
      Follow these instructions to sign up for the GruntWorx Free Trial and use Organize LITE, Populate LITE,
                     Organize, Populate, and Trades products with Intuit Lacerte tax software.

How to Set up a GruntWorx Account
>   From the GruntWorx.com homepage, enter email address and click FREE TRIAL!
>   Complete the Registration
>   Look for the sign-up email including the temporary password
>   Log in to the GruntWorx Portal and set up new password
>   Read and accept the master agreement and EULA

GruntWorx Dashboard Navigation

•   Each time a user logs in, a notification displays information about the current tax year, news or updates.
•   The logo in the top left corner takes user to GruntWorx Homepage
•   Welcome corner displays user’s name, option to Sign-Out, Download Agent link, a Help link which will turn on ?
    icons, Settings and Add To Balance.
•   Hovering over Add To Balance displays account’s current balance
•   The Info Banner provides information relating to using GruntWorx and the Current Expected Lead-Time. New
    notifications are displayed on the Info Banner when posted until the user dismisses the post.
•   Below the Peach Info Banner are buttons - Awaiting Populate Lite Jobs, Show Only Open Clients, Search/Find a
    Client, Add a Client, Import Multiple Clients, Filter Client Table and Tutorials.
>   In the top right-hand corner of the GruntWorx Dashboard,
    click Settings
Admin Settings
Firm Contact Information
• Update any firm details
• Click Save Firm Info to save any changes
Security Settings
• Set firm-wide Two-Factor Authentication settings here
• Adjust code sending protocol under User Settings
    • New users must select 2FA code protocol at first login
• Click Save Security Settings after making any changes
Default Settings
• Select Intuit Lacerte as Tax Software
• Set firm-wide job preferences:
    • Option for default Trades product (User can select alternate
        trades on a per job basis)
    • Repaginate Organized Documents default option
• Click Save Default Settings after making any changes
Manage Accounts
•   Add or edit accounts as needed to the Manage Accounts tab.
    Most often this is used for firms that have multiple locations.
    A default account is provided – Clients – but the name can be
    edited anytime under Manage Accounts.
Manage Users
•   Add or edit users in the Manage Users tab. Make any user an
    Admin on the account, option to enable job cost display on
    Dashboard, get two-factor authentication code if needed and
    adjust account access permissions.
•   If a user’s account gets Locked, under Manage Users, click
    unlock user.

                                               Inventory
                                               •    Provides detailed job history and the account’s current
                                                    balance which can be exported to a CSV
                                               •    Run a Job Cost Report by selecting start and end dates and click-
                                                    ing download report

                                                        IMPORTANT: Admins must add users and give account
                                                        permissions to allow user access.

User Settings
•   Update User Contact Information at any time. This is used for
    GruntWorx to report any issues with jobs.
•   Job Status Notification preferences can be changed to text, email
    or no notifications
•   If enabled by the Firm Admin, Two Factor Authentication settings
    can be adjusted here
•   Click Update User Settings after making changes
•   Change the Default Display Tab in User Preferences
•   A Warn when balance is below field allowing the user to be alert-
    ed when the account balance reaches the selected amount.
•   Option to hide or display the Organize Lite tab. Organize Lite jobs
    can now be submitted from any tab or account.
•   Change Your GruntWorx Password here
TIP: Passwords expire every 90 days and must contain at least eight characters, mixed case and one number.
>   To continue set-up, click Download Agent from the GruntWorx Dashboard
IMPORTANT: The GruntWorx Agent is only needed for the Populate Lite and Populate products. The Agent should be
installed at each workstation where GruntWorx will be utilized.
>   Once the download is complete, run GWAgentSetup.exe (the file you downloaded) and select GruntWorx Agent
    for Intuit Lacerte.
•   Follow the prompts to complete installation
•   The Agent installation will ask the user to select the location of their Lacerte idata. If idata location is on a server,
    and the server is not visible in the location selector, choose the default location given and complete the Agent
    installation. Then contact GruntWorx Support to change the location.
IMPORTANT: Depending on the user’s IT policies and browser permissions, installation of the GruntWorx Agent may
require administrator rights and/or the assistance of firm IT personnel. In some cases, anti-virus software should be
temporarily disabled to allow a complete installation of the GruntWorx Agent software.

Considerations for Intuit Lacerte Users
>   Lacerte users must install the Intuit-provided Software Development Kit, or SDK
•   This tool allows the GruntWorx Agent to work with Lacerte
•   The SDK link is located on the GruntWorx Dashboard banner

>   To submit jobs from the GruntWorx Dashboard or to
    populate data from the GruntWorx-provided Pointsheet, users
    do not need to have the tax software open but if they do, should
    have the Lacerte Client tax file closed.
>   If the user receives an error stating the Agent cannot locate a
    client with a matching SSN, first check that the Client ID
    matches in both the tax software and GruntWorx.
•   If the Client ID matches, the user’s idata location may need to be
    corrected. Contact GruntWorx Support to assist.
TIP: The user may be prompted with an additional Lacerte login
during submission or population. Look for the Intuit Proconnect
Sign In screen behind any open windows. Not signing in will cause
proforma collection failure and the job will not process.

IMPORTANT: Minimum required fields in the client tax file:
Taxpayer and spouse name/s, SSN/s and filing status.
How to Submit Jobs
>   Add Clients
•   From the GruntWorx Dashboard, click on an icon to add
    client/s

                                                >    Add Single Clients
                                                •    Click on the      icon and
                                                     fill out all required fields

                                                IMPORTANT: Client ID must
                                                be identical to the Lacerte
                                                Client ID.

>   Add Multiple Clients
•   Click on the    icon to upload a .csv file.
•   Follow the instructions and template to create and import the file
TIP: Clients’ names and IDs can be edited prior to job submission by clicking
on the icon on the far right of the client row. Client information cannot be
edited for a job in process.
>   To submit client’s source documents: Click on the client’s name, then either
    drag and drop PDF files into the dotted box or click in the box to browse computer for PDF files.

IMPORTANT: Add up to 15 PDFs per client, 150 MB per PDF.

>   Once all files are uploaded, make product selections

•   Choose either Non-Validated or Validated
•   Non-Validated products are not reviewed by GruntWorx for accuracy. The documents are processed with OCR
    and Business Intelligence technology only.
•   Validated products process through OCR and Business Intelligence as well as human review by GruntWorx
    Validators. Make the choice of Organize Lite, Populate Lite, Organize or Populate.
•   Make Trades selections
•   Non-Validated products do not have the option to add a Trades product. However, Populate Lite has an option for
    Trades Summary within the self-validation tool. There is no need to add Trades Summary to Populate Lite during
    Product selections.
•   Validated products can have Extract All Trades or Trades Summary added. Or have No Trades extracted.
>   Once selections are made, click Submit

TIP: For Product and Pricing information, click a Help button.
>   For Populate and Populate Lite jobs, proforma collection will begin

TIP: After clicking Submit, a black window will appear on your screen. This is Intuit’s SDK running to allow access to
the client tax file in Lacerte.

TIP: The GruntWorx Agent will retrieve the client’s proforma data from the client tax file in Lacerte and submit the
job to GruntWorx. Client’s file must be closed during this time.

IMPORTANT: Any client with a Job Status of Not Started has not been submitted to GruntWorx.

•   This Status means something went wrong during the submission process. Either the Agent is not installed, the
    browser needs to be configured to run the Agent, the client file has password protection in the tax software, or
    the Client ID was not found in the tax software. Users should fix the issue, click on the client row and try to sub-
    mit again, making sure the tax software is open and the client tax file is closed.
•   Turn-around time during tax season is 1-3 days. During this time, users can click a link in the Peach Info Banner
    to view the current estimated lead-time. Estimated lead-times are updated daily.

When a Job is Complete
>   When a job is complete, a job completion text message or email notification is sent to the user if set up in User
    Settings. Log back in to the GruntWorx Dashboard and locate client.

•   If the site stayed open in the browser, the page will need to
    be refreshed, and sign in again
>   When Job Status is Completed, click on the client’s name
•   If Organize Lite or Organize was selected, there will be a PDF
    named bookmarked.pdf. If a Trades product was added to
    Organize, there will also be a Pointsheet.xls.
•   If Populate Lite or Populate, with or without a Trades product was selected, there will be a bookmarked.pdf and
    a Pointsheet.xls.
>   Simply click on either file name to download and open
•   The Pointsheet.xls file requires Microsoft Excel to view, edit and Populate
>   After opening the .xls file, the user will need to enable Excel’s macro feature
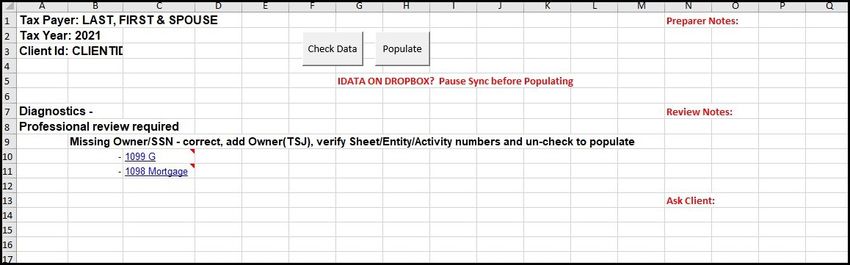
>   The user should then review the Diagnostics sheet

•   There may be comments or flags on certain pages added by GruntWorx Validators. It is recommended that the
    user check those pages thoroughly and make any necessary changes before moving on.

TIP: Users can review or edit the extracted data on each tab of the workbook prior to importing. If edits were made in
the Pointsheet, the user should click Check Data to verify field formatting is still correct.

TIP: Blue hyperlinks are provided with each form extraction and, when clicked, will bring the user directly to the cor-
responding page in the opened PDF.

IMPORTANT: Dropbox users will need to pause syncing prior to clicking Populate in the Pointsheet.
>   With Lacerte open, and the client’s tax file closed, click Populate on the Diagnostics tab of the Pointsheet
•   The Agent then populates the data into the client file. The Agent should be given the time to complete the
    import.
>   When the import is complete, open the client’s return.
•   Users can easily review or adjust any fields within the client’s file in Lacerte

              Tips for best scanning practices can be found here in this video.
                             For system requirements click here.

          If you have any problems or need additional help you can reach us at:
                      Support@GruntWorx.com • 877.830.6059
Supported Forms

                         Here is a list of all the supported forms for the
                          GruntWorx Organize and Populate services.
                                       Organize LITE & Organize

• W-2                     • 1099-A                     • 1099-NEC
• W-2G                    • 1099-B                     • 1099-PATR
• W2C                     • 1099-C                     • 1099-Q
• 1042S                   • 1099-CAP                   • 1099-R
• 1095-A                  • 1099-G                     • RRB-1099
• 1095-B                  • 1099-DIV                   • RRB-1099-R
• 1095-C                  • 1099-INT                   • 1099-S              • 5498-SA
• 1098                    • 1099-H                     • 1099-SA             • 5498-ESA
• 1098-C                  • 1099-K                     • SSA-1099            • Grantor Letter as 1041 K-1
• 1098-E                  • 1099-LTC                   • Consolidated 1099   • Supporting Tax Documents
• 1098-T                  • 1099-MISC                  • 2439                • Receipts

                                       Populate LITE & Populate

• W-2                     • 1099-INT
• W-2G                    • 1099-R
• 1095-A                  • RRB-1099
• 1098                    • SSA-1099
• 1099-MISC               • 1099-OID
• 1099-NEC                • Consolidated 1099
• 1099-B                  • 112OS K-1
• 1099-G                  • 1065 K-1
• 1099-DIV                • 1041 K-1

Please Note: 1099-MISCs, 1099-NECs, and 5498s are extracted
to the Pointsheet but not populated into Lacerte.
You can also read