KAT Implants System Surgical and Restorative Manual
←
→
Page content transcription
If your browser does not render page correctly, please read the page content below
KAT Implants™ System
Surgical and Restorative Manual

                                  Invented and made in USA. US Patents 8,398,400, 8,469,710 and 8,734, 155

                                                                                               Rev. 5
Contents
KAT System Implants........................................................... 1
KAT System Overview and Drilling Instructions..................... 2
Surgical, Restorative and Lab Kits ....................................... 3
Implant Placement Instructions........................................... 4
Prepable, Contoured and Angled Abutments........................ 5
Closed Tray Impression Technique........................................ 6
Open Tray Impression Technique.......................................... 7
Immediate Placement and Temporary Abutments................ 8
bob-KAT Implants, Ball and Locator Abutments.................... 9
Immediate Screw-Retained Denture..................................10
Cast-to and Burn-out Implant Level Abutments.................11
Indications For Use and Warranty.......................................12
KAT System™ Implants
Implants Highlights bob-KAT 2.5 and 3.1 mm implants
3 mm • 2.5 and 3.1 mm diameters
Two-piece implants • 10, 12 and 14 mm lengths
• Indicated for all areas of the mouth for long
• KAT System implants are provided in 2.5, 3.1, 3.5, 4.3, 5.0 and 6.5 term applications
mm diameters. Implant length • 0.25 mm deep double lead thread
• All implants have the same 3.1 mm diameter Post to receive • Use with o-ring housing and any abutment
abutments. (for the exception of the angled abutments on
2.5 mm implants)
• A single platform of all KAT implants allows the use of all abutments
on all implants.
• Implant Post and abutments have 1.5 degree taper.
• Watertight connection at 30 Ncm of torque. 1 tom-KAT 2.5 and 3.1 mm implants
• No retaining screw is needed to retain the abutments.
3 mm
• 2.5 and 3.1 mm diameters
• Superior implant strength. 2 • 10, 12 and 14 mm lengths
• Place smaller diameter implants in thinner ridges. • Indicated for all areas of the mouth for long-
• Aggressive thread increases implant surface area. term applications
• Place shorter implants in limited height bone. Implant length • 0.25 mm deep double lead thread
• Use with any abutment (for the exception of
• Implant Post is designed to withstand 100 Ncm of torque. 3 the angled abutments on 2.5 mm implants)
• One implant driver can be used to place all implants.
• Secure friction fit connection between the driver and implant.
• One step implant placement.
• As little as 15 Ncm is needed to attach the abutment to the implant. Standard Diameter Implants
• Indexed abutments have zero rotational play.
3 mm • 3.5 and 4.3 mm diameters
• Predictable abutment placement with a torque wrench.
• 6 (4.3 mm), 8, 10, 12 and 14 mm lengths
• Abutment can be used as impression coping for better prosthesis fit. • Indicated for all areas of the mouth
• 0.4 mm and 0.5 mm deep double lead threads
0.7 mm Implant length
One-piece implants • Use with any abutment of KAT System
• One-piece 2.5 mm implants are FDA cleared for long-term
applications. One-piece 3.0 mm implants are cleared for upper lateral
and lower incisors.
• One-piece implants are provided in 2.5 and 3.0 mm diameters. Wide Diameter Implants
• One-piece implants are provided in 10, 12 and 14 mm lengths. • 5.0 and 6.5 mm diameters
• Use the same surgical instrumentation as with two-piece implants. 3 mm • 5.0 mm is available in 6, 8, 10, and 12 mm
• Use the same Drivers as with two-piece implants. lengths
• 6.5 mm is available in 7 and 8 mm lengths
• Use in areas where mesial-distal space is not sufficient for abutment
• Indicated for all areas of the mouth
placement (less than 5 mm). 0.7 mm • 0.5 mm deep double lead thread
Implant length
• Use with any abutment of KAT System
Short Implants
3 mm
• 4.3 and 5.0 mm diameters
• 6 mm length
• Indicated for all areas of the mouth
0.7 mm • 0.5 mm deep double lead thread
6.0 mm • Use with any abutment of KAT System
1000x SEM image of the
RBM blasted surface
3.1 mm One-piece Implants
• 2.5 and 3.0 mm diameters
1. Connection between implants and abutments is watertight at 30 Ncm of torque. 7.5 mm
• 10, 12 and 14 mm lengths
Independent testing by University of Rochester Eastman Institute for Oral Health.
2. Two-piece 3.1 mm implant strength is 440 N per Implant Fatigue Test conducted • 2.5 mm implants are indicated for long-term
according to ISO 14801: 2007. Test performed by MDT Laboratory, Minnetonka, applications; 3.0 mm implants are indicated for upper
MN, USA. Implant length
lateral and lower incisors
3. KAT Implants are able to withstand toques up to 100 Ncm. Implant Torque Test • Implants require intra-oral preparation with copious
conducted by KAT Implants, LLC. irrigation and conventional impression technique
1-877-528-7978
katimplants.com
1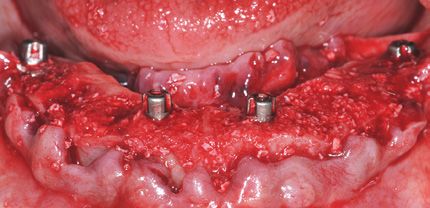
KAT Implants™ System Overview and Drilling Instructions
System Highlights Threaded bore 3.1 mm
Buccal Bone in multiple adjacent
Same Implant extraction sites and molars
Single Platform Post on all 1.5 degree
locking taper 3 mm Buccal Bone in single
KAT implants extraction sites
for screwless
• KAT System two-piece implants are provided in 2.5, 3.1, 3.5, 4.3, 5.0 connection Buccal Bone in healed sites
0.7 mm
and 6.5 mm diameters.
• All implants have the same 3.1 mm diameter Post to receive
abutments.
Solid implant
• A single platform of all KAT implants allows the use of all KAT System body for superior
abutments on all implants. 1 strength
Implant length
(8.0 mm)
Locking Taper Connection Aggressive
double lead
thread
• Implant Post and abutments have 1.5 degree taper.
Self-
• No micro-gap between implant and abutment. 2 threading
• No retaining screw is needed to retain the abutments. apex
Solid Implant Body
• Superior implant strength. 3
• Place smaller diameter implants in thinner ridges.
• Aggressive threads increase implant surface area. Same threaded bore in
6.5 and 7.2 mm
• Place shorter implants in limited height bone. all abutments
• 6 mm length implants are available in 4.3 and 5.0 mm diameters. Same locking taper bore
1.8 and 2.5 mm in all abutments
gingival cuff
Secure Implant Placement Bone level
4.2, 4.6, 5.0 and 5.4 mm
• Implant Post is designed to withstand 100 Ncm of torque. 4 Contoured Abutment 4.6 x 7.2 (2.5 mm gingival cuff)
• One implant driver can be used to place all implants.
• Secure friction fit connection between the driver and implant.
• One step implant placement.
Predictable Prosthesis Fabrication
Placement Instrument is used to attach all abutments, Removal Instrument is used to remove all abutments,
• As little as 15 Ncm is needed to attach the indexed abutment to the including healing abutments including healing abutments
implant. Placement Removal
Instrument Instrument
• Indexed abutments have zero rotational play.
• Predictable abutment placement with a torque wrench.
• Abutment can be used as impression coping for better prosthesis fit.
Drill Selection Guide
Implant Diameter Soft Bone Medium Bone Hard Bone
2.5 1.5 1.5, 2.0 - 1/2 length 1.5, 2.0
3.1 2.0 2.0, 2.7 - 1/2 length 2.0, 2.7
3.5 2.0, 2.7 2.0, 2.7, 2.9 2.0, 2.7 , 3.2
4.3 2.0, 2.7, 3.2 2.0, 2.7, 3.5 2.0, 2.7, 3.5, 3.9
5.0 2.0, 2.7, 3.5, 3.9 2.0, 2.7, 3.5, 4.2 2.0, 2.7, 3.5, 4.2, 4.7
6.5 2.0, 2.7, 3.5, 4.2, 4.7, 5.6 2.0, 2.7, 3.5, 4.2, 4.7, 5.6 2.0, 2.7, 3.5, 4.2, 4.7, 5.6, 6.0
Warning: Drill length is measured from the drill point. Allow 2 mm of safety margin between drill point and critical structures.
4000x SEM image of the
implant/abutment junction Drilling Instructions:
8 mm 2 mm Twist Drill 1.5 mm
Use 1.5 and 2 mm Twist Drills at 1000 rpm with copious irrigation or at 100 rpm
1. 2.5 mm implants should not be used with Angled Abutments. without irrigation. Replace Twist Drills every 12–20 drilling cycles.
2. Gap Analysis Test was performed by Sherry Laboratories, Broken Arrow, OK, USA.
Conclusion: “The dental implant and abutment were in intimate contact (no Twist Drill 2.0 mm Use Final Drills at 100 rpm without irrigation. Exercise great caution when
gap was detected) in continuos areas along the interface length. Dark areas are drilling hard bone. Bone chips can be collected and placed over the implant
discolorations from the polishing process.” shoulder after installation of the healing abutment. Replace Final Drills every
3. 3.1 mm implant strength is 440 N per Implant Fatigue Test conducted according Final Drills 50 drilling cycles.
to ISO 14801: 2007. Test performed by MDT Laboratory, Minnetonka, MN, USA. 6 mm 1 mm
4. KAT Implants are able to withstand toques up to 100 Ncm. Implant Torque Test Warning: Failure to follow Drilling Instructions can result in heat trauma to the
conducted by KAT Implants, LLC. bone and implant loss.
Guide Pin (use with 2 mm drill)
2 mm
1-877-528-7978
katimplants.com
2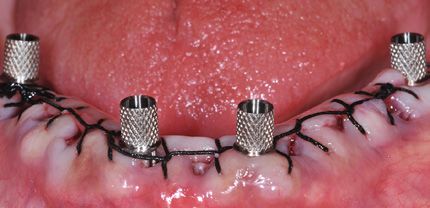
Surgical, Restorative and Laboratory Kits

                                                                               Final Drills

                                                                                                             Square Drivers
                                                        Twist Drill 2.0 mm
                                                                                                                              Short
                                                                                                                                  Long
                                                                                                                                                Drill Extender
                                                 Twist Drill 1.5 mm                                                                   FG

• Same diameter
  as final implants
• More narrow                                                                                                                                                    Reamers
  apical half
• Use sterile needle
  holder to handle
• Clean and                  Trial Implants                                                                                                                      Depth Gage
  sterilize as other
  instruments
                                                                                                                                                                 Trial Abutments

                                                                                                                                                                 Guide Pins

Diameter guides        Length guide
                                                                                                     Drivers HP
                                                                                                     Drivers M
                                                                                                Placement Inst.
                                                                                                 Removal Inst.

                                                                                              Surgical Kit

Placement Screw                                            Removal Instrument                            Placement Screw                                                      Removal Instrument
 Short and Long                                              Short and Long                                   Long                                                                  Long

                                                                             Removal Screw                                                                                            Removal Screw
                                                                             Short and Long                                                                                              Long
Placement Instrument                                                                                         Placement Instrument
   Short and Long                                                             Square Driver                                                                                             Square Driver
                                                                             Short and Long                         Long                                                                   Long

                                      Restorative Kit                                                                                      Laboratory Kit

                                                                                                                                                                                                        3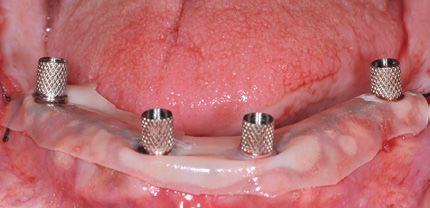
Implant Placement Instructions
Implant Placement
Implant Handling - Diagram 1
• Open PETG Tray over a sterile field. Remove PE Pouch containing
implant; cut PE Pouch and insert the Implant Driver inside to engage
the implant. Contamination of the implant must be avoided.
• Use Implant Driver M (used with Ratchet Wrench) or Implant Driver
HP (used with Handpiece) to place implant in osteotomy.
• Adjustable Torque Wrench pictured in this manual is a precision
PETG Tray PE Pouch
instrument; it should only be used for implant torque verification and
Implant/Healing Abutment installation. 1
• Use 25 rpm motor speed with Implant Driver HP. Set torque amount at
25 Ncm; higher torque may lead to Implant Driver HP fracture.
• Up to 70 Ncm of torque can be safely applied to the implants with
Implant Driver M.
Implant Placement - Diagram 2
Buccal Bone level in multiple
adjacent extraction sites or molars
• Place Implant Post to the buccal bone level in healed sites. Proximal 3 mm Buccal Bone level in single
bone may be much higher. extraction site
• Place Implant Post 1.5 mm subcrestally to the buccal bone in single Buccal Bone level in healed sites
0.7 mm
extraction sites.
• Place Implant Post 3 mm subcrestally to the buccal bone in multiple
adjacent extraction sites and immediate molar replacement sites.
• Bone ridge reshaping is recommended when large bone level 4 mm 3.8 mm Avoid tilting the Driver 1 Implant placement diagram
discrepancy is present. Implant Driver HP Implant Driver M
• One of the laser marks located on the Implant Driver should face 2
labially after the implant is fully inserted.
1. Driver tilting may lead to unexpected driver disengagement and distortion of the implant post. This distortion may affect the fit of the implant level screw-
retained restorations only. The fit of all other abutments will not be compromised.
Bone Reaming - Diagram 3
• The use of a Reamer will allow uninhibited Healing Abutment
insertion. Reamer should be the same size or larger than Healing
Abutment.
Place Reamer over the implant
• Do not use Reamer unless reverse torque on implant is greater than 20 post prior to reaming.
Ncm. If it is less than 20 Ncm, ream bone during second stage. Ream at 100 RPM without
• Use Reamer at 100 rpm without irrigation. irrigation.
Rinse chips before placement of
• Replace Reamers every 100 implants. the abutment.
Replace Reamers every 100
implants.
Healing Abutment Placement - Diagram 4
Reamer placed over the
• Rinse bone chips thoroughly after bone reaming. Implant
• Place Healing, Temporary or Final Abutment over the Implant Post;
use the Placement Instrument to activate locking taper connection. 3
Insert Placement Instrument into the implant and apply 15 Ncm of
torque with a Torque Wrench. The Healing and Temporary Abutments
are designed to slide 0.2 mm more over the implant post than the Apply 15 Ncm of torque to the
final abutments. Placement Instrument to seat
Healing Abutment
• Place cotton pellet inside the Healing Abutment and close the
opening with a suitable block-out material.
4.5 mm
Placement Instrument
2.0 mm
0.7 mm Buccal Bone level in
healed sites
Removal Instrument
Apply clock-wise torque to
the Removal Instrument to
remove Healing Abutment Healing Abutment Placement Diagram
4
1-877-528-7978
katimplants.com
4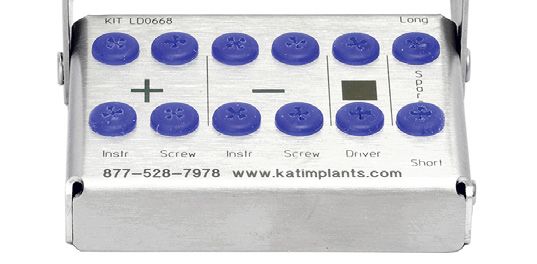
Prepable, Contoured and Angled Abutments

Prepable, Contoured and Angled Abutments

Clinical Steps - Diagrams 1–7

1. Wait 3 months in the mandible and 4 months in maxilla prior to
   removal of the Healing Abutment.
2. Screw Removal Instrument clock-wise inside the Healing Abutment;
   apply torque with a wrench to remove the Healing Abutment.
3. Healing Abutment is removed.
4. Place corresponding diameter Trial Abutment over the implant
   to determine the length of the final abutment. The body of Trial                                1                                            2                                  3                                    4
   Abutment is 6.5 mm long.
5. Attach the appropriate abutment to the implant with Placement
   Instrument and Torque Wrench set at 25 Ncm.
6. Place cotton pellet and block-out material inside the abutment.
   Abutment may be prepared intra-orally with a carbide bur under
   copious irrigation. Alternatively, the abutment can be removed using
   Removal Instrument and prepared on a Milling Analog extra-orally.
   Sonicate milled abutment in an alcohol bath for 3–5 minutes after
   each extra-oral milling operation. Accumulation of the milling dust
   inside the abutment will lead to improper fit between components.
7. Proceed with a conventional impression technique.                                               5                                                          6                                                         7

 Required Instrumentation                                                                                                 ALL NON-INDEXED ABUTMENTS ARE ATTACHED WITH 25 Ncm OF TORQUE

   Placement Instrument,                                                                                                                                                                                         10 or 20 degree
   Short [004001S]                                                        Prepable Abutment                                              Contoured Abutment                Angled Abutment                       angle

   Placement Instrument,
   Long [004001L]

   Removal Instrument,                                                    6.5 and 8.5 mm                                               6.5 or 7.2 mm
   Short [004002S]                                                                 length                                                      length                                   8.5 mm

   Removal Instrument,                                                                                                                                            1.8 and 2.5 mm              3 mm
   Long [004002L]                                                                                                                                                 gingival cuffs                                            2.5 mm

   Milling Analog                                                                                                  4.2, 4.6, 5.0 and                                4.2, 4.6, 5.0 and
                                                                                                                                                                                                                            4.2, 4.6 and 5.0 mm1
   [005003]                                                                                                        5.4 mm                                           5.4 mm
                                                                                                                                                                                        1. Angled Abutments 4.2 have 4.2 mm mesial-distal width.
   Torque Wrench
   [009005]
                                                                                                           6.5 mm
                                                                             2.5 mm

                                                                                            Trial Abutments 4.2, 4.6, 5.0 and 5.4 mm
                                                                                            Use Trial Abutments to choose healing
                                                                                            abutment’s diameter and the gingival cuff
                                                                                            length of the contoured abutments.

1-877-528-7978
katimplants.com
                                                                                                                                                                                                                                               5
Closed Tray Impression Technique (Clinical and Laboratory)

Closed Tray Abutments                                                                Clinical Instructions

Clinical Instructions - Diagrams 1–4
1. Closed Tray Abutment is placed over the implant. Insert Placement
   Instrument inside the Closed Tray Abutment and implant. Apply 15
   Ncm of torque with a Torque Wrench. Remove Placement Instrument.
2. Insert Impression Coping CT (Closed Tray) inside the Closed Tray
   Abutment, rotate the coping to align it with the indexing slot. Notice
   that the coping will “drop” in. Apply firm finger pressure at that time.
   Proper seating will produce a “click” sound. Impression coping
   is supplied with each abutment, it is a single-use item.
3. Apply light and heavy body impression materials around Impression
   Coping CT and insert the impression tray.
4. Remove the tray. Impression Coping CT will remain inside the                                   1                                            2                                             3                                           4
   impression material. Remove Closed Tray Abutment from the implant
   with Removal Instrument. Disinfect the impression and the abutment.
   Send abutment, impression coping, analog and impression to the lab.
                                                                                                                                                                                    Custom Abutment
Laboratory Instructions - Diagrams 5–10                                                                      Indexing Key

5. Attach Closed Tray Abutment to the Implant Analog with 15 Ncm of
   torque.
                                                                                   11.6 mm
6. Insert Closed Tray Abutment into impression, gently rotate the                                            Welds
   abutment to align it with the indexing slot of the impression coping.
   Notice that the abutment will “drop” in. Apply firm finger pressure                                                               Top of the implant post should be approximately at the same level with buccal gingival margin for best aesthetic results.
   at that time. Proper seating will produce a “click” sound. If                                                                       KAT Implants has an on-site laboratory to fabricate custom abutments, crowns and bridges. Consult the Catalog for
   impression of multiple implants is taken, insert the abutments in their                                                                                                   pricing or call toll-free 877-528-7978.
                                                                                                             4.2, 4.6, 5.0, 5.4 mm
   original places.
7. Fabricate hard and soft tissue models.
                                                                                      Laboratory Instructions                                ALL INDEXED ABUTMENTS ARE ATTACHED WITH 15 Ncm OF TORQUE
8. Remove the impression tray.
9. Use Milling Analog to mill the abutment according to Maximum
   Reduction Diagram on this page. Do not remove threaded bore and
   welds. Sonicate the milled abutment 3 min. in alcohol bath to remove
   milling chips. Failure to sonicate will result in excessive binding
   between the abutment and implant analog/implant which may result
   in Indexing Key coming loose. Customize the abutment with indirect
   resin, such as Diamond Crown, if custom abutment fabrication is
   necessary. Failure to follow maximum reduction guidelines may lead
   to separation of the Indexing Key from the abutment body. Care must
   be taken to use the same abutment over the same analog when
   multiple implants are restored. Failure to do it will lead to poor fit of
   the restoration.
10. Attach milled abutment to the analog with 15 Ncm of torque and                           5                       6                                7                                 8                               9                             10
    proceed with crown fabrication.
Required Instrumentation
                                                                                                                                                                                                      Threaded bore
    Placement Instrument,                                                                                                                                                            Weld
    Short [004001S]                                                                                                                                                                  Bore

    Placement Instrument,                                                                                                                                                                                                        4.2 mm
    Long [004001L]

    Removal Instrument,
    Short [004002S]                                                                                                                                   Indexing Key

    Removal Instrument,
    Long [004002L]
                                                                                                                                        Abutment Wall                                       Maximum vertical and axial reduction
                                                                                                                                                                                                 for all Indexed Abutments
    Implant Analog
    [005001]

    Torque Wrench
    [009005]
                                                                                                                                         Three welds are positioned                 Laboratory Kit includes:
                                                                                                                                         120 degrees apart. Do not                  • Placement and Removal Instruments, Long
                                                                                                                                         remove any welds.
1-877-528-7978                                                                                                                                                                      • Placement and Removal Screws, Long
katimplants.com
                                                                               6                                                                                                    • Square Driver, Long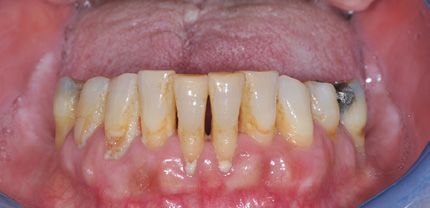
Open Tray Impression Technique (Clinical and Laboratory)

Pick-Up Abutments™                                                               Clinical Instructions

Clinical Instructions - Diagrams 1–5

1. Place Pick-up Abutment over the implant post with finger pressure.
2. Insert Placement Instrument in a clock-wise direction and apply 15
   Ncm of torque with a torque wrench.
3. Insert Removal Screw with finger pressure in a clock-wise direction.
4. Place light and heavy body impression material around the Pick-up
   Abutment and place the impression tray. Apply 1 full turn to the
   Removal Screw with Square Driver FG in a clock-wise direction to lift
   the abutment from the implant.
                                                                                            1                       2                                   3                                  4                                  5
5. Remove the impression tray. Abutment will remain inside.
Laboratory Instructions - Diagrams 6–12                                                                          Indexing Key

6. Impression tray contains the indexed abutment that has to be milled.                                                                                                 Custom Abutment

7. Insert the implant analog inside the abutment. Screw the Placement
   Screw inside the analog in a clock-wise direction, apply 15 Ncm of             11.6 mm
   torque to the Placement Screw via the Square Driver while holding                     Welds
   the analog with pliers to prevent any rotation.
8. Fabricate hard and soft tissue models.                                                                                 Top of the implant post should be approximately at the same level with buccal gingival margin for best aesthetic results.
9. Screw the Removal Screw in a clock-wise direction with Square Driver                                                     KAT Implants has an on-site laboratory to fabricate custom abutments, crowns and bridges. Consult the Catalog for
                                                                                4.2, 4.6, 5.0 mm                                                                  pricing or call toll-free 877-528-7978.
   and wrench to lift the abutment from the implant.
10. Remove the tray.
                                                                                 Laboratory Instructions                ALL INDEXED ABUTMENTS ARE ATTACHED WITH 15 Ncm OF TORQUE
11. Remove the abutment from impression and place it over the analog.
    Care must be taken to use the same abutment over the same analog
    when multiple implants are restored. Failure to do it will lead to poor
    fit of the restoration.
12. Use Milling Analog to mill the abutment according to Maximum
    Reduction Diagram on this page. Do not remove threaded bore and
    welds. Sonicate the milled abutment 3 min. in alcohol bath to remove
    milling chips. Failure to sonicate will result in excessive binding
    between the abutment and implant analog/implant which may result
    in Indexing Key coming loose. Customize the abutment with indirect                              6
    resin, such as Diamond Crown, if custom abutment fabrication is
    necessary. Failure to follow maximum reduction guidelines may lead
    to separation of the Indexing Key from the abutment body. Care must
    be taken to use the same abutment over the same analog when                                                               7
    multiple implants are restored. Failure to do it will lead to poor fit of                                                                                   8                                   9                                 10
    the restoration. Attach the finished abutment to the analog with 15
    Ncm of torque and proceed with crown fabrication.                                                                                                                                      Threaded bore
                                                                                                                                                                         Weld
Required Instrumentation                                                                                                                                                 Bore

    Removal Screw, Short                                                                                                                                                                                              4.2 mm
    [004008S]
    Removal Screw, Long
    [004008L]
    Placement Instrument,
    Short [004001S]
    Placement Instrument,                                                                                                                                                      Maximum vertical and axial reduction
    Long [004001L]                                                                                 11                    12
                                                                                                                                                                                    for all Indexed Abutments
    Removal Instrument,
    Short [004002S]
    Removal Instrument,
    Long [004002L]                                                                                                                                                                                          Indexing Key
    Square Driver, Short
    [004010S]
    Square Driver FG
    [004011]                                                                                                                                                                                   Abutment Wall
    Torque Wrench
    [009005]
                                                                                                             Three welds are positioned                                  Laboratory Kit includes:
                                                                                                             120 degrees apart. Do not                                   • Placement and Removal Instruments, Long
                                                                                                             remove any welds.
1-877-528-7978                                                                                                                                                           • Placement and Removal Screws, Long
katimplants.com
                                                                                                                                                                         • Square Driver, Long                                                        7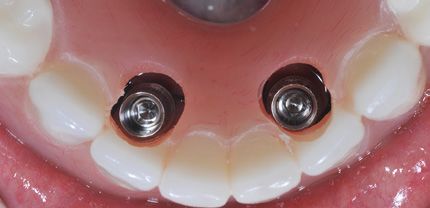
Immediate Placement and Temporary Abutments
Immediate Anterior and Premolar Teeth Replacement
Immediate Placement
Immediate Anterior and Premolar Teeth Replacement
1. Consult Implant Placement Instructions.
2. Ream the bone with the Reamer at 100 RPM without irrigation. Buccal bone
Buccal bone
3. Attach the Healing Abutment with 15 Ncm of torque. level in single level in multiple
extraction sites adjacent
4. Attach the implant abutment (15 Ncm for indexed abutments and extraction sites
and molars
25 Ncm for non-indexed abutments).
1 Anticipate 1 - 1.5 mm bone loss in a single extraction site and 2 mm in multiple adjacent extraction sites
Immediate Molar Replacement
• Adequate attached gingiva width must be present.
• Buccal bone must be intact.
• Immediate molar replacement in elderly and smokers might not
lead to good bone healing.
Temporization with Temporary Abutments, Crown
A. Consult Implant Placement Instructions.
B. Attach Temporary Abutment, Crown with 15 Ncm of torque.
C. Screw the Removal Screw inside the abutment with finger pressure
and try-in the stent. Place temporary crown material into the stent and 2 3 4
insert the stent over the Removal Screw and abutment; allow material
to set. Rotate the Removal Screw with Square Driver FG in a clock-wise
direction to remove the abutment. Add resin to the abutment as needed.
Immediate Molar Replacement
D. Attach restoration with 15 Ncm of torque.
Three common molar root configurations
1. Mesially tilted.
Temporization with Temporary Abutments, Bridge
2. Converging.
Temporary Abutments, Bridge are indexed abutments. Preparation can be
3. Diverging.
done intra- or extra-orally using a Milling Analog. Sonicate in alcohol for
3-5 min. after extra-oral preparation. Attach with 15 Ncm of torque.
Warning:
Immediate temporization should not be done unless implant stability 1) 2) 3)
exceeds 35 Ncm of torque.
Required Instrumentation Recommended treatment:
1. 5 mm diameter implant placed in a mesial root.
2. 6.5 mm diameter implant placed to engage
Removal Screw, Short surrounding walls.
[004008S]
3. 3.5, 4.3 or 5 mm diameter implant placed to
Removal Screw, Long engage bone past the apical area (if sufficient bone
[004008L] height is present).
1) 2) 3)
Placement Instrument,
Short [004001S]
Placement Instrument, Temporization with Temporary Abutment, Crown
Long [004001L]
Removal Instrument,
Short [004002S]
8.3 mm
Removal Instrument,
Long [004002L]
Square Driver, Short
[004010S]
4.2, 4.6 mm
Square Driver FG A B C D Temporary Abutment, Crown
[004011]
Torque Wrench Temporization with Temporary Abutments, Bridge
[009005]
8.3 mm Temporary Abutments, Bridge may be used to:
• Support the temporary bridge during permanent bridge fabrication.
• Support cemented temporary crowns during permanent crown fabrication.
Temporary Abutments, Bridge may be attached to the implant during immediate implant
placement if at least 35 Ncm of primary stability is present.
4.2, 4.6, 5.0 and 5.4 mm
1-877-528-7978 Temporary Abutments, Bridge may be used as the permanent abutments. They will cover more
katimplants.com
8 Temporary Abutment, Bridge of the implant post as compared to regular abutments.bob-KAT Implants, Ball and Locator Abutments
bob-KAT Implants, Ball and Locator Abutments bob-KAT Implants
bob-KAT Implants
bob-KAT Implants are placed with the same Implant Drivers as other KAT
implants. Consult Implant Placement Instructions prior to placement. bob-KAT implants:
Bone reaming should not be done unless it is desired to convert the case 2.5 x 10, 12, 14
3.1 x 10, 12, 14
from a removable to a fixed bridge one. If this conversion is to be done, the Use with housing, small and o-ring, small.
following steps must be taken:
Two options - removable or fixed.
1. Cut the ball portion with a new carbide bur, do not remove the radius
that separates ball portion from locking taper portion. Clean and rinse 1 2 3
the post, any remaining metal chips will negatively affect the locking
taper connection;
Do not remove
2. Ream the bone with a desired size reamer, rinse the post from any this radius!
bone chips. Any remaining bone chips will negatively affect the
locking taper connection;
3. Place abutment over the implant post and tap it 3–5 times with a
Cut the ball with carbide drill. Use copious irrigation. Ream the bone. Tap the abutment.
surgical mallet via a suitable instrument, such as mirror handle or a
blunt osteotome.
bob-KAT implants may also be prepared to receive a crown directly, same
as One-Piece Implants. Use new carbide bur to prepare the post prior to
taking conventional crown and bridge impression. Ball Abutments 4.2 mm
Housing
4.7 mm
4.2 mm
Healing Abutment L/B Placement
3.5 mm
Bone reaming must be done prior to the placement of Ball and Locator
Abutments. Read Implant Placement Instructions page of this manual for
reaming instruction. Use Reamer L/B to ream bone. 5 mm
Ball/Locator Abutment Insertion 3 mm
1 mm
Place Ball or Locator Abutment over the implant. Use Ball Abutment
Placement Instrument or Locator Abutment Placement Instrument and
surgical mallet to apply 3–5 moderate taps on top of the Abutment.
2, 3, 4, 5 mm
All implants have the Healing Abutment L/B Ball Abutments Ball Abutment 10o Ball Abutment 10o
same post Use Reamer L/B to ream with o-ring housing
Ball/Locator Abutment Removal bone Use Reamer L/B Use Reamer 4.2
to ream bone and to ream bone and
Healing Abutment L/B Healing Abutment 4.2
Removal of the Abutment is accomplished with the Abutment Remover.
It is a crown remover type instrument that is fitted with either a Ball
Abutment Removal Tip or a Locator Abutment Removal Tip.
Ball Abutment Placement Instrument
Place Corresponding Removal Tip over the Abutment to engage the
undercut. Place and hold the gauze over the abutment to prevent
accidental loss of the abutment and hurting your fingers. Activate the Ball Abutment Removal Tip
lever of the Abutment Remover to remove the abutment. One activation is
sufficient to remove the abutment.
Abutment Remover (includes wrenches to attach
the Ball Abutment and Locator Removal Tips)
Locator Abutments
Locator Placement Instrument
1 mm
2.5, 3.5, 4.5 mm
Locator Removal Tip
Use Healing Abutment L/B
Use Reamer L/B to ream
bone
Abutment Remover (includes wrenches to attach
the Ball Abutment and Locator Removal Tips)
1-877-528-7978
katimplants.com
9Immediate Screw-Retained Denture
Immediate Denture Abutment (ID Abutment™)
Clinical Steps - Diagrams 1–10
Warning: 1 7
Implant loading with modified immediate denture should not be done unless
implant stability exceeds 35 Ncm of torque.
1. Pre-operative image.
2. Consult Implant Placement Instructions for implant placement.
3. Place bone grafting material in extraction sockets and around the
implants.
4. Attach ID Abutments with retaining screws and Square Driver FG; 2 8
proceed with suturing.
5. Create the openings in the immediate denture to allow passive fit
of the denture over the ID Abutments. Immediate denture flanges
should not be trimmed at this stage to allow accurate and repeatable
denture insertion. Verify proper fit with opposing dentition.
6. Place rubber dam over the ID Abutments.
7. Place cotton pellets inside ID Abutments. Apply Vaseline to the
3 9
outside surfaces of the immediate denture. Fill the denture with
self-curing acrylic and insert the denture over the ID Abutments. Ask
patient to close and maintain light pressure during the curing stage.
8. Use coarse diamond drill to access the retaining screws of the ID
Abutments. Use Square Driver to remove retaining screws and
immediate denture. Trim the denture to allow unrestricted oral
hygiene.
9. Polish the screw-retained denture.
4 10
10. Attach the screw-retained denture to the implants with Square Driver
and a Torque Wrench set at 20 Ncm. Screw-retained denture may be
relined and reinforced with wire at a later appointment.
This treatment works well for the lower teeth immediate extractions
where an affordable immediate fixed long-term solution is desired.
Required Instrumentation
5
Square Driver, Short
[004010S]
Square Driver, Long
[004010L]
Square Driver FG
[004011]
6
Torque Wrench
[009005]
3 years post-op x-ray
4.6 mm
4.0 mm
1 year post-op image
ID Abutment includes a retaining screw.
1-877-528-7978
katimplants.com
10Cast-to and Burn-out Implant Level Abutments
Cast-to and Burn-out Abutments IL
Clinical and Laboratory Instructions - Diagrams 1–8
1. Inserted implant.
2. Attach the Impression Coping IL (Implant Level) to the implant with
a Placement Screw. Apply 20 Ncm of torque to the Impression Screw
with a Square Driver, Short and a Torque Wrench.
3. Take the open tray impression.
4. Remove the impression tray and send it to the laboratory. 1 2 3
5. Attach the Implant Analog to the Impression Coping IL with Square
Driver and 20 Ncm of torque.
6. Fabricate soft and hard tissue models.
7. Remove the impression tray from the cast.
8. Attach the Cast-to Abutment IL to the Implant Analog. Proceed with
the framework fabrication. Attach the finished restoration to the
implants with the Square Driver and Torque Wrench set at 20 Ncm.
• Burn-out material – Delrin
• Cast-to Abutment IL comes with a Retaining Screw (#004009)
• Impression Coping IL is used with the Placement Screw. Placement
Screw, Short and Placement Screw, Long are sold separately.
4 5 6
Required Instrumentation
Placement Screw, Short
[004007S]
Placement Screw, Long
[004007L]
Impression Coping IL
[004015]
Square Driver, Short
[004010S]
7 8
Implant Analog
[005001]
8.0 mm
Torque Wrench
[009005] 7.5 mm
3.5 mm
Placement Screw, Short - 18 mm Cast-to Abutment IL
Placement Screw, Long - 23 mm • 003100
Delrin plastic and Gold Alloy.
8.0 mm
3.5 mm
Burn-out Abutment IL
• 003102
Delrin plastic.
Casting Clean-up Drill
1-877-528-7978 • 003105
katimplants.com
11Indications for Use
Warranty and Return Policy
Indications for Use
KAT Implants™ Warranty KAT Implants System is intended to restore edentulous areas of the maxilla and mandible, to provide support for
Instrumentation removable dentures or fixed bridges, or to be used as a single tooth replacement. Single or splinted implants can be
immediately loaded if good primary stability and appropriate occlusal loading are achieved. The implant can be placed in
Instruments manufactured by KAT Implants will be replaced if found extraction sites or healed alveolar ridges.
defective or damaged under normal-use conditions. Duration of the
Instrumentation Warranty is one (1) year from the date of initial invoice. KAT 3.0 mm implant is indicated for use in maxillary lateral or mandibular lateral and central incisors in single or
multiple units to support prosthesis, such as artificial teeth. The implant can be placed in extraction sites or healed
Surgical Drills and Reamers alveolar ridges and can be immediately loaded when good primary stability is achieved and the functional load is
Surgical drills and reamers are covered under a ninety (90) day warranty appropriate.
from the date of initial invoice. Surgical drills used at 100 rpm speed tom-KAT 2.5 mm and 3.1 mm are self-tapping titanium alloy threaded screws indicated for transitional and long-term
should be replaced after 50 osteotomies. Pilot drills (twist drill 1.5 mm intra-bony applications such as providing support for transitional or long-term crowns, bridges, and dentures. tom-KAT
and twist drill 2.0 mm) should be replaced after 12 to 20 osteotomies. 2.5 mm and 3.1 mm may also be used for inter-radicular transitional application.
Reamers should be replaced after 100 drilling cycles.
Contraindications
Return Policy
KAT implants should not be used in patients who have diseases that can interfere with proper healing and
Unopened items may be returned within thirty (30) days from the date osseointegration of the implants. Examples of such diseases are blood dyscrasias, uncontrolled diabetes, malignancies,
of initial invoice; items must be accompanied by an original invoice and a hyperthyroidism, bruxism, oral infections and/or myocardial infarction within one year. KAT implants should not be
Return Authorization Form. Returns must receive prior approval from KAT placed into ridges with insufficient bone height and/or width.
Implants and are subject to a 15% restocking fee. No refund will be issued
after 30 days. Damaged items will not be accepted. All exchanges are Warning
subject to approval by Customer Care. Please call us at 1-877-528-7978 to Implant placement and restoration require additional training. Appropriate and adequate training in proper technique
request a Return Authorization Form or for other inquires. is recommended prior to implant placement. KAT implants must be used according to indications described above.
Disclaimer of Liability Failure to do so can result in implant failure and loss of surrounding bone. Specific drills are provided for placement of
KAT implants; the use of other drills may result in improper osteotomy and implant failure. KAT implants are supplied
KAT Implants products should only be used with components in sterile containers. Do not use sterile components if packaging is damaged. It is important that the clinician take into
manufactured or sold by KAT Implants. The use of surgical or prosthetic considerations local loading conditions when determining the number and spacing of short implants. Considering the
components not manufactured or distributed by KAT Implants will void all reduced bone support provided by short implants, it is important for the purpose of early diagnosis and treatment that
expressed or implied warranties and obligations. the clinician closely monitors soft tissue and supporting bone health status by means of the radiographic evaluation.
KAT Implants strongly recommends postgraduate education in implant Precautions
dentistry prior to use of KAT Implants System. The clinician must be
familiar with and adhere to the Instructions for Use (IFU) supplied with Proper examination of the patient is mandatory prior to the implant placement. Panoramic x-rays are recommended
the KAT Implants products. KAT Implants’ responsibilities and obligations for location of the mandibular canal, mental foramina, sinuses, adjacent teeth and the height of available bone.
arising from incidental or consequential damages resulting from use of Computerized imaging may also be helpful in determining the availability of bone. KAT Implants System has not been
KAT Implants products are limited to replacement or repair of the products evaluated for safety and compatibility in the MR environment. KAT Implants System has not been tested for heating
under our warranties. or migration in the MR environment. Immediate loading may not be appropriate in Type IV bone due to difficulty in
achieving primary stability. One-Piece implants are not to be used with abutments. 2.5 mm implants are not intended
Distributed Products for angle correction. If 2.5 mm implants are used for transitional purposes while other implants are integrating, the
Please consult the manufacturer of the distributed product for warranties removal of the implants should be done at a time when loading of the other implants is considered safe (3 months in the
and services associated with the distributed products. Contact information mandible and 4 months in maxilla, longer healing may be necessary in poor quality bone). Federal (U.S.A.) Law restricts
is located on the product packaging. the sale of this device to a purchase by or on the order of a licensed dentist.
Product Images Side Effects
Product images used in this publication may not fully represent the actual The following complications can occur: dehiscence, delayed healing, paresthesia, local and generalized allergic reaction,
product. Please contact KAT Implants for detailed specifications of each hematoma, edema, excessive bleeding, and infection.
product. Sterilization and Packaging
Product Availability KAT implants are supplied in a sterile blister pack. Inside the sterile pack is a soft polyethylene package containing the
Products listed in this publication may not be available in all countries. implant. Implant Abutments, Healing Abutments and other components of the KAT Implants System are also provided in
KAT Implants is committed to a continual improvement of KAT Implants sterile packaging. Instrumentation and drills are provided in non-sterile packaging. Instrumentation and drills must be
System and reserves the right to change or discontinue its products at any cleaned in an ultrasonic bath and sterilized using steam sterilization prior to use.
time without prior notice. Open the sterile PETG tray over a sterile field. Wear sterile gloves when handling the polyethylene plastic package
containing the implant. Open the polyethylene package by cutting on the abutment-receiving post side of the package.
Insert the Implant Driver into the package and attach it to the implant with firm pressure. Remove the implant from the
package and place it into the prepared site. A sterile environment must be maintained to ensure that the implant is not
contaminated.
Read Instructions for Use
STERILE R Sterilized using irradiation
Symbols used on a package label Use by (expiration date)
2 Do not reuse
LOT Batch Code
1-877-528-7978
katimplants.com
12NOTES:
KAT Implants, LLC
T 877.528.7978 • 603.427.0084
F 603.427.0045
E info@katimplants.com
15 Rye Street, Suite 115
Portsmouth, NH 03801

                                SRM-Rev.5
You can also read