Laminate Flooring Approved Methods - Habitat for Humanity Cabarrus ...
←
→
Page content transcription
If your browser does not render page correctly, please read the page content below
Laminate Flooring
                                          Approved Methods
                                                     August 20,2020

This section was compiled by volunteers of Cabarrus HFH to comply with current construction practices, we
have used the Internet for the content of some of the contents described for laminate and vinyl laminate flooring
in this section.

       Laminate Flooring                          Page 1 of 13                             August 20,2020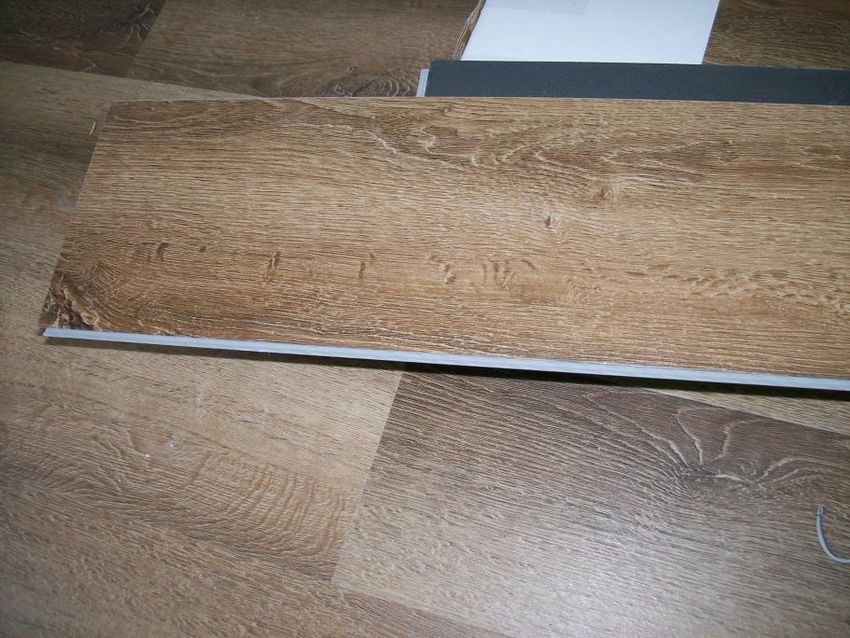
Note to the Reader: Due to differing conditions, tools, and individual skills, the authors of this manual and Habitat For
Humanity of Cabarrus assume no responsibility for any damages, losses incurred, deaths, or injuries suffered as a result
of following the information published in this manual. Although this manual was created with safety as the foremost
concern, every construction site and construction project is different. Accordingly, not all risks and hazards associated
with Home building could be anticipated by the authors of this manual and Habitat For Humanity of Cabarrus. Always
read and observe all safety precautions provided by any tool or equipment manufacturer, and always follow all accepted
safety procedures. Because codes and regulations are subject to change, you should always check with authorities to
ensure that your project complies with all local codes and regulations.

Table of Contents
Installing laminate flooring ..................................................................................................................................................... 2
   Supplies: .............................................................................................................................................................................. 3
   Prepare the Floor: ............................................................................................................................................................... 3
   Prepare Door Jambs ............................................................................................................................................................ 4
   Plan the first and last rows ................................................................................................................................................. 5
   Cut the first and last rows ................................................................................................................................................... 6
   Install the first row .............................................................................................................................................................. 7
   Install the remaining rows .................................................................................................................................................. 8
   Handling special situations: ................................................................................................................................................ 9
   How to end flooring at a doorway .................................................................................................................................... 11
   Vinyl Laminate Flooring .................................................................................................................................................... 11

Installing laminate flooring
Laminate flooring is installed in almost every room in a newly built Habitat home since it doesn’t have to be
glued down and doesn’t involve grout or mortar. Planks can be cut with a hand saw, circular saw or flooring
cutter, and laminate flooring comes in planks that simply snap together with a tongue-and-groove system,
making it quick and relatively trouble-free. Habitat uses laminate flooring that has the foam padding under each
plank and does not require laying down foam padding.

            Laminate Flooring                                                       Page 2 of 13                                                       August 20,2020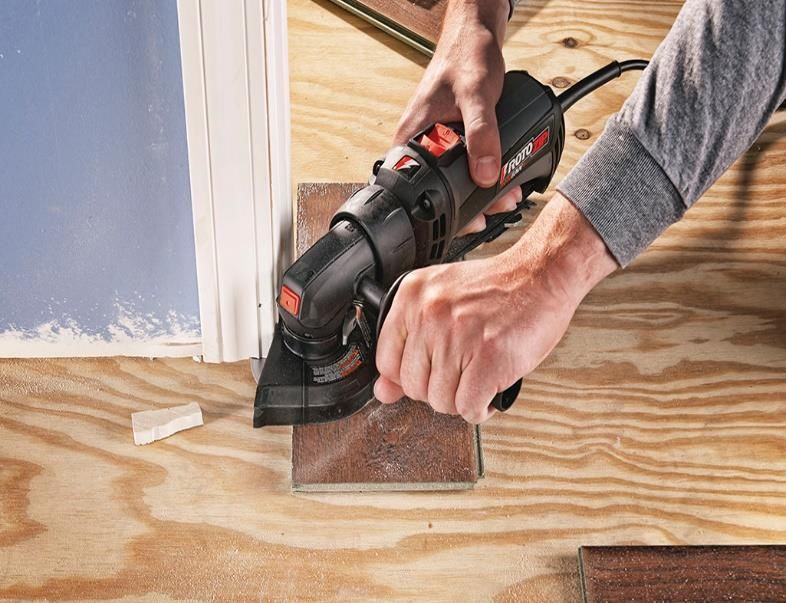
Typically, Habitat provides all the tools. These include the following:
Supplies:
16d Common nails,
Caulk to match the color of the floor
Wood glue
Laminate flooring
Entry door threshold
Transition fitting between laminate flooring and vinyl flooring
Quarter round (.75 x.75 inches)
Jamb saw (multi-tool)
Prepare the Floor:
Before you begin, you need to ensure your sub-floor is ready for install of the laminate planks. Laminate
flooring is ready to install as long as the base floor is clean and smooth. Use a metal scarper to remove
any bumps (paint, joint compound) and make sure nails are flush with the wood floor. Be sure to sweep
and vacuum the debris. Subfloor seams are the usual suspects. Use screws to repair any floor where
there's a squeak.
The baseboards are installed properly. You will be install quarter- round moulding after the floor is
down so have a scrap piece of this quarter-round moulding on hand to make sure the edge of the laminate
planks are covered by this molding. Fix concrete subfloors with a patching compound, and for wood
subfloors, remove protruding nails and replace any damaged boards.
Lay out the unopened boxes of laminate planks in the room. This will allow them to acclimate to the
room’s temperature and humidity. They should acclimate for at least 48 hours.
For uneven floors, a foam underlayment can be used as the base for your laminate planks. If you
determine you need to level the floor, you can sand the floor and apply a patching compound.
Laminate Flooring Page 3 of 13 August 20,2020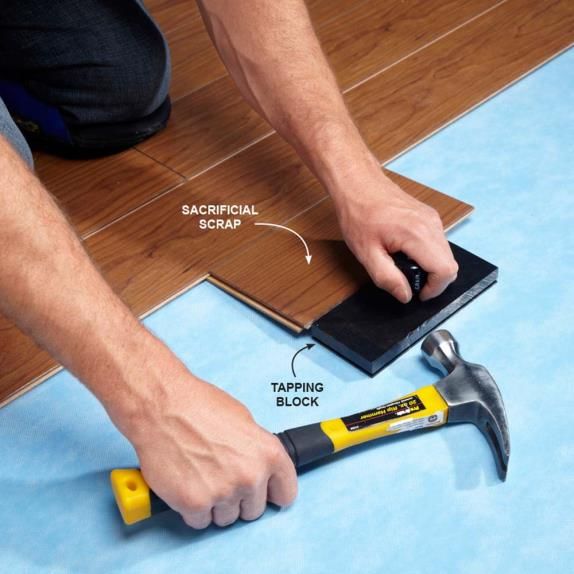
Prepare Door Jambs
It’s much easier to cut the trim around doorways than it is to cut the flooring to match the moulding’s
irregular shape. Once cut, the flooring will just slip under it, leaving a more finished look.
If needed, take a plank of flooring lay it finished side down next to the door’s moulding. This will show
you how high up you need to cut the moulding.
Trace a guide line along the surface of the moulding with a pencil.
Use a jamb saw to make this cut. You can also use a multi tool with a wood/metal cutting blade.
It is better to cut a little above the line you traced to allow for easy plank installation as well as to ease
the installation of the threshold.
Laminate Flooring Page 4 of 13 August 20,2020
Plan the first and last rows

   1.   Installing the flooring can take on different strategies. One strategy is to have the planks run parallel
        to the longest wall or focal point in the room. Another strategy is to run the planks perpendicular or
        parallel to the entry door to the room. Which ever strategy you choose it needs to be consistent.
   2.   Measure the width of the room from this wall and divide the distance by the width of the planks. This
        will tell you what the width of the final row of planks should be. Allow for a 3/8-inch gap along both
        walls to allow for expansion of the flooring.
   3.   To calculate the width needed for the first and last row, add the width of a full plank to the width needed
        for the last row. Divide that number by two and cut each plank in the first and last row to that width.
        Don’t forget to allow for the 3/8-inch gaps along both walls. For example, if the planks are 4” wide and
        the room is 10’ 2” (122”) wide then the math will show that 122/4=30 and that the end plank will be
        roughly 2” wide (requiring cutting it with a circular saw). But if we follow the rule above, we add 2” to
        the 4” width of the plank and divide by 2 and get 3”. It would be prudent to cut the first set of planks to
        3” so you have about a 3” wide end plank
   4.   Measure the length of the run of the first row from wall to wall. Be sure to not allow for the end plank
        of the run to be less than 12”. Adjust the first plank by cutting it on the end that will be hidden by the
        quarter round moulding so that you get at the opposite an end plank of 12” or more.
   5.   When installing planks of laminate flooring, stagger the seams of succeeding runs of planks. There are
        numerous strategies on how to do this. Avoid the strategy of staggering the seam of every other row to
        be at the same spot. This will give an H style for the floor seams. A better technique is to randomize
        the seam pattern of the rows. See the illustration below:

        Laminate Flooring                          Page 5 of 13                             August 20,2020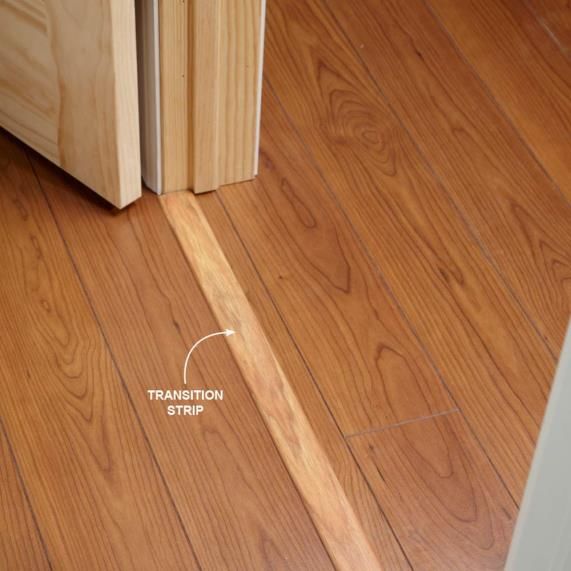
6. Installing flooring around doorways is one of the thorniest issues you'll deal with. Simplify it by starting
on the wall that has the most doorways. Of course, you'll still have to undercut jambs and trim, but it's a
lot easier starting at a doorway than ending up at one.
Cut the first and last rows
Before cutting the planks, check the cutting instructions for your particular flooring product.
You can cut the planks using a table saw, miter saw, circular saw, hand saw or laminate cutter/shear as in
above photo; however a diamond blade is recommended as laminate can be tough to cut through and may
damage another type of blade.
Typically, you will cut with the finished side up. Use duct tape to mark the plank more easily and reduce
splintering.
Tip: Use a finishing blade for the cleanest cut. But don't worry. Moulding will cover all the cut edges when
the project is complete. Use clamps to help hold the planks steady while cutting.
If your laminate product didn’t come with an attached underlayment, roll out two rows of the
underlayment and trim it to size with a utility knife.
The underlayment should meet but not overlap, as overlaps in the underlayment result in bumps under the
flooring. Duct taping the seam will hold the underlayment in place and help maintain the vapor barrier.
Laminate Flooring Page 6 of 13 August 20,2020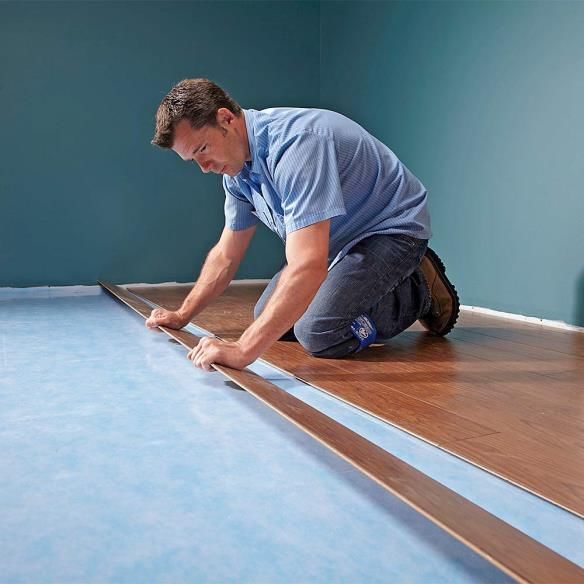
Install the first row

  1. The first thing to know when you lay laminate flooring is that all laminate flooring will expand and
     contract due to temperature and humidity fluctuations. To allow for this expansion, place 3/8-inch
     spacers along the wall to leave a consistent gap around the edges of the floor. You can tack nail
     temporarily 16D nails to get you the spacing.
  2. If the door to the room is located on one of the shorter walls, start laying the planks on the door side of
     the room. This will ensure you have the clean, uncut edge at the threshold.
  3. Begin the first row of flooring by placing the planks with the tongue side facing the wall. Install the
     second plank next to the first by aligning the tongue into the groove and press the plank down to snap it
     in place.
  4. When you come to the end of the first row, cut the length of plank needed to complete the row. When
     measuring, remember to allow for the 3/8-inch gap at each end.

       Laminate Flooring                         Page 7 of 13                             August 20,2020
Install the remaining rows

  1.    Pull boards from several boxes during installation to even out color variations.
  2.    Use the remainder of the laminate flooring planks you cut at the end of row one to start the next row, as
        long as it’s longer than 1 foot. If it’s not, start the row with a plank cut to a length greater than 1 foot.
  3.    Start the second row where you started off the first. This will stagger the seams, which results in a more
        natural look. It also gives the flooring added stability. The seams should be staggered at least 12 inches
        from any adjacent seam.
  4.    Hold the long side of the second row plank at an angle and feed the tongue into the groove of the
        installed row. Press down and snap the plank into place.
  5.    Since the fiber in laminate flooring is susceptible to water damage, make sure there are no gaps between
        the seams. Use a tapping block to close these gaps. You can also use a scrap piece of laminate floor to
        snap into the groove of the plank and tap with a hammer to close any gaps.
  6.    Continue snapping planks into place until the row is complete, trimming the last plank to size.
  7.    Every 3-4 rows measure the distance from the last plank to the end wall to make sure you are close to a
        parallel line with the plank.
  8.    Lay each row beginning with the remnant pieces longer than one foot from the row before until the room
        is complete.
  9.    Once the laminate has been installed, remove the spacers and install a matching threshold where the
        doors are located, quarter-round moulding to the walls using finishing nails with a nail gun. Be sure to
        nail the molding into the baseboard and not the laminate flooring.
  10.   Be sure to leave a ¾” gap between 2 rooms at the door to allow for the threshold placement.
        Note that in some cases it might make sense to not have thresholds at entries to rooms. This can add to
        the appearance of the floor but should be done only after carefully measuring the room layout and
        determining that this will not cause very narrow strips along a wall. If unsure it is better to go with
        thresholds in doorways. All doorways along a hall should be treated in the same way so this is not for
        the faint of heart.

        Laminate Flooring                           Page 8 of 13                              August 20,2020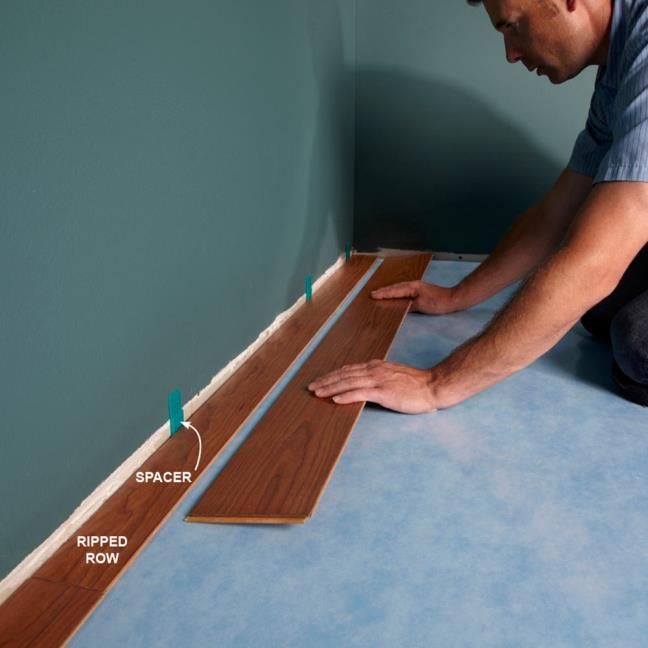
Handling special situations:
Closets
Quite a bit of plank cutting as you work the planks into the closet.
Closing gaps between planks
Use a scrap piece of plank to butt into the short side of the plank you need to close the gap with the next
one. Make sure that the end of the row is secured and does not move when you tap, use a flat bar at the
end row so secure the row from moving. It is usually a good idea to get help from a partner to step on
the part of row already laid to keep it from moving when joining 2 pieces together. Each laminate design
has unique features which may make it easier to flush up end joints or side joints first. This will become
clear as you lay a few rows.
Adjusting an entire row
Use a special flat bar to tap one end of a row if you need to move the entire row of planks to the left or
right to close the gap on the end so it is covered by the quarter-round.
Doorways and Thresholds
The threshold should cover the transition between one room and another. The high part of the
threshold should be under the bottom of the door when it is closed. Usually this high part is placed on
the inside of the door stop.
Makes sure that the threshold is measured and cut to fit between the left and right side of the door jamb.
The threshold can usually be cut so that it fits under the door jamb yielding a clean look. There is
enough springiness in the threshold so that it can be slipped in on both sides if it is slightly longer than
the width of the door jamb opening. Little gaps can be caulked with special colored caulk
Some threshold come with a metal bracket that is secured to the floor with screws and the threshold
snap into it. See photo:
Laminate Flooring Page 9 of 13 August 20,2020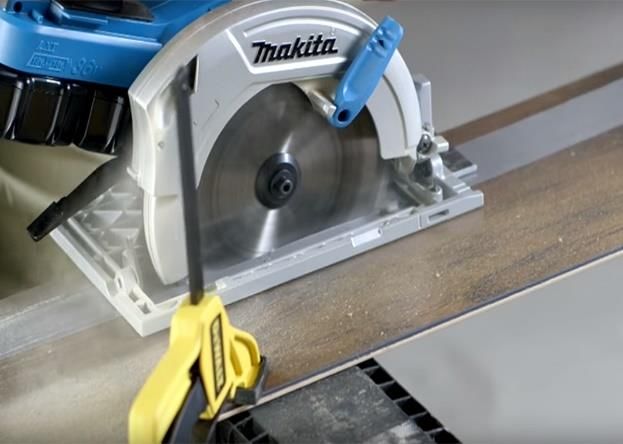
In the absence of a metal bracket, we have used construction adhesive on top of the subfloor at the threshold gap and then temporarily tacked the threshold with 18ga, pin nails. We have also used a threshold which has an edge that can be removed with a special cutter included with the transition. After scoring the piece to be removed the piece can be snapped off. Be careful as the edge is very sharp so use sandpaper to dull the sharp edge, We used this type of transition between 2 different flooring (laminate to vinyl sheeting). This allows the transition to accommodate the different heights of the finished floor. Laminate Flooring Page 10 of 13 August 20,2020
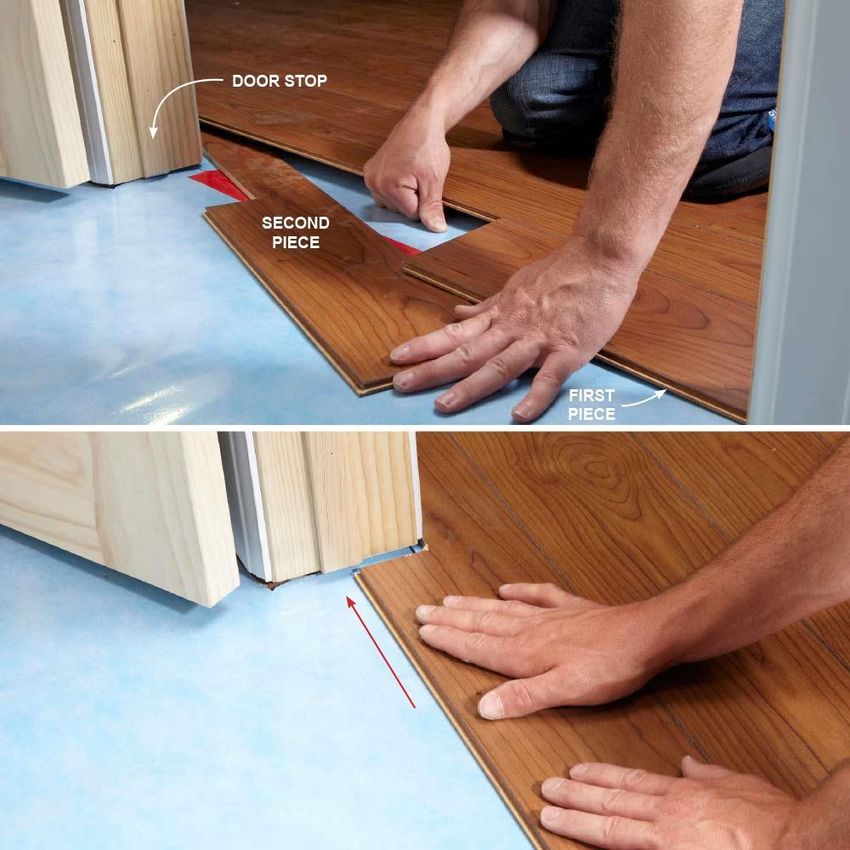
How to end flooring at a doorway

Often, there's no avoiding ending up at a doorway. If your flooring is running parallel to the door entry, it's a bit
tricky because you have to slide the flooring under both jambs. You also have to trim the plank where it meets
the baseboard. Here's how to handle it with just a little bit of trim carpentry.
        1. Lift to fit:
        Plan on a seam in the middle of the doorway. Notch and cut the first piece to fit and then slide it
        completely under the jamb. Notch the second piece so it'll be just short of the door stop when it's in
        place. Lift the flooring to get it around the corner and under the casing, then snap it in.
        2. Slide both pieces over:
        Once the two pieces are connected, slide them both over just far enough so that both jambs cover the
        flooring ends.
If your flooring is running perpendicular to the door entry you just have to make the cut to the end so it fits
under the door jamb.

Vinyl Laminate Flooring
In recent houses Habitat Cabarrus has been using 100 % vinyl laminate flooring. This has the advantage of
being completely waterproof so it can be used in kitchens and bathrooms without concern about buckling of the
flooring due to water getting in the joints. This also provides a consistent look throughout the house. Many of
the techniques used in standard laminate floors are the same but from the limited use we have so far the end
joints must be closed first and the narrow or tongue side should always go into the wide flange or groove side.
Going in the other direction is very difficult. It is very difficult to slide a row once it is locked with this flooring
which is why the end joint should be closed first.

Shown below are images of some of the strategies when working with vinyl laminate flooring.

        Laminate Flooring                            Page 11 of 13                               August 20,2020
Vinyl Laminate showing semi-random stagger pattern (white strips show joint locations)
Vinyl Laminate showing groove on long side. Note very narrow tongue on other side and tight joint on pieces
below
Laminate Flooring Page 12 of 13 August 20,2020Laminate Flooring Page 13 of 13 August 20,2020
You can also read