LoadMaster for Azure Installation Guide - UPDATED: 19 March 2021 - Kemp
←
→
Page content transcription
If your browser does not render page correctly, please read the page content below
LoadMaster for Azure
Installation Guide

UPDATED: 19 March 2021
LoadMaster for Azure

     Copyright Notices

     Copyright © 2002-2021 Kemp Technologies, Inc. All rights reserved. Kemp Technologies and the
     Kemp Technologies logo are registered trademarks of Kemp Technologies, Inc.

     Kemp Technologies, Inc. reserves all ownership rights for the LoadMaster and Kemp 360 product line
     including software and documentation.

     Used, under license, U.S. Patent Nos. 6,473,802, 6,374,300, 8,392,563, 8,103,770, 7,831,712, 7,606,912,
     7,346,695, 7,287,084 and 6,970,933

    kemp.ax                                 2                Copyright 2002-2021, Kemp Technologies, All Rights Reserved
LoadMaster for Azure

     Table of Contents
       1 Introduction                                                                                                    4

          1.1 Related Firmware Version                                                                                       4

          1.2 Load Balancing in Microsoft Azure                                                                              4

          1.3 Known Issues/Limitations                                                                                       7

       2 Installation Prerequisites                                                                                      8

       3 Creating a LoadMaster for Azure VM                                                                              9

          3.1 Licensing Options                                                                                              9

          3.2 Creating a LoadMaster for Azure VM                                                                             9

              3.2.1 Enable a 10 Gb Interface (Optional)                                                                 15

                    Add a Single Interface to the LoadMaster                                                            15

                    Add Multiple Interfaces to the LoadMaster                                                           17

          3.3 Licensing and Initial Configuration                                                                       18

       References                                                                                                       21

       Last Updated Date                                                                                                22

    kemp.ax                                  3                 Copyright 2002-2021, Kemp Technologies, All Rights Reserved
LoadMaster for Azure
1 Introduction
1 Introduction
This document provides step-by-step instructions on how to deploy a Kemp Virtual LoadMaster
using the Azure Resource Manager (ARM) portal. This document is intended to provide an overview
of LoadMaster for Azure and to introduce some basic aspects of LoadMaster functionality.
1.1 Related Firmware Version
Published with LMOS version 7.2.48.4 LTS. This document has not required substantial changes
since 7.2.48.4 LTS. However, the content is in sync with the latest LoadMaster LTS firmware.
1.2 Load Balancing in Microsoft Azure
Before we create a LoadMaster Virtual Machine (VM) in Azure, it is important to understand the
traffic flow so that VMs in Microsoft Azure can be configured appropriately.
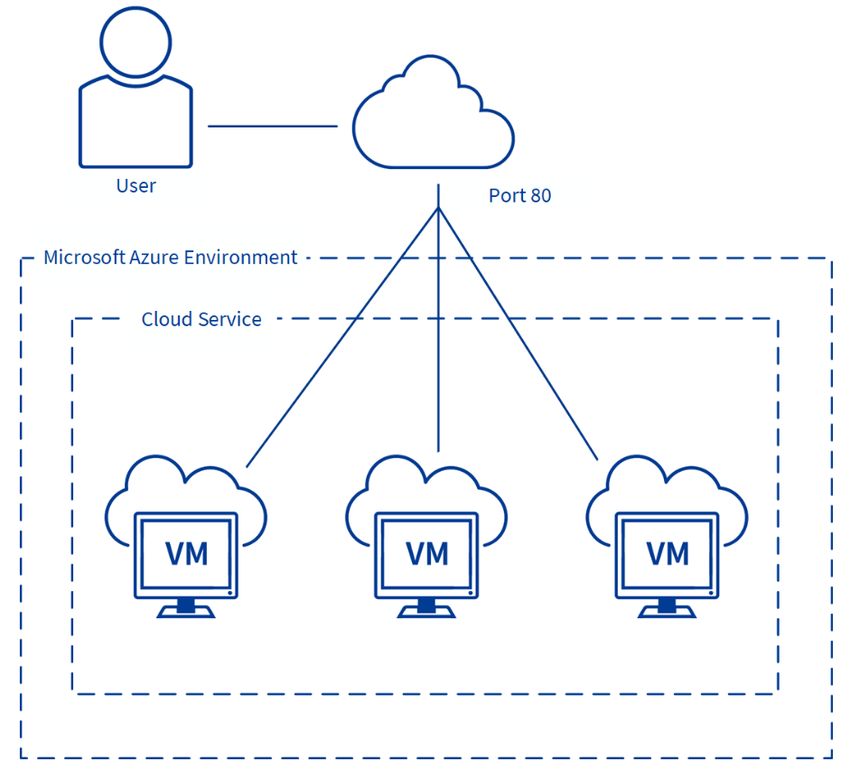
Microsoft Azure Infrastructure as a Service (IaaS) deployments accept traffic only on published
endpoints. Any request to access Microsoft Azure workloads passes through the default load
balancing layer of the Microsoft Azure platform. The figure below depicts the default deployment
without the use of a Kemp LoadMaster in Azure.
kemp.ax 4 Copyright 2002-2021, Kemp Technologies, All Rights Reserved
LoadMaster for Azure
1 Introduction
Any workload being published consists of an availability set, which represents a single VM or
multiple VMs. When a VM is created, if an availability set exists, you have an option to connect the
VM to an existing availability set. As more VMs are connected to an existing VM (and thus to an
existing availability set), the built-in Microsoft Azure load balancer distributes connections when
creating a load-balanced endpoint.
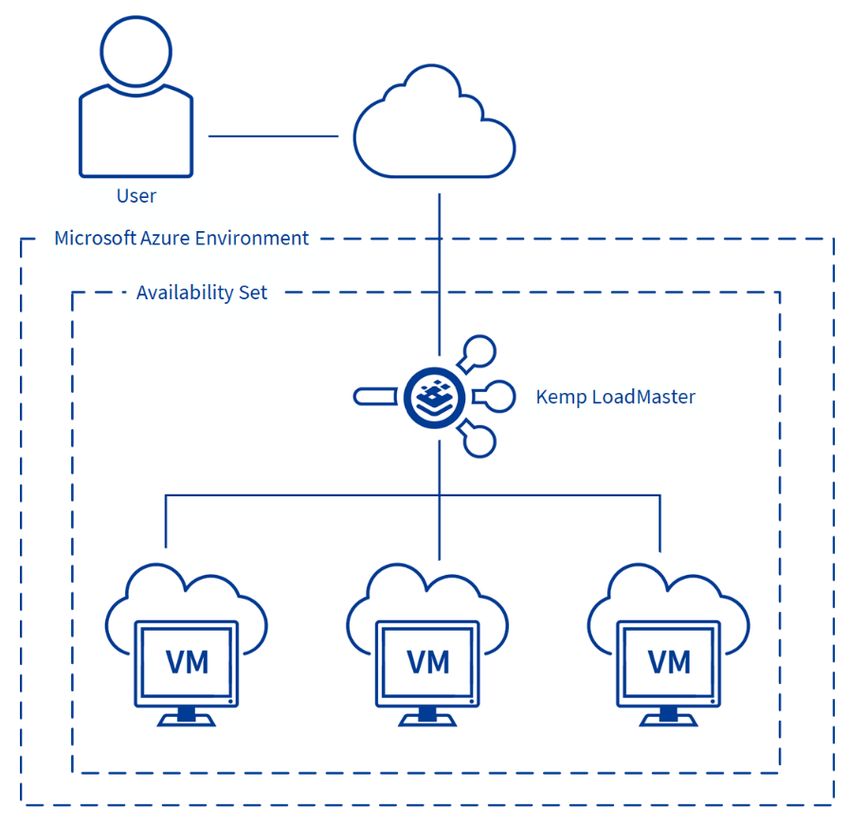
If you wish to use LoadMaster for Azure for your deployment, the following steps must be
completed:
1. The LoadMaster for Azure needs to be deployed first.
kemp.ax 5 Copyright 2002-2021, Kemp Technologies, All Rights ReservedLoadMaster for Azure
1 Introduction
2. All the VMs that need to be load balanced using the LoadMaster can then be created and
must be connected to the existing LoadMaster VM to create the required grouping.
3. Finally, when creating endpoints, we cannot use the Load-Balance traffic on an existing
endpoint option in Azure as we do not want to use the Microsoft Azure Load Balancer to
load balance incoming connections.
The figure below depicts the flow when LoadMaster for Azure is deployed:
Notice that VM1, VM2 and VM3 in this example are grouped into a single availability set and the
endpoint for published Virtual Services is created only on the LoadMaster VM. By doing this, we
kemp.ax 6 Copyright 2002-2021, Kemp Technologies, All Rights ReservedLoadMaster for Azure
1 Introduction
receive all load balanced traffic on the LoadMaster VM and the logic of load balancing incoming
connections are applied as per the configured Virtual Service on the LoadMaster for a given
workload.
Also, notice that VM1, VM2 and VM3 will not have any endpoints as they are not going to be
published directly to the internet.
There may be exceptions to this rule for connections that
require direct connectivity to the VM such as Remote Desktop
Connections to Windows Server OS.
1.3 Known Issues/Limitations
There are a couple of known issues/limitations to be aware of:
l Transparency is not possible in HA setups in Azure environments. For more information and
requirements, refer to the Transparency Feature Description document on the Kemp
Documentation page.
l Do not downgrade from firmware version 7.2.36 or higher to a version below 7.2.36. If you do
this, the LoadMaster becomes inaccessible and you cannot recover it.
l The Virtual Service IP address must be the same IP address as the network interface.
l Alternate default gateway support is not permitted in a cloud environment.
kemp.ax 7 Copyright 2002-2021, Kemp Technologies, All Rights ReservedLoadMaster for Azure
2 Installation Prerequisites
2 Installation Prerequisites
To support LoadMaster for Azure, the following are required:
l An active subscription of Microsoft Azure Virtual Machines
l A client computer running Windows 7 or newer
l Internet Explorer 9 or newer, or any modern browser
l A minimum of 2GB RAM on the cloud environment
l If you want to enable 10 Gb throughput for a LoadMaster virtual machine (VM) in Azure, you
must select an Azure VM instance type that supports the 10 Gb Mellanox driver. Refer to the
Sizes for Linux virtual machines in Azure page for further details.
It is not possible to bond interfaces on Azure LoadMasters.
kemp.ax 8 Copyright 2002-2021, Kemp Technologies, All Rights ReservedLoadMaster for Azure
3 Creating a LoadMaster for Azure VM
3 Creating a LoadMaster for
Azure VM
Please ensure that the prerequisites documented in the earlier section are met.
3.1 Licensing Options
There are four main licensing options when deploying a LoadMaster for Azure:
l Hourly consumption
l Bring Your Own License (BYOL)
l Free version
l License Agreement - Service Provided License Agreement (SPLA)/Metered
To use the BYOL option, follow the steps below:
1. Deploy the BYOL – Trial and perpetual license version of the Virtual LoadMaster (follow
the steps in the section below to do this).
2. Contact a Kemp representative to get a license.
3. Update the license on your LoadMaster to apply the license change (System
Configuration > System Administration > Update License).
4. Kemp recommends rebooting after updating the license.
3.2 Creating a LoadMaster for Azure VM
This section provides step-by-step instructions on how to deploy a Kemp Virtual LoadMaster.
kemp.ax 9 Copyright 2002-2021, Kemp Technologies, All Rights ReservedLoadMaster for Azure
3 Creating a LoadMaster for Azure VM
There is a button on the Microsoft Azure Marketplace called GET IT NOW. When you click this
button and log in, you are brought to the Azure portal and a choice of products is displayed. When
you select a product and click Continue, you are brought to the dashboard screen to create a
Virtual Machine.
The steps in this document reflect the steps in the Azure Marketplace (http://portal.azure.com).
To deploy a new LoadMaster using ARM, follow the steps below:
1. From the Azure Management Portal dashboard, click Create a resource.
2. Enter Kemp in the search bar and press Enter on your keyboard.
kemp.ax 10 Copyright 2002-2021, Kemp Technologies, All Rights ReservedLoadMaster for Azure
3 Creating a LoadMaster for Azure VM
3. Select LoadMaster Load Balancer ADC Content Switch.
4. From the drop-down menu, select the desired LoadMaster type and click Create.
5. Under Project details, complete the following fields:.
a) Select the Azure Subscription.
b) Select an existing or create a new Resource group to deploy the LoadMaster into.
6. Under Instance details, complete the following fields:
kemp.ax 11 Copyright 2002-2021, Kemp Technologies, All Rights ReservedLoadMaster for Azure
3 Creating a LoadMaster for Azure VM
a) Enter a Virtual machine name for the LoadMaster.
b) Select an Azure Region.
c) Optionally select Availability options if you are deploying a High Availability (HA)
pair.
d) Confirm that the desired LoadMaster type is selected in the Image drop-down list.
e) Enable or disable Azure Spot instance.
f) Select the desired Size for the virtual machine.
LoadMaster Recommended vCPU Recommended RAM
VLM-500 2 vCPU 4 GiB
VLM-3000 4 vCPU 8 GiB
VLM-MAX User defined * User defined *
* VLM-MAX vCPU and RAM allocation can be assigned based on your requirements due to the
uncapped performance available.
If you want to enable 10 Gb throughput for a LoadMaster virtual machine (VM) in Azure, you must
select an Azure VM instance type that supports the 10 Gb Mellanox driver. For more information,
refer to the Enable a 10 Gb Interface (Optional) section.
7. Under Administrator account, complete the following fields:
a) Select the Authentication type (SSH public key or Password).
Kemp recommends using a password, but either way will work
fine.
b) Enter a Username.
kemp.ax 12 Copyright 2002-2021, Kemp Technologies, All Rights ReservedLoadMaster for Azure
3 Creating a LoadMaster for Azure VM
This username is not used by the LoadMaster for Azure. The
default username to access the LoadMaster is bal.
c) Enter a Password for the bal account and confirm the password.
This password is used to access the LoadMaster Web User
Interface (WUI).
d) SSH public key source: You can either create a new key pair, use an existing key
stored in Azure, or use an existing public key.
It is recommended to store SSH keys in a secure location.
8. Click Next: Disks.
9. Leave the defaults for Disk options and Data disks.
10. Click Next: Networking.
11. Under Network interface, complete the following fields:
a) Select an existing or create a new Virtual network.
kemp.ax 13 Copyright 2002-2021, Kemp Technologies, All Rights ReservedLoadMaster for Azure
3 Creating a LoadMaster for Azure VM
b) Select an existing or create a new Subnet.
c) Select an existing or create a new Public IP.
d) Keep the default setting for NIC network security group.
The security group should contain rules for port 8443
(management), 22 (SSH), and any other ports that are needed
by the back-end. Do not block port 6973.
e) If the VM size selected supported Accelerated networking, select On.
If you want to enable 10 Gb throughput for a LoadMaster VM in
Azure, you must select an Azure VM instance type that supports
the 10 Gb Mellanox driver. For more information, refer to the
Enable a 10 Gb Interface (Optional) section.
f) If you are deploying a HA pair of LoadMasters, you can select an existing load balancer.
12. Click Next: Management.
13. You can optionally make any necessary changes to the Monitoring, Identity, and Auto-
Shutdown sections or leave them as default.
14. Click Next: Advanced.
15. You can optionally make any necessary updates to the Extensions and Custom data
sections or leave them as default.
16. You can optionally make any necessary updates to the Tags section or leave the
defaults.
17. Click Next: Review + create.
kemp.ax 14 Copyright 2002-2021, Kemp Technologies, All Rights ReservedLoadMaster for Azure
3 Creating a LoadMaster for Azure VM
18. You can optionally click Download a template for automation to download an ARM
template.
19. Click Create.
If you chose to create a new SSH key pair, you are now
prompted to store the private key for the public key you
created. Azure does not store the private key. After the SSH key
is created, you will not be able to download the private key.
The creation of a VM may take a few minutes or more depending on the Azure portal’s
responsiveness and other factors. Ensure that the VM is created without any errors. Resolve any
errors if needed.
When creating connected VMs, ensure to select the same Virtual network as the LoadMaster.
3.2.1 Enable a 10 Gb Interface (Optional)
Follow one of the two procedures below depending on whether you are adding a single network
interface or multiple network interfaces to the LoadMaster.
To enable 10 Gb throughput for a LoadMaster virtual machine (VM) in Azure, you must select an
Azure VM instance type that supports the 10 Gb Mellanox driver. Accelerated Networking is
supported on most general purpose and compute-optimized instance sizes with two or more vCPUs.
These supported series are: D/DSv2 and F/Fs. On instances that support hyperthreading, Accelerated
Networking is supported on VM instances with four or more vCPUs. Supported series are: D/Dsv3,
E/Esv3, Fsv2, Lsv2, Ms/Mms and Ms/Mmsv2. Refer to the Sizes for Linux virtual machines in Azure
page for further details.
Add a Single Interface to the LoadMaster
To enable 10 Gb interfaces on the LoadMaster, perform the following steps:
1. Deploy the LoadMaster.
For the purposes of this document, the Standard DSv2
machine size is used.
kemp.ax 15 Copyright 2002-2021, Kemp Technologies, All Rights ReservedLoadMaster for Azure
3 Creating a LoadMaster for Azure VM
When you instantiate a 10 Gb interface, it appears as two
interfaces in the LoadMaster Web User Interface (WUI). The two
interfaces are related and have the same MAC address. Only
the first interface has an IP address. If you want to modify the
interface, you must do this on the interface that has the IP
address listed.
2. License the LoadMaster.
3. Verify that the Mellanox driver has instantiated correctly by performing the following
steps:
a) If the LoadMaster was deployed with a single interface, two interfaces are displayed
under System Configuration > Interfaces on the LoadMaster WUI. If only one interface
is displayed this means that the Mellanox driver has not instantiated.
b) To instantiate the Mellanox driver, you must shut down the LoadMaster. Navigate to:
System Configuration > System Administration > System Reboot and click
Shutdown. You must also stop the LoadMaster from the Azure WUI by clicking Stop.
c) To start the LoadMaster on the Azure WUI, click Start.
d) When the LoadMaster boots up, navigate to: System Configuration > Interfaces on
the LoadMaster WUI and verify that two interfaces (eth0 and eth1) are displayed under
System Configuration > Interfaces.
e) You can also verify that two interfaces are active by checking performing an Ifconfig.
To perform an Ifconfig, navigate to System Configuration > Logging Options > System
kemp.ax 16 Copyright 2002-2021, Kemp Technologies, All Rights ReservedLoadMaster for Azure
3 Creating a LoadMaster for Azure VM
Log Files and click Debug Options. On the Debug Options screen, click Ifconfig. This
displays two interfaces with the same hardware address.
Add Multiple Interfaces to the LoadMaster
The Azure WUI does not allow interfaces with accelerated networking to be added. You must add
the interface by using the Azure command line interface (CLI) or by using PowerShell.
You must run the command with the LoadMaster in a powered
off state.
1. Create the interface using the Azure CLI similarly to the example below:
PS C:\Users\test> az network nic create --resource-group testdoc --name myNic2
--vnet-name myVnet --subnet subnet2 --accelerated-networking true --public-ip-
address myPublicIp2 --network-security-group myNetworkSecurityGroup --location
eastus
2. When the interface is created, you can add this interface to the LoadMaster when it is in a
powered off state. Navigate to the Networking tab of the LoadMaster on the Azure WUI.
3. Click Attach network interface.
4. When the attachment is complete, both interfaces appear on the Azure WUI.
5. Restart the LoadMaster.
kemp.ax 17 Copyright 2002-2021, Kemp Technologies, All Rights ReservedLoadMaster for Azure
3 Creating a LoadMaster for Azure VM
6. Verify that the interfaces are displayed under System Configuration > Interfaces on the
LoadMaster WUI. The LoadMaster WUI should now display four interfaces.
You can also verify that four interfaces are active by checking performing an Ifconfig. To perform an
Ifconfig, navigate to System Configuration > Logging Options > System Log Files and click Debug
Options. On the Debug Options screen, click Ifconfig.
Unlike the single interface case where eth0 and eth1 are related, for multiple interfaces, eth0 and
eth2 and eth1 and eth3 are related (with the same MAC address). eth0 and eth1 have the IP
addresses, the other interfaces without the IP addresses are related by the HWaddr (the MAC
address).
3.3 Licensing and Initial Configuration
The following procedure outlines how to set up LoadMaster for Azure by ensuring appropriate
licensing and basic configuration before you can create a Virtual Service and publish the required
workloads:
1. Using a supported web browser, navigate to https://:8443.
kemp.ax 18 Copyright 2002-2021, Kemp Technologies, All Rights ReservedLoadMaster for Azure
3 Creating a LoadMaster for Azure VM
Substitute with the DNS name you created in
previous section.
2. Take the appropriate steps to acknowledge notification about the self-signed certificate
to proceed.
3. You are presented with the End User License Agreement (EULA). You must accept the
EULA to proceed further. Click Agree to accept the EULA.
4. You are prompted to enter your Kemp ID and password for licensing. If you do not have a
Kemp ID, click the link to create one. Click License Now.
5. When licensing a BYOL LoadMaster, a list of available licenses is provided and/or a
temporary trial license. Select the desired license and click Continue.
When licensing a trial, you are presented with a VLM-
MAX Enterprise Plus subscription.
6. The LoadMaster requires you to log in before you can proceed any further. The password
used to log in will vary depending on whether you choose to use Password authentication
or SSH Public Key authentication when creating the VM in the Licensing Options section:
a) Password: Provide the username bal and the password which was set in the
Licensing Options section. Click Continue.
b) SSH Public Key: Provide the default username bal and password 1fourall to proceed.
You are required to change the default password soon after. Click Continue.
7. You are then presented with the main menu and home screen of the LoadMaster.
8. Before using the LoadMaster, it must be licensed. For instructions on how to license the
LoadMaster, refer to the LoadMaster LicensingFeature Description.
9. After licensing, you are given the opportunity to enable Kemp Analytics. With this feature,
LoadMaster collects and sends usage data to Kemp for analysis. This data is strictly about
product usage, enabled capabilities, and statistics. No sensitive user data, or traffic of any
kind is either collected or communicated. To enable this feature, click Enable Kemp
Analytics. To proceed without enabling this feature, click Don't Enable Kemp Analytics.
For more information, visit https://kemp.ax/KempAnalytics.
Before you can create Virtual Services, you should create VMs that you are load balancing through
LoadMaster for Azure. Ensure that your Network Security Group (NSG) is set up correctly depending
kemp.ax 19 Copyright 2002-2021, Kemp Technologies, All Rights ReservedLoadMaster for Azure
3 Creating a LoadMaster for Azure VM
on which services you are load balancing. For instructions on how to create Virtual Services, refer
to the Virtual Services and Templates Feature Description.
kemp.ax 20 Copyright 2002-2021, Kemp Technologies, All Rights ReservedLoadMaster for Azure
References
References
While the instructions above provide a basic overview of how to deploy and configure LoadMaster
for Azure, it is not designed to be a comprehensive guide to configure every possible workload. This
section identifies some of many guides published on our resources section of our website. Unless
otherwise specified, the following documents can be found at
http://kemptechnologies.com/documentation.
Kemp LoadMaster, Product Overview
Web User Interface (WUI), Configuration Guide
CLI, Interface Description
RESTful API, Interface Description
Virtual Services and Templates, Feature Description
SubVSs, Feature Description
SSL Accelerated Services, Feature Description
Port Following, Feature Description
Content Rules, Feature Description
ESP, Feature Description
Quickstart Guide
LoadMaster HA for Azure, Installation Guide
Licensing, Feature Description
You can find more documentation here: http://kemptechnologies.com/documentation
You can engage in community discussions on forums at: http://forums.kemptechnologies.com/
kemp.ax 21 Copyright 2002-2021, Kemp Technologies, All Rights ReservedLoadMaster for Azure
Last Updated Date
Last Updated Date
This document was last updated on 19 March 2021.
kemp.ax 22 Copyright 2002-2021, Kemp Technologies, All Rights ReservedYou can also read