Mai Tai M777 Hybridization System - USER MANUAL
←
→
Page content transcription
If your browser does not render page correctly, please read the page content below
www.scigene.com

                Mai Tai® M777
             Hybridization System
                                  USER MANUAL
                       Cat. #1075‐00‐5 (115V); 1075‐00‐6 (230V)

                                     FOR RESEARCH USE ONLY
                                Not for Use in Diagnostic Procedures

1287 Reamwood Avenue, Sunnyvale, CA 94089 USA • Tel 408‐733‐7337 • Fax 408‐733‐7336 • techserv@scigene.com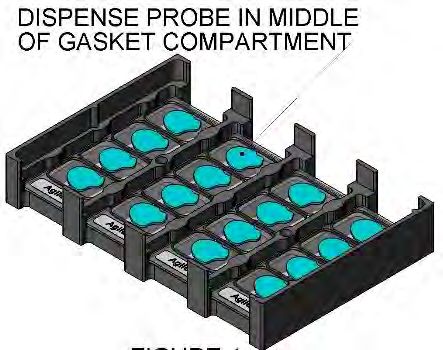
Mai Tai M777 Hybridization System — USER MANUAL

Serial Number

The following serial number identifies the specific oven you have purchased and must be referenced
when requesting service. A copy is affixed to the oven.

                          Technical Service: (408) 733‐7337, techserv@scigene.com

Warranty

SciGene warrants that the heating unit described in this manual shall be free of defects in materials and
workmanship for a period of 12 months from date of delivery. This warranty does not cover removable
parts or accessories. In the event of a defect during the warranty period, SciGene’s limit of liability will
be to provide replacement parts at no charge or, at its sole discretion, replace the product. The
foregoing warranty is void in the event the unit was abused or modified or used in a manner
inconsistent with its intended purpose. SciGene makes no other warranty, expressed or implied
including warranties of merchantability and fitness for a particular purpose. In no event shall SciGene
be liable for any direct, indirect, special, incidental or consequential damages or for any damages
resulting from loss arising out of or in connection with the sale, use or performance of the product.

Copyright

Copyright ©2008‐2015 SciGene Corporation. All rights reserved. SciGene and Mai Tai are trademarks of
SciGene Corporation, Sunnyvale, CA. All other trademarks used in this manual are the property of their
respective owners.

Version 2.4, April 2015                              1                   (408) 733‐7337, techserv@scigene.com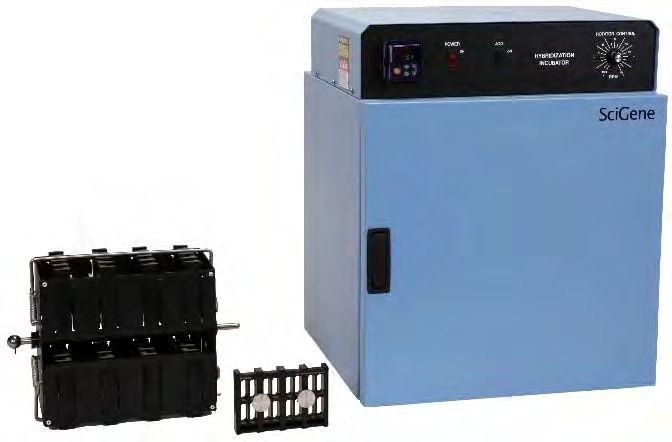
Mai Tai M777 Hybridization System — USER MANUAL

                                                           Table of Contents
I.         SAFETY NOTICES .............................................................................................................3
      A.      Intended Use .................................................................................................................................. 3
      B.      Oven Safety .................................................................................................................................... 3
      C.      Symbols and Conventions .............................................................................................................. 3
      D.      Warnings ........................................................................................................................................ 4
      E.      Cautions ......................................................................................................................................... 4
      F.      Compliance .................................................................................................................................... 5
II.        UNPACKING AND SET UP ................................................................................................6
      A.      Unpacking, Lifting and Moving the Oven....................................................................................... 6
      B.      Items Provided ............................................................................................................................... 6
      C.      Environmental Requirements ........................................................................................................ 6
      D.      Installation and Location................................................................................................................ 6
III. USING YOUR MAI TAI HYBRIDIZATION SYSTEM...............................................................7
      A.      Oven Components, Controls and Accessories ............................................................................... 7
      B.      Using the Temperature Controller ................................................................................................. 8
      C.      Calibrating the Temperature Controller ........................................................................................ 8
      D.      Setting the Rotator Speed.............................................................................................................. 9
      E.      Using the Jog Switch ...................................................................................................................... 9
      F.      Loading and Removing Mai Tai Rotator ......................................................................................... 9
      G.      Loading and Removing Mai Tai Cassettes ...................................................................................... 9
IV. USING MAI TAI HYBRIDIZATION CASSETTES .................................................................. 10
      A.      Cassette Set Up and Loading ....................................................................................................... 10
      B.      Cassette Cleaning and Storage .................................................................................................... 12
V.         MAINTAINING YOUR OVEN ........................................................................................... 13
      A.      Powering Off ................................................................................................................................ 13
      B.      Cleaning the Oven ........................................................................................................................ 13
      C.      Checking and Replacing Fuses ..................................................................................................... 13
VI. TROUBLESHOOTING ...................................................................................................... 14
VII. SPECIFICATIONS ............................................................................................................ 14
VIII. RELATED ACCESSORIES.................................................................................................. 14
IX. DECLARATION OF CONFORMITY ................................................................................... 15

Version 2.4, April 2015                                                        2                               (408) 733‐7337, techserv@scigene.com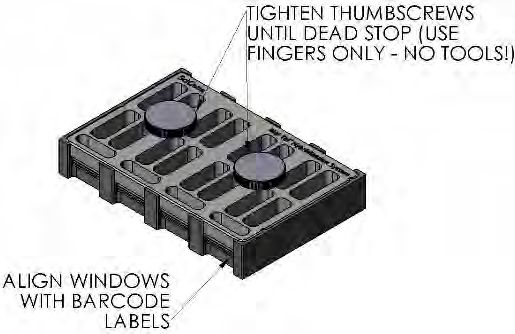
Mai Tai M777 Hybridization System — USER MANUAL

       I.      SAFETY NOTICES

            A. Intended Use
               The Mai Tai M777 Hybridization System consists of a high precision oven and rotator with
               convection heating system for bubble mixing test samples with Agilent microarrays.
               Le système d'hybridation M777 Mai Tai est constitué d'un four à haute précision et de la
               coiffe avec système de chauffage par convection pour Bubble mélangeant Agilent ou
               Affymetrix puces.

            B. Oven Safety
               Before operating the oven, read the information in this section concerning hazards and
               potential hazards. Ensure that anyone involved with the oven’s operation is instructed in
               both general safety practices for laboratories and specific safety practices for the oven.
               Avant le fonctionnement de l'oven, lisez les renseignements dans cette section concernant
               les risques et les dangers potentiels. S'assurer que toute personne impliquée avec le
               fonctionnement de l'oven est instruit dans les pratiques générales de sécurité pour les
               laboratoires et les pratiques de sécurité spécifiques pour l'oven. Avant le fonctionnement de
               l'oven, lisez les renseignements dans cette section concernant les risques et les dangers
               potentiels. S'assurer que toute personne impliquée avec le fonctionnement de l'oven est
               instruit dans les pratiques générales de sécurité pour les laboratoires et les pratiques de
               sécurité spécifiques pour l'oven.

            C. Symbols and Conventions
               The following chart is an illustrated glossary of the electrical symbols that are used on the
               oven. Whenever such symbols appear on ovens, please observe appropriate safety
               measures.
               Le tableau suivant est un glossaire illustré des symboles électriques qui sont utilisées sur le
               système. Chaque fois que ces symboles apparaissent sur les ovens, veuillez observer les
               mesures de sécurité appropriées.

                1. Electrical Symbols
                                 This symbol indicates that this is a protected ground terminal that must
                                 be connected to earth ground before any other electrical connections
                                 are made to the oven.
                                 Ce symbole indique qu'il s'agit d'un terminal de terrain protégé qui doit
                                 être connecté à la terre avant que toutes les autres connexions
                                 électriques sont apportées à l'oven.

                                 CAUTION: This symbol warns of an electrical hazard and alerts you to
                                 consult this Operator’s Manual for further information and to proceed
                                 with caution.
                                 ATTENTION: Ce symbole vous avertit à consulter ce guide de
                                 l'utilisateur pour plus d'informations et de procéder avec prudence.

Version 2.4, April 2015                                3                     (408) 733‐7337, techserv@scigene.com
Mai Tai M777 Hybridization System — USER MANUAL
This symbol indicates the OFF position of the main POWER switch.
Ce symbole indique la position OFF de l'interrupteur principal.
This symbol indicates the ON position of the main POWER switch.
Ce symbole indique la position ON de l'interrupteur principal.
2. Non‐Electrical Symbols
CAUTION: This symbol illustrates a heat hazard. Proceed with caution
when working around these areas to avoid being burned by hot
components.
ATTENTION: Ce symbole illustre un danger pour la chaleur. Faire preuve
de prudence lorsque vous travaillez autour de ces zones pour éviter
d'être brûlé par les composants du chauds.
CAUTION: This symbol alerts you to consult this Operator’s Manual for
further information and to proceed with caution.
ATTENTION: Ce symbole vous avertit à consulter ce guide de l'utilisateur
pour plus d'informations et de procéder avec prudence.
D. Warnings
Failure to comply with the following warnings that are affixed to the product can lead to
possible personal injury or death.
Défaut de respecter les avertissements suivants qui sont apposées sur le produit peut
conduire à possibles lésions corporelles ou la mort.
This symbol on the rear of the oven indicates the presence of the fuse box.
Warning: For Continued Protection Against Fire, Replace Only with Same
Type Rating of Fuse. Always disconnect the power cord before attempting
to replace the fuse.
Ce symbole sur l'arrière de l'oven indique la présence de la boîte de fusibles.
Avertissement: Pour le maintien de la Protection contre l'incendie,
remplacer uniquement avec la même cote de Type de fusible. Toujours
débrancher le cordon d'alimentation avant d'essayer de remplacer le
fusible.
E. Cautions
Failure to comply with the following cautionary statement affixed to the product may lead
to possible personal injury.
Omission de se conformer à la mise en garde suivante apposée sur le produit peut entraîner
des blessures possibles.
This symbol indicates the potential presence of a Hot Surface. Use care when
working inside the oven chamber to avoid being burned.
Ce symbole indique la présence potentielle d'une surface chaude. Faites
attention lorsque vous travaillez à l'intérieur de la chambre du four pour éviter
d'être brûlé.
Version 2.4, April 2015 4 (408) 733‐7337, techserv@scigene.comMai Tai M777 Hybridization System — USER MANUAL
F. Compliance
1. European Conformity (CE)
This symbol indicates the instrument is in compliance with all applicable
European Union Electromagnetic Compatibility and Low Voltage Directives.
2. Restriction of Hazardous Substances (RoHS)
The RoHS directive was adopted in February 2003 by the European Union. It
restricts (with exceptions) the use of six hazardous materials (including lead
and mercury) in the manufacture of various types of electronic equipment. All
SciGene instruments carrying the CE mark are also RoHS compliant.
3. Electrical and Electronic Equipment Waste (WEEE)
WEEE is a European Community directive that became European Law in
February 2003. The crossed out wheelie bin symbol on a product or its
packaging indicates that it must NOT be disposed of with standard waste at
the end of its lifetime. Instead, it is your responsibility to return it to a
designated collection point for electronic equipment recycling. Contact your
local SciGene distributor for information on drop off locations.
4. Electromagnetic Compatibility (EMC)
The Model 777 Microarray Oven is a Class A digital device under FCC Title 47
Part 15B and designated as Class A electrical equipment for measurement,
control, and laboratory use (EN61326).
Note regarding Canadian EMC compliance: Le present appareil numerique
n’emet pas de bruits radioelectrique depassant les limites applicables aux
appareils numeriques de class A prescrites dans le reglement sur le brouillage
radioelectrique edicte par le Ministere des Communications du Canada.
Version 2.4, April 2015 5 (408) 733‐7337, techserv@scigene.comMai Tai M777 Hybridization System — USER MANUAL
II. UNPACKING AND SET UP
A. Unpacking, Lifting and Moving the Oven
The oven weighs approximately 70 lbs (32 kg) so caution is needed when lifting the unit to
protect yourself and others from personal injury. Two people are required to lift the unit,
one on each side, keeping it balanced and sharing the load. Remove any packing material
from around the top and sides of the oven, then carefully lift out, place on the bench and
inspect for damage.
If the oven is damaged upon arrival, please retain all shipping materials and contact
SciGene or your local distributor for assistance.
B. Items Provided
The following items are included in the shipping carton with the oven:
User Manual
Power Cord
Drip Pan
Mai Tai Rotator and Cassette(s) (if so equipped)
C. Environmental Requirements
Ensure that the area where the oven is installed meets the following conditions, for
reasons of safety and performance:
Ambient temperature +15 to +32°C (58 to 90°F)
Relative humidity 20 to 80% RH non‐condensing
Air flow clearance 6 inches (15 cm) minimum above unit
D. Installation and Location
Place the oven on a stable, level surface within a few feet of the power source. Allow 6
inches of clearance at top for adequate air flow. DO NOT place under a shelf where
solutions are stored. Any liquid entering the electrical compartment through the vent holes
on the top of the unit will cause damage.
Ensure there is adequate clearance on all sides of the oven, which may be warm to the
touch, including enough space to open the door completely. Using only the power cord
provided, plug it into the back of the oven and then to a properly grounded outlet. Turn on
power using the ON/OFF switch on the front control panel.
To avoid a safety hazard or damage to the
instrument, do not allow liquids to enter the
vent holes on top of the oven.
Pour éviter tout risque de sécurité ou endommager
le instrument, ne permettent pas de liquides dans le
des trous d'évent sur la partie supérieure du four.
Version 2.4, April 2015 6 (408) 733‐7337, techserv@scigene.comMai Tai M777 Hybridization System — USER MANUAL
III. USING YOUR MAI TAI HYBRIDIZATION SYSTEM
A. Oven Components, Controls and Accessories
Name Function
Power Switch Turns ON/OFF power to the oven
Rotator Speed Control Selects desired speed for internal rotator
Jog Switch Moves rotator at selected speed with door open
Temperature Controller Used to set, control and observe temperature
Door Latch Secures the door, with button release to open
Digital Thermometer (optional) Used to verify and calibrate temperature
Temperature Calibration Jack Connection for optional digital thermometer
Temperature Controller
Digital Thermometer (optional)
cat. #1051‐52‐0
Power Switch
Jog Switch
Rotator speed control
Temperature
Calibration Jack Door Latch
(in back)
Press here
to close
Door Latch
Press here
to release
Push door closed and
press lever to secure.
Version 2.4, April 2015 7 (408) 733‐7337, techserv@scigene.comMai Tai M777 Hybridization System — USER MANUAL
B. Using the Temperature Controller
The Model 777 Microarray Oven is equipped with a Watlow EZ‐Zone temperature
controller. It is calibrated at the factory to provide accurate chamber temperatures from
ambient +5 to 99°C. The controller has two LED displays: the upper red display shows
ACTUAL temperature inside the chamber and the lower green display shows the SET or
programmed temperature. To program an oven temperature, simply push the up or down
arrows until the desired temperature is shown in the lower display. The oven will adjust the
heat of the chamber until the SET temperature is attained.
C. Calibrating the Temperature Controller
To ensure accurate (±0.5°C) oven temperatures, the performance of the EZ‐Zone controller
should be periodically checked by comparing the temperature displayed on the controller
to an accurate, NIST‐certified (National Institute of Standards and Technology) thermal
measurement device. SciGene recommends the calibration method below to achieve
accurate oven temperatures. No other methods are recommended.
1. Calibration Check
a. Turn on the oven, set to 65°C and allow temperature to stabilize (30 min).
b. Connect a NIST‐certified digital thermometer (SciGene Cat. #1051‐52‐0) to the
blue jack (secondary RTD) at the top back of the oven.
c. Verify that the temperature shown on the digital thermometer matches that
shown on the controller within ±0.5°C. If it does not, follow the steps below to
adjust the controller.
2. Calibration Procedure
a. Turn on the oven, set to 65°C and allow temperature to stabilize (30 min).
b. Connect a NIST‐certified digital thermometer (SciGene Cat. #1051‐52‐0) to the
blue jack at the top back of the oven.
c. Calculate the difference in temperature shown on the controller to the digital
thermometer. For example, if the controller displays 65.0°C and the
thermometer displays 66.5°C, the difference (offset) is 1.5°C.
d. On the controller, press the up and down arrows simultaneously for 3 seconds.
The upper display will now read “A1” and the lower display “open”.
e. Press the green circle button 3 times until the lower display shows “i.CA”. The
upper display shows the offset value between the controller and thermometer
when the unit was last calibrated.
f. Use the up/down arrows to adjust the offset value to the temperature
difference calculated in Step c. For example, if the controller displays a
temperature 1.5°C lower than the thermometer, adjust the offset by adding
1.5 to the value shown.
g. Press the key twice to return to the operation display. Your oven is now
calibrated to provide accurate temperatures between ambient + 5 to 99°C.
Version 2.4, April 2015 8 (408) 733‐7337, techserv@scigene.comMai Tai M777 Hybridization System — USER MANUAL
D. Setting the Rotator Speed
The rotator is turned on and off and its speed of rotation controlled through the rotary
switch. Turn the dial clockwise from its stopping point to turn on the rotator drive system
and set the speed of rotation. Rotation speed is adjustable up to 80 RPM.
E. Using the Jog Switch
The jog switch is used to momentarily advance the rotator when the door is open. When
the jog switch is pressed, the rotator will turn at the speed selected on the speed
controller. It will not move if the speed controller is turned off or is set too low.
F. Loading and Removing Mai Tai Rotator
The Mai Tai rotator is loaded and removed using a two‐step process. When loading, first
insert the end of the shaft that ends in a ball joint with alignment pin into the slotted
bearing on the right wall of the chamber. The left end of the shaft is then placed into the
bearing on the left side of the chamber. Reverse the procedure to remove the rotator.
Insert ball with alignment Place shaft on left bearing
pin into right bearing
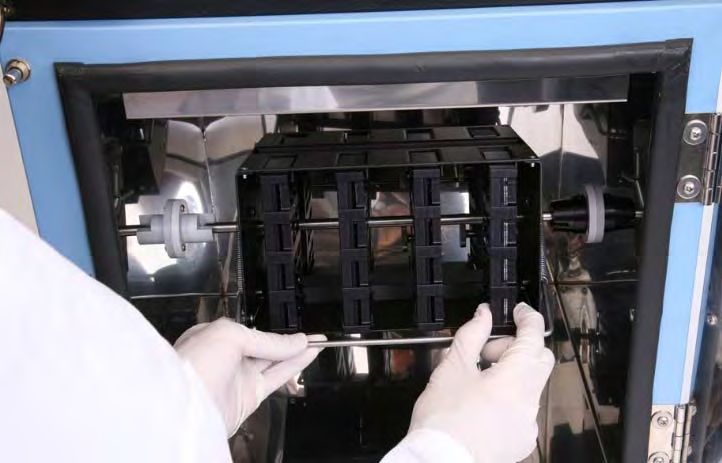
G. Loading and Removing Mai Tai Cassettes
Up to eight Mai Tai Cassettes may be loaded into a Mai Tai Rotator. Adjust the rotator
position for easy loading by using the jog switch on the oven control panel. To insert a
cassette, (1) lower and hold the spring bar open and then, (2) slide the bottom of the
cassette into an empty slot. Release the spring bar to hold the cassette in place during
rotation. Reverse the procedure to remove the cassette.
.
Take care when working inside the oven or touching hot surfaces to avoid being burned.
Attention, en travaillant à l'intérieur des surfaces chaudes du four ou de toucher pour éviter
d'être brûlé.
Version 2.4, April 2015 9 (408) 733‐7337, techserv@scigene.comMai Tai M777 Hybridization System — USER MANUAL
IV. USING MAI TAI HYBRIDIZATION CASSETTES
A. Cassette Set Up and Loading
With the Mai Tai Rotator installed, pre‐heat the hybridization oven to the desired incubation
temperature.
1. Place the base plate on a flat surface such as a laboratory bench.
2. Place one gasket slide per chamber into the cassette with the “Agilent” label facing
up and aligned with the “barcode” side of the chamber, as shown below. It is not
necessary to process four slides at once. Load one to four slides as desired.
When placing the gasket slide, ensure it does NOT rest on the edge of the base plate.
Practice placing glass slides into the chamber prior to running an experiment.
Lorsque vous placez le curseur de joint, se assurer qu'il ne repose pas sur le bord de la
plaque de base. Pratique placer des lames de verre dans la chambre avant d'exécuter
une expérience.
3. Pipette the labeled probe into each chamber of the gasket slide using the volumes
shown in the table below for each gasket slide format.
Gasket Format Probe Volume
1 microarray 520 microliters
2 microarrays 260 microliters
4 microarrays 110 microliters
8 microarrays 40 microliters
Dispense hybridization solution in the center of the well without touching the gasket
with the pipette tip.
Répartir la solution d'hybridation dans le centre du puits sans toucher le joint
d'étanchéité avec l'embout de pipette.
Version 2.4, April 2015 10 (408) 733‐7337, techserv@scigene.comMai Tai M777 Hybridization System — USER MANUAL
4. Holding the slide at the ends with the array side down and ensuring that the
barcode side matches with the one on the gasket slide, bring the array down slowly
holding it horizontal to the gasket slide.
Placing the array evenly onto the gasket slide is crucial to prevent spilling or leakage.
Placer le tableau uniformément sur la lame de joint est crucial pour éviter tout
déversement ou de fuite.
5. When all slides have been placed, make sure all assemblies are laid flat against the
base plate. See below for examples of proper and improper placement.
6. Place the cover plate over the arrays with the barcode window matching the
barcodes on the array. See above for correct orientation of the cover plate.
7. Tighten the thumb screws by hand until stopped. Do NOT use tools.
8. Tilt the cassette back and forth, looking in the window slots to ensure that the
bubbles move freely inside each array chamber. Release any stationary bubbles by
gently tapping each corner of the assembly on a firm surface as it is rotated. For
optimal hybridization, it is best to have one large bubble which moves freely.
9. Place the assembly into the Mai Tai Rotator in the pre‐heated oven. Raise the
spring bar and load a Mai Tai Cassette by sliding the cassette into an empty slot.
10. When rotating multiple cassettes, load equal numbers of cassettes on opposing
sides of the rotator to balance weight.
11. Set the rotator speed control to the RPM setting recommended by the microarray
manufacturer.
12. Incubate the cassette(s) for the time and duration recommended by the microarray
manufacturer, and then use hand protection (glove or mitt) to remove them from
the rotator and allow to cool for a few minutes.
13. Loosen thumbscrews, lift the top plate and one‐at‐a‐time, remove the array gasket
assembly and separate them while submerged in buffer specified by the microarray
manufacturer.
14. Wash and dry the microarray(s) manually or on the Little Dipper Processor
[SciGene Cat. #1080‐40‐X] using SciGene Wash Buffers 1 and 2 for Agilent CGH
Arrays [Cat. # #5188‐5221 and Cat. #5188‐5222].
Version 2.4, April 2015 11 (408) 733‐7337, techserv@scigene.comMai Tai M777 Hybridization System — USER MANUAL
B. Cassette Cleaning and Storage
Hybridization solution may occasionally spill and dry on to Mai Tai base and cover plates,
making arrays or gasket slides stick to these parts during hybridization. Base plates, cover
plates and thumb screws need to be cleaned periodically to prevent such sticking.
1. Disassemble each cassette into base, cover and screws.
2. Use lint‐free wipes soaked in 70% ethanol to carefully wipe all surfaces and holes
to remove dried hybridization solution and salts.
3. Allow the clean parts to dry completely by evaporation.
4. Re‐assemble parts together using the thumb screws and store in a clean, dry place.
Version 2.4, April 2015 12 (408) 733‐7337, techserv@scigene.comMai Tai M777 Hybridization System — USER MANUAL
V. MAINTAINING YOUR OVEN
A. Powering Off
Turn the power switch to the OFF position and unplug the power cord before performing
any cleaning or service procedure.
B. Cleaning the Oven
Clean metal surfaces using a soft cloth and mild, detergent‐based cleaner. Avoid abrasive
cleaners that can scratch surfaces. Do NOT use caustic or strongly alkaline solutions (e.g.,
strong soaps, ammonia, or bleach). Under no circumstances should solutions be allowed to
enter through the ventilation slots on the top of the oven.
If running radioactive or biohazardous reactions, consult your institution’s radiation safety
officer or biosafety office for assistance.
Turn power switch to the OFF position and unplug the power cord before
performing any cleaning procedure!
Tournez le commutateur d'alimentation sur la position OFF et débranchez le cordon
d'alimentation avant d'effectuer toute opération de nettoyage!
Ensure oven has cooled to room temperature prior to cleaning.
Assurer le four est refroidi à température ambiante avant de le nettoyer!
C. Checking and Replacing Fuses
Two fuses are located in the removable block below the power cord receptacle on the top,
back of the oven. Blown fuses will have a broken filament or appear dark. Always replace
fuses with the same amperage and voltage as shown on the label below the fuse block.
Turn power switch to the OFF position and unplug
the power cord before performing any service procedure.
Tournez le commutateur d'alimentation sur la position OFF et débranchez le cordon
d'alimentation avant d'effectuer toute opération de service!
Pry open tab
To remove fuses:
with screwdriver
1. Insert a small, flat blade screwdriver into the tab
recess just below the plug receptacle.
Fuse holder
2. Push down to release the fuse block.
3. Slide fuse holder out from the fuse block while Push clip up
holding the retaining tab out of the way. to release
4. Gently pry out the fuses.
Fuse block
Version 2.4, April 2015 13 (408) 733‐7337, techserv@scigene.comMai Tai M777 Hybridization System — USER MANUAL
VI. TROUBLESHOOTING
Symptom Cause Solution
Oven does not turn on. Blown fuse(s) Replace fuse(s) on back of unit,
beneath power cord receptacle.
Door does not close Latch is improperly Adjust threaded rod on inside of
properly or is difficult to adjusted or needs latch or contact SciGene or your
open. replacement. local distributor to replace the latch
if necessary.
Controller is not responding Controller is faulty or is Cycle oven on and off. Contact
when buttons are pressed. program settings have SciGene or your local distributor to
been lost. reset or replace the controller.
VII. SPECIFICATIONS
Electrical
Cat. #1075‐00‐7 115V AC; 50/60 Hz; 6A
Cat. #1075‐00‐8 230V AC; 50/60 Hz; 3A
Dimensions and Weight
Outside H x W x D 22 x 18 x 17 inches (55 x 45 x 42 cm)
Weight 70 lbs (32 kg)
Performance and Controls
Temperature Range Ambient +5°C to 99°C
Temperature Regulation ± 0.1°C
Rotation Speed Up to 80 RPM
Digital Thermometer Output T‐type Thermocouple
VIII. RELATED ACCESSORIES
Cat. # Description UoM
1070‐20‐0 Rotator for Agilent SureHyb and Original Hyb Chambers. EA
1075‐10‐0 Mai Tai Hybridization Cassette. Holds four slides. EA
1075‐20‐0 Mai Tai Rotator. Holds up to 8 Mai Tai Cassettes. EA
1040‐95‐0 Packaging Set for Model 777 Oven (includes box and foam inserts). EA
1051‐52‐0 Digital thermometer, T‐type. Includes cable and NIST certificate. EA
Version 2.4, April 2015 14 (408) 733‐7337, techserv@scigene.comMai Tai M777 Hybridization System — USER MANUAL
IX. DECLARATION OF CONFORMITY
Model 777 Microarray Oven
SciGene
1287 Reamwood Avenue
Sunnyvale, CA 94089 USA
Declares that the above referenced product(s) meets the essential requirements of
the following European Union Directives by using the relevant standards shown
below to indicate compliance.
EMC Directive 2004/108/EC
Standard:
IEC 61326‐1 2005 Electrical equipment for measurement, control and
laboratory use
LVD Directive 2006/95/EC
Standards:
IEC 61010‐1 2010 Electrical Equipment for Measurement, Control and
Laboratory use
3rd Edition Part 1: General requirements
IEC 60204‐1 2006 Electrical equipment of machines
RoHS Directive 2011/65/EC
Terry Gill Sunnyvale, California, USA
Name of Authorized Representative Place of Issue
Director of Product Manufacturing January 02, 2015
Title of Authorized Representative Date of Issue
Signature of Authorized Representative
Version 2.4, April 2015 15 (408) 733‐7337, techserv@scigene.comYou can also read