MANUAL. phorcontrol - BLOCK OPTIC
←
→
Page content transcription
If your browser does not render page correctly, please read the page content below

MANUAL.
phorcontrol.

PART 01. | PHORCONTROL                        PART 02. | POLAPHOR TV
    5    Software parameters                      18   Software parameters
    5    Intended use                             18   Introduction
    5    Prohibited use                           19   Powering on and off
    5    Delivery contents                        19   Controlling
    6    Introduction                             19   Configuration of the visual acuity
    6    Graphical user interface                      system
    7    The display area in detail               21   Customization of the visual acuity
    8    The quick selection area in detail            device
    9    The control area in detail               23   Software-Updates
    10   Settings                                 24   Wiring and installation
    14   Recover to factory defaults
    14   Installation and configuration
    15   First connection
    16   First start of the control application
    16   Demo-Mode

     Version 1.37 E | 26.04.2019

2
CONTENT.
                                                                   manual.

PART 03. | MINIPHOR 2            PART 04. | POLAPHOR HD
26   Software parameters         32   Device Specifications
26   Introduction                32   Intended Applications
27   Description                 32   Unintended Application
28   Software-Updates            32   Scope of supply
28   Distance measurement        33   Safety Remarks
29   Docking station             34   Liability of Manufacturer
31   Declaration of Conformity   34   Responsibility of User
                                 34   Warranty
                                 35   Polaphor HD - front view
                                 36   Polaphor HD – rear view
                                 36   Mounting
                                 37   Putting into operation
                                 37   Before the first use
                                 37   Safety note
                                 38   Care and maintenance
                                 38   Errors
                                 39   Software update
                                 39   Technical data
                                 41   Declaration of Conformity
                                 42   Software options and accessories

                                                                         3
Visual acuity systems by Block Optic are controlled by an extra Android based tablet (or
    mobile phone). To provide examiners the opportunity of a convenient face to face position,
    the offered tests are shown on that tablet as well.
      One tablet can be used to control many available visual acuity devices.
      Most of the functionality is accessible by the control tablet, so it is explained in the first
    part 01 of this document. The following parts specify the existing acuity systems.

      Ongoing research and development may have an effect on design and delivery contents.
    To ensure, the used software is up to date, it is strongly recommended to check for updates
    periodically.
      The operating systems (in this case Android) may change with its version or hardware distri-
    butor. Therefore, shown example images may vary with the used system. If you have questions
    look on our homepage for a recent manual or contact our service team.

4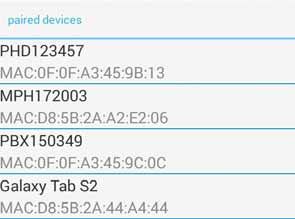
PART 01.
                                                                                 PhorControl.

Software parameters
  Title			           PhorControl
  Version		          1.37, January 2019
  Manufacturer       Block Optic Design GmbH
  				               Semerteichstr. 60
  				               44141 Dortmund
  				               Germany

Intended use
  PhorControl is used for convenient controlling of the visual acuity systems Miniphor 2,
Polaphor Box and Polaphor HD.

Prohibited use
   Not intended purposes are not allowed. Noncompliance may lead to damage or hazard and
finally to a loss of guaranty.

  The charts, that are displayed by the control software, are abstract and can not verify visual
acuity.

Delivery contents
  PhorControl is software only. If your acuity system is delivered with a control tablet, is
specified on your delivery note.

   If your system configuration changes or you have to re-install, look to the advices on chapter
Installation and configuration, page 14.

                                                                                                    5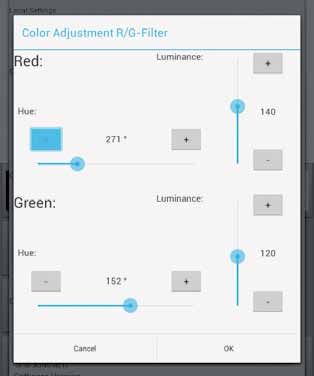
Introduction
      PhorControl is an application for Android Version 4.0 and above. It needs Bluetooth and
    Wifi to work properly. It is used to control the visual acuity systems Polaphor HD, Polaphor
    TV and Miniphor 2.

    Graphical user interface
      The graphical user interface is split into 3 areas.

       Display area (1)
       The display area shows a picture of the test that
    is actually displayed on the acuity system. The

                                                            1
    grey bar in the upper part of this area contains
    many symbols and abbreviations, which represent
    different functions. A detailed description can be
    found in the chapter „The display area in detail“
    on page 7.
       If a Miniphor is controlled the lower part of the

                                                            2
    display area shows a scale which stands for the
    actual refraction distance. It is descibed in detail
    in the chapter „Distance measurement“ on page 28

       Quick selection area (2)
       In this part of the screen the user can store
    his favourite tests and activate them with a tip. If

                                                            3
    not all stored tests are shown a wipe to the left
    or right will scroll through these tests. The quick
    selection area is discussed in detail in the chapter
    „The quick selection area in detail“ on page 8.

      Control area (3)
      The control area shows quick access buttons in
    the left column and test related buttons in the rest of it. Read the details in the chapter „The
    control area in detail“ on page 9.

6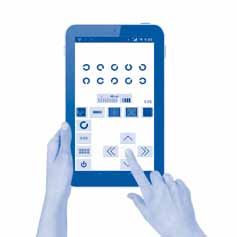
PART 01.
                                                                                PhorControl.

The display area in detail
  The display area shows the actual test displayed on the acuity system. Depending on additi-
onal functions like e.g. masking or randomization the picture is updated. If polarized tests are
used, hatch patterns show which part of the test is seen by each eye. If a stereo test is shown,
the user can see which symbol is shown three-dimensional and its orientation (front or back).

   By tipping into the display area for a short time, a bar with different symbols and abbrevi-
ations will appear. Those are:

            red / green overlay: the background is filled with with the mentioned colours like
          the monocular red / green test

            contrast on / off: the contrast of the shown optotypes can be in- or decreased with
          the additional buttons in the control area. The actual contrast is shown in percent
          and is calculated using Weber`s formula.

             Distance measurement on / off: This option is only visible when a Miniphor 2 is
           controlled. A scale appears in the lower part of the display area which shows the
           actual distance between the patient and the Miniphor 2. The number in brackets is
the nominal distance. Depending on the real distance in relation to the nominal distance the
scale can move to „-“ (real distance larger than the no-
minal distance) or „+“ (real distance smaller than the no-
minal distance). The operator can see it as an indicator
to remind the patient of the correct refraction distance.
   A new nominal distance can be set by tipping on the
real distance at any time.

                                                                                                   7
To enshure a maximum of accurancy the patient must hold the Miniphor still and its surface
    must be perpendicular to the patient‘s line of sight. A small inaccurancy because of the ambient
    lighting or the patient‘s anatomy or hair style can‘t be excluded.
       The distance measurement was concipated for a range of 30-60cm. Out of this area precision
    is lost. Distances of more than one meter are shown as „MAX“.

                 Invert on / off: The display of the optotypes is inverted.

      Touching the display area for a long time will open the settings window as described in
    „Settings“ on page 10.

       If exactly two devices are paired with the control tablet a wiping gesture to the left or right
    will switch between these devices. The name of the active device is displayed at the bottom
    of the display area.

    The quick selection area in detail
       Tests that are used often can be stored in the quick selection area for convenience. Each
    available test can be stored here.
       The selection of the desired tests is described in the
    chapter „Settings“ on page 10 under the menu item „fa-
    vorite specials“. All available tests sorted into groups
    are shown there. A long tip on a test will separate it off
    the group. It can then be dragged to the desired positi-
    on in the quick selection area. A long tip on a test icon
    in the quick selection area will separate it and it can be
    repositioned or moved out of the quick selection area.

8
PART 01.
                                                                                  PhorControl.

The control area in detail
   The control area consists of two parts: the buttons in the left column allow a direct selection
of the optotypes, acuity steps and masks. A long tip on each button opens a window with
the selection. The buttons on the right remind of a cross hair and allow a relative selection of
the acuity steps and optotypes.

         The upper button determines the sort of the optotypes. Available optotypesare Lan-
       dolt rings, Snellen E‘s, numbers, letters and 2 sets of children pictures.

          The button below determines the visual acuity size.

         The button below sets the masks. Available are Show all (no mask), horizontal mask,
       vertical mask, single optotype.

          The lower key puts the device into stand-by. Pushing the button while in stand by
       turns the screen on and restores the standard display. A long tip on the button also
       restores the standard settings.

                  The arrow keys up/down will change the sort of optotype.

                   The arrow keys left/right increase or decrease the acuity. Depending on the
                displayed acuity two tips on the button are needed to change the acuity size.
                   A long tip ignores the minimum amount of displayed optotypes and switches
to the next acuity step directly.
   The size of some special tests can also be changed with the arrow keys.

  The function and appearance of the middle key depends on the various tests:

          During refraction the optotypes are randomized.

          With binocular tests the picture of the right and left eye is swapped. While displaying
       stereo tests the plane of the three-dimensional symbol is changed from front to back
       and vice versa.

                                                                                                     9
Depending on the test additional keys can appear in the control area:

                        While using the contrast test the two shown buttons appear to decrease or
                     increase the contrast. The buttons will vanish when the contrast test is quit
                     in the display area.

                          When a sequence is started three additional buttons appear to control the
                        sequence. Tipping the arrow keys show the next or previous programmed
                        chart while the cross ends the sequence.

     Settings
                                         A long tip in the display area opens a window where the
                                       settings can be made.

                                          •      The menu item „favourite specials“ opens a list with
                                       all available tests that can be moved to the quick selection
                                       area (see „The quick selection area in detail“ on page 8).

                                            This is also the place where sequences can be created.
                                         A sequence is a defined order of tests. An example is the
                                         premade MKH sequence. To create a new sequence the REC
                                         button must be pressed. Next the sequence must be named.
                                         After confirming the button „start recording“ a filmstrip ap-
                                         pears in the control area showing the
                                         status of the recording. Each test that
                                         should be added to the sequence must
     be activated. This can be a standard test (consisting of optotype group, acuity size, mask and
     filter) or a special test. Once the test is activated a tip on the REC button stores it at the end
     of the sequence. Tipping the END button stops the recording and moves the sequence in the
     group sequences in the „favourite specials“ screen. From now on the sequence is treated like
     the other tests and can be moved to the quick selection area.When moving a sequence an
     additional wastebasket symbol appears, so it can be deleted on demand.

10
PART 01.
PhorControl.
• „visus“ lets the operator define the acuity sizes during
refraction. Two presets are available: linear and logarithmic.
With the third option the operator can choose the desired
acuity steps by selecting them
• Under the menu item „customize“ the user can change the
appearance of the application. It is possible to adjust the back-
ground colour with the sliders color, brightnes and saturation and
to change the look of the buttons.
The buttons of the left column in the control area can show
a constant value. That means this value doesn‘t change during
refraction. With a tip on the buttons this value will be shown and
the selection window will be hidden. A long tip on each button is
necessary to open the selection window. It is an alternate way to
navigate during the refraction.
• „change visual acuity system“ shows all paired
devices. A tip on the desired device connects it
with the remote tablet. Each device has its own
profile, that means different tests may be available
between a far- and a nearvision system. The tests
in quick selection area are stored for each device
separatly.
If exactly two devices are paired with the con-
trol tablet a wiping gesture to the left or right will
switch between these devices. The name of the
active device is displayed at the bottom of the dis-
play area.
11• „configure visual acuity system“ stores settings, which are important for displaying op-
totypes or special tests:
• Distance: the reading distance is set
here in 10cm steps
• Screensaver: determines, which picture
will be shown after a defined amount of time of
inactivity
• Activate after: the amount of time be-
fore the screensaver is activated
• Switch dark after: the amount of time
before the screen turns black
• Allow standby after: the amount of the
standby time
• Initial presentation: determines, which
optotypes and acuity steps are shown at startup
• Colour adjustment for red and green: each co-
lor can be adjusted separate for tests using R/G filters,
Bichrome Balance Test or for monocular adjustment. For
optimal results first adjust the hue value then the lumi-
nance level. A detailed example on how to adjust the
colors with a Polaphor TV can be found on page 20.
12PART 01.
PhorControl.
• MKH-Frame: determines if the tests of the MKH
sequence are shown in a box and what size this box has.
The brightness of the box can also adjusted.
• Device Information: shows the serial number of
the device, screen size. BT-MAC address and the software
version of the device. If the device is connected to a
wireless network with the internet, the lower button can
be tipped for possible software updates.
• „About“ shows the software version of the PhorCon-
trol application. If connected to the internet, it is possible
to search for a newer version of it.
13Recover to factory defaults
You may want to have a clean program, with all the default values, as it was delivered once.
The Android Operating system offers this opportunity natively. Go to system configurations,
applications and delete the App-Data. (The specifiers may vary with the manufacturer)
Attention: Do never delete the application data on the acuity system this
way.
Installation and configuration
Condition for installing the control applica-
tion on a tablet with android version 4.0 (or
higher) is a permission of unknown sources in
the system security settings.
Special note: The newest application can be downloaded from
http://downloads.block-optik.de/PhorControl/PhorControl.apk
or from the block-optic website.
14PART 01.
PhorControl.
During the installation process it is necessary to authorize an access to different system
services. You need to confirm to proceed.
The menus may look different with other
Android-Versions or tablet manufacturers. Look
into the manual or contact your tablet distribu-
tor, if needed.
First connection
Before a connection of the control tablet to
the visual acuity system can be established, it
is essential to pair both bluetooth devices.
Pairing with Polaphor Box, Miniphor 2 and
Polaphor HD
After booting the visual acuity device the
software starts automatically and stays in front
as long as it will be closed with direct access
to the the device (and not by the control tablet).
By multiple touches on the touch-screen you can reach the Android home button on the
lower margin of the acuity device. If you do not have a touch screen connect a USB-mouse
and do this by multiple clicking.
Go to Settings (gearwheel) -> Bluetooth and click on the name of the acuity device at the top.
A countdown starts. Until it is expired you open the same system menu on your control tablet,
but the click on the search button, instead. After some seconds your acuity device should
appear. After selecting it and confirmation on both devices the paring should be successful.
Now both devices should be listed as paired devices on each others paired list.
15First start of the control application
At the first start of the control app, a list of all paired devices starts. (After delivery) your
device has the bluetooth name that is written on its label. It consists of a type-specifier
followed by a serial number.
After selecting your acuity device, the control application builds up the connection and
loads the device information. At the end the special tests are loaded and the current state is
displayed.
The next time you start the control app, it will try to connect automatically to the last con-
nected device, until you press configuration -> change device.
Special note: If your acuity system is switched off, its bluetooth is switched off
or it is out of reach, the control app will try to connect.
Demo-Mode
For demonstration purposes the demo modes at the bottom starts a virtual acuity system.
The functionality of this demo is highly reduced in comparison to real acuity systems. You
must never use the control app for acuity testing directly.
16PART 01.
PhorControl.
17Software parameters
Title Polaphor Box
Version 1.15, January 2015
Distributor Block Optic Design GmbH
Semerteichstr. 60
D-44141 Dortmund
Germany
Introduction
The visual acuity system Polaphor TV consist of three components:
• 3D-Television, that can display an image that is intended to be separated with circular
polarized filters.
• Polaphor Box, a small computer with pre-installed visual acuity software.
• Tablet with pre-installed PhorControl software.
The television and computer compose the visual acuity device, the tablet is the control
device.
The use, which is not described in this manual threatens the guaranty. You should close the
acuity software only for setting up WLAN and bluetooth.
Manipulation of other settings may decrease functionality enormously.
Attention: Deleting the data of the visual acuity device destroys essential
configuration settings and starting will not be possible any more.
(In contrast: deleting application data on the control tablet might
be reasonable, page 14 )
After delivery, nearly all settings (including pairing) are done. You just need to mount it on
the wall and set the distance and colour parameters (page 19).
If you need a re-installation anyway, read chapter Wiring and installation on page 24.
18PART 02.
Polaphor TV.
Powering on and off
The voltage supply for the computer is provided by the USB connector of the television, so
that it is switched on together with your television, automatically. The boot process lasts some
seconds and then you are ready to start the control application.
Switch the acuity screen to black by pressing the power button in the lower, left corner.
Touching this button again starts the examination. To turn off the television and the control
tablet, when you do not need them for a longer period of time.
Controlling
Control your visual acuity device with the control application, which is described in the first
part of this manual.
Configuration of the visual acuity system
Open the configuration dialog, by clicking the tablets configuration button and then
configure visual acuity system.
Local settings
Set up the visual acuity system to match to your examination room. Optotypes are scaled to
the configured distance and can be mirrored, if you use a mirror. Results are displayed instantly.
Display
To increase the display life time, and save energy loss or just to show some pictures, you
have the opportunity to set up a screen saver. Choose between its type (logo, photo or slide
show) and select a time to start with it. In addition you can select a time, when the display
should turn to black.
You have the opportunity to set the current shown test as first test of every examination
by touching on. Leave this dialog and return after adjusting, if required.
19Colour adjustments
Colour adjustments are important for tests
that
• need coloured filters for separation (like
your phoropter or glasses may be equipped
with)
• red and green tones for Bichrom Balance
test or similar.
• red and green tones for other tests.
While adjusting the colours, a matching test
is displayed on the visual acuity device and a
new adjustment dialog on the control tablet.
Adjust each colour tone with the horizontal
bar and the brightness with the vertical ones.
You can use the buttons for fine tuning. On
your acuity device, you can observe the place
in colour space on the left and the example test
between the set colours on the right.
Other adjustments that might be necessary:
• a correction of television specific parame-
ters. Settings of your television can have ne-
gative effects, for instance: contrast, bright-
ness, gamma or sharpness.
• the size of the MKH-test-field. (MKS-Test are
made for a distance of 5,5m and have a size
32 cm x 32 cm. Adjust the grey value of the
background of the test field)
Device information
In this area all parameters of your device are displayed.
20PART 02.
Polaphor TV.
Customization of the visual acuity device
Logo
With default setting the logo of the distributor is shown after 6 minutes of inactivity. To
exchange this logo with a customized one do the following:
• make sure your pictures dimension is 1920x1080 pixel and is saved as “Logo.jpg” to root
directory of an empty USB-stick.
• put the stick into the USB-connector of the running computer (not into the connector of
the television).
• you will be asked if the picture should be imported to the device. To proceed, confirm
with a mouse that is also connected to the computer.
Prior logos will be deleted. Remove the stick after the import.
Photo
To import a photo
• make sure your size dimension is 1920x1080 pixels and is saved as “Foto.jpg” to root
directory of an empty USB-stick.
• put the stick into the USB-connector of the running computer (not into the connector of
the television).
• you will be asked if the picture should be imported to the device. To proceed, confirm
with a mouse that is also connected to the computer.
Prior photos will be deleted. Remove the stick after the import.
After the import of a photo you may display it with the screen saver. (more on page 23,
Display).
3D-Photo
Three-dimensional pictures consist of 2 separate images in 1920x1080. Each one for a single
eye.
The import is similar to the photo import:
• put the matching pictures as „FotoL.jpg“ und „FotoR.jpg“ to the root of an empty USB-
Stick. L is correlated to the left eye and R to the right.
• put the stick into the USB-connector of the running computer (not into the connector of
the television).
• you will be asked if the picture should be imported to the device. To proceed, confirm
with a mouse that is also connected to the computer.
Prior 3d-photos will be deleted. Remove the stick after the import.
After the import a 3D-photo you can use them for 3D-tests. It is recommended, to put them
21into your favorite special tests line (page 8).
Slide-show
A Slide-show may be set as screen-saver. You can also start it manually at any time, by
clicking the slide show button.
The importing is similar to the import of a photo:
• put all pictures with a resolution of 1920x1080 pixels in jpg-format in the root of the USB-
stick. If the display-order is matters to you, make sure to name them in alphabetic order.
• put the stick into the USB-connector of the running computer (not into the connector of
the television).
• you will be asked if the picture should be imported to the device. To proceed, confirm
with a mouse that is also connected to the computer.
Prior slide-shows will be deleted, independent of the quantity of images. Remove the stick
after the import.
22PART 02.
Polaphor TV.
Software-Updates
Dependent of your prospects you have two possibilities for updating your visual acuity
device.
Internet-Update
To check for updates easily, use the control tablet. For this, you have to assure WLAN at the
visual acuity device is active (and connected to a reachable network with internet access) in
the Android configuration. It is important that the acuity software is running. Start the control
software on the tablet, navigate to Configure visual acuity system and touch Check for Update.
Connecting and downloading from the server may last several minutes. The installation of the
software needs to be confirmed with a USB-mouse, that has to be connected to one of the
USB-connectors of the computer. This important security concept prevents your acuity system
of malicious software. If a WLAN is not available, please continue with the following method.
Update with an USB-stick
Checking for an update is still possible like
described before: configure visual acuity system
and check for update, but (without an internet
connection) downloading will fail.
If a new version is detected:
• download the current version with another
computer to the root directory of an empty
USB-stick.
• you can find it on our website or by typing
in the address:
http://downloads.block-optik.de/PolaphorBox/
Update/Polaphor.apk
• connect a USB-mouse to the visual acuity
computer. And click right to stop the acuity
software.
• connect the USB-stick to the other USB-
connector of the visual acuity device.
• navigate with the File-Browser to to the
USB-root-directory and click on Polaphor.apk.
It is necessary grant all permissions.
23Wiring and installation
The Polaphor Box is connected to the television by HDMI-wire and micro USB cable, as well.
The box is mounted on the back of the television with Velcro tape.
To ensure a manual installation, a file explorer and an internet browser are pre-installed.
Connect a mouse to control these programs.
The software installation is equivalent to the descriptions of chapter Software-Updates
(page 23). If a WLAN connection is established you can download the software with the inter-
net-browser of the box. In addition to the software, a configuration file is needed. It installs
automatically if you have an internet connection or a connected USB-stick containing this
configuration file in its root.
If this doesn‘t work, contact your distributor. The number, printed on the computers label
might be needed.
To establish a bluetooth connection, pair the acuity device with an android mobile device.
This is described on page 15.
24PART 02.
Polaphor TV.
25Software parameters
Title Miniphor 2
Version 1.0, January 2017
Distributor Block Optic Design GmbH
Semerteichstr. 60
D-44141 Dortmund
Germany
Introduction
The Miniphor 2 is an electronic acuity system fpr near vision, which is held by the patient.
Touching the display areais not necessary, because it is controlled by the operator. Continuo-
us distance measurement enshures the correct reading distance. The additional 3D extension
allows to show binocular tests with circular polarization. A docking station serves as a tray,
which also charges the Miniphor 2.
The Miniphor 2 is controlled with a separate tablet and the application PhorControl, which
is described on page 6.
Special note: Please also read the manual of the tablet manufacturer!
Attention: Deleting the data of the visual acuity device destroys essential
configuration settings and starting will not be possible any more.
26PART 03.
Miniphor 2.
Description
Miniphor 2:
On / Off button
Distance measurement
Display area
Charging contacts
Miniphor 2 with 3D extension:
Distance measurement
3D display area
27Software-Updates
To download and install updates the Miniphor 2 must be connected with the internet via
WLAN. PhorControl is responsible for checking and installing the updates (see „Settings“ on
page 10).
Distance measurement
A reliable near refraction depends on either keeping the desired refraction distance or the
knowledge of the actual distance. For this the Miniphor 2 always comes with distance mea-
surement.
Turning the distance measurement on and off
Tipping the DIS function in the upper part of
the display area turns the distance measurement
on or off.
Usage
As soon as the distance measurement is acti-
vated the actual distance is shown. The number
in brackets is the nominal distance and a scale
indicates the deviance.
The nominal distance can be changed by tipping the actual distance. This distance then
becomes the new nominal distance. All acuities rely on the nominal distance; the optotypes
are scaled properly.
Accuracy
To enshure a maximum of accurancy the patient must hold the Miniphor still and its surface
must be perpendicular to the patient‘s line of sight. A small inaccurancy because of the ambient
lighting or the patient‘s anatomy or hair style can‘t be excluded.
The distance measurement was concipated for a range of 30-60cm. Out of this area precision
is lost. Distances of more than one meter are shown as „MAX“.
28PART 03.
Miniphor 2.
3D extension
The separation of special tests in the Miniphor 2 is based on the anaglyphic method. As
soon as the 3D extension is connected the main housing the separation method changes to
circular polarization. For all binocular tests the appropriate analyzers are needed now.
The separation method changes to red/green again if the 3D extension is removed from the
housing.
Special note: With the 3D extension attached the optical path is 12cm longer
than without it. This value is already considered by the distance
measurement.
Docking station
The docking station is used for charging the Miniphor 2 between refractions. It must be
placed precisely in the tray.
Special note: Distance measurement is not possible during the charging in the
docking station.
2930
PART 03.
                                                                                           Miniphor 2.

Declaration of Conformity

                                     EG-Konformitätserklärung
                                             Declaration of Conformity

                                          Block Optic Design GmbH
                                              Semerteichstr. 60
                                              44141 Dortmund

erklärt hiermit, dass das nachstehende Produkt
declares that the following device

Bezeichnung                                         Miniphor 2
Name

Geräteart                                  Sehtest nach DIN 58220 Teil 5
Type

den Anforderungen der Richtlinie 93/42/EWG
meets the requirements of the directive 93/42/EC

entspricht und unter Einhaltung folgender Normen
in compliance with the following directives

                                                   DIN EN 60601-1
                                                   DIN EN 60601-1-2
                                                   DIN 58220

Ort, Datum                                                               Dortmund, den 04.04.2019
Place, Date

Name, Funktion                                                           Jörg Grawunder, Geschäftsleitung
Name, Function

                                                                                                            31
Device Specifications
Device Type Polaphor HD Visual acuity system
Version 1.3, January 2016
Manufacturer Block Optic Design GmbH
Semerteichstr. 60
D-44141 Dortmund
Intended Applications
The Polaphor HD is used to examine the monocular and binocular acuity of the eyes.
It is used for optometry and ophthalmology.
Unintended Application
Other applications as those described above are prohibited. During wrong practice unpre-
dictable hazard can occur.
Scope of supply
The Polaphor HD can be delivered with various equipment. The actual scope of supply is
listed in the detailed delivery note
32PART 04.
Polaphor HD.
Safety Remarks
a) Please read the instruction manual carefully and make yourself acquainted with all
functions before you start to operate the device.
b) Don‘t change anything at the system by yourself as this might impact the safety and leads
to the expiry of the warranty.
c) This system is not intended for use in areas with risk of explosions.
d) Do not operate the Polaphor HD if you observe visible damages. Breakdowns which have
impact on the safety need to be repaired immediately. In this case, please contact an autho-
rized service technician at Block Optic.
e) Please let all repairs of the Polaphor HD be done by a service technician authorized by
Block Optic.
f) Only use original accessory parts for the Polaphor HD.
g) If the system will not be used for a longer period, please turn off the main switch and
turn out the power plug.
h) Accessories which will be connected with the electric supply of the Polaphor HD need
to be proven to comply with the appropriate DIN EN or IEC specifications. Furthermore all
configurations have to comply with the requirements of the system standard DIN EN 60601-
1-1 (IEC 601-1-1) and its modifications. Coupling of non-medical devices (e.g. dataprocessing
devices) to a medical electronical system such as the examination unit must not lead to a
safety degree for patient, user, and the environment which is beyond DIN EN 60601-1-1 (IEC
601-1-1) and its modifications. If the admissible leakage current is exceeded by the coupling,
protective measures according to the system standard DIN EN 60601-1-1 (IEC 601-1-1) and its
modifications need to be provided.
After installation or later modifications the system must not put any risk to the patient, the
user or the environment.
33Liability of Manufacturer
The device has been manufactured according to the latest technical development and ack-
nowledged technical safety directives. Block Optic considers itself responsible for any impact
on safety, reliability and performance of the device only if:
• Mounting, extensions, readjustments, modifications or repairs are carried out by
authorized persons,
• the electric installation of the concerned room complies with the requirements of
VDE 0107 and
• the device is used according to the instruction manual.
Responsibility of User
The user is responsible for:
• compliance with standards for prevention of accidents and the directives for
establishment, operation and application of medical devices (Medical Device
Operating Directive)
• MPBetriebV),
• operation,
• maintenance,
• duly and safe condition of the product and
• storage of the instruction manual at the usage site.
Warranty
The „Allgemeinen Verkaufs- und Lieferbedingungen“ of Block Optic are effective as the
basic principle.
34PART 04.
Polaphor HD.
General information
The Polaphor HD is a visual acuity system of the next generation. A high-resolution flat panel
monitor combined with a powerful computer form the basis for unlimited test possibilities.
You can switch easily through different visual acuity steps and even groups of optotypes
by the clearly designed infrared remote control.
It is even possible to do refractions for official purposes with the Polaphor HD, because the
display of the Landolt rings complies with the ISO 8596.
Many charts for monocular and binocular correction and for recognizing phorias come with
the standard version of the Polaphor HD.
Because of the use of a computer new tests can be implemented into the Polaphor HD if
desired.
The Polaphor HD box contains the visual acuity system Polaphor HD, the wall mount and
the manual. A controlling device must be ordered separately.
Polaphor HD - front view
display
IR receiver
35Polaphor HD – rear view
wall mount
louvers
Mounting
Important for the correct mounting of the Polaphor HD is on the one hand the refraction
distance and on the other hand the height to achieve a relaxed head position of the patient.
The Polaphor HD allows a refraction distance between 3,0 and 7,0 meters and must be
adjusted individually for each refraction room. The size of the optotypes is calculated automa-
tically for the entered distance. When choosing the height of the Polaphor HD, have in mind
the average eye height of the sitting patients (about 130 cm).
36PART 04.
Polaphor HD.
Putting into operation
Connect the appliance plug with the appropriate female connector at the bottom of the Po-
laphor HD. The equipment is ready to use and can be turned on and off with the main switch.
Before the first use
Before the first use personal settings must be made in the menu of the Polaphor HD to
achieve the correct results.
According to page 19 „Configuration of the visual acuity system“ the refraction distance must
be selected. The optotypes, polarized tests and Schober test are automatically calculated de-
pendend on the entered distance. For reliable and reproducible results the distance from the
entrance pupil to the optotype must be measured.
Important! To achieve best results with the special tests on a Polaphor HD Light
it is necessary to adjust the colors red and green to the present filters
(see part 02, color adjustments)
The visual acuity system Polaphor HD is designed without any mechanic or movable parts.
This results in a compact, wearing free and fail-safe instrument. Nevertheless, if a defect occurs
please contact your local distributor with a detailed description of the malfunction.
Safety note
Only skilled service technicians are allowed to open the visual acuity system for maintenance
or repairs.
Caution! Do not pour any liquids over the device especially the louvers! Do not
cover the louvers!
Caution! The use of the device is prohibited if the power cord is damaged!
Important! Keep in mind to turn off the Polaphor HD with the main switch every
day.
37Care and maintenance
The surface has to be cleaned with a dry cloth. Never use aggressive detergents; the sen-
sitive surface could be damaged !
Errors
description possible causes correctives
The display is dark Connector plug missing Connect the appliance plug
with the socket and turn on
the system..
Fuse defect Check the two fuses in the
drawer of the main switch
The Polaphor HD is in the Press any key on the remote
stand-by mode control for about 1 second.
The remote control doesn’t Batteries are empty. Change the batteries.
work
The IR receiver is covered. Make sure a free line of sight
to the receiver is existing
The separation is not op- The Polaphor HD is not Loose the screws on the ball
timal aligned. joint and align the Polaphor HD
The wrong optotypes are Other instruments control A new coding of the remote
shown or change auto- the Polaphor HD. control is required. Please
nomous. contact the service hotline.
38PART 04.
Polaphor HD.
Software update
If connected to the internet, the Polaphor HD will periodically check for updates. Using Phor-
Control a manual check is also possible. Navigate to Configure visual acuity system and touch
Check for Update. Connecting and downloading from the server may last several minutes. The
installation of the software needs to be confirmed with a USB-mouse, that has to be connected
to one of the USB-connectors of the computer. This important security concept prevents your
acuity system of malicious software.
If no internet is available, the software can be updated with a memory stick, which must be
ordered at Block Optic. To update the Polaphor HD Software, the stick must be connected to
the Polaphor HD. Turn on the device and wait a few minutes. After the update is completed,
a message will apear. Turn off the Polaphor HD, remove the stick and start the device again.
Technical data
examination distance: 3,0 - 7,0 meters, in steps of 10cm
visible area: about 530x297mm
frame color similarto RAL 9016
color coordinates white (CIE): x 0,31 / y 0,33
control: Tablet, Android OS 4.0 and up, Bluetooth
dimensions (incl. wall mount): W 642 mm / H 440 mm / D 235 mm
weight: 13,5 kg
main voltage: 230 V/50 Hz
power consumption: 60 watts active
10 watt stand-by
panel quality: complies ISO 13406-2 / Class II
fuses: primary: 2 x 3,15A T
maintenance and
calibration intervals: every 5 years
operation conditions:
temperature of the environment between +10°C and +40°C
relative humidity between 30% and 75%
air pressure between 800hPa and 1060hPa
3940
PART 04.
                                                                                                Polaphor HD.

Declaration of Conformity
                                        EG-Konformitätserklärung
                                                Declaration of Conformity

                                             Block Optic Design GmbH
                                                 Semerteichstr. 60
                                                 44141 Dortmund

   erklärt hiermit, dass das nachstehende Produkt
   declares that the following device

   Bezeichnung                                         Polaphor HD
   Name

   Geräteart                                  Sehtest nach DIN 58220 Teil 3, Teil 5
   Type

   den Anforderungen der Richtlinie 93/42/EWG
   meets the requirements of the directive 93/42/EC

   entspricht und unter Einhaltung folgender Normen
   in compliance with the following directives

                                                      DIN EN 60601-1
                                                      DIN EN 60601-1-2
                                                      DIN 58220

   als Medizinprodukt der nachstehenden Klasse zugeordnet wurde
   as a medical device of

                                                       Klasse 1
                                                       Class 1

   Ort, Datum                                                               Dortmund, den 04.04.2019
   Place, Date

   Name, Funktion                                                           Jörg Grawunder, Geschäftsleitung
   Name, Function

                                                                                                               41
Software options and accessories
28 10 0000.48 POLAPHOR® children picture set B 18
• collection of 6 pictures
• acuity steps 0.05 - 2.0
• display format of the Polaphor will be kept
28 10 0000.9 POLAPHOR® children picture set Ni-DIT
• collection of 6 pictures
• acuity steps 0.05 - 2.0
• display format of the Polaphor will be kept
28 10 0000.29 POLAPHOR® children picture set Rossano
• collection of 8 pictures
• acuity steps 0.05 - 2.0
• display format of the Polaphor will be kept
28 10 0000.32 POLAPHOR® children picture set LEA
42PART 04.
Polaphor HD.
• collection of 4 pictures
• acuity steps 0.05 - 2.0
• display format of the Polaphor will be kept
28 10 0000.37 POLAPHOR® children picture set Oesterberg
• collection of 12 pictures
• acuity steps 0.05 - 2.0
• display format of the Polaphor will be kept
28 10 0000.38 POLAPHOR® children picture set MO3
• collection of 12 pictures
• acuity steps 0.05 - 2.0
• display format of the Polaphor will be kept
28 20 0000.17 POLAPHOR® simulation of a Nidek CP-690 Type T
• display of 32 charts
• special features (e.g. randomizer, R/G overlay) still usable
• display format of the Polaphor can still be used
28 20 0000.18 POLAPHOR® simulation of a Nidek CP-690 Type DIN/ISO
43• display of the Nidek‘s 32 charts CP-690 Type DIN/ISO
• DIN/ISO conformance up to 5 meters
• special features of the POLAPHOR® (e.g. randomizer, R/G overlay, etc.) still usable
• display format of the POLAPHOR® can still be used
28 20 0000.19 POLAPHOR® simulation of a Topcon ACP-7 Type A
• display of the Topcon‘s 30 charts ACP-7 Type A
• special features of the POLAPHOR® (e.g. randomizer, R/G overlay, etc.) still usable
• display format of the POLAPHOR® can still be used
28 20 0000.28 POLAPHOR® simulation of a Topcon ACP-7 Type DIN
• display of the Topcon‘s 30 charts ACP-7 Type DIN
• DIN conformance up to 5,5 meters
• special features of the POLAPHOR® (e.g. randomizer, R/G overlay, etc.) still usable
• display format of the POLAPHOR® can still be used
28 20 0000.21 Allocation of a serial port
• serial port for a connection to e.g. Möller Vistron 900+
• normal use of the Polaphor still possible with the IR remote control
28 20 0000.36 Allocation of a serial port, bluetooth connection included
• serial port including a Bluetooth connection (pair) for a connection to e.g. Huvitz HDR
7000 or Möller Visutron 900+ (control software for Visutron 900+ not included, for sub-
sequent installation POLAPHOR must be send to manufacturer)
• normal use of the POLAPHOR still possible with the IR remote control
28 20 0000.15 POLAPHOR® connection to automatic refractor Nidek RT-2100/
RT-3100/RT-5100 T-Type
• hardware Add-On „Nidek CCG“
• communication cable, 10 meters
• emulation of a CP 690 Type T with the Nidek control panel
• normal use of the Polaphor still possible with the IR remote control
28 20 0000.39 POLAPHOR® connection to Topcon CV 5000
• simulation of an ACP 8 type A with the Topcon control panel *
• communication is effected with Topcon IR emitter
• normal use of the Polaphor still possible with the remote control
44PART 04.
Polaphor HD.
28 20 0000.42 POLAPHOR® connection to Huvitz HDR 7000
• simulation of a CCP-3100 with Huwitz control panel
• communication is effected with external CCG device
• normal use use of the Polaphor® still possible with the remote control
45MANUAL. phorcontrol. Block Optic Design GmbH Semerteichstraße 60 D-44141 Dortmund/Germany Fon: +49 (0) 2 31/10 87 78-50 Fax: +49 (0) 2 31/17 63 06-5 E-Mail: info@block-optic.com Internet: www.block-optic.com
You can also read