TN-USB3-xx-01 Series - User Guide - Scorpion-USB 3.0 to Gigabit Ethernet Fiber Adapter - Transition Networks
←
→
Page content transcription
If your browser does not render page correctly, please read the page content below

TN-USB3-xx-01 Series

    Scorpion-USB™ 3.0 to Gigabit Ethernet Fiber Adapter
    1000Base-SX

    User Guide

33644 Rev. C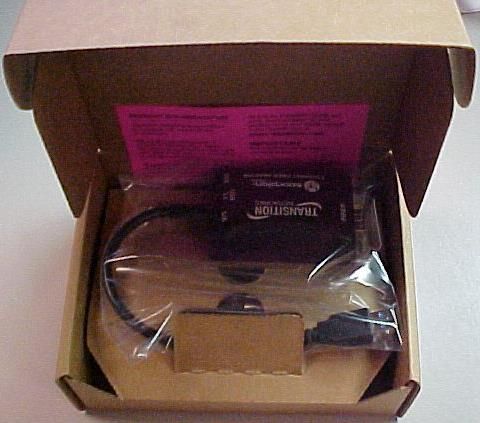
Table of Contents
Introduction......................................................................................................................... 3
Ordering Information .......................................................................................................... 3
Additional Features ............................................................................................................. 3
Related Manuals and Information ...................................................................................... 3
Product Views...................................................................................................................... 4
Application Example ............................................................................................................ 5
Specifications....................................................................................................................... 5
Dimensions ......................................................................................................................... 6
Pre-Installation .................................................................................................................... 6
   Safety .............................................................................................................................. 6
   Unpacking ....................................................................................................................... 7
   Package Contents ........................................................................................................... 7
   Connectors and LEDs ...................................................................................................... 7
Connecting the TN-USB3-xx-01 ........................................................................................... 8
   Installation Overview...................................................................................................... 9
Driver Installation ................................................................................................................ 9
   Available Drivers ............................................................................................................. 9
Installing the Driver ...........................................................................................................10
   Typical Plug and Play Install..........................................................................................10
   Uninstall the Driver Package ........................................................................................14
   Windows Driver Setup Program (Windows 7 Professional) .........................................15
   Windows 7 Driver Configurable Parameters ................................................................16
   Windows 8.1 Driver Configurable Parameters .............................................................17
   Manual Windows Driver Update ..................................................................................18
   Messages ......................................................................................................................18
Troubleshooting ................................................................................................................19
   Troubleshooting Windows 7 / 8.1 Driver & Performance Problems ...........................21
Recording Information for Technical Support ...................................................................23
Limited Lifetime Warranty ................................................................................................24
Contact Us .......................................................................................................................25
Compliance Information....................................................................................................26
   Declaration of Conformity ............................................................................................26
   FCC Regulations ............................................................................................................26
   Canadian Regulations ...................................................................................................27
   European Regulations ..................................................................................................27
Electrical Safety Warnings .................................................................................................28
Record of Revisions ...........................................................................................................28

33644 Rev. C                                                                                               Transition Networks • User Guide | 2
Introduction
Transition Networks’ TN-USB3-xx-01 Scorpion-USBTM 3.0 to Gigabit Ethernet Fiber
Adapter allows a PC, laptop, tablet or other computer equipment without a fiber
interface to connect to a fiber network through a USB 3.0 (or 2.0 or 1.1) interface.
The TN-USB3-xx-01 provides protocol conversion from USB to 1000Base-X (100/1000
Base-X for SFP version) for use with laptops, tablets, and convertibles with USB ports in
secure networking environment or where wireless is not permitted and connectivity to a
fiber network is required.

Ordering Information
               Model                                    Description
     TN-USB3-SX-01(SC)          USB 3.0 to 1000Base-SX MM SC Ethernet Adapter
     TN-USB3-SX-01(LC)          USB 3.0 to 1000Base-SX MM LC Ethernet Adapter
     TN-USB3-SFP-01             USB 3.0 to 100/1000Base-X Open SFP Ethernet Adapter

Additional Features
The TN-USB3-xx-01 was designed with these features:
 •     USB 3.0 [5Gbit/s (625MB/s)] peripheral device
 •     1000Base-X (100/1000 Base-X for SFP version)
 •     SFP fiber interface – MSA compliant supporting up to a 1W module
 •     Fixed optic versions LC and SC
 •     Standard OS support – Windows 7, 8.1, and 10 both 32-bit and 64-bit
 •     Standard drivers provided by ASIX on the Transition Networks webpage.
 •     Plastic ABS enclosure with 9” pigtail to USB 3.0 Type-A connector

Related Manuals and Information
A printed documentation card is shipped with each Scorpion-USB adapter. The full User Guide is
available online. For Transition Networks Drivers, Firmware, Manuals, etc. go to the Product
Support webpage (no logon required). For Transition Networks Application Notes, Brochures,
Data Sheets, Specifications, etc. go to the Support Library (no registration required). Note that
this manual provides links to third party web sites for which Transition Networks is not
responsible. Other related manuals are listed below.
1. Product Documentation Postcard, 33504
2. TN-USB3-xx-01 User Guide, 33644 (this manual)
3. SFP manual (model specific; see Transition Networks SFP page)
Note: Information in this document is subject to change without notice.

33644 Rev. C                                                          Transition Networks • User Guide | 3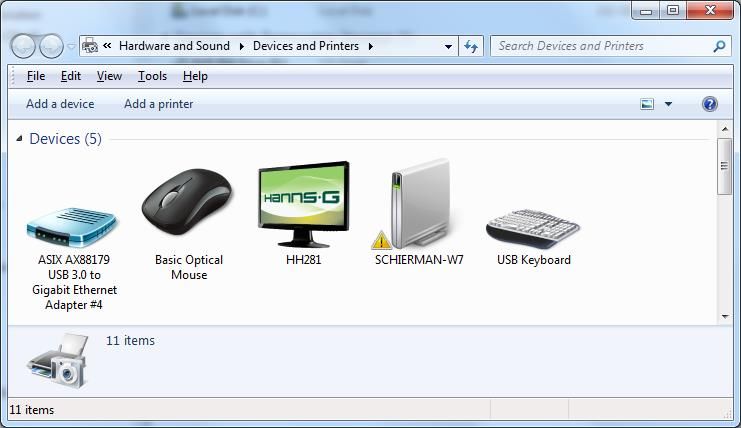
Product Views

                TN-USB3-SX-01(LC)

                TN-USB3-SX-01(SC)

                 TN-USB3-SFP-01

33644 Rev. C                        Transition Networks • User Guide | 4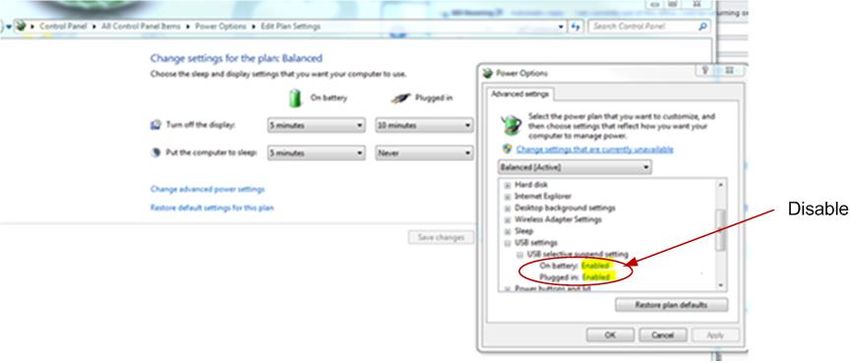
Application Example
The TN-USB3-xx-01 can provide a Gigabit Ethernet USB-to-LAN connection as shown
below. A variety of other applications exist.

                              Application Example

Specifications
  Standards                      IEEE 802.3™-2008; USB 3.0
  Compliance - Emission          EN55032 Class A; FCC Class A
  Compliance - Immunity          EN55024
  Safety Compliance              CE Mark
                                 LC: Typical 2.1 W
                                 SC: Typical 2.18W
  Power Consumption
                                 SFP: MSA compliant supporting up to a 1W module; Power estimate
                                 (worst case): 3.15 W
  Power Source                   USB bus
                                 Unit: 0.20 Lb. (3.2 Oz.) (90.7 Gms.)
  Weight
                                 Unit + packaging: 0.35 Lbs. (5.6 Oz.) (158.7 Gms.)
  Operating Temperature          0 to 50 deg. C
  Storage Temperature            -20 to 80 deg. C
  Altitude                       0-10,000 feet
  Operating Humidity             5% to 95% (non-condensing)
                                 USB 3.0: Theoretical max - 625 MBps (5000Mbps) *
  Data Rate
                                 Fiber:   Theoretical max - 125 MBps (1000Mbps) *
  Max. Frame Size                1518 bytes untagged
                                 Cable rated for 1500 insertions minimum; maximum insertion force of
  Cable
                                 35N at max rate of 12.5mm per minute
                                 Empty SFP cage
  Fiber Connectors               850nm, LC, MM, 3.3V
                                 850nm, SC, MM, 3.3V

* Data Rate - Theoretical max is the actual signaling rate not the data throughput of the
device. The data throughput will be determined by the combination of all the software
and hardware components involved in the system.

33644 Rev. C                                                             Transition Networks • User Guide | 5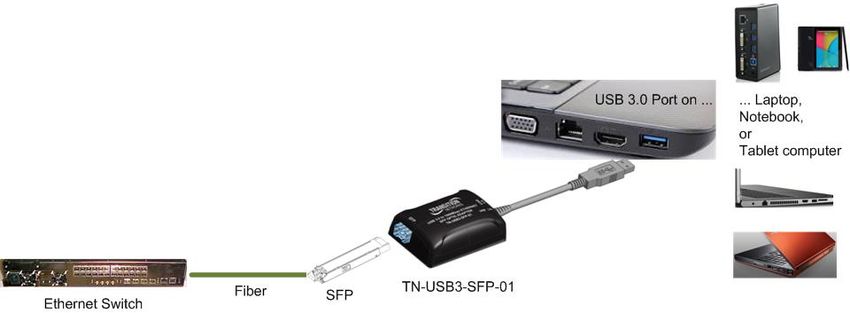
Min TX Pwr       -10.0 dBm
                                  Max TX Pwr       -4.0 dBm
    Fiber Specs (LC)              Rx Sensitivity   -17.0 dBm
                                  Rx Max In Pwr    -3.0 dBm
                                  Link Budget       7.0 dB
                                  Min TX Pwr     -9.5 dBm
                                  Max TX Pwr     -4.0 dBm
    Fiber Specs (SC)              Rx Sensitivity -17.0 dBm
                                  Rx Max In Pwr 0.0 dBm
                                  Link Budget     7.5 dB

Dimensions
TN-USB3-xx-01(LC):

Pre-Installation

Safety
See "Electrical Safety Warnings" on page 28 for Electrical Safety Warnings in multiple
languages.
•    Do not use this product near water, for example, in a wet basement or near a
     swimming pool.
•    Avoid using this product during an electrical storm. There may be a remote risk of
     electric shock from lightning.
Warning: This product contains lead, known to the State of California to cause cancer,
and birth defects or other reproductive harm. Wash hands after handling.

33644 Rev. C                                                          Transition Networks • User Guide | 6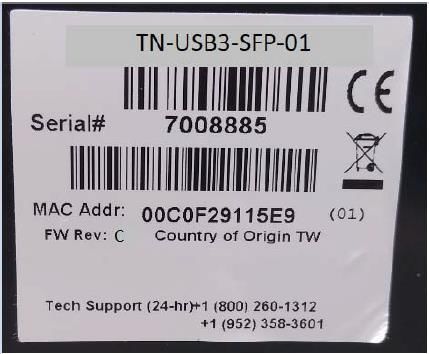
Unpacking
1. Carefully unpack all TN-USB3-xx-01 contents.
2. Verify receipt of all TN-USB3-xx-01 components;
   see “Package Contents” below.
3. Place the TN-USB3-xx-01 and related materials in the desired
   install location.
4. Save the TN-USB3-xx-01 shipping carton and packing
   materials for future use.

Package Contents
Make sure you have received one TN-USB3-xx-01 device and one printed documentation
card.

Connectors and LEDs
Data speed:     USB 3.0: 5Gbps (USB 3.0 type-A connector)
                Fiber:  1000Mbps
Fiber Port:      Connector: MM LC, MM SC, or empty SFP cage
Modes:     100/1000Base-X
LEDs:
USB Status:     Green/Yellow: Green = USB 3.0, Yellow = USB 2.0, OFF – USB down.
SFP / LC TP Link/Activity: Green/Yellow: Green = Link @1000, Yellow= Link@100,
                BLINK= activity

                  Figure 3: Connectors and LEDs (TN-USB3-SFP-01)

The SFP fiber interface is MSA compliant supporting up to a 1W module.

               LC Connector                            Pigtail USB 3.0 Type A End

33644 Rev. C                                                        Transition Networks • User Guide | 7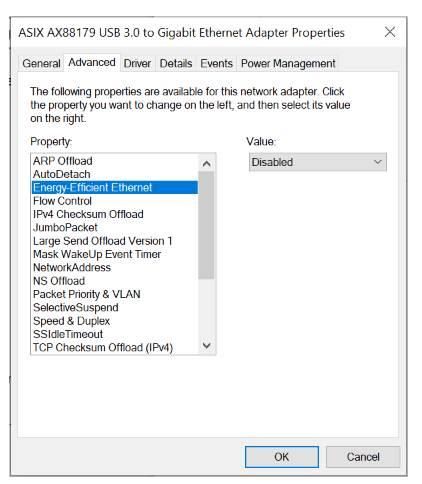
Connecting the TN-USB3-xx-01
This section describes how to connect the TN-USB3-xx-01 to a PC/Notebook/Tablet. The
TN-USB3-xx-01 can be used to allow a portable device, like a laptop or tablet computer,
to connect to a fiber based Gigabit Ethernet network, via its USB 3.0 port, providing
secure network access over a fiber infrastructure.

                               TN-USB3-xx-01 Connections
The figure above shows USB 3.0 connections for a TN-USB3-xx-01 to a desktop PC, a
laptop PC, and a tablet. The procedure is provided below.
1. Insert the TN-USB3-xx-01 USB connector into an available USB 3.0 port on your
   computer or device.
    Note: For maximum performance, connect the TN-USB3-xx-01 directly to a USB 3.0
    port on your computer.
    If you are connecting to a USB hub, make sure it operates at USB 3.0 speed and can
    provide the required power for this device. A USB 2.0 hub will also work, but only at
    USB 2.0 speeds.
2. Insert one end of a fiber Ethernet cable into the FIBER port of the TN-USB3-xx-01.
3. Insert the other end of the Ethernet network cable into an Ethernet port on the
   other end.
4. If the TN-USB3-xx-01 is discovered by your computer, continue operation. Note that
   the first time you plug in the TN-USB3-xx-01, it may take 2 full minutes for the driver
   to install, before it begins working.
   If the TN-USB3-xx-01 is not discovered, install the driver; see the “Driver
   Installation” sections below.
Note that it will not appear as TN-USB3-xx-01; it will appear as the Asix chip (i.e., the
USB 3.0 to Gigabit Ethernet controller).

33644 Rev. C                                                            Transition Networks • User Guide | 8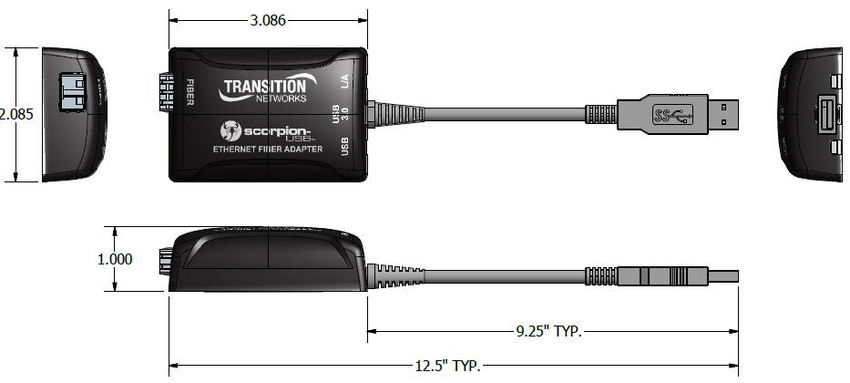
Installation Overview
1. Plug the TN-USB3-xx-01 to the PC’s USB 3.0 port. If it works (LEDs lit and device
     detected), you do not need to perform additional steps. If there is a problem with
     operation, continue with the rest of the steps below.
2. Procure and load the latest AX88179 driver from ASIX. See Available Drivers below.
3. Procure and load the latest driver for the PC’s USB 3 Host Controller(s), either from
     the OS provider or the Host Controller chipset manufacturer (e.g., Intel).
4. Reboot the PC and try again.
5. Be patient. The first time you plug in the TN-USB3-xx-01, it may take 2 full minutes
     for the driver to install, before it begins working.
6. Disable SelectiveSuspend and SSIdleTimeout power saving features.

Driver Installation
Available Drivers
The Transition Networks Scorpion drivers page and the ASIX Drivers Download site
provide the driver packages. From the ASIX webpage choose Downloads then Software
& Tools to locate the driver for your OS.

Select the appropriate driver package and unzip it. Each driver package has a
Readme.txt file that describes the driver's configurable parameters. Each driver package
has a History.txt file that says you must first uninstall any older version driver setup
program, and also provides a version history for the particular driver setup program.
The supported downloaded drivers have these filenames:
1.   AX88179_178A_LINUX_DRIVER_v1.14.4_SOURCE.zip
2.   AX88179_178A_Macintosh_10.6_to_10.12_Driver_Installer_v2.8.0_20160912.zip
3.   AX88179_178A_Win7_32bit_Driver_v1.12.11.0_WHCK.zip
4.   AX88179_178A_Win7_64bit_Driver_v1.14.11.0_WHCK.zip
5.   AX88179_178A_Win7_v1.x.11.0_Drivers_Setup_v3.0.3.0.zip
6.   AX88179_178A_Win10_8.x_32bit_Driver_v1.18.2.0_WHCK.zip
7.   AX88179_178A_Win10_8.x_64bit_Driver_v1.18.2.0_WHCK.zip
8.   AX88179_178A_Win10_8.x_v1.18.2.0_Drivers_Setup_v1.0.0.0.zip

33644 Rev. C                                                         Transition Networks • User Guide | 9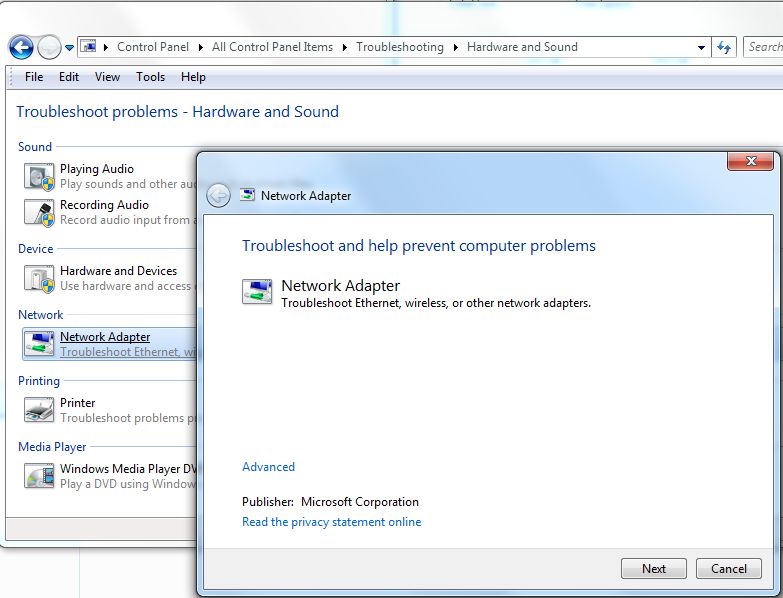
Installing the Driver
Various Management features exist, depending on the OS and driver support. The
standard OS support includes Windows 7, 8 and 8.1 (32-bit and 64-bit) and 10. Other
drivers are available from the Drivers Download site. If the Windows OS is up to date,
the driver is automatically recognized and ready to go without additional effort. If the
driver is not automatically recognized, use one of the procedures in this section:
    •   Typical Plug and Play Install below
    •   Standard Windows Driver Update on page 16.
    •   Windows 7 Driver Configurable Parameters on page 16 or
        Windows 8 Driver Configurable Parameters on page 17
    •   Uninstall the Driver Package on page 14

Typical Plug and Play Install
This is the recommended default install procedure for Windows 7; the screens and
procedures are similar for Windows 8.1 and 10.
1. Plug the TN-USB3-xx-01 into the computer’s USB port. The Installing device driver
   software dialog displays.

2. At the Searching Windows Update... dialog, click the link that indicates Skip
    obtaining driver software from Windows Update...

33644 Rev. C                                                           Transition Networks • User Guide | 10
3. At the Installing driver software... dialog, wait for the driver install to finish. 4. When the Ready to use dialog displays, click the Close button. The wizard closes. If no error messages display, continue operation. To verify the hardware is recognized by your system, navigate to Devices and Printers: displays ASIX AX88179 USB 3.0 to Gigabit Ethernet Adapter #x (where x is the number of adapter cards in your system). 33644 Rev. C Transition Networks • User Guide | 11
You can also verify device detection by navigating to Windows Control Panel > Device
Manager > Network adapters where the device displays as ASIX AX88179 USB 3.0 to
Gigabit Ethernet Adapter #x

You can right mouse click the TN-USB3-xx-01 entry in Device Manager (ASIX AX88179
USB 3.0 to Gigabit Ethernet Adapter #x) to display additional options as shown and
described below.

Update Driver Software...: lets you search automatically for updated driver software on
your computer and on the Internet, or browse your computer for driver software, and
locate and install driver software manually.
Disable: displays a confirmation dialog stating “Disabling this device will cause it to stop
functioning. Do you really want to disable it?” Click the Yes or No button.
Uninstall: displays a confirmation dialog with the Warning: You are about to uninstall
this device from your system. An option checkbox also displays to Delete the driver
software for this device at the same time as the uninstall. See below for procedure
details.
Scan for hardware changes: displays the Device Manager > Network adapters > ASIX
AX88179 USB 3.0 to Gigabit Ethernet Adapter #x screen shown above.

33644 Rev. C                                                            Transition Networks • User Guide | 12
Plug and Play Messages
Message: This device can perform faster. This ASIX AX88179 USB 3.0 to Gigabit Ethernet
Adapter #x can transfer information faster if you connect it to a Super-Speed USB 3.0
port. Displays if you plug the device into a USB 2.0 or USB 1.1 port.

33644 Rev. C                                                       Transition Networks • User Guide | 13
Uninstall the Driver Package
1. Navigate to the Windows Device Manager.
2. Click the ► icon left of the Network adapter entry to display the network adapters
   in your system.
3. Select the TN- USB3-xx-01 device (listed as ASIX AX88179 USB 3.0 to Gigabit
   Ethernet Adapter #x).
4. Select Action > Uninstall.

5. At the confirmation dialog, check or uncheck the option checkbox also displays to
   Delete the driver software for this device at the same time as the uninstall.

6. Click the OK button to uninstall the driver software (and optionally delete the driver
   software from your system).

33644 Rev. C                                                         Transition Networks • User Guide | 14
Windows Driver Setup Program (Windows 7 Professional)
The following is an example to update AX88179 Windows driver for use if the Typical
Plug and Play Install (above) does not work on your computer. These are standard
Windows driver update procedures.
Note: Before you run the setup program to install newer driver, uninstall the older
version driver setup program that user installed before. Check the list in "Control Panel”
-> "Programs" -> "Programs and Features". If there is an AX88179 driver in the list,
uninstall it before you run the setup program. Refer to your computer’s Microsoft
Windows documentation to update the driver if necessary.

1. Navigate to the driver download save location.

2. Right click the desired file (e.g.,
    AX88179_178A_Win7_32bit_Driver_v1.12.11.0_WHCK.zip).
3. Select Extract All... .
4. At the Select a Destination and Extract Files dialog, click the Extract button.

5. Navigate to and double click on the Setup.exe file in the Unzip folder. You can also
   right click the file and select Run as administrator to launch. If a Windows UAC
   screen displays, select Yes and continue.
6. When the InstallShield Wizard Completed screen displays, exit the wizard.
7. If the driver install is successful, continue with normal operation. The USB LED lights
    after the driver is installed and functional. If the driver install is unsuccessful,
    continue with the “Troubleshooting” section on page 19.

33644 Rev. C                                                               Transition Networks • User Guide | 15
Windows 7 Driver Configurable Parameters Configurable parameters for idle or downed links: 1. SpeedDuplex: Set the Ethernet link speed. -Auto: Auto detect the Ethernet link speed -10Half: Set the Ethernet force on 10HD -10Full: Set the Ethernet force on 10FD -100Half: Set the Ethernet force on 100HD -100Full: Set the Ethernet force on 100FD -1000Full: Set the Ethernet force on 1000FD 2. NetworkAddress : Lets you set a MAC address of the device or use the device default MAC address. 3. FlowControl: Configure flow control advertised capabilities. -Disabled Disable flow control -TxEnabled Enable transmit flow control -RxEnabled Enable receive flow control -RxTxEnabled Enable transmit and receive flow control 4. Packet Priority & VLAN: Enable or disable the ability to insert the 802.1Q priority and VLAN tags into the transmit packets. -Packet Priority & VLAN Disabled Disable to insert the 802.1Q priority and VLAN tag -Packet Priority Enabled Only enable to insert the 802.1Q priority tag -VLAN Enabled Only enable to insert the 802.1Q VLAN tag -Packet Priority & VLAN Enabled Enable to insert the 802.1Q priority and VLAN tag 5. VLAN ID: If user set a valid VLAN ID, the driver inserts the VLAN tag with this VLAN ID into the transmit packets and device will filter the received packets. 6. AutoDetach: This feature is basically a soft-disconnect from the USB host when the Ethernet link is down/ cable unplugged. Enable or disable AutoDetach ability. If AutoDetach is enabled, three seconds later after Ethernet cable was unplugged, the device will be detached from USB. -Disabled Disable AutoDetach -Enabled Enable AutoDetach -Use EEPROM Setting Disable or enable AutoDetach according to the EEPROM setting 7. SelectiveSuspend: Allows NDIS to suspend an idle AX88179B network adapter by transitioning the adapter to a lower-power state. -Disabled Disable SelectiveSuspend function -Enabled Enable SelectiveSuspend function 8. SSIdleTimeout: Selective suspend idle time-out in units of seconds. If selective suspend is enabled and the unit is idle for SSIDLE Timeout seconds, then the adapter can transition to a lower-power state. 33644 Rev. C Transition Networks • User Guide | 16
Windows 8.1 Driver Configurable Parameters
Configurable parameters for idle or downed links:
1. SpeedDuplex: Set the Ethernet link speed.
  -AutoNegotiation:      Auto detect the Ethernet link speed
  -10 Mbps Half Duplex: Set the Ethernet Auto-Negotiation on 10HD
  -10 Mbps Full Duplex: Set the Ethernet Auto-Negotiation on 10FD
  -100 Mbps Half Duplex: Set the Ethernet Auto-Negotiation on 100HD
  -100 Mbps Full Duplex: Set the Ethernet Auto-Negotiation on 100FD
  -1.0 Gbps Full Duplex: Set the Ethernet Auto-Negotiation on 1000FD
2. NetworkAddress : Lets you set a MAC address of the device or use the device default
MAC address.
3. FlowControl: Configure flow control advertised capabilities
  -Disabled   Disable flow control
  -TxEnabled Enable transmit flow control
  -RxEnabled Enable receive flow control
  -RxTxEnabled Enable transmit and receive flow control
4. Packet Priority & VLAN: Enable or disable the ability to insert the 802.1Q priority and
VLAN tags into the transmit packets.
  -Packet Priority & VLAN Disabled Disable to insert the 802.1Q priority and VLAN tag
  -Packet Priority Enabled     Only enable to insert the 802.1Q priority tag
  -VLAN Enabled             Only enable to insert the 802.1Q VLAN tag
  -Packet Priority & VLAN Enabled Enable to insert the 802.1Q priority and VLAN tag
5. VLAN ID: If user set a valid VLAN ID, the driver inserts the VLAN tag with this VLAN ID
into the transmit packets and device will filter the received packets.
6. AutoDetach: This feature is a power savings mode and basically a soft-disconnect
from the USB host when the Ethernet link is down/ cable unplugged. Enable or disable
AutoDetach ability. If AutoDetach is enabled, 3 seconds later after Ethernet cable was
unplugged, the device will be detached from USB.
   -Disabled Disable AutoDetach
   -Enabled   Enable AutoDetach
   -Use EEPROM Setting Disable or enable AutoDetach according to the EEPROM
setting
7. SelectiveSuspend: Allows NDIS to suspend an idle AX88179 network adapter by
transitioning the adapter to a lower-power state.
  -Disabled     Disable SelectiveSuspend function
  -Enabled      Enable SelectiveSuspend function
8. SSIdleTimeout: Selective suspend idle time-out in units of seconds. If selective
suspend is enabled and the unit is idle for SSIDLE Timeout seconds, then the adapter can
transition to a lower-power state.

33644 Rev. C                                                           Transition Networks • User Guide | 17
Manual Windows Driver Update
Use the procedure below to update the revised Windows driver on your platform.
1. Remove the TN-USB3-xx-01 from the USB 3.0 port of your PC.
2. Boot your PC/Notebook/PDA to Windows system.
3. Copy the new AX88179 Windows driver (AX88179.SYS) to the Windows system driver
   default folder. (e.g., C:\WINDOWS\system32\drivers for WinXP platform) to
   overwrite the previous AX88179 driver. If you still can't find the correct folder, search
   for the "AX88179.SYS" file in your computer to find a correct folder.
4. Insert the TN-USB3-xx-01to the USB 3.0 port of your PC.
5. Enable the USB function from the BIOS setting of your PC. (Refer to the PC User
    Manual for the detailed BIOS setting.)
6. Verify that the TN-USB3-xx-01 works properly.

Messages

Message: Installing device driver software. Searching Windows Update... Obtaining
         device driver software from Windows Update might take a while. Skip
         obtaining device driver software from Windows Update.
Meaning: Windows Informational message only.
Recovery: None required. Wait for the search to finish and follow the on-screen
   instructions.

Message: Device driver software was not successfully installed. Please consult your
            device manufacturer for assistance getting this device installed. ASIX AX88179
            USB 3.0 to Gigabit Ethernet Adapter x Failed.
Meaning: The device driver did not install properly in Windows.
Recovery:
1. Click the link What can I do if my device did not install properly?
2. Read the displayed MS Windows article. The content varies between operating
  systems, but basically says to:
           • Make sure your computer is connected to the Internet and automatic
              updating is turned on.
           • Manually check for drivers on Windows Update.
           • Install software for the device.
  Information is also provided on how to perform these three suggestions. Follow the
    on-screen instructions.
3. Perform the Troubleshooting steps below if the device driver software still is not
  successfully installed.

33644 Rev. C                                                           Transition Networks • User Guide | 18
Troubleshooting
If a problem or exception occurs, perform these steps.
1. General: a) Do not connect too many USB devices to the computer. b) Wait 5
seconds after connecting the device before using it. c) Use powered USB hubs to
connect other USB devices. d) Do not connect USB devices when the system is busy
(i.e., running slower than normal).
2. If you are connecting to a USB hub, make sure it operates at USB 3.0 speed. Note
that the TN-USB3-xx-01 is a USB 3.0 device, but it also works at USB 2.1, 2.0, and 1.1
speeds. Make sure that any other USB devices are operating properly (native PC
USB port, USB hub, USB port on docking station).
3. If your computer does not recognize the TN-USB3-xx-01, make sure that the TN-
USB3-xx-01 is properly inserted into the USB 3.0 slot. Try starting the PC with the
TN-USB3-xx-01 plugged in to the USB port.
4. For maximum performance, connect the TN-USB3-xx-01 directly to a USB 3.0 port
on your computer. If you are connecting to a USB hub, make sure it operates at USB
3.0 speed and can provide the required power for this device.
5. Remove the TN-USB3-xx-01, and then reinsert it into the computer’s USB 3.0 slot
with the computer running.
6. Verify the Connectors and LEDs steps on page 5.
7. Verify the Connecting the TN-USB3-xx-01 steps on page 8.
8. Verify the Installing the Driver steps on page 10.
9. Try the Windows Driver Setup Program steps (see above).
10. Try the Manual Windows Driver Update (see above).
11. In Windows Network Connections, check for the presence of the TN-USB3-xx-01
device. In the example below, the Device Name is “AX88179 USB3.0 to Gigabit
Ethernet Adapter”.
12. See the Download Driver site for driver Readme files.
13. Review the Installation Overview on page 9 and verify that the PC BIOS and USB
Host Controller drivers are current and power saving features are disabled.
14. Check the documentation that came with your computer for PC troubleshooting.
15. Try to troubleshoot the problem using Windows Device Manager. The TN-USB3-xx-
01 may be listed as "Unknown Device" or "Other Device" or the correct device name
may be displayed.
33644 Rev. C Transition Networks • User Guide | 1916. At Windows Control Panel > All Control Panel Items > Troubleshooting > Hardware
and Sound in the Network section select Network Adapter to display device
troubleshooting. Click the Next button or click the linked text “Advanced”.
17. Check your OS vendor documentation and website for troubleshooting steps / tools.
In Windows, try "Microsoft Fix it" or "Microsoft USB Hardware Verifier" or
"Microsoft System Restore". In Linux, check your distro's documentation and web
page for troubleshooting steps. For computers using non-Intel USB 3 xHCI
controllers, go to the manufacturer’s website and download and install the newest
driver.
18. At AXIS Properties > Advanced tab, select the Energy Efficient Ethernet property,
then at the Value dropdown make sure ‘Disabled’ is selected as shown below.
Having EEE enabled can cause dropped packets with some SFPs.
19. Contact TN Technical Support; see Contact Us on page 24 below.
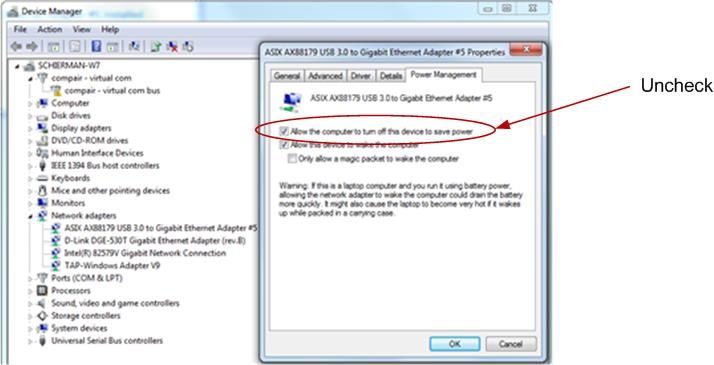
33644 Rev. C Transition Networks • User Guide | 20Troubleshooting Windows 7 / 8.1 Driver & Performance Problems Check the related TN product webpage for updated drivers/information (e.g., log in to the Scorpion-USB product page and select the SUPPORT FILES tab). See the TN Support webpage for the Support Library, Product Support, and Customer Support. For computers using Intel USB 3 xHCI controllers, see the Intel recommendation to use Windows 8.1 native driver. Note that Windows 7 Doesn’t Provide USB 3.0 eXtensible Host Controller Driver, but other download sources are available. Note: “Windows 10* and Windows 8.1* have a native Microsoft USB 3.0 driver. Intel is not releasing a specific Intel® USB 3.0 eXtensible Host Controller Driver for Windows 10 or 8.1. If you are upgrading from Windows 7* to Windows 10 or 8.1, uninstall the Intel USB 3.0 eXtensible Host Controller Driver before installing the upgrade.” See the Microsoft Download and install drivers page. Problem: TN-USB3-xx-01 plugged in but not detected by Windows TN-USB3-xx-01 LEDs not lit (with or without link established) ASIX device not detected in Windows Device Manager Work around: 1. Disable Selective Suspend (from Control Panel, Power Management, Advanced Settings). The exact steps are OS version dependent; In Windows 7 for example: 2. In the TN-USB3-xx-01 USB port Device Manager Power Management tab, deselect (un-check) “Allow the computer to turn off this device to save power”. 33644 Rev. C Transition Networks • User Guide | 21
For more information:
    Windows 10 http://jonathanesmith.blogspot.com/2015/12/windows-10-usb-
    selective-suspend.html
    Selective Suspend:
    https://blogs.msdn.microsoft.com/usbcoreblog/2011/05/10/demystifying-usb-
    selective-suspend/

The product label and the package label contain information to record to help if calling
Tech Support. A sample product label is shown below:

33644 Rev. C                                                          Transition Networks • User Guide | 22
Recording Information for Technical Support After performing the troubleshooting procedures above, and before calling or emailing Tech Support, record as much information as possible to help the Tech Support Specialist. SKU: __________________________ Serial #: __________________________ FW Rev.: ______________________ The first two digits are the PCB Rev. (A) and the PCA Rev. (2). The next two digits are the firmware version (B6). The next five digits are the PCB number (11531). The last five digits are the specific serial number for that board (10006 - different for each device). Computer Make / Model: __________________________________________________ Operating System: ______________________________________________________ BIOS version: __________________________________________________________ Driver installed: _________________________________________________________ Driver install method: ____________________________________________________ Driver modifications: ____________________________________________________ LED status: ____________________________________________________________ Error messages: ________________________________________________________ Other TN devices in network: _____________________________________________ _______________________________________________________________________ Third party devices in network: ____________________________________________ _______________________________________________________________________ Troubleshooting steps taken: _____________________________________________ _______________________________________________________________________ _______________________________________________________________________ Additional notes: _______________________________________________________ _______________________________________________________________________ _______________________________________________________________________ Contact Transition Networks technical support department; see Contact Us below. 33644 Rev. C Transition Networks • User Guide | 23
Limited Lifetime Warranty
Effective for Products Shipped May 1, 1999 and After. Every Transition Networks labeled
product purchased after May 1, 1999, and not covered by a fixed-duration warranty will
be free from defects in material and workmanship for its lifetime. This warranty covers
the original user only and is not transferable.
This warranty does not cover damage from accident, acts of God, neglect,
contamination, misuse or abnormal conditions of operation or handling, including over-
voltage failures caused by use outside of the product’s specified rating, or normal wear
and tear of mechanical components.
Any warranty hereunder is extended to the original consumer or purchaser and is not
assignable. Transition Networks makes no express or implied warranties including, but
not limited to, any implied warranty of merchantability or fitness for a particular
purpose, except as expressly set forth in this warranty. In no event shall Transition
Networks be liable for incidental or consequential damages, costs, or expenses arising
out of or in connection with the performance of the product delivered hereunder.
Transition Networks will in no case cover damages arising out of the product being used
in a negligent fashion or manner.
This warranty does not cover damage from accident, acts of God, neglect,
contamination, misuse or abnormal conditions of operation or handling, including over-
voltage failures caused by use outside of the product’s specified rating, or normal wear
and tear of mechanical components.
Transition Networks will, at its option:
•Repair the defective product to functional specification at no charge
•Replace the product with an equivalent functional product
•Refund a portion of purchase price based on a depreciated value
To return a defective product for warranty coverage, contact Transition Networks’
Customer Support for a return authorization number.
Send the defective product postage and insurance prepaid to the following address:
Transition Networks, Inc.
10900 Red Circle Drive
Minnetonka, MN 55343
USA
Attn: RETURNS DEPT: CRA/RMA # ___________
Failure to properly protect the product during shipping may void this warranty. The
return authorization number must be written on the outside of the carton to ensure its
acceptance. We cannot accept delivery of any equipment that is sent to us without a
CRA or RMA number.
CRA’s are valid for 60 days from the date of issuance. An invoice will be generated for
payment on any unit(s) not returned within 60 days.
Upon completion of a demo/ evaluation test period, units must be returned or
purchased within 30 days. An invoice will be generated for payment on any unit(s) not
returned within 30 days after the demo/ evaluation period has expired.
The customer must pay for the non-compliant product(s) return transportation costs to
Transition Networks for evaluation of said product(s) for repair or replacement.

33644 Rev. C                                                        Transition Networks • User Guide | 24
Transition Networks will pay for the shipping of the repaired or replaced in-warranty
product(s) back to the customer (any and all customs charges, tariffs, or/and taxes are
the customer’s responsibility).
Before making any non-warranty repair, Transition Networks requires a $200.00 charge
plus actual shipping costs to and from the customer. If the repair is greater than
$200.00, an estimate is issued to the customer for authorization of repair. If no
authorization is obtained, or the product is deemed not repairable, Transition Networks
will retain the $200.00 service charge and return the product to the customer not
repaired. Non-warranted products that are repaired by Transition Networks for a fee
will carry a 180-day limited warranty. All warranty claims are subject to the restrictions
and conventions set forth by this document.
Transition Networks reserves the right to charge a $50 fee for all testing and shipping
incurred, if after testing, a return is classified as “No Problem Found.”
THIS WARRANTY IS YOUR ONLY REMEDY. NO OTHER WARRANTIES, SUCH AS FITNESS
FOR A PARTICULAR PURPOSE, ARE EXPRESSED OR IMPLIED. TRANSITION NETWORKS IS
NOT LIABLE FOR ANY SPECIAL, INDIRECT, INCIDENTAL OR CONSEQUENTIAL DAMAGES
OR LOSSES, INCLUDING LOSS OF DATA, ARISING FROM ANY CAUSE OR THEORY.
AUTHORIZED RESELLERS ARE NOT AUTHORIZED TO EXTEND ANY DIFFERENT WARRANTY
ON TRANSITION NETWORKS’S BEHALF.

Contact Us
10900 Red Circle Drive
Minnetonka, MN 55343 USA
telephone: +1.952.941.7600
toll Free: 800.526.9267
fax: 952.941.2322
sales@transition.com
info@transition.com
techsupport@transition.com
https://www.transition.com

33644 Rev. C                                                          Transition Networks • User Guide | 25
Compliance Information
Declaration of Conformity

FCC Regulations
RADIO AND TELEVISION INTERFERENCE
This equipment has been tested and found to comply with the limits for a Class A digital device,
pursuant to Part 15 of the FCC rules. These limits are designed to provide reasonable protection
against harmful interference in a residential installation. This equipment generates, uses and can
radiate radio frequency energy and, if not installed and used in accordance with the instructions,
may cause harmful interference to radio communications. However, there is no guarantee that
interference will not occur in a particular installation. If this equipment does cause harmful
interference to radio or television reception, which can be determined by turning the equipment
off and on, the user is encouraged to try to correct the interference by one or more of the
following measures:

- Reorient or relocate the receiving antenna.
- Increase the separation between the equipment and the receiver.
- Connect the equipment into an outlet on a circuit different from that to w hich the receiver is
connected.
- Consult the dealer or an experienced radio/TV technician for help.
Changes and Modifications not expressly approved by the manufacturer or registrant of this
equipment can void your authority to operate this equipment under Federal Co mmunications
Commission’s rules.
* In order to maintain compliance with FCC regulations shielded cables must be used with this
equipment. Operation with non-approved equipment or unshielded cables is likely to result in
interference to radio & television reception.
* NOTE: Shielded cables were used when testing this product.

33644 Rev. C                                                                  Transition Networks • User Guide | 26
Canadian Regulations
This digital apparatus does not exceed the Class A limits for radio noise for digital apparatus set
out on the radio interference regulations of the Canadian Department of Communications.
Le présent appareil numérique n'émet pas de bruits radioélectriques dépassant les limites
applicables aux appareils numériques de la class A prescrites dans le Règlement sur le brouillage
radioélectrique édicté par le ministère des Communications du Canada.

European Regulations
Warning
This is a Class A product. In a domestic environment this product may cause radio interference in
which case the user may be required to take adequate measures.
Achtung !
Dieses ist ein Gerät der Funkstörgrenzwertklasse A. In Wohnbereichen können bei Betrieb dieses
Gerätes Rundfunkstörungen auftreten. In diesem Fäll ist der Benutzer für Gegenmaßnahmen
verantwortlich.
Attention !
Ceci est un produit de Classe A. Dans un environment domestique, ce produit risque de créer des
interférences radioélectriques, il appartiendra alors à l'utilsateur de prende les measures
spécifiques appropriées.

        In accordance with European Union Directive 2002/96/EC of the European Parliament
        and of the Council of 27 January 2003, Transition Networks will accept post usage
        returns of this product for proper disposal. The contact information for this activity can
be found in the 'Contact Us' portion of this document.

      CAUTION: RJ connectors are NOT INTENDED FOR CONNECTION TO THE PUBLIC
TELEPHONE NETWORK. Failure to observe this caution could result in damage to the public
telephone network.

Der Anschluss dieses Gerätes an ein öffentlickes Telekommunikationsnetz in den
EGMitgliedstaaten verstösst gegen die jeweligen einzelstaatlichen Gesetze zur Anwendung der
Richtlinie 91/263/EWG zur Angleichung der Rechtsvorschriften der Mitgliedstaaten über
Telekommunikationsendeinrichtungen einschliesslich der gegenseitigen Anerkennung ihrer.

33644 Rev. C                                                                  Transition Networks • User Guide | 27
Electrical Safety Warnings
Electrical Safety
IMPORTANT: This equipment must be installed in accordance with safety precautions.
Elektrische Sicherheit
WICHTIG: Für die Installation dieses Gerätes ist die Einhaltung von Sicherheitsvorkehrungen
erforderlich.
Elektrisk sikkerhed
VIGTIGT: Dette udstyr skal 28nstallers I overensstemmelse med sikkerhedsadvarslerne.
Elektrische veiligheid
BELANGRIJK: Dit apparaat moet in overeenstemming met de veiligheidsvoorschriften worden
geïnstalleerd.
Sécurité électrique
IMPORTANT : Cet équipement doit être utilisé conformément aux instructions de sécurité.
Sähköturvallisuus
TÄRKEÄÄ : Tämä laite on asennettava turvaohjeiden mukaisesti.
Sicurezza elettrica
IMPORTANTE: questa apparecchiatura deve essere installata rispettando le norme di sicurezza.
Elektrisk sikkerhet
VIKTIG: Dette utstyret skal 28nstallers I samsvar med sikkerhetsregler.
Segurança eléctrica
IMPORTANTE: Este equipamento tem que ser instalado segundo as medidas de precaução de
segurança.
Seguridad eléctrica
IMPORTANTE: La instalación de este equipo deberá llevarse a cabo cumpliendo con las
precauciones de seguridad.
Elsäkerhet
OBS! Alla nödvändiga försiktighetsåtgärder måste vidtas när denna utrustning används
Record of Revisions
Rev Date Notes
A 9/22/16 Initial release for TN-USB3-SX-01(SC), TN-USB3-SX-01(LC), and TN-USB3-SFP-01.
B 1/11/21 Update DoC and troubleshooting.
C 2/23/21 Update weblinks.
Trademarks Notice: All trademarks and registered trademarks are the property of their respective
owners.
Copyright Restrictions: © 2016-2021 Transition Networks. All rights reserved. No part of this work may be
reproduced or used in any form or by any means - graphic, electronic or mechanical - without written
permission from Transition Networks.
33644 Rev. C Transition Networks • User Guide | 28Transition Networks 10900 Red Circle Drive Minnetonka, MN 55343 USA telephone: +1.952.941.7600 toll Free: 800.526.9267 fax: 952.941.2322 sales@transition.com info@transition.com techsupport@transition.com https://www.transition.com 33644 Rev. C Transition Networks • User Guide | 29
You can also read