Maximizing Microsoft Office Communicator
←
→
Page content transcription
If your browser does not render page correctly, please read the page content below
Maximizing Microsoft Office Communicator

Microsoft Office Communicator is an instant messaging tool on the standard image for CG workstations. This Tech Tip
contains basic instructions on how to use the following features of Office Communicator:

   Create New Contact Groups
   Add/Remove Contacts to/from Groups
   View and Sort Settings
   Status Alerts
   Group Chat
   Office Communicator Note
   Send an Attachment
   Modify Text Format and Add Emoticons
   Change the Conversation Subject
   Take Notes in OneNote
   Share your Computer Screen
   Communicator Saving Options
   Save a Conversation

Create New Contact Groups
   Contact Lists enable you to save your colleagues to a list by any name of your choosing. There are no criteria for
   how to organize a Contact List in your Office Communicator window, however you are limited to 64 groups, 100
   contacts per group, and 300 contacts overall, by the application. You can group individuals according to whichever
   way suits your needs. For example, you could group your classmates from Boarding Team Member school into one
   contact list, and create another contact list for everyone you know at the detailer’s office.

   Once you’ve decided what group names and organization you want to use, proceed with the following steps.

                                       1. Open Office Communicator,
                                          right‐click on
                                          “Recent Contacts”, then select
                                          “Create New Group".

                                       2. A new group title field will appear
                                          with the text “New Group”. Type
                                          the group name and press “Enter”.

   Return to top.

                                                     Page 1 of 14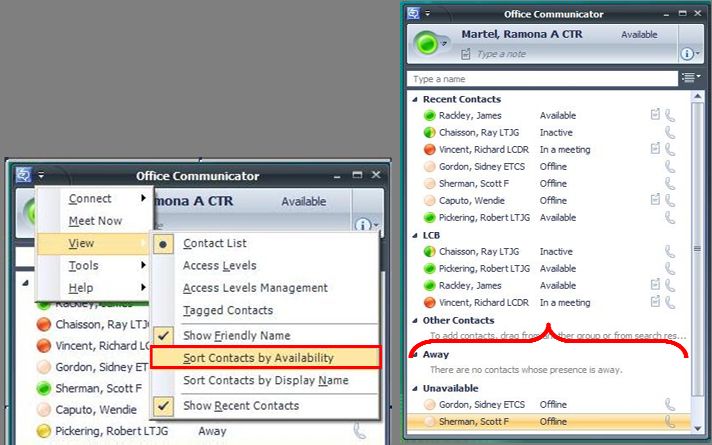
Add/Remove Contacts to/from Groups
  There are two ways to add contacts to a group: “Click and drag” or “Right‐Click and Add”. This section contains
  some important steps and things to remember when adding contacts.

      1. Locate the person you want to add to contacts by either using
         the search bar at the top, or checking your “Recent Contacts”
         group, which shows all persons you have messaged within a
         specific timeline.

                                                                          2. Once you’ve identified the individual
                                                                             you will be adding, left‐click and drag
                                                                             their name so that the cursor is over
                                                                             the new group. Release the mouse
                                                                             button. Repeat this step as needed.

                                                                                    NOTE
                                                      This search feature will not only look at the Coast Guard’s
                                                      Global Address List (GAL), but it will also search through your
                                                      Microsoft Outlook contacts as well. Occasionally, you may
                                                      notice that a username which appears during the search has a
                                                      white status marker, and is labeled as “Presence Unknown”. Do
                                                      not add these contacts to your contacts in Office Communicator
                                                      because they are contacts with non .mil addresses which have
                                                      no access to the Coast Guard’s messaging system.

      3. Another way to add a contact instead of how it is done in Step
         2, is to right‐click on the contact name, highlight “Add to
         Contact List”, and select the correct Group from the drop‐down
         menu.

                                                    Page 2 of 14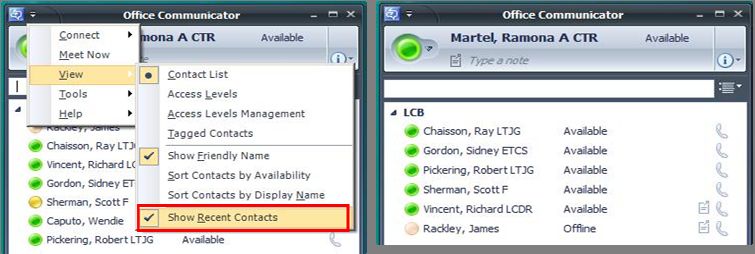
4. To remove a Contact from a group, right‐click the contact name and select “Remove from Group”.

  Return to top.

View and Sort Settings
  Sometimes the number of contacts in the list can grow until it’s overwhelming. These are some simple tips on how
  to change the settings in Office Communicator to limit the number of visible contacts.

      1. With Office Communicator open, click on the Main
         Menu drop‐down arrow indicated by the screenshot
         at right.

      2. Hover over “View” and select “Sort Contacts by Availability” to move the contacts with a status of
         “unavailable” or “away” to different Contact Lists at the bottom of your Office Communicator window.

                                                   Page 3 of 14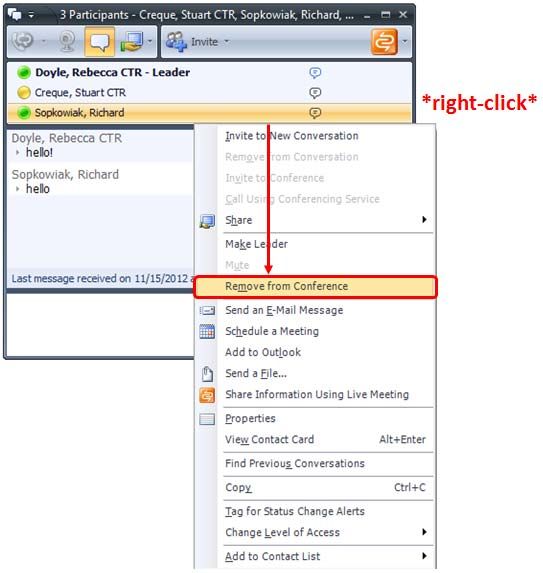
3. To remove the Recent Contacts group from your view, go back to Steps 1 and 2 of this section, and hover
          over “View” again. Click on “Show Recent Contacts” to un‐check and remove that Contact List from your
          view.

   Return to top.

Status Alerts
   To be notified when a Contact changes their status, logs on, or logs off, you want to turn on Status Change Alerts for
   that individual.

       1. Right‐click the arrow left of the Contact name,
          and select “Tag for Status Change Alerts”.

       2. A gold star will appear to the right of the
          Contact name.

   Return to top.

                                                        Page 4 of 14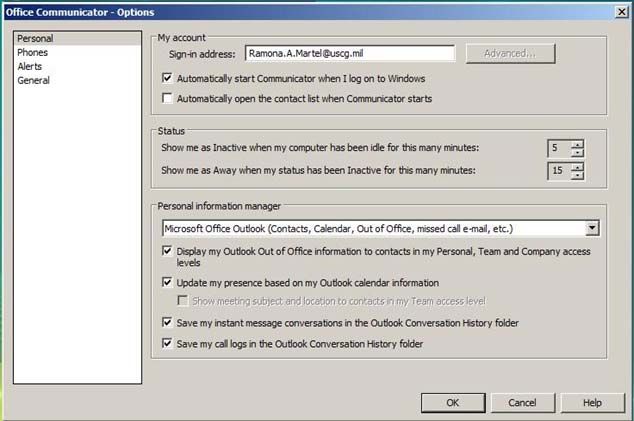
Group Chat
  The Group Chat feature allows you to have a message conversation with a group of participants. All of the following
  features are available in Instant Message and Video Chat.

      1. To invite ALL members of one group, right‐click a Contact Group
         arrow, and select “Send an Instant Message”.

                                                     A Group Chat appears with all Group Member Names listed.

     2. To chat with multiple Contacts from different groups, select
        a Contact, then hold down the “Ctrl” key on your keyboard
        while selecting the other Contact names.

                                             Then right‐click on one of the Contacts and select
                                             “Send an Instant Message”.

                                             3. To create a chat from an already open conversation, add additional
                                                contacts by left‐clicking and dragging the additional Contact(s) into
                                                the open dialog box. The new Contact will be invited to join.

                                                    Page 5 of 14
4. The last way to add a Contact to a Group Chat may be
      done from the Chat window itself. Click the drop‐down
      arrow next to “Invite” and select “Invite a Contact”.

                                    A window labeled “Invite a Contact” will appear. Search for and select a Contact
                                    name, and then click “OK”. The new Contact is the invited to the Group Chat.

   5. Now, to remove a Contact from a Group Chat,
      right‐click on the participant’s name, and select
      “Remove from Conversation”. The Contact is
      then removed from the Group Chat.

                         NOTE
   These are just basic Tips and Tricks on starting a
   conversation in Office Communicator. For a
   more detailed explanation of how to use Office
   Communicator or LiveMeeting to conduct a
   meeting, look for a new CGFIXIT Tech Tip on
   Online Meetings.

Return to top.

                                                   Page 6 of 14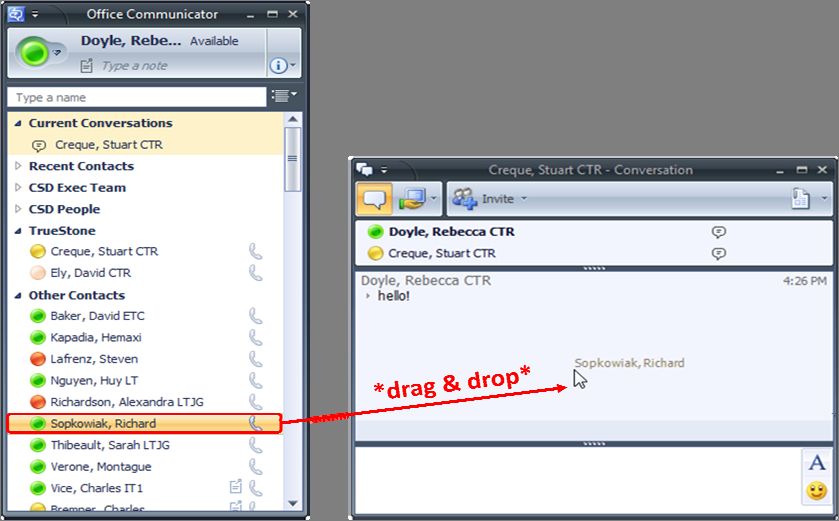
Office Communicator Note
  There is a feature of Office Communicator which allows you to publicly post
  a statement visible to other people using the application. There are no CG
  policies governing what information may be placed here, but it is
  recommended that you keep the language respectful and professional.

      1. To create a note, simply type a message into the box directly
         below your name on the Office Communicator console, and
         press “Enter” on your keyboard.

      2. To view someone’s note, hover your mouse over the
         icon near their contact name that looks like a notepad.

      3. To remove your note, highlight and delete the text and press “Enter” on your keyboard.

      4. If you have out of office messages turned on, they will be visible in this space. You will need to turn off your
         Out of Office replies before your note field can be cleared.

  Return to top.

Send an Attachment
  There are numerous way to share files with other users over the CGOne network. One simple method is done in an
  Office Communicator conversation. These steps require the recipient to accept the document transfer before the
  file can be successfully downloaded to their computer.

  Some files cannot be transferred due to size or type.
  For example, .exe files cannot be sent over CGOne via
  e‐mail or Office Communicator.

      1. Perhaps the easier way to send a file to a
         contact over office communicator, is to use
         the “drag and drop” method. Left‐click to
         select the file in question from its folder
         and drag it into the conversation window.

          If you are using this method, skip to Step 4 now.

      2. In the top‐right‐hand corner of your
         conversation window, there is an icon
         which resembles a notepad, and an arrow
         for a drop‐down menu. Click on the arrow
         and select “Send a File…”.

      3. A browser window will open. Navigate to
         the file, highlight it, and click “Open”.

                                                     Page 7 of 14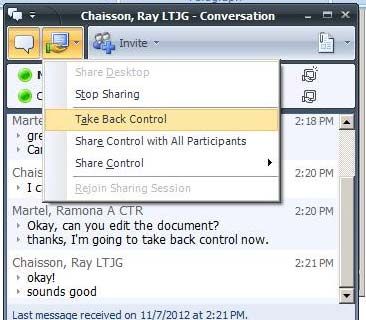
4. The recipient will be notified that they are being
                                                                     sent a file, but that they must accept the file by
                                                                     following the on‐screen instructions. Your screen
                                                                     will look like this until the transfer completes.

     5. If successful, your conversation window will show

     6. If not successful, verify that the recipient
        acknowledged the document transfer before trying
        another method to share the file. Reference the
        Maximizing your Microsoft Outlook Tech Tip on
        how to attach the file to an e‐mail.

  Return to top.

Modify Text Format and Add Emoticons
  For your convenience, the text formatting and emoticon
  buttons are easily accessible within the conversation window.

     1. To change the font style, color, or size, highlight the
        text you wish to modify and click on the text
        formatting button.

         A drop‐down menu will appear.
         When you make a selection, the
         drop‐down menu should disappear.
         If not, click on the text formatting
         button again.

                                                     Page 8 of 14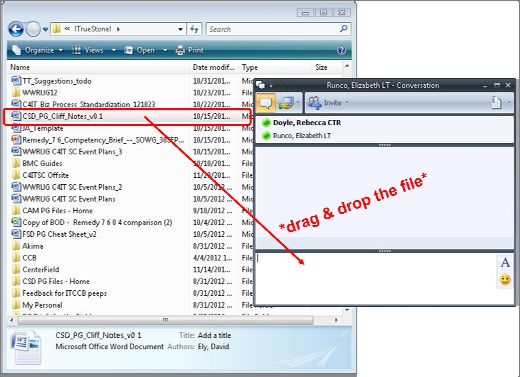
2. To add the image of a face, or some other graphic that fits the context of your discussion, click on the
         emoticon button.

                                                       A drop‐down menu will appear.

                                                       Once you make your selection, the menu will disappear and the
                                                       icon will be added to your drafted dialog box.

  Return to top.

Change the Conversation Subject
  Every conversation in Office Communicator has a Subject. If the conversation originates as a response to an e‐mail,
  the subject will be the title of the e‐mail. If it originates any other way, the subject will be generic, such as
  “Conversation”.

  If you intend to save the conversation or takes notes using Microsoft OneNote, it may be beneficial to first re‐name
  the conversation so that you may locate it more easily later.

      1. In the upper‐right‐hand corner of the
         conversation window, select the drop‐
         down menu arrow next to the notepad.

      2. A menu will appear. Select “Change
         Conversation Subject…”

      3. A new window will pop‐up. Enter the new name of the conversation
         and click “OK” to apply the change.

      4.   The new subject will appear immediately.

  Return to top.

                                                      Page 9 of 14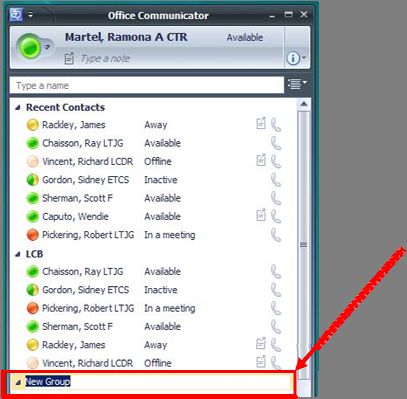
Take Notes in OneNote
  Microsoft OneNote is a very useful tool, primarily because it frequently automatically saves. It can be very useful for
  organizing anecdotal information and to‐do lists.

      1. In the upper‐right‐hand corner of the conversation window, select the drop‐down menu arrow next to the
         icon which looks like a notepad.

      2. Select “Take Notes Using OneNote”

      3. The application will automatically load and create a new page in OneNote. This simple action copies the
         conversation subject, names of participating persons, and the date and time the note page was created.
         Click anywhere in the empty whitespace to add notes, copy and paste text or images, etc.

  Return to top.

                                                     Page 10 of 14
Share your Computer Screen
While in a conversation, it’s possible to share your entire desktop or only one of your multiple monitors. A green
border will appear around the edge of whichever screen(s) you choose to share.
As with other functions described in this Tech Tip, there are multiple ways to share your desktop.
1. To share your desktop with a contact whom you are
not already in conversation with, right‐click on a
contact name, highlight “Share” and select “Share
Desktop”. The contact will receive an invitation to
view your desktop. *right‐click*
2. To share your desktop from an open conversation,
click drop‐down arrow next to the Share icon ,
and select “Share Desktop”.
NOTE
If you have two monitors, both options #1 and #2 will
give you the option to “Share Desktop”, “Share Main
Monitor”, or “Share Second Monitor”. A bright green
border will appear around the perimeter of the shared
area.
3. To turn off sharing, click the Share icon again, and
select “Stop Sharing”
Return to top.
Share your Desktop
When sharing your desktop, you can give another person in the conversation the ability to control your computer.
This feature can be especially helpful if the individual is trying to show you something, or if you are using Office
Communicator to run a meeting and the participant wants to advance the powerpoint slides on his/her own.
1. Click drop‐down arrow next to the Share icon,
and hover over “Share Control”.
Select the name of the person in the
conversation whom you wish to allow the
ability to control your computer.
2. Verify the Contact can move your mouse, make
selections on your screen, and/or is able to
enter information with his/her keyboard.
Page 11 of 143. When you are ready to rescind their ability to control your
computer, click the Share drop‐down again, and select
“Take Back Control”.
Return to top.
Communicator Saving Options
Instant messages and call logs can be saved and Archived in Outlook.
1. Click the Main Menu drop‐down arrow in the upper‐left corner, highlight “Tools”, and select “Options”.
2. The window labeled “Office Communicator – Options” will appear. Ensure the following boxes are checked:
“Save my instant message conversations in the Outlook Conversation History folder”
“Save my call logs in the Outlook Conversation History folder”
Click “OK” to save.
Instant messages and call logs
will now be saved in Microsoft
Outlook’s Conversation History
folders. See the Section of this
Tech Tip on how to Save a
Conversation.
Return to top.
Page 12 of 14Save a Conversation
Sometimes OC conversations contain useful or important
information that needs to be saved and referenced at a
later date. If this is the case, it may be easiest to save the
conversation as an e‐mail. Saved conversations can even be
forwarded like a regular e‐mail message.
1. In the top‐left‐hand corner of the
conversation window is a small icon for a
drop‐down menu. Select that, then hover
the mouse over “File” and then select “Save
As E‐Mail”
2. A message will appear in the conversation
window (only on your screen) that the
conversation was saved.
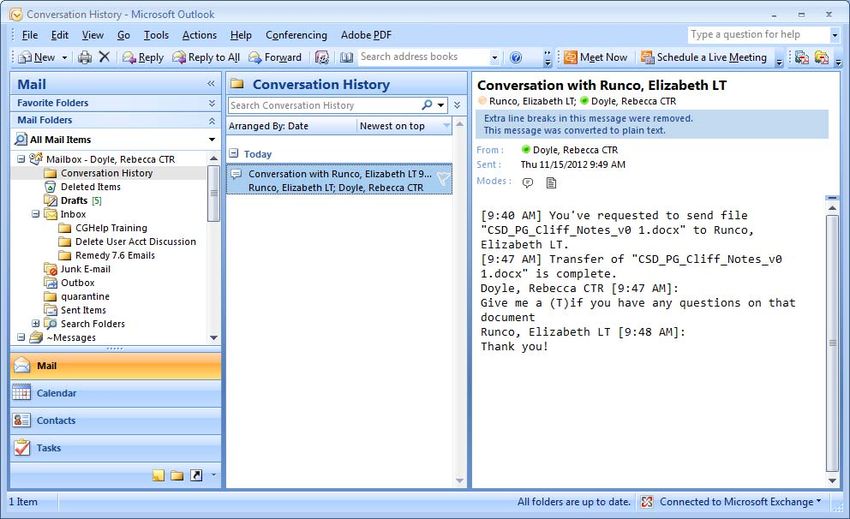
3. To view the saved conversation, open
Microsoft Outlook and left click on the
folder labeled “Conversation History” to
view its contents.
The recently saved conversation is displayed
like an e‐mail.
Page 13 of 144. If you wish to view the conversation in HTML, you
will be able to see the text formatting. To do this,
left‐click on the light blue bar displayed beneath the
conversation name.
The bar will turn orange and a drop down menu will
appear.
Select the option to “Display as HTML”.
The screen will update, but if you look at a different
message in Microsoft Outlook, you will have to re‐
do these steps each time you want to view the
conversation in HTML.
Return to top.
If you follow these steps and still experience problems
please submit a CGFIXIT ticket to request assistance.
Page 14 of 14You can also read