MD Model-driven Mobile Development - GitHub Pages
←
→
Page content transcription
If your browser does not render page correctly, please read the page content below
MD² - Model-driven Mobile Development

       MD²
Model-driven Mobile
   Development
              Group members:
                Sören Evers
              Klaus Fleerkötter
               Daniel Kemper
             Sandro Mesterheide
             Jannis Strodtkötter

                   Tutors:
          Steffen Henning Heitkötter
         Dr. Tim Alexander Majchrzak

               Dr. Frank Köhne

                                            Page 1 of 81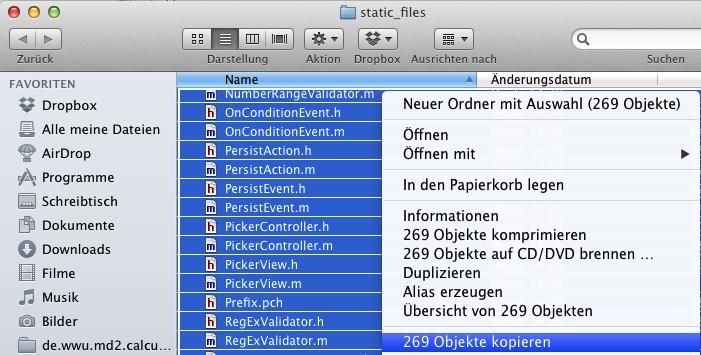
MD² - Model-driven Mobile Development

Table of Contents
Introduction ............................................................................................................................................................................... 4
Approach ..................................................................................................................................................................................... 5
    General .................................................................................................................................................................................... 5
    Tools ......................................................................................................................................................................................... 5
Modeler’s Handbook .............................................................................................................................................................. 6
    Getting Started ..................................................................................................................................................................... 6
         Setting up an environment......................................................................................................................................... 6
         Live Coding Example .................................................................................................................................................... 7
         Deploying an MD² App on Android ........................................................................................................................ 7
         Deploying an MD² App on iOS .................................................................................................................................. 8
    Language reference.......................................................................................................................................................... 12
         Package Structure ........................................................................................................................................................ 12
         Model elements............................................................................................................................................................. 12
             Entity ............................................................................................................................................................................ 13
             Enum ............................................................................................................................................................................ 14
         View elements ............................................................................................................................................................... 14
             Container Elements ................................................................................................................................................ 15
                  Grid Layout ........................................................................................................................................................... 15
                  FlowLayoutPane ................................................................................................................................................. 15
                  TabbedPane .......................................................................................................................................................... 16
             Content Elements .................................................................................................................................................... 16
                  Input elements..................................................................................................................................................... 16
                  TextInput ............................................................................................................................................................... 16
                  OptionInput .......................................................................................................................................................... 16
                  CheckBox ............................................................................................................................................................... 17
                  Label ........................................................................................................................................................................ 17
                  Tooltip..................................................................................................................................................................... 17
                  Button ..................................................................................................................................................................... 18
                  Image ....................................................................................................................................................................... 18
                  Spacer ...................................................................................................................................................................... 19
                  Auto Generator and Entity Selector............................................................................................................ 19
                  Style.......................................................................................................................................................................... 19
                  Element referencing and renaming ............................................................................................................ 20

                                                                                                                                                                             Page 2 of 81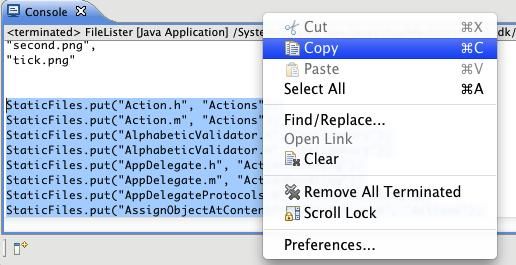
MD² - Model-driven Mobile Development
        Controller elements .................................................................................................................................................... 20
             Main .............................................................................................................................................................................. 20
             Actions ......................................................................................................................................................................... 21
                 CustomAction....................................................................................................................................................... 21
                 Binding and unbinding actions ..................................................................................................................... 21
                 CustomEvent ........................................................................................................................................................ 22
                 Binding and unbinding validators ............................................................................................................... 23
                 Mapping and unmapping view elements ................................................................................................. 23
                 CallTask .................................................................................................................................................................. 23
                 CombinedAction ................................................................................................................................................. 23
             Validator ..................................................................................................................................................................... 24
             Workflow .................................................................................................................................................................... 25
             ContentProvider ...................................................................................................................................................... 26
             RemoteConnection ................................................................................................................................................. 26
Developer’s Handbook ........................................................................................................................................................ 26
    Setup ...................................................................................................................................................................................... 26
        General ............................................................................................................................................................................. 26
        Workspace & Requirements in Android............................................................................................................. 27
        Workspace & Requirements in iOS....................................................................................................................... 27
        Deploying a new framework version................................................................................................................... 32
        Implementing a server connection ....................................................................................................................... 32
    App .......................................................................................................................................................................................... 33
        Android ............................................................................................................................................................................ 33
        iOS ...................................................................................................................................................................................... 35
             Model............................................................................................................................................................................ 35
             Controller ................................................................................................................................................................... 36
             View .............................................................................................................................................................................. 39
    Preprocessing..................................................................................................................................................................... 40
Challenges ................................................................................................................................................................................. 45
Conclusion ................................................................................................................................................................................ 46
Appendix ................................................................................................................................................................................... 49
    Demo screenshots ............................................................................................................................................................ 49
    Language grammar .......................................................................................................................................................... 52
    Backend connection specification ............................................................................................................................. 79

                                                                                                                                                                             Page 3 of 81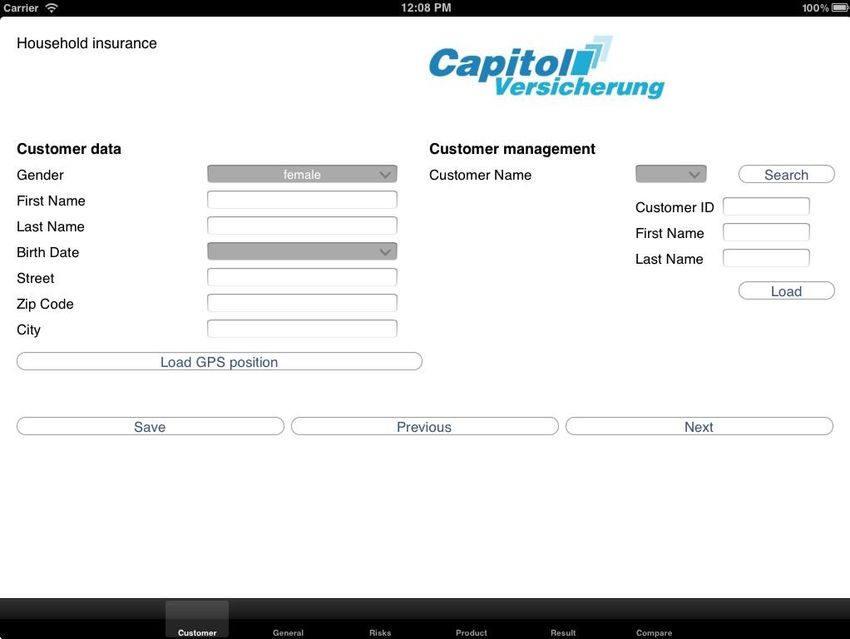
MD² - Model-driven Mobile Development

Introduction
Mobile development becomes more and more important as the usage of smart phones and tablets
increases. There are different mobile operating systems requiring different apps. The traditional
way to address this issue is the development and maintenance of one app per supported operating
system. This approach yields high costs due to increased development and maintenance efforts.
One alternative to solve this issue is to develop web apps that will be enhanced by an intermediate
layer. The most prominent example is PhoneGap. Although the intermediate layer styles the apps to
look like native app, the user will still encounter differences in the look and feel compared to native
apps. MD² presents a new approach. MD² uses model driven mobile development to combine the
advantages of both other approaches. MD² defines a domain specific modeling languages which is
used to model an app. The domain specific language abstracts from platform specific concepts and
allows easier and faster development of apps in a declarative way. Based on the modeled app the
generators construct native apps for each of the target platforms. Thereby the developer has to
maintain only one app, more precisely one model of an app, but can enjoy the benefits of native
apps.

The task of this project was to proof the concept of model driven mobile development. Therefore
the goal was neither to support all mobile operating systems nor to provide the ability to develop
all possible kinds of apps. The goal was to proof the ideas behind model driven mobile development
on their practicability. Therefore, MD² targets Android and iOS as mobile platforms and the
functionality is based on a use case of the insurance area. It should be possible to generate tariff
calculators. Saying this a bit more generally, with MD² it should be possible to model and generate
apps, that can be used to display data to the user, collect data from the user and communicate with
backend servers that perform the further processing of the data.

In the context of MD² two kinds of developers are required: App modelers and framework
developers. The app modelers are the end users of the MD² framework and use MD² to model and
generate apps. The third chapter of this documentation is targeted on modelers and can be used as
a starting point and hand book to model apps with MD². Framework developers on the other hand
develop and maintenance the framework itself. They introduce new features and fix bugs in both
the language and the generators. The fourth chapter should be used by them to get to know the
architecture of the MD² framework, the thoughts behind design decisions and how the different
parts work. Additionally they should read the third chapter as well because the basic ideas and
explanations of all language elements are required prerequisites for them as well. Besides those
two technical chapters there are more general chapters in this documentation. The next chapter
will introduce the approach of the project seminar used to develop the framework. Chapter five
evaluates the ideas behind MD² and chapter six concludes and provides an outlook.

                                                                                          Page 4 of 81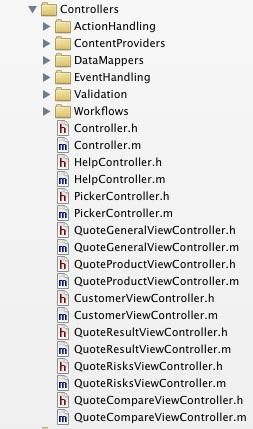
MD² - Model-driven Mobile Development

Approach
General
The development of the MD² framework consisted of basically three steps. First the general
architecture had to be specified. Based on the architecture the language had to be written. The
language provides, beside a grammar to which modelers have to comply, the metamodel of models
of apps that can be modeled with MD². This metamodel is required for the third step, the
development of the generators.

To develop the generators, we chose a prototype based approach. This means that we first
developed prototypical apps directly for Android and iOS. These prototypes should be
representative and comply with the general architecture. Later on these prototypes have been used
to develop the generators. Therefore we first analyzed the prototypes on parts that are
independent of a certain model and will always be the same. We transferred these parts to libraries.
The other parts built the basis for the development of the generators. We took one part after
another and transformed them into generatable code by identifying the model dependent pieces
and letting them be generated based on the input model.

After knowing the building blocks of the development we structured how we will tackle them. First
we defined the general architecture with the whole team, because this is the basis of the
framework. Then we divided the team in three groups and approached the development of the
language and the prototypes for Android and iOS in parallel. After these three steps have been
finished we developed the two generators. Each of them was based on the language and the
respective prototype. Besides the two prototypes we found a third task that had to be done. Since
the language, and therefore the metamodel, became larger and more complicated as initially
assumed, we introduced a preprocessing step. The preprocessing transforms a model, as defined by
a modeler, to a version that is better suited for the generation. So we had again three tasks to be
performed in parallel and therefore split our team respectively into three groups.

Tools
The tools that we used were mostly predefined. As development environment for all the
development tasks we used Eclipse, except for the development of the iOS apps, for which we had
to use Xcode. The development of the apps has been done with the recommended tools. To develop
the language we used Xtext, which has been suggested to us by our tutors.

The only decision we had to make was on the tool to develop the generators with. We had two
options. We could either use Xtend or Acceleo. The advantages of Xtend are a better integration
with the Xtext framework, it being more flexible because templates and behavior are handled in

                                                                                        Page 5 of 81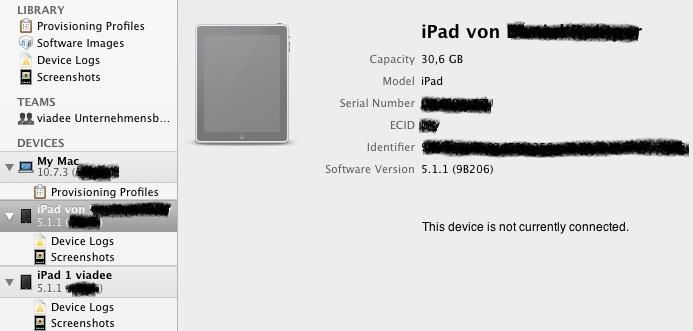
MD² - Model-driven Mobile Development
methods and Xtend uses a Java like language that provides many features to facilitate generator
building. Drawbacks are no support for manipulation of generated code and that it uses a general
purpose language which leads to a not standardized frame. The benefits of Acceleo on the other
hand are a good integration in Eclipse and support of development functionality as debugging,
tracking and tracing, support of protected regions that allow comfortable manipulation of
generated code, native generator building and it applies to the MOF Model to Text Transformation
standard as specified by the OMG. Drawbacks of Acceleo are that it is more static since it is template
based and difficult to integrate in a multi model environment.

The powerfulness of the two generators is comparable. In our case the available Java know-how in
the team outweighed the advantages of the better UI of Acceleo due to the limited time. For a
longer-lasting project it might make sense to build-up the know-how and benefit from the better UI
integration. E.g. both, Acceleo and Xtend do not provide functionality to copy static files. However,
in Xtext we were more used to the code basis and thus it was easy to provide this feature. In Acceleo
much more research would have been necessary to solve this problem. Protected regions may come
in handy, but we had and have not really seen the urgent need for this feature and it was never
formulated as a compulsory requirement.

Modeler’s Handbook
Getting Started
Setting up an environment
The MD² framework will be deployed as Eclipse plugin. Therefore it is shipped as a set of three jar
files. To “install” this plugin simply copy the three files into the plugin folder of your Eclipse
installation folder. The Eclipse installation folder is usually located in C:\Program
Files\eclipse. Every time a new version of the framework will be deployed, these files have to
be replaced.
The MD² plugin is based on Xtext. So Xtext has to be installed for the plugin to work. The
installation of Xtext is done by using the Install New Software wizard of Eclipse. To start it choose
Help -> Install New Software... from the menu bar and Add.... Use
http://download.eclipse.org/modeling/tmf/xtext/updates/composite/releases/ as Location.
From the appeared list choose Xtext in the latest version and in the sublist choose Xtext
Runtime and Xtext UI.

                                                                                         Page 6 of 81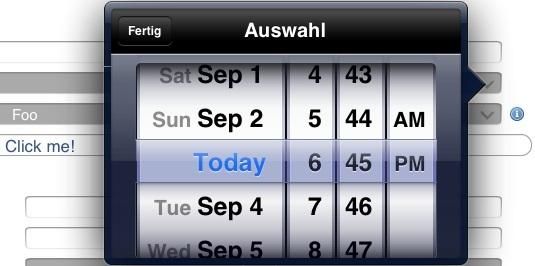
MD² - Model-driven Mobile Development

Live Coding Example
In the folder Screencasts the live coding example can be found. It is a set of the following nine
screencasts:
    ● 01 Introduction
    ● 02 Create project
    ● 03 Model
    ● 04 First View
    ● 05 Controller
    ● 06 Run first app
    ● 07 Second View
    ● 08 Extended Controller
    ● 09 Run enhanced app
Additionally the file liveApp.zip contains the source code, that has been developed during the
screencasts.

Deploying an MD² App on Android
A common Eclipse-based development environment is recommended to debug, run or package
your generated Android app. We suggest using your already set-up Eclipse installation and
upgrading it. Therefore start the Install New Software wizard, add https://dl-
ssl.google.com/android/eclipse/ and select Developer Tools. After the Developer Tools have
been installed via the Window menu the Android SDK Manager and the AVD Manager can be
startet. MD² currently supports API level 11 / Android 3.0. The corresponding SDK should be
installed by using the Android SDK Manager. If you want to test your App on your local
machine using Android’s emulator, create an virtual Android device using the AVD Manager.

Within your MD² project, you’ll find a complete Android project for Eclipse in src-
gen/.android. Import and run it like any other Android project by
following these steps:

   1. Choose File > Import... > Existing Project into Workspace
   2. Choose the option Select root directory, select the folder src-gen/.android and click Finish
   3. While building the workspace, the Android ADT plugin takes a short while to perform
      additional tasks, including generating the gen source folder.
   4. Start the app by choosing Run > Run or Debug as... > Android Application .
      If prompted, choose the virtual device you have created earlier, or a physical device
      connected via USB.

For further details on how to run, debug and publish Android applications, please refer to the
chapter “Workflow” on Android Developers.

                                                                                        Page 7 of 81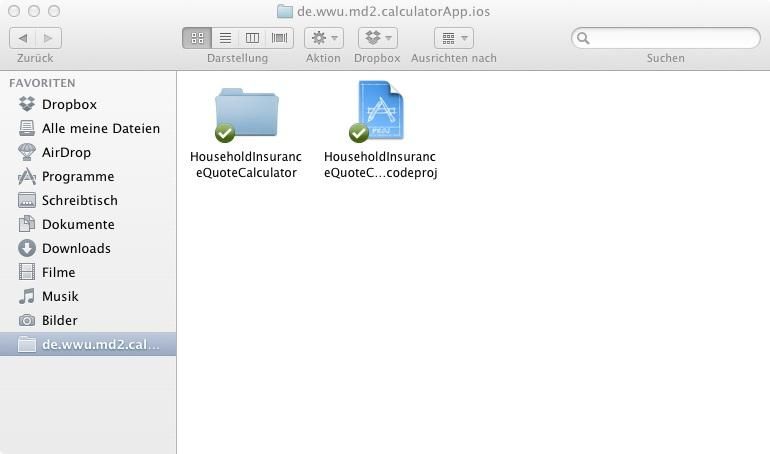
MD² - Model-driven Mobile Development
Please note that all JAR files within lib must be included in the build path and exported in order for
the Dalvik compiler to see them. Normally, this is already set in the project settings and can be
neglected. But bear this in mind if you experience any NoClassDefFound errors while deploying,
especially if you want to use an external build tool.

Deploying an MD² App on iOS
In general, the apps generated by the MD² framework are easy to test and deploy. This comes from
the fact, that for each app the according project file will be generated, which enables the direct
startup of the Xcode project after the generation. This is simply done by double clicking the project
file in the main folder of the generated app as depicted in Figure 1.
However, as with every iOS app, it can only be started on a Macintosh operating system and with
Xcode installed.

Figure 1: Project start-up by project file

Figure 2: Started project in Xcode

                                                                                          Page 8 of 81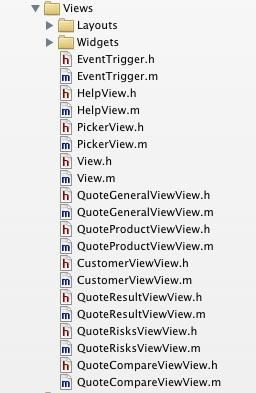
MD² - Model-driven Mobile Development
After the app has been started, Xcode will appear completely configured, similarly than in Figure 2.
The name of the project is the one defined in the main block as app name. Under the same name a
folder has been created, which contains all necessary static and generated files in several sub
folders structured by the Model-View-Controller concept. Figure 3 depicts the folder structure in
all layers of the MVC concept and the supporting files additionally. The detailed structure derived
from the architecture can be seen in the appropriate section.

Figure 3: Folder structure of the model layer (left top) controller layer (middle), view layer (right)
and supporting file (left bottom)

Additionally, the app can be deployed either on the simulator or on a specific hardware device. In
order to change the deployment, the run configuration has to be changed. By clicking on the menu
right next to the stop button, you can choose between an attached device, the iPad simulator or the
iPhone simulator. In most cases the first two options should be sufficient. This configuration is
depicted in Figure 4.

Figure 4: Run configuration for iPad simulator

Beginning with the start on the iPad simulator, you simply have to choose the second option from
the run configuration and click on the run button. After that, the simulator appears with the started
app, similarly to the HouseholdInsuranceQuoteCalculator app from Figure 5.

                                                                                           Page 9 of 81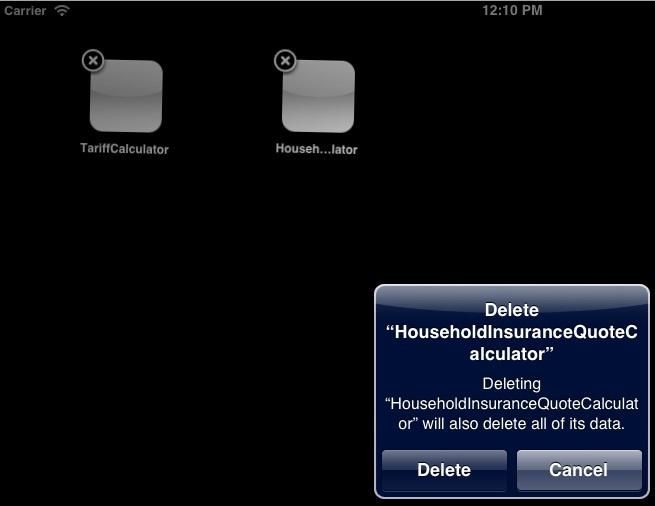
MD² - Model-driven Mobile Development

Figure 5: Started HouseholdInsuranceQuoteCalculator app on the iPad simulator

Another issue with the simulator is the occasional need to delete the local data the app
automatically creates, even without local content providers. In order to clean the installation after
the model has been changed, you have to delete the local data. As depicted in Figure 6 the
appropriate app has to be clicked for a longer time until the app icons are shaking. After this the
black x button has to be clicked and the deletion finally confirmed like it can be seen in Figure 7.
The procedure is equivalent on the iPad hardware device, simply by exchanging clicks with touches.

Figure 6: Delete local data on simulator

                                                                                       Page 10 of 81
MD² - Model-driven Mobile Development
Figure 7: Confirmation to delete local data
Finally, the hardware device has to be registered for the specific licence that should be used for
deployment, which can be seen in Figure 8. After this, it can be used and plugged in to the
Macintosh computer via the USB port. As the device will be recognized by Xcode properly and
displayed in the run configuration the first option has to be selected. Like in Figure 9 the first option
changes to the actually plugged device.
Figure 8: Provisioning profile and device management
Figure 9: Run configuration for iPad hardware device
Here, the procedure to start up the app is similar to the iPad simulator so that it will not be
discussed in detail here.
Page 11 of 81MD² - Model-driven Mobile Development
Language reference
The MD² framework enforces an MVC design pattern. This part sketches out the functionality
covered by each component. The language uses keywords to specify components in the language;
sometimes followed by a unique name that has to be assigned to that component so that other
components can reference to it. Each component may have attributes to further specify its
functionality.
The following formatting is used throughout this reference guide:
Language keywords: bold typewriter font
Attributes: typewriter font
References are underlined and named by the component they have to point to: underlined
typewriter font
A common structure of an MD² file is as follows:
package PACKAGE_NAME
component NAME {
attribute DEFINITION
attribute STRING
attribute OTHER_COMPONENT
}
component NAME {
...
}
...
Package Structure
All components in MD² are organized in a package structure that represents the MVC structure. All
documents have to be placed in corresponding packages (views, models or controller). For
example, all view files are expected to be in the package any.project.package.views. The
package has to be defined in each MD² file as follows:
package PACKAGE_NAME
The package name has to be a fully qualified name that reflects the actual folder structure.
Model elements
In the model layer the structure of data objects is being described. As model elements
Entities and Enums are supported.
Page 12 of 81MD² - Model-driven Mobile Development
Entity
An entity is indicated by the keyword entity followed by an arbitrary name that identifies
it.
entity NAME {
}
Each entity may contain an arbitrary number of attributes of the form
ATTRIBUTE_NAME: [] () {
name STRING
description STRING
}
The optional square brackets [] indicate a one-to-many relationship. That means that the
corresponding object may hold an arbitrary number of values of the given datatype.
Supported complex data types are:
● Entity
● Enum
Supported simple data types are:
● integer - integer
● float - float of the form #.#
● boolean - boolean
● string - a string that is embraced by single quotes (') or double quotes (")
● date - a date is a string that conforms the following format: "YYYY-MM-DD"
● time - a time is a string that conforms the following format: "hh:mm:ss[(+|-
)hh[:mm]]"
● datetime - a date time is a string that conforms the following format: "YYYY-MM-
DDThh:mm:ss [(+|-)hh[:mm]]"
Parameters are optional and will be transformed into implicit validators during the
generation process. They have to be specified as a comma-separated list. On default each
specified attribute is mandatory. To allow null values the parameter optional can be set.
Further supported parameters depend on the used data type and are explained as follows:
● integer supports
max INTEGER – maximum allowed value of the attribute
min INTEGER – minimum allowed value of the attribute
Page 13 of 81MD² - Model-driven Mobile Development
● float supports
max FLOAT – maximum allowed value of the attribute
min FLOAT – minimum allowed value of the attribute
● string supports
maxLength INTEGER – maximal length of the string value
minLingth INTEGER – minimal length of the string value
Optionally, attributes can be annotated with a name and a description which are used for
the labels and the tooltips in the auto-generation of views. If a tooltip is annotated a
question mark will be shown next to the generated input field. If no name is annotated, a
standard text for the label will be derived from the attribute's name by transforming the
camel case name to natural language. E.g. the implicit label text of the attribute firstName
is "First name".
Exemplary entity that represents a person:
entity Person {
name: string
birthdate: date {
name: "Date of Birth"
description: "The exact day of birth of this person."
}
salary: float (optional, min 8.50, max 1000)
addresses: Address[]
}
Enum
An enumeration is indicated by the keyword enum followed by an arbitrary name that
identifies it. Each enum may contain an arbitrary number of comma-separated strings.
Other data types are not supported.
Exemplary enum element to specify weekdays:
enum Weekday {
"Mon", "Tue", "Wed", "Thu", "Fri", "Sat", "Sun"
}
View elements
View elements are either ContentElements or ContainerElements that can contain other content or
container elements. Furthermore, basic styles for some content elements can be defined.
Page 14 of 81MD² - Model-driven Mobile Development
Container Elements
Grid Layout
Grid layouts align all containing elements in a grid. Elements can either be containers or content
elements. The grid is populated row-by-row beginning in the top-leftmost cell.
GridLayoutPane NAME () {
}
For each grid layout at least the number of rows or the number of columns has to be specified. If
only one of these parameters is given, the other is calculated by MD² on generation time. In case
that both parameters are specified and there are too few cells, all elements that do not fit in the
layout will be discarded. The following comma-separated parameters are supported:
● columns INTEGER – the number of columns of the grid
● rows INTEGER – the number of rows of the grid
● tabIcon PATH – if the layout is a direct child of a TabbedPane, an icon can be specified
that is displayed on the corresponding tab. See section on TabbedPanes for more details.
● tabTitle STRING – if the layout is a direct child of a TabbedPane, a text can be specified
that is displayed on the corresponding tab. See section on TabbedPanes for more details.
FlowLayoutPane
A flow layout arranges elements (containers or content elements) either horizontally or vertically.
By default all elements are arranged in a left-to-right flow.
FlowLayoutPane NAME () {
}
The following comma-separated parameters are supported:
● vertical or horizontal (default) – flow direction
● tabIcon PATH – if the layout is a direct child of a TabbedPane, an icon can be specified
that is displayed on the corresponding tab. See section on TabbedPanes for more details.
● tabTitle STRING – if the layout is a direct child of a TabbedPane, a text can be specified
that is displayed on the corresponding tab. See section on TabbedPanes for more details.
Page 15 of 81MD² - Model-driven Mobile Development
TabbedPane
A tabbed pane is a special container element that can only contain container elements. Each
contained container will be generated as a separate tab. Due to restrictions on the target platforms,
tabbed panes can only be root panes, but not a child of another container element. By default the
title of each tab equals the name of the contained containers. By using the tabTitle and tabIcon
parameters the appearance of the tabs can be customized.
TabbedPane NAME {
}
Content Elements
Input elements
Input elements can be used to manipulate model data via mappings (see controller section). At the
moment text inputs, dropdown fields and checkboxes are supported. All input elements support the
optional attributes label and tooltip that can be used to create compound input fields with a
label and a help text button added.
TextInput
Text input fields can be used for freetext as well as date and time inputs.
TextInput NAME {
label STRING
tooltip STRING
type
}
Besides the tooltip and label attribute, a text field type can be specified to influence the appearance
of the actual input field. The following text field types are supported:
● default - display a standard input field (this is the default)
● date - display a date picker
● time - display a time picker
● timestamp - display a combined date and time picker
OptionInput
Option inputs are used to represent enumeration fields in the model.
OptionInput NAME {
label STRING
tooltip STRING
Page 16 of 81MD² - Model-driven Mobile Development
options Enum
}
Besides the tooltip and label attribute, option inputs support the optional options attribute. This
can be used to populate the input with the string values of the specified Enum. If options is not
given, the displayed options depend on the Enum type of the attribute that has been mapped on the
input field (see controller section).
CheckBox
Check boxes are used as a representation for boolean model attributes.
CheckBox NAME {
label STRING
tooltip STRING
checked BOOLEAN
}
Besides the tooltip and label attribute, check boxes provide the optional attribute checked that
allows to specify whether the checkbox is checked by default or not. This setting will be overruled
by actual values loaded from the model.
Label
Display a label element. Labels allow the modeler to present text to the user. Often they are used to
denote input elements. For the label definition there exists the following default definition
Label NAME {
text STRING
style
}
as well as this shorthand definition
Label NAME (STRING){
style
}
The text can either be annotated as an explicit text attribute or the label text to display can be
noted in parentheses directly after the label definition. The optional style can either be noted
directly (cf. Style section) or an existing style definition can be referenced.
Tooltip
Display tooltip element. Tooltips allow the modeler to provide the user with additional information.
For the tooltip definition there exists the following default definition
Page 17 of 81MD² - Model-driven Mobile Development
Tooltip NAME {
text STRING
}
as well as this shorthand definition that allows to note the help text in parentheses directly after the
label definition
Tooltip NAME (STRING)
Button
Display button element. Buttons provide the user the possibility to call actions that have been
bound on events of the Button. For the button definition there exists the following default definition
Button NAME {
text STRING
}
as well as this shorthand definition that allows to specify the text in parentheses directly after the
button definition
Button NAME (STRING)
Image
Display image. For the image exists the following default definition
Image NAME {
src PATH
height INT
width INT
}
as well as this shorthand definition that allows to specify the image path in parentheses directly
after the image name
Image NAME (PATH) {
height INT
width INT
}
Images support the following attributes:
● src - Specifies the source path where the image is located. The path has to be relative to the
directory /resources/images in the folder of the MD² project
Page 18 of 81MD² - Model-driven Mobile Development
● height (optional) - Height of the image in pixels
● width (optional) - Width of the image in pixels
Spacer
A Spacer is used in a GridLayoutPane to mark an empty cell or in a FlowLayoutPane to occupy some
space. Using an optional additional parameter the actual number of spacers can be specified.
Spacer (INT)
Auto Generator and Entity Selector
The AutoGenerator is used to automatically generate view elements to display all attributes of a
related entity and the according mappings of the view elements to a Content Provider. It is possible
to either exclude attributes using the exclude keyword or to provide a positive list of attributes
using the keyword only.
AutoGenerator NAME {
contentProvider ContentProvider (exclude|only Attribute)
}
In case of one-to-many relationships for attributes (annotated with []) or a content provider it has
to be defined which of the elements should be displayed in the auto-generated fields. The
EntitySelector allows the user to select an element from a list of elements. The attribute
textProposition defines which ContentProvider stores the list and which attribute of the
elements shall be displayed to the user to allow him to find the desired element.
EntitySelector NAME {
textProposition ContentProvider.Attribute
}
Style
Styles can be annotated to several view elements such as labels and buttons to influence their
design. They can either be defined globally as a root element in the view and then be referenced or
annotated directly to the appropriate elements.
style NAME {
color
fontSize INT
textStyle
}
Page 19 of 81MD² - Model-driven Mobile Development
The following optional style attributes are supported. If a attribute is not set, the standard setting is
used for each platform.
● color (optional) - specifies the color of the element as a named color or a six or eight
digit hex color (with alpha channel)
● fontSize INT (optional) - specifies the font size
● textStyle (optional) – the text style can be normal or italic, bold or a
combination of both.
As named colors the 16 default web colors are supported: aqua, black, blue, fuchsia, gray, green,
lime, maroon, navy, olive, purple, red, silver, teal, white, yellow.
Element referencing and renaming
Elements can not only be defined where they should be used, but there is also a mechanism of
defining an element once and reuse it several times. Instead of defining a new element another
element can be referenced – internally this leads to a copy of the actual element. However, names
have to be unique so that each element could only be referenced once. To avoid those name clashes
a renaming mechanism had been implemented that allows to set new names for the actual copied
element.
Element -> NAME
Controller elements
Main
The Main object contains all basic information about an app. Each project must contain exactly one
Main object that can be in an arbitrary controller.
main {
appName STRING
appVersion STRING
modelVersion STRING
startView ViewContainer
onInitialized Action
defaultConnection RemoteConnection
defaultWorkflow Workflow
}
The attributes are explained as follows:
● appName - The name of the application
● appVersion - a string representation of the current app version, e.g. “RC1”
Page 20 of 81MD² - Model-driven Mobile Development
● modelVersion (optional) - a string representation of the current model version that has
to be in accordance with the model version of the backend
● startView - reference to any container element (cf. view) that should be used as the
initial view after the app start-up
● onInitialized - reference to any action that should be executed directly after start-up,
e.g. to define the initial mappings and validator bindings. A common use case is to refer to a
combined action here that calls appropriate custom actions for the binding tasks.
● defaultConnection (optional) - a default remote connection can be specified here, so
that it is not necessary to specify the same connection in each content provider
● defaultWorkflow (optional) - Exactly on e workflow can be active at the same time.
Using this parameter it is possible to specify a workflow that is active right after the app
start-up. It has the same effect as calling a SetActiveWorkflowAction in the onInitialized
action.
Actions
An Action provides the user the possibility to declare a set of tasks. An Action can be either a
CustomAction or a CombinedAction.
CustomAction
A CustomAction contains a list of CustomCodeFragments where each CustomCodeFragment
contains one task. For each type of task there exist a specific CustomCodeFragment that is
distinguished by the keyword that introduces it. The main tasks are binding actions to events,
binding validators to view elements and mapping view elements to model elements. For every task
there is a counterpart for unbinding and unmapping. Furthermore there are CallTasks that can call
other actions.
CustomAction NAME {
}
Binding and unbinding actions
Actions are bound to events. There are several types of actions and events available. CustomActions
and CombinedActions are referenced externally whereas SimpleActions are declared directly. For
events, there are local event types that listen to the state of a certain view element as well as global
event types. The most powerful event type is the OnConditionEvent.
bind|unbind action
on|from
. |
|
SimpleActions provide a quick way to change the state of the app:
Page 21 of 81MD² - Model-driven Mobile Development
● NextStepAction - proceed to the next Workflow step
● PreviousStepAction - go back to the last Workflow step
● GotoStepAction (, BOOLEAN)- Change to the given Workflow
step. The second parameter indicates whether an error message should be shown if the
action fails.
● GotoViewAction () - Change to the given view element
● DataAction ( ) - Perform a CRUD
action (save, load, remove) on the given ContentProvider
● NewObjectAction () - Creates a new object for the given
ContentProvider
● AssignObjectAction (use forMD² - Model-driven Mobile Development
Binding and unbinding validators
Validators are bound to view elements. The validator can be a referenced element or a shorthand
definition can be used in place.
bind|unbind validator
on|from
The shorthand definition has the same options but does not allow reuse.
bind|unbind validatorMD² - Model-driven Mobile Development
Validator
Validators are used to validate user input. For each validator type corresponding parameters can be
assigned. The message parameter is valid for every type and will be shown to the user if the
validation fails.
The RegExValidator allows the definition of a regular expression that is used to validate the user
input.
validator RegExValidator NAME (message STRING regEx STRING)
The IsIntValidator checks whether the user input is a valid integer.
validator IsIntValidator NAME (message STRING)
The IsNumberValidator checks whether the user input is a valid integer or float value.
validator IsNumberValidator NAME (message STRING)
The IsDateValidator allows to define a format that the date at hand shall conform to.
validator IsDateValidator NAME (message STRING format STRING)
The NumberRangeValidator allows the definition of a numeric range that shall contain the user
input.
validator NumberRangeValidator NAME (message STRING min FLOAT max
FLOAT )
The StringRange allows the definition of a string length range. The length of the STRING input by
the user will be checked against this range.
validator StringRangeValidator NAME (message STRING minLength INT
maxLength INT)
The NotNullValidator makes the input field required.
validator NotNullValidator NAME (message STRING)
RemoteValidator
The RemoteValidator allows to use a Validator offered by the backend server. By default only the
content and id of the field on which the RemoteValidator has been assigned are transmitted to the
backend server. However, additional information can be provided using the provideModel or
Page 24 of 81MD² - Model-driven Mobile Development
provideAttributes keyword.
validator RemoteValidator NAME (message STRING connection
model ) |
validator RemoteValidator NAME (message STRING connection
attributes )
Workflow
A Workflow is used to define several steps in which the application can currently be. It is possible to
define several Workflows. Workflows can be nested and there is at most one Workflow active.
workflow NAME {
}
Each WorkflowStep defines one view that is related to it and will be displayed if the WorkflowStep
becomes the current WorkflowStep of the active Workflow. Additionally conditions can be defined,
that restrict switching to the next or previous WorkflowStep. Also events can be specified that
trigger the change to the next or previous WorkflowStep.
Instead of the former mentioned settings, a Workflow can be referred to that will become active
while this WorkflowStep is the current one.
step NAME:
view
forwardCondition { }
forwardMessage STRING
backwardCondition { }
backwardMessage STRING
forwardOnEvent forwardEvents
backwardOnEvent
or to jump to a different Workflow
step NAME:
subworkflow
The event definition for EvenDef is the same as for event bindings:
. |
|
Page 25 of 81MD² - Model-driven Mobile Development
ContentProvider
Each content provider manages one instance of an entity. View fields are not mapped directly to a
model element, but only content providers can be mapped to view elements. Data instances of the
content providers can be updated or persisted using DataActions.
It allows to CREATE_OR_UPDATE (save), READ (load) and DELETE (remove) the stored instance.
Which of those operations is possible is specified in allowedOperations. By default all operation are
allowed. A filter enables to query a subset of all saved instances. The providerType defines whether
the instances shall be stored locally or remotely.
RemoteConnection
The remote connection allows to specify a URI for the backend communication. The backend must
comply with the MD² web service interface as specified in the appendix.
remoteConnection NAME {
uri URI
}
Developer’s Handbook
This section contains information for developers who want to extend the MD² framework source
code. Furthermore, it also describes what needs to be regarded when implementing a back-end
server for apps developed using MD².
Setup
General
First, setup your IDE and environment:
4. Install Eclipse (Indigo or newer). Preferably, use the Eclipse’s JEE distribution.
5. Install via Help -> Install New Software... and
http://download.eclipse.org/modeling/tmf/xtext/updates/composite/releases/ Xtext and
Xtend
Second, copy the sources to where you want to edit them. Check out the source repositories1:
1. Create an empty directory and within it:
2. Optional: Create a workspace directory and point Eclipse to it
1This guide assumes that the source code is stored in repositories of the VCS system GIT. But without a or
with another VCS, the steps should be quite similar.
Page 26 of 81MD² - Model-driven Mobile Development
3. Clone the following repositories without changing their name
○ framework
○ For Android: framework-lib-android
○ For iOS: ios-file-lister.git
4. Optional: Add repositories to EGit using its repository view
5. Import the projects contained in these repositories using File > Import... >
Import Existing Project into Workspace
Once your environment is ready, you can start altering the framework code:
1. git pull the latest changes
2. Run the workflow GenerateMD2.mwe2 (found at src/de/wwu/md2/framework).
3. Run the project as an "Eclipse Application" to launch a new Eclipse instance in which you
can develop your MD² app.
Workspace & Requirements in Android
Generated apps rely on the runtime library md2-android-lib.jar. This jar contains all parts
that do not rely on code generation. It is contained within the repository framework-lib-
android and currently copied manually into the framework projects, from where it is copied as a
resource into generated apps during their generation.
Building the runtime library is done using Ant. See the build.xml for details. The following targets
are available:
● ant compile to compile the project
● ant package to just create a jar (Output folder is dist/ )
● ant release to package and copy the result into the framework project. Be sure to
adhere to the directory structure described in Installation.
You can run these targets from Eclipse (This requires a JDK7 to be present under JAVA_HOME on
the PATH) :
● Select build.xml
● Click Run -> Run as... -> Ant build...
● Within the dialog, select the target (see above). You'll want 'package' to create the jar or
'package'
● Run it.
Workspace & Requirements in iOS
As already said the basic requirement to develop iOS applications and extend the framework by
further static classes in Objective-C is a computer that runs a Mac OSX operating system. Here, it has
to be considered that only versions above 10.6 contain the Apple Software Development Kit (SDK)
and, thus, are able to develop iOS and Mac OSX applications with Xcode. Since now, the most
sophisticated and officially supported tool for development is Xcode, although there are certain less
advanced compilers that can compile Objective-C code.
Page 27 of 81MD² - Model-driven Mobile Development
FileLister
In order to add new static files to the framework the so-called FileLister has been developed, which
collects all files that are marked as static from a certain path and puts them in an own folder. Figure
1 shows the static file tagging for an exemplary file.
Figure 1: Static files tagging on iOS
Before the FileLister can be executed for the first time, it has to be configured properly in order to
point to the correct path the static files are collected from. Therefore, the run configuration has to
be changed by right-clicking on the project, selecting “Run As” and clicking “Run Configurations...”.
This procedure can be seen in Figure 2. After this a new window appears and the “Arguments” tab
has to be clicked. After this an argument will be added, which contains the path in double quotes
(e.g. “/Users/unims/Documents/Xcode Workspace/TariffCalculator/TariffCalculator”) as depicted
in Figure 3.
Figure 2: Configure the FileLister by its Run Configuration
Figure 3: Set the path to the folder of the iOS static files (here: iOS prototype)
After the FileLister is correctly configured, it can be started. Therefore right-click on the project,
select “Run As” and then click on “Java Application”, which is described in Figure 4. During the
FileLister is collecting all static files, the appropriate code that will be inserted later into the
FileStructure is displayed on the console. Figure 5 shows an exemplary output of the FileLister. By
Page 28 of 81MD² - Model-driven Mobile Development
selecting all lines in the console, which begin with “StaticFiles.put”, right-clicking on the console
view and clicking “Copy” (Figure 6) in the end the appropriate code for the FileStructure will be
copied.
Figure 4: Start the FileLister to collect static files
Figure 5: Output of the FileLister after execution
Figure 6: Copy the collected static files
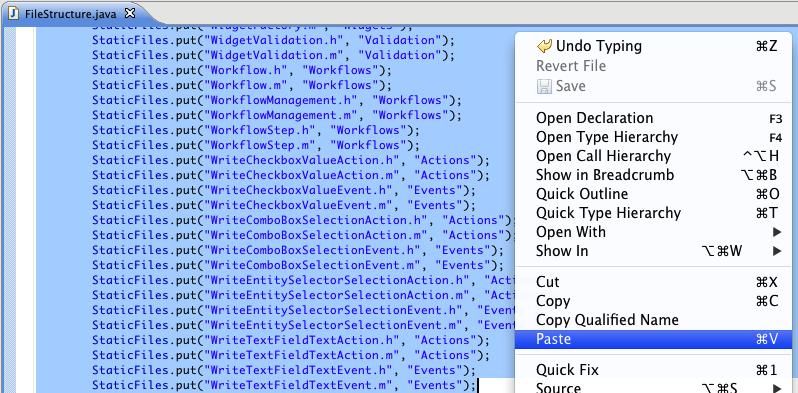
FileStructure
After the static files have been selected by the FileLister these new files have to be registered to the
framework. For this reason, the FileStructure class will be introduced that stores all necessary
static, generated and resource files for the whole app. During the generation process it will be used
to build the project file for the generated app, which contains references to all files. Like described
in Figure 7 the previously copied code from the console has to be inserted. Therefore, the old code
has to be selected and the new code to be pasted.
Page 29 of 81MD² - Model-driven Mobile Development
Figure 7: Paste the collected static files into the file structure class
Resources
In addition, the next step considers the update of the static file resources, which will be added to the
generated app during generation. As Figure 8 describes, the old resources have to be deleted
before. Afterwards, the static files collected by the FileLister have to be copied, as you can see in
Figure 9. These will be contained in the automatically generated “static_files” folder and can be
found under the path configured the run configuration (see Figure 3), e.g.
“/Users/unims/Documents/Xcode Workspace/TariffCalculator/TariffCalculator/static_files”.
Figure 8: Delete the old static file resources from the framework project
Page 30 of 81MD² - Model-driven Mobile Development
Figure 9: Copy the new static file resources from the “static_files” folder
Figure 10: Insert the new static file resources to the framework project
Finally, in the last step the new static file resources will be added to the project, like depicted in
Figure 10.
Exception breakpoints
Another issue that especially helps debugging the generated app is the exception breakpoint. In
case of critical errors where the app is crashing completely this construct helps to find the source of
the problem. With an exception breakpoint Xcode jumps to the line of code in the class at which the
error occurs. Otherwise, Xcode jumps to the main class and the actual source is hidden.
Therefore, the tab selected in Figure 12 has to be chosen, clicked on the “+” button at the bottom,
like described in Figure 11, and “Add Exception Breakpoint” has to be clicked.
Figure 11: Add an exception breakpoint to the generated app for debugging
Page 31 of 81MD² - Model-driven Mobile Development
Figure 12: Configure the exception breakpoint
Afterwards, the window from Figure 12 appears and the exception breakpoint has been created
and can be configured. Normally, the default configuration is sufficient and can be confirmed.
Deploying a new framework version
To deploy a new version of the framework, one simply has to select the main framework project
de.wwu.md2.framework and choose File -> Export.... In the opened wizard select
Plug-in Development -> Deployable plug-ins and fragments. In the next step all
three framework projects have to be selected. Additionally the option Directory should be
marked and the path to the folder, to which the plugin shall be deployed, has to be entered. To
deploy the plugin now, one simply has to click the Finish button.
Implementing a server connection
Generated apps can communicate with a server using remote ContentProvider. The developers
chose to employ RESTful JSON over HTTP as platform-neutral mode of transportation. It fits the aim
of transporting entity instances back and forth and is easy to implement on the server-side. To
further ease the server implementation, each generated app contains a stub implementation
intended to serve as a facade. You can use and extend this project to implement a connection
between the deployed apps and your existing application infrastructure. Otherwise, it is also
possible to implement such an endpoint from scratch.
To start off, import the generated backend stub project in Eclipse:
1. Choose File > Import... > Existing Project into Workspace
2. Choose the option Select root directory, select the folder src-gen/.android and click Finish
The project has the following IDE dependencies:
● JEE extensions
Page 32 of 81You can also read