MERINO COMPACT LAMINATES
     TECHNICAL GUIDE
←
→
Page content transcription
If your browser does not render page correctly, please read the page content below

MERINO COMPACT LAMINATES
TECHNICAL GUIDE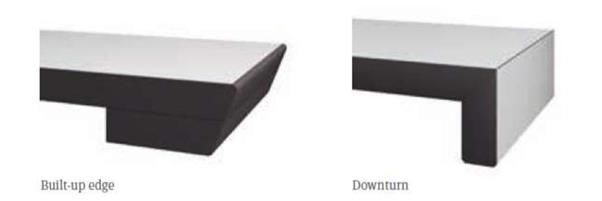
Contents
1     Introduction .............................................................................................................................................. 3
2     Pre-Fabrication .......................................................................................................................................... 3
    2.1      Transport, Storage & Handling .......................................................................................................... 3
      2.1.1          Transport & Storage .................................................................................................................. 3
      2.1.2          Handling .................................................................................................................................... 4
    2.2      Preconditioning & The Environment ................................................................................................. 4
3     Fabrication................................................................................................................................................. 4
    3.1      Cutting ............................................................................................................................................... 4
    3.2      Bonding & Trimming ......................................................................................................................... 5
    3.3      Drilling & Fasteners for Fixtures and Attachments ........................................................................... 6
    3.4      Cutouts, Edge Profiling & Finishing ................................................................................................... 7
4     Post Fabrication......................................................................................................................................... 9
5     Maintenance & Care ................................................................................................................................. 9

                                                                                                                                                    2|Page
1 INTRODUCTION
  Merino Compact laminates are a high-performance, interior surfacing solution used in both structural
  and decorative applications.

  Compact laminates, also known as compacts, are thick High-Pressure Laminates sheets that conform to
  EN 438 standards. They generally range from at least 2mm in thickness, and can go as high as 35mm.
  Compared to most engineered materials, compacts are highly homogenous and twice as dense as
  Plywood and MDF boards.

  Compacts are offered in a Dual Sided Design configuration and can be fabricated for use in a diverse
  range of applications, such as wall panels, railings, furniture units, lab equipment etc. For more details
  on the possibility of applications, please refer to Applications Guide.

2 PRE-FABRICATION
  Compact laminates can be applied in both horizontal and vertical standalone applications, as well as
  furniture assemblies where high impact resistance and strength are desired, along with an attractive
  look.

  All safety standards and regulations which are applicable to the decorative HPL and wood processing
  industry in terms of dust extraction, fire prevention should be adhered during processing Compact
  Laminate. If adequate extraction is not provided, appropriate respiratory protection must be worn as
  some people experience an allergic reaction to dust and fine particles.

  2.1 TRANSPORT, STORAGE & HANDLING
         While compact laminates have a density comparable to decorative laminates, they are many
         times thicker. Consider a typical compact laminate sheet with dimensions of 8x4 feet and 5 mm
         thickness- with a typical density greater than 1.35 kgs/m3, this sheet can weigh greater than 20
         kgs or 44 lbs.

         Thus, compact laminate require more care when being transported, handled and stored.
         Carelessness during any of these stages can cause issues which may affect the quality of the
         product and the installation. Please keep the following guidelines in mind to ensure best results.

         2.1.1 TRANSPORT & STORAGE
                 Compact panels are thick and if stored improperly can warp or telegraph due to their
                 own weight.

                 Store the panels in a closed area with regulated environment, specifically temperature
                 and humidity. The panels should remain as flat as possible, as any irregularity can cause
                 a range of issues- from warping, telegraphing to chipped edges.

                 Ensure the protective film stays on the panel as long as it is stored, though storage
                 beyond 9 months is not recommended.

                 Use pallets wherever possible, and lay a protective board on the top and bottom of the
                 stack.

                                                                                                3|Page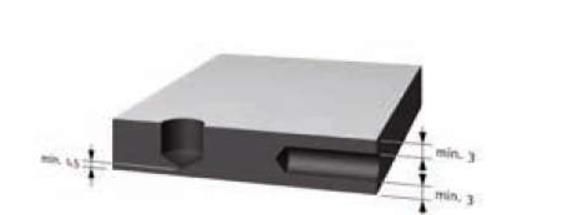
2.1.2 HANDLING
                 Always lift panels one at a time, avoiding sliding sheets over one another. The top and
                 bottom surface of each panel should be clean and free from any dust particles or
                 impurities. If forklifts and similar mechanized vehicles are used to load or unload a
                 vehicle, ensure that the pallets are clean and structurally sound. NEVER ALLOW THE
                 LAMINATES TO TOUCH THE GROUND OR THE WALLS WHILE THEY ARE BEING CARRIED

                 Merino Compact laminates should be gently stacked over each other in a horizontal
                 manner, in a back-to-back configuration. A board with similar size may be placed over
                 the top and bottom panel of the stack, to maintain a uniform pressure on the underlying
                 sheets and prevent any warpage in bulk stock.

   2.2 PRECONDITIONING & THE ENVIRONMENT
            Preconditioning the compact panels is vital for a quality product installation.
            Store the Compact Panels for at least 48 hours (ideally 72 hours) in the following
            environmental conditions-
                                  o   18-24C temperature
                                  o   55% relative humidity
            for a period of 48 hours. These numbers may vary slightly depending on general environment
            conditions in the geographical area.
            The best approach is to make sure all material to be fabricated are conditioned together. The
            stock must be kept in an area that allows for ventilation all around the stored material.

3 FABRICATION
  Compact panels are thick laminate sheets and must be fabricated and machined using power tools. As is
  the case with any fabrication involving power tools, safety and processing norms must be followed
  closely to create a safe working space.

  All safety standards and regulations which are applicable to the wood processing industry in terms of
  particle extraction, fire prevention should be adhered to during processing of compact laminate. If
  adequate extraction is not provided, appropriate respiratory protection must be worn to avoid allergic
  reaction.

  CNC machines, circular saws, routers and drills are some of the tools used typically when fabricating
  compact laminate based furniture.

   3.1 CUTTING
         Merino recommends the use of diamond tipped tools whenever possible, with sharp, well
         maintained blades.
         Before cutting the panels, ensure that the final panel dimensions are planned in order to
         minimize any possible shade variations from placing two different parts of panels side by side.
         Circular bench or table saws are generally recommended for cutting compact laminates to
         desired size. The quality of the cut depends on multiple factors such as tooth shape, tooth pitch,
         proper saw blade projection, feed rate, rotational and cutting speeds.

                                                                                               4|Page
Recommended tooth shapes are alternate and hollow tooth. The trapezoidal flat tooth is used
for ensuring longer tool life and consistently good cutting quality (see Figure below).
Use a slower feed speed for thicker panels. Always cut along the length of the entire panel, avoid
cutting more than 1/4" thickness of material in a single pass.
In order to get a clean cut and maintain the look of both decorative faces, the quality of the cut
edge can be controlled by adjusting the height of the saw blade. Saw entry angle of 45° is
considered as optimal. To achieve this, 10 percent of the saw blade diameter needs to protrude
over the work piece. In case of any issues, refer-
o When cut on face side is not clean → Saw blade should be set higher
o When Cut on the underside is not clean → Saw blade should be set lower
To further improve cut quality, a combination of a scoring blade and a sacrificial panel can be
used.
The scoring blade must be used in a climb cut configuration- this scoring blade is smaller in size
than the main blade, cuts only upto 1/8” deep and rotates in opposite direction (along the
direction of the feed) to that of the main blade. Care must be taken to prevent kickback or
backlash.
The sacrificial panel can be plywood, hardboard or similar base underneath the compact
laminate sheet.
When using a CNC for cutting and machining, use a carbide blade, with suggested rotation speed
ranging from 20000-27000 rev/min.
3.2 BONDING & TRIMMING
Prior to bonding, compact panels must be prepared by sanding and cleaning to remove dust,
grease and any contamination, especially around the cuts on the edge.
While bonding two compact laminates panels together, it is essential to ensure that dimensional
movements are not arrested. To avoid post-bonding stress, only adequately conditioned
compact laminates should be bonded together. Machine directions of the panels must always
be same during bonding. It is recommended to avoid bonding of large surface areas; the required
5|Pageapplication solutions and/or visual effects should be achieved by a partial build-up of the
required section.
Joints that are subjected to heavy stress, for example due to vibrations, impacts or similar,
should be reinforced with mechanical connecting elements.
For final trimming, diamond-tipped tools are highly recommended. Tools with segmented blades
are not recommended for this operation as the overcut in the overlap zone remains visible.
Securing work piece and controlling the tool is of prime importance as the cutting pressure is
high.
3.3 DRILLING & FASTENERS FOR FIXTURES AND ATTACHMENTS
DRILLING: Drill bits used for drilling plastic sheet materials, with a point angle between 60° and
80°, are recommended for drilling compact laminate. The cutting speed and feed rate should be
decided by the material type drill bit – HSS, HM, DIA. Specification of the tool manufacturers
should be referred.
Spiral bits for drilling metal or wood can also be used, provided rotation speed and speed rate
are reduced.
For drilling through holes, the compact laminate needs to be resting on a solid base which can
be drilled into. Before the drill bit breaks through the compact laminate, the feed rate should be
reduced to avoid break-outs on the exit side. For blind holes, (drill holes that do not go through)
the minimum board thickness that must remain is 1.5mm. In order to drill parallel to the surface
of panel, the minimum panel thickness on either side of the drill hole should be 3mm (Figure
below).
FIXING: Through holes must have adequate clearance to take care of the dimensional movement.
The diameter of the drill hole should be 2 – 3 mm larger than the diameter of the fixing device
to avoid cracking. Using Countersunk screws is not recommended for fixing. If countersunk
screws cannot be avoided, countersunk cup washers must be used.
6|PageCutting screw threads in compact laminate is straightforward and self-tapping screws can also
be used for this purpose. Slow thread screws are recommended as they ensure a better pull-out
resistance. Pre-drilling is must for all cases. Metal and chipboard screws are appropriate for
screw connections parallel to the panel surface. Screws must go through to a minimum depth of
25 mm and the diameter of the drill hole must be selected suitably to prevent splitting.
Jointing: Joints between compact laminate panels can be made with a combination of gluing and
fixing devices viz. splines or biscuits (made of compact laminate) or grooves. While joining
compact panels, it is important to ensure that connecting panels always follow the same
production direction. Varieties of mechanisms for creating sturdy compact laminate joints can
be seen in Figures below.
3.4 CUTOUTS, EDGE PROFILING & FINISHING
Cut-outs: Cut-outs and slots e.g. for switches or access openings, always should be rounded, as
sharp corners can cause in formation of cracks. Internal corners should be finished with an inner
radius of at least 3 mm. Grooves and rebates must be rounded to avoid cracks. Cut-outs can be
made directly with a router. Adequate gaps for dimensional movements must be allowed for
integrated components.
Edge Profiling: Numerous edge profiling options are available (Figure below).
7|PageCutter marks can be removed by sanding operation and an even edge colour can be achieved by
applying a silicone-free oil. Sharp corners and edges should be chamfered to eliminate the
chance of injury and chipping.
FASLE EDGES: Visually thicker boards can be made with built-up edges or by introducing
downturns or upstands. For built-up edges, compact laminate strips of required dimension are
glued along the edge of the main panel while ensuring the same machine direction. For
thicknesses up to 100 mm or to ensure the decor remains visible on the edge for aesthetic
reasons, a downturn or upstand is a preferred solution. At first, the two components to be
connected are mitred at 45 degrees. Next, the work piece is placed on a level surface, face side
down, so that the tips of the mitres touch each other and adhesive tape is applied over this joint.
Then, both work pieces must be turned over carefully.
Finally, adhesive is applied and the shorter work piece or upstand is then folded over and pressed
home. The upstand must be secured in the correct position with adhesive tape until the adhesive
sets properly.
8|Page4 POST FABRICATION
During fabrication processes, the protective film must be left on. Once all the fabrication processes have
been completed, and the worksite cleaned, it is recommended to remove the film from both sides
simultaneously.
5 MAINTENANCE & CARE
Compact laminates require similar maintenance and care compared to standard decorative laminates.
• Care
HPL do not suffer from corrosion or oxidation, so no further surface protection and basic
maintenance is required. Protect the compact surface from any heat sources. Do not use sharp
objects on the decorative surface.
• Cleaning
In case of ordinary stains, Merino recommends cleaning the surface gently with a clean, damp, soft
cloth.
For persistent stains like coffee or tea, use a mild cleaner/detergent followed by wiping with a clean
cloth. Do not use brushes or scourers at any time.
9|PageYou can also read