Model TC3 Electronic Counter - Operation Manual - Deitz Company
←
→
Page content transcription
If your browser does not render page correctly, please read the page content below
Model TC3 Electronic Counter
        Operation Manual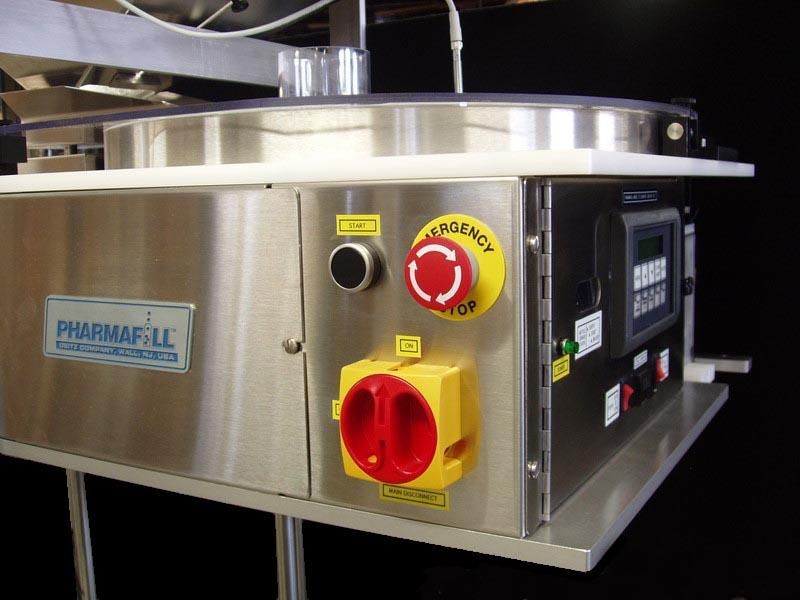
Rev 2022-03-08                                                                               Pharmafill Model TC3 User Manual

CONTENTS

1.  General Illustrations ...................................................................................pgs II thru XI
2.  Safety Reminder.............................................................................................................1
3.  Introduction ....................................................................................................................2
4.  Specifications .................................................................................................................4
5.  Installation and Commissioning
    5.1. Unpacking ..........................................................................................................5
    5.2. Connect Electric, Compressed Air and Blower Air ............................................6
    5.3. Systems Check ....................................................................................................8
6. General Information
    6.1. Standard Features And Capabilities ....................................................................9
7. Controls
    7.1. Control Panel Components ................................................................................11
    7.2. Operator Interface Display Panel (HMI) - Overview ........................................13
    7.3. Run Mode ..........................................................................................................14
    7.4. Speed Ajustment................................................................................................16
    7.5. Menu 1. Adjust Settings ....................................................................................17
    7.6. Menu 2. Fill One ...............................................................................................19
    7.7. Menu 3. Index One ............................................................................................21
    7.8. Menu 4. Half-step Index ....................................................................................22
    7.9. Menu 5. Check Count ........................................................................................23
    7.10. Menu 6. Technician Only ..................................................................................25
    7.11. Counting Sensor ................................................................................................27
8. Counting and Filling
    8.1. Product Guide Adjustments...............................................................................29
    8.2. Bottle Gating Cylinder Positioning ...................................................................33
    8.3. Bottle Sensor Positioning ..................................................................................35
    8.4. Testing To Establish Parameters .......................................................................36
    8.5. First - Use Check Count Mode ..........................................................................36
    8.6. Second - Use Fill One Mode .............................................................................36
    8.7. Last - Use Run Mode.........................................................................................36
    8.8. Summary ...........................................................................................................37
9. Breakdown, Cleaning and Buildup
    9.1. Breakdown of Remove-To-Clean Contact Parts (Summary) ............................38
    9.2. Breakdown of Remove-To-Clean Contact Parts (Illustrated) ...........................40
    9.3. Buildup of Remove-To-Clean Contact Parts (Summary) .................................47
    9.4. Clean-In-Place Contact Areas ...........................................................................49
    9.5. Cleaning Non-Contact Areas.............................................................................49
    9.6. Cleaning Recommendations ..............................................................................49
10. Technical Information
    10.1. Principle of Operation .......................................................................................51
    10.2. Cycle of Operation ............................................................................................52
    10.3. Troubleshooting.................................................................................................53
    10.4. Index of Technical Notes/Drawings ..................................................................55
                     (Technical Notes/Drawings Begin After Last Page)

Deitz Company Inc.                                              TC3 User Manual                                           Page       I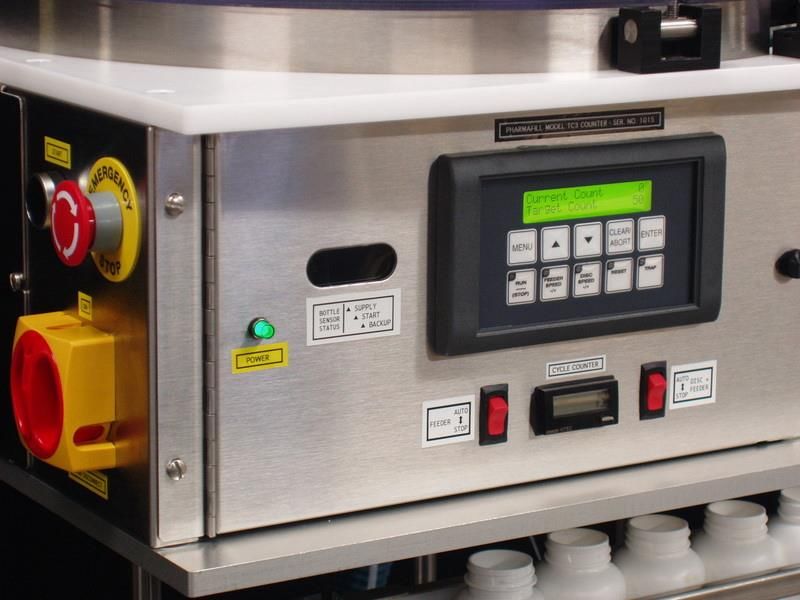
Rev 2022-03-08                                       Pharmafill Model TC3 User Manual

Section 1 - GENERAL ILLUSTRATIONS
1.1 - Front View

                     STACK LIGHT

                                     HOPPER          HOPPER
                                      DOOR

      DUST
     COVER
     HOLDER                                                               AUTO-FEED
                                                                           SENSOR
                                                                            CABLE
      RIM
     DUST
    COVER                                                                   PRODUCT
                                                                             GUIDES

      RIM                                                                     AIR
     BAND                                                                   MANIFOLD

                                                                           COUNTING
                                                                             HEAD

     CONTROL
      PANEL

     SUPPLY                                    START                          BACKUP
     SENSOR                                   SENSOR                          SENSOR

                                                              GATING CYLINDERS

Deitz Company Inc.                 TC3 User Manual                     Page      II
Rev 2022-03-08                                       Pharmafill Model TC3 User Manual

1.2 - Overhead View

                                                                        AIR GUIDE
                              CENTER HUB                                ASSEMBLY

             GLASS DISC                         PRODUCT GUIDE
         (UNDER CENTER HUB)                     (LONG, POINTED)           FLOW
                                                                          GUIDE

                                                                               AIR
                                                                             NOZZLES

      DEFLECTOR
         ARM
                                                PRODUCT
                                               GUIDE PLATE

               AUTO-FEED
                SENSOR                                                         AIR
                                                                             MANIFOLD

     DISPLAY
      PANEL
                                                 ADJUSTABLE
                                                    GUIDE
                                                   BLOCK

                                                                      GUIDE CHUTE
                 RUN
               CONTROL
               SWITCHES
                   S

Deitz Company Inc.                 TC3 User Manual                    Page    III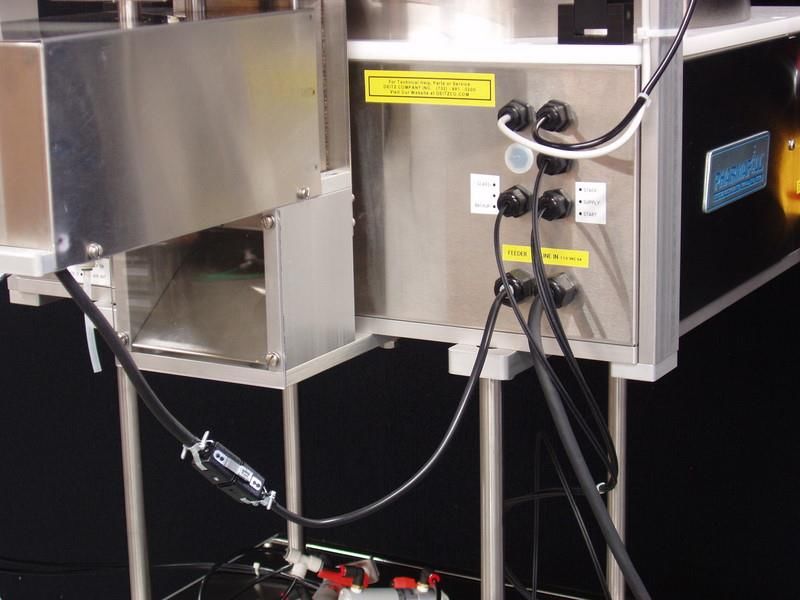
Rev 2022-03-08                                      Pharmafill Model TC3 User Manual

1.3 - Counting Head

                                                                  GUIDE CHUTE
                                                                  CLEAR COVER
            COUNTING
             WINDOW

                                                                   COUNTING
                                                                    SENSOR

                 DIVIDER
                  FLAG

          TRAP (CLOSED)                                            TRAP (OPEN)

                      TRAP FLAG

                                                                        CENTERING
                                                                          WHEEL

                                                     CLEAR HEAD
                       FUNNEL                          COVER

Deitz Company Inc.                TC3 User Manual                    Page     IV
Rev 2022-03-08                                  Pharmafill Model TC3 User Manual

1.4 - Power Switches

   COMPONENT
    FUSES ARE
   BEHIND THIS
      PANEL

             START BUTTON

               EMERGENCY
              STOP BUTTON
            (TWIST RELEASE)

                 MAIN POWER
                 DISCONNECT
                   SWITCH

Deitz Company Inc.            TC3 User Manual                    Page V
Rev 2022-03-08                                       Pharmafill Model TC3 User Manual

1.5 - Right Side Rear

               HOPPER

         AIR MANIFOLD                                                   FEEDER PAN
                                                                           (SIEVE
                                                                          INSIDE)
    COUNTING
     SENSOR

                                                                           FEEDER

     HEAD
   CENTERING
     WHEEL

                                                                      CHIP CHUTE
        COOLING FAN

             COMPRESSED                                  BLOWER
           AIR CONNECTIONS                             POWER OUTLET

                        BLOWER                                             LIFT
                        AIR HOSE                                        PLATFORM

Deitz Company Inc.                 TC3 User Manual                     Page VI
Rev 2022-03-08                                  Pharmafill Model TC3 User Manual

1.6 -Left Side Rear

                                                STACKLIGHT
                                                  CABLE

                  FEEDER

                           AUTO-FEED
                            SENSOR
                             CABLE

                                                                SENSOR
                                                              FIBER OPTIC
                                                                CABLES

    CHIP CHUTE
  (CLEAR COVER)

     FEEDER
     POWER
      CORD                         MAIN AC IN
                                    POWER
                                     CORD

Deitz Company Inc.         TC3 User Manual                       Page VII
Rev 2022-03-08                                             Pharmafill Model TC3 User Manual

1.7 - Glass Disc, Ring Nut, Washer

                                                                 GLASS DISC (20”)

                     DISC SUPPORT RING
                      (BONDED TO DISC)

                                                                       RING NUT
                      CLEAR
                     PLASTIC
                     WASHER

1.8 - Clear Rim Cover, Center Hub Knob

                         CENTER HUB                              CLEAR RIM DUST
                            KNOB                                     COVER

Deitz Company Inc.                       TC3 User Manual                      Page VIII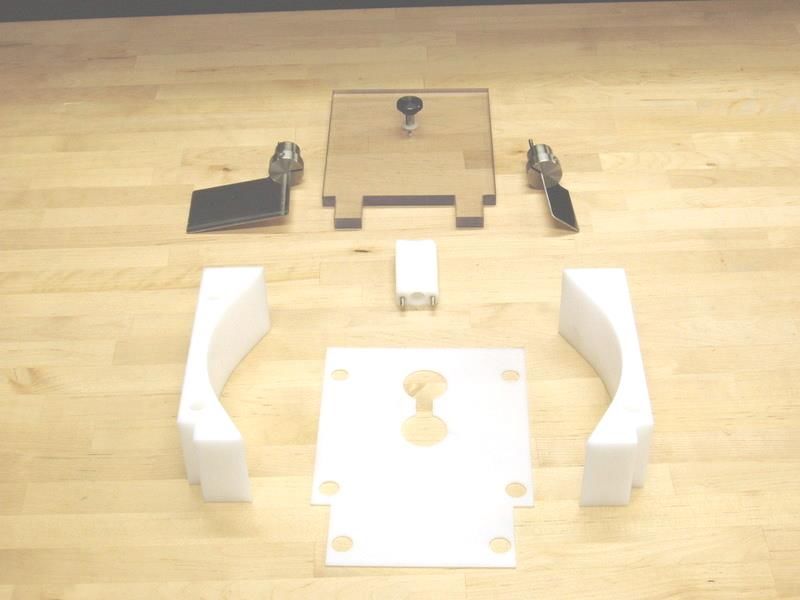
Rev 2022-03-08                                                 Pharmafill Model TC3 User Manual

1.9 - Guide Block Assembly (Left Side)

                                CLEAR
                                CHUTE                   PRODUCT
                                COVER                  GUIDE PLATE

                 PRODUCT
                  GUIDE

                      GUIDE BLOCK
                         SHIELD

                                                                            GUIDE
                                                                            BLOCK

   1.10 - Guide Block Assembly (Right Side)

                               GUIDE PLATE

                                                                     FLOW GUIDE

              GUIDE PLATE
               CLAMPING
                BLOCK

                                                           CLEAR CHUTE
                                                              COVER

                 CHUTE COVER
                  MOUNTING
                    BLOCK

Deitz Company Inc.                           TC3 User Manual                      Page   IX
Rev 2022-03-08 Pharmafill Model TC3 User Manual
1.11 - Center Hub, Deflector Arm, Auto-Feed Sensor
AUTO-FEED
SENSOR
CENTER HUB
SENSOR
TARGET
DEFLECTOR
ARM DEFLECTOR
SPRING
1.12 - Counting Head Breakdown Parts
CLEAR COVER
TRAP DIVIDER
FLAG FLAG
CENTER BLOCK
SIDE SIDE
BLOCK BLOCK
BACK PLATE
Deitz Company Inc. TC3 User Manual Page XRev 2022-03-08 Pharmafill Model TC3 User Manual
1.13 - Counting Head Breakdown Parts (Cont’d)
COUNTING
CLEAR SENSOR
CHUTE COVER
COVER
COUNTING COUNTING
WINDOW SENSOR
COUNTING
SENSOR
FIBER OPTIC
CABLES
FUNNEL
(4 SIZES)
FUNNEL FUNNEL
HOLDER BLOCK
BLOCK BLOCK
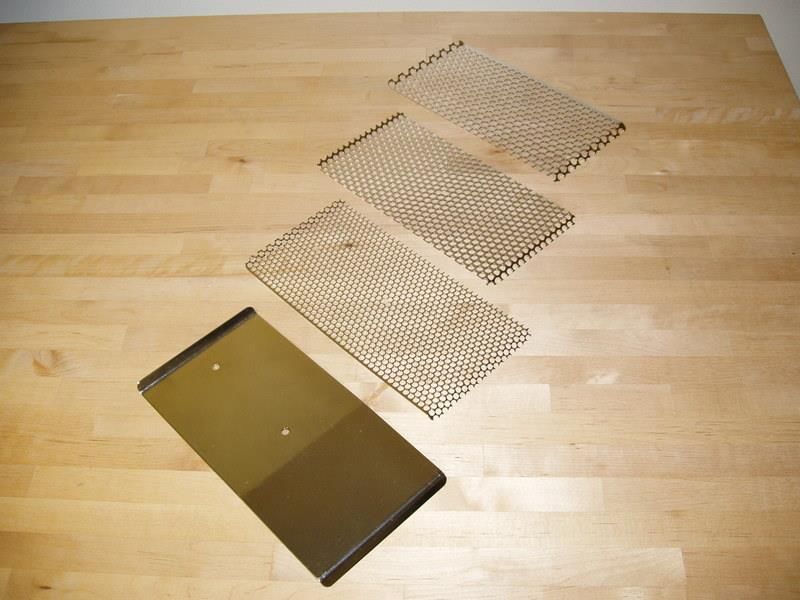
1.14 – Feeder Chute Sieves
.250 HOLES
.188 HOLES
.156” HOLES
SOLID SIEVE
Deitz Company Inc. TC3 User Manual Page XIRev 2022-03-08 Pharmafill Model TC3 User Manual
Section 2 - SAFETY REMINDER
Warning
This machine contains moving parts and
operates automatically. This may present a
hazard to personnel.
Never operate this machine with any covers or guards removed or any guard switches or
safety devices removed or bypassed.
Only people who have been correctly trained should operate or clean this machine.
Only people who are correctly qualified and trained should carry out maintenance,
installation or any other service work.
Never clean or service the machine without
isolating the electrical supply and isolating the
air supply.
Always test for the presence of voltage before touching or working on electrical
components.
Note that there might be other requirements that could apply.
Refer to the manuals supplied by the component manufacturers for further safety
instructions.
Deitz Company Inc. TC3 User Manual Page 1Rev 2022-03-08 Pharmafill Model TC3 User Manual
Section 3 - INTRODUCTION
Thank you for purchasing a Pharmafill Model TC3 Automatic Pill Counter. We at Deitz
Company hope you will find that the Model TC3 meets or exceeds your expectations and
requirements for an affordable, reliable and innovative addition to your packaging operation.
Pharmafill products are designed and manufactured by Deitz Company Inc., in Wall, NJ, USA.
We have manufactured machinery for the bottle filling industry since 1966 and started our
Pharmafill line in 1993. We are a small (but growing) family-owned business that emphasizes
quality, innovation and superior customer service.
If you have any questions or comments, please contact us by phone or visit our website. Chances
are someone whose last name is Deitz will handle your inquiry personally.
Deitz Company Inc.
PO Box 1108
1750 Route 34
Wall, NJ, USA 07719
Tel 732-681-0200
Fax 732-681-8468
E-mail support@deitzco.com or
support@pharmafill.com
Web site deitzco.com or
pharmafill.com
The operation manual is designed to make it easier for you to know the machine and to make use
of its intended range of operation. It contains important instructions on how to operate the
machine safely, adequately and economically. Observing these instructions helps to avoid risks,
to reduce cost for repair work and machine downtime, and enhances the machine’s operational
reliability and lifetime.
The operation instructions are to be supplemented by further instructions due to existing national
regulations on accident prevention and environmental protection.
If used in compliance with the instructions contained in this manual and provided that safety
devices are regularly maintained and properly working, this machine is not dangerous to the
operator.
This manual is to be kept accessible to all operators using this machine and it is assumed that
before use the operator will read fully, and understand this manual and will follow instruction
stated within.
Deitz Company Inc. TC3 User Manual Page 2Rev 2022-03-08 Pharmafill Model TC3 User Manual Section 3 – INTRODUCTION (Cont’d) As this machine may be used in the packaging of hazardous substances the operator should be aware of the precautions required for these substances. In addition to the operating instructions and the binding regulations on accident prevention valid in the country where the machine is being used and at its operational site, the recognized technical rules on safe and proper working have to be observed as well. These operating instructions and the information contained therein have been compiled with due care and attention. However, DEITZ COMPANY does not take any responsibility for misprints, translation errors or other errors and any damages resulting there from. DEITZ COMPANY retains the right to make changes in the described products to improve functionality, reliability and design. The measurements or data shown on schematics, sketches and photos are not binding. They are for description purposes. The information and drawings found in the operation manual are the intellectual property of DEITZ COMPANY and may not be copied or given to third parties. LEGAL NOTICE: DEITZ COMPANYTM, PHARMAFILLTM and any graphic representations of the same are legal trademarks of Deitz Company Inc. and may not be used by others without specific written permission from Deitz Company. Deitz Company Inc. TC3 User Manual Page 3
Rev 2022-03-08                                                                         Pharmafill Model TC3 User Manual

Section 4 – SPECIFICATIONS
(Also see technical information at end of manual)

GENERAL
                 Model                  TC3 Automatic Pill Counter
            Description                 Fully Automatic Electronic Counting Filler
                  Type                  AD1115
      Product Capability                Most solid oral dose tablets, capsules and caplets.
                                        Maximum width or diameter: 0.9 inch (22 mm)
                                        Maximum length: 0.9 inch (22 mm)
                                        Maximum height: 0.4 inch (10 mm)
Maximum Counting Rate                   Typical coated tablet, diameter .25 inch: 2500-3000 per minute
                                        Typical capsule, size 00: 1000-1500 per minute
Maximum Filling Rate                    50-60 bottle per minute
          Accuracy                      Typically 99.99% (1 error per 10,000 pills) at optimal conditions

INPUTS
               Voltage                  110 VAC 1
                 Cycles                 50/60 HZ
                  Phase                 1
             Amperage                   6.0A peak
         Compressed Air                 80 PSI [550 kPa], consumes less than 1.0 CFM [28 LPM]
                                        AIR MUST BE FREE OF WATER VAPOR AND OIL
         Room Humidity                  85% RH non-condensing

DIMENSIONS
           Floor foot print             25” wide x 37” deep [62cm X 94cm]
            Hopper height               Variable from 61” to 70” [155cm to 178cm] 2
            Overall height              Variable from 75” to 84” [191cm to 214cm]
             Bottle height              Up to 10”[25cm] 3
                   Weight               300 lbs [136 Kg]

OTHER

     Hopper Capacity                    1.9 cu. ft [.054 m3], or 2.8 cu. ft [.079 m3] with 6” extension
           Glass Disc                   Float Glass 20” diam. X 1/4" thickness [50 cm x 6 mm]
Construction Materials                  See Section 10 – Contact Compliance Document

Notes:
1. Other input voltages are available as factory options if specified at the time of order
2. May be adjusted further by adjusting or modifying leveling feet.
3. Bottle height based on 34” [86cm] high conveyor surface.

Deitz Company Inc.                                          TC3 User Manual                             Page 4
Rev 2022-03-08 Pharmafill Model TC3 User Manual
Section 5 - INSTALLATION AND COMMISSIONING
5.1 - Unpacking
❑ Carefully remove the cardboard cover from the pallet.
❑ Remove all packing materials any additional boxes that may be inside.
❑ Remove the threaded rods, washers and nuts that hold the machine to the pallet.
❑ Remove the machine from the pallet and position on the floor.
❑ Remove any shrink-wrap, bubble wrap and/or protective cardboard inserts.
❑ Inspect all supplied equipment for damage.
❑ If any damage is present please notify DEITZ COMPANY immediately.
❑ VERY IMPORTANT: Refer to Section 9: “Cleaning – Breakdown and Buildup” to
remove the last of the packing material and for cleaning prior to first use. DO NOT
attempt to operate the machine before all packing material is removed.
❑ Connect compressed air, electrical power and then test. See the procedure on the
following pages.
Deitz Company Inc. TC3 User Manual Page 5Rev 2022-03-08 Pharmafill Model TC3 User Manual
5.2 - Connect Electric, Compressed Air And Blower Air
1. Locate the main power cord at the
MAIN rear of the machine. Plug this into your
POWER
CORD 110 VAC 6A outlet.
2. Locate the compressed air filter-
regulator at the rear of the machine.
Attach the air line from your
compressor here.
TO 3. Confirm that the air tube coming out
110 VAC of the filter regulator is attached to the
OUTLET
machine as shown here.
4. Lift (to unlock) the knob on the
COMPRESSED regulator and turn until the gage
AIR
FILTER-REGULATOR
indicates 80 PSI. Press the knob down
(ADJUST TO 80 PSI) COMPRESSED to lock.
AIR IN
1/4-NPT
TO TC3
COMPRESSED
AIR IN
FROM FILTER
Deitz Company Inc. TC3 User Manual Page 6Rev 2022-03-08 Pharmafill Model TC3 User Manual
5.2 - Connect Electric, Compressed Air And Blower Air (Cont’d)
BLOWER 5. Locate the blower power cord and
AIR the blower air hose at the rear of the
HOSE
lift platform.
BLOWER
POWER 6. Plug the blower power cord from
CORD
the lift platform into the blower power
outlet on the back of the TC3.
7. Attach the blower air hose from the
lift platform to the 1-1/4” opening at
the rear of the air manifold tube.
AIR
MANIFOLD
OPENING
BLOWER
POWER
OUTLET
BLOWER
AIR
HOSE
Deitz Company Inc. TC3 User Manual Page 7Rev 2022-03-08 Pharmafill Model TC3 User Manual
5.3- Systems Check
1. Turn on the Main Power Switch by
rotating it clockwise.
START E-STOP
2. Twist and release the E-stop button.
3. Press the START button.
4. Confirm that the Control Panel
MAIN
POWER
lights.
SWITCH
5. Confirm that the counting sensor
lights.
6. Press the RESET button several
times and confirm that the divider flag
flips back and forth smoothly and
quickly.
7. Press the TRAP button several
times and confirm that the trap flag
flips back and forth smoothly (but not
as quickly as the divider flag).
POWER DISPLAY RESET TRAP
LIGHT PANEL BUTTON BUTTON
DIVIDER
FLAG
TRAP
FLAG COUNTING
SENSOR
Deitz Company Inc. TC3 User Manual Page 8Rev 2022-03-08 Pharmafill Model TC3 User Manual
Section 6 - GENERAL INFORMATION
6.1 - Standard Features And Capabilities
The Model TC3 Pill Counter is an electronic counter/filler. The TC3 will count most solid
oral dose products, including clear, translucent or center-hole. It is designed to be easy to
operate and maintain, and is ruggedly built to stand up to hard use and last for decades.
The electronics system includes two computers - one in the programmable logic controller
(PLC) and one in the Counting Sensor -, which are specially programmed for this application
to provide the most advanced features and performance.
The TC3 is designed for automatic production filling, but it can be used for manual filling
(one bottle at a time) and count verification (total counting).
❑ Automatic Production Filler – continuously fill one bottle after another with a
preset quantity, as a conveyor automatically supplies empty bottles and takes
away filled ones.
❑ Manual Production Filler – with each push of a button, fill one bottle with a pre-
set quantity. Bottles may be supplied by conveyor or by hand.
❑ Check Counter – count the total contents of a pre-filled bottle.
The TC3 is a “roll up” design, so that is can be easily positioned over a conveyor that brings
bottles to and from the machine. The integral lift platform may be varied in height (manually
via hand crank or electrically, using the optional motor). The machine includes two bottle-
indexing air cylinders and three bottle sensors (supply, start and backup), with brackets for
mounting on industry standard conveyor rails. The TC3 is compatible with our Pharmafill
conveyors and most others that are less than 6” in width. .
The large supply hopper at the top of the machine is filled with a bulk quantity of pills.
Under the hopper is the variable speed vibratory feeder chute, which regulates the flow of
pills onto the rotating glass disc. The pills are rotated around the disc, where a single file row
of pills is directed from the edge of the disc to flow into the exit chute. As the flow leaves the
exit chute, it enters the counting head.
The first section of the counting head is the photoelectric counting window, where the pills
are counted. Below the window is the divider flag, which alternately diverts the flow of pills
to the left or right side chamber, as the target count is achieved. Below that is the trap flag,
which controls the flow of counted pills exiting the side chambers of the head, according to
the status of the bottle on the conveyor below.
Deitz Company Inc. TC3 User Manual Page 9Rev 2022-03-08 Pharmafill Model TC3 User Manual 6.1 - Standard Features And Capabilities (Cont’d) When filling a bottle, pills flow through one side chamber and exit through the bottom. The exit of the opposite side chamber is blocked by the trap flag, creating a “closed trap”. When the target count is reached, the divider flag splits the flow of pills and diverts it into the closed trap. Counting continues as the filled bottle is removed. When a new bottle is in place, the trap flag switches sides, allowing the pills in the trap to exit and counting continues.. In this manner, pills are continuously counted even as the bottles are moving in and out of the filling station. If a fault occurs with bottles on the conveyor, counting will stop automatically until the fault is cleared. Deitz Company Inc. TC3 User Manual Page 10
Rev 2022-03-08                                                 Pharmafill Model TC3 User Manual

Section 7 - CONTROLS
7.1 - Control Panel Components
The Control Panel contains all the operator controls necessary to operate the machine and
displays text messages and other information to provide feedback to the operator.

                                   DISPLAY
                                    PANEL

                       BOTTLE
                       SENSOR
                       STATUS                                              CYCLE
                       WINDOW                                             COUNTER

                         POWER
                       INDICATOR
                          LIGHT

                                                                MANUAL
                                                                OVERIDE
                                                               SWITCHES

                                              Operator Interface Display Panel – this is the
                                              main operator interface, also known as the Human
                                              Machine Interface (HMI). It consists of a 2-line
                                              LCD display and 10 membrane switches. The five
                                              buttons on the upper row are for Menu functions
                                              and the five on the lower row are dedicated
                                              function switches. A detailed explanation of every
                                              function and display follows.

                                              1. Power Up – when the machine is first turned
                                              on, the message shown at the upper left will
                                              display for a moment.

                                              2. Ready – after one second, the display will
                                              show the Current Count and the Target Count.
                                              The machine is now ready for operation.

Deitz Company Inc.                           TC3 User Manual                        Page 11
Rev 2022-03-08 Pharmafill Model TC3 User Manual
7.1 - Control Panel Components (cont’d)
The Control Panel includes:
• Operator Interface Display Panel (HMI)
• Feeder Switch
• Disc/Feeder Switch
• Cycle Counter
• Bottle Sensor Status Window
• Power Indicator Lamp
1. OPERATOR INTERFACE DISPLAY
PANEL – see the following sections for details.
2. FEEDER AUTO/OFF SWITCH – when
switched off, the feeder will not operate.
3. DISC + FEEDER AUTO/OFF SWITCH –
when switched off, both the disc and the feeder
will not operate.
4. CYCLE COUNTER – tallies the number
bottles filled by incrementing each of time the
bottle gating cylinders are cycled.
5. BOTTLE SENSOR STATUS WINDOW –
this window in the front panel lets the operator see
the status lights on the fiber optic sensors that
monitor the presence of bottles on the conveyor.
Green light indicates power on. Yellow light
indicates an output signal (object detected).
6. POWER INDICATOR LAMP – whenever
the machine is connected to the electric power
source, the green light will be on. This does not
indicate the status of the rotary main power
switch, nor E-stop pushbutton.
Deitz Company Inc. TC3 User Manual Page 12Rev 2022-03-08 Pharmafill Model TC3 User Manual
7.2 – Operator Interface Display Panel - Overview
Bottom Row Buttons –
These five buttons are used during RUN mode.
In Run mode, the machine continuously fills
bottles with the target count, stopping only when a
fault is detected or when the operator intervenes.
See section 7.3 for full information.
Top Row Buttons –
These five buttons are used to control Menu
functions: adjusting the preset values of
parameters and accessing other features. The
MENU button only works when you are not in
any filling mode (RUN, FILL ONE or CHECK
COUNT).
The MENU selections are;
1. Adjust Settings
2. Fill One
3. Index One
4. Half-step Index
5. Check Count
6. Technician Only
7.
See sections 7.4 through 7.7 for full
information.
Deitz Company Inc. TC3 User Manual Page 13Rev 2022-03-08 Pharmafill Model TC3 User Manual
7.3 - Run Mode
RUN MODE is the fully automatic filling mode.
In Run mode, the machine continuously fills
bottles to the target count, stopping only when a
fault is detected or when the operator intervenes.
1. Press RUN (STOP) to start or stop automatic
filling.
Blower Delay – When RUN mode is started,
there is a 5 second delay to allow the air
blower to come up to speed.
2. Filling Starts - After 5 seconds, the disc and
feeder will start (if the manual override switches
are both in the AUTO position) and product will
begin to flow through the counter. As product is
counted, the Current Count will increase. Filling
will be stopped if faults are detected.
3. Waiting for Bottle – If Run Mode is selected
without a bottle in the start position, the machine
will wait for a bottle, and start filling once a bottle
is detected. Starts automatically.
4. Start Bottle Error – Filling will stop and this
message is displayed when the start sensor detects
no bottle after filling has started (due to tipping or
sensor misalignment, etc.). When the error is
corrected, the message will read “Start Error –
Press CLR”. Does not restart automatically. You
must press CLEAR.
Deitz Company Inc. TC3 User Manual Page 14Rev 2022-03-08 Pharmafill Model TC3 User Manual
7.3 - Run Mode (cont’d)
5. Bottle Supply Error – Filling stops when there
is no bottle at the Supply sensor on the conveyor.
Restarts automatically when a bottle is detected.
6. Bottle Backup Error – Filling stops when
there is a bottle detected at the Backup sensor on
the conveyor. Restarts automatically when no
bottle is detected.
7. Trap Full Error – As a filled bottle is being
replaced, the pills flow into the closed trap. This
message is displayed and filling stops if the
Current Count exceeds the preset Trap Max Count
while the trap is closed. When the next bottle does
arrive, the error is corrected and the message will
read “TrapError – Press CLR”. Does not restart
automatically. You must press CLEAR.
8. RESET Button– Press this button to cause the
Current Count to go to zero and flip the Divider
flag to the other side.
In RUN mode, filling will continue.
In FILL ONE mode or CHECK COUNT
mode, filling will stop.
9. TRAP Button – The trap flag position (left or
right) in controlled automatically. To temporarily
change the position of the trap flag, press and hold
this button. The trap flag will switch to the other
side. When the button is released, the flag will
return to the automatic position.
Deitz Company Inc. TC3 User Manual Page 15Rev 2022-03-08 Pharmafill Model TC3 User Manual
7.4 – Speed Adjustment (revised 2009-11-17)
SPEED ADJUSTMENT – The Feeder and Disc
speed may be adjusted at anytime, except during
Menu mode. The speeds are adjustable in 1%
increments (0 to 100%).
1. FEEDER SPEED – Press this button to enable
adjustment of the feeder speed. Press again when
done.
2. DISC SPEED – Press this button to enable
adjustment of the disc speed. Press again when
done.
3. Adjust 1 at a time! - Do not press both speed
buttons at same time – if both buttons are pressed
at the same time, no adjustment is possible.
4. Rotate the “ADJUST VALUE” knob
clockwise to increase the speed, counter-
clockwise to decrease the speed. Speed change is
immediate.
Range: 0% to 100%
The “ADJUST VALUE” knob is an encoder-type
switch. It will rotate in either direction without
limit, but the value will not decrease or increase
beyond the correct range or limits.
ADJUST VALUE
KNOB
Deitz Company Inc. TC3 User Manual Page 16Rev 2022-03-08 Pharmafill Model TC3 User Manual
7.5 - Menu 1. Adjust Settings (revised 2009-11-17)
The menu buttons work in the following manner:
• Press MENU to access the menu items.
• Use the UP
and DOWN arrow to scroll
through the menu selections.
• Press ENTER to make your selection.
• Press CLEAR to exit Menu Mode at any time.
1. ADJUST SETTINGS is used to change the
preset values:
• Target Count
• Slowdown Count,
• Trap Max Count
• Flag Delay
• Drop Time
• Index Time
ADJUST VALUE Rotate the “ADJUST VALUE” knob clockwise
KNOB to increase the number, counter-clockwise to
decrease the number.
Press ENTER to accept the new value.
The “ADJUST VALUE” knob is an encoder-type
switch. It will rotate in either direction without
limit, but the value will not decrease or increase
beyond the correct range or limits
TARGET COUNT – This is the total number of
pills to be counted into each bottle. When the
desired value is displayed, press ENTER.
SLOWDOWN COUNT – When the Current
Count exceeds the Slowdown Count, the feeder
and disc speed will slow down (see Sec. 7G) until
the target count is reached, then normal speed will
resume. This produces greater accuracy at the
moment the target count is reached, when the
divider flag flips to start a new count. The value is
usually 10 to 20 less than the Target Count
Deitz Company Inc. TC3 User Manual Page 17Rev 2022-03-08 Pharmafill Model TC3 User Manual
7.5 - Menu 1. Adjust Settings (cont’d)
TRAP MAX COUNT – As a filled bottle is
being replaced, the product flows into the closed
trap. If the Current Count exceeds the Trap Max
count before the bottle is detected, filling will stop
to prevent over-filling of the closed trap. This
value should be set so that the trap does not fill
with more product than can be dropped at
once without blocking the funnel.
FLAG DELAY – When the Counting Sensor
detects the pill that matches the target count, there
must be a brief delay to allow that pill to fall from
the sensor area to the Divider flag. Typically this
delay is between 0.00 to 0.03 seconds and rarely
needs adjustment. Use the Fill One function to test
the setting (see menu item 2).
DROP TIME - When the Counting Sensor
detects the pill that matches the target count, there
must be a brief delay to allow that pill to fall
through the counting head, into the bottle. This is
the Drop Time. Typically this delay is between
0.20 to 0.40 seconds and rarely needs adjustment.
INDEX TIME – When a bottle is filled, the
bottle gates cycle, allowing the filled bottle to
advance one position. The time it takes the bottle
to advance one position is the Index Time. The
gates then return to normal and the filled bottle is
released. The value for the Index Time depends
on bottle width and conveyor speed. See Section
7.12 for a full explanation.
Deitz Company Inc. TC3 User Manual Page 18Rev 2022-03-08 Pharmafill Model TC3 User Manual
7.6 - Menu 2. Fill One
In FILL ONE mode, the operator can fill one
bottle at a time, stopping after each bottle is filled
and released. Excess pills will be counted into the
closed trap and held for the next bottle. The
machine will now behave just as it does in RUN
mode, but will stop after the target count is
reached.
Note: This is a useful tool for setup and testing
before going to RUN mode.
1. Press MENU
2. Use the UP or DOWN arrow buttons to
scroll to “2. Fill One”.
3. Press ENTER to select FILL ONE mode.
4. Ready to begin – press ENTER again to start
filling.
Blower Delay – Before filling begins, there is
a 5 second delay to allow the air blower to
come up to speed
Deitz Company Inc. TC3 User Manual Page 19Rev 2022-03-08 Pharmafill Model TC3 User Manual
7.6 - Menu 2. Fill One (cont’d)
6. Filling starts - After 5 seconds, the disc and
feeder will start (if the manual override switches
are both in the AUTO position) and product will
begin to flow through the counter. As product is
counted, the Current Count will increase. Filling
will be stopped if faults are detected.
7. Filling stops – When the target count is
reached, the divider flag flips, the feeder and disc
stop, and the bottle gates cycle. The blower
remains on. The excess count is held in the closed
trap. Press ENTER again to fill another bottle.
8. Press CLEAR at anytime to exit this mode.
Deitz Company Inc. TC3 User Manual Page 20Rev 2022-03-08 Pharmafill Model TC3 User Manual
7.7 - Menu 3. Index One
In Index One mode, the operator can manually
cycle the bottle gates to release one bottle and
bring a new one to the start position. This is
intended as an aid in setting up the position of the
bottle gates.
1. Press MENU
2. Use the UP or DOWN arrow buttons to
scroll to “3. Index One”.
3. Press ENTER to select Index One mode.
4. Press ENTER – the bottle gating cylinders will
make one cycle, as follows:
• Step 1 – Open - Gate 1 withdraws and
Gate 2 extends so that all bottles move up
one position.
• Index Time delay times out.
• Step 2 – Close - both cylinders return to
the normal position so that the filled bottle
is released.
5. Press ENTER again to repeat or press CLEAR
to exit this mode.
Deitz Company Inc. TC3 User Manual Page 21Rev 2022-03-08 Pharmafill Model TC3 User Manual
7.8 - Menu 4. Half-step Index
In Half-step Index mode, the operator can
manually step through the bottle gating cycle,
without using the Index Time. This is intended as
an aid in setting up the position of the bottle gates.
1. Press MENU
2. Use the UP
or DOWN arrow buttons to
scroll to “4. Half-step Index”.
3. Press (and release) ENTER to select Half-step
Index mode.
4a. Press ENTER once – the bottle gating
cylinders will open – Gate 1 withdraws and Gate
2 extends so that all bottles move up one position.
4b. Press ENTER again – the bottle gating
cylinders will close -Both Gate 1 and Gate 2
return to the normal position so that the first bottle
is released.
5. Press ENTER again to repeat or press CLEAR
to exit Half-step Index mode.
Deitz Company Inc. TC3 User Manual Page 22Rev 2022-03-08 Pharmafill Model TC3 User Manual
7.9 - Menu 5. Check Count
In Check Count mode, the machine will count
continuously. The Target Count, Slowdown Count
and Trap Max Count are ignored. The divider flag
will not flip automatically, the trap will stay open
and bottles will not be indexed. This mode is used
to:
• count the contents of a container
• run accuracy and speed tests.
• run all the product out of the machine
1. Press MENU
2. Use the UP or DOWN arrow buttons to
scroll to “5. Check Count”.
3. Press (and release) ENTER to select Check
Count mode.
4. If you intend to keep track of the count, be sure
to press RESET to set the Current Count to zero
before starting.
5. Press ENTER to begin counting.
Blower Delay – Before filling begins, there is
a 5 second delay to allow the air blower to
come up to speed.
Deitz Company Inc. TC3 User Manual Page 23Rev 2022-03-08 Pharmafill Model TC3 User Manual
7.9 - Menu 5. Check Count (cont’d)
6. Filling Starts - After 5 seconds, the disc and
feeder will start (when the both manual override
switches are in the AUTO position) and product
will begin to flow through the counter. As product
is counted, the Current Count will increase. The
maximum count is 9999.
8. Press CLEAR to stop counting and to exit this
mode.
Deitz Company Inc. TC3 User Manual Page 24Rev 2022-03-08 Pharmafill Model TC3 User Manual
7.10 - Menu 6. Technician Only (revised 2009-11-17)
The Technician Only menu is for adjusting certain
parameters that are not normally changed, but are
available for the technician for special cases:
• Slowdown percentage for the feeder and
disc speeds.
• On/off status of the three bottle sensors.
1. Press MENU
2. Use the UP
or DOWN arrow buttons to
scroll to “6. Technician Only”.
3. Press ENTER to select Technician Only mode.
The following settings set the slowdown speed as
a percentage of the preset speed (which was set
using the FEEDER SPEED and DISC SPEED
buttons).
The “ADJUST VALUE” knob is an encoder-type
switch. It will rotate in either direction without
limit, but the value will not decrease or increase
beyond the correct range or limits
4. Feeder Slowdown %
Rotate the “ADJUST VALUE” knob clockwise
to increase the number, counter-clockwise to
decrease the number.
ADJUST VALUE
KNOB
Press ENTER to accept the new value. Press
CLEAR to exit without saving.
5. Disc Slowdown %
Rotate the “ADJUST VALUE” knob clockwise
to increase the number, counter-clockwise to
decrease the number.
Press ENTER to accept the new value. Press
CLEAR to exit without saving.
Deitz Company Inc. TC3 User Manual Page 25Rev 2022-03-08 Pharmafill Model TC3 User Manual
7.10 - Menu 6. Technician Only (Cont’d)
The following settings enable or disable the bottle
sensors on the conveyor. Normally all three
should be ON.
Press the UP arrow button to enable.
Press the DOWN arrow button to disable
6. Supply Check is ON/OFF
7. Start Check is ON/OFF
8. Backup Check is ON/OFF
Deitz Company Inc. TC3 User Manual Page 26Rev 2022-03-08 Pharmafill Model TC3 User Manual
7.11 - Counting Sensor
OVERVIEW
❑ Detects solid (opaque) product and translucent or clear product, such as gel caps.
❑ Automatically and continuously adjusts light level for maximum sensitivity
❑ Compensates for dust buildup and sets alarm if conditions become marginal.
Threshold Adjustment – how much the light level must drop to count.
When the light in the counting window is unblocked, the sensor detects 100% of the light.
When an object falls through the window, the light is blocked. If the threshold size is set to
40%, the sensor will send a count signal when 40% of the light is blocked; that is, when the
light level falls below 60%. The sensor will reset when the light level rises above 60% again.
This is the factory setting and works with most products. The threshold can be reduced to as
low as 5%.
Adjustable in 5% increments
Light bar 1=5%
Light bar 8 = 40% (factory setting, most products)
• THRESHOLD FACTORY SETTING = 8 (good for all but the smallest pills)
One-Shot Delay Adjustment – how long the count signal stays on.
This is a feature for CLEAR PRODUCT ONLY. It is used to stretch the count signal so a
product with a clear center does not produce a “double” count. Normally set at the minimum
(5 ms) for solid product. For clear or opaque product, increase the one-shot according to the
length of the product. For example, 10 ms for round gel caps .25” long, or 40 ms for oblong
gel caps .90” long.
Adjustable in 5 millisecond increments
Light bar 1 = 5 ms (factory setting, for solid product)
Light bar 8 = 40 ms (for long clear products)
• ONE-SHOT DELAY FACTORY SETTING = 1 (good for all solid product)
• ONE-SHOT DELAY 2-8 is for CLEAR PRODUCTS ONLY
• With ANY product, if the ONE-SHOT DELAY is set too high, it will cause
OVERFILLS (too many pills in the bottle)
• With CLEAR product, if the ONE-SHOT DELAY is set too low, it will cause
UNDERFILLS (too few pills in the bottle).
Deitz Company Inc. TC3 User Manual Page 27Rev 2022-03-08 Pharmafill Model TC3 User Manual
7.11 – Counting Sensor (Cont’d)
THRESHOLD (Factory setting = 8)
To adjust:
❑ Press and release + (plus)
▪ Light bar will change to indicate current threshold
▪ “LO” and “DO” lights will flash alternately
❑ Press + to increase the threshold (less sensitive)
❑ Press – to reduce the threshold (more sensitive)
Will automatically exit adjustment mode after 4 seconds of inactivity
Will automatically reset light level for maximum performance before returning to
normal.
ONE-SHOT DELAY (Factory setting = 1)
To adjust:
❑ Press and release – (minus)
▪ Light bar will change to indicate current one-shot delay
▪ “Clock” light will flash
❑ Press + to increase the one-shot delay.
❑ Press – to reduce the one-shot delay.
Will automatically exit adjustment mode after 4 seconds of inactivity
Will automatically reset light level for maximum performance before returning to
normal.
POWER ON (GREEN) COUNT SIGNAL (YELLOW)
LIGHT BAR 8
HS
(CLOCK)
DO LIGHT BAR 1
LO
+ (PLUS) BUTTON
- (MINUS) BUTTON
Deitz Company Inc. TC3 User Manual Page 28Rev 2022-03-08 Pharmafill Model TC3 User Manual
Section 8 – COUNTING & FILLING
8.1 - Product Guide Adjustments
The Product Guides must be adjusted to create a
steady flow of product down the channel, into the
2 5
1 chute and through the center of the counting
window. The flow must be single file, one level
4 high. There are five adjustments.
1. Adjustment 1 - WIDTH
3
The width of the channel is adjusted by moving
the Guide Block Assembly side-to-side. So that
the Guide Block will open fully, make sure that
ADJ. KNOB
the Guide Plate depth is not limiting the travel.
GUIDE BLOCK Loosen the two knobs on the Guide Plate Clamp
and slide the plate to the front (towards you).
WIDTH Width Adjustment
SCALE
To adjust, begin by loosening the knob and
moving the guide block to the left.
Place a few pills in the channel and move the
guide to the right so that only a single file row
may pass down the channel. Leave enough room
PRODUCT so that the product will flow freely. Tighten the
GUIDE
PLATE
knob.
Note the width setting on the Guide Block Scale.
Note if you are in the WIDE or NARROW zone.
GUIDE
PLATE
CLAMP
PRODUCT CHANNEL
GUIDE
Deitz Company Inc. TC3 User Manual Page 29Rev 2022-03-08 Pharmafill Model TC3 User Manual
8.1 - Product Guide Adjustments (Cont’d)
PRODUCT GUIDE PLATE
Adjustment 2 – DEPTH
Once the width of the channel is set, the Product
Guide Plate must adjusted so that it comes close
to the glass disc, without touching it. This is to
close any gaps where the chute meets the glass
disc.
Flip the Guide Plate (if necessary)
First, the Guide Plate must be installed with the
GUIDE
proper side up. The Guide Plate is labeled to
PLATE indicate which side should be up, based in the
CLAMP setting of the Width Scale. If the Width Scale is
near the middle (5), either side may be up. To
change to Guide Plate, loosen two knobs and
remove the Guide Plate. Take the Product Guide
out of the slot and place it in the other slot. Re-
install the Guide Plate and tighten the knobs.
PRODUCT
GUIDE
Depth Adjustment
Loosen the two knobs on the Guide Plate a small
PUSH DOWN
amount, only enough to move the plate. Slide it
forward until it touches the edge of the glass disc,
and then move it back a bit, so that it does not
drag on the disc (adjust for minimum clearance).
As you tighten the two knobs, push down on the
DEPTH back end of the Guide Plate, so that the pointed tip
SCALE of the Product Guide is resting on the glass disc.
Use your fingertip to confirm the point is down on
the glass. If you can feel the point, it is too high.
Note the position of the Guide Plate as indicated
SECOND SLOT
on the Depth Scale. It should be approximately
the same number as on the Width Scale.
Also, before you tighten the knobs, you may slide
the product guide back and forth in it’s slot. The
default position is when the pointed tip of the
Product Guide aligns with the second slot in the
TIP air guide.
Deitz Company Inc. TC3 User Manual Page 30Rev 2022-03-08 Pharmafill Model TC3 User Manual
8.1 - Product Guide Adjustments (Cont’d)
Adjustment 3 – CENTERING
To count properly, objects must fall directly from
the chute into the center of the counting head.
This way the object will fall through the center of
the light source of the counting window and strike
the divider flag at the same angle whether
CENTERING
diverting right or left.
CHUTE SCALE
The centering adjustment is needed because when
you make a change to the width of the Product
Guide, you are moving the left side of the chute.
CENTERING As the width of the chute changes, so does the
WHEEL location of the centerline.
Centering Adjustment
After changing the width of the Product Guides,
COUNTING center the Counting Head by turning the
HEAD Centering Wheel on the right side of the machine.
Note the position of the Counting Head as
indicated on the Centering Scale. It should be
approximately the same number as on the Width
Scale
CENTERLINE
OF CHUTE
WIDTH
Visually confirm that the Counting Head is
OF CHUTE centered on the chute by looking at the red light
source from directly in front of the chute. You
may remove the Clear Chute Cover for a better
view, or bend down to look up through the Clear
LIGHT
SOURCE Front Cover of the Counting Head.
Deitz Company Inc. TC3 User Manual Page 31Rev 2022-03-08 Pharmafill Model TC3 User Manual Deitz Company Inc. TC3 User Manual Page 32
Rev 2022-03-08                                       Pharmafill Model TC3 User Manual

8.1 - Product Guide Adjustments (Cont’d)

                                   Adjustments 4 & 5 – AIR GUIDE HEIGHT

                                   The Air Guides work for all types of product
                                   (tabs, caps, etc.). Compares to solid mechanical
                                   guides, they separate the product better, are easier
                                   to adjust and are not prone to stoppages that
                                   require operator intervention.
                     HEIGHT
                     SCALE         Air Guide Height Adjustment

                                   To set the Air Guides, loosen the knobs on the air
                                   guide blocks. Use the handle on the air manifold
     AIR
                                   to rotate the Air Jets up or down.
   NOZZLES
                                   Set the height of the Air Jets so that the air flows
                                   just above the pills in the channel. Generally, they
                                   should be set at approximately 2 pills high.

                                   If set too low, the air will disturb the flow in the
                                   channel, impeding the flow and possibly blowing
                                   pills right out of the channel. If set too high, faults
                                   might not be rejected. You can fine-tune this
                                   adjustment while running the product during
                                   testing.

                                   Once set at the right height, tighten the knobs.
                                   Note the position on the Height Scale.

                                   Air Pressure Adjustment
                          AIR
   AIR FLOW              FLOW
                                   This is adjustment is best made while running the
    SCALE               OPENING    product during testing.

                                   For first time setup, set the Air Pressure Relief
                                   Ring so that the opening is unrestricted. As you
                                   run the product, watch to see if doubles and
                                   piggybacks are being rejected. Increase the air
                                   pressure by rotating the ring upwards, until you
                                   have satisfactory results.

                                   Once set at the right height, tighten the knob. Note
                                   the position on the Pressure Scale

                                                         DEFLECTOR
                                                           SPRING

Deitz Company Inc.                TC3 User Manual                          Page 33
Rev 2022-03-08 Pharmafill Model TC3 User Manual
8.2 - Bottle Gating Cylinder Positioning
SETTING UP YOUR BOTTLES & GATING
1. Select a funnel with the bottom opening which
best matches the neck of you bottle. You want the
the funnel opening to be smaller than the neck of
the bottle, but large enough so that the pills do not
FUNNEL
“bridge” and block the funnel.
2. Adjust the conveyor rails to allow the bottles to
pass freely down the conveyor and directly under
the filling funnel.
3. Using the crank handle on the front of the lift
platform, (or the push-button pendant control, if
equipped with motorized lift option), adjust
machine height to bring the bottom of the top of
CRANK the bottle approximately 1/8” to 1/4" below the
HANDLE funnel. Make sure the bottle is centered under the
funnel left-to-right and front-to-back.
4. Turn on the conveyor and set to the desired
speed. Place 5 to 10 bottles on the conveyor. The
bottles will move down until the first one comes
GATE 1 GATE 2 to rest at Gate 1
5. Position Gate 1 so that the first bottle is held
directly under the funnel. Position Gate 2 so it is a
distance downstream from Gate 1 equal to the
width of one bottle.
6. Use “4. Half-Step Index” several times to test
the position of Gate 2. Adjust the position of Gate
2 so that bottles are not struck by Gate 1 when it
extends. Bottle should not be “kicked” by Gate 1.
7. Use “3. Index One” to test the index time.
Release several bottles. Adjust the “Index Time”
under “Adjust Setting” so that the gates remain
open just long enough the let one bottle pass.
FUNNEL
Deitz Company Inc. TC3 User Manual Page 34Rev 2022-03-08 Pharmafill Model TC3 User Manual
8.2 - Bottle Gating Cylinder Positioning (Cont’d)
BOTTLE GATING EXPLAINED
The supply of bottles moves down the conveyor
and comes to rest on Gate 1, which holds the
bottle at the exact filling position.
Gate 2 is positioned downstream (usually to the
NORMAL
FILLING right) of Gate 1 by a distance equal to one bottle
POSITION width (dimension A).
When filling, the first bottle will be held at the
filling position by Gate 1 and there will be no
GATE 1 GATE 2 bottle at Gate 2.
When the target count is reached, Gate 1 retracts
and Gate 2 extends. The supply of bottles moves
forward one position. Now a new empty bottle is
A
in the filling position.
When the Index Time has passed, Gate 1 extends
and Gate 2 withdraws and filling begins again.
The previously filled bottle moves down the
conveyor.
FILLED BOTTLE AT GATE 2
GATE 2 EXTENDED
FILLED BOTTLE EXITING
GATE 1 EXTENDED
Deitz Company Inc. TC3 User Manual Page 35Rev 2022-03-08 Pharmafill Model TC3 User Manual
8.3 - Bottle Sensor Positioning
BOTTLE SENSORS
SUPPLY
BOTTLE
SENSOR There are three photoelectric fiber optic bottle
sensors. They must be positioned along the
conveyor rail so that the light source will shine
directly at the side of the bottle when the bottle is
stopped in a line with other bottles.
1. The Supply Bottle Sensor is positioned
upstream from the filling station, to assure a
supply of empty bottle is available.
START
BOTTLE 2. The Start Bottle Sensor must be positioned on
SENSOR the bottle in the filling station. It may be
necessary to angle the sensor slightly to get a
straight on look at the bottle. Use a ¼” open
wrench to adjust the angle bracket. Do not
position it at a bottle upstream, or errors at the
filling position will not be detected.
3. The Backup Bottle Sensor in positioned
downstream from the filling station, to detect if
bottles backup from a downstream stoppage,
which could interfere with the release of bottles
BACKUP from the filling station.
BOTTLE
SENSOR
4. You can check the status of the all three bottle
sensors can by looking through the Bottle Sensor
Status window in the control panel. The green
light indicates power is on and the yellow light
indicates an output signal (bottle detected).
Deitz Company Inc. TC3 User Manual Page 36Rev 2022-03-08 Pharmafill Model TC3 User Manual
8.4 - Testing To Establish Parameters
For each product to be counted, you will have to establish the correct parameters for the best
combination of speed and accuracy. We recommend the following method.
❑ Hand count a certain quantity of product (100 in this example) into a container. This will
be your test batch.
❑ Use the test batch to set the basic product guide adjustments to the machine for this
product and note the settings.
8.5 – First - Use Count Check Mode
❑ Select Check Count Mode. Count the test batch several times, starting at a very moderate
speed.
❑ If the counts are inaccurate, check the guide settings and continue counting.
❑ Once the counts are accurate and repeatable, increase the speed of the feeder and/or disc
slightly and continue counting.
❑ Above a certain speed for each product, you will not be able to maintain accuracy. Go
back to a lower speed and consider this the maximum speed for that product. Note the
speed setting for the feeder and disc.
8.6 – Second - Use Fill One Mode
❑ Select Fill One Mode. Set the TARGET COUNT to 50 and your SLOWDOWN COUNT
to 49 (for now). Pour all the test batch of 100 onto the disc and use Manual mode to
check the action of divider flag. Do this several times. The excess overrun quantity (for
example, 5 or 6 pieces) in the closed trap should be accurately counted. Adjust the FLAG
DELAY if it is not accurate.
❑ If the overrun is consistently more when directed to one-side than the other, the head may
not be centered properly.
❑ The amount of the overrun can help you to set the SLOWDOWN COUNT value: for
example, if the overrun is consistently around 10 pieces, you should set the Slowdown
Count to be at least 10 less than the Target Count (because that is how many pass before
the disc is can slow down or stop.)
8.7 – Last - Use Run Mode
❑ Only go to Run Mode after proving the speed and accuracy are optimized.
Deitz Company Inc. TC3 User Manual Page 37Rev 2022-03-08 Pharmafill Model TC3 User Manual
8.5 – Summary
1. PREPARATION
NOTE: The machine should be cleaned before first use, and before running a new
product.
❑ Set all the product guides to the correct setting for the product.
❑ Set the FEED and DISC speeds.
❑ Adjust the conveyor for the preferred container.
o Rail width
o Bottle Gating Cylinders
o Bottle Sensors
o Conveyor Speed
❑ The correct funnel should be in place.
❑ The correct feeder sieve should be in place.
❑ The hopper should be filled and the hopper door opened.
❑ Set the preset values for Target Count, Slowdown Count, Trap Max Count and Flag
Delay, Drop Time and Index Time.
2. CHECK COUNT MODE – count the contents of a pre-filled container.
❑ Count a known test batch to confirm accuracy.
❑ The contents will be counted and the tally will be displayed until RESET is pressed
again.
❑ Press CLEAR to exit.
3. FILL ONE MODE
❑ One container will be filled to the Target Count and the machine will stop.
❑ Any pills that run on after the stop will be counted and held in the closed trap.
❑ To continue, press ENTER again.
❑ Press CLEAR to exit.
4. AUTOMATIC MODE
❑ Press RUN.
❑ Bottles will be filled continuously.
❑ Press RUN again to stop.
Deitz Company Inc. TC3 User Manual Page 38Rev 2022-03-08 Pharmafill Model TC3 User Manual
Section 9 –BREAKDOWN, CLEANING AND BUILDUP
9.1 - Breakdown Of Remove-To-Clean Contact Parts (Summary)
NOTE: The line numbers below refer to the illustration in the next section.
1. Remove the Chute Clear Cover by loosening the mounting knob at the bottom and
sliding it off.
2. Remove the Auto-feed Sensor Cable from the Auto-feed Sensor, by unscrewing the
knurled ring at the end of the cable.
3. Remove the Clear Rim Cover by loosening the hold-down screw in front and the
mounting screws in back and sliding the cover forward.
4. Remove the Rim Band from the groove in the top cover by lifting it up, starting at one
end and working around.
5. Remove the Adjustable Product Guide Assembly by removing the adjustment knob..
6. Pull out the Manifold Release Pin, then...
7. …rotate the Air Guide Assembly up and out of the way
8. Remove the Center Hub Assembly by removing the center knob.
9. Unscrew the Disc Hold-down Ring Nut. Remove the Plastic Hold-down Washer.
10. Carefully lift and remove the Glass Disc (with Aluminum Support Disc attached).
Note that the support disc has a slot which aligns with a pin on the drive hub. Make sure
this is oriented correctly when you install the glass again.
11. This is the top of the machine with contact parts removed. Wipe down as needed.
Make sure the Rim Groove is clear of any dust or debris.
12. Disconnect the Counting Sensor Electrical Cable. First, slide the black collar down
to unlock the cable, then pull down on the connector to disconnect the cable.
13. Remove the Counting Sensor Cover. Slide the Counting Sensor to the right to
remove it from two the mounting pins.
14. Remove the Counting Window and Counting Sensor as one unit. Do not disconnect
the fiber optic cables from the top of the Counting Sensor.
15. Remove the Funnel Holder and the Funnel.
Deitz Company Inc. TC3 User Manual Page 39Rev 2022-03-08 Pharmafill Model TC3 User Manual
9.1 - Breakdown Of Remove-To-Clean Contact Parts (Summary)(Cont’d)
16. Remove the Clear Front Cover.
17. Remove the Funnel Mounting Block.
18. Remove The two Side Blocks, one on the left and one on the right. They are identical
and interchangeable.
19. Remove the Center Block
20. Remove the Divider Flag and the Trap Flag.
21. Remove the Back Plate.
22. Backplate partially removed.
23. Remove the Hopper Door Adjusting Knobs.
24. Loosen the three Hopper Mounting Screws.
25. Tilt the Hopper forward and remove the Hopper Door. The Hopper can be wiped
down in this position.
26. Remove the two Sieve Mounting Knobs in the Feeder Chute. Remove the Feeder
Sieve.
27. Wipe clean the Feeder Chute in this position, or remove the two Feeder Chute
Mounting Screws and remove the Feed Chute.
28. Remove four screws and take off the Chip Chute Clear Cover. Clean out the Chip
Chute.
Deitz Company Inc. TC3 User Manual Page 40Rev 2022-03-08 Pharmafill Model TC3 User Manual
9.2 - Breakdown Of Remove-To-Clean Contact Parts (Illustrated)
1. Remove the Chute Clear Cover by loosening
CLEAR the mounting knob at the bottom and sliding it off.
CHUTE
COVER
AUTO-FEED
2. Remove the Auto-feed Sensor Cable from the
SENSOR Auto-feed Sensor, by unscrewing the knurled
ring at the end of the cable.
AUTO-FEED
SENSOR
CABLE
3. Remove the Clear Rim Cover by loosening the
KNOBS hold-down screw in front and the mounting
screws in back and sliding the cover forward.
CLEAR
RIM
COVER
4. Remove the Rim Band from the groove in the
RIM top cover by lifting it up, starting at one end and
BAND working around.
Deitz Company Inc. TC3 User Manual Page 41You can also read