NAACC Stream Crossing Survey Digital Data Collection Users Guide - North Atlantic Aquatic Connectivity Collaborative (NAACC)
←
→
Page content transcription
If your browser does not render page correctly, please read the page content below
NAACC Stream Crossing Survey
     Digital Data Collection Users Guide

                       Developed by the

North Atlantic Aquatic Connectivity Collaborative (NAACC)

                     Version 1.1 – May 2015

    For more information, go to: www.streamcontinuity.org.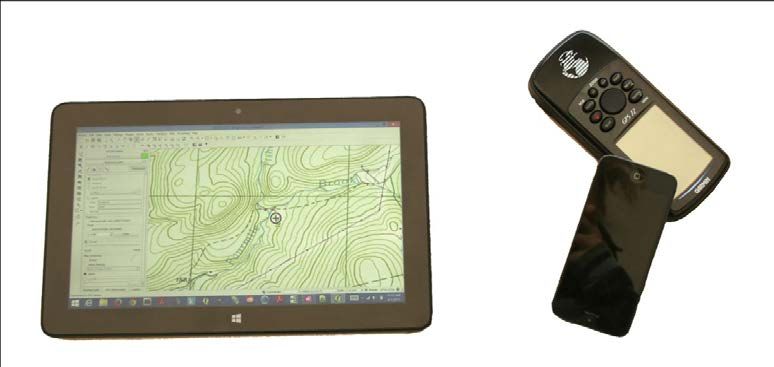
Preface

Acknowledgments
Funding for the development of the NAACC Digital Data Collection System was provided by the U.S. Fish and Wildlife
Service North Atlantic Landscape Conservation Cooperative (NALCC).

License of this document
Permission is granted to copy, distribute and/or modify this document under the terms of the GNUFree Documentation
License.

Questions and Comments

Technical support questions about the NAACC Digital Data Collection System or the NAACC website:
        Bob English
        Daystar
        …computing and research services
        367 Four Mile Brook Rd.
        Northfield, MA 01360
        Phone: (413)834-1841; Fax: (978)882-0243
        bobengl@gmail.com; http://edaystar.com

Questions about NAACC:
       Scott Jackson
       Department of Environmental Conservation
       Holdsworth Hall
       University of Massachusetts
       Amherst, MA 01003
       Fax: (413) 545-4358; Phone (413) 545-4743
       Email: sjackson@umext.umass.edu

Links

The latest versions of the NAACC Digital Stream Crossing Survey Data PDF forms (must log in).
https://streamcontinuity.org/cdb2/files.cfm

Please report bugs or feature requests to bobengl@gmail.com.
Table of Contents
Preface

Overview                                                                  1
What is the NAACC Digital Data Collection System?
Who should read this guide?
Recommended Technology for Field Data Collection
Glossary of Terms

System Requirements and Setup                                             2
Hardware and Software for Windows 7 and Windows 8
Setup Instructions for Windows 7 and Windows 8 Devices
Hardware and Software for iOS (Apple iPads, iPhones)
Setup Instructions for iOS Devices

Preparing for Digital Data Collection at Road-Stream Crossings            4

Instructions for Data Entry Using the NAACC Survey Data PDF Field Forms   6

Instructions for Bulk Uploading Completed Field Forms                     9

Closing Remarks                                                           9
Overview
This document provides guidance for using the North Atlantic Aquatic Connectivity Collaborative (NAACC) Digital Data
Collection System.

The North Atlantic Aquatic Connectivity Collaborative (NAACC) is a network of individuals from universities, conservation
organizations, and state and federal natural resource and transportation departments focused on improving aquatic con-
nectivity across a thirteen-state region, from Maine to Virginia. The NAACC has developed common protocols for as-
sessing road-stream crossings (culverts and bridges) and developed a regional database for this field data. The infor-
mation collected will identify high priority bridges and culverts for upgrade and replacement. The NAACC will support
planning and decision-making by providing information about where restoration projects are likely to bring the greatest
improvements in aquatic connectivity.

What is the NAACC Digital Data Collection System?
The NAACC Digital Data Collection System (DDCS) consists of three parts:
(1) GPS navigation to road-stream crossings to be surveyed,
(2) collection of data with digital PDF survey data forms using mobile devices, and
(3) bulk data upload to the online NAACC database (https://streamcontinuity.org/).

Who should read this guide?
We designed this guide for anyone who will be involved in collecting and entering data into the NAACC database using
the DDCS. Coordinators will find useful information and suggestions for planning field surveys, and observers will find
detailed information on how to navigate to crossings, complete the field forms and bulk upload collected data.
Information technology personnel should read this manual to learn how to set up devices for data collection in the field.
We recommend reading the entire guide for your platform before configuring your device, since you may not require all
of the functionality described, and thus may not need to download and install some of the “Required Software” for your
platform.

Recommended Technology for Field Data Collection
For a technological platform in the field, we recommend use of a Windows 7 or Windows 8 tablet with at least 64 GB of
storage capacity. While this is the only platform that supports all the features offered by the DDCS, iPads (or even
iPhones) with at least 64 GB of storage also function quite well. Unfortunately, at this time, we do not support the
Android operating system because of the lack of a full-featured PDF reader for Android. Software and setup
recommendations for the Windows and iOS platforms can be found below.

Glossary of Terms
 Term                             Definition
 Android                          An open source operating system for mobile computing devices (smart phones and
                                  tablet computers)
 Bluetooth                        A wireless system for transferring data between computing devices
 DDCS                             An acronym for the NAACC Digital Data Collection System
 Gigabyte (GB)                    1,000,000,000 (1 billion) bytes
 Global Positioning System (GPS) A space-based satellite navigation system that provides location information without
                                 a cell tower or Internet
 iOS                              The operating system used for iPads and iPhones
 Kilobyte                         1,000 bytes
 Megabyte (MB)              1,000,000 (1 million) bytes
 Random Access Memory (RAM) Temporary storage for programs while they are running
 Storage                          Permanent data storage (can be solid state or magnetic)
 Universal Serial Bus (USB)       A wired system for transferring data between devices

                                                                                                                        1
System Requirements and Setup
Figure 1: Some devices that can be used for digital data collection in the field. Dell Venue 11
(Windows 8 OS); iPhone 5 (iOS); Garmin GPS 72 external GPS receiver.
Hardware and Software for Windows 7 and Windows 8
• This is the fully supported and recommended platform.
• All required software is free.
• All functions work without cell tower or internet connections.
• Logon is required for https://streamcontinuity.org/cdb2/files.cfm
Recommended Hardware: A tablet having at least 64 GB of storage space with as much RAM and as fast a processor
as possible. A stylus is highly recommended.
Operating System: Windows 7 or Windows 8 (64 bit if possible)
Required Software: • QGIS (http://www.qgis.org/en/site/forusers/download.html)
• GpsGate Client for Windows (http://gpsgate.com/download)
• Adobe Reader (http://get.adobe.com/reader/) or Adobe Acrobat
• MDScan (http://windows.microsoft.com/en-us/windows/search#q=MDScan&s=Store)
• Internet Information Server (see instructions below)
Available Functions: • GPS navigation to crossings using QGIS, USGS maps and shapefiles
• Using external serial port, USB or Bluetooth GPS devices (internal devices are
untested)
• Adding new coordinators and lead observers in the field
• Searching for towns (PA has over 900 townships!)
• Automatic import and naming of photos
• A single form that contains both crossing and culvert information
Required Files: • NAACC-WindowsFieldForm.pdf (https://streamcontinuity.org/cdb2/files.cfm)
• getPosition.html (https://streamcontinuity.org/cdb2/files.cfm)
2Setup Instructions for Windows 7 and Windows 8 Devices
1. Download the “Required Software” listed above and install the latest versions.
2. Go to Control Panel → Programs and Features and click on the “Turn Windows features on or off” link on the
left. Check the box next to Internet Information Services and click OK. Check the installation by typing
“localhost” into the address bar of your web browser. You should see the IIS7 welcome screen. If you don't see
the IIS7 welcome screen, get in touch with your IT support person or Bob English (bobengl@gmail.com).
3. Download the file getPosition.html and put it in C:\inetpub\wwwroot (substitute your root drive letter as
needed). You will use this file to display your location coordinates in a web browser for easy copying and pasting
into the PDF field form.
4. You may use nearly any external GPS receiver, including older serial port, or newer USB or Bluetooth receivers.
You can even use your smartphone to broadcast GPS information over Bluetooth to your tablet. Please note
that using older serial port devices may require a serial port to USB converter. At this time, internal GPS
receivers have not been tested on Windows.
5. We recommend using GPSGate Client to connect your GPS device to other software on your tablet because it
makes connecting older devices easier, and it will export your location coordinates to “getPosition.html,” which
can be conveniently opened from a button on the PDF field form. Once you have connected your GPS receiver to
your tablet, open GpsGate and click the “Setup Wizard” button to discover your receiver. After you have
connected your GPS receiver, please make sure to click on the “Output” tab and select “GPS in browser” from
the drop down menu and then click the “Add” button. If you plan to use QGIS for locating crossings, you should
also add “Virtual COM Port” from the drop down. Finally, go to the “Advanced” tab and check the “Start
GpsGate after boot” check box so that GpsGate will connect automatically in the future. If you have any trouble,
see the users’ guide (http://gpsgate.com/support/client_users_guide).
6. Now download NAACC-WindowsFieldForm.pdf and open it in Adobe Reader or Adobe Acrobat. If you use the
free Adobe Acrobat, you will need to use the MDScan application (described later) to take your photos and save
them in PDF format. If you use Adobe Acrobat, you may attach standard “.jpg” photos to your field form.
Hardware and Software for iOS (Apple iPads, iPhones)
• All required software is free and available from the App Store.
• Internal GPS receivers will work on iOS systems, but they may not be as accurate as external receivers when a
cell tower connection is not available.
Recommended Hardware: An iPad with cellular antenna (iPhones will also work but may be harder to use) with 64
GB of storage. A stylus is highly recommended.
Operating System: iOS
Required Software: • PDF Expert 5
• Where Am I At?
• (navigation software not tested yet)
Available Functions: • GPS navigation to crossings (check out Avenza PDF Maps, iGIS)
• Using the internal GPS sensor (external devices are untested)
• Adding new Coordinators and Lead Observers in the field
• Searching for towns (PA has over 900 towns!)
• Automatic import and naming of photos
• A single form that contains both crossing and culvert information
Required Files: NAACC-iOSFieldForm.pdf (https://streamcontinuity.org/files.html/)
3Setup Instructions for iOS Devices (Apple iPads and iPhones)
1. Download and install the latest versions of “PDF Expert” and “Where Am I At.”
2. Download the NAACC-iOSFieldForm.pdf. If you download to a computer you may then email a copy to yourself
to open on your iOS device.
3. Proceed to “Instructions for data entry using the PDF Forms” below.
Preparing for Digital Data Collection at Road-Stream Crossings
This section describes some options for prioritizing crossings to survey, navigating to crossings and organizing survey data
forms before surveys take place.
For each state in the NAACC region, United States Geological Survey (USGS) HUC-12 subwatersheds have been prioritized
for field surveys by the NAACC project team. These subwatersheds were prioritized based on several objectives including
brook trout, diadromous fish, and the potential vulnerability of culverts to failure using input from the NAACC
workgroup. These prioritized results can be a useful starting place for identifying areas to survey. In addition, there may
be locally important watersheds or habitats in your state or region that may help guide location of surveys. To see the
NAACC priority subwatersheds in your area, visit the web map at http://arcg.is/1F2rPJu. This web map also depicts road-
stream crossings symbolized by their estimated restoration potential which can help focus survey efforts within a
subwatershed, using data from UMass's Critical Linkages program. Finally, for those interested in prioritizing
subwatersheds based on their own objectives (e.g. only brook trout), an ArcGIS tool is available to allow users to run
their own customized prioritization using a subset of metrics. This tool is available for download and use in ArcGIS at this
link.
Windows systems have the advantage of using the open-source, free GIS software called “QGIS” for planning and
navigating to crossings. One possible work flow is to go to the NAACC search page
(https://streamcontinuity.org/cdb2/search_crossings.cfm) and search for the locations that you plan to survey. You may
currently search by state, town or by HUC8 watershed. Each state, town or HUC8 watershed must be exported
separately. The states of NY, PA, VA and WV have too many unassessed crossings to be exported at once, so you are
limited to searching by town or watershed for those states. Once you have your search results, you may export a
shapefile of those results. You may then open a shapefile or shapefiles in QGIS, and clip or merge layers to get the area
or areas you wish to survey. Please note that all shapefiles are in the WGS 84, EPSG: 4326 projection. In addition, you
may look at the attribute table for the crossings to survey to get information such as the crossing code, town and
watershed. Coordinators may also consider preparing the digital survey data forms ahead of time for their field crews.
For example, using the QGIS attribute table for the crossings to be surveyed, a coordinator could save a survey data form
for each crossing to be surveyed with a file name containing the crossing code. In that way, the observers can check GPS
coordinates against the field form file name and simply open the correct field form and begin entering data.
QGIS can also help for navigating to crossings because the software has the ability to import location information from a
GPS device in real time, which does not require either an Internet or cell tower connection. In QGIS 2.6.1, go to View →
Panels and check “GPS Information.” This action will make a tab available in the “layers” panel named “GPS
Information.” With your GPS device on, connected to your tablet using GpsGate, and the GPS Information panel selected,
you can click the button with the wrench icon and then click the “Connect” button to connect to your GPS device. A
resizable circle with crosshairs should appear on your map, assuming you are at a location that appears on the map you
are viewing. This function has been fully tested on the Windows platform using GpsGate as the “middleman” between
your external GPS device and QGIS. The final step is to download a “base” layer map. Using the base layer map, with the
shapefile of crossings to survey on top, you will be able to watch your position on the map as you travel to each crossing.
4First, check your state GIS website to see if USGS quadrangle maps are available. For example, in Massachusetts,
seamless USGS maps are available for the entire state. If USGS maps are not available for your state, you may download
them from (http://ngmdb.usgs.gov/maps/topoview/viewer), or use QGIS to download OpenStreetMap data (Vector-
>OpenStreetMap->Download Data; also see http://www.openstreetmap.org).
There are many other options. Those without GIS skills may prefer to use the NAACC website search page
(https://streamcontinuity.org/cdb2/search_crossings.cfm) to return search results for crossings to be surveyed and then
use the “Map results” button to view and print a map. You may print the map by using the “Print Screen” key on your
keyboard to copy the screen. Then an image viewer may be used to paste, clip and print the map. Field crews can then
use the map and/or a smartphone or automobile GPS device to navigate to crossings. Finally, for those who prefer, data
may be collected in the field using paper forms; however, the paper method requires entering the both in the field and
into web forms on the NAACC website. The paper method thus increases the possibility of transcription errors.
Tips:
• OpenStreetMap data is available for entire states in shapefile format (see http://download.geofabrik.de/north-
america.html).
• QGIS 'Style' files for coloring and formating OSM shapefile data are available at
https://github.com/charleyglynn/OSM-Shapefile-QGIS-stylesheets
• For USGS Quads downloaded from the “topoView” online map, make sure you have “on the fly transformation”
selected in the project properties, because different years may be in different projections.
• When downloading from USGS Quads from “topoview” use the thumbnail view to choose a map year with
coloring so that you get road and town names superimposed.
• If necessary, you may download multiple maps to get the area coverage you need, but you probably want the
1:24,000 scale.
• If you download multiple maps, you will need to select the correct “Coordinate Reference System” (CRS) from
the “Layer->Properties->General dialog” in order to tile maps together. The 'custom' layer will be automatically
entered for you, but you must explicitly select and save it. You may open the layer xml file in a text editor to find
the correct projection and extents to match the custom CRS if necessary.
• To create seamless maps, you may use QGIS to clip borders from the USGS maps. To accomplish this task, you
may download the “KMZ” file format from topoView, extract it and use QGIS to create a clipping layer (Vector -
>Research Tools->Polygon From Layer Extent) from the KML file. Once you have created the clipping layer you
may use it to clip each raster layer to create a seamless map (Raster->Extraction->Clipper). This may seem like a
lot of work, but you will only need to do it once for your coverage area.
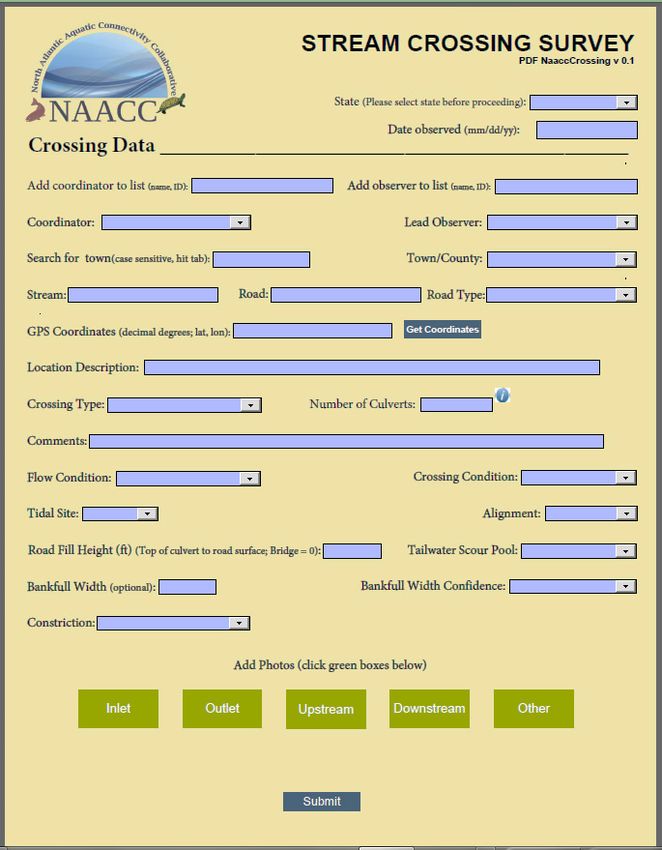
5Instructions for Data Entry Using the NAACC Survey Data PDF Form
Figure 2 – The NAACC-WindowsFieldForm.pdf Crossing Data section
This section describes how to use some of the special features of the digital PDF field forms. For instructions on how to
measure and collect data in the field, please refer to the instruction guide and training documents on
streamcontinuity.org.
Some Tips on Entering Data:
• Do not use the File Revert option in Adobe Reader, the “Clear Forms” option in Adobe Acrobat or the “Clear
Forms” option in PDF Expert. We have found the clearing to be unreliable, and it leaves variables improperly set
in our programming code. Please save blank forms and open a new blank form rather than trying to reset a form
containing data you have already entered.
• Although editing the survey data form is not possible in Adobe Reader or Adobe Acrobat, (other than filling in
form fields), it is possible using PDF Expert. Please do not use the editing features of PDF Expert to add
annotations or text (other than that which belongs in the form fields) to a field form. Editing a data form will
most likely make it impossible to bulk upload your data.
• You may fill a form out partially and reopen it later to complete entering data. Please note that if you do save
the form, and then want to change the town you have saved previously, you must reset the “State” field in order
to reset the “Search for town” and “Town/County” inputs.
6• Pressing the”'Enter” key does not move to the next field. On Windows tablets, use the tab key (or shift+tab for
the previous field). iPads and iPhones should have a forward and back arrow that makes moving to the previous
or next field very easy.
• On at least some Windows tablets, you can display the tab key all the time by choosing the “split” keyboard.
• Entering a letter in a drop-down menu will select an option that starts with that letter in Adobe Reader or Adobe
Acrobat.
• Pressing the down arrow will scroll through options in a drop-down menu in Adobe Reader or Adobe Acrobat.
• On at least some Windows tablets, you can display a full keyboard (having up and down arrows) by typing
“osk.exe” into search on the Start page.
• Photos will appear with your crossing record in the same orientation as they appear on your field form, so please
make sure they are not upside down.
State: To complete the digital field form, you must start by choosing your “State” at the top of the form. Choosing a state
populates the “Coordinator,” “Lead Observer,” and “Town/County” fields with data specific to the chosen state.
Date Observed: You must enter the “Date observed” in the format “mm/dd/yy.” Please note that it is not necessary to
enter 01 for January or 07 for the 7th day of the month. A single digit “1” or “7” will do.
Add coordinator/ Add observer: The “Add coordinator to list (name, ID)” and “Add observer to list (name, ID)” fields are
necessary, because we expect that new coordinators and lead observers will be completing their training on a regular
basis and thus will need to be added to the forms. To use these fields, the coordinator or observer must have been
previously entered into the NAACC database. You must enter the coordinator's or observer's name and ID separated by a
comma and then tab out of the field. After you do this, the coordinator or observer will be automatically selected in the
corresponding field and added to the list in alphabetical order. The IDs may be retrieved from the NAACC website by
clicking on the “Edit Observers” or “Edit Coordinators” link and hovering your mouse over the person's name. The ID will
appear in a pop up at the bottom of the screen.
Search for town: This input allows for finding town names easily in long drop down lists. For example, PA has over 900
townships, so scrolling through such a long list could be inconvenient on some devices. The search is case sensitive, so
searching with a capital “H” will cause only the towns that start with H or have a capital H in the name to appear in the
“Town/County” drop down menu. Using this search feature is optional, and for states with only a few towns or counties,
it may be easier to simply select the name from the “Town/County” drop down menu.
GPS Coordinates: GPS coordinates must be entered as WGS 84 decimal coordinates. Unfortunately, there is no
reasonable way to automatically import GPS coordinates into the form. However, there are easy ways to copy and paste
those coordinates on any platform. On a properly configured Windows device, clicking the “Get Coordinates” button on
the Windows PDF, will open a web form in your web browser, and if your tablet is connected to a GPS device using
GpsGate, you may click another button on the web form to get your current location. You then simply copy the
coordinates and paste them into the PDF form. For iOS , we have recommended an app that provides GPS coordinates in
the “latitude comma longitude” format for easy pasting. On iOS, open the “Where Am I At” app, click “Share” and then
click the text/iMessage button to copy the coordinates and paste them into the PDF form in PDF Expert.
7Number of Culverts: You may enter an integer from 1 to 9 into this field. The Windows platform will automatically
create the number of culvert forms that you enter. On Windows, you may subsequently change the number if you have
made a mistake, and the form will adjust the number of culvert forms and inform you with appropriate messages. On
the iOS platform, the form comes with 7 culvert templates installed. Entering a number into the “Number of Culverts”
field will automatically delete any extra culverts in the form. You will get a pop-up window that warns you that you will
lose any data you have entered in the structure forms that you delete, so it is a good idea to enter the number of culverts
before entering any structure data. Data entered into the crossing form will not be affected by deleting structure forms.
Please note that you may not add culverts on the iOS platform if you accidentally delete too many (i.e., if you enter a
number that is too low) Rather, you must begin again with a new form.
Add Photos: Automatic adding and naming of photos is supported on the iOS and Windows platforms. On the iOS
platform, you just click on the relevant photo button (e.g., Inlet, Outlet.), and a pop up will provide the option to take a
picture with your camera or add an existing photo from your files. On the Windows platform, you must take your photos
before clicking a button. For example, clicking the Inlet button will open a file dialog that will allow you to browse to the
Inlet photo and add it to the PDF, but it will not allow you to take a picture with the camera and add it. On Windows, the
way to take photos depends on whether you are using Adobe Reader or Adobe Acrobat. If you are using Adobe Reader,
you must use the MDScan application to take photos and save them in PDF format because Adobe Reader restricts
photos to that format. When using Adobe Acrobat, you may take photos with the built-in camera application and add
the standard .jpg images to your PDF form. If you need to use MDScan, please refer to the help instructions that come
with that app. In all cases, your photos will be automatically named during the bulk uploading process described below.
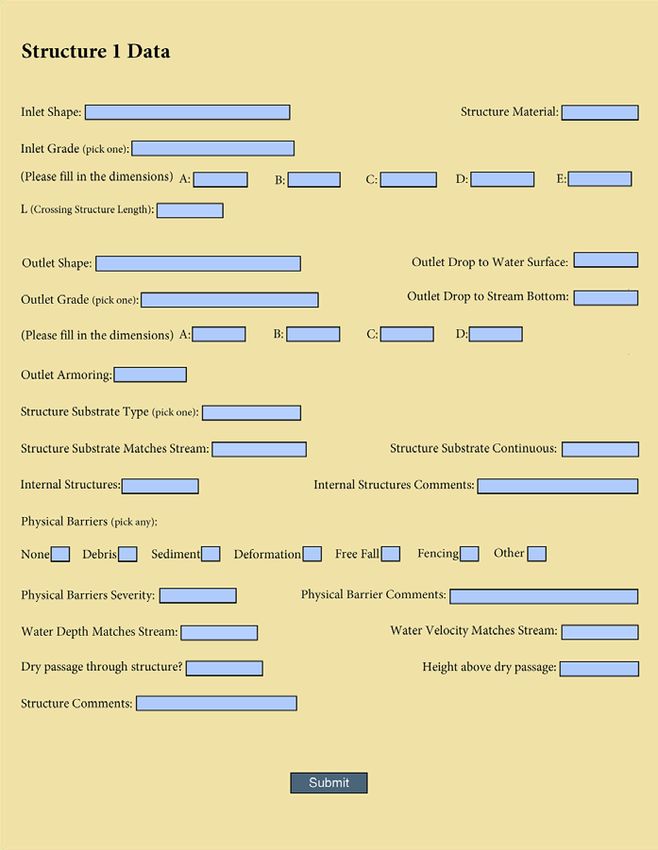
Figure 3 – The NAACC-WindowsFieldForm Structure Data section
8Completing structure forms should be fairly straightforward. Images of the structure types (not shown here) are part of
the form and indicate how to measure and enter dimensions. When you click the “Submit” button, the form checks all
fields for correct data entry, e.g., reasonable dimensions, the correct number of dimensions, and requiring (or not)
particular fields or structure types depending on the choice of Crossing Type in the Crossing Data section. All these data
entry requirements are detailed in the NAACC Stream Crossing Survey Data Form Instruction Guide.
Finally, you will notice that the “Submit” button always appears at the bottom of the Survey Data form if there are no
culverts in the crossing, or on the last Structure Data page. When you click “Submit,” if the data passes inspection you
will either get a file save dialog or a message indicating that the data is OK, depending on which platform you are using.
Instructions for Bulk Upload of Completed Field Forms
For the Windows and iOS forms, a new system, under development, will require you only to zip all your PDFs into one
archive for upload. This system will automatically read the crossing, structure, and image data from each PDF and add it
to the database. However, for each crossing in the zip archive, a Google map will pop up, and you will need to verify the
crossing location. Once you have chosen the exact location of the crossing, we will automatically name the photographs
using the crossing code (similar to xy1234567812345678-Inlet.jpg etc.), and store them in the database.
Closing Remarks
The process of digitally collecting field data for road-stream crossings with location information is evolving but is still in
its early stages. Although GPS receivers have been around for some time, powerful smartphones and tablet computers
are relatively new. We considered several options for our DDCS, including Collector for ArcGIS, Terrago, and custom apps
for iOS and Android. However, neither Collector for ArcGIS or Terrago are programmable enough to allow for the
complex data validation and other features that we need, and building custom apps for iOS and Android is cost
prohibitive and would be expensive to maintain over time. In the end, we selected Adobe PDF forms because they are
free and highly programmable, and have low programming costs. We invite your feedback on the NAACC DDCS.
We hope you find that these forms are easy to use and meet your needs for digital collection of road-stream crossing
data.
9You can also read