PULSAR ECA NEMA Type 4X - ELECTRONIC CONTROL ASSEMBLY - Installation, Operation & Maintenance Instruction
←
→
Page content transcription
If your browser does not render page correctly, please read the page content below
Installation, Operation &
Maintenance Instruction

                                          ®
                                 PULSAR ECA
                                 NEMA Type 4X
                     ELECTRONIC CONTROL ASSEMBLY

IOM-CTL-2001-Rev E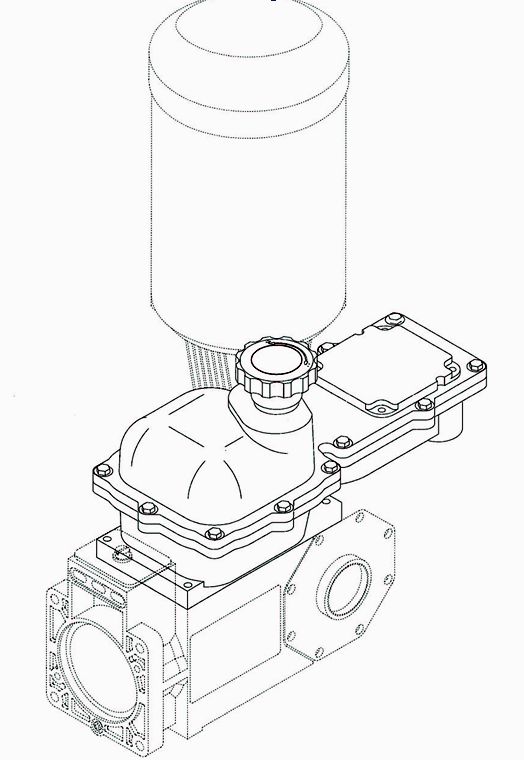
ECA FACTORY SERVICE POLICY
    Your ECA is a state of the art microprocessor-based stroke length control device for use with
    PULSAR® Diaphragm Metering Pumps. If you are experiencing a problem with your ECA, consult the
    trouble-shooting guide. If the problem is not covered or cannot be solved, please contact your local
    PULSA Series Sales Organization or our Technical Service Department at (585) 292-8000 for further
    assistance.
    Trained individuals are available to diagnose your problem and arrange a solution. Solutions may
    include purchasing a replacement unit or returning the ECA to the factory for inspection and repair.
    All returns require a Return Material Authorization (R.M.A.) number to be issued by Pulsafeeder. Parts
    purchased to correct a warranty issue may be credited after examination of the original parts by
    Pulsafeeder personnel. Parts returned for warranty considerations which are good will be sent back
    freight collect.
    Any field modifications will void the warranty. Out-of-warranty repairs will be subject to Pulsafeeder's
    standard bench fees and testing costs associated with replacement components.

FCC Warning
    This equipment generates and uses radio frequency energy. If not installed and used properly, in strict
    accordance with the manufacturer’s instructions, it may cause interference to radio communications.
    Operation of this equipment in a residential area is likely to cause interference in which case the user,
    at his own expense, will be required to take whatever measures necessary to correct the interference.

Copyright
    Copyright © 2006 - 2014 Pulsafeeder, Inc. All rights reserved.
    Information in this document is subject to change without notice. No part of this publication may be
    reproduced, stored in a retrieval system or transmitted in any form or any means electronic or
    mechanical, including photocopying and recording for any purpose other than the purchaser’s personal
    use without the written permission of Pulsafeeder.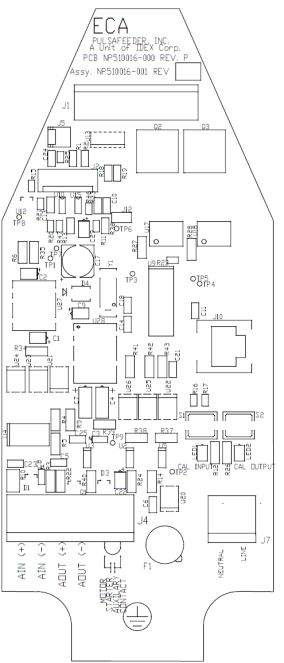
Table of Contents
1. INTRODUCTION ................................................................................................................................ 1
2. FOREWORD ...................................................................................................................................... 1
  2.1     Description ............................................................................................................................... 1
  2.2     ECA Standard Features .......................................................................................................... 1
3. SAFETY CONSIDERATIONS ............................................................................................................ 2
  3.1     General Safety ......................................................................................................................... 2
  3.2     Electrical Safety ....................................................................................................................... 3
  3.3     Fire Safety ................................................................................................................................ 3
  3.4     Hydraulic Safety ...................................................................................................................... 3
  3.5     Liability Exclusion ................................................................................................................... 3
4. TRANSPORT AND STORAGE ................................................................................................................... 5
  4.1     Consignment receipt and unpackaging ................................................................................ 5
  4.2     Handling ................................................................................................................................... 5
  4.3     Lifting ........................................................................................................................................ 5
  4.4     Recycling and end of product life .......................................................................................... 5
5. STORAGE INSTRUCTIONS ...................................................................................................................... 6
  5.1     Short Term (0 - 12 months) ..................................................................................................... 6
  5.2     Long Term (12 months or more) ............................................................................................ 7
6. INSTALLATION AND WIRING ................................................................................................................... 8
  6.1     Location .................................................................................................................................... 8
  6.2     Installation Notes ..................................................................................................................... 8
  6.3     Installation guidelines for EMC compliance ......................................................................... 8
  6.4     Housing Access ....................................................................................................................... 9
  6.5     Electrical Wiring ...................................................................................................................... 11
  6.6     Power Wiring Information ....................................................................................................... 11
  6.7     Labeling – Nameplate.............................................................................................................. 15
  6.8     Control Input and Output Connections ................................................................................. 15
     6.8.1      Motor Status Input ........................................................................................................... 15
     6.8.2      Analog Input (current loop) ............................................................................................ 15
     6.8.3      Analog Output (current loop) ......................................................................................... 16
7. START UP AND OPERATION ................................................................................................................... 17
  7.1     Overview ................................................................................................................................... 17
8. INPUT/OUTPUT SETUP ........................................................................................................................... 17
  8.1     System User Calibration ......................................................................................................... 17
     8.1.1      Analog Input Signal Calibration ..................................................................................... 17
     8.1.2      Analog Input Signal Loss................................................................................................ 18
     8.1.3      Analog Output Signal Calibration .................................................................................. 18
9. MECHANICAL ZERO CALIBRATION ......................................................................................................... 19
  9.1     Factory Re-initialization .......................................................................................................... 20
10. DIAGNOSTICS ................................................................................................................................... 20
  10.1 Trouble Code Reporting ......................................................................................................... 20
  10.2 Trouble Codes ......................................................................................................................... 22
  10.3 Self-Test Mode ......................................................................................................................... 23
  10.4 Error Recovery ......................................................................................................................... 24
11. SPECIFICATIONS ................................................................................................................................... 25
12. POWER-UP OPTIONS SUMMARY ............................................................................................................ 26
13. FIELD WIRING SUMMARY....................................................................................................................... 27
14. TROUBLESHOOTING GUIDE ................................................................................................................... 1
15. M AINTENANCE & SPARE PARTS ............................................................................................................ 2
  15.1 Operating Precautions ............................................................................................................ 2
  15.2 Cleaning and Decontamination .............................................................................................. 2
  15.3 User Replaceable Parts for the ECA...................................................................................... 3

                                                                                          ii
Conventions
For the remainder of this bulletin, the following conventions are in effect.
A WARNING DEFINES A CONDITION THAT COULD CAUSE DAMAGE TO BOTH THE
EQUIPMENT AND THE PERSONNEL OPERATING IT. THIS MANUAL MUST BE CONSULTED
IN ALL CASES WHERE THE WARNING SYMBOL IS MARKED IN ORDER TO FIND OUT THE
NATURE OF THE POTENTIAL HAZARDS AND ANY ACTIONS WHICH HAVE TO BE TAKEN
TO AVOID THEM.
CAUTION, POSSIBILITY OF ELECTRIC SHOCK
Notes are general information meant to make operating the equipment
easier.
Tips have been included within this bulletin to help the operator run the
equipment in the most efficient manner possible. These “Tips” are drawn
from the knowledge and experience of our staff engineers, and input from
the field.
Revision History:
Rev E (07-24-2014)
−
rd
Updated to reflect requirements of UL 61010-1 3 Edition
iii1. INTRODUCTION
The ECA is a microprocessor based stroke length control device for use with the PULSAR
diaphragm-metering pump. It has been designed to operate in a variety of industrial
environments. This document describes the ECA controller only. The operation and maintenance
of the PULSAR metering pump is covered in the pump IOM. Please refer to this IOM for important
safety and operational instructions for your PULSAR pump.
2. FOREWORD
The pumps to which these “instructions” refer to are designed for use in industrial areas and
therefore cannot be treated as retail products. The present documentation gives instructions to be
used by qualified personnel only. It must be used in compliance with the regulations, laws
and technical standards in force and cannot, under any circumstances, take the place of plant
standard or additional regulations, including any which are not legally enforceable, which have
been issued with the scope of ensuring safety.
Equipment with special manufacturing or constructive variances may differ in details with respect
to this description.
In case of any difficulty, please contact PULSAFEEDER, INC. Technical Service.
The ECA is rated for NEMA 4 locations as identified on the controller nameplate.
2.1 Description
The ECA is an electromechanical servo controller dedicated to the PULSAR diaphragm
metering pump series. The unit is physically attached and integrated into the pump's design.
The controller allows for precise adjustment of output flow of a process media by means of
stroke length positioning.
The ECA is designed for the international industrial market. The analog control signals offer
flexible remote control. They are fully isolated - from each other as well as earth ground - for
improved protection and reliability.
The ECA is designed to simplify and automate the calibration of the analog signals. Analog
signal calibration is accomplished by simple push button entry. Calibration functions must be
completed while the internal circuitry of the unit is accessible, and therefore at a time when the
surrounding environment is considered safe for electronic work.
2.2 ECA Standard Features
• Electronic Stroke Length Control
• NEMA Type 4x enclosure
• 4-20mA input and output
• EEPROM storage of calibration data
• Diagnostics and Self-Test mode
1The ECA is available for 115 or 230 VAC
operation, at either 50 or 60 Hz. Each ECA
controller must be operated on the appropriate
AC supply as per the nameplate ratings.
3. SAFETY CONSIDERATIONS
The ECA is a sophisticated microprocessor based controller for use only with PULSAR diaphragm
metering pumps. It yields tremendous control capacity -- electrical, mechanical and (in conjunction
with the PULSAR pump) hydraulic in nature. In consideration of SAFETY, the user should be
mindful of this relative to his/her safety, that of co-workers and of the process environment. Please
consider the following prior to the installation and operation of an ECA controlled PULSAR metering
pump:
• Read and understand all related instructions and documentation before attempting to install
or maintain this equipment
• Observe all special instructions, notes, and cautions.
• Act with care and exercise good common sense and judgment during all installation,
adjustment, and maintenance procedures.
• Ensure that all safety rules, work procedures, and standards that are applicable to your
company and facility are followed during the installation, maintenance, and operation of this
equipment.
3.1 General Safety
The ECA was designed as a stroke length position actuator for operation solely with the
PULSAR metering pump. Use for any other application is considered un-safe and voids all
certification markings and warranties.
23.2 Electrical Safety
The ECA can be considered an industrial process controller. Improper application and use can
be hazardous. You are solely responsible for its use.
The ECA’s electrical installation must conform to all local, state and national relevant electrical
codes. Installation and electrical maintenance must be performed by a qualified electrician.
Before installing or servicing this device, all power must be disconnected from the source at the
main distribution panel.
The ECA emits electro-magnetic energy and may generate radio frequency interference. Its use
is restricted to industrial applications. You are responsible for shielding this energy/interference.
Certain wiring procedures may require that the user wear a wrist strap to dissipate static
charges.
.
INSTALLATION AND ELECTRICAL MAINTENANCE MUST BE PERFORMED BY A QUALIFIED ELECTRICIAN.
Before installing or servicing this device, all power must be disconnected from the source at
the main distribution panel. Certain calibration functions must be completed while the electronic
section of the unit is exposed and power is applied to the unit, be certain to ensure that proper
procedures are followed and that fingers, tools, and wiring do not contact exposed circuitry and
components.
The ECA emits electromagnetic energy and generates radio frequency interference. Its use is
restricted to industrial applications. The user bears all responsibility for shielding this
energy/interference.
3.3 Fire Safety
In case of electrical fire, use a Class C fire extinguisher. Never use water to extinguish a
Class C fire.
Class C fires involve electrical equipment, such as appliances, wiring, circuit breakers and
outlets. Never use water to extinguish class C fires - the risk of electrical shock is far too great!
Class C extinguishers do not have a numerical rating. The C classification means the
extinguishing agent is non-conductive. Geometric symbol (blue circle)
3.4 Hydraulic Safety
Thoroughly review and adhere to the contents of the PULSAR Installation, Operation,
Maintenance Instruction manual (current version) for hydraulic installation of your PULSAR
metering pump.
3.5 Liability Exclusion
Pulsafeeder, Inc. is unable to monitor the observance of the instructions given in this manual,
nor verify the actual working conditions and installation of the equipment, the correct operation
and maintenance of the equipment and accessories. An incorrect installation, or misuse of the
equipment, may cause serious damage and may pose a danger to persons or property. Any
anomalies must be reported to the maintenance supervisor. The user is not authorized to
tamper with the machine for any reason.
3Attempts to disassemble, modify or tamper in general by unauthorized personnel
will void the guarantee and will release Pulsafeeder, Inc. from any liability for
damage caused to persons or property resulting from such actions.
Pulsafeeder, Inc. is considered released from any liability in the following cases:
- improper installation;
- improper use of the equipment by non-professional or inadequately trained
operators;
- use not in compliance with regulations in the Country of use;
- lack of maintenance or improperly performed;
- use of non-original spare parts or incorrect parts for the model in
question;
- total or partial failure to observe the instructions;
- exceptional environmental events.
DO NOT PERFORM ANY WORK ON THE PUMP, MOTOR OR ECA CONTROL UNIT
WITH ELECTRICAL POWER CONNECTED TO THE ECA CONTROL UNIT. DO NOT
OPERATE ECA UNIT WITH THE COVER REMOVED. DANGER OF ELECTRONIC
SHOCK AND MECHANICAL PINCH HAZARD!
INSTALLATION AND REPAIRS SHOULD ONLY BE PERFORMED BY AUTHORIZED
PERSONNEL!
- FOLLOW ALL SAFETY/ LOCAL LOCK-OUT, TAG-OUT PROCEEDURES!
44. TRANSPORT AND STORAGE
4.1 Consignment receipt and unpackaging
Immediately after receipt of the equipment it must be checked against the delivery/shipping
documents for its completeness and that there has been no damage in transportation.
Check any crate, boxes or wrappings for any accessories or spare parts that may be packed
separately with the equipment or attached to side walls of the box or equipment.
Each product has a unique serial number. Check that this number corresponds with that
advised and always quotes this number in correspondence as well as when ordering spare
parts or further accessories.
Shortages or damage should be reported immediately to the carrier and your Pulsafeeder
Representative.
4.2 Handling
Boxes, crates, pallets or cartons may be unloaded using fork lift vehicles or slings dependent
on their size and construction.
4.3 Lifting
A crane must be used for all controller/pump sets in excess of 25 kg (55 lb). Fully trained
personnel must carry out lifting, in accordance with local regulations.
Slings, ropes and other lifting gear should be positioned where they cannot slip and where a
balanced lift is obtained.
4.4 Recycling and end of product life
At the end of the service life of the product or its parts, the relevant materials and parts should
be recycled or disposed of using an environmentally acceptable method and local
requirements. If the product contains substances that are harmful to the environment, these
should be removed and disposed of in accordance with current regulations. This also includes
the liquids and/or gases that may be used in the "seal system" or other utilities.
Make sure that hazardous substances are disposed of safely and that the correct personal
protective equipment is used. The safety specifications must be in accordance with the current
regulations at all times.
55. STORAGE INSTRUCTIONS
The ECA can be successfully stored for extended periods. The key to this success is control
of temperature and humidity.
5.1 Short Term (0 - 12 months)
The ECA should be stored in a temperature and humidity controlled environment. It is
preferable to keep the temperature constant in the range of -18 to 40° Celsius (0 to 104°
Fahrenheit). The relative humidity should be 0 to 90% non-condensing.
If the ECA is installed on the pump, it should not be removed during this period - provided the
above conditions can be applied to the pump as well.
6If the ECA is removed from the pump eccentric box, it should be stored in the same pump
mounted orientation. After removing the ECA from the eccentric box, seal the opening with
a dust and moisture proof material. If the ECA was shipped in its own carton, it should be
stored in that carton.
5.2 Long Term (12 months or more)
Storage of the ECA for periods of longer than twelve months is not recommended. If extended
storage is unavoidable, the ECA should be stored in accordance with those conditions
stipulated for Short Term Storage. In addition, a porous bag of 85g (3 oz) silica gel or similar
desiccant should be placed within the enclosure. The cover should be re-installed to seal the
desiccant within the enclosure. The two conduit connections must be tightly capped. Inspect
the unit carefully for any signs of damage and remove the desiccant before placing it into
operation.
Special note for long-term storage:
If AC input power has not been applied to the ECA for a period greater than 12 months, the
controller must be prepared for operation. The ECA should have AC power applied at the
input for a period of 8 hours before placing pump into normal operation. Refer to Installation
and Wiring section for AC power connection instructions.
76. INSTALLATION AND WIRING
6.1 Location
The site selected for the installation of your ECA is largely dependent on that of the
PULSAR metering pump. Please review the PULSAR Installation Operation
Review the Safety section prior to installing the ECA. It contains important information
required to properly install and operate the ECA in industrial environments.
Maintenance Instruction Manual (current version) provided with your PULSAR
metering pump. It details system related issues that are important to proper operation
of the PULSAR metering pump. Be mindful of the following ECA related issues when
selecting a site. Avoid locations where the ECA would be subjected to extreme cold or
heat. Note the warning statement. The installation of this device must comply with
national, state and local codes.
AVOID LOCATIONS WHERE THE ECA WOULD BE SUBJECTED TO EXTREME COLD OR HEAT [LESS THAN
-18° CELSIUS (0° FAHRENHEIT) OR GREATER THAN 40° CELSIUS (104° FAHRENHEIT)] OR DIRECT
SUNLIGHT. FAILURE TO OBSERVE THIS WARNING COULD DAMAGE THE ECA AND VOID ITS WARRANTY.
6.2 Installation Notes
• The ECA is a microprocessor-based controller that uses static sensitive CMOS
components. Do not make any electrical connections (high or low voltage) without
adequately grounding the ECA and the worker to eliminate any electrostatic charge
between the two. A conductive wrist strap worn by the worker and attached to the ECA
enclosure is adequate to satisfy this requirement.
• Conduit connections can carry fluids and vapors into the ECA causing damage and
void the warranty. Care should be taken when installing conduit to protect against
fluid/vapor entry. In accordance with any applicable codes provide sealed entries and
conduit drains near the point of entry as required.
• All applicable codes and regulations should be adhered to in the installation and wiring
of the ECA.
The safety of any system incorporating the ECA is the responsibility of the assembler
of the system.
6.3 Installation guidelines for EMC compliance
• The cover must be installed properly.
• Shielded cables used for analog inputs and outputs
• Proper Earth grounding
• Insure Power mains are properly filtered for isolation from line transients, lightning
strikes, or other electrical noise sources.
Failure to observe the guidelines above may lead to erratic and possibly unsafe operating
conditions.
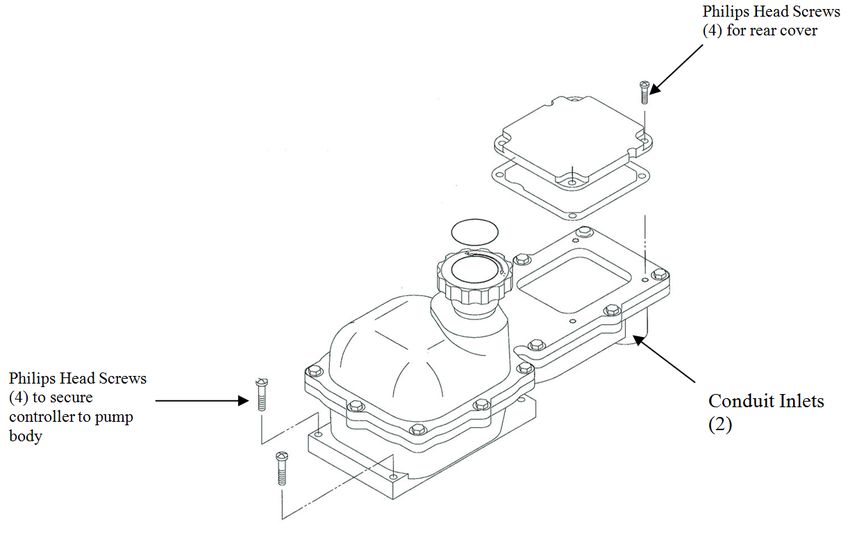
86.4 Housing Access
All wiring and programming of the ECA must be accomplished through the removal of the
housing cover. Use this procedure for removal and replacement:
Cover Removal
• Disconnect power at the source (follow your local Lock-Out-Tag-Out procedures).
• Disconnect power at the source.
• Loosen and remove the 4 Phillips head screws which secure the rear cover.
• Grasp the cover and lift straight up.
Figure 1
Cover Re-installation
91. Disconnect power at the source (follow your local Lock-out-Tag-out procedures).
2. Verify that the mating surface of the lower half of the ECA is clean.
3. Inspect the mating surface for any indication of damage or dirt.
4. Position the cover and set in place.
5. Insert and tighten the 4 phillips head screws.
6. Return the ECA to the desired operating condition.
7. Torque the 13 Socket Head Cap Screws to 100in-lb (11.3 N-m). Use a crisscross pattern
to tighten the bolts to ensure a proper seal around the entire perimeter.
Figure 2
8. Check the cover lies flat with no air gaps. Re-torque the cover bolts if needed. DO NOT
exceed a maximum of 125in-lb (14.1N-m) torque.
9. When wiring is completed and cover is properly replaced, the ECA is now ready for
operation. Remove Lock-out-Tag-out protection and restore power. See 4.4 for Electrical
Wiring.
106.5 Electrical Wiring
WHILE THE ECA WIRING REQUIREMENTS ARE VERY SIMPLE, ALWAYS KEEP IN MIND THAT ACCESS
TO THESE CONNECTORS REQUIRES THE REMOVAL OF THE COVER, AND AS SUCH THIS PROCEDURE
SHOULD ONLY BE PERFORMED BY A TRAINED PROFESSIONAL.
Wait a minimum of 3 minutes after disconnecting power before servicing the ECA or
pump motor. Capacitors retain a charge even after power is removed from the controller.
It is highly recommended that you take a step-by-step approach to wiring and confirming proper
ECA operation:
1. Make the Line voltage connections. These will allow you to operate the ECA and
attached Pulsafeeder pump.
2. Decide which low voltage Inputs and Outputs (e.g., 4-20mA in) will be used and make
those connections
3. Power-up and test the ECA to confirm the connections and check for proper operation.
6.6 Power Wiring Information
THESE PROCEDURES REQUIRE REMOVAL OF THE ENCLOSURE COVER. THIS SHOULD BE DONE ONLY IF
THE AREA IS KNOWN TO BE SAFE FOR ELECTRONIC WORK.
• Verify the correct supply voltage (115VAC or 230VAC) with the nameplate affixed to
your ECA. Ensure that your supply voltage matches the ECA configuration.
• Wires should be routed within the enclosure in a manner that maintains separation
between line voltage and extra-low voltage conductors.
• Applicable national and local electrical codes take precedence over
recommendations in the table below.
• A circuit breaker or fuse must be provided as noted below.
11Recommended Minimum Wiring and Circuit Breaker
Power 115 VAC Operation 230 VAC Operation
Requirements Actual Circuit Wire Wire Safety Actual Circuit Wire Wire Safety
1 1
Draw Breaker Size Size Approvals Draw Breaker Size Size Approvals
14 2.5 UL, CUL, 14 2.5 UL, CUL,
ECA 200ma 10A 2 200ma 10A 2
AWG mm CE AWG mm CE
Note 1: UL File E217212, Applicable standards are CSA 22.2 14-23, Cenelec EN61326-1,
UL61010-1, and EN61010-1 3rd edition
Note the ECA input current ratings from the name plate and check the applicable electrical codes
for required wire type and size, grounding requirements, over-current protection, and incoming
power disconnect before wiring the controller. Connect the proper AC voltage supply to power the
ECA at connector J7. Neutral and Line connection points are indicated on the circuit board under
the connector. The Earth connection is made to the stud on the chassis via a ring terminal
(provided). See Figure 3 for details. Remove approximately 0.3 inches, (7-8mm) of insulation from
the end of each conductor. Loosen the terminal strip screw, and insert the stripped wire end fully
into the terminal. Tighten the screw to 5 in-lbs. (0.5 Nm) to secure the conductor. Make certain
that the terminal grips the wire, not the insulation. The operating voltage and frequency of the
ECA is factory configured -- an internal motor and capacitor are sized according to voltage and
frequency. If the power supplied to the unit does not match the factory configuration (shown on
the nameplate), it will malfunction/damage and void the warranty.
Note: Power wiring should have a rating of at least 300 volts AC (rms) and a temperature
rating of at least 105 Degrees C.
A circuit breaker or disconnect switch with fuses, must be provided in accordance with all
applicable local and national electrical codes and regulations. Size external fusing/breaker for
ratings for the wiring used for the unit.
Applicable national and local electrical codes take precedence over recommendations made here.
To ensure proper operation, the ECA should remain powered at all times. A dry
contact input provides the ECA with motor status (on vs. off). See Motor Status Input
Section
Input Power must be run in separate conduit. Do not combine Power and Control wires in
a common conduit!
Field Wiring conductors shall be copper conductors only!
12Figure 3 – Earth grounding
13Ref. Section
Motor Status
Input
Figure 4
146.7 Labeling – Nameplate
6.8 Control Input and Output Connections
6.8.1 Motor Status Input
The contactor or motor starter controlling the PULSAR motor should be equipped with a
normally open auxiliary contact, which closes to indicate the PULSAR motor is on. This
auxiliary contact, which must be an un-powered, dry contact only, is to be wired to inputs (J4-5
and J4-6) at the ECA, after removing the factory installed jumper wire. Remove approximately
0.3 inches, (7-8mm) of insulation from the end of each conductor. Loosen the terminal strip
screw, and insert the stripped wire end fully into the terminal. Tighten the screw to 5 in-lbs.
(0.5 Nm) to secure the conductor. Make certain that the terminal grips the wire, not the
insulation. It is critical that the ECA receive this input, as stroke length should only be adjusted
when the pump motor is running. An alternate contact that represents motor status (for
example a relay contact in a local control cabinet) can also be used for this function.
DAMAGE TO THE ECA MAY OCCUR IF THE STATUS INPUT WIRING RECOMMENDATIONS ARE NOT
FOLLOWED.
6.8.2 Analog Input (current loop)
The Analog Input is used for remote control of the pump flow. It accepts current inputs
anywhere in the range of 0 to 25mA (e.g., 4-20mA) provided the “span” (the difference
between the high and low value) is greater than 2mA. Use shielded cable (minimum 2-
conductor) for connection to the Analog Input. Recommended: use shielded cable, 22AWG, 3-
pair, and 6-conductor for connections (e.g. Belden 5545FE). Attach the positive lead to
terminal J4-1 and the negative lead to terminal J4-2 (see Figure 5). Position indicators are
printed on the circuit board below each terminal. Remove approximately 0.3 inches, (7-8mm)
of insulation from the end of each conductor. Loosen the terminal strip screw, and insert the
stripped wire end fully into the terminal. Tighten the screw to 5 in-lbs. (0.5 Nm) to secure the
conductor. Make certain that the terminal grips the wire, not the insulation. The ECA will
provide approximately 160 ohms of resistance to a current loop. It will also accept voltage
signals in the 0-4 volt DC range. The Analog Input is electrically isolated from all other inputs,
outputs and earth ground.
156.8.3 Analog Output (current loop)
The Analog Output sends a signal representing the actual stroke length position. It can
be adjusted to source current in the 0 to 25 mA range (4-20mA factory default). The
output can also be set up for reverse-acting or split-ranging operation. The Current
Output can be used to control slave devices (e.g. ECA’s, ELMA's, PULSAMATICs,
etc.) or to fulfill closed loop system requirements. Use shielded cable (minimum 2-
conductor) for connection to the analog output. Recommended: use shielded cable,
22AWG, 3-pair, and 6-conductor for connections (e.g. Belden 5545FE). Attach the
positive lead to terminal J4-3 and the negative lead to terminal J4-4 (see Figure 5).
Position indicators are printed on the circuit board below each terminal. Remove
approximately 0.3 inches, (7-8mm) of insulation from the end of each conductor.
Loosen the terminal strip screw, and insert the stripped wire end fully into the terminal.
Tighten the screw to 5 in-lbs. (0.5 Nm) to secure the conductor. Make certain that the
terminal grips the wire, not the insulation. The Analog Output will drive a maximum
load of approximately 700 ohms. The Analog Output is electrically isolated from all
other inputs, outputs, and earth ground.
Note: Analog Input and Analog Output wiring should have a rating of at least 300 volts AC
(rms) and a temperature rating of at least 75 Degrees C.
Note: If strip length guidelines in above sections are not followed, there is a risk of electric
shock as well as shorting of adjacent connections generating hazardous sparks.
Ref. Section Analog
Output
Ref. Section Analog
Input
Figure 5
167. START UP AND OPERATION
7.1 Overview
Once all electrical connections have been made, your ECA is ready for Start-up. The
following sections detail the procedures required to complete the ECA start up.
WARNING: The ECA NEMA 4X Stroke controller includes a manual stroke control
wheel. DO NOT OPERATE THIS MANUAL STROKE CONTROL WHEEL WHILE THE
POWER TO THE STROKE CONTROLLER IS OFF. This will cause the electronics to
error. The ECA will stop operation and will need to be reset to look for the motor zero
position!
- WARNING: DO NOT attempt to remove the cover of the ECA and set up the ECA
in a very wet or rainy environment. While care has been taken to insulate power
connections, DANGEROUS voltages are present and can cause electric shock, and
possible electrocution if safety procedures are not followed
WHEN POWER IS SUPPLIED TO THE UNIT, LINE VOLTAGE MAY BE PRESENT WITHIN THE ECA
ENCLOSURE EVEN WHEN THE MOTOR IS OFF.
DURING START-UP, IT MAY BE NECESSARY TO RUN THE PUMP MOTOR. THIS WILL CAUSE FLUID TO
DISCHARGE FROM THE PUMP. YOU ARE RESPONSIBLE FOR SAFELY DIVERTING FLOW FROM THE
PUMP DURING START-UP AND CALIBRATION.
THE ECA IS DESIGNED TO CONTROL THE PUMP STROKE LENGTH
WITHIN THE PUMPS RATED PRESSURE AND FLOW. OPERATION
BEYOND RATED SPECIFICATIONS, EVEN INTERMITTENTLY, MAY
DAMAGE EQUIPMENT AND VOID THE WARRANTY.
IF THIS EQUIPMENT IS USED IN ANY MANNER NOT SPECIFIED BY
PULSAFEEDER, PROTECTION PROVIDED BY THE EQUIPMENT MAY BE
IMPAIRED.
8. INPUT/OUT SETUP
- WARNING: DANGEROUS LINE VOLTAGES ARE
PRESENT ON THE CIRCUIT BOARD DURING THIS
PROCEDURE. USE CAUTION WHILE PRESSING BUTTONS.
Figure 6
8.1 System User Calibration
8.1.1 Analog Input Signal Calibration
The analog input signal should be user calibrated to each system. To perform a
calibration, the signal-generating device (e.g., PLC) must be powered up, wired to
the ECA and capable of altering its output from the minimum to the maximum
17signal. Note that the minimum span, or difference between low and high values, is
2.0 mA. The ECA will not actuate to change stroke length during this process.
THIS PROCEDURE REQUIRES REMOVAL OF THE ENCLOSURE COVER. THIS PROCEDURE SHOULD BE
PERFORMED ONLY IF THE AREA IS KNOWN TO BE SAFE FOR ELECTRONIC WORK.
• With the cover removed and power supplied to the ECA, press and release the
white Input Cal pushbutton. The Cal Input LED will blink slowly, indicating the ECA
is ready to accept the low (0% stroke) analog input value.
• Send the low analog signal to the ECA (generally 4 mA) from the signal-generating
device (e.g., PLC). It is highly recommended that you use the actual signal the ECA
will be receiving during calibration.
• When the low analog input value has stabilized (allow 10-15 seconds), press the
white Input Cal pushbutton to accept it as the 0% flow analog signal value. The Cal
Input LED will now blink rapidly.
• Send the desired analog high signal (generally 20 mA).
• When the high analog input value has stabilized (allow 10-15 seconds), press the
white Input Cal pushbutton to accept it as the high (100% stroke) analog signal
value. The Cal Input LED will extinguish, unless the minimum span of 2.0 mA is
violated, then the ECA will return to step 1 above.
Reverse-acting calibration is accomplished by input of a high signal (i.e., 20 mA) as the low
(0% stroke) analog input value, and a low signal (i.e. 4 mA) as the high (100% stroke)
analog signal.
• Replace the cover (see Section Cover Re-installation) and continue with the
output calibration if that function is being utilized.
8.1.2 Analog Input Signal Loss
A failure of the analog input signal is detected if the input signal falls below the
calibrated 0% stroke signal by 0.3 mA. For example, if the ECA is calibrated with a
range of 4-20 mA and the signal falls to 3.6 mA then a Signal Loss failure will be
logged. If the calibrated 0% stroke signal is 0.3 mA or less, no Signal Loss failure
will be generated. Input signals above the calibrated 100% stroke signal are simply
ignored, the stroke position will be driven to 100% and no error condition occurs.
In the event of a loss of analog signal
or an abnormally low signal, the ECA
will drive to the zero stroke position.
The ECA will recover once a valid
analog signal is present and resume
control to the appropriate set point.
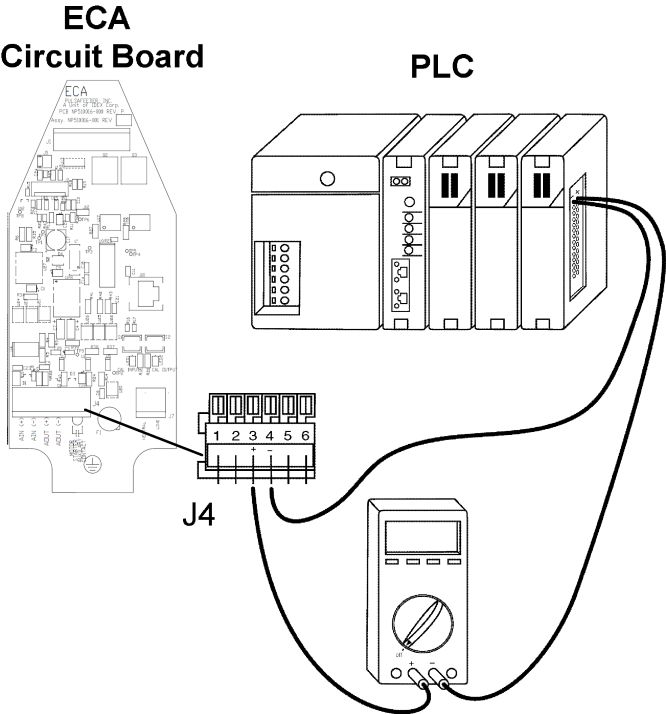
8.1.3 Analog Output Signal
Calibration
18THIS PROCEDURE REQUIRES REMOVAL OF THE ENCLOSURE COVER. THIS SHOULD BE DONE ONLY IF THE AREA
IS KNOWN TO SAFE FOR ELECTRONIC WORK.
Figure 7
To calibrate the analog output, attach a milli-ammeter to the output circuit of the ECA in series
with the PLC used to control the process (as shown in figure 7). It is recommended that you
calibrate the ECA analog output values to whatever is required by the PLC. For example, the
ECA output can be adjusted at the zero point so that the screen on the PLC system reads
zero %, regardless of the actual mA value of the signal. The ECA will not actuate to change
stroke length during this process.
1. With the cover removed and power supplied to the ECA, press the black Output Cal
pushbutton. The Cal Output LED will blink slowly and current output will be set to the present
analog out low calibration value. (4 mA factory default)
2. Press and hold the white Input Cal pushbutton to increase current
output until the desired low set point is reached. Release and press
again to decrease current output. Current will change in steps of
approximately 0.02 mA, at a rate of 20 steps per second.
3. Press the black Output Cal pushbutton. The Cal Output LED will
blink rapidly and current output will be set to the present analog out
high calibration value. (20 mA factory default)
4. Press and hold the white Input Cal pushbutton to decrease current
output until desired high set point is reached. Release and press
again to increase current output. Current will change in steps of
0.125 mA at a rate of 20 steps per second.
5. Press the black Output Cal pushbutton. The Cal Output LED will
extinguish, unless the minimum span of 2.0 mA is violated, then the
ECA will return to step 1 above.
6. Remove Power to the ECA. Replace the cover (see Section Cover
Re-installation) and return power to the ECA.
Figure 10
9. MECHANICAL ZERO CALIBRATION
THIS PROCEDURE REQUIRES REMOVAL OF THE ENCLOSURE COVER. THIS SHOULD BE DONE ONLY IF
THE AREA IS KNOWN TO BE SAFE FOR ELECTRONIC WORK.
If the ECA was shipped with a pump attached, the mechanical zero calibration was
performed at the factory. If the ECA was shipped without a pump attached, performing the
mechanical zero calibration is mandatory to successful installation/operation. The ECA
controller automatically performs a mechanical zero calibration if it does not have a valid
zero calibration set point stored. If you suspect the zero calibration set point is incorrect,
follow the calibration procedure below. The pump MUST be running during this
process to ensure an accurate zero position is calibrated. Therefore you MUST
ensure it is safe to operate the pump during the procedure.
• Verify that power to the ECA is off
• Remove the enclosure cover.
19• Press and hold the BLACK pushbutton
• Apply power to the ECA.
• A mechanical zero calibration routine will begin. The routine begins when the motor
internal to the ECA starts motion looking for the zero position. Once the ECA
begins the routine you may release the pushbutton.
• The calibration routine is complete when the motor reaches the zero position and
the rotor locks for approximately 30 seconds. Zero calibration ends when the motor
stops running. .
• Remove Power to the ECA. Replace the cover (see Section Cover Re-
installation) and return power to the ECA.
9.1 Factory Re-initialization
THIS PROCEDURE REQUIRES REMOVAL OF THE ENCLOSURE COVER. THIS SHOULD BE DONE ONLY IF
THE AREA IS KNOWN TO BE SAFE FOR ELECTRONIC WORK.
A Factory Re-initialization restores all EEPROM calibration settings and mode settings to their
factory default values and is typically not required. The user also needs to keep in mind that
once the Factory Re-Initialization is performed, all user calibrations are erased. This procedure
should be performed only if the user has reason to believe that the internal ECA memory has
become corrupted. Memory Corruption usually manifests itself with inconsistent or erratic
operation. A number of factors could cause memory value corruption including:
1. Disregard of electrostatic precautions during installation,
2. Improper wiring,
3. Voltage surges, spikes, etc.
The pump MUST be running during this process to ensure an accurate zero position is
obtained. Therefore you MUST ensure it is safe to operate the pump during the
procedure.
• Verify that power to the ECA is off.
• Remove the enclosure cover.
• Press and hold both black and white pushbuttons while applying power to the ECA.
• Release the CAL pushbuttons and the unit is restored to the factory default settings.
• The unit will automatically perform a new mechanical zero calibration as part of the
Factory Re-Initialization routine.
• Perform any additional calibration procedures as required.
• Remove Power to the ECA. Replace the cover and return power to the ECA.
10. DIAGNOSTICS
10.1 Trouble Code Reporting
The ECA is designed to be as fault-tolerant and self-recovering as possible. When the ECA
encounters an abnormal condition, a trouble code is indicated by blinking CAL LED’s located on
the ECA main board, internal to the enclosure, as follows:
• Both LED’s will blink once.
• The Cal Input LED will blink a number of times to indicate the first trouble code digit.
20• The Cal Output LED will blink a number of times to indicate the second trouble code
digit.
This sequence will repeat until the trouble condition is cleared.
2110.2 Trouble Codes
Code Definition Description Action
The CPU failed to read an encoder pulse, or has not Clear error by
received the expected signals in a certain amount of time. cycling power.
Thus, the controller has lost its zero reference. It then
11 attempts to recover by doing a mechanical zero
Encoder
or calibration. If the mechanical zero calibration is
Error
12 successful, this error is cleared, and normal operation
continues. If further errors prevent successful mechanical
zero calibration, this error is a fatal error and requires
user intervention.
Failure to reach commanded position within the timeout Wait 10 minutes,
period (5 minutes). After 10 minutes, the error will clear or clear fatal error
and the controller will automatically retry the position by cycling power.
Position
13 Error
adjustment. If the error continues to occur for ten
consecutive times, no further retries will be attempted,
and the error will become a fatal error requiring user
intervention.
The motor thermistor indicates the motor case Correct reason for
temperature has reached approximately 90°C (194°F). motor Over-
Over
14 This will stop motor operation until the motor case Temperature
Temperature condition.
temperature drops below approximately 80°C (176°F) at
which point the error clears automatically.
The Analog Input signal dropped more than 0.3 mA below Correct reason for
21 Signal Loss the low cal point. This error clears automatically when the low input signal.
analog input signal returns to normal.
The Analog Output signal and Analog Input signal at 0% Refer to Self-Test
Self-Test
22 Signal Error
stroke position do not agree (refer to Self-Test Mode Mode
description for further details).
The Analog Output signal and Analog Input signal at Refer to Self-Test
Self-Test
23 100% stroke position do not agree (refer to Self-Test Mode
Signal Error
Mode description for further details).
Self-Test Contact factory
24 Thermistor Thermistor readings are not within specifications.
Error
Self-test Refer to Self-Test Mode description for additional No action.
33 passed information.
2210.3 Self-Test Mode
The ECA has a diagnostic test mode which can be used to verify performance and troubleshoot
problems. To initiate the self-test:
• Remove power from the ECA, and remove the top cover.
• Disconnect any field wires attached to J4, and connect Analog Out to Analog In.
(jumper J4-1 to J4-3 and J4-2 to J4-4).
• Press and hold the white Input Cal pushbutton.
• Apply power to the ECA and release white Input Cal pushbutton. The ECA will
enter the self-test mode and automatically perform the following tests:
Calibrates mechanical zero position
Drives to the 0% stroke position, testing the motor drive and the encoder. Both Cal
LED’s will blink if the zero calibration fails.
Pauses for 30 seconds, and then confirms that the Analog Output and the Analog Input
are correct. Sets trouble code 22 if analog ports do not agree.
Drives to the 100% stroke position, testing the motor drive and the encoder. Sets the
trouble code to 13 if the 100% position is not attainable.
Pauses for 30 seconds, and then confirms that the Analog Output and the Analog Input
are correct. Sets trouble code 23 if analog ports do not agree.
Confirms that the motor thermistor is reading in correct range. Sets trouble code 24 if
thermistor readings are outside specifications.
Sets trouble code 33 to indicate test passed.
Turn power off to the ECA, and remove the jumpers installed in step 2. Re-connect field
wires.
23Replace the cover and return power to the ECA.
10.4 Error Recovery
In cases of abnormal operation, the following procedure is recommended:
1. First, check all power and process connections to ensure all wiring is secure and properly
connected.
2. Check the internal connections within the ECA.
3. Ensure that the cable connections from the stroke adjustment motor and encoder are
secure and seated properly.
4. Perform a Factory Re-initialization, as previously mentioned in this IOM. This will also
force a new mechanical zero calibration to be performed. The pump motor should be
operating during this process as the ECA will adjust stroke to re-locate the zero position.
Ensure that it is safe to operate the pump during this step.
5. Perform a new Analog Input signal calibration
6. Perform a new Analog Output signal calibration
2411. SPECIFICATIONS
Input Power 115 Volt/ 60Hz, 115 Volt/ 50Hz, 230 Volt/ 60 Hz, or 230 Volt/
50Hz
Input Current 200ma nominal, 2 amperes (short circuit)
Stroke Length Control 0 – 100% control range
Resolution – 0.0625% increments
Stroke Adjustment response Approximately 1% per second
Analog Input
Operating Range 0 to 25.5mA (4-20 mA factory default)
Input Impedance 160 ohms
Minimum Span 2.0 mA
Isolation 500V from all other inputs, outputs and ground, optically
isolated
Conditioning 8 second running average.
Split Ranging and Reverse Acting accessible via calibration.
Analog Output
Operating Range 0 to 25.5mA (4-20 mA factory default)
Maximum Load 700 ohms
Minimum Span 2.0 mA
Conditioning None. Output represents current stroke position.
Split Ranging and Reverse Acting accessible via calibration.
Isolation 500V from all other inputs, outputs and ground, optically
isolated.
Status Input
Motor On/Off Optically isolated dry contact input. Open contact indicates
motor is off. Controller will then suspend all stroke control
action. Motor starter should provide a contact for connection
here.
Environmental
Rated Ambient Temperature -20°C to 40°C (-4°F to 104°F)
Storage Ambient Temperature -25°C to 60°C (-13°F to 140°F)
Enclosure NEMA4, IP66, NEMA 4X
Approvals UL/ULC - NEMA 4X
CE – IEC EN 61010-1
Transient Voltage Max Impulse withstand 1500V (115VAC Models), 2500V
(230VAC Models) at 50uS
Voltage Overload 120% Continuous,
Pollution Degree Suitable for Pollution Degree 3
Input Voltage 115 (105-125 acceptable range) or 230 (208 – 240 acceptable
range) VAC
Note: factory configured only for correct input voltage range
(specified at time of purchase) Single phase input only 50 or 60
25Hz. Input frequency range 48 Hz to 62 Hz
Altitude: 3300 Ft (1000 M) above sea level (de-rate 5% per additional
3300 Ft)
Humidity 0-90% (non-condensing)
Temperature 0° C (32° F) Minimum operating temperature
40° C (104° F) Maximum operating temperature
Earth Leakage Current Size Earth Leakage Circuit Breakers (ELCB) to a detection
level of 30 mA or greater
Fuse One Power input fuse (AC over current protection) is located on
the main control board. This fuse is a 2 amp slow-blow type
(Schurter 34.6618, Digikey 486-1138-ND. The fuses should be
checked after any failure of the unit to power up properly.
12. POWER-UP OPTIONS SUMMARY
Upon application of input power, the ECA will perform certain functions if the pushbuttons are used, as
follows:
Pushbuttons Function Reference
pressed at power- Section
up
NONE Normal operation, use all calibration data from memory
BLACK key Forces a mechanical zero position calibration Mechanical
Zero
Calibration
WHITE key Initiates self-test with jumpers Self-Test
Mode
Resets all to factory default values, performs an
BOTH keys (WHITE Error
automatic mechanical zero calibration, analog signals
and BLACK) Recovery
will require re-calibration
2613. FIELD WIRING SUMMARY
Function/Connection Reference
Connector Location
Section
Line connection 115VAC, Line 1 connection 230 Electrical
Line
VAC Wiring
Neutral connection 115 VAC, Line 2 connection 230 Electrical
J7 Neutral
VAC Wiring
Earth ground connection 115 or 230 VAC Electrical
Ground
Wiring
Analog input (control) signal positive (+) Analog Input
Position 1
(current loop)
Analog input (control) signal common (-) Analog Input
Position 2
(current loop)
Analog output (feedback) signal positive (+) Analog Output
Position 3
(current loop)
J4
Analog output (feedback) signal common (-) Analog Output
Position 4
(current loop)
Motor enable dry contact Motor Status
Position 5
Input
Motor enable dry contact Motor Status
Position 6
Input
2714. TROUBLESHOOTING GUIDE
Problem Potential Cause Solution
INTERNAL LED DISPLAY
No LED Normal, after setup. No action required
Display
No power supplied. Check power source. plug & circuit
breaker
Supply power wired incorrectly. Check wiring.
Supply power outside of specification. Check voltage/frequency against
specification.
LED’s are Normal at startup Adjust as per Start-up & Operation section
flashing Indicates operation fault See table in Diagnostics Trouble Code
section for LED blink codes
POWER
No power No power supplied. Check power source. Plug & Circuit
Breaker
Indicators Supply power wired incorrectly. Check wiring.
Supply power outside of specification. Check voltage/frequency against
specification.
Motor
Motor not No power supplied Check power source. Plug & Circuit
working/ No Breaker
stroke control
Internal fuse is blown Replace internal fuse, Call service if
condition continues
Damaged electronics or motor Call field service15. MAINTENANCE & SPARE PARTS
All maintenance work must be carried out only when the ECA and connected
equipment is stopped and disconnected from mains supply (including auxiliary
circuits). Maintaining original characteristics over time must be ensured by an
efficient maintenance and inspection plan, developed and managed by qualified
technicians, taking into account the service and the actual environmental conditions
in which it operates.
15.1 Operating Precautions
All operations must be performed by qualified personnel.
Work on the unit should only be performed with safety supervisor authorization, after
having verified that:
a) Disconnect power at the source (follow your local lockout tag out procedures)
b) The power line is disconnected and no parts are energized, including any auxiliaries
c) Ensure that any risk of accidental restart has been excluded
d) Consult Manufacturers Pump Operating Manual for instructions on minimizing risk
due to pressurized or chemically dangerous conditions with in the Pump system
e) With pump switched off, that the ON-OFF valves on the suction and discharge
pipelines are closed.
f) Pump has been adequately cleaned, when operating in environments exposed to
aggressive chemicals.
g) Maintenance personnel shall refer to the Installation & Wiring Instruction section for
safe return to service after repair.
Since the machine object of supply is a product designed and intended for operation in
industrial areas, additional measures must be adopted and assured by the person
responsible for the installation, should more restrictive safety conditions be required.
15.2 Cleaning and Decontamination
The ECA enclosure may be cleaned with water and mild detergent.
Decontamination shall occur when the ECA is exposed to a release of process
chemicals. Follow the SDS for clean-up in the event of a chemical spill.
215.3 User Replaceable Parts for the ECA
MFG & MFG P/N Description
Schurter 34.6618 Fuse, 2 amp slow-blow type (available via
Digikey 486-1138-ND)
3A unit of IDEX Corporation
2883 Brighton Henrietta Town Line Road
Rochester NY 14623
+1 (585) 292-8000
pulsa.com
pulsa@idexcorp.com
4You can also read