Operating manual Robot Control Mate - ABB
←
→
Page content transcription
If your browser does not render page correctly, please read the page content below
ROBOTICS

Operating manual
Robot Control Mate
Trace back information:
Workspace Main version a392
Checked in 2021-03-19
Skribenta version 5.4.005
Operating manual
                 Robot Control Mate
                               RobotWare 7.2

            Document ID: 3HAC073107-001
                                   Revision: H

© Copyright 2019-2021 ABB. All rights reserved.
Specifications subject to change without notice.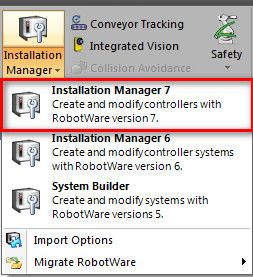
The information in this manual is subject to change without notice and should not
be construed as a commitment by ABB. ABB assumes no responsibility for any errors
that may appear in this manual.
Except as may be expressly stated anywhere in this manual, nothing herein shall be
construed as any kind of guarantee or warranty by ABB for losses, damage to persons
or property, fitness for a specific purpose or the like.
In no event shall ABB be liable for incidental or consequential damages arising from
use of this manual and products described herein.
This manual and parts thereof must not be reproduced or copied without ABB's
written permission.
Keep for future reference.
Additional copies of this manual may be obtained from ABB.
Original instructions.

                 © Copyright 2019-2021 ABB. All rights reserved.
                 Specifications subject to change without notice.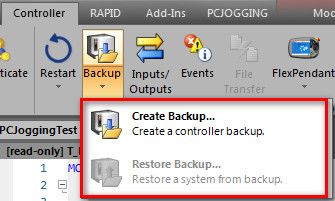
Table of contents

Table of contents
    Overview of this manual ...................................................................................................................   7
    Product documentation ....................................................................................................................    9

1   Introduction                                                                                                                                  11

2   Getting started                                                                                                                               15

3   Working with the Robot Control Mate                                                                                                           17
    3.1      Overview .........................................................................................................                   17
    3.2      Procedure ........................................................................................................                   18

4   Reference information                                                                                                                         25
    4.1      Features in RobotStudio .....................................................................................                        25
    4.2      Scenarios for controllers with FlexPendant ............................................................                              31

Operating manual - Robot Control Mate                                                                                                              5
3HAC073107-001 Revision: H
                                                 © Copyright 2019-2021 ABB. All rights reserved.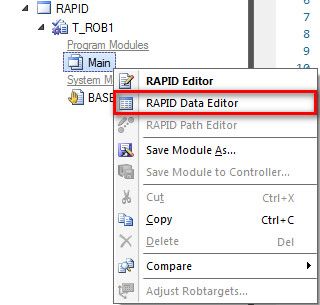
This page is intentionally left blank
Overview of this manual

Overview of this manual
About this manual
                       This manual contains basic instructions for OmniCore based robot systems using
                       the Robot Control Mate. This manual describes basic aspects for auto-jogging,
                       position modification, control and calibration.

Usage
                       This manual should be used during operation.

Who should read this manual?
                    This manual is intended for:
                             •   operators
                             •   product technicians
                             •   service technicians
                             •   robot programmers

Prerequisites
                       The reader should:
                             •   Be trained in robot operation.
                             •   Have basic knowledge of RAPID programming language.
                             •   Be familiar with RobotStudio.

References

                        Reference                                                                 Document ID
                        Operating manual - RobotStudio                                            3HAC032104-001
                        Product manual - OmniCore C30                                             3HAC060860-001
                        Operating manual - OmniCore                                               3HAC065036-001
                        Operating manual - Integrator's guide OmniCore                            3HAC065037-001
                        Technical reference manual - System parameters                            3HAC065041-001

Revisions

                        Revision      Description
                        A             Released with RobotWare 7.0.
                        B             The following updates are made in this revision:
                                        • Added a new installation method.
                                        • Updated the user interface figures of Jog tab page and Calibrate tab
                                            page.
                                        • Updated the calibration step.
                        C             The following updates are made in this revision:
                                        • Updated the installation, uninstallation and upgrade procedures.

                                                                                              Continues on next page
Operating manual - Robot Control Mate                                                                              7
3HAC073107-001 Revision: H
                                        © Copyright 2019-2021 ABB. All rights reserved.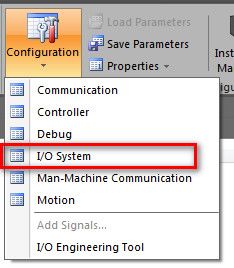
Overview of this manual
Continued

                Revision   Description
                D          The following updates are made in this revision:
                             • Updated safety related information.
                             • Updated the installation and upgrade method.
                             • Added new functions to Jog and Control tab pages.
                             • Added resolver data transfer function between robot memory and con-
                                 troller to Calibrate group.
                             • Updated the procedure of working with the PC Jogging add-in.
                             • Added warning before starting revolution counter update process.
                E          Released with RobotWare 7.0.2. The following updates are made in this revi-
                           sion:
                              • Renamed the product as Robot Control Mate from PC Jogging.
                              • Restructured the manual to provide step-by-step procedures on con-
                                 trolling and jogging functions.
                              • Added a note reminding users to disconnect the FlexPendant from the
                                 FlexPendant UI.
                              • Updated the installation, uninstallation and upgrade procedures.
                F          The following updates are made in this revision:
                             • Removed the limitation requiring only one task exists.
                             • Added the step of task selection when program executions are performed
                                 in multitask scenarios.
                G          Released with RobotWare 7.1. The following updates are made in this revision:
                              • Added steps to activate operator safety function AllowMoveRobAuto
                                 for controllers in RobotWare 7.1.
                              • Updated steps for disconnecting the FlexPendant.
                H          Released with RobotWare 7.2. The following updates are made in this revision:
                              • Wording change from "jog" to "auto-jog".
                              • Updated supported RobotWare and RobotStudio versions, and related
                                 descriptions.
                              • Supported IRB 1100, IRB 1300 and IRB 14050.
                              • Added IRB 14050-specific functions, such as LeadThrough and auto-
                                 jogging in arm mode, are added.
                              • Added interface to use part of Authenticate functionalities in Robot
                                 Control Mate.
                              • Added steps to edit user grants to make sure control and auto-jogging
                                 functions are available to use.
                              • Updated the safety related information.

8                                                                        Operating manual - Robot Control Mate
                                                                                     3HAC073107-001 Revision: H
                            © Copyright 2019-2021 ABB. All rights reserved.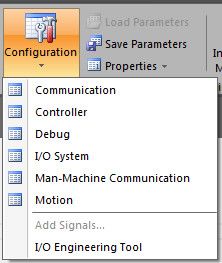
Product documentation

Product documentation
Categories for user documentation from ABB Robotics
                     The user documentation from ABB Robotics is divided into a number of categories.
                     This listing is based on the type of information in the documents, regardless of
                     whether the products are standard or optional.

                                   Tip

                         All documents can be found via myABB Business Portal, www.abb.com/myABB.

Product manuals
                       Manipulators, controllers, DressPack/SpotPack, and most other hardware is
                       delivered with a Product manual that generally contains:
                             •   Safety information.
                             •   Installation and commissioning (descriptions of mechanical installation or
                                 electrical connections).
                             •   Maintenance (descriptions of all required preventive maintenance procedures
                                 including intervals and expected life time of parts).
                             •   Repair (descriptions of all recommended repair procedures including spare
                                 parts).
                             •   Calibration.
                             •   Decommissioning.
                             •   Reference information (safety standards, unit conversions, screw joints, lists
                                 of tools).
                             •   Spare parts list with corresponding figures (or references to separate spare
                                 parts lists).
                             •   References to circuit diagrams.

Technical reference manuals
                    The technical reference manuals describe reference information for robotics
                    products, for example lubrication, the RAPID language, and system parameters.

Application manuals
                       Specific applications (for example software or hardware options) are described in
                       Application manuals. An application manual can describe one or several
                       applications.
                       An application manual generally contains information about:
                             •   The purpose of the application (what it does and when it is useful).
                             •   What is included (for example cables, I/O boards, RAPID instructions, system
                                 parameters, software).
                             •   How to install included or required hardware.
                             •   How to use the application.
                             •   Examples of how to use the application.

                                                                                              Continues on next page
Operating manual - Robot Control Mate                                                                             9
3HAC073107-001 Revision: H
                                         © Copyright 2019-2021 ABB. All rights reserved.
Product documentation
Continued
Operating manuals
The operating manuals describe hands-on handling of the products. The manuals
are aimed at those having first-hand operational contact with the product, that is
production cell operators, programmers, and troubleshooters.
10 Operating manual - Robot Control Mate
3HAC073107-001 Revision: H
© Copyright 2019-2021 ABB. All rights reserved.1 Introduction
1 Introduction
About the Robot Control Mate
Overview
The Robot Control Mate provides basic instructions for OmniCore-based robot
systems. In cases where a FlexPendant is unavailable, the Robot Control Mate
together with RobotStudio features allow users to control the robot from a connected
PC.
Controllers supporting the Robot Control Mate (option 3065-1 Robot Control Mate)
are attached with a safety warning label. This label indicates that the controller is
delivered and can start in automatic mode, and use Robot Control Mate to control
the robot in scenarios without a FlexPendant.
xx2100000357
Key functions
• Auto-jogging
With combined selection of the motion mode and coordinate system, the
robot can be auto-jogged to a specific position.
• Position modification
You can define a desired target point in the RAPID instruction and use the
target point to modify the robot position.
• Control
It allows you to make the motors on and off. It also displays the program
control buttons.
• Calibration
It allows you to update the revolution counter of one or all axes for the robot,
as well as memory data transfer between robot and controller.
• Status display
You can have a quick view on the controller status, such as operating mode,
speed, motor state and program execution state.
Continues on next page
Operating manual - Robot Control Mate 11
3HAC073107-001 Revision: H
© Copyright 2019-2021 ABB. All rights reserved.1 Introduction
Continued
Prerequisites
To work with Robot Control Mate, the following is required:
• OmniCore controller with RobotWare 7.2 or later
• RobotStudio 2021
Note
The latest version of Robot Control Mate does not compatible with RobotWare
and RobotStudio versions earlier than the specified ones. Always update
RobotWare and RobotStudio to the required versions to use the latest Robot
Control Mate.
Limitation
The Robot Control Mate,
• Supports IRB 910INV, IRB 1100, IRB 1300 and IRB 14050.
• Can only be used in automatic mode.
Safety related
The OmniCore controller provides safety functions to ensure the safe operation
with robots. Robot Control Mate is allowed to work in automatic mode with all safety
means in place.
Note
Make sure to read through safety instructions before staring work.
Note
The integrator is responsible that the safety devices necessary to protect people
working with the robot system are designed and installed correctly.
The integrator is responsible for the safety of the final application.
Using an emergency stop switch
An emergency stop switch must be connected to the external emergency stop
input interface to make sure the emergency stop function is enabled. The emergency
stop switch must be positioned in easily accessible places so that the robot can
be stopped quickly.
For details about how to connect an external emergency stop switch, see Product
manual - OmniCore C30.
Leaving enabling device connection open
The enabling device connection must be left open if there is no teach pendant
connected to the controller. Then, the robot can only work in automatic mode.
For details about how to configure the enabling device connection, see Product
manual - OmniCore C30.
Continues on next page
12 Operating manual - Robot Control Mate
3HAC073107-001 Revision: H
© Copyright 2019-2021 ABB. All rights reserved.1 Introduction
Continued
Activating a safety guard device
A safety guard device (such as a safety fence) must be active in automatic mode.
When the system is powered on, entering the robot working area is not allowed.
A safety fence is recommended. In case the fence is opened, the automatic stop
is enabled and the robot can be stopped.
For details about how to connect an automatic stop, see Product manual - OmniCore
C30.
Using FlexPendant reducing risks
The FlexPendant is always the optimum solution to reduce risks in some specific
applications. Before using Robot Control Mate, working environment and
applications in use must be fully assessed. The integrator is responsible to make
sure the environment and application are applicable to use Robot Control Mate in
automatic mode. If any potential risk exists, use FlexPendant in manual mode to
reduce risks.
Body protection
• Sensitive body parts, such as the eyes and the larynx, must be protected by
personal protective equipment (PPE).
• Operators working with the Robot Control Mate must be trained and have
the required knowledge.
Operating manual - Robot Control Mate 13
3HAC073107-001 Revision: H
© Copyright 2019-2021 ABB. All rights reserved.This page is intentionally left blank
2 Getting started

2 Getting started
Preparation before using the Robot Control Mate
                    Before using the Robot Control Mate, make sure:
                             1 RobotStudio has been downloaded, installed and activated on the PC.
                                Download RobotStudio from http://new.abb.com/products/robotics/robotstu-
                                dio/downloads. For more information about how to install and run the
                                RobotStudio, see Operating manual - RobotStudio.
                             2 The PC is connected to the controller and that the controller is powered on.
                                For more information about the PC connection to the controller, see section
                                Connecting a PC to the controller in Operating manual - RobotStudio.

Installing the Robot Control Mate
                     Use the following procedure to install the Robot Control Mate.
                             1 Open RobotStudio and go to RobotApps in the Add-Ins ribbon tab.
                             2 In the displayed RobotApps window, enter a keyword in the Search text box.
                                The Robot Control Mate icon is displayed.
                             3 Click the icon and then click Add on the right pane.
                             4 Click Accept in the displayed disclaimer window.
                                The package will be downloaded and installed automatically.
                             5 Close and reopen RobotStudio.
                                The Robot Control Mate icon is displayed in the Controller ribbon tab.

Starting the Robot Control Mate
                    Use this procedure to open the Robot Control Mate
                             1 Open RobotStudio.
                             2 In the Controller ribbon tab, click Robot Control Mate in the Robot Tools
                               group.
                                The Robot Control Mate ribbon tab is displayed.

                                        Note

                                 To close the Robot Control Mate tab, click Close.

                             3 Start working with the Robot Control Mate after connecting to a controller.

                                        Note

                                 If there is no controller is connected, Unknown will be displayed in the
                                 Controller Status group, and the control and auto-jogging functions are
                                 unavailable to use.

                                                                                        Continues on next page
Operating manual - Robot Control Mate                                                                      15
3HAC073107-001 Revision: H
                                      © Copyright 2019-2021 ABB. All rights reserved.
2 Getting started
Continued
Uninstalling the Robot Control Mate
Use the following procedure to uninstall the Robot Control Mate.
1 Open RobotStudio and click the Add-Ins tab.
2 In the Add-Ins window on the left pane, right-click the Robot Control Mate
package under the Installed Packages navigation tree.
3 Choose Uninstall Package from the shortcut menu.
4 Click Yes to proceed.
The uninstallation procedure starts automatically.
5 Close and reopen RobotStudio.
The Robot Control Mate is removed from the navigation tree on the left pane.
Upgrading the Robot Control Mate
If a new version of the Robot Control Mate is available, uninstall the earlier versions
as instructed in Uninstalling the Robot Control Mate on page 16 and then reinstall
as instructed in Installing the Robot Control Mate on page 15.
Note
If RobotStudio is in a version earlier than 2021, upgrade RobotStudio to the latest
version first and then install the Robot Control Mate in RobotApps as instructed
in Installing the Robot Control Mate on page 15.
16 Operating manual - Robot Control Mate
3HAC073107-001 Revision: H
© Copyright 2019-2021 ABB. All rights reserved.3 Working with the Robot Control Mate
3.1 Overview
3 Working with the Robot Control Mate
3.1 Overview
The user interface
xx1900001318
Group Description
Controller Tools Provides controlling and auto-jogging functions, such as motor
status switching, program execution and robot position auto-
jogging.
Calibrate Provides calibration functions to update revolution counters
and to transfer robot memory between robot and controller.
Controller Status Displays the basic information of the controller and robot.
Authenticate Provides part of User Authorization System (also called UAS)
functionalities that are inherited from the RobotStudio.
Detailed information about UAS, see Operating manual - Robot-
Studio.
Close Closes the Robot Control Mate tab.
Operating manual - Robot Control Mate 17
3HAC073107-001 Revision: H
© Copyright 2019-2021 ABB. All rights reserved.3 Working with the Robot Control Mate
3.2 Procedure
3.2 Procedure
Introduction
Use the following procedures to operate a robot system using the Robot Control
Mate together with RobotStudio features.
Connecting to a controller
1 Switch on the main power on the controller.
2 Open RobotStudio.
3 Add a controller by choosing One Click Connect from the Add Controller
category in the Controller ribbon tab.
Note
You can also choose Add Controller or Add Controller from Device List
and then select the desired controller from the list.
The controller is loaded and displayed in the navigation tree.
4 Activate the AllowMoveRobAuto function.
- On the Controller ribbon tab, click Request Write Access.
- In the Controller navigation tree, choose Configuration > Controller.
- Click Operator Safety to display the settings.
- Set AllowMoveRobAuto to Active.
- Restart the controller.
5 Open the Robot Control Mate.
Enabling necessary user grants
Enabling functions in Control window
Current user must be granted with the Remote Start and Stop right to enable the
functions in Control window. Otherwise, the control functions are unavailable to
use and a warning message is displayed when opening the Control window.
Perform the following procedure to edit user grants:
1 In the Controller ribbon tab, click Authenticate and then click Edit User
Accounts.
2 In the Edit User Accounts window, click the Roles tab.
3 On the Roles tab, select the role to which the user belongs and then click
Edit User.
4 Select the Remote Start and Stop checkbox.
5 Click Apply.
More details about how to manage user rights in the UAS system, see Operating
manual - RobotStudio.
Continues on next page
18 Operating manual - Robot Control Mate
3HAC073107-001 Revision: H
© Copyright 2019-2021 ABB. All rights reserved.3 Working with the Robot Control Mate
3.2 Procedure
Continued
Enabling functions in Auto-jog window
If the local certificate is not loaded when a real controller is connected, the
auto-jogging functions are unavailable to use and a warning message will be
displayed when opening the Auto-jog window. Users have to verify the local
presence to enable the functions.
Verify the local presence in the following two ways:
• With a powered-on FlexPendant but in logged-out state
1 Press the enabling button twice.
2 Open the Robot Control Mate and then open the Auto-jog window to
check whether functions are enabled.
• Without a FlexPendant
1 Create a physical DI signal.
2 In the Controller ribbon tab, click Configuration and then click I/O
system.
3 In the Type pane of the Configuration - I/O system window, right-click
System Input and choose New System Input.
4 Choose the created physical DI signal from the Signal Name drop-down
list.
5 Choose Verify Local Presence from the Action drop-down list.
6 Save the change and restart the controller.
7 Open the Robot Control Mate and then open the Auto-jog window.
8 Change the DI signal value three times using the physical device for
whom the signal created.
The warning message is removed and the auto-jogging functions are
available to use.
Performing the program executions
1 Check the calibration status of the robot in the Controller Status group in
the Robot Control Mate tab page.
If the robot is uncalibrated, calibrate the robot as instructed in Calibrating
the robot on page 21.
2 In the Robot Control Mate tab page, click Control in the Controller Tools
group.
The Control window is displayed.
3 Turn the motors on.
4 Select a task from the Selected Tasks drop-down list.
If there are multiple tasks, the program executes for the selected task.
5 Set the speed of program execution by dragging the scroll bar.
The speed of 100% indicates that the program is running at full speed.
6 Perform program executions.
• Play: starts the program execution.
• Pause: pauses a program execution.
• Prev: executes one instruction backward.
Continues on next page
Operating manual - Robot Control Mate 19
3HAC073107-001 Revision: H
© Copyright 2019-2021 ABB. All rights reserved.3 Working with the Robot Control Mate
3.2 Procedure
Continued
• Next: executes one instruction forward.
Note
Click Reset program to main to set the program pointer to the first line of
the main routine.
It is also possible to set the program pointer to routine by selecting a
module and routine from the Module and Routine drop-down list first, and
then click PP to Routine.
Auto-jogging the robot
1 In the Robot Control Mate tab page, click Control in the Controller Tools
group.
The Control window is displayed.
2 Turn the motors on.
Note
For IRB 14050, setting LeadThrough to Enable in the Auto-jog window
will automatically turn the motors on, and the Operation Mode displays
Auto (LeadThrough).
For more details about the lead-through function, see Operating
manual - OmniCore.
3 Click Auto-jog in the Controller Tools group.
The Auto-jog window is displayed.
4 Select the auto-jogging mode.
• Joint: this mode auto-jogs the robot axis by axis. It moves one robot
axis at a time.
• Linear: this mode enables the tool center point of the selected tool to
move along straight lines from "point A to point B" in space or to move
in rotational motion based on the selected coordinate system's axis.
• Arm: this mode is only available for IRB 14050. In this mode, both the
tool center point and the orientation of the tool is fixed in space and
only the angle of the arm is changed. The tool center point is neither
rotated nor moved.
5 Select the coordinate system.
If Tool or Wobj is selected, a work object or tool must be selected from the
Work Object or Tool drop-down list respectively, to specify the reference
based on which the robot axis moves.
6 Select the increment mode.
• None: the robot moves continuously to the specified point.
• Small/Medium/Large: the robot will move a rated step each time based
on the selected incremental movement size.
Continues on next page
20 Operating manual - Robot Control Mate
3HAC073107-001 Revision: H
© Copyright 2019-2021 ABB. All rights reserved.3 Working with the Robot Control Mate
3.2 Procedure
Continued
• Customized: users can define increment step by clicking Customized
Increment.
7 Set the auto-jogging speed by dragging the scroll bar.
8 (Optional) Select load data from the Load drop-down list.
If equipment is mounted on any of the robot axes, then axes loads must be
set. Otherwise overload errors might occur during auto-jogging.
9 Click the + or - button in the Position area to auto-jog the robot axes to the
desired position.
Note
The robot can also be auto-jogged using target settings. Select a target from the
Target drop-down list. Detailed position information of the selected target point
is displayed. Then, press and hold Go to to move the robot until it reaches the
target position or click Modify Position to apply the robot position to the RAPID
program.
Calibrating the robot
WARNING
Before starting the revolution counter update procedure, make sure all robot
axes are moved to the synchronization position and all the notches of
synchronization marks are aligned.
If a revolution counter is incorrectly updated, it will cause incorrect manipulator
positioning, which in turn may cause damage or injury! Always verify the results
after calibrating any robot axis to verify that all calibration positions are correct.
Detailed information about calibration, revolution counter update, and so on can
be found in the robot product manual.
1 Check the calibration state in the Controller Status group in the Robot
Control Mate tab page.
2 If the state is Uncalibrated, check whether controller or robot has been
replaced or the SMB board has been replaced.
• If yes, proceed to step 3.
• If no, proceed to step 7.
3 In the Robot Control Mate ribbon tab, click Robot Memory in the Calibrate
group.
In the displayed Update Memory dialog box, choose Update controller with
robot memory data or Update robot memory with controller data according
to the actual situation.
CAUTION
Do not mix the memory data transfer direction.
Continues on next page
Operating manual - Robot Control Mate 21
3HAC073107-001 Revision: H
© Copyright 2019-2021 ABB. All rights reserved.3 Working with the Robot Control Mate
3.2 Procedure
Continued
For more details about memory data transfer, see Operating
manual - Integrator's guide OmniCore.
4 A dialog box is displayed, warning that the transfer operation cannot be
undone. Click OK to proceed or click Cancel to cancel.
5 After the data is successfully transferred, a message is displayed, warning
that the controller requires to be restarted. Click OK to close the message.
6 Restart the controller.
7 In the Robot Control Mate ribbon tab, click Revolution Counter in the
Calibrate group.
In the displayed Update Revolution Counter dialog box, check the calibration
status of the axes and, in the Selection column, select the axes for which
revolution counters need to be updated.
For more details about robot revolution counter update, see the robot product
manual.
8 A dialog box is displayed, warning that the updating operation cannot be
undone. Click OK to proceed or click Cancel to cancel.
9 After the revolution counters of the selected axes are successfully updated,
a message is displayed, warning that the controller requires to be restarted.
Click OK to close the message.
10 Restart the controller.
11 After the calibration is done, auto-jog the robot and check whether the robot
is well calibrated.
For details about robot auto-jogging, see Auto-jogging the robot on page 20.
If the robot is not correctly calibrated, calibrate again in the Update
Revolution Counter dialog box.
Working with the robot system
1 Create a testing RAPID program or load an existing RAPID program in the
RAPID editor.
For more information about how to work with RAPID editor, see Operating
manual - RobotStudio.
2 Auto-jog the robot to a desired position in the Auto-jog window.
For details about robot auto-jogging, see Auto-jogging the robot on page 20.
3 Select a desired target point from the Targets drop-down list and click Modify
Position.
4 In the Robot Control Mate ribbon tab, click Control in the Controller Tools
group.
The Control window is displayed.
5 Run the RAPID program.
Continues on next page
22 Operating manual - Robot Control Mate
3HAC073107-001 Revision: H
© Copyright 2019-2021 ABB. All rights reserved.3 Working with the Robot Control Mate
3.2 Procedure
Continued
For details about how to execute the program, see Performing the program
executions on page 19.
CAUTION
If the speed is higher than 10% of the fully speed, a warning message
displays, prompting to confirm the running speed. Click Yes to remain the
speed setting or click No to change the speed to 10% of the fully speed.
Make sure all risks are cleared before clicking Yes and run the program at
a high speed. If any risky situation occurs, click Pause in the Control tab
to stop the program or press the external emergency stop switch.
Operating manual - Robot Control Mate 23
3HAC073107-001 Revision: H
© Copyright 2019-2021 ABB. All rights reserved.This page is intentionally left blank
4 Reference information
4.1 Features in RobotStudio
4 Reference information
4.1 Features in RobotStudio
Feature list
The following table provides the features in RobotStudio that will be used together
with the Robot Control Mate when operating a robot system.
For more details about how to use the RobotStudio features, refer to the popup
message displayed in RobotStudio or see Operating manual - RobotStudio.
Feature group Feature Action
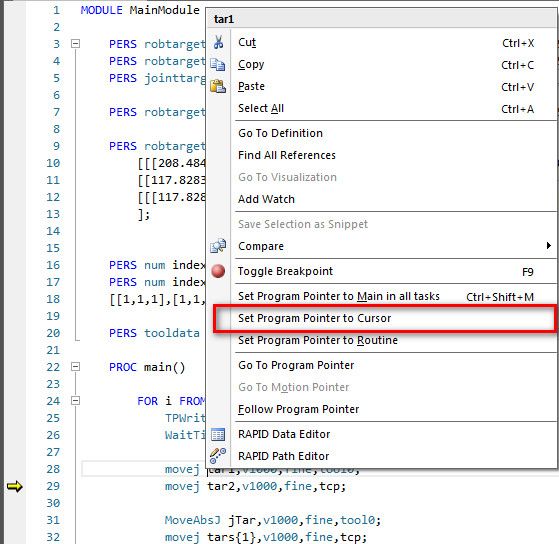
Operation Run from the current cursor 1 Make sure the RAPID program is opened
by double-clicking the specific RAPID
module from the Controller navigation tree.
2 In the RAPID ribbon tab, click Request
Write Access in the Access group.
3 Right-click the line where the cursor is and
choose Set Program Point to Cursor from
the shortcut list.
xx1900001401
4 Click Play in the Control tab and then the
program will run from the line where the
cursor is.
Note
The find a desired line or program module, type
the required line number or choose the module
from the list in the Find group in the RAPID ribbon
tab
xx1900001367
Continues on next page
Operating manual - Robot Control Mate 25
3HAC073107-001 Revision: H
© Copyright 2019-2021 ABB. All rights reserved.4 Reference information
4.1 Features in RobotStudio
Continued
Feature group Feature Action
Programming Online programming 1 Make sure the RAPID program is opened
by double-clicking the specific RAPID
module from the Controller navigation tree.
2 In the RAPID ribbon tab, click Request
Write Access in the Access group.
Then, the RAPID script can be edited and
programmed.
xx1900001369
RAPID data editing Right-click a specific RAPID module from the
Controller navigation tree and then choose RAPID
Data Editor.
xx1900001368
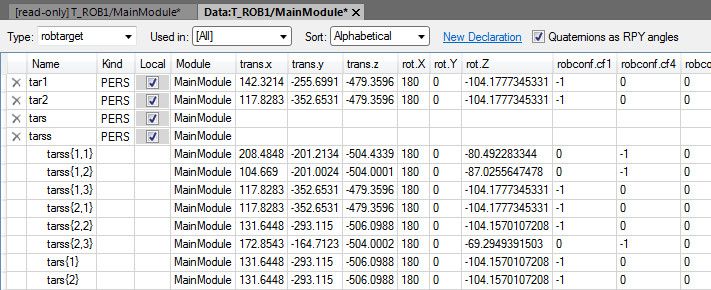
Specific point data editing In the RAPID Data Editor window, edit the detailed
data of a specific point.
xx1900001402
Continues on next page
26 Operating manual - Robot Control Mate
3HAC073107-001 Revision: H
© Copyright 2019-2021 ABB. All rights reserved.4 Reference information
4.1 Features in RobotStudio
Continued
Feature group Feature Action
Controller management System restart In the Controller ribbon tab, click Restart in the
Controller Tools group.
xx1900001329
System backup and restore In the Controller ribbon tab, choose Create
Backup or Restore Backup from the Backup list
in the Controller Tools group.
xx1900001370
System installation In the Controller ribbon tab, choose Installation
Manager 7 from the Installation Manager list in
the Configuration group.
xx1900001372
Continues on next page
Operating manual - Robot Control Mate 27
3HAC073107-001 Revision: H
© Copyright 2019-2021 ABB. All rights reserved.4 Reference information
4.1 Features in RobotStudio
Continued
Feature group Feature Action
User right management User grant viewing In the Controller ribbon tab, choose View User
Grants from the Authenticate list in the Access
group.
xx2100000399
User grant editing In the Controller ribbon tab, choose Edit User
Accounts from the Authenticate list in the Access
group.
xx2100000400
Continues on next page
28 Operating manual - Robot Control Mate
3HAC073107-001 Revision: H
© Copyright 2019-2021 ABB. All rights reserved.4 Reference information
4.1 Features in RobotStudio
Continued
Feature group Feature Action
System status and configura- I/O status checking In the Controller ribbon tab, choose I/O System
tion from the Configuration list in the Configuration
group.
xx1900001327
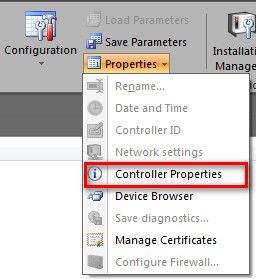
System information checking In the Controller ribbon tab, choose Controller
Properties from the Properties list in the Config-
uration group.
xx1900001326
System configuration In the Controller ribbon tab, choose the required
item from the Configuration list in the Configura-
tion group.
Continues on next page
Operating manual - Robot Control Mate 29
3HAC073107-001 Revision: H
© Copyright 2019-2021 ABB. All rights reserved.4 Reference information
4.1 Features in RobotStudio
Continued
Feature group Feature Action
xx1900001371
Log Log viewing View the logs by either of the following methods:
• In the Controller ribbon tab, click Events.
xx1900001373
• Check the logs from the Output area at the
bottom of the RobotStudio window.
xx1900001374
30 Operating manual - Robot Control Mate
3HAC073107-001 Revision: H
© Copyright 2019-2021 ABB. All rights reserved.4 Reference information
4.2 Scenarios for controllers with FlexPendant
4.2 Scenarios for controllers with FlexPendant
Overview
The Robot Control Mate is mainly used for the controller without a FlexPendant.
The FlexPendant can be disconnected from the controller in automatic mode. To
disconnect the FlexPendant in automatic mode the user must have the Safety
Services grant. The administrator must provide this grant using the UAS
Administration Tool in RobotStudio.
Note
In cases where the controller is replaced with a new main computer, a
FlexPendant is required after the replacement to be able to change to automatic
mode. Otherwise, the controller starts in manual mode and the Robot Control
Mate is unable to use.
This section describes how to properly disconnect the FlexPendant from a
controller.
Disconnecting the FlexPendant
Note
The disconnection operation can only be executed on the FlexPendant. Do not
use the Robot Control Mate to disconnect the FlexPendant.
1 On the status bar, tap the QuickSet button.
The QuickSet window is displayed.
2 Tap the Info tab.
The System Info window is displayed.
3 Check the robot type and options.
Make sure the robot type is supported and the option 3018-1 Hot Swappable
FlexPendant exists.
Note
If the controller does not have the option 3018-1 Hot Swappable
FlexPendant, contact ABB to install the RobotWare version with the option.
4 Tap the Control tab.
The Control Panel window is displayed.
5 In the Mode section, check the operating mode and make sure the system
is in Auto mode.
6 Tap the Logout/Restart tab.
The Logout/Restart window is displayed.
7 Tap Detach FlexPendant in the FlexPendant section.
Continues on next page
Operating manual - Robot Control Mate 31
3HAC073107-001 Revision: H
© Copyright 2019-2021 ABB. All rights reserved.4 Reference information
4.2 Scenarios for controllers with FlexPendant
Continued
A message is displayed, prompting to disconnect the FlexPendant within 30
seconds.
Note
The logged-in user must be the one has sufficient grant to disconnect the
FlexPendant. If not, you will get a permission denied message. In this case,
click Log out in the Current User section. Then, log in again using the user
with the Safety Service permission is granted.
8 Tap Disconnect.
A popup window with 30 seconds countdown timer is displayed.
9 Disconnect the FlexPendant within 30 seconds.
32 Operating manual - Robot Control Mate
3HAC073107-001 Revision: H
© Copyright 2019-2021 ABB. All rights reserved.ABB AB
Robotics & Discrete Automation
S-721 68 VÄSTERÅS, Sweden
Telephone +46 (0) 21 344 400
ABB AS
Robotics & Discrete Automation
Nordlysvegen 7, N-4340 BRYNE, Norway
Box 265, N-4349 BRYNE, Norway
Telephone: +47 22 87 2000
ABB Engineering (Shanghai) Ltd.
Robotics & Discrete Automation
No. 4528 Kangxin Highway
PuDong District
SHANGHAI 201319, China
Telephone: +86 21 6105 6666
ABB Inc.
Robotics & Discrete Automation
1250 Brown Road
Auburn Hills, MI 48326
USA
Telephone: +1 248 391 9000
abb.com/robotics
3HAC073107-001, Rev H, en
© Copyright 2019-2021 ABB. All rights reserved.
Specifications subject to change without notice.You can also read