Operator's Licence Information - Transportation | Alberta.ca
←
→
Page content transcription
If your browser does not render page correctly, please read the page content below

Operator’s Licence
                             Information

For Motorcycles, Mopeds
and Power bicycles
A supplement to the Basic Licence Driver's Handbook
Table of                                                                         Boots or shoes . .  .  .  .  .  .  .  .  .  .  .  .  .  .  .  . 22
                                                                                 Gloves . .  .  .  .  .  .  .  .  .  .  .  .  .  .  .  .  .  .  .  .  .  . 23
Contents                                                                         The Rider. .  .  .  .  .  .  .  .  .  .  .  .  .  .  .  .  .  .  .  . 23
                                                                                 Cell phones . .  .  .  .  .  .  .  .  .  .  .  .  .  .  .  .  .  . 24
CHAPTER 1
Motorcycle Licensing and                                                         CHAPTER 3
Operator Information                                                             Knowing Your Motorcycle
Learning to ride. .  .  .  .  .  .  .  .  .  .  .  .  .  .  .  .  . 4            Choosing the right motorcycle. .  .  .  . 26
Getting a Class 6 Licence . .  .  .  .  .  .  .  .  .  . 5                       Get familiar with the
Knowledge test. .  .  .  .  .  .  .  .  .  .  .  .  .  .  .  .  .  . 5               motorcycle controls. . . . . . . . . . . . 26
Road test . .  .  .  .  .  .  .  .  .  .  .  .  .  .  .  .  .  .  .  .  .  . 5   Motorcycle Pre-trip Inspection. .  .  .  . 27
Taking a motorcycle course . .  .  .  .  .  .  .  . 6                            Tires. .  .  .  .  .  .  .  .  .  .  .  .  .  .  .  .  .  .  .  .  .  .  .  . 27
Motorcycle operator information . .  .  .  . 8                                   Wheels. .  .  .  .  .  .  .  .  .  .  .  .  .  .  .  .  .  .  .  .  .  . 28
Requirements to operate a motorcycle .9                                          Drive system. .  .  .  .  .  .  .  .  .  .  .  .  .  .  .  .  .  . 28
Some types of motorcycles . .  .  .  .  .  .  . 10                               Electrical. .  .  .  .  .  .  .  .  .  .  .  .  .  .  .  .  .  .  .  .  . 28
Other two-wheeled vehicle operator                                               Fluids. .  .  .  .  .  .  .  .  .  .  .  .  .  .  .  .  .  .  .  .  .  .  . 28
    information. .  .  .  .  .  .  .  .  .  .  .  .  .  .  .  .  .  . 12         Clutch and throttle. .  .  .  .  .  .  .  .  .  .  .  .  . 29
Moped. .  .  .  .  .  .  .  .  .  .  .  .  .  .  .  .  .  .  .  .  .  .  . 12    Mirrors. .  .  .  .  .  .  .  .  .  .  .  .  .  .  .  .  .  .  .  .  .  . 29
Requirements to operate a moped . . 13                                           Brakes. .  .  .  .  .  .  .  .  .  .  .  .  .  .  .  .  .  .  .  .  .  .  . 29
Power bicycle . .  .  .  .  .  .  .  .  .  .  .  .  .  .  .  .  . 14             Kickstand . .  .  .  .  .  .  .  .  .  .  .  .  .  .  .  .  .  .  .  . 29
Requirements to operate a power
    bicycle . .  .  .  .  .  .  .  .  .  .  .  .  .  .  .  .  .  .  .  .  . 15   CHAPTER 4
                                                                                 Keeping Control
CHAPTER 2                                                                        Position of the Rider. .  .  .  .  .  .  .  .  .  .  .  . 32
Preparing to Ride                                                                Starting . .  .  .  .  .  .  .  .  .  .  .  .  .  .  .  .  .  .  .  .  . 33
Motorcycle helmets . .  .  .  .  .  .  .  .  .  .  .  .  . 18                    Manual (standard) transmissions . .  . 34
Selecting a helmet. .  .  .  .  .  .  .  .  .  .  .  .  .  . 18                  Shifting gears. .  .  .  .  .  .  .  .  .  .  .  .  .  .  .  .  . 35
Safety helmet standards. .  .  .  .  .  .  .  .  .  . 19                         Shifting to a higher gear
Protecting your eyes and face. .  .  .  .  .  . 20                                   (upshifting). .  .  .  .  .  .  .  .  .  .  .  .  .  .  .  .  . 36
Clothing. .  .  .  .  .  .  .  .  .  .  .  .  .  .  .  .  .  .  .  .  .  . 21    Downshifting one or more gears . .  . 36
Hypothermia . .  .  .  .  .  .  .  .  .  .  .  .  .  .  .  .  .  . 22            Turning corners . .  .  .  .  .  .  .  .  .  .  .  .  .  .  . 37
Hyperthermia, dehydration                                                        Starting on an uphill grade . .  .  .  .  .  . 37
    and hot weather. .  .  .  .  .  .  .  .  .  .  .  .  .  . 22                 Traction . .  .  .  .  .  .  .  .  .  .  .  .  .  .  .  .  .  .  .  .  . 38
Braking and Stopping. .  .  .  .  .  .  .  .  .  .  . 39                           CHAPTER 7
Some braking tips. .  .  .  .  .  .  .  .  .  .  .  .  .  . 40                     Group Riding
Stopping distance. .  .  .  .  .  .  .  .  .  .  .  .  .  . 41                     Staggered formation. .  .  .  .  .  .  .  .  .  .  .  . 66
Skids. .  .  .  .  .  .  .  .  .  .  .  .  .  .  .  .  .  .  .  .  .  .  .  . 42   Passing in formation. .  .  .  .  .  .  .  .  .  .  .  . 68
Signaling . .  .  .  .  .  .  .  .  .  .  .  .  .  .  .  .  .  .  .  . 43          Single-file formation. .  .  .  .  .  .  .  .  .  .  .  . 68
Turns . .  .  .  .  .  .  .  .  .  .  .  .  .  .  .  .  .  .  .  .  .  .  . 43
Counter-steering (push-steering) . .  . 44                                         CHAPTER 8
When travelling around a curve. .  .  . 44                                         Riding Under Challenging
Parking . .  .  .  .  .  .  .  .  .  .  .  .  .  .  .  .  .  .  .  .  . 45         Conditions
Hill Parking . .  .  .  .  .  .  .  .  .  .  .  .  .  .  .  .  .  . 46             Riding after dark. .  .  .  .  .  .  .  .  .  .  .  .  .  .  . 70
                                                                                   Riding in Poor Weather. .  .  .  .  .  .  .  .  .  . 71
CHAPTER 5                                                                          Visibility . .  .  .  .  .  .  .  .  .  .  .  .  .  .  .  .  .  .  .  .  . 71
Riding in Traffic                                                                  Temperature extremes . .  .  .  .  .  .  .  .  .  . 71
Protect yourself! Be seen!. .  .  .  .  .  .  .  . 48                              Wind . .  .  .  .  .  .  .  .  .  .  .  .  .  .  .  .  .  .  .  .  .  .  . 72
Road Position. .  .  .  .  .  .  .  .  .  .  .  .  .  .  .  .  . 48                Traction . .  .  .  .  .  .  .  .  .  .  .  .  .  .  .  .  .  .  .  .  . 72
Maintaining a space cushion . .  .  .  .  . 49                                     Road conditions. .  .  .  .  .  .  .  .  .  .  .  .  .  .  . 73
Choosing the best lane position. .  .  . 51                                        Crossing railroad tracks. .  .  .  .  .  .  .  .  .  . 74
Blind Spots. .  .  .  .  .  .  .  .  .  .  .  .  .  .  .  .  .  .  . 52
Large Vehicles. .  .  .  .  .  .  .  .  .  .  .  .  .  .  .  .  . 53               CHAPTER 9
Intersections . .  .  .  .  .  .  .  .  .  .  .  .  .  .  .  .  . 54               Emergencies When Riding
Changing Lanes. .  .  .  .  .  .  .  .  .  .  .  .  .  .  . 56                     Sudden stops. .  .  .  .  .  .  .  .  .  .  .  .  .  .  .  .  . 76
Passing. .  .  .  .  .  .  .  .  .  .  .  .  .  .  .  .  .  .  .  .  .  . 56       Avoiding Obstacles. .  .  .  .  .  .  .  .  .  .  .  .  . 77
Passing parked vehicles. .  .  .  .  .  .  .  .  .  . 57                           Riding over obstacles. .  .  .  .  .  .  .  .  .  .  . 78
Being passed . .  .  .  .  .  .  .  .  .  .  .  .  .  .  .  .  . 58                Tire blowouts. .  .  .  .  .  .  .  .  .  .  .  .  .  .  .  .  . 79
                                                                                   Animals . .  .  .  .  .  .  .  .  .  .  .  .  .  .  .  .  .  .  .  .  . 80
CHAPTER 6                                                                          Flying objects. .  .  .  .  .  .  .  .  .  .  .  .  .  .  .  .  . 80
Carrying Passengers and Cargo                                                      Mechanical Problems. .  .  .  .  .  .  .  .  .  .  . 81
Adjusting to carrying a passenger. .  . 61                                         Stuck throttle. .  .  .  .  .  .  .  .  .  .  .  .  .  .  .  .  . 81
Carrying a passenger . .  .  .  .  .  .  .  .  .  .  . 62                          Wobble . .  .  .  .  .  .  .  .  .  .  .  .  .  .  .  .  .  .  .  .  . 81
Carrying cargo. .  .  .  .  .  .  .  .  .  .  .  .  .  .  .  . 63
Introduction

A message from Alberta Transportation
Riding a motorcycle is a high risk activity. This is because motorcycles
have the disadvantage of being less stable, smaller and more vulnerable
in a crash than other vehicles on the road. New riders are at the greatest
risk of having a collision because they are unfamiliar with the controls and
handling characteristics of motorcycles.

Even if you are an experienced automobile driver, when learning to ride a
motorcycle, be aware that you are once again a beginner. Always ride with
an attitude of safety. Try to anticipate and avoid dangerous situations by
riding tactically. Being involved in a collision can mean a loss of income,
health and possibly a life.

This handbook is a supplement to the Basic Licence Driver’s Handbook, which
is available at all Alberta Registry Agent offices. It is also online at
www.transportation.alberta.ca (under Drivers and Vehicles). The Basic Licence
Driver’s Handbook outlines the rules of the road, which apply to all road users
including motorcyclists. The Operator's Licence Information for Motorcycles,
Mopeds and Power bicycles contains specific information about riding
principles and safe riding tips. These two books contain the information
necessary to help beginner riders prepare for the knowledge and practical
tests required for obtaining a motorcycle licence.

Ride to live.

Alberta Transportation

                                                                                  1
Alberta Transportation recommends that all beginner riders seek
    professional training from a licensed motorcycle training school.

    If further information is required regarding Driver Training Schools
    or the Driver Examination process, please contact a Driver Programs
    Administrator at:

    Edmonton 780-427-8901 or Calgary 403-297-6679
    For toll-free service anywhere in Alberta, call 310-0000.

    All handbooks, knowledge, road testing and licensing services are
    available from any Registry Agent office. To locate these services, refer
    to your local telephone yellow pages or:

    www.servicealberta.gov.ab.ca/Drivers_MotorVehicles.cfm

    This handbook is a guide only and has no legal authority. The laws that
    apply to driving a vehicle can be found in the Traffic Safety Act and its
    related Regulation. This information is available from:

    Queen’s Printer Bookstore
    Park Plaza Building
    10611 – 98 Avenue
    Edmonton, Alberta
    T5K 2P7
    Telephone: 780-427-4952

    For toll-free service anywhere in Alberta, call 310-0000.
    Web site: www.qp.gov.ab.ca/catalogue/index.cfm

2
1
Chapter 1
    Motorcycle Licensing
    and Operator Information
1
    Motorcycle Licensing and Operator Information

    Learning to ride
    A Class 6 licence is required to operate a motorcycle on a public roadway.

    When learning to ride a motorcycle, a person must:

    • be at least 16 years old
    • hold a valid operator’s licence, this can be a Class 7 (learner’s)
    • have an instructor 18 years of age or older with a valid Class 6
      non-Graduated Driver’s Licence (GDL) either seated on the bike, following
      on another motorcycle, or in another motor vehicle.

    Probationary riders in the GDL program are subject to the following
    conditions as well:

    • if they hold a Class 7 licence, they may not ride at night, (night time for
      GDL motorcycle riders is defined as from one hour after sunset or 12:00
      midnight, whichever is earlier, and extends until one hour before sunrise
      or 5 A.M., whichever is later)
    • have a zero alcohol level
    • they will be suspended at eight demerit points than fully licensed drivers
      at 15.

4
1
Getting a Class 6 License (Motorcycle)

Knowledge test
The Class 6 knowledge test is a requirement for obtaining a Class 6
operator’s license, and must be obtained prior to the road test. The
knowledge test questions are taken from this guide and the Alberta Basic
License Driver’s Handbook.

The questions are about safe-driving practices for motorcycle riders, rules
of the road, and traffic control signs and signals, as well as licensing
information.

A fee is charged for each knowledge test.

Road test
The Class 6 operator’s license road test is done in a traffic environment. The
road test is done at a registry agent office or at an approved motorcycle
school.  Tests at motorcycle schools will be available for students who have
completed an authorized training course.

All Class 6 road tests are scheduled by registry agents, who will arrange
for driver examiners to do the tests. This includes tests done at motorcycle
schools.

Driver examiners will assess the rider’s “road-readiness” before entering into
traffic. The driver examiner will ensure the motorcycle is mechanically safe
before the test. If it is not mechanically safe, the driver examiner will not do
the test.

Instructions will be given to the rider prior to the road test. The rider will
also receive instructions in advance of each maneuver and during the test,
by use of a one-way radio.

                                                                                   5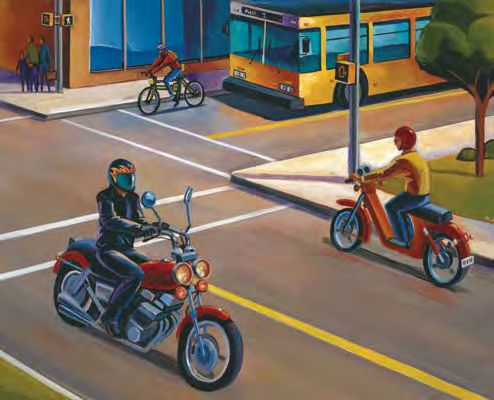
1
    The use of one-way radios will also allow the driver examiner to advise
    the rider of immediate dangers and stop the test if necessary. The driver
    examiner will follow the rider in another vehicle.

    The rider may also stop the test by stopping in a safe location. If the rider
    feels that he or she can not continue, the road test may be stopped by the
    rider and the concern or problem can be resolved.

    The road test is 45 minutes long. This enables the driver examiner to fully
    assess the rider’s skills and abilities in a variety of road and traffic conditions.
    The driver examiner will be checking to see that the rider is following the
    rules of the road, and handling the motorcycle safely. These include proper
    signaling, left and right turns, road position, intersection judgment, speed
    control and balance.

    The individual being tested must provide a motorcycle for the road test.

    A fee is charged for each road test.

    Taking a motorcycle course
    Alberta Transportation strongly recommends that all new riders take a
    course to learn how to safely ride a motorcycle.

    The following are some of the skills taught at these courses.

    •   balance and control by weaving between markers
    •   riding slowly in a straight line
    •   starting on a hill
    •   collision avoidance
    •   shifting around curves
    •   emergency braking
    •   riding in a circle
    •   turning left and right.

6
1
Motorcycle on-lot skill test diagrams
Circle
Serpentine Left /right turns Curve and
and shifting shifting
Hill start
71
Brake test Collision Balance
avoidance
Motorcycle operator information
Motorcycles are defined as follows in the: Traffic Safety Act.
1(w): “motor cycle” means a motor vehicle, other than a moped, that is
mounted on 2 or 3 wheels and includes those motor vehicles known in the
automotive trade as motor cycles and scooters.
The following are also important definitions.
Cycle – “cycle” means a bicycle, power bicycle, motor cycle or moped.
Motor vehicle – “motor vehicle” means (i) a vehicle propelled by any
power other than muscular power, or (ii) a moped, but does not include a
bicycle, a power bicycle, an aircraft, an implement of husbandry or a motor
vehicle that runs only on rails.
81
Vehicle – “vehicle”, means a device in, on or by which a person or thing
may be transported or drawn on a highway and includes a combination of
vehicles but does not include a mobility aid.
Requirements to operate a motorcycle
A person must be a minimum of 16 years old
Minimum age before operating a motorcycle with a Class 7
licence.
Operator licence Yes. Class 6.
Yes. A person shall not operate a motor vehicle on
Registration a highway unless there is a subsisting certificate of
registration issued for that vehicle.
Insurance Yes. Insurance is required for motor vehicles.
Yes. For the rider and passenger. See chapter
Helmet
two for helmet standards.
May only carry as many passengers as the
vehicle is designed for.
Special laws Passengers must ride on a seat that is designed
for passengers and use the foot rests.
May not ride beside another cycle in same lane.
91
Some types of motorcycles
Cruiser Sport Touring
Touring Dual Purpose
101
Trike Scooter
Adventure Tour Sport Bike
111
Other two-wheel vehicle operator information
Moped
A moped is defined as follows in the:
Use of Highway and Rules of the Road Regulation
1(o): “moped” means a vehicle that
(i) is propelled by an electric motor or an engine that has a displacement
of not more than 50 cubic centimetres, and
(ii) is a limited-speed motorcycle under the Motor Vehicle Safety Regulations
(Canada) (C.R.C., c. 1038);
Note:
• Top speed of 70 km/h
• No weight restrictions
• Minimum seat height of 650 mm
121
Requirements to operate a moped
14 years of age, since this is the age for
issuing a Learner’s licence.
Minimum age
A Class 7 Learner’s licence is considered an operator’s
licence when the holder is operating a moped.
Therefore, supervision is not required.
Yes. Class 7 minimum. A licence is required for motor
Operator’s licence vehicles and the motor vehicle definition includes
mopeds.
Yes. A person shall not operate a motor vehicle on
a highway unless there is a subsisting certificate of
Registration
registration issued for that vehicle. The motor vehicle
definition includes mopeds.
Yes. Insurance is required for a motor vehicle and the
Insurance
motor vehicle definition includes mopeds.
Helmet Yes. See chapter two for motorcycle helmet standards.
Mopeds must be operated as far to right side
of highway as practical, or on the shoulder of
a highway if available. May use the left lane
Special laws of one-way in an urban area.
An operator may not carry passengers if under
16 years of age.
131
Power bicycle
A power bicycle is defined as follows in the:
Use of Highway and Rules of the Road Regulation
1 (o): “power bicycle” means a vehicle that is a power-assisted bicycle under
the Motor Vehicle Safety Regulations (Canada) (C.R.C., c. 1038);
Note:
• Electric motor with a maximum power of 500 watts
• Top speed of 32 km/h
• No weight restriction
• Includes power assisted bicycles
141
Requirements to operate a power bicycle
A person who is less than 12 years old shall not drive a
power bicycle on a highway.
A person who is less than 18 years old shall not drive a
Minimum age power bicycle on a highway unless the person carries the
consent of a parent or guardian in a form and manner
approved by the Registrar or holds a subsisting operator's
licence.
No. A licence is required for a motor vehicle, and the
Operator’s licence
definition of motor vehicle excludes power bicycles.
No. A person shall not operate a motor vehicle on
a highway unless there is a subsisting certificate of
Registration
registration issued in respect of that vehicle. The definition
of a motor vehicle excludes power bicycles.
No. Insurance is required for a motor vehicle. The
Insurance
definition of a motor vehicle excludes power bicycles.
Helmet Yes. See chapter two for motorcycle helmet standards.
Power bicycles must operate as far to right side of
highway as practical, or on the shoulder of highway if
Special laws available. May use left lane of one-way in an urban area.
An operator may not carry passengers if under 16
years of age.
151
Notes:
162
Chapter 2
Preparing to Ride2
Preparing to Ride
Wear the proper gear
Motorcycle helmets
In Alberta, operators and passengers of motorcycles, mopeds or power
bicycles must wear an approved safety helmet that is securely fastened to
the person’s head.
Selecting a helmet
There are three types of helmets that provide different levels of coverage.
Full coverage (full face)
• provides the best head protection
• has a visor for eye protection
• has the greatest structural integrity
• provides the greatest protection from the weather
• protects the ears and base of the skull
• protects the lower face and chin.
Three-quarter coverage (open face)
• provides good head protection
• accepts a visor for protection from the weather
and for the eyes
• protects the ears and base of the skull.
One-half coverage (shorty)
• provides limited head protection.
182
When choosing a helmet, wear it for five to ten minutes. This will let you
know if the helmet will become uncomfortable before buying it.
Also, be sure it fits properly all the way around. Fasten it securely on
your head when you ride. If it is possible to remove the helmet without
loosening the chin strap then the helmet is not safe.
Safety helmet standards
An approved helmet will have a sticker to show that it meets current safety
standards. According to the Vehicle Equipment Regulation 322/2002, section 93:
(1) A safety helmet intended for the use of an operator or a passenger of
a cycle must meet one or more of the standards for motorcycle safety
helmets adopted under subsection (3) in effect on the date on which it was
manufactured.
(2) The following are adopted and apply to safety helmets in accordance with
subsection (1):
(a) CSA Standard CAN3-D230-M85;
(b) U.S.A. Federal Motor Vehicle Safety Standard FMVSS 218 Motorcycle
Helmets 1993 OCT;
(c) U.S.A. Federal Motor Vehicle Safety Standards FMVSS 218 Motorcycle
Helmets 2000 OCT;
(d) British Standards Institute Standard BSI-B6658 – 1995;
(e) Snell Memorial Foundation M2000.
(3) A safety helmet must have the mark or label CSA, DOT or BSI or the mark
or label of the organization in subsection (2)(e) indicating that the safety
helmet met one or more of the specifications required on the date on which
it was manufactured.
(4) No person shall buy, sell or offer for sale a safety helmet intended for the
use of operators or passengers of cycles unless it complies with subsections
(1) to (3).
192
Manufacturers recommend that a helmet be replaced after it has been
involved in a collision. Do not buy a used helmet, since there is no way
to determine if it has been in a collision or damaged by other means.
Follow the manufacturer’s recommendations for the usable life expectancy
of the helmet. Do not modify a helmet in any way that would reduce its
effectiveness and certification. For example, do not paint it, clean it with a
solvent or install a microphone and speakers.
Protecting your eyes and face
A plastic shatter-resistant face shield will help protect your face from wind,
dust, dirt, rain, insects and rocks thrown up from other vehicles. These
problems are distracting, painful and dangerous. If you have to deal with
the distractions, you may not be able to give your full attention to the road.
Eyeglasses or sunglasses may not provide adequate protection for your eyes.
There are a number of motorcycle eyewear products suitable for riding that
provide additional protection.
Most motorcycle windshields do not give adequate protection for your eyes
or face. The best protection is a full-face helmet with a built-in face shield.
If you choose a helmet that does not have full-face protection, you should
consider eyewear that is specifically designed for motorcycle riding to
protect your eyes. If you wear corrective glasses, you should wear goggles
that go over the glasses for protection.
To be effective, eye or face shield protection must:
• be free of scratches
• be resistant to penetration
• give a clear view to either side
• fasten securely so it does not blow off
• permit enough room for eyeglasses or sunglasses if needed.
202
Tinted eye protection should not be worn at night or any other time when
the light conditions are poor. If tinted eye protection is used, remember to
carry a clear shield for reduced visibility.
Clothing
Clothing designed for motorcycle riders provides the best protection from
scraps and cuts during a collision. It also protects from weather and debris.
Clothing should be worn in layers so that a rider can adjust to the changing
weather conditions.
Jackets and pants
Jackets and pants should cover your arms and legs completely. They should
be snug enough to not flap in the wind, yet loose enough to move freely
and cover your layered clothing. Sturdy synthetic textiles or motorcycle
thickness leather provides the best protection. Jeans give only minimum
protection and will wear through quickly when skidding on the road surface
in the event of a collision at highway speeds. Riding in lightweight pants,
shorts or lightweight nylon material is not recommended.
Choose bright coloured clothing that will help you to be visible when
riding. Reflective strips on your motorcycle, helmet and jacket will make you
more visible at night.
In cold or wet weather, proper clothing should help keep you warm and
dry. A cold weather jacket designed for motorcycle riding should resist wind
and fit snugly at the neck and wrists. A good quality motorcycle rainsuit will
not balloon or tear apart at highway speeds. It should have long sleeves,
pants and extra room to fit comfortably over your regular riding clothes.
212
Hypothermia
Hypothermia occurs when the body loses internal heat due to cold or
wind chill conditions. Motorcyclists are especially at risk for rapid chilling,
which will lead to a slowing of reflexes and response time. Hypothermia
can also reduce a rider’s ability to concentrate and react to changing traffic
conditions. Even in warm weather, the constant exposure to wind when
riding may cause hypothermia. Proper riding gear such as a windproof
jacket and insulated layers of clothing are essential.
Hyperthermia, dehydration and hot weather
Hyperthermia is when the body temperature rises markedly. It can occur
with overexposure to high temperatures in the environment. To avoid
overheating, a rider should stay well hydrated by drinking plenty of water
prior to and during the ride when taking breaks. Modern motorcycle
specific riding coats and helmets may come with venting, which will
allow for some airflow. Riding without a coat will only make the effects of
hyperthermia worse. Plan for frequent water breaks and rest periods that
are directly out of the sunlight where possible.
In very hot weather, hot wind passing over exposed skin will quickly dry the
moisture out of your body causing dehydration. Wearing a proper jacket
will reduce the chances of becoming dehydrated.
Boots or shoes
Your boots or shoes should cover your ankles and be made of leather or
other synthetic material. The soles should be made of durable slip resistant
material that will provide enough grip to keep your feet from slipping and
you from losing control of the motorcycle. Proper footwear should also
allow you to operate the foot controls effectively. Keep the heels short so
they do not catch on rough surfaces or the controls. Tuck the laces in so
that they do not catch on the motorcycle.
222
Gloves
Wear gloves that allow you to grip the controls and protect your hands
in a crash. It is best to use gloves that are designed for motorcycle riding.
The gloves should be made of leather or similar durable material, be
comfortable, and flexible. They should cover your wrists and overlap the
sleeves of the jacket. Cold weather and water resistant gloves are also
available for cooler weather.
The Rider
Unlike the driver of a car, you have no seat belt or metal around you for
protection in a collision. Always drive with extreme care. You cannot be
sure that other drivers will see you or that they will yield the right-of-way
to you when required. A large number of motorcycle collisions happen
to riders with just a few months of riding experience. You should get the
experience necessary under the best conditions and in light traffic.
To reduce the risk of being in a collision, do the following:
• Be visible to the other motorists by wearing proper clothing
• Make yourself aware of your surroundings and make other motorists
aware of you
• Ride in the best lane and lane position possible to see and be seen
• Use the proper electrical signals and brake lights, (during daylight hours the
use of hand signals helps to increase the likelihood that you will be seen)
• Maintain an adequate space cushion when following another vehicle,
being followed, and when passing or being passed
• Scan your path of travel at least 12 seconds ahead
• Identify and separate multiple hazards
• Be prepared to act by remaining alert and knowing how to carry out
proper collision-avoidance moves.
232
Never ride after drinking alcohol or taking drugs, including many
prescription and over-the-counter drugs. These may affect your abilities
to judge and react. Do not drive when tired or under stress, and avoid
becoming dehydrated.
Cell phones
Cell phones are convenient but can divert attention away from the riding
task. Pull over, when safe to do, to the side of the road when using a
cell phone, including a hands free phone. A good practice is to check for
messages each time you take a break from riding.
243
Chapter 3
Knowing Your Motorcycle3
Knowing Your Motorcycle
Choosing the right motorcycle
When choosing a motorcycle, a rider should consider what type of riding
will be done, as well as the level of experience and skill. It is important that
a motorcycle fits a rider properly. The rider should be able to:
• have both feet flat on the ground as the motorcycle is straddled
• push, park and place the motorcycle on its stand without straining
• reach and operate all controls without straining or stretching.
Know what type of riding you plan to do and choose a motorcycle that is
designed for that purpose and your budget.
Get familiar with the motorcycle controls
You should be completely familiar with the motorcycle controls before
you take it out on the street. This is particularly important when riding an
unfamiliar motorcycle. Be sure to review the owner’s manual.
Light Switch (high/low) Engine Cut-Off
Switch
Choke (varies)
Electric
Turn-Signal Start
Switch Button
Ignition Key
(varies)
Horn Button
Throttle
Clutch Lever Front Brake Lever
Speedometer
& Odometer
Tachometer
(if equipped)
Fuel Supply Valve
(if equipped)
Rear Brake Pedal
Gear-Change Lever
Kick Starter
(if equipped)
Note: Refer to the owner’s manual for the control locations of a specific motorcycle.
263
Before riding a motorcycle, do the following:
• Be familiar with all the controls and be able to operate them without
having to look.
• Know the motorcycle’s gear pattern, work the throttle, work the clutch
and brakes a few times before you start riding.
Motorcycle Pre-trip Inspection
You should make a complete pre-trip inspection of your motorcycle before
every ride. The following information will provide the essentials for an
inspection, but you may want to develop your own way of inspecting a
motorcycle.
Tires
q Air pressure – check that the air pressure in the tires is correct by
referring to the owner’s manual. The information may also be on the
tire.
q Tread – check for uneven or worn tread. These can cause a rider to lose
traction control.
q General wear – inspect for cuts, bulges, damage to the sidewalls and
for objects embedded in the tires.
273
Wheels
q Wire spoke wheels – check for damaged, missing or broken spokes, as
well as spoke tension.
q Mag wheels – check for damage or cracks.
q Rims – check for damage.
Drive system
q Chain – check for tension and lubrication.
q Belt – check for tension and wear.
q Shaft – check for oil leaks.
Electrical
q Lights – check that the taillight and that both high and low beam
headlights work. The headlight should come on when the motor is
running.
q Brake light – check that both brake controls activate the light.
q Turn signals – test both signals by turning them on and off.
q Horn – try the horn to see if it is working.
q Engine cut-off switch – check that it works.
q Instrument lights – check they are working properly.
q Safety interlock switch on the side stand – check that it is working.
Fluids
q Oil – check the oil level.
q Coolant – if the motorcycle engine is liquid cooled, check the fluid
level, and check the hoses for cracks.
q Fuel – check that there is enough fuel for the trip.
q Leaks – check that there are no leaks on the ground under the
motorcycle.
q Brakes – check that the brake fluid level is adequate and check hoses
for leaks or cracks.
q Differential – check that the fluid level is adequate.
283
Clutch and Throttle
q Clutch – when squeezing the clutch lever, check that the cable
moves freely and feels tight. If you have a hydraulic clutch, check for
adequate fluid level.
q Throttle – check that it returns to the closed position easily, without
assistance from the rider.
Mirrors
q Mirrors – make sure both mirrors are clean, properly adjusted and
securely fastened. Adjust each mirror so you can see the lane behind,
and as much as possible of the other lanes on the road next to you.
When properly adjusted, a mirror may show the edge of your arm or
shoulder. Remember that objects in your mirrors may be closer than
they look. Never rely entirely on your mirrors. Shoulder check to see
the traffic behind and to the side of you.
Brakes
q Brakes – try both front and rear brakes one at a time, be sure each one
feels firm and holds the motorcycle when the brake is fully applied.
Kickstand
q Center stand – check for cracks and bends, stand should be secure
when retracted.
q Side stand – check for cracks and bends, stand should be secure when
retracted.
293
Notes:
304
Chapter 4
Keeping Control4
Keeping Control
A motorcycle is a unique vehicle. It requires both skill and a proper attitude
from the rider if it is to be ridden safely. Each motorcycle is different and
will respond differently to rider inputs.
Practice proper motorcycle techniques, including slow speed skills,
countersteering, braking and swerving in a safe place.
Position of the Rider
• Seat – sit far enough forward so that your arms are slightly bent when
holding the handle grips. This will allow you to turn the handlebars
without stretching or moving your shoulders.
• Hands – start with your right wrist as close to flat as possible. Hold the
handle grips lightly but firmly. Use a hand grip that will prevent you from
accidentally using too much throttle, but allows you access to all the
controls. Choose a grip for your motorcycle and physical size.
RIGHT
WRONG
324
• Balance – to help keep your balance, hold your knees with a light
contact against the gas tank and look in the direction you want to go.
Do not look down.
• Feet – should be firmly on the footpegs immediately beside the brake
and shift lever at all times when the motorcycle is moving. Do not point
your feet down. If they drop down, they may get caught between the
road and the footpegs. You need your feet for effective braking and gear
selection. Do not drag your feet or rest them on the controls.
Starting
It is best for beginners to practice starts and stops in a safe, traffic-free
area. Smooth coordination is required between the clutch and the throttle.
Too much throttle can cause a rider to lose control, too little will cause the
engine to stall.
Before starting out check the following:
• If the motorcycle is equipped with an anti-theft lock be sure it is released
allowing the handle bars to move freely from left to right.
• The mirrors are adjusted properly.
• The fuel is turned on.
• The engine cut-off switch is set to the run position.
• The engine is warmed up and running smoothly.
• The lights are on.
Take the bike off the stand before allowing a passenger to get on. Always
check that your footing is secure so that you do not loose your balance
before taking the bike off the stand.
334
Make sure the path in front is clear of:
• children
• pedestrians
• other traffic
• any obstacles.
Before pulling away, make sure it is safe:
• Look over both shoulders to check the blind spots.
• Make sure other road users see you. Many drivers have trouble seeing
motorcycles and may drive in front of them. Most drivers involved in a
collision with a motorcycle say they never saw the motorcycle. Use your
signals and yield to other traffic when entering the traffic flow.
Manual (standard) transmissions
Shifting gears on a motorcycle equipped with a manual transmission is a
skill that requires considerable practice. The rider must learn to change
gears using the left foot to operate the gearshift lever and the left hand to
operate the clutch.
The engine provides power. The clutch is used to transfer power, or
separate power, from the engine to the rear wheel. When the clutch lever
is released, the connection is engaged and the power of the engine is
transferred to the drive wheel of the motorcycle.
When the clutch lever is squeezed, the connection is disengaged. This
prevents the transfer of engine power to the drive wheel. It is while the
connection is disengaged that the rider changes gears.
344
As the rider begins to release the clutch lever, the connection will begin to
engage again. This can be felt before the clutch lever is fully released. The
point where this first occurs is called the “friction zone.”
It is in this friction zone that the rider must coordinate the slow release of
the clutch lever while gently using the throttle to achieve a smooth start
and prevent engine stalling.
When riding, it is important that the proper gear is selected so the engine
does not lug, move the vehicle in rough, bumpy fashion, or race, revs the
engine but does not move the motorcycle effectively. Once the motorcycle
is in motion and the rider has completed shifting to the selected gear,
the hand must be removed from the clutch lever and returned to the
hand grip.
Shifting gears
Smooth and timely gear shifting takes practice but, once learned, will help
you maintain control. The owner’s manual will explain the number of gears
and the optimum speed for each gear. Start out in first gear and gradually
shift up to higher gears as the speed increases. Try to maintain a speed that
is appropriate for the conditions. Remember that the posted speed limit is
the maximum for ideal road and weather conditions.
Remember to always be in the correct gear for the speed at which you
are travelling. You should also be in a gear that will make it possible to
accelerate away from any hazard.
There is more to shifting gears than simply getting the motorcycle to
accelerate smoothly.
354
Shifting to a higher gear (upshifting)
• Accelerate in first gear.
• Turn the throttle off while squeezing the clutch lever.
• Place your foot under the gear change lever and move it upwards to
select the second gear.
• Slowly release the clutch and gently apply the throttle.
A smooth shift to the next gear is the result of a coordinated clutch release
with the application of a small amount of throttle.
Downshifting one or more gears
• Turn the throttle off while squeezing the clutch lever.
• Place your foot on top of the gear change lever. Firmly push the lever
down as far as it will go and then release.
• Slowly release the clutch and gently apply the throttle.
It is important to shift down through each gear when slowing down or
stopping. However, it is possible to come to a complete stop without
releasing the clutch and shifting down to first gear.
Make sure the motorcycle is going slowly enough when shifting to a lower
gear. If the motorcycle is going too fast, it will lurch and the rear wheel
may lock. This is more likely to happen under adverse road and weather
conditions such as rain and loose gravel. Under these conditions you
may need to slow down enough to shift safely. Be aware that any sudden
deceleration by downshifting without braking can surprise the motorist
behind. This is because your taillight will not light to give warning.
364
Turning corners
It is best to shift gears before entering a turn. The entry speed of a turn
should be a speed where you can gently accelerate through the turn. Any
sudden change in power to the rear wheel can affect balance and exceed
the amount of traction available. This can cause the wheel to lock, spin or
create a skid.
Starting on an uphill grade
It is more difficult to get a motorcycle moving on an uphill grade than it is
on flat ground. There is a greater danger of rolling backward into someone
or stalling the engine. Here is the best way to do it.
• With the engine running, use the front brake to hold the motorcycle and
shift into first gear.
• Change to the foot brake to hold the motorcycle while opening the
throttle slightly with your right hand.
• Slowly release the clutch until reaching the friction zone then release the
rear brake while gradually applying more power with the throttle. Avoid
releasing the clutch too quickly since it may cause the engine to stall, or
cause the front wheel to come off the road resulting in a loss of control.
374
Traction
Traction is the amount of grip between your tires and the road surface. Loss
of traction can have disastrous results for the rider of a two-wheeled vehicle.
Some of the most important factors affecting the amount of traction
available are:
• tire compounds – softer compounds provide greater traction at the
expense of a shorter tire life
• tire pressure – maintain pressure according to the manufacturer’s
specifications
• tire tread patterns – select tires that are appropriate for the conditions
you expect to encounter
• road surfaces – asphalt (wet or dry), concrete (wet or dry), metal, snow
and ice, gravel, sand, painted lines, various types of road debris such as
antifreeze, oil, leaves, holes, frost cracks and spilled materials.
Be aware that roads are most slippery during the first few minutes of rain.
The motorcyclist should scan the road surface ahead to determine road
condition. Braking, cornering and acceleration require the most traction.
The rider’s demand for traction will determine how the traction is used.
A rider should always be aware that there is only a certain amount of
traction available. If the demand exceeds the traction available, the result
will be a loss of control.
384
Braking and Stopping
A majority of motorcycles have two brakes which operate independently.
In most cases, there is the hand-operated front brake and the foot-operated
rear brake. When stopping, apply both front and rear brakes at the same
time. The front brake provides about 70% of a bike’s braking power. It is
best to apply the brakes by gradually increasing pressure. This progressive
braking makes it possible to control the amount of braking force needed to
achieve threshold braking.
Some motorcycles are equipped with integrated braking systems that link
front and rear brake operation together. Anti-lock brake systems are also
available on some models. If your bike has either of these systems, check
your owner’s manual for instruction on the best way to use the brakes.
394
Some braking tips
• Make a smooth downshift to avoid a rear wheel skid. Downshifting when
braking will allow you to use engine compression to help the motorcycle
to slow down, but it will not activate the brake light. This will mean that
motorists behind you will not be warned that you are braking.
• Use extra caution when braking in a turn, and on slippery or rough roads.
When possible, avoid braking and turning at the same time.
• Practice controlled stops in a safe, traffic-free area.
• Learn to apply even braking force and acquire a feeling for when your
tires are about to skid. This is called threshold braking.
• You can apply both brakes in a curve after straightening the motorcycle.
When doing this, use caution and take care not to lock either wheel,
especially on slippery road surfaces.
• Shift to first gear while stopping so you can move forward quickly
if necessary.
• Keep at least one brake firmly applied while stopped.
• Riding with your brake partially applied activates the brake light. This may
confuse other drivers, and cause unnecessary wear on the brakes.
• When applying brakes in an emergency, use both brakes to the maximum
effort but do not lock the wheels. Over-braking one or both wheels is one
of the most common causes of skidding.
• If the front wheel locks, release the brake immediately. If the rear wheel
locks when travelling in a straight line, it is safe to slowly release the
brake. If the bike is not travelling in a straight line, then it is best to keep
the rear brake applied until stopped.
• If the skid is caused by over-acceleration, ease up on the throttle and
steer in the direction you want the front of the bike to go.
404
Stopping distance
Not all riders know how much time or distance it takes to fully stop a
motorcycle. As a result, they may make errors in judgement that can lead to
a collision. Three factors determine how long it takes to stop. These factors
are perception time, reaction time, and braking time.
1. Perception time
Perception time is how long it takes for your brain to recognize a
situation and understand the need to stop. This can take about three-
quarters of a second, depending on the rider. Less experienced riders
are often slower to recognize a danger. The time this takes vary greatly
depending on the rider’s visual search skills, level of attention, decision
making abilities, degree of fatigue, and use of alcohol or other drugs.
Perception distance is how far a motorcycle travels during this time.
2. Reaction time
Reaction time is the time it takes to physically react and to start braking.
The average reaction time is three-quarters of a second. Reaction
distance is how far a motorcycle travels during this time.
3. Braking time
Braking time is how long it takes a motorcycle to stop, from the time
the brake is first applied until the motorcycle actually stops. The distance
travelled in this time is called the braking distance. The actual braking
distance will depend on the speed, weight of the motorcycle, traction of
the tires on the road surface, the quality of the brakes, road and weather
conditions and rider skill.
Total stopping distance is the sum of perception distance, reaction
distance and braking distance.
Remember, when you increase your speed, you increase your stopping
distance.
414
Skids
Skids are the result of:
• rider input as to how a rider uses the throttle, clutch, brakes and handles
road conditions
• turning too sharply or at too great a speed
• braking too hard, usually the rear wheel
• accelerating too quickly
• the combined effects of braking and turning on the amount of available
traction.
These rider errors are made even worse by poor road conditions, such
as slippery surfaces or loose sand or gravel. The best way out of a skid is
not to get into one. Plan ahead so you will not be forced to make rapid
adjustments. When you are not familiar with the road, drive slower. If a
skid occurs, don't panic. If handled properly you may be able to get out
of difficulty.
424
Signaling
Do not confuse other drivers by signaling too early or too late. Remember
to cancel the signal light if it does not turn off automatically. In some
situations, use a hand signal as well as a turn signal light to make yourself
more visible to drivers.
Left turn Right turn
Turns
Low-speed steering for a turn
When riding at slow speeds generally less than 20 km/h, a motorcycle can
be steered by turning the front wheel in the direction you want to go. This
requires good balance and coordination between the clutch, throttle and
rear brake. Practice doing this in a safe, traffic-free area. Use a light but firm
grip on the handlebars for all turns.
The application of a turn at an intersection is the same for a motorcycle as
other vehicles. Since motorcyclists are more vulnerable at an intersection,
extra caution and a controlled speed is required when entering, and riding
through a turn.
434
Counter-steering (push-steering) for a curve
When riding at speeds greater than 20 km/h in a curve, you must follow
the lean of the motorcycle and will need to master the skill of counter-
steering (push-steering). Counter-steering means, steering one way to send
the bike in the opposite direction. In a curve at higher speeds, a motorcycle
is pushed outward by centrifugal force. To counter this outward push,
the motorcycle must lean inward. The greater the speed, the more the
motorcycle must lean. To create this inward lean, push on the left handlebar
to turn left and push on the right handlebar to turn right. Increasing
the amount of push will increase the lean to allow a sharper and quicker
change in direction. When the steering input is completed, simply release
the pressure on the handlebar. If necessary, apply pressure on the opposite
handlebar to assist in straightening the motorcycle.
When travelling around a curve:
• Reduce speed when approaching a curve. Many motorcyclists, especially
inexperienced ones, misjudge their speeds and attempt to corner too
quickly. Slow down even more when road or weather conditions are poor.
• If braking or downshifting, do it before the curve.
• Rather than looking at one spot or immediately in front of your bike, turn
your head and keep your eyes looking through the curve to where you
want to go.
• Lean in the direction of the curve by counter-steering (push-steering).
• Avoid slowing down suddenly while in the curve. Sudden changes in
speed while in a curve could cause the motorcycle to lose traction.
• Gently accelerate when leaving the curve.
444
Provide gentle
acceleration
through the curve
Straighten the
bike as you
finish the curve
Lean into the turn by
Slow down pushing forward on the
before the handlebar on the side
curve you wish to lean
towards. Push right - go
right, push left - go left
Parking
Park where it is safe and legal. Signs, curb markings and common sense
will tell a rider where parking is permitted. Park at an angle, other than
perpendicular to the curb or edge of the roadway with your rear wheel
no more than 50 centimetres from the curb.
Note: Motorcycles are permitted to park at an angle where other vehicles are required
to park parallel to the curb.
Your motorcycle may have a centre stand, a side stand or both. These are
usually operated from the driver’s left side.
When leaving your bike parked, make sure the front wheel is turned fully
to the left, locked and the ignition key is removed.
454
Hill parking
When parking on a hill, it is best to park facing uphill to avoid having the
bike roll forward off the stand. If a curb is present, have the rear wheel make
contact with the curb to prevent the bike from rolling back if using a side
stand.
465
Chapter 5
Riding in Traffic5
Riding in Traffic
Protect yourself! Be seen!!
Many motorists do not expect, or see, motorcycles that share the same road
with them. Although a collision may be the other motorist’s fault, that won't
help the motorcycle rider who is more likely to be injured. Riders need to
take a tactical approach when riding in traffic.
Road Position
Experienced riders know that they must constantly adjust and readjust their
lane positions depending on changing traffic and road conditions.
The left portion of a lane, where the left wheels of a vehicle would travel,
is often recommended as the best place to ride on a two lane highway.
On a four lane highway ride in the right portion of the lane so you can:
• be seen by oncoming vehicles more easily
• see oncoming vehicles more easily
• use the full lane you are entitled to, discouraging motorists from trying to
share your lane or move into your lane
• see farther into, and be more easily seen from road junctions on the left
• avoid the slippery area that may be formed in the centre of the lane
caused by leaks from other vehicles.
These points illustrate why it is best to use the left portion of the lane most
of the time. However, there are many times when it is smarter to use the
centre or right portion of the lane in order to expand your space cushion.
485
Maintaining a space cushion
• Avoid remaining beside another moving vehicle or riding in the blind
spot. The other driver might make a sudden shift into your lane. Be sure
you are where the other driver has the best chance to see you.
• Keep your distance. The closer you follow another vehicle, the greater
your risk. The best protection you can have is the distance between
yourself and others. Distance provides three advantages. It allows:
1) time to react and take action in order to avoid a collision
2) you to choose an alternate path should something unexpected happen
3) time to avoid an emergency situation, which could cause you to lose
control or be hit from behind.
• When conditions are ideal, stay at least two seconds behind the vehicle
ahead. At higher speeds, or when road conditions are less than ideal, stay
even further behind.
• Motorcycles can usually stop in a shorter distance than other vehicles,
so try to make room for the vehicles behind you if possible.
Maintain a two second following distance under ideal conditions.
495
• Use the mirror(s) to be aware of vehicles behind you.
• If a vehicle behind you is following too closely, increase your following
distance from the vehicle ahead. This will allow you more space to stop
gradually if necessary. It will also give the vehicle behind more time to
stop, reducing the risk of a rear-end collision.
• A proper following distance allows the driver of oncoming vehicles more
time to see you.
• Never assume that other drivers have seen you. Plan ahead and leave
space for any emergency situation.
• Leave sufficient space when passing parked vehicle’s in case a vehicle door
is suddenly opened into your path.
• Avoid riding too close to the centre line or to the curb since this may
encourage other drivers to attempt to pass you in your lane.
• The law does not allow you to ride between lanes (splitting a lane) or
share a lane with other drivers.
Do not try to pass by squeezing past vehicles
• Be prepared to sound your horn if necessary to make other drivers aware
of your presence.
505
Choosing the best lane position
One of the ways for a rider to be seen is to know and use the best road
position for each situation. There is no single position that is always best.
Here are some things to consider when choosing your lane position.
• Before the crest of a hill, move to the centre or right lane position.
You never know what might be coming over the hill.
• When riding in a curve, choose a position that will give the best view
through the curve ahead.
• Avoid the turbulence or wind blast that is caused by large vehicles. When
a large vehicle is approaching, move to the right lane position and keep
a firm grip on the handlebar. Wait for a while after the vehicle has passed
before returning to your previous lane position.
Move to the right of your lane. Be prepared for turbulence, wind blast
or a change in wind conditions.
515
Blind Spots
Even when the mirrors are properly adjusted, there are large areas behind
and to the side of a rider that can not be seen in the mirrors. These are
called blind spots. Always shoulder check to confirm that your blind spot is
clear of traffic before changing lanes or passing.
When following another vehicle, stay out the other driver’s blind spot as
much as possible.
Vehicle A is using both of the outside mirrors and the inside rear view mirror.
Vehicle A can see motorcycle B.
Vehicle A can not see motorcycles C and D.
Ride where you can be seen clearly in the other vehicle’s rear view mirror.
Stay well back to be seen better. This will
also provide you with more time to react to
the unexpected actions of others and to road
hazards such as potholes and debris.
525
Large Vehicles
It is very important to give large vehicles lots of space. There are large blind
spots both behind and to the side of large vehicles. If you are following a
large vehicle too closely, the driver will not be able to see you and your view
of the road ahead is reduced. Following too closely increases your chances
of a rear end collision. It also creates a hazardous situation by not allowing
enough time to react to avoid any debris or potholes that may be in the
lane.
The “right turn squeeze” could occur if a motorcycle rider is positioned
between a large vehicle that is turning right and the curb. In this position,
the driver of the large vehicle may not see the motorcycle rider. Stay out of
this position. Choose a lane position that allows plenty of distance between
you and the other vehicle.
Stay out of this position
535
Intersections
Many collisions involving motorcycles happen at intersections. Some causes
of collisions at intersections are the result of:
• oncoming vehicles making a left turn in front of a motorcycle
• vehicles entering from a cross street.
To avoid intersection collisions do the following.
• Give yourself lots of room and ride in a lane or lane position that provides
the best view of oncoming traffic. Have a space cushion around the
motorcycle. Position yourself to see and be seen so you can take evasive
action.
• When approaching the intersection, be prepared to apply the brakes if
necessary.
• Always check your mirrors so that you are aware of the traffic behind you.
• Be prepared to change your lane or lane position to separate yourself from
the greatest immediate hazard.
• If your motorcycle stalls in an intersection and cannot be started, walk it
clear of all traffic and out of the intersection. If the motorcycle is equipped
with emergency hazard lights, they should be activated.
545
STOP
STOP
Slow down and be ready to adjust your lane position. If an oncoming driver wants to turn
left, slow down and move to the right portion of your lane, since this will increase the space
between you and the oncoming vehicle. Never assume that the other driver has seen you.
STOP
STOP
If a vehicle is about to enter from the right side of the intersection, stay or move to the left
portion of your lane and be prepared to stop. If a vehicle can enter your path, assume that
it will.
STOP
STOP
If traffic is about to enter the intersection from either side of a road, stay in the left portion of
the lane. Be prepared to take evasive action or stop.
555
Changing Lanes
There is always some risk involved when changing lanes and you must do
it safely. Avoid unnecessary lane changes. The few seconds that you think
might be saved by constantly switching lanes is not worth the risks involved.
Plan ahead so you are not forced into making sudden lane changes.
When changing lanes:
• make sure a lane change is permitted
• check traffic ahead and use your mirrors to check traffic behind you
• because mirrors have blind spots, always glance over your shoulder to the
lane into which you will be moving
• give the proper signal
• look again and, if it is safe, make the lane change.
Passing
Passing another vehicle may look easy but there is always risk involved.
Do not pass unless it is necessary. Ask yourself, “What will I gain?” If it is
necessary to pass, be sure you are passing in a legal passing zone and make
sure it is safe.
Do not pass:
• a vehicle that has stopped for a pedestrian crossing the road
• near or at the crest of a hill
• just before or within an intersection
• at a railway crossing
• on a curve or any place where the view ahead is obstructed
• on the shoulder of the road
• when the traffic in front is slowing down unexpectedly.
565
When passing on a two-way highway:
• ride in the left portion of the lane at a safe following distance to increase
your line of sight
• check ahead for oncoming traffic to ensure you have enough space to
complete the pass safely
• check your mirrors
• shoulder check to the left to ensure that no one is attempting to pass you
• turn on your left signal light
• look ahead for oncoming traffic
• maintain a two second following distance until you are about to pass
• check ahead again to be sure you still have the space necessary to
complete the pass safely
• pass the other vehicle, but remember that you are not permitted to
exceed the speed limit
• after passing the vehicle, pull far enough ahead until you can see the
front of the passed vehicle in your mirror. Check over your right shoulder,
signal, and move back into your travel lane when it is safe to do so.
• passing on the right is permitted only when the road has two or more
lanes going in the same direction, when the vehicle being overtaken is
making a left turn, or if there is a traffic lane available for passing to the
right.
Passing parked vehicles
When passing parked vehicles, stay toward the left portion of your lane.
This will help avoid problems caused by vehicle doors opening or people
stepping out from between parked vehicles.
A bigger problem can occur when a driver pulls away from the curb without
checking that the lane is clear of traffic. The driver may fail to see you even
if a shoulder check is done. In either event, the driver may pull out and
enter into your path so slow down or be prepared to change lanes.
57You can also read