P-00631 (3/2014) Division of Public Health Bureau of Environmental and Occupational Health
←
→
Page content transcription
If your browser does not render page correctly, please read the page content below
Division of Public Health
Bureau of Environmental and Occupational Health
P-00631 (3/2014)
Acknowledgements

The Wisconsin Flood Toolkit was made possible through funding from cooperative
agreement 5UE1/EH001043-02 from the Centers for Disease Control and Prevention
(CDC) and the commitment of many individuals at the Wisconsin Department of Health
Services (DHS), Bureau of Environmental and Occupational Health (BEOH), who
contributed their valuable time and knowledge to its development.

Special thanks to:
Jeffrey Phillips, RS, Building Resilience Against Climate Effects (BRACE) Program Manager,
         DHS
Megan Christenson, MS, MPH, Epidemiologist, DHS
Elizabeth Evans, MPH, Epidemiologist, DHS
Stephanie Krueger, Public Health Associate, CDC/DHS
Eleanor Ganz, BRACE Toolkits LTE, DHS

For more information, please contact:
Jeffrey Phillips, BRACE Program Manager
Department of Health Services
Bureau of Environmental and Occupational Health
1 W. Wilson St., Room 150
Madison, WI 53703
Jeffrey.Phillips@dhs.wisconsin.gov
608-266-6761

Cover photos courtesy of: FEMA and Northland News Center

                Division of Public Health
                Bureau of Environmental and Occupational Health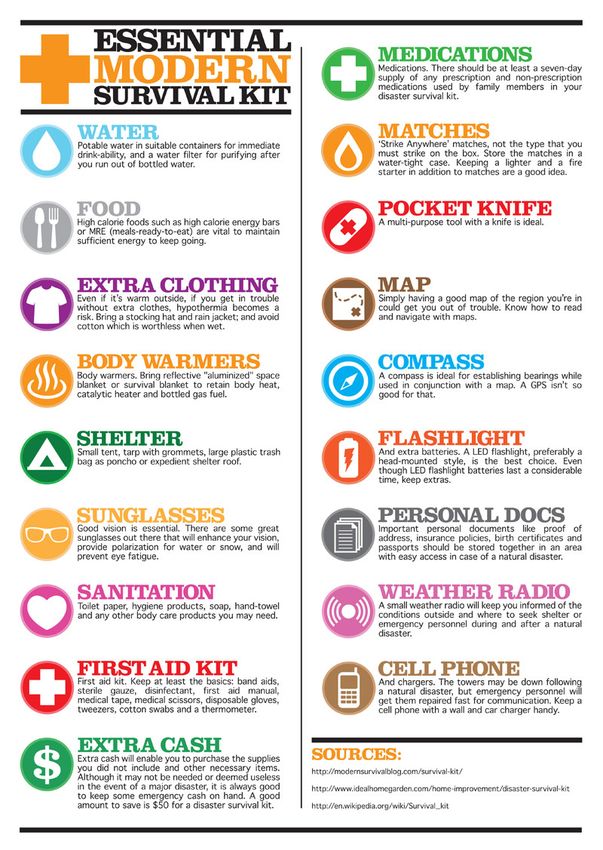
Contents

Introduction
Purpose
Background
Climate Trends
Health Impacts
Flood Response and Recovery Guidance

Definitions

Guides
Guide 1: General Flood Information
Guide 2: Flood Preparedness
Guide 3: Disinfecting Your Well and Water System
Guide 4: Re-entering Your Home
Guide 5: What to Do with Food after a Flood
Guide 6: Cleaning and Sanitizing with Bleach after an Emergency
Guide 7: Mold Clean-up with Bleach
Guide 8: Suggested Talking Points about Floods
Guide 9: Message Maps during a Flood Event

Appendices
Appendix A: References
Appendix B: Additional Resources
Introduction
Purpose
The purpose of this flood toolkit is to provide information to local governments, health
departments, and citizens in Wisconsin about preparing for and responding to flood events.
The toolkit focuses on providing background information, practical guidance, strategies,
media releases, talking points, definitions, and useful reference materials on this topic. The
guides in this toolkit may be copied and printed onto local government or health agency
letterhead for distribution to residents affected by flood. Additional documents may be
found in Appendix B, Additional Resources.
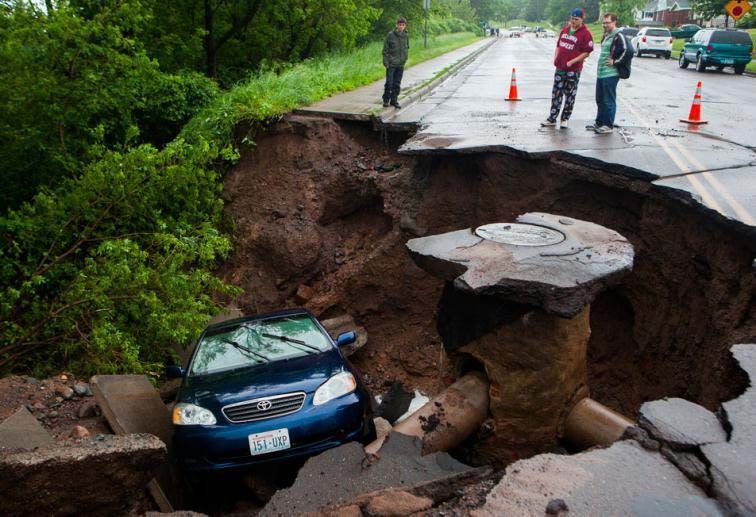
Background
Although Wisconsin does not
have exceptionally steep
terrain, mountain slopes, or
low-lying coastlands, significant
areas of the state are flooded
every year. Flooding in
Wisconsin is generally caused
by the accumulation of
excessive surface runoff in low-
Image Source: WICCI
lying flat areas or the
overflowing of rivers and lakes. Routine annual flooding poses a danger to human life and
safety, causes significant damage to property and infrastructure, and negatively affects the
state’s economy. From 1990 to 2008, Wisconsin experienced eight flood-related fatalities¹
and countless injuries caused by responding to and recovering from flood events. Flooding
in southwestern Wisconsin in 2008 was responsible for property damage, agricultural
losses, and business losses with an estimated value of $764 million to $1 billion.2 Based on
these data, preparing for flood events remains a priority for Wisconsin governmental units,
citizens, and businesses.
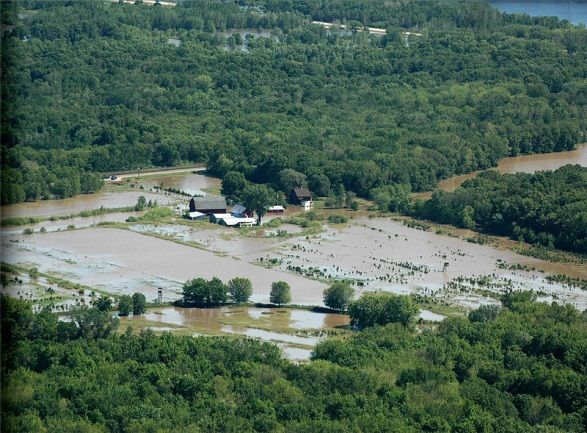
Climate Trends
Long-term trend analysis of Wisconsin’s climate indicates that the state is becoming
warmer and wetter. Climate data has provided evidence that parts of southern and
western Wisconsin have had an increase in annual precipitation of 7 inches above the
1950-2006 average. After analyzing historical climate data from 1950 to 2006 and
developing downscaled local climate models, University of Wisconsin climate scientists
created potential climate projections based on the historical trends and scientifically
validated models.3 Several of the modeled
outcomes suggest that flooding may
become much more likely, and more
intense, in coming years.

These projections suggest that Wisconsin
emergency planners may be faced with
more precipitation, coming in more
frequent and intense storms, and more
runoff, especially during the winter when
soil may be frozen.3

Health Impacts
These projections also suggest that                                       Image Source: WICCI

Wisconsin may need to prepare for many more public health
impacts due to flooding, including drowning, contaminated drinking water, damaged and
dangerous property, and exposure to mold. Emergency planning must consider flooding
needs, such as access to safe food and drinking water, safe use of electrical and heating
appliances, and transportation out of flood zones.
Flood Response and Recovery Guidance
Under the Wisconsin “Home Rule” principle, flood preparedness and response are
considered local activities. The local or county Emergency Management office, health
agency, or police/fire first responders will be the lead agency during a flood event.
However, when requested, state resources will be provided to assist and support the local
response.

 Image Source: Google
Definitions

Surface Water Flooding
     Flooding due to increased flow volumes in river and stream beds reaching over their
     banks, increased flow volumes released from breached dams and impoundments,
     high volumes of overland flow (runoff), or increased recharge causing lake water
     levels to rise over their shorelines.

Groundwater Flooding
     Flooding due to increased recharge causing the water table to rapidly rise, either
     forcing water to flood above the ground surface or forcing water by hydraulic
     pressure through cracks and crevices and into basements.

Septic System
     A privately owned and operated home wastewater disposal system which includes:
     conventional septic tank/drain field systems, dry wells, holding tanks, mound
     systems, and alternative treatment systems.

Safe Water Supply
     Drinking water is considered to be “safe” when it is determined to be free of
     coliform bacteria by a certified laboratory following approved standard methods.
     The accepted standard is “0” colony-forming units (cfu) of coliform bacteria per
     100-ml of water or a “negative” result using a presence/absence sampling medium.

Flood/Flash Flood Watch
     Flooding or flash flooding is possible in the flood watch area.

Flood/Flash Flood Warning
     Flooding or flash flooding is already occurring or will occur soon in the warning
     area.
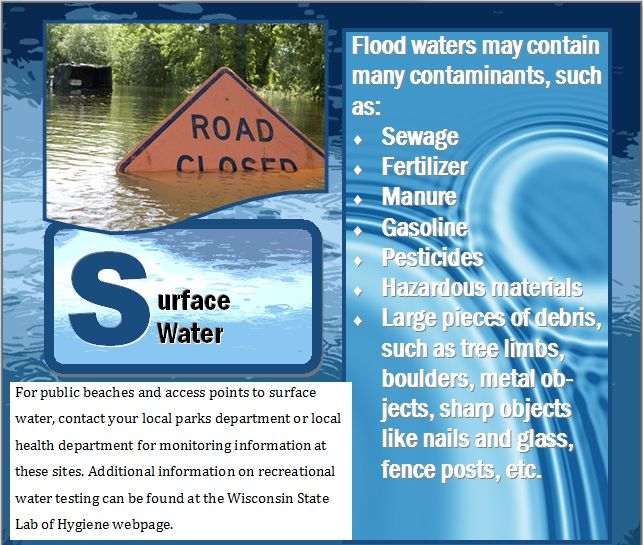
Guide 1: General Flood Information

      Do NOT swim or bathe in rivers, streams, creeks, or lakes in flooded areas!

Local Public Health Department Contact Information:
Water Testing Information: http://www.slh.wisc.edu/environmental/microbiology/
Drinking Water Issues
Be sure to check with your local health department
regarding well testing kits, well disinfection information,
or available flooding resources.

Municipal Water Users
•   Turn on and run faucets for at least five minutes
    before using water for drinking or food preparation.
•   If a "boil water" notice is issued, follow any directions
    given by the Wisconsin Department of Natural
    Resources, local water utility, or local health
    department.

Private Well Owners
•   Private well owners whose well has been flooded
    should assume that flooded wells are contaminated.
•   Do not drink or bathe in water from a private well that
    has been or is flooded.
•   Wait until floodwaters have receded before sampling
    or disinfecting your well.                                  For more information contact your local zoning office,
•   To sample your water supply yourself, obtain a well         code administrator, or sanitary inspection office.
    water testing kit from your local public health
    department.
•   If contamination is found, disinfect your well/water
    supply. See guide on Well Disinfection.
•   Until the test results are known, follow these
    procedures to ensure safe drinking water:
    o   Drink bottled water or water from a known, safe
        source.
    o   If necessary, you can make water safe to drink by
        boiling it for five minutes.
•   When in doubt, if the water is CLOUDY, ODOROUS,
    COLORED - DO NOT DRINK THE WATER!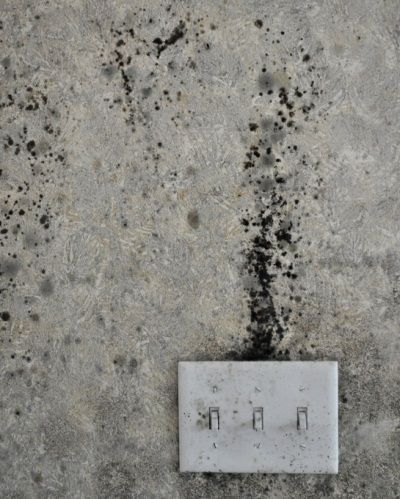
Guide 2: Flood Preparedness

Secure your home:
• Contact your local health department to familiarize yourself with community emergency
   plans.
• Speak to your insurance company about flood coverage.
• List emergency numbers and contacts near phones.
• If you live in a flood zone, raise electrical components, furnace, and water heater above
   flood zone level.
• Install backflow valves for drains, toilets, and other sewer connections.
• Install sump pumps with backup power.

In case of a flood watch or warning:
• Gather emergency supplies (see next page).
• Stay informed – listen to local weather reports.
• Turn off power.
• If time allows:
    o Bring outdoor possessions indoors and secure them.
    o Fill bathtubs, sinks, and plastic bottles with clean water.
• Do not walk through water. If water levels begin to rise, immediately seek higher ground.
• Prepare for evacuation:
    o Make transportation arrangements and make sure the gas tank is full.
    o Check on friends, family, and neighbors that may be isolated or unaware of the situation.
    o Collect important documents including ID cards, insurance cards, and medical records.
    o Map a safe evacuation route in advance.

In case of an ordered evacuation:
• Turn off the gas, electricity, and water.
• Disconnect appliances.
• Listen to evacuation orders and follow evacuation route.
    o Take emergency supplies, as outlined on the next page.
• Avoid flood zones and remain informed by listening to weather reports.
http://www.bt.cdc.gov/disasters/floods/readiness.asp
http://www.redcross.org/images/MEDIA_CustomProductCatalog/m4340128_Flood.pdf
*Note: Have one gallon per person per day for at least three days. *Note: Pack at least a three-day supply of non-perishable food- and don’t forget the manual can opener!
Guide 3: Disinfecting Your Well and Water System

                                     DO NOT TURN ON THE PUMP!
Step 1: Close the valves so you will bypass your water softener and any other water
treatment equipment. A strong chlorine solution can damage this equipment. You should
disinfect these devices separately following the manufacturer’s instructions.

Step 2: Calculate the amount of bleach needed for your well according to the following
table:

                                           .

               http://www.cdc.gov/healthywater/emergency/safe_water/wells/disinfection_wells_bored.html

Step 3: Using water from a known, safe source, add a volume of water – at least as great as
the volume of water standing in the well – and the bleach into new, clean garbage cans or
other comparable containers.
   •     When handling bleach, wear rubber hand and eye protection.

Step 4: Turn off the power supply to the well, remove your well cap or seal, and note any
issues with the well that may need repair.
Step 5: Carefully pour the bleach solution down the well in one continuous pour. Step 6: Connect a new, clean hose to a nearby hose faucet and turn the electrical power back on. Step 7: Turn the water faucet on and recirculate the chlorinated solution through the hose and back to the well. Be sure you rinse the inside surface of the casing, all the way down to the bottom of the well. Step 8: Turn off the electrical power and drain both the pressure tank and the water heater. (Doing this will allow the water from these tanks to be totally replaced by the chlorinated solution.) Step 9: Turn the electrical power to the pump back on. Let the well water refill the pressure tank and water heater. Step 10: Turn on every water faucet, both inside and outside, until you can smell chlorine in each one. Step 11: Turn off every faucet, and allow the chlorine solution to remain in the well and plumbing system at least overnight, but preferably for 24 hours. Step 12: Flush the chlorine solution from the entire water system by using a hose connected to an outside faucet. Run the chlorinated water out of the system, but not into your septic system or into surface waters. Step 13: Keep running the water until you can no longer notice a smell of chlorine at any faucets. Step 14: Wait a few days, and then resample your well water to make sure it is bacteriologically safe to drink.
Guide 4: Re-entering Your Home
    A home that is flooded might be contaminated with mold or sewage, which can cause health risks
    for your family. There might also be safety risks if your gas and electric service was interrupted.
    The following tips will help you avoid or reduce health and safety risks as you re-enter your home.

               Avoid the Flood Zone

•    Turn Around, Don't Drown®6: The Centers for Disease
     Control and Prevention (CDC) reports that half of all
     flood-related drowning occurs when a vehicle is
     driven into floodwaters. The next highest percentage is
     due to walking into or near flood waters.
•    Two feet of rushing water can carry away most
     vehicles, and six inches can knock over an adult.
•    Stay out of areas that are barricaded or closed.
                                                                    Natural Gas Safety

                                                    •   If you notice a natural gas odor when entering your
                                                        home, do NOT enter. Immediately call your local utility
                                                        company or fire department.
                                                    •   Have your furnace or gas appliance inspected by a
                                                        professional repair person, and then have them relight the
                                                        appliance or furnace.
                                                    •   While waiting for your furnace to be relighted, do NOT use
                                                        other heating sources, such as gas space heaters, grills, or
                                                        other appliances, that can give off dangerous fumes.
                                                    •   Carbon monoxide produced by gas appliances is
                                                        dangerous and can be fatal. If using a portable generator,
                                                        keep it outside and far away from the building. Breathing the
                                                        exhaust fumes from a portable generator could result in
                                                        death in minutes.
Electrical Safety
• Never turn power on or off while standing in water.
• Have your electrical system inspected by an electrical contractor
or building inspector.
• Any electrical outlets that were submerged MUST be
inspected for safety.
• If you have electrical problems, call your local utility company.
• Electrical appliances that were exposed to water must be
completely dry before use. Note: Electrical motors that were
submerged probably will not work (e.g., refrigerator motor).
• If you use electric heaters, be careful to place them away from
items that can burn. Do not leave electric heaters unattended.
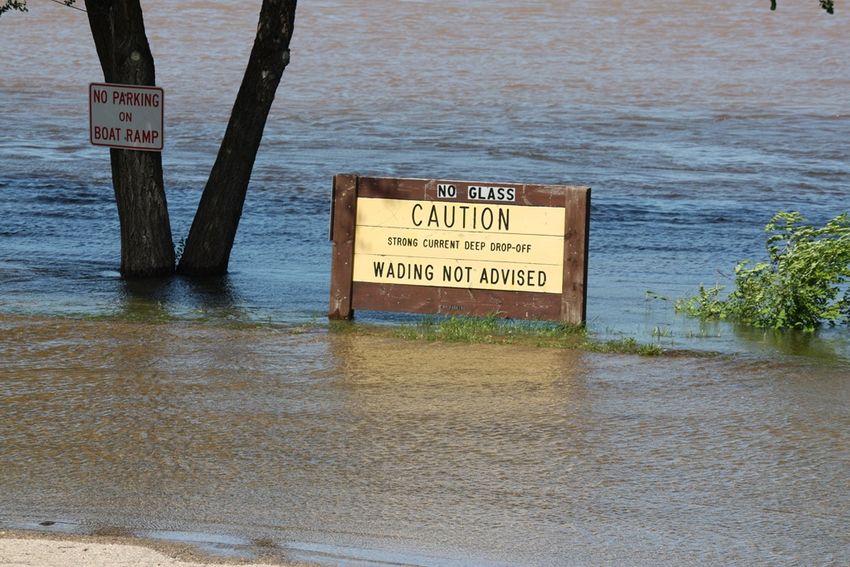
Water Damage
• Buildings that have been flooded should be inspected by a
building inspector for structural damage before re-occupancy.
• If your basement is flooded, don’t rush to pump it out. If you
drain your basement too quickly, the pressure outside the walls
will be greater than the pressure inside, which may cause the
basement floor and walls to crack and collapse.
• Broken water pipes may have created puddles in your home.
Using electrical appliances while standing in water can
cause electric shock or electrocution.
• If you receive a cut or puncture wound while cleaning your
home, tetanus shots are available through your local public
health department.
• If you are on municipal water, run water faucets for at least five
minutes before using water for drinking or food preparation. If a
Image Source: Google
Note: Damaged or wet flooring, carpeting, furniture, "boil water" notice is issued, follow any directions given by the
drywall, insulation, etc., should be removed and
disposed of to prevent mold growth. In case of water Department of Natural Resources, the local utility company, or
damage, contact your local public health department
for a list of plumbers and a flood brochure. your local public health department.Guide 5: What to do with Food after a Flood
Type of Food Proper Action after Flood
Baby formula Use only pre-prepared, canned baby formula that requires
no added water.
Food not in waterproof Discard if they have come into contact with floodwaters.
containers
Canned foods Discard if damaged.
(Undamaged, commercially canned foods can be saved if
you remove the can labels, wash cans, and disinfect with
one cup bleach to five gallons of water. Re-label cans,
including expiration date, with a marker.)
Screw caps, snap lids, crimped Discard if they have come into contact with floodwaters.
caps (soda pop bottles), twist
caps, flip tops, and home-
canned foods
Refrigerated or frozen food Check food for spoilage by odor and appearance.
Perishable foods left at room temperature for more than
two hours should be thrown out.
Frozen food that has thawed should be thrown out.Guide 6: Cleaning and Sanitizing with Bleach after an
Emergency
Cleaning and sanitizing your household after an emergency is important to help prevent the
spread of illness and disease.
Using Cleaning and Sanitizing Products
1. Wash surfaces with soap and warm, clean
water to remove dirt and debris.
2. Sanitize surfaces with a bleach solution (see
below for instructions to make a bleach
solution).
It is critical to read and follow the safety instructions
on any product you use. Below are important safety
guidelines when using sanitizing products:
• WARNING: Never mix bleach with ammonia or any other cleaner. This creates
toxic gases that are dangerous and can cause serious injury. Ammonia is commonly
found in window cleaners – check the cleaner bottle to see if it contains ammonia.
• Wear rubber boots, gloves, and eye protection.
• If using bleach mixtures indoors, open windows and doors to allow fresh air to
enter.
Cleaning and Sanitizing with Bleach
Use regular unscented 5% household bleach and follow the instructions in the attached
charts.Recommendations for Cleaning and Sanitizing Various Surfaces with
Bleach and Water
Area or Item to be Amount of Bleach and Cleaning Steps
Cleaned Water to Mix
Bleach Water
Amount Amount
Clean and Sanitize Food Cans and Surfaces
Food surfaces that may 1 1 gallon 1. Wash with soap and
warm, clean water.
have touched teaspoon
2. Rinse with clean
floodwaters
water.
(Examples: 3. Dip or rinse in a
countertops, cups and sanitizing solution of
plates, flatware) 1 teaspoon of bleach
per 1 gallon of clean
Note: Throw away wooden water.
cutting boards, infant toys, 4. Allow to air-dry.
baby bottle nipples, and
pacifiers.
Food cans that are not 1 cup 5 gallons 1. Remove can labels.
2. Wash cans with soap
bulging, open, or
and warm, clean
damaged
water.
3. Dip cans in mixture
of 1 cup of bleach per
5 gallons of water.
4. Allow to air-dry.
5. Re-label cans with
permanent marker.Clean and Sanitize Other Household Surfaces and Items
Surfaces that do not 1 cup 5 gallons 1. Clean surface with
soap and warm, clean
soak up water and that
water.
may have touched
2. Rinse with clean
floodwaters water.
(Examples: floors, stoves, 3. Sanitize using a
sinks, certain toys, mixture of 1 cup of
countertops, and tools) bleach to 5 gallons of
water.
4. Allow to air-dry.
Clean Mold Growth From Hard Surfaces
Mold growth on hard 1 cup 1 gallon 1. Mix 1 cup of bleach
in 1 gallon of water.
surfaces
2. Wash surfaces with
(Examples: floors, walls,
the bleach/water
windows, stoves, sinks,
mixture.
certain toys, countertops,
3. If surfaces are rough,
flatware, plates, and tools)
scrub them with a
stiff brush.
4. Rinse surfaces with
clean water.
5. Allow to air-dry.
Source: CDCGuide 7: Mold Cleanup with Bleach
Before you clean
Fungi (molds) need a source of moisture, a source of
organic matter, and proper temperature. After a flood
event, the floodwaters will have soaked carpeting,
furniture, building materials (drywall, wood studs,
flooring, etc.), creating a suitable environment for
mold growth. These materials must be removed or
completely dried out to prevent mold from growing.
Areas inside your home that have poor air movement
and retain moisture are likely areas for future mold
Image Source: Google
growth. Remove any sources of moisture, and repair
damage that may contribute to moisture.
If I see mold in my home should it be tested?
Testing for mold is generally not necessary. If you can
see and smell it, you have a mold problem. In flood
situations, mold growth may begin on the back side of
wet drywall, between building substrates, or under wet
carpeting. It may not be visible, but you may notice a
musty or moldy smell. Elimination of wet, flood-damaged
building materials, furnishings, and personal items will
be necessary to prevent mold problems. If ongoing mold
problems occur, it is recommended that you have a
thorough inspection to determine the cause of the mold
growth. The Wisconsin Department of Health Services
recommends that you hire a consultant specializing in
Image Source: FEMA building assessments to evaluate your entire house.How can I clean up mold in my home? Occasionally, mold can be found in the bathroom - on a windowsill, shower curtain, or wall. This mold can be wiped off the surface with a damp cloth and cleaning agent (e.g., window or bathroom cleaner). Preventing mold growth requires controlling the moisture source. This may be as simple as using a dehumidifier or fixing a simple leak. For larger mold problems (about 10 square feet), follow the instructions on Image source: CDC the next pages.
Step 1: Preparation Phase – What you need:
•   Plastic sheets, at least 4 mm thick, to cover door openings, floors, and vents
•   A breathing respirator that covers mouth and nose with HEPA cartridges
•   Three spray bottles/plant misters
•   Paper towels or disposable rags
•   Heavy-duty plastic garbage bags
•   General household cleaner (without ammonia)
•   Regular household bleach (between 1% to 5% chlorine)
    o   Note: Bleach is typically not necessary to clean up mold, unless a sewage release occurred. In that
        case, both mold and bacteria can be reduced by using a bleach solution as a final disinfecting rinse.
•   Latex or rubber gloves and goggles
•   A one-cup measuring container
•   Three buckets that will hold at least one gallon of water each
•   Commercial grade HEPA vacuum
    o   Do not use a home vacuum since it is not designed for this type of work. Contact your local health
        department to find out where to rent a HEPA vacuum in your area.
•   Dehumidifier
    o   Do not use a fan since it can cause mold spores to be released.
Step 2: Mixing Phase
•   Spray bottle #1: Mix general household cleaner and water in a bucket; then transfer to spray bottle
    (follow manufacturer’s instructions).
•   Spray bottle #2: Add 1 cup bleach to every gallon of tap water in a bucket; then transfer to spray bottle.
    o   Note: Bleach is necessary when there has been a gray (laundry) or black (sewage) water release.
        Use precautionary measures, such as gloves and eyewear, when handling bleach.
•   Spray Bottle #3: Clean, warm water for rinsing.
WARNING: Do not mix bleach with household cleaners that contain ammonia. If ammonia is mixed
with bleach, a toxic gas can form, causing serious injury or death.
Step 3: Application and Cleaning Phase
•   Prepare the work area:
    o   Seal off the room from the rest of the house with the plastic and tape.
    o   Keep children and animals out of the work area.
    o   Do not eat, drink, use gum/tobacco, or smoke at any time during cleaning.
    o   Use a dehumidifier prior to, during, and after the cleanup to keep areas dry and prevent mold from
        reoccurring.
CAUTION: The bleach solution is irritating and harmful to the skin, eyes, and clothing. Avoid direct
contact with the bleach by wearing rubber gloves, respirator, and goggles during the entire mixing
and cleaning process.
• Removing the mold:
o Removing visible mold – Spray with general household cleaner (spray bottle #1). Start from the
top and work down, changing towels frequently. Discard towels in plastic bag. Rinse the same area
with clean water on a damp towel or lightly spray with warm rinse water in a spray bottle (spray
bottle #3) and wipe with a clean towel.
Repeat until all visible mold is gone.
o Removing mold and water –Spray with bleach solution (spray bottle #2), wipe affected area of
mold, and let set for 15 minutes. Rinse the area with a damp towel using clean, warm water or by
lightly spraying with warm rinse water in a spray bottle (spray bottle #3) and wiping with a clean
towel.
Step 4: Cleaning up the Work Area
• Once the surface is dry to the touch, use the HEPA vacuum to remove allergens. Place HEPA vacuum bag
into a garbage bag. Tightly tie the garbage bag and dispose of it as you would your everyday household
garbage.
• Flush wastewater down a toilet, utility sink, or floor drain.
• Change out of your cleaning clothes and wash them separately from your family’s laundry.
• Wash hands and face.
- At this point, you can apply paint or other coating to the surface. You may wish to use a paint/coating
that contains a fungicide to prevent future mold growth. Be sure to follow the manufacturer’s
instructions and recommendations when using any mold-resistant paint or paint additive.
Remember, these are also pesticides and may have adverse health effects on some individuals.
o Note on Use of Ozone Air Cleaners:
Do not use ozone air cleaners to kill mold. Ozone air cleaners generate ozone: a known respiratory
irritant. The U.S. Environmental Protection Agency (EPA) does not recommend using ozone-
generating air cleaners for treating indoor mold problems. If a contractor recommends the use of an
ozone-generating air cleaner to treat mold problems in your home, please file a complaint with the
Department of Agriculture, Trade, and Consumer Protection at 1-800-422-7128.Guide 8: Suggested Talking Points about Floods
These talking points may be inserted into Message Maps for outreach broadcasts pre-flood,
during the flood, and post-flood. See the example on the following page.
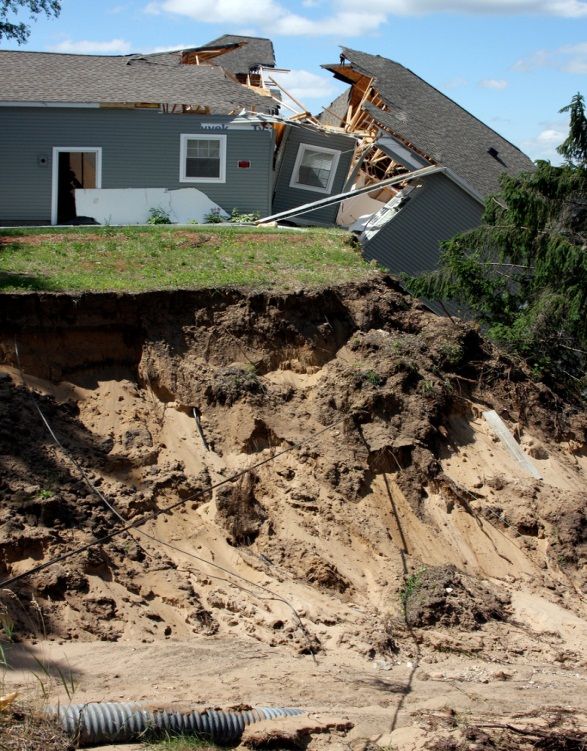
Pre-Flood Event Messages
• Prepare a family plan, and have emergency telephone numbers available.
• Assemble a disaster supply kit with enough food, water, and other
supplies for at least 72 hours.
• Obtain a National Weather Service (NWS) Emergency Band Radio or
portable radio. Have extra batteries.
• Follow the guidance provided in broadcasted flood warnings.
During the Flood Event Messages
• Follow broadcasted evacuation guidance.
• Stay out of floodwaters if possible. Floodwaters may contain bacterial
contaminants, hazardous substances, and debris or sharp objects.
• Don’t travel into or through floodwaters, if possible. Obey warning and
road-closed signs.
• Don’t attempt to save household possessions during the flood event. Wait
until dangerous flood conditions have passed.
Post-Flood Event Messages
• Be sure the flood zone has been secured and hazardous conditions
(e.g., downed power lines) have been eliminated.
• Before entering into any building, be sure the building has been inspected
for structural integrity and that hazards (e.g., natural gas leaks) have been
eliminated.
• Attempt to assess damage and losses, and estimate value of damage to
provide a community-wide damage assessment.
• Attempt to begin cleanup assessment and identify options quickly to
minimize water damage and environmental contamination issues.Guide 9: Message Maps during a Flood Event
Message mapping is one of the most important risk communication tools that public health
agencies can employ. The goal of a message map is to convey important information in a
concise and straightforward fashion.
General guidelines to follow when creating a
message map include:
Conciseness
• Stick to three key messages or one key
message with three parts for each
underlying concern or specific question.
• Keep key messages brief. The reader
should ideally spend less than 10 seconds
per line.
• Develop messages that are easily
understood by the target audience. (For
communications with the general public,
use a 6th to 8th grade readability level.)
Brevity
• Place messages within a message set. The
most important messages should occupy
the first and last positions.
• Develop key messages that cite credible
third parties.
• Use graphics and other visual aids to
enhance key messages.
Clarity
• Keep a positive tone. Messages should be
solution oriented and constructive. Try to
balance negative messages with positive
ones.4
• Avoid unnecessary uses of the words no,
not, never, nothing, and none.5The following is a message map that could be used when addressing the general public
regarding flood response and safety.
Main Message: “At this time, the City/County of___________ has experienced
significant flooding. To help you and your loved ones stay safe during this event…”
Key Messages Supporting Information
(3 key messages) (3 items of supporting information for
each key message)
Supporting Information 1:
Message 1: Listen to messages being broadcast by Emergency
Follow broadcasted evacuation Management, your local news media, or your local
guidance. governmental leaders regarding evacuation
procedures.
Supporting Information 2:
Those living alone can be isolated and unaware of
the dangers posed by flooding.
Supporting Information 3:
Check on your neighbors, friends, and relatives.
Message 2: Supporting Information 1:
Stay out of flood waters, if at all Floodwaters may contain many contaminants,
possible. including bacteria, viruses, hazardous wastes,
debris, and sharp objects.
Supporting Information 2:
Half of all flood-related drowning occurs when a
vehicle is driven into floodwaters. Follow this
advice: Turn Around, Don't Drown®.5
Supporting Information 3:
The next highest percentage of drowning is due to
walking into or nearby floodwaters.
Message 3: Supporting Information 1:
Don’t attempt to save or salvage Wait until flooding has receded before attempting
personal items during the flood. to salvage belongings.
Supporting Information 2:
Don’t attempt to enter the flood zone until
authorities have declared the area safe.
Supporting Information 3:
Don’t return to a flood-damaged home until it has
been inspected for structural safety and hazards.Appendix A: References
1 National Weather Service Weather Forecast Office, Milwaukee/Sullivan, WI. Floods
and Flash Floods. (http://www.crh.noaa.gov/mkx/?n=flashfloodflyer)
2 National Weather Service. Hydrologic Information Center – Flood Loss Data.
(http://www.nws.noaa.gov/hic/index.shtml)
3 Climate projections in this toolkit come from: Wisconsin’s Changing Climate:
Impacts and Adaptation. 2011. Wisconsin Initiative on Climate Change Impacts.
Nelson Institute for Environmental Studies. UW-Madison and Wisconsin
Department of Natural Resources, Madison, WI.
4 Covello VT. Message mapping. Accessed March 7, 2014 at:
http://www.orau.gov/cdcynergy/erc/content/activeinformation/resources/Covell
o_message_mapping.pdf
5 National Weather Service. Turn Around Don’t Drown®.
(http://tadd.weather.gov/tadd-intro.shtml)Appendix B: Additional Resources
Wisconsin Department of Health Services (DHS): Flood Hazards and Recovery
http://www.dhs.wisconsin.gov/flood/index.htm
DHS: West Nile Virus and Mosquito Bite Prevention
http://www.dhs.wisconsin.gov/communicable/ArboviralDiseases/WestNileVirus/I
ndex.htm
Wisconsin Emergency Management, “Ready Wisconsin”: Flooding
http://readywisconsin.wi.gov/flooding/default.asp
American Red Cross: Flood Safety
http://www.redcross.org/prepare/disaster/flood
American Red Cross: Flood Information in Other Languages
http://www.redcross.org/prepare/disaster-safety-library
American Red Cross: Flood Safety Checklist
http://www.redcross.org/images/MEDIA_CustomProductCatalog/m4340128_Floo
d.pdf
Federal Emergency Management Agency (FEMA)
http://www.fema.gov/
FEMA Spanish Language Portal
http://www.fema.gov/es/
Federal Centers for Disease Control and Prevention (CDC): Floods
http://emergency.cdc.gov/disasters/floods/Federal Environmental Protection Agency (EPA): Flood Cleanup (Booklet)
http://www.epa.gov/iaq/flood/flood_booklet_en.pdf
Federal Environmental Protection Agency (EPA): Mold Guide
http://www.epa.gov/mold/pdfs/moldguide.pdf
Federal Environmental Protection Agency (EPA): National Stormwater Calculator
http://www.epa.gov/nrmrl/wswrd/wq/models/swc/
List of Wisconsin Local Public Health Departments
http://www.dhs.wisconsin.gov/localhealth/
List of Wisconsin Tribal Health Directors
http://www.dhs.wisconsin.gov/localhealth/
List of County Building, Code, and Zoning Officials
http://www.wccadm.com/staff_directory.htmYou can also read