Pilots Manual - Ozone :: Paragliders
←
→
Page content transcription
If your browser does not render page correctly, please read the page content below

Pilots Manual
Thank You                  01
Warning                    02
Team Ozone                 03
Your Mojo 6                04
Preparation                07
Basic Flight Techniques    09
Rapid Descent Techniques 12
Incidents                  16
Caring For Your wing       19
Ozone Quality              26
Technical Specifications   27
Drawing/Riser lengths      28
Line diagram		             29
Materials			               30

                                EN v1.1 March 2021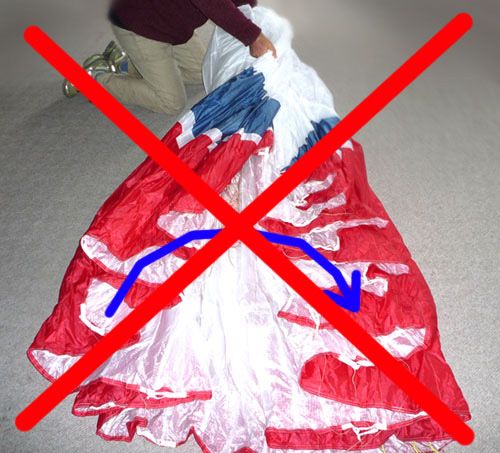
THANK YOU

    T                                                                                                                               EN
          hank you for choosing to fly Ozone. As a team of free flying enthusiasts, competitors and adventurers, Ozone’s
          mission is to build agile paragliders of the highest quality with cutting edge designs, performance and maximum
          security.

    Confidence and belief in your paraglider is a far greater asset than any small gains in performance - ask any of the Ozone
    pilots on your local hills, or those who have taken our gliders on ground-breaking adventures or stood on podiums around
    the world. All our research and development is concentrated on creating the best handling/performance characteristics
    possible with optimum security. Our development team is based in the south of France. This area, which includes the
    sites of Gourdon, Monaco and Col de Bleyne guarantees us more than 300 flyable days per year which is a great asset
    in the development of the Ozone range.

    As pilots we fully understand just how big an investment a new paraglider is. We know that quality and value for money
    are essential considerations when choosing a new wing, so to keep costs low and quality high we manufacture all of our
    products in our own production facility. During production our wings undergo numerous rigorous quality control checks
    that are fully traceable, this way we can guarantee that all of our paragliders meet the same high standards.

    It is essential that you read this manual before flying your wing for the first time. The manual will help you get the most
    out of your new wing, it details information about the design, tips and advice on how best to use it and how to care for
    your wing to ensure it has a long life and retains a high resale value. For the latest updates, including all technical datas
    please refer to the online version found on the product’s page on at www.flyozone.com.

    If you need any further information about any of our products please check flyozone.com or contact your local dealer,
    school or any of us here at Ozone.

    Safe Flying!
    Team Ozone

                                                                                                                                     01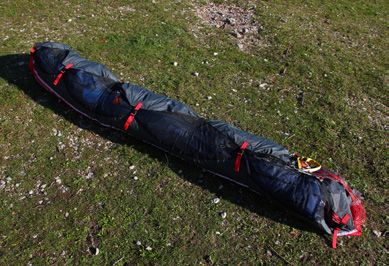
WARNING
        • Paragliding is a potentially dangerous sport that can cause serious injury including bodily harm, paralysis
          and death. Flying an Ozone paraglider is undertaken with the full knowledge that paragliding involves
          such risks.
        • As the owner of an Ozone paraglider you take exclusive responsibility for all risks associated with its use.
          Inappropriate use and or abuse of your equipment will increase these risks.
        • Any liability claims resulting from use of this product towards the manufacturer, distributor or dealers
          are excluded.
        • Be prepared to practice as much as you can - especially ground handling, as this is a critical aspect of
          paragliding. Poor control while on the ground is one of the most common causes of accidents.
        • Be ready to continue your learning by attending advanced courses to follow the evolution of our sport,
          as techniques and materials keep improving.
        • Use only certified paragliders, harnesses with protector and reserve parachutes that are free from
          modification, and use them only within their certified weight ranges. Please remember that flying a glider
          outside its certified configuration may jeopardise any insurance (e.g. liability, life etc) you have. It is your
          responsibility as the pilot to verify your insurance cover.
        • Make sure you complete a thorough daily and pre-flight inspection of all of your equipment. Never
          attempt flying with unsuitable or damaged equipment.
        • Always wear a helmet, gloves and boots.
        • All pilots should have the appropriate level of license for their respective country and third party
          insurance.
        • Make sure that you are physically and mentally healthy before flying.
        • Choose the correct wing, harness and conditions for your level of experience.
        • Pay special attention to the terrain you will be flying and the weather conditions before you launch. If you
          are unsure do not fly, and always add a large safety margin to all your decisions.
        • NEVER fly your glider in rain, snow, strong wind, turbulent weather conditions or clouds.
        • If you use good, safe judgment you will enjoy many years of paragliding.

        Remember, PLEASURE is the reason for our sport

02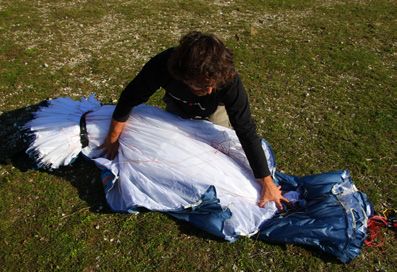
TEAM OZONE
   Everyone at Ozone continues to be driven by our passion for flying, our love of adventure and our quest to
   see Ozone’s paraglider development create better, safer and more versatile paragliders.
                                                                                                                EN
   The design team consists of David Dagault, Luc Armant, Fred Pieri, Russell Ogden, Honorin Hamard and
   Sam Jobard. Dav started flying when he was 12 years old and has accumulated a wealth of experience
   in competition flying, XC and paraglider design. Luc, a dedicated XC and competition addict has
   a background in naval architecture. Fred, our resident geek is a mathematician, mechanical engineer
   and vol Biv specialist. Russ is a competition pilot and test pilot with 1000s of hours testing experience.
   World and European champion Honorin is a naturally talented pilot who has been flying since he was 13
   years old. Sam designs and develops our range of harnesses, he has a great deal of experience both
   flying paragliders and designing harnesses. Between them, they bring a wealth of knowledge, ideas and
   experience and work closely together in the design, development and testing process.

   Mike Cavanagh is the boss and multiple winner of the UK XC league, when not out flying he generally
   keeps control of the mayhem. He is helped by Jean Christophe Skiera (JC) who manages our distribution
   network and the product range. Promotion and marketing are coordinated by BASE jumping legend Matt
   Gerdes.

   Back in the office Karine Marconi, Chloe Vila and Isabelle Martinez run the show. These wonderful ladies
   look after the ordering system, the dealers, the design team and the general day to day running of the
   company - without them it would be chaos.

   Our own manufacturing facility in Vietnam is headed up by Dr Dave Pilkington who works relentlessly
   manufacturing gliders and producing prototypes as well as researching materials and manufacturing
   processes for our future products. He is backed up by a superb team managed by Khanh and Phong with
   over 1000 production staff.

                                                                                                                 03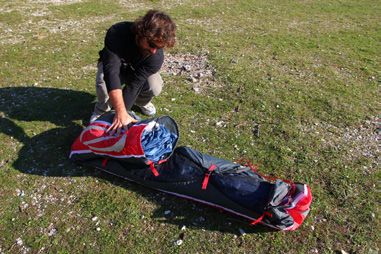
YOUR MOJO 6
         The Mojo 6 continues the Mojo Legacy. Designed specifically for newly qualified pilots, the latest version
         offers significantly more performance whilst retaining the safety, fun, and ease of use expected of this
         class.

         Using the proven planform, cell count and aspect ratio of the Mojo 5, the Mojo 6 benefits from the
         knowledge and experienced gained from our high performance projects: Line drag has been reduced by
         a massive 28% due to a new complex internal structure which features an increased number of diagonal
         ribs. The design of the profile has evolved to offer more lift and less drag whilst retaining the smooth
         comfortable, confidence inspiring feel required of this level of wing. The leading edge also benefits from
         double 3D shaping which cleans the airflow in this aerodynamically critical area along with an innovative
         new intake shape to reduce vibrations and sail flutter.

         Together, these developments result in a paradigm shift in performance, pushing the speed, sink rate
         and glide performance into the category above without sacrificing the safety and the ease of use that
         defines the very essence of the Mojo. Higher performance makes soaring, thermalling and top landing
         easier and allows you to progress faster.

         Performance is not everything though. Ease of use, comfort, safety and fun are equally important factors
         in any wing. Excellent launch characteristics ensures the Mojo 6 inflates cleanly and easily in all wind
         conditions. In the air the Mojo 6 absorbs turbulence offering damped yet informative feedback through
         the brakes and risers for a comfortable, smooth ride. The precise yet forgiving feel of the brakes offers
         excellent handling characteristics making it easy to climb to the top of the stack.

         Certified EN A, the Mojo 6 is suitable for students in all levels of training and ideal for the newly qualified.
         The Mojo 6 is reliable and dependable, perfect for pilots who require a safe and solid wing for ridge
         soaring, thermalling, and XC flying during their first few hundred hours and beyond. It is also suitable for
         more experienced pilots who seek the highest levels of passive safety for their flying adventures.

04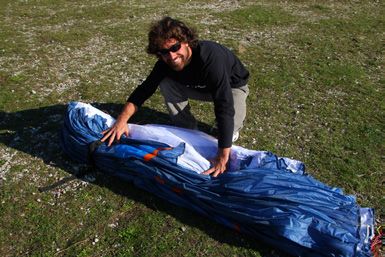
Rucksack                                                                                                                              EN
As standard, your wing is supplied with a specially designed bag that is light and comfortable. It features
a padded hip belt, ergonomic adjustable shoulder straps and extra pockets to store keys, accessories
and all those extra bits. Its large volume allows you to store all of your equipment whilst distributing the
weight for comfortable hiking. We have a large range of bags and you can choose from any of them at
the time of order.

      Brake Lines
The brake line lengths have been set carefully during testing. We feel it is better to have slightly long brake   IMPORTANT
lines and to fly with a wrap (one turn of the handle around the hand). However, if you do choose to adjust        In the unlikely
their length please keep in mind the following:                                                                   event of a brake line
                                                                                                                  snapping in flight, or
• Ensure both main brake lines are of equal length.                                                               a handle becoming
• If a brake handle has been removed, check that its line is routed through the pulley when it is replaced.       detached, the glider
                                                                                                                  can be controlled by
• When the brakes are fully released in flight, the brake lines should be slack. There must be a substantial      gently pulling the rear
  bow in them to guarantee no deformation of the trailing edge when accelerated.                                  risers (C-risers).
• There must be a minimum of 5-10cm of free play before the brakes begin to deform the trailing edge.
  This prevents the trailing edge from being deformed when using the speed system.

      Risers
The Mojo 6 has been designed with 3 risers per side. The A risers are covered with coloured webbing for
easy identification and split into two - the smaller riser, holding only the outermost A line, is for an easier
application of big ears.

The risers feature attachments for a foot operated accelerator system, they do not feature trimmers or any
other adjustable devices.

                                                                                                                                             05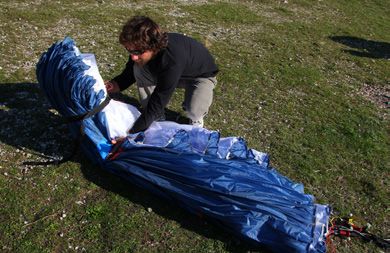
Total Weight in flight
     Each Ozone glider has been designed and certified for a defined weight range. We strongly recommend
     that you respect these weight ranges. If you are between sizes the following information may help you
     make a decision as to which size to buy:
     • For the most precise and dynamic handling or if you generally fly in mountains and/or in strong
       conditions, you should chose to fly in the top part of the weight range.
     • If you want a better sink rate, or if you generally fly in flat lands and/or in weak conditions, you may
       choose to fly nearer the middle part of the weight range. Remember, you can always add ballast for
       when conditions are stronger.
     • It is not recommended to fly at the very bottom of the weight range.

           Towing
     The Mojo 6 may be tow-launched. It is the pilot’s responsibility to use suitable harness attachments and
     release mechanisms and to ensure that they are correctly trained on the equipment and system employed.
     All tow pilots should be qualified to tow, use a qualified tow operator with proper, certified equipment, and
     make sure all towing regulations are observed.

     When towing you must be certain that the paraglider is completely over your head before you start. In each
     case the maximum tow force needs to correspond to the body weight of the pilot.

           Limitations
     The Mojo 6 has been designed as a solo intermediate XC wing and is not intended for tandem flights
     nor aerobatic manoeuvres. Primarily designed for the newly qualified, it exhibits no unusual flying
     characteristics and has a very high resistance to both collapses and stalls whilst remaining solid and
     well-pressured throughout the speed range.  Due to this forgiving nature, it is also suitable for all levels
     of training.

06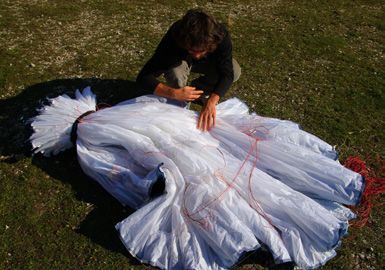
PREPARATION
          Accelerator System                                                                                                                    EN
    To set up the accelerator system, first route the lines supplied with the speed system through the harness.        IMPORTANT
    Make sure this is done correctly and that the lines pass through all of the pulleys (check your harness            Using the accelerator
    manual for instructions). Attach the speed system lines to the accelerator system on the risers with the           decreases the angle
    Brummel hooks.                                                                                                     of attack and makes
                                                                                                                       the wing more prone
    A basic set-up can be performed on the ground: ask a friend to pull the risers tight into their in-flight          to collapse, therefore
    position whilst you sit in the harness on the ground. Now adjust the lengths of the lines so that the main         using the accelerator
    bar sits just beneath your seat. You should be able to hook your heel in to the lower loop of the accelerator.     near the ground or in
                                                                                                                       turbulent conditions
    There must be enough slack in the speed system to ensure the A risers are not inadvertently pulled during          should be avoided.
    normal trim speed flight, but not so long that it is impossible to use the full speed range of the glider. Fully
    extending the lower loop of the speed bar will accelerate the wing to approximately half its accelerated
    speed range. For full speed, hook your heels on to the upper bar and smoothly extend your legs, maximum
    speed is when the pulleys on the risers overlap. Once set up, test the full range of the accelerator in
    calm flying conditions and ensure that both risers are pulled evenly during operation. Fine-tuning can be
    completed when you are back on the ground.

          Harness
    It is important to set up your harness correctly before flying the wing. Make sure to spend time adjusting
    your harness’s different settings until you are completely comfortable. We recommend a chest strap
    setting between 44cm and 48cm (measured between the centre of the hang points).

    The wing has been certified with a standard seated harness, XS/S sizes are certified with a chest strap set
    to around 40-42cm, the M between 44-46cm, and the L/XL between 46-48cm. Do not fly with a chest strap
    setting too tight (below 42cm) or too wide (above 48cm) as this will affect the behaviour and feedback of
    the wing. Using a pod harness in a laid back supine position does not invalidate the certification but it may
    have an influence on the behaviour of the wing. Pod harnesses increase the risk of twists occurring during
    a large asymmetric collapse and should only be used by experienced pilots.

                                                                                                                                                 07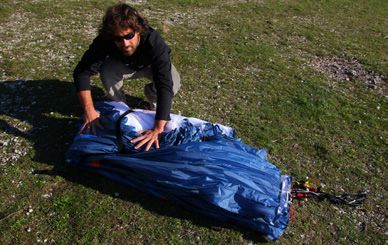
Wing
     To prepare the wing, lay it out on the top surface and perform a thorough daily check. You should inspect
     the top and bottom surfaces for any rips and tears or any other obvious signs of damage. Lay out the lines
     one side at a time, hold up the risers and starting with the brake lines, pull all lines clear. Repeat with the
     stabilo, D (uppers), C, B and A lines, laying the checked lines on top of the previous set, and making sure
     no lines are tangled, knotted or snagged. Mirror the process on the other side and then inspect the lines
     for any visual damage. Then inspect the risers for any signs of obvious damage. The general rule is if it
     looks OK then it is OK, however if you have any doubts please get advice from an experienced pilot or
     your local dealer or instructor.

     To familiarise yourself with the glider it is a good idea to perform practice inflations and small flights on a
     training hill. This will enable you to set up your equipment correctly.

     Take-off checklist:
     1. Check reserve parachute - pin is in and handle secure
     2. Helmet on and fastened
     3. All harness buckles closed - check leg-loops again
     4. Risers connected to the harness correctly with carabiners and maillons tight
     5. Accelerator system connected
     6. Holding the A risers and your brake handles correctly
     7. Leading edge open
     8. Aligned in the middle of the wing and directly into wind
     9. Airspace and visibility clear

08
BASIC FLIGHT TECHNIQUES
Launching EN
The Mojo 6 can be launched with either the forward or reverse technique. The wing should be laid out in
a pronounced arc, with the centre of the wing higher than the tips.
Forward Launch - Nil to Light winds
When the wind is favourable, whilst gently holding the A risers move forward positively, your lines should
become tight within one or two steps and the wing will immediately start to inflate. You should maintain
a constant pressure through the harness and on the risers until the wing is overhead. Do not pull down
or push the risers forward excessively, this will cause the leading edge to deform and possibly collapse,
making the take-off more difficult and potentially dangerous.
Move smoothly throughout the entire launch, there is no need to rush or snatch at it. You should have
plenty of time to look up and check your canopy before committing yourself. Once you are happy that the
wing is inflated correctly, accelerate smoothly off the launch.
IMPORTANT
Reverse Launch - Light to Strong Winds Never take off with
Lay out your wing as you would for the forward launch. However, this time turn to face it, passing one a glider that is not
entire set of risers over your head as you turn. Now you can inflate the glider with your body weight and fully inflated or if you
the A-risers. Once the wing is overhead, release the risers, brake gently if necessary, turn and launch. are not in control of
In stronger winds, be prepared to take a few steps towards the glider as it inflates. This will take some of the pitch/roll of your
the energy out of the glider and it will be less likely to overfly you. This reverse-launch technique can be wing.
used in surprisingly light winds too.
Speed to Fly
Flying at trim speed (hands-up), the Mojo 6 will achieve its ‘best glide’ speed for still air. You should fly
at this speed when gliding downwind or when the air is not excessively sinking. For better penetration in
headwinds and improved glide performance in sinking air, crosswinds or headwinds, you should fly faster
than trim speed using the accelerator system. Using up to half bar does not degrade the glide angle or
stability significantly and will improve your flying performance, you will reach the next thermal faster and
higher. At full speed the Mojo 6 is stable, however we recommend that you do not fly at full speed close
to the ground or in turbulent air.
09By applying approximately 20cm of brakes the Mojo 6 will achieve its minimum-sink rate; this is the speed
to use for thermalling and ridge soaring in lifting air.
Turning
To familiarize yourself with the Mojo 6 your first turns should be gradual and progressive. To make efficient IMPORTANT
and coordinated turns, first check the airspace is clear and then lean towards the direction you wish to Never initiate a turn at
turn. The first input for directional change should be weight-shift, followed by a smooth application of the minimum speed (i.e.
brake until the desired bank angle is achieved. To regulate the speed and radius of the turn, coordinate with full brakes on) as
your weight shift with the inner and outer brake. you could risk entering
a spin.
Active Flying
To minimize the likelihood of suffering collapses in turbulent conditions, it is essential to use active flying.
These are skills that are best learnt by playing with the glider on the ground. Flying with a small amount
of brake applied (approx. 20cm) will allow you to feel the feedback from the wing. In turbulent conditions
the internal pressure of the wing is constantly changing and by using a small amount of brake will you feel
these changes. The aim of active flying is to maintain a constant pressure through the brakes, If you feel
a reduction or loss of pressure quickly apply the brakes until you feel normal pressure again. Once you
have normal pressure, raise the hands back to the original position. Avoid flying with continuous amounts
of deep brake in rough air as you could inadvertently stall the wing - always consider your airspeed. The
brake inputs can be symmetric or asymmetric; you may have to apply both brakes or just one. These IMPORTANT
subtle adjustments will keep the glider flying smoothly and directly above you and dramatically reduce the Always keep hold of
likelihood of a collapse. If the glider pitches in front of you, use the brakes to slow it down. Equally, if the your brakes. Do not fly
glider drops behind you, release the brakes to allow it to speed up, but be ready to anticipate the following in turbulent conditions
pitch forward. The goal is to maintain the wing directly overhead with a constant level of internal pressure.
No pilot and no glider are immune to collapses however correct active flying will reduce the chances
significantly. When the conditions are turbulent, be more active and anticipate the movements of your
wing, always be aware of your altitude and do not over-react.
We strongly advise you to keep hold of your brakes at all times and to not fly in turbulent conditions.
10Landing EN
The Mojo 6 shows no unusual landing characteristics but as a reminder, here are some tips:
• Always set up for your landing early, give yourself plenty of options and a safe margin for error.
• Once below 30 metres avoid turning tightly as the glider will have to dive to accelerate back to normal
flight. If you are at low altitude, or if you hit sink, this could mean you hit the ground harder than
necessary.
• Lean forward out of your harness before the actual landing (especially if it’s turbulent), with your weight
leaning forward against the chest strap, and make sure your legs are ready for the landing and a possible
PLF (parachute landing fall).
• Allow the glider to fly at hands up (trim) speed for your final descent until you are around 1 metre above
the ground (in windy or turbulent conditions you must fly the glider actively all the way). Apply the brakes
slowly and progressively to slow the glider down until groundspeed has been reduced to a minimum and
you are able to step onto the ground.
• In light winds/zero wind you need a strong, long and progressive flare to bleed off all your excess ground
speed. In strong winds your forward speed is already low so you are flaring only to soften the landing. A
strong flare may result in the glider climbing upwards and backwards quickly, leaving you in a vulnerable
position.
• If the glider does begin to climb, ease off the brakes (10-20cm) - do not put your hands up all the way -
then flare again, but more gently this time. Keep the brakes at mid speed, stand up, be ready to run and
make sure you brake fully as you arrive on the ground.
• Choose the appropriate approach style in function of the landing area and the conditions.
• In strong winds you need to turn towards the glider the second your feet touch the ground. Once facing
the wing pull smoothly and symmetrically down on the brakes to stall the wing. If the glider pulls you,
run toward it.
• If the wind is very strong, and you feel you might be dragged, or lifted again, stall the glider with the C
risers. This stalls the wing in a very quick and controllable way and will drag you less than if you use the
brakes.
• Always land heading into wind!
11RAPID DESCENT TECHNIQUES
Ozone would like to remind you that the following manoeuvres should be learnt under the supervision of
a qualified instructor and always used with caution. Never forget that properly analysing the conditions
before launch will help avoid the need to use these techniques.
Big Ears
Folding in the wingtips increases the sink rate without radically changing the airspeed. This is useful for
staying out of cloud or descending quickly through the lift band of the hill, for example when top landing.
To pull Big Ears, keep hold of your brake handles and take the outermost A-line on each side, then pull out
and down (preferably one at a time) until the wingtips fold under. The Outer A line is attached to the Baby
A riser, making identification and use of the big ear system easier. The size of the Big Ears can be adjusted
by pulling more line, or reaching higher up the line. For directional control while using the Big Ears, you
should use weight shift. To reopen the ears, release both A lines at the same time. To help reinflation,
brake gently one side at a time until tips regain pressure. Avoid deep symmetric applications of the brake
as this could accidently induce parachutal or full stalls.
You may use Big Ears for the final landing approach but they should be released before making the final
flare. Ozone advise to not use this technique in turbulent or windy conditions due to the reduced ability to NEVER induce Big
fly actively and the risk of an inadvertent stall whilst descending through the wind gradient. Ears in accelerated
flight, this can lead
Once the big ears are engaged you can further increase the sink rate by pushing on the accelerator bar, to a major deflation.
however NEVER try to pull the Big Ears in if the accelerator is already pushed. The lower angle of attack Always pull the Big
and the act of deflating the tips can lead to a major deflation. Always make the Big Ears first and then Ears first and then
apply the speed bar. apply the speed bar.
Whilst it is possible to enter a spiral dive whilst holding in Big Ears, the high forces applied to the lower
lines could exceed the breaking strain of the lines leading to equipment failure! DO NOT perform spiral
dives with Big Ears
Ozone strongly recommend to NOT perform spiral dives with big ears engaged. engaged.
12B-Line Stall EN
B-stall is for fast descents in emergency situations only, sink rates of around 6 m/s can be achieved. It is
however faster and safer to lose altitude with a spiral dive than a B-stall.
To initiate the B-stall, keep the brakes in your hand and take hold of both the B risers near the maillons.
IMPORTANT
Pull down firmly - there is a lot of pressure so it requires a reasonably amount of force. As you pull the
The pitching movement
B-lines the airflow over the wing is broken and the glider loses its forward speed but remains open with
on exiting the B stall is
a reduced cord. Once the wing is in B stall, maintain your position. Make sure to pull symmetrically
small but necessary.
otherwise the wing can rotate during the B stall, if this occurs pull the opposite side to stop the rotation
We recommend you do
or release the B risers to resume normal flight. If you pull too much B-line the glider may horseshoe and
not brake the glider
move around a lot. If this occurs, slowly release the B lines until the wing stabilises or simply exit the B
until you are sure that
line stall by immediately releasing the B risers. Do not attempt to maintain a B line stall that is not stable.
the glider is flying
properly again.
To exit the B-stall the B-risers should be released symmetrically and in one smooth, progressive motion.
The glider will resume normal forward flight without further input. Check you have forward flight again
before using the brakes.
Spiral Dives
If you turn your glider in a series of tightening 360’s it will enter a spiral dive. This will result in rapid height
loss. To initiate a spiral, look and lean in to the direction you want to go, then smoothly and progressively
pull down on the inside brake. The Mojo 6 will first turn almost 360 degrees before it drops into the spiral. IMPORTANT
Once in the spiral you should re-centre your weight shift and apply a little outside brake to keep the outer Always be prepared
wing tip pressured and inflated. to pilot the wing out
of a spiral dive. Use
Safe descent rates of more than 8m/s (1600 ft/min approx.) are possible in a spiral dive, but above these opposite weight shift
rates the associated high speeds and g-forces can be disorientating. Always pay particular attention to and apply enough
your altitude. To exit the spiral dive, smoothly release the inside brake and allow your weight shift to go outside brake to
towards the outside. As the Mojo 6 decelerates allow it to continue to turn until enough energy is lost for stop the wing from
it to return to level flight without an excessive climb and surge. spiralling.
13The Mojo 6 shows little tendency to remain neutral in a spiral dive, however some parameters could
interfere with its behaviour. These might include: unsuitable chest strap setting (too tight), total weight in
flight outside of the certified weight range, or being in a very deep spiral at a very high sink rate >14m/s.
You should always be prepared to pilot the wing out of a spiral dive. To do so, use opposite weight shift
and smoothly apply enough outside brake until you feel the wing start to decelerate, the glider will then
start to resume normal flight. Recovering from a spiral with hard or quick opposite inputs will result in an
aggressive climb and surge and is not recommended. Always be prepared to manage the energy, bleed
off the speed if necessary. Never perform spiral dives close to the ground.
Active C Riser Control
Whilst gliding it is possible to pilot the wing with the C risers, this gives an improved feel and control over
the wing enabling you to fly actively without using the brakes. Using brakes whilst accelerated causes drag IMPORTANT
which is not only inefficient but it also reduces the inherent stability of the profile - using the brakes whilst Never apply the brakes
accelerated can actually lead to a collapse. Using the C risers increases the angle of attack more evenly whilst using the speed
across the chord and does not weaken the profile as much as using the brakes. The direct feel allows you system - it makes the
to stop collapses before they happen and maintain higher speeds and higher levels of efficiency through wing more prone to
turbulence. collapse.
To fly with the C risers, keep hold of your brake handles (remove any wraps) and take hold of the C risers.
With the C risers you can fly actively through turbulence; If you see or feel the leading edge lose pressure,
at the same time as releasing some or all of the accelerator you can also apply pressure to the C’s, this
will help keep the nose open. Be careful to use only small inputs with the C risers, you risk stalling part or
all of the wing if you are over enthusiastic. The amount of pressure and size of the input is dependent on
the amount of turbulence/loss of pressure, but always be gentle at first. Learn the feel of the wing - how
much speed bar to release and the force required on the C’s to keep the nose open without inducing
unnecessarily large pitch movements.
The Mojo 6 is inherently stable at full speed, C riser control is very effective up to about ¾ speed, however
during the last few cms of speed bar travel C riser control on its own becomes less effective and can lead
14to a collapse. When flying faster than ¾ speed, we recommend to control the pitch of the wing actively
using a combination of the speed bar and C riser input. If you feel the nose of the wing start to collapse
EN
or pitch forward whilst accelerated the first action should be to release the speed bar impulsively and then
make any necessary C riser input, always release the speed bar first before making any C inputs. Using
the combined active speed bar/C riser control technique you will be able to maximise your speed and
efficiency whilst minimising the likelihood of collapses.
Be prepared for plenty of practice as this new method may take some time for it to become totally intuitive,
efficient and comfortable. This control method is suitable for gliding in good ‘normal’ air, it does not
replace proper active flying with the brakes in strong turbulent conditions. If you are unsure about the air
return the glider to trim speed, release the C risers and fly the glider actively with the brakes.
15INCIDENTS IN FLIGHT
Deflations
Due to the flexible form of a paraglider, turbulence may cause a portion of the wing suddenly to collapse.
This can be anything from a small 30% (asymmetric) collapse to a complete (symmetric) collapse.
If you have a collapse, the first thing to do is to control your direction. You should fly away from the ground
or obstacles and other pilots. Asymmetric collapses should be controlled by weight shifting away from the WARNING
collapse and applying enough brake to control your direction. This action alone will be enough for a full Uncoordinated
recovery of the wing most of the time. wingovers can lead
to large asymmetric
Once a glider is deflated it is effectively a smaller wing, so the wing loading and stall speed are higher. This collapses and cravats,
means the glider will spin or stall with less brake input than normal. In your efforts to stop the glider turning therefore they should
towards the collapsed side of the wing you must be very careful not to stall the side of the wing that is still never be executed
flying. If you are unable to stop the glider turning without exceeding the stall point then allow the glider to near the ground.
turn whilst you reinflate the collapse.
If you have a deflation which does not spontaneously reinflate, make a long smooth progressive pump
on the deflated side. This pumping action should take about 1-2 seconds per pump. Pumping too short
and fast will not reinflate the wing and pumping too slow might take the glider close to, or beyond, the
stall point.
Symmetrical collapses reinflate without pilot input, however 15 to 20cm of brake applied symmetrically will
speed the process. After a symmetric collapse always consider your airspeed. Make sure the glider is not
in parachutal stall before making any further inputs.
If your Mojo 6 collapses in accelerated flight, immediately release the accelerator and manage the collapse
using the methods described above.
16Cravats EN
If the tip of your wing gets stuck in the lines, this is called a ‘cravat’. This can make your glider go into a
spiral, which is difficult to control. The first solution to get out of this situation is to stabilise the glider into
IMPORTANT
normal flight, i.e get control of your direction and then use strong deep pumps of the brake on the cravated
A bad preparation
side. When doing so it is important to lean away from the cravat otherwise you risk spinning or deepening
on launch, poorly
the spiral. The aim is to empty the air out of the wing tip, but without spinning. Correctly done, this action
executed aerobatics
will clear the cravat quickly and is the most efficient and effective method. You can also try pulling on the
and flying in
stabilo line (CRL4 - outside line on the C riser) to free small stubborn wing tip cravats. Whichever method
conditions too strong
you use, be careful with any brake inputs as you may stall the opposite wing.
for your ability are
the main causes of
If it is a very large cravat and the above options have not worked then a full stall is the next option. Only
cravats.
attempt this if you have enough altitude and you know what you are doing. Remember if the rotation is
accelerating and you are unable to control it, throw your reserve parachute immediately whilst you still
have enough altitude.
Deep Stall / Parachutal Stall IMPORTANT
It is possible for gliders to enter a state of parachutal stall. This can be caused by several situations Only a few cms of
including; a very slow release from a B-line stall; flying the glider when wet; or after a front/symmetric input from your brakes
deflation. The glider often looks as though it has recovered properly but carries on descending vertically can maintain the wing
without full forward motion. This situation is called ‘deep stall’ or ‘parachutal stall’. in a parachutal stall.
Always release your
It is unlikely to happen on any Ozone glider, but should it do so your first reaction should be to fully raise wraps if you have
both hands. This normally allows the glider to return to normal flight but If nothing happens after a few taken them!
seconds, apply the speed bar or reach up and push the A-risers forwards to encourage the wing to regain
normal flight. Ensure the glider has returned to normal flight (check your airspeed) before you use the
brakes again.
Do not fly in rain, doing so significantly increases the likelihood of parachutal stalls occurring. To reduce
the chance of stalling in rain avoid using deep brake movements or Big Ears. Find a safe area to land and
using the speed bar, maintain a good airspeed at all times.
17Flying in the Rain
Modern wings are susceptible to rain and moisture, flying with a wet wing can result in the loss of normal
flight.
Due to the efficient, wrinkle-free design of the sail, water tends to bead on the leading edge causing flow
separation. Flow separation will make the wing more prone to entering inadvertent parachutal stalls, so
flying in the rain, or with a wet wing (e.g early morning dew) should be avoided at all costs. IMPORTANT
Never fly in the rain or
If you are accidently caught-out in a rain shower, it is best to land immediately. If your wing becomes wet with a wet glider.
in the air it is advised to maintain accelerated flight using the speed bar and/or releasing the trimmers,
even during the final approach. DO NOT use big ears as a descent technique, big ears increases drag, and
with a wet wing this will further increase the chances of a parachutal stall occurring. Instead, lose height
with gentle 360’s and maintain your air speed at all times. If your wing enters parachutal stall when wet,
immediately release the trimmers and accelerate the wing to regain airspeed.
18CARE AND MAINTENANCE
Packing EN
To prolong the life of your wing and to keep the plastic reinforcements in the best possible condition it is very important to pack the wing
carefully.
Ozone recommends to use the concertina packing method exactly as shown so that all of the cells rest alongside each other and the
plastic reinforcements are not unnecessarily bent. Using an Ozone Saucisse or Saucisse light pack will help preserve the life of the wing
and aid with the speed and ease of packing.
Step 1. Lay mushroomed wing
on the ground. It is best to start
from the mushroomed position
as this reduces the dragging
of the leading edge across the
ground.
Step 2. Group LE reinforcements
with the A tabs aligned, make
sure the plastic reinforcements
lay side by side.
Step 3. Lay wing on its side and Strap
LE...Note the glider is NOT folded
in half; it is folded with a complete
concertina from tip to tip. It is really
important to not stress the middle cell or
bend the plastic too tightly.
19Step 4. Group together the middle/trailing
edge of the wing by sorting the folds near
the B, C and D tabs.
If using a Saucisse pack go to Step 8.
Step 5. Once the LE and rear of the wing have
been sorted, turn the whole wing on its side.
Step 6. Fold the wing with 3 or 4 folds whilst being
careful to not crush the LE.
Step 7. Now place the folded wing into the stuff sack.
20Step 8. If using the Saucisse Pack, carefully
zip it up without trapping any material.
EN
Step 9. Turn the Saucisse on its side and make the first
fold just after the LE reinforcements. Do not fold the plastic
reinforcements, use 3 or 4 folds around the LE.
IMPORTANT: Do NOT lay the wing
flat on the ground before packing the
glider, this will cause abrasion damage
to the top surface as you pull the glider
towards the middle. ALWAYS pack from
a mushroom or lift the wing off the
ground when gathering the wing and
grouping the leading edge.
IMPORTANT: Do not fold the glider in the centre, you
will bend the plastics, instead pack the wing with a full
concertina method from tip to tip before packing into the
stuff sac.
21Caring Tips
Careless ground handling damages many paragliders. Here are some things to avoid in order to prolong
the life of your aircraft:
• DO NOT drag your wing along the ground or any hard surface as this is guaranteed to cause damage to
the sailcloth. Lift it up and carry it clear of the ground.
• DO NOT try to open your wing in strong winds without untangling the lines first - this puts unnecessary
strain on the lines.
• DO NOT walk on the wing or lines.
• DO NOT repeatedly inflate the glider and then allow it to crash back down. Try to keep this movement
as smooth as possible by moving towards the glider as it comes down.
• DO NOT slam your glider down on the ground leading edge first! This impact puts great strain on the
wing and stitching and can even explode cells.
• FLYING in salty air, in areas with abrasive surfaces (sand, rocks etc.) and ground handling in strong
winds will accelerate the aging process.
• DO NOT fly in the rain or expose the wing to moisture.
• DO NOT expose the wing to unnecessary UV or high levels of heat. Leaving the wing sitting in the sun or
allowing it to get hot (e.g in the back of a car) will significantly increase the chances of premature ageing.
• If you fly with a wrap, you should regularly undo the twisting that appears on the main brake lines. By
twisting the line become shorter and you can end up with a constant tension on the trailing edge.
• Change your main brake lines if they are damaged.
• When groundhandling be careful to not saw the brake lines against the risers or main lines. The abrasion
caused by a sawing motion can damage the main lines and the risers. If you notice any signs of abrasion,
especially to the lines, make sure to replace them. It is important to modify your groundhandling
technique to stop any future damage.
• Your wing has an opening on the wing tips called the ‘Butt hole’. The Butt hole makes it easy to empty
any sand, leaves, rocks, mobile phones etc that may have accumulated in the wing.
It is recommended that you regularly CHECK your wing, especially after a heavy period of use, after an
incident or after a long period of storage.
22Storage and Transport EN
Always store all your flying equipment in a dry room, protected from direct heat. Your wing should be dry
before being packed away, moisture, heat and humidity are the worst elements for damaging your glider.
Storing a damp glider in your car under the sun would be terrible for example.
IMPORTANT
Take care that no insects get packed away with the wing. They may eat the cloth and make holes in a bid Never pack away or
to escape. They can also leave acidic deposits if they die and decompose. store your glider wet.
Transport the wing in the supplied bags and keep away from oils, paints, chemicals, detergents etc.
Cleaning
Any kind of wiping/scratching can damage the coating of the cloth. We recommend to not clean the wing,
but if you do have to, use a soft cloth dampened with a small amount of water and use gentle movements
across the surface. IMPORTANT
Never use detergent or
If you land in salt water, you must first rinse it thoroughly with clean fresh water. Dry the wing completely, chemical cleaners.
preferably out of the sun, in the wind. Never use a hair dryer or other sources of direct heat.
Wing Repairs
Always let a registered dealer, professional repair centre or the manufacturer carry out any major or
complex repairs, especially those near seam margins.
If you damage the sail:
If the rip is small and in the middle of a panel however you can fix it yourself. You’ll find all the materials
in the repair kit you need. The fabric can be simply mended with the sticky rip stop/spinnaker tape. When
cutting out the patches allow ample overlap of the tear and make sure both sides are different sizes. Make
sure to round off each corner of the patches.
You can find more information about repairing your wing on the Ozone website, including step by step
instructions with pictures.
23If you damage a line:
Any line that is visually damaged MUST be replaced. Replacement lines can be ordered from your local
Ozone dealer or from a reputable paragliding service centre.
It is important that replacement lines are made from the correct materials and diameters. You should
check lengths against their counterpart on the other side of the wing to make ensure symmetry. Once the
line has been replaced, inflate and check the glider before flying.
Maintenance Checks
In addition to the normal daily and pre flight checks, it is recommended to service the wing regularly. The
dimensions of the lines tend to move during the first part of their life, it is therefore recommended to have
a performance trim check within the first 50hrs of use. To ensure the correct trim, the lines should be
measured and adjusted to the published values as necessary. Loops in the C lines are in place to make
this process easier.
To ensure proper airworthiness the wing needs to be technically serviced by an experienced professional
for the first time after 24 months, or after 100 hours of use. If the wing is used frequently however, we
recommend an annual airworthiness check.
You alone are responsible for your flying equipment and your safety depends on it. You should service the
wing after a heavy period of use, after an incident or after a long period of storage. Changes in inflation/
groundhandling/flying behaviour indicates the wing is aging, if you notice any changes you should have
the wing checked before flying again.
The service centre should perform a thorough inspection of the wing and inform you of the condition of the
sail, risers and lines and whether any parts need to be checked or changed before the next normal service
period. The sail and the lines do not age in the same way or at the same rate; it is possible that you may
have to change part or all of the lines during the wing’s life. For this reason it is important to do regular
inspections so that you know the exact condition of all of the components of your glider.
24We recommend these inspections to be carried out by a qualified professional and to include the following:
EN
Porosity is measured with a porosity meter, the time taken by a certain volume of air to go through a
certain surface of the cloth. The time in seconds is the result. A measurement is done in a several places
on the top surface along the span of the glider behind the leading edge.
The tearing resistance of the cloth - A non-destructive test following the TS-108 standard which
specifies minimum tear strength for sky diving canopies should be made using a Bettsometer. (B.M.A.A.
Approved Patent No. GB 2270768 Clive Betts Sails)
Strength of the lines - An upper, middle and lower A line, along with a lower B and a lower C (and lower
D if applicable) line should be tested for strength. Each line is tested to breaking point and the value IMPORTANT
recorded. The minimum value is 14G for all main riser lines calculated from the maximum certified flying Take care of your
weight of the glider. The added minimum strength for the middle lines and upper lines should be the same glider and make sure
value. If the breaking strength is close to the minimum value calculated, the professional should give a you have it checked
period after which the strength test should be performed again. and serviced according
to the schedule.
Lengths of the lines - The overall length (riser lines + mid lines + upper lines) has to be checked under
5Kgs of tension. The difference between the measured length and the original length should not exceed
+/- 10mm. Compliance of the test sample’s suspension lines, brake lines and risers were checked by the
testing laboratory after the test flights were completed.
Risers - Visual inspection for signs of wear or abrasion. Differences to manual lengths should not exceed
+/-5mm.
Canopy check - A full visual check should be carried out: All the components of the wing (stitching, ribs,
diagonals, lines, tabs, ...) should be checked for signs of deterioration.
Finally, a flight test to confirm that the wing behaves normally should be carried out by a professional.
Modifications
Your Ozone Mojo 6 was designed and trimmed to give the optimum balance of performance, handling and
safety. Any modification means the glider loses its certification and will be more difficult and dangerous to
fly. For these reasons, we strongly recommend that you do not modify your glider in any way.
25OZONE QUALITY GUARANTEE
At Ozone we take the quality of our products very seriously, all our gliders are made to the highest
standards in our own manufacturing facility. Every glider manufactured goes through a stringent series
of quality control procedures and all the components used to build your glider are traceable. We always
welcome customer feedback and are committed to customer service. Ozone guarantees all of its products
against manufacturer’s defects or faults. Ozone will repair or replace any defective product free of charge.
Ozone and its distributors provide the highest quality service and repair, any damage to products due to
wear and tear will be repaired at a reasonable charge. If you are unable to contact your dealer then you
can contact us directly at info@flyozone.com.
Summary
Safety is paramount in our sport. To be safe, we must be trained, practised and alert to the dangers
around us. To achieve this we must fly as regularly as we can, ground handle as much as possible and
take a continuous interest in the weather. If you are lacking in any of these areas you will be exposing
yourself to more danger than is necessary.
Every year many pilots get hurt launching; don’t be one of them. Launching is the time that you are most
exposed to danger so practice it lots. Some launch sites are small and difficult and conditions aren’t
always perfect. If you’re good at ground handling you’ll be able to confidently and safely launch whilst
others struggle, practice as much as you can. You’ll be less likely to get hurt and more likely to have a
great day’s flying.
Respect the environment and look after your flying sites.
If you need to dispose the wing, do so in an environmentally responsible manner. Do not dispose of it with
the normal household waste.
Finally, RESPECT the weather, it has more power than you can ever imagine. Understand what conditions
are right for your level of flying and stay within that window.
Happy flying & enjoy your Mojo 6.
Team Ozone
26TECHNICAL SPECIFICATIONS
EN
XS S M L XL
No. of Cells 40 40 40 40 40
Projected Area (m2) 19.1 20.7 22.6 24.5 26.6
Flat Area (m2) 22.4 24.3 26.4 28.7 31.2
Projected Span (m) 8.12 8.47 8.83 9.21 9.6
Flat Span (m) 10.48 10.92 11.39 11.88 12.48
Projected Aspect Ratio 3.46 3.46 3.46 3.46 3.46
Flat Aspect Ratio 4.91 4.91 4.91 4.91 4.91
Root Chord (m) 2.74 2.86 2.98 3.11 3.24
Glider Weight (Kg) 4.29 4.66 4.9 5.32 5.75
Max Control Travel (cm) 70 75 82 83 85
In-Flight Weight Range (Kg) 55-70 65-85 80-100 95-115 110-130
Certification EN A A A A A
27TECHNICAL DRAWINGS
Trailing Lower Surface
Edge B C
A
Leading Upper Surface Riser Riser
Riser
Edge
Brake
Line
Baby A Pulley
Riser
(Big Ears)
Upper
Cell
Lines Accelerator
Openings
Brake Pulleys Brake
Butt Hole Lines Handle
Middle
Lines
Brummel Hook Non Accelerated
Riser for Speed System A 500mm
Lines Stabilo Line
B 500mm
Risers C 500mm
Accelerated Pulleys axis - axis
A 345mm
Main Hangpoint B 375mm
to Harness Carabiner C 500mm
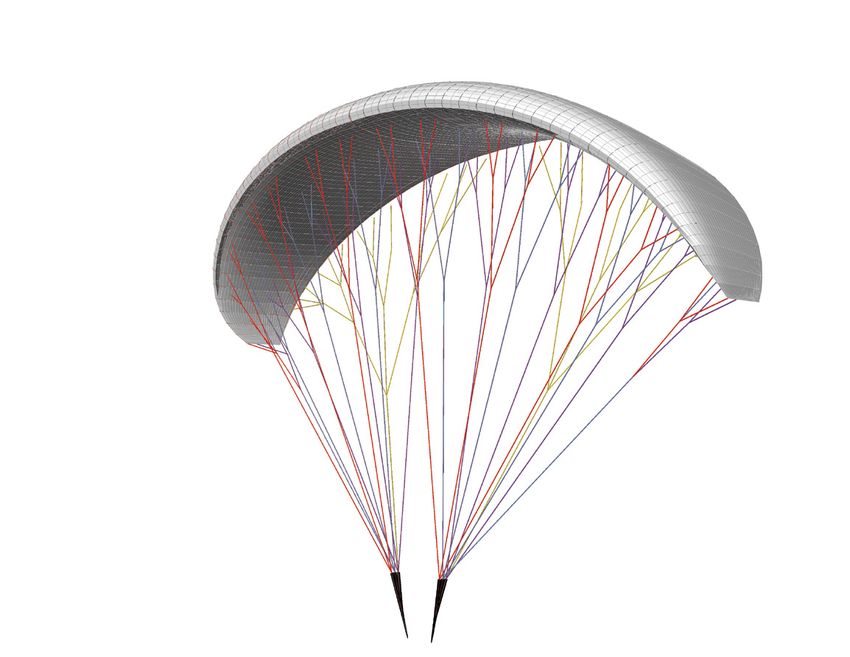
28Mojo 6 Rigging diagram
LINE DIAGRAM A Riser
Individual and linked line lengths can be found online.
B Riser EN
AR3 AR2 AR1
BR1 BR2 BR3
AM1
AM2
BM1 BM2
A3 A2 A1
A4
A5
A6
A7
A8 B2
A9 B1 B3 B4 B5 B6
A10 B7 B8
B9
C8 C7 C6 C5 C4 C3 C2 C1
C10 C9
D7 D6 D5 D4 D3
D10 D2 D1 K11
MSA MSB D8 K10 K12
DM2 K9
K8
K7
DM1 K5 K6
CM2 K2 K3 K4
CM1 K1
KMU4
KMU3
CRU4
KMU2
CR1 KMU1
CR3 CR2
KML2
KML1
CRL4
KRU
C Riser
KRL
Brake Handle
29MATERIALS
All Ozone gliders are made from the highest quality materials available.
Cloth
Upper Surface
Dominico 30D MF
Lower Surface
Dominico 20D MF
Internal Ribs
Porcher 9017 E29
Leading Edge Reinforcement
Plastic
Main Line Set Brake Lines
Riser Lines
Main brake Lines
PPSL Liros - 10-200-040/DSL
Middle Lines Middle brake lines
Edelrid 8000U Edelrid 8000U
Upper Lines Upper brake lines
Edelrid 8000U Edelrid 8000U
Risers and hardware
Shackles
Maillon rapides
Riser webbing
20mm zero stretch polyester webbing
Pulleys
Austri Alpin
301258 Route de Grasse
Le Bar sur Loup
06620
FranceYou can also read