PIMP UP YOUR (NON-CI) SOC RIDE WITH GITLAB CI - SOC INTEREST GROUP MEETING - 2020 OCTOBER 6TH - CERN INDICO
←
→
Page content transcription
If your browser does not render page correctly, please read the page content below
Pimp up your (non-CI) SoC ride
        with gitlab CI
    SoC Interest Group Meeting – 2020 October 6th

                  Michał HUSEJKO
      Stanford University / CERN ATLAS Project
Legal statement:
No SD Cards were harmed while
working on the presentation !!!

                                  2
Long, long, long time ago… XUP trainings at
CERN (2017)

                                              3
Presentation outline
• Introduction
• HW and SW used for testing
• Workstation/gitlab-runner configuration
• Stage 1 – generate XSA (“Vitis”)
• Stage 2 – compile SoC images (“Petalinux”)
• Stage 3 – program a board (“Prog”)
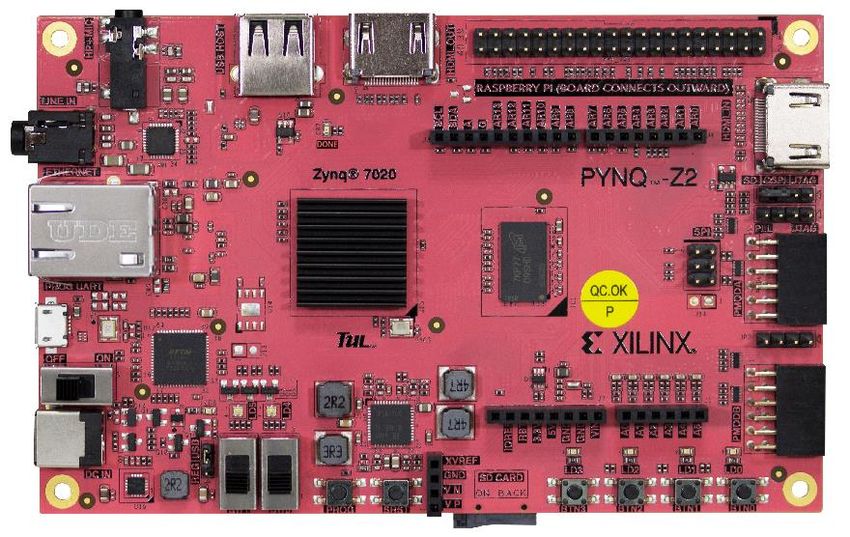
4HW and SW used for testing
• What we want to achieve for Zynq SoC:
• Generate all images (PL+PS) with CI
• Configure the board directly from CI (fsbl/bit->jtag, kernel-> TFTP, rootfs->NFS) using
manual CI job.
• Intel NUC workstation:
• Used for local compilations and gitlab-runner (shell executor), OS: Ubuntu LTS
18.04.4, 32 GB RAM, Intel i7-6770HQ (4c/8t)
• Configured with NFS export, TFTD, and DHCP servers
• USB dongle with JTAG and internal network connected to Pynq-Z2 board
• Vivado 2019.2 (no service pack)
• Petalinux 2019.2 (no BSP used)
• Pynq-Z2 board
• Configured for JTAG boot, no SD card used/inserted.
• Power from USB dongle (as of now, later will be controlled by Eth outlet).
5DHCP for internal network
• The DHCP server will serve internal network 10.5.5.x (Eth from USB
dongle, directly connected to PYNQ-Z2 board)
• sudo service isc-dhcp-server start
6TFTP to serve Linux kernel
• sudo service tftpd-hpa start
• Service tied to dongle eth interface (/etc/default/tftpd-hpa)
• Folder to store image.ub:
• /tftpboot
7NFS export to serve Linux root file system
• NFS export:
/tftpboot/nfsroot *(rw,sync,no_root_squash,no_subtree_check,crossmnt)
• sudo service nfs-kernel-server start
• Petalinux bootargs:
• console=ttyPS0,115200n8 earlyprintk ip=dhcp root=/dev/nfs rootfstype=nfs
nfsroot=10.5.5.1:/tftpboot/nfsroot,port=2049,nfsvers=3,tcp rw
8Stage 1 – generate XSA (“Vitis”)
9Setting up CI flow for your project
• Many approaches to CI, but generally two are most reasonable:
• Start with already existing CI framework – a good example is a Hog CI framework:
• https://gitlab.cern.ch/hog
• Implement (minimalistic) CI flow which will execute your Vitis flow in sequence as
a batch job
• Can be applied to already existing design (by opening and executing your existing XPR file)
• Can be applied to a new design
• One could mix Vivado project and non-project modes
• To avoid any flame war (vivado project vs. non-project, etc), the example
presented here is using second approach, and follows this steps:
• Populate shell environment with variables, which are set based on what you plan
to do.
• Execute Vitis flow.
• Store artifacts in (shared) storage.
10Configure shell environment
• Generic and customized yaml file used to control and configure the flow
• Yaml parsed and used to generate env. variables which drive the whole
flow.
CI Flow
Vivado options
Petalinux options
11XPR project creation
• Basic Vivado project generation
12Execution of synthesis and implementation
• Very similar like you will execute with Vivado GUI
• Call pre-defined “hooks” for automated timing analysis
• Store checkpoints for (timing closure) debuging
13Write bit/ltx and Zynq handout file (XSA)
• git short sha ($CI_COMMIT_SHORT_SHA) injected into bitstream and
put into the file names. Used to trace CI generated artifacts.
14Makefile
• Call all Vitis steps in sequence (xpr, syn, imp, bit/xsa)
• Post process Vivado logs with python.
• Store artifacts (reports, bit/xsa, dcp) on shared storage.
15XSA is a main Vivado artifact which we are
concerned with
• Pass XSA from Vivado to Petalinux flow through storage.
Storage
Stage 1 - Vivado Stage 2 - Petalinux
(generate XSA file) (ingest XSA file)
16Stage 2 – compile SoC images
(“Petalinux”)
17Simple petalinux flow
• Get XSA file from storage
• Create basic Zynq(-7000) project using “zynq” template – no BSP used
• petalinux-create --type project --template zynq --name peta
• Ingest XSA file into basic project
• petalinux-config --project peta --get-hw-description=./xsa/ --silentconfig
• Configure newly created project to match your (CI) needs – details on the next slide
• Apply new config:
• petalinux-config --project peta –silentconfig
• Build the project:
• petalinux-build --project peta
• Store artifacts in the storage (to be used by programming stage)
• In principle push whole ./peta/images/linux repo to the storage under the same location from
where the XSA came from.
18Configure newly created project to match
your (CI) needs
• DTG Settings -> Kernel Bootargs -> generate boot args automaticaly []
• Disable
• DTG Settings -> Kernel Bootargs -> user set kernel bootargs
• console=ttyPS0,115200n8 earlyprintk ip=dhcp root=/dev/nfs rootfstype=nfs
nfsroot=10.5.5.1:/tftpboot/nfsroot,port=2049,nfsvers=3,tcp rw
• u-boot configuration -> TFTP Server IP
• Assign static IP (10.5.5.1)
• Image Packaging Configuration -> Root filesystem type -> (NFS)
• Chose NFS
• Image Packaging Configuration -> Location of NFS root directory (/tftpboot/nfsroot)
• Image Packaging Configuration -> tftpboot directory (/tftpboot)
• Firmware Version Configuration -> hello-ci) Hostname
• Firmware Version Configuration -> (pynq-z2) Product name
• Firmware Version Configuration -> (1.00.07) Firmware Version
• Configure CONFIG_BOOTCOMMAND for netboot
19Firmware Version Configuration -> (hello-ci)
Hostname
• Hostname name used to help visualize traceability – inject branch
name and git sha into it (replace hello-ci project name)
20Stage 3 – program the PYNQ-Z2
board (“Prog”)
21Programming flow (1/4)
• Executed as a manual CI job, part of a whole pipeline
• Extract content of ./peta/images/linux from storage
• Populate /tftpboot and /tftpboot/nfsroot with
content from above
• Image.ub -> /tftpboot
• rootfs -> unpack to /tftpboot/nfsroot
22Programming flow (2/4)
• Remaining necessary contents of the
./peta/images/linux pushed over jtag:
• petalinux-boot --jtag --uboot --fpga --bitstream
system.bit
23Programming flow (3/4)
• Push button image redeployment with full gitlab hash
traceability
24Programming flow (4/4)
• The PYNQ-Z2 board is alive !!!
25Work in progress
• Forwarding console over network
• Power outlet controlled over Ethernet (NETIO) to power-cycle the
board.
26You can also read