QUICK TIPS FOR FULL-ACCESS ACCOUNTS - Florida SHOTS
←
→
Page content transcription
If your browser does not render page correctly, please read the page content below
Florida SHOTS™

      QUICK TIPS
FOR FULL-ACCESS ACCOUNTS

  Contact Information

  www.flshots.com

  Free help desk:
  877-888-SHOT (7468)
  Monday – Friday, 8 A.M. to 5 P.M. Eastern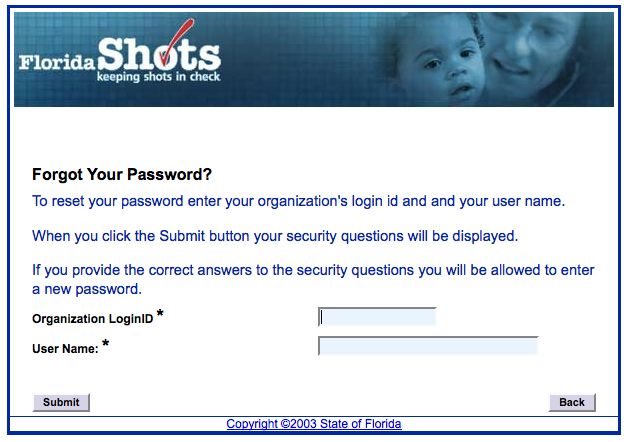
Quick Content Finder

LOGGING IN                                                  1

FORGOTTEN PASSWORD                                          2

UNLOCKING AND RESETTING USERS (ADMINISTRATIVE USERS ONLY)   4

ADDING AND REMOVING PERSONNEL (ADMINISTRATIVE USERS ONLY)   5

FUNCTIONS AVAILABLE ON THE REGISTRY’S MAIN MENU             8

ENTERING VACCINATIONS IN THE REGISTRY                       9

DH FORM 680                                                 12

1. LOGGING IN

              Login Screen

              • URL:                                               • Below your login information, you will see the
                https://www.flshots.com/flshots/signin.csp           Florida SHOTS “Current Announcements.” It is
                                                                     important that you read these in order to stay
              • For quick access, add this URL to                    current with all Florida SHOTS updates and
                your “Favorites”                                     system releases.

              • Passwords must be entered exactly as they
                were created.

              How to Log In                                         - For security purposes, you will be required to
                                                                      change this password upon logging in for the
              • Organization Login ID (OLI): The OLI is a             first time.
                unique identifier assigned to your organization
                by the Florida Department of Health (DOH).          - Passwords are case-sensitive, at least seven
                The OLI is not case sensitive.                        characters long, and must be kept confidential.
                                                                      They should be changed once every 90 days.
              • User Name: The user name is a unique
                identifier that informs the system of the user’s    - If you are unable to log in after entering your
                identity within their organization. DOH assigns       password twice, use the “Need Password
                the Local Org Administrator’s user name, and          Assistance?” function to reset it.
                then that administrator may add additional
                users. (Florida SHOTS will automatically            After three failed login attempts, the account
                create these user names, or the Local Org           will be locked, and an administrator will need to
                Administrator can create one.) The user name        unlock it. The local administrator will be able to
                is not case sensitive.                              unlock the individual accounts of staff members.
                                                                    However, if the local administrator is unavailable,
              • Password: When your account is activated,           or if the user is locked out, that person will need
                DOH, or your Local Org Administrator,               to reset their password or call the Florida SHOTS
                will provide you with a password to access          help desk directly to have their account unlocked.
                the system.

AS OF MAY 25, 2018                                                                                        QUICK TIPS      1
2. FORGOTTEN PASSWORD
Setting Security Questions
Florida SHOTS allows you to reset your password by answering user-selected security questions. If
you have not selected security questions and answers, you will be prompted to do so when you log
into the system. To change these questions and answers later, select the “Security Question Edit”
link from the “Administration” menu.
Once questions and answers are on file, if you forget your password, click the “Need Password
Assistance?” link on the login screen.
QUICK TIPS 22. FORGOTTEN PASSWORD (cont.)
Security Prompts
You will be prompted to enter your Organization Login ID, User Name, and answer your security
questions. If the questions are answered correctly, you will be allowed to reset your password. If the
questions are not answered correctly after three attempts, your account will be locked and your Local
Org Administrator, or the Florida SHOTS help desk, will need to unlock the account.
QUICK TIPS 33. UNLOCKING AND RESETTING USERS (ADMINISTRATIVE USERS ONLY)
A user’s password can be reset at any time by entering, and then confirming, a new
password. Changing a password will automatically renew its expiration date for 90
more days. After any changes are made, the Local Org Administrator must click the
“Submit” button to save the new information. The administrator can then verify that
the changes have been made by checking the “Personnel List” page again.
If a password has been expired for more than 60 days, the system automatically
changes the user’s status to inactive. To reactivate the user, go to “Personnel List”
and place a check mark in the “Inactive” box and click “Display.” Click on the
personnel record, delete the end date for the user you are reactivating, and assign
a new password. Select the box at the bottom left of the screen, which states “User
must change password at next logon”, so that the user will be able to select their own
password when they next log in to Florida SHOTS.
If you do not know who your Local Organization Administrator is, please click on
“Customer Support” in the menu and find the “Contacts” link. This provides users with
the Local Organization Administrator, as well as contact information for the Florida
SHOTS Team.
QUICK TIPS 44. ADDING AND REMOVING PERSONNEL (ADMINISTRATIVE USERS ONLY)
Edit Contact Information
Local Org Administrators can edit contact information on the “Enrolled Organization
Maintenance” page by choosing “Organization Edit” under “Administration” in the
sidebar menu. If any other information is incorrect, please send an email to the
Florida SHOTS help desk (flshots@flhealth.gov).
Adding New Users
The “Add New Person” button within the “Personnel List” screen takes administrators
to the “Personnel Maintenance” screen for creating a new system user. There,
administrators can enter several key pieces of information regarding the new user
they are adding. The Local Org Administrator must have the user’s start date prior to
creating their profile in the system. End dates are not required, but should be added
when a user leaves or no longer requires access to Florida SHOTS. The system will
only accept an end date that is equal to, or less than, the password expiration date.
QUICK TIPS 54. ADDING AND REMOVING PERSONNEL (cont.)
Adding New Users cont.
Users who administer vaccines to patients should have a “Yes” in the Immunization Provider
box. Users who do not provide immunizations should have a “No.” Any user who is, by Florida
statutes, allowed to sign and certify the DH Form 680 should have a “Yes” in the Certify Form
680 box with complete Medical License Data. Users who cannot sign Form 680s should have
a “No” in that box. To determine who can certify the DH Form 680, please see the “DH680
FAQs” in the Training Guide section under “Provider Training” on flshotsusers.com. The
Provider Person ID is generated by the system for immunization providers only. This unique ID
can be changed by your Local Organization Administrator. The System User box should only
be checked for users who require access to Florida SHOTS. If the box is left unchecked, the
user will not be able to log into Florida SHOTS, but will appear on your organization’s list of
immunization providers.
QUICK TIPS 64. ADDING AND REMOVING PERSONNEL (cont.)
Adding New Users cont.
Users requiring access to Florida SHOTS must have certain information included in their user
account. System User ID is generated by the system, but can be changed by the administrator.
Password Expiration is also generated by the system each time a new password is created. System
Password must initially be set by the administrator or the Florida SHOTS help desk, and will need
to be entered again in the Confirm Password box. Authorization must be set to “Full Access” for the
user to have access to Florida SHOTS. Roles will be determined by the Local Org Administrator, but
the majority of users are set as “Local Org Staff.” Users who are authorized to create (Note: This is
different from “Certify.”) a certified Form 680 must have “Yes” selected in the box for Create Certified
Form 680. If user is not authorized to “create” the DH Form 680, leave this box set to “No”.
When a new user signs into Florida SHOTS, they will see a task in the “User Task List” to
acknowledge training. From there, they can link to the training and resources page within the registry
and check the box to acknowledge training. Administrators may also check the box next to Florida
SHOTS training acknowledged within the personnel record.
QUICK TIPS 75. FUNCTIONS AVAILABLE ON THE REGISTRY’S MAIN MENU
Use the menu on the left side of the screen to perform various functions including accessing patient
records, reminder recall, data transactions, inventory, running multiple reports, administration of your
account, and customer support.
Menu Options
• Submit: IMPORTANT—This button results in data being permanently stored on the central
server. This button becomes active (yellow) once changes are made to a record, and allows
users to save data after all required information is entered during the patient registration or
update process.
• Task List: Information needing your attention in regards to your organization will be posted
here. You will be notified upon logging in to Florida SHOTS if there are items in your task list.
• Patients: Search, complete, or update patient information (e.g., demographics, immunization,
etc.), generate forms, and reports. When you are finished, always remember to release the
patient record.
• Reminder Recall: Run reports and create labels for patients who are, or will be, due for
immunizations within specified date ranges.
• System Transactions: Upload log reports for your organization and view transaction statistics to
ensure data quality.
• Vaccine Inventory: VFC providers may view temperature logs, order vaccine through VFC, and
make changes to inventory.
• Assess Imm Levels: Run reports used to evaluate immunization coverage levels for your
organization.
• Reports: Create, view, print, and download various useful reports including Vaccine Utilization,
Physical Inventory, and Immunization Statistics.
• Administration: Manually update your password or security questions/answers, and view
organization details. For those users with administrative rights, you can add users within
your facility, unlock passwords, manage user accounts, and update certain information about
your organization.
• Customer Support: Find links to announcements, contacts, provide feedback, view the user
guide, and access multiple training options.
Note: Every screen has a “Help Text” icon. Click on it to show or to hide helpful information about
that page. For more information, click on the help text icon “?” at the top of the screen. You can click on
it again to hide the text.
QUICK TIPS 86. ENTERING VACCINATIONS IN THE REGISTRY
Once a patient is in the registry, you are ready to add vaccinations to their record. Click the
“Vaccinations” link on the left side menu. Choose one of these two options to add shots: “Add a
Vaccination Record” or “Add Historical Vaccination Records.”
Option 1: “Add a Vaccination Record”
(Required for VFC Participants)
All VFC administered vaccines must be entered into Florida SHOTS. To meet VFC requirements,
fill in all of the required information (highlighted in blue) on the “Add a Vaccination Record” page.
Following this method to enter VFC information will allow you to track your shot records and manage
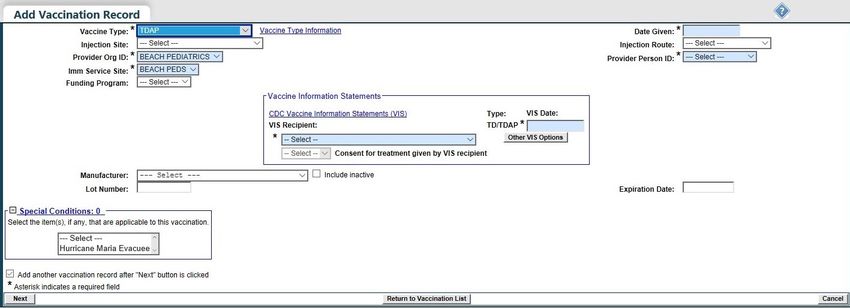
your VFC inventory. Select “Add a Vaccination Record.” The system will display the “Add Vaccination
Record” page, equipped with pull-down lists that include all required vaccine information. To display
the selections, simply click the down arrow next to each box.
QUICK TIPS 96. ENTERING VACCINATIONS IN THE REGISTRY (cont.)
• Vaccine Type: Enter the type of vaccine the patient received.
• Date Given: Enter the date, or if vaccine was given today, enter “T” and the current date will
automatically populate.
• VIS Date: Enter the date of the Vaccine Information Statement provided for this vaccination.
Some combination vaccines may require multiple VIS publication dates. If a single VIS
statement exists for combination vaccines, you will see a button labeled “Other VIS Options,”
which allows you to use either the separate statements or the combined statement. To view
current and historical VIS information, click on the “CDC Vaccine Information Statements
(VIS)” link found above “VIS Recipient,” or visit http://www.cdc.gov/vaccines/hcp/vis/index.
html.
• VIS Recipient: Select the person receiving the VIS statements for this patient. Mother, father,
guardian and patient names will be available when they are already in the patient record. If
“Other” is selected, you will enter the name of the person receiving the form, as well as that
person’s relationship to the patient. If the relationship is mother, father, or guardian and the
name entered is different than what is already on record, the user will be given the option to
replace the current information with the new. This information will be included on the Form
DH687, Clinic Record Card, along with whether or not this person also gave consent for
treatment.
• Consent for Treatment Given by VIS Recipient: When VIS information is recorded, this field is
enabled and required. Leave the default value at “Yes” if the person receiving the VIS gave
consent for treatment. If the person giving consent is not the same as the person receiving
the statements, local policy on documentation of consent for treatment should be used. This
information will be included on the Form DH687, Clinic Record Card, along with the name of
the VIS recipient.
• Injection Site: This field records the specific place on the body where an immunization is
administered.
• Injection Route: This field records the method used to administer the immunization. When
Intranasal or Oral is selected, an Injection Site is not required.
• Provider Org. ID: The name of the organization administering the vaccination defaults to your
practice. (If you are entering historical shots not administered at your practice, you must
select “Other” from the drop-down menu.)
• Provider Person ID: This is a required field identifying the immunization provider who
administered the vaccination at that facility.
• Imm Service Site: If your organization has multiple service sites, you may indicate which site
administered the vaccination. If the vaccination being recorded is the most recent, and the
service site selected differs from the service site on the “Patient Information” page, users will be
asked whether or not to update the patient’s service site.
QUICK TIPS 106. ENTERING VACCINATIONS IN THE REGISTRY (cont.)
• Funding Program: If your organization, or any of its sites, participates in one of the VFC
ordering efforts, you will see the “Funding Program” menu. If you are administering vaccine
from one of the listed Funding Programs, select that effort from the drop down menu. If you
are using privately purchased vaccine, leave this box marked as “Select” and continue with
recording your vaccine.
• VFC Eligibility: This field will only be visible if a VFC PIN and start date are recorded for
your organization by Florida SHOTS and a VFC ordering effort is selected from the “Funding
Program” menu. Specify the patient’s eligibility for receiving VFC vaccine as it applies to this
vaccination.
• Manufacturer, Lot Number & Expiration Date: These are required when the vaccination is VFC
eligible and the date given is within the last 30 days; otherwise, these fields are optional. If
manufacturer is selected, lot number is required. The expiration date can only be entered once
a manufacturer is selected.
Option 2: “Add Historical Vaccination Records”
(Recommended When Entering Historical Records for Patients Who Have Received Vaccines from
Other Providers)
We recommend that you use the option “Add Historical Vaccination Records” when you are entering
shots for patients who’ve received vaccinations from other providers and those shots are not in the
registry. The “Historical Shots” screen lets you simultaneously enter several shots. Select a vaccine
type, and then enter the dates in which that vaccine type was given. Additionally, you can select a
date and then input all vaccines given on that date.
By clicking on the checkboxes next to the “Date Given” fields, you are indicating that the shot
was provided by your organization. (Do not click the checkbox if your organization did not give this
particular shot). Once you’ve entered all historical shots for a patient, or all fields have been filled
on the page, click “Next” and you will be returned to the “Vaccination List” screen where you must
click “Submit” or “New Imm Status” to evaluate and save the vaccinations.
If your organization is not listed as the patient’s Current Immunization Provider (CIP), while
the record is being saved, you will be asked if your organization should become the CIP. If your
practice is, in fact, taking over as the immunization provider for this patient, click “OK”. If you do
not wish to be the CIP, click “Cancel”.
QUICK TIPS 117. DH FORM 680
Printing 680s
Use the “Form 680” option located in the menu on the left to view and print the D.H. Form 680.
Once this link is clicked, the Florida Certification of Immunization selection criteria screen
appears. You must first choose the “Type(s)” of Form 680 to generate based on the patient’s
immunizations and the requirements. Next, select your location from the dropdown menu for IMM
Service Site, along with the parent or guardian’s name that will appear on the Form 680.
You have the option to print the Florida Certificate of Immunization, DH Form 680. Once this link
is clicked, the Form 680 selection criteria appears.
Electronically Certifying a Form 680
You may also create an electronically certified DH Form 680, if authorized by your Local
Org Administrator. If you have this permission, select the appropriate name from the “Physician
or Authorized Signature” drop-down list. The “Create Current Form 680” button will now appear as
“Create Certified (e-signed) Form 680.” Click on it to proceed. Please note that the system will
default to “Create a Parent PIN” to allow parents to access the Certified 680 from a personal
computer. If you do not wish to issue a PIN, please uncheck the box. You may also choose to do
this at a later time for the patient/parent by selecting “Create PIN” from the menu.
The DH Form 680 will appear. To complete the certification, scroll to the bottom of the screen
where you can choose to certify and print the form, or certify the form only:
• “Certify (e-sign) & Print”
• “Certify (e-sign) Only”
QUICK TIPS 127. DH FORM 680 (cont.)
When one of the two buttons has been selected, the completed DH Form 680 will appear. The
certified form will show the embedded authorized signature, as well as a unique electronic
certification number and the Florida SHOTS logo. The DH Form 680 is not certified by Florida
SHOTS without this special logo and number.
The organization’s information will also be shown, as well as the name of the user who issued
(created) the DH Form 680.
QUICK TIPS 13You can also read