Red Hat AMQ 7.3 Getting Started with AMQ Broker - For Use with AMQ Broker 7.3
←
→
Page content transcription
If your browser does not render page correctly, please read the page content below
Red Hat AMQ 7.3

Getting Started with AMQ Broker

        For Use with AMQ Broker 7.3

                                      Last Updated: 2019-05-07
Red Hat AMQ 7.3 Getting Started with AMQ Broker For Use with AMQ Broker 7.3
Legal Notice
Copyright © 2019 Red Hat, Inc.

The text of and illustrations in this document are licensed by Red Hat under a Creative Commons
Attribution–Share Alike 3.0 Unported license ("CC-BY-SA"). An explanation of CC-BY-SA is
available at
http://creativecommons.org/licenses/by-sa/3.0/
. In accordance with CC-BY-SA, if you distribute this document or an adaptation of it, you must
provide the URL for the original version.

Red Hat, as the licensor of this document, waives the right to enforce, and agrees not to assert,
Section 4d of CC-BY-SA to the fullest extent permitted by applicable law.

Red Hat, Red Hat Enterprise Linux, the Shadowman logo, JBoss, OpenShift, Fedora, the Infinity
logo, and RHCE are trademarks of Red Hat, Inc., registered in the United States and other
countries.

Linux ® is the registered trademark of Linus Torvalds in the United States and other countries.

Java ® is a registered trademark of Oracle and/or its affiliates.

XFS ® is a trademark of Silicon Graphics International Corp. or its subsidiaries in the United States
and/or other countries.

MySQL ® is a registered trademark of MySQL AB in the United States, the European Union and
other countries.

Node.js ® is an official trademark of Joyent. Red Hat Software Collections is not formally related to
or endorsed by the official Joyent Node.js open source or commercial project.

The OpenStack ® Word Mark and OpenStack logo are either registered trademarks/service marks
or trademarks/service marks of the OpenStack Foundation, in the United States and other
countries and are used with the OpenStack Foundation's permission. We are not affiliated with,
endorsed or sponsored by the OpenStack Foundation, or the OpenStack community.

All other trademarks are the property of their respective owners.

Abstract
This guide describes how to get started using AMQ Broker.
Table of Contents
Table of Contents
.CHAPTER
. . . . . . . . . . 1.. .OVERVIEW
. . . . . . . . . . . . . . . . . . . . . . . . . . . . . . . . . . . . . . . . . . . . . . . . . . . . . . . . . . . . . . . . . . . . . . . . . . . . . . . . . . . . . . . . . . . . . . . .4. . . . . . . . . . . . .
1.1. KEY FEATURES 4
1.2. SUPPORTED STANDARDS AND PROTOCOLS 4
1.3. SUPPORTED CONFIGURATIONS 4
1.4. DOCUMENT CONVENTIONS 5
The sudo command 5
About the use of file paths in this document 5
.CHAPTER
. . . . . . . . . . 2.
. . UNDERSTANDING
. . . . . . . . . . . . . . . . . . . .AMQ
. . . . . BROKER
. . . . . . . . . . . . . . . . . . . . . . . . . . . . . . . . . . . . . . . . . . . . . . . . . . . . . . . . . . . . . . . . . . . . . . . 6. . . . . . . . . . . . .
2.1. BROKER INSTANCES 6
2.2. CLUSTERING AND HIGH AVAILABILITY 6
Clustering 6
High availability (HA) 6
2.3. SECURITY 7
2.4. UNDERSTANDING THE AMQ ADDRESS MODEL 7
Point-to-point messaging 7
Publish-subscribe messaging 8
Combining point-to-point and publish-subscribe messaging 9
2.5. MESSAGE PERSISTENCE 9
Journal-based persistence 10
Database persistence 10
2.6. RESOURCE CONSUMPTION 10
2.7. MONITORING AND MANAGEMENT 11
.CHAPTER
. . . . . . . . . . 3.
. . INSTALLING
. . . . . . . . . . . . . .AMQ
. . . . . .BROKER
. . . . . . . . . . . . . . . . . . . . . . . . . . . . . . . . . . . . . . . . . . . . . . . . . . . . . . . . . . . . . . . . . . . . . . . . . . . 12
..............
3.1. DOWNLOADING THE AMQ BROKER ARCHIVE 12
3.2. EXTRACTING THE AMQ BROKER ARCHIVE ON LINUX 12
3.3. EXTRACTING THE AMQ BROKER ARCHIVE ON WINDOWS SYSTEMS 13
3.4. UNDERSTANDING THE AMQ BROKER INSTALLATION ARCHIVE CONTENTS 13
. . . . . . . . . . . 4.
CHAPTER . . .CREATING
. . . . . . . . . . .A
. . STANDALONE
. . . . . . . . . . . . . . . .BROKER
. . . . . . . . . . . . . . . . . . . . . . . . . . . . . . . . . . . . . . . . . . . . . . . . . . . . . . . . . . . . . . . . . 15
..............
4.1. CREATING A BROKER INSTANCE 15
4.2. STARTING THE BROKER INSTANCE 17
4.3. PRODUCING AND CONSUMING TEST MESSAGES 18
4.4. STOPPING THE BROKER INSTANCE 19
.CHAPTER
. . . . . . . . . . 5.
. . RUNNING
. . . . . . . . . . . THE
. . . . .AMQ
. . . . . BROKER
. . . . . . . . . .EXAMPLES
. . . . . . . . . . . . . . . . . . . . . . . . . . . . . . . . . . . . . . . . . . . . . . . . . . . . . . . . . . . . . . . . 21
..............
5.1. SETTING UP YOUR MACHINE TO RUN THE AMQ BROKER EXAMPLES 21
5.1.1. Downloading and installing Maven 21
5.1.2. Downloading and installing the AMQ Maven repository 21
5.1.3. Configuring the Maven settings file 21
5.2. AMQ BROKER EXAMPLE PROGRAMS 23
5.3. RUNNING AN AMQ BROKER EXAMPLE PROGRAM 24
. . . . . . . . . . . 6.
CHAPTER . . .NEXT
. . . . . .STEPS
. . . . . . . . . . . . . . . . . . . . . . . . . . . . . . . . . . . . . . . . . . . . . . . . . . . . . . . . . . . . . . . . . . . . . . . . . . . . . . . . . . . . . . . .26
..............
.APPENDIX
. . . . . . . . . . .A.
. . USING
. . . . . . . .YOUR
. . . . . . SUBSCRIPTION
. . . . . . . . . . . . . . . . . . . . . . . . . . . . . . . . . . . . . . . . . . . . . . . . . . . . . . . . . . . . . . . . . . . . . . . . . . . . . . . .27
..............
Accessing your account 27
Activating a subscription 27
Downloading zip and tar files 27
Registering your system for packages 27
. . . . . . . . . . . .B.
APPENDIX . . INTRODUCTION
. . . . . . . . . . . . . . . . . .TO
. . . APACHE
. . . . . . . . . .MAVEN
. . . . . . . . . . . . . . . . . . . . . . . . . . . . . . . . . . . . . . . . . . . . . . . . . . . . . . . . . . . . . . .28
..............
1Red Hat AMQ 7.3 Getting Started with AMQ Broker
B.1. MAVEN POM FILES 28
B.2. MAVEN REPOSITORIES 29
B.3. THE MAVEN SETTINGS FILE 29
2Table of Contents
3Red Hat AMQ 7.3 Getting Started with AMQ Broker
CHAPTER 1. OVERVIEW
AMQ Broker is a high-performance messaging implementation based on ActiveMQ Artemis. It uses an
asynchronous journal for fast message persistence, and supports multiple languages, protocols, and
platforms.
1.1. KEY FEATURES
AMQ Broker provides the following features:
Clustering and high availability options
Fast, native-IO persistence
Supports local transactions
Supports XA transactions when using AMQ Core Protocol JMS and AMQ OpenWire JMS clients
Written in Java for broad platform support
Multiple management interfaces: AMQ Console, Management APIs, and JMX
1.2. SUPPORTED STANDARDS AND PROTOCOLS
AMQ Broker supports the following standards and protocols:
Wire protocols:
AMQP 1.0
Artemis Core Protocol
HornetQ Core Protocol
MQTT
OpenWire (Used by A-MQ 6 clients)
STOMP
JMS 2.0
NOTE
The details of distributed transactions (XA) within AMQP are not provided in the
1.0 version of the specification. If your environment requires support for
distributed transactions, it is recommended that you use the AMQ Core Protocol
JMS.
1.3. SUPPORTED CONFIGURATIONS
Refer to the article "Red Hat AMQ 7 Supported Configurations " on the Red Hat Customer Portal for
current information regarding AMQ Broker supported configurations.
4CHAPTER 1. OVERVIEW
1.4. DOCUMENT CONVENTIONS
This document uses the following conventions for the sudo command and file paths.
The sudo command
In this document, sudo is used for any command that requires root privileges. You should always
exercise caution when using sudo, as any changes can affect the entire system.
For more information about using sudo, see The sudo Command.
About the use of file paths in this document
In this document, all file paths are valid for Linux, UNIX, and similar operating systems (for example,
/home/...). If you are using Microsoft Windows, you should use the equivalent Microsoft Windows paths
(for example, C:\Users\...).
5Red Hat AMQ 7.3 Getting Started with AMQ Broker
CHAPTER 2. UNDERSTANDING AMQ BROKER
AMQ Broker enables you to loosely couple heterogeneous systems together, while providing reliability,
transactions, and many other features. Before using AMQ Broker, you should understand the capabilities
it offers.
2.1. BROKER INSTANCES
In AMQ Broker, the installed AMQ Broker software serves as a "home" for one or more broker instances.
This architecture provides several benefits, such as:
You can create as many broker instances as you require from a single AMQ Broker installation.
The AMQ Broker installation contains the necessary binaries and resources that each broker
instance needs to run. These resources are then shared between the broker instances.
When upgrading to a new version of AMQ Broker, you only need to update the software once,
even if you are running multiple broker instances on that host.
You can think of a broker instance as a message broker. Each broker instance has its own directory
containing its unique configuration and runtime data. This runtime data consists of logs and data files,
and is associated with a unique broker process on the host.
2.2. CLUSTERING AND HIGH AVAILABILITY
Clustering and high availability (HA) enable you to group multiple brokers together to increase
messaging throughput and reliability.
Clustering
By using clustering, you can:
Connect brokers in a variety of topologies and architectures.
A broker cluster can contain brokers on a shared host, different hosts, or both shared and
different hosts.
Load balance client connections across the brokers in the cluster.
Redistribute messages across the brokers in the cluster at runtime to avoid imbalanced load
scenarios.
High availability (HA)
You can minimize downtime in a broker cluster by implementing HA. With HA, the brokers in the cluster
are grouped into master-slave groups: master brokers are active and serve client requests, while slave
brokers back them up. If a master broker goes offline, its slave broker becomes active. Clients can then
reconnect to the slave broker and resume sending and receiving messages.
AMQ Broker supports several HA policies:
Replication
The master and slave brokers synchronize their messaging data over the network. If a master broker
fails, the slave broker becomes active using the synchronized data.
Shared-store
Master and slave brokers share the same location for their messaging data. If a master broker fails,
the slave broker becomes active using the data in the shared location.
Live-only
6CHAPTER 2. UNDERSTANDING AMQ BROKER
If a broker is shut down, it copies its messages and transaction state to another broker in the cluster.
Typically, you use this policy to scale down a broker cluster, not to handle unexpected broker failures.
2.3. SECURITY
AMQ Broker provides a number of methods you can use to authenticate clients and control what they
can access on the broker.
Guest/anonymous access control
You can configure the broker to allow anonymous access. If a user does not have login credentials, or
if their credentials fail validation, the user can be granted a guess account with limited access.
Basic user and password access control
With this method, you store client user names, passwords, and security roles in properties files. A
client can connect to the broker by using its user name and password. After the connection is
accepted, the role assigned to the client’s user name controls the resources they can access on the
broker.
For an added layer of security, you can encrypt the client’s connection to the broker by configuring
server-side SSL/TLS certificates. This is also called one-way SSL/TLS.
Certificate-based access control
This method provides greater security than user and password access control by using an SSL/TLS
certificate to authenticate the client. Also called two-way SSL/TLS, both the broker and the client
present certificates and validate each other’s identity during the TLS handshake. Once verified, the
client is assigned to a security role that defines the resources it can access on the broker.
LDAP integration
If LDAP is deployed in your environment, you can integrate AMQ Broker with it to authenticate
clients and authorize what they can access.
Kerberos integration
If Kerberos is deployed in your environment, you can integrate AMQ Broker with it to authenticate
clients and authorize what they can access.
NOTE
You can only use Kerberos to authenticate and authorize AMQP clients.
2.4. UNDERSTANDING THE AMQ ADDRESS MODEL
AMQ Broker provides a flexible address model that enables you to define point-to-point and publish-
subscribe messaging patterns that work for any messaging protocol.
An address represents a messaging endpoint. Each address has a routing type (anycast or multicast),
and a set of queues (that is, destinations). Essentially, the address model enables you to define what you
want the broker to do when it receives a message with a particular address.
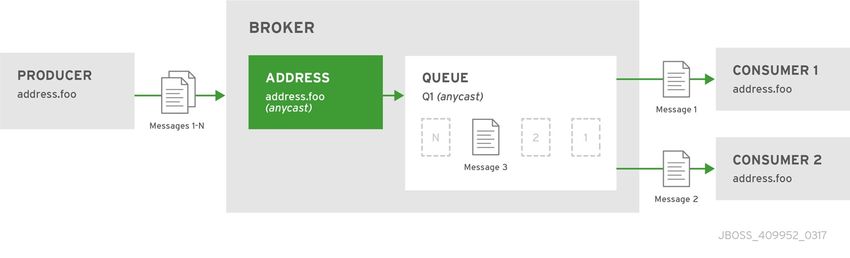
Point-to-point messaging
The AMQ address model supports point-to-point messaging (also called anycast) in which a producer
sends a message to a single consumer. If multiple consumers are connected to the same queue,
messages are distributed among each consumer equally, provided the consumers are able to handle
them equally. Point-to-point messaging provides traditional queue-like behavior.
Figure 2.1. Point-to-point messaging with one queue
7Red Hat AMQ 7.3 Getting Started with AMQ Broker
Figure 2.1. Point-to-point messaging with one queue
You can also use point-to-point messaging with multiple queues for a single address. In this case,
messages sent to the address are distributed evenly across all associated queues. If more than one
consumer connects to the same queue, AMQ distributes messages between them.
Figure 2.2. Point-to-point messaging with two queues
Publish-subscribe messaging
The AMQ address model also supports publish-subscribe messaging (also called multicast) in which a
producer sends a message to every consumer subscribed to the address. Publish-subscribe messaging
provides topic-like behavior.
Figure 2.3. Publish-subscribe
8CHAPTER 2. UNDERSTANDING AMQ BROKER
Figure 2.3. Publish-subscribe
Publish-subscribe messaging also supports durable and non-durable subscription queues.
Combining point-to-point and publish-subscribe messaging
AMQ Broker also supports both point-to-point and publish-subscribe semantics for the same address.
This configuration is not common, but it does provide the greater flexibility required for advanced
messaging patterns.
Figure 2.4. Point-to-point and publish-subscribe
2.5. MESSAGE PERSISTENCE
AMQ Broker persists message data to ensure that messages are never lost, even if the broker fails or
shuts down unexpectedly. AMQ Broker provides two options for message persistence: journal-based
persistence and database persistence.
9Red Hat AMQ 7.3 Getting Started with AMQ Broker
Journal-based persistence
The default method, this option writes message data to message journal files stored on the file system.
Initially, each of these journal files is created automatically with a fixed size and filled with empty data. As
clients perform various broker operations, records are appended to the journal. When one of the journal
files is full, the broker moves to the next journal file.
Journal-based persistence supports transactional operations, including both local and XA transactions.
Journal-based persistence requires an IO interface to the file system. AMQ Broker supports the
following:
Linux Asynchronous IO (AIO)
AIO typically provides the best performance, but it requires the following:
Linux Kernel version 2.6 or later
Supported file system
To see the currently supported file systems, see Red Hat AMQ 7 Supported Configurations .
Java NIO
Java NIO provides good performance, and it can run on any platform with a Java 6 or later runtime.
Database persistence
This option stores message and bindings data in a database by using Java Database Connectivity
(JDBC). This option is a good choice if you already have a reliable and high performing database
platform in your environment, or if using a database is mandated by company policy.
The broker JDBC persistence store uses a standard JDBC driver to create a JDBC connection that
stores message and bindings data in database tables. The data in the database tables is encoded using
the same encoding as journal-based persistence. This means that messages stored in the database are
not human-readable if accessed directly using SQL.
To use database persistence, you must use a supported database platform. To see the currently
supported database platforms, see Red Hat AMQ 7 Supported Configurations .
2.6. RESOURCE CONSUMPTION
AMQ Broker provides a number of options to limit memory and resource consumption on the broker.
Resource limits
You can set connection and queue limits for each user. This prevents users from consuming too
many of the broker’s resources and causing degraded performance for other users.
Message paging
Message paging enables AMQ Broker to support large queues containing millions of messages while
also running with a limited amount of memory. When the broker receives a surge of messages that
exceeds its memory capacity, it begins paging messages to disk. This paging process is transparent;
the broker pages messages into and out of memory as needed.
Message paging is address-based. When the size of all messages in memory for an address exceeds
the maximum size, each additional message for the address will be paged to the address’s page file.
Large messages
With AMQ Broker, you can send and receive huge messages, even when running with limited memory
10CHAPTER 2. UNDERSTANDING AMQ BROKER
With AMQ Broker, you can send and receive huge messages, even when running with limited memory
resources. To avoid the overhead of storing large messages in memory, you can configure AMQ
Broker to store these large messages in the file system or in a database table.
2.7. MONITORING AND MANAGEMENT
AMQ Broker provides several tools you can use to monitor and manage your brokers.
AMQ Console
AMQ Console is a web interface accessible through a web browser. You can use to monitor network
health, view broker topology, and create and delete broker resources.
CLI
AMQ Broker provides the artemis CLI, which you can use to administer your brokers. Using the CLI,
you can create, start, and stop broker instances. The CLI also provides several commands for
managing the message journal.
Management API
AMQ Broker provides an extensive management API. You can use it to modify a broker’s
configuration, create new resources, inspect these resources, and interact with them. Clients can also
use the management API to manage the broker and subscribe to management notifications.
AMQ Broker provides the following methods for using the management API:
Java Management Extensions (JMX) - JMX is a standard technology for managing Java
applications. The broker’s management operations are exposed through AMQ MBeans
interfaces.
JMS API - Management operations are sent using standard JMS messages to a special
management JMS queue.
Logs
Each broker instance logs error messages, warnings, and other broker-related information and
activities. You can configure the logging levels, the location of the log files, and log format. You can
then use the resulting log files to monitor the broker and diagnose error conditions.
11Red Hat AMQ 7.3 Getting Started with AMQ Broker
CHAPTER 3. INSTALLING AMQ BROKER
AMQ Broker is distributed as a platform-independent archive file. To install AMQ Broker on your system,
you must download the archive and extract the contents. You should also understand the directories
included in the archive.
Prerequisites
The host on which you are installing AMQ Broker must meet the AMQ Broker supported
configurations.
For more information, see Red Hat AMQ 7 Supported Configurations .
3.1. DOWNLOADING THE AMQ BROKER ARCHIVE
AMQ Broker is distributed as a platform-independent archive file. You can download it from the Red Hat
Customer Portal.
Prerequisites
You must have a Red Hat subscription.
For more information, see Using your Subscription .
Procedure
1. In a web browser, navigate to https://access.redhat.com/downloads/ and log in.
The Product Downloads page is displayed.
2. In the JBoss Integration and Automation section, click the Red Hat AMQ Broker link.
The Software Downloads page is displayed.
3. Select the desired AMQ Broker version from the Version drop-down menu.
4. On the Releases tab, click the Download link for the specific AMQ Broker file you want to
download.
3.2. EXTRACTING THE AMQ BROKER ARCHIVE ON LINUX
If you are installing AMQ Broker on Red Hat Enterprise Linux, create a new user account for AMQ
Broker, and then extract the contents from the installation archive.
Procedure
1. Create a new user named amq-broker and provide it a password.
$ sudo useradd amq-broker
$ sudo passwd amq-broker
2. Create the directory /opt/redhat/amq-broker and make the new amq-broker user and group
the owners of it.
$ sudo mkdir /opt/redhat
$ sudo mkdir /opt/redhat/amq-broker
$ sudo chown -R amq-broker:amq-broker /opt/redhat/amq-broker
12CHAPTER 3. INSTALLING AMQ BROKER
3. Change the owner of the archive to the new user.
$ sudo chown amq-broker:amq-broker amq-broker-7.x.x-bin.zip
4. Move the installation archive to the directory you just created.
$ sudo mv amq-broker-7.x.x-bin.zip /opt/redhat/amq-broker
5. As the new amq-broker user, extract the contents by using the unzip command.
$ su - amq-broker
$ cd /opt/redhat/amq-broker
$ unzip .zip
$ exit
A directory named something similar to amq-broker-7.3 is created. In the documentation, this
location is referred to as .
3.3. EXTRACTING THE AMQ BROKER ARCHIVE ON WINDOWS
SYSTEMS
If you are installing AMQ Broker on a Windows system, create a new directory folder for AMQ Broker,
and then extract the contents there.
Procedure
1. Use Windows Explorer to create the directory folder \redhat\amq-broker on the desired drive
letter.
For example: C:\redhat\amq-broker
2. Use Windows Explorer to move the installation archive to the directory you just created.
3. In the \redhat\amq-broker directory, right-click the installation archive zip file and select
Extract All.
A directory named something similar to amq-broker-7.3 is created. In the documentation, this
location is referred to as .
3.4. UNDERSTANDING THE AMQ BROKER INSTALLATION ARCHIVE
CONTENTS
The directory created by extracting the archive is the top-level directory for the AMQ Broker
installation. This directory is referred to as , and includes the following contents:
This directory… Contains…
/web/api API documentation.
/bin Binaries and scripts needed to run AMQ Broker.
/etc Configuration files.
13Red Hat AMQ 7.3 Getting Started with AMQ Broker
This directory… Contains…
/examples JMS and Java EE examples.
/lib JARs and libraries needed to run AMQ Broker.
/schema XML schemas used to validate AMQ Broker
configuration.
/web The web context loaded when AMQ Broker runs.
14CHAPTER 4. CREATING A STANDALONE BROKER
CHAPTER 4. CREATING A STANDALONE BROKER
You can get started quickly with AMQ Broker by creating a standalone broker instance on your local
machine, starting it, and producing and consuming some test messages.
Prerequisites
AMQ Broker must be installed.
For more information, see Chapter 3, Installing AMQ Broker.
4.1. CREATING A BROKER INSTANCE
A broker instance is a directory containing the configuration and runtime data for a broker. To create a
new broker instance, you first create a directory for the broker instance, and then use the artemis
create command to create the broker instance.
This procedure demonstrates how to create a simple, standalone broker on your local machine. The
broker uses a basic, default configuration, and accepts connections from clients using any of the
supported messaging protocols.
Procedure
1. Create a directory for the broker instance.
If you are using… Do this…
Red Hat Enterprise Linux
1. Create a new directory to serve as the location for the broker
instance.
$ sudo mkdir /var/opt/amq-broker
2. Assign the user that you created during installation.
$ sudo chown -R amq-broker:amq-broker /var/opt/amq-
broker
Windows Use Windows Explorer to create a new folder to serve as the location
for the broker instance.
2. Use the artemis create command to create the broker.
If you are using… Do this…
15Red Hat AMQ 7.3 Getting Started with AMQ Broker
If you are using… Do this…
Red Hat Enterprise Linux
1. Switch to the user account you created during installation.
$ su - amq-broker
2. Change to the directory you just created for the broker instance.
$ cd /var/opt/amq-broker
3. From the broker instance’s directory, create the broker instance.
$ /bin/artemis create mybroker
Windows
1. Open a command prompt from the directory you just created for
the broker instance.
2. From the broker instance’s directory, create the broker instance.
> \bin\artemis.cmd create mybroker
3. Follow the artemis create prompts to configure the broker instance.
Example 4.1. Configuring a broker instance usingartemis create
$ /opt/redhat/amq-broker/bin/artemis create mybroker
Creating ActiveMQ Artemis instance at: /var/opt/amq-broker/mybroker
--user: is mandatory with this configuration:
Please provide the default username:
admin
--password: is mandatory with this configuration:
Please provide the default password:
--role: is mandatory with this configuration:
Please provide the default role:
amq
--allow-anonymous | --require-login: is mandatory with this configuration:
Allow anonymous access? (Y/N):
Y
Auto tuning journal ...
done! Your system can make 19.23 writes per millisecond, your journal-buffer-timeout will
be 52000
You can now start the broker by executing:
16CHAPTER 4. CREATING A STANDALONE BROKER
"/var/opt/amq-broker/mybroker/bin/artemis" run
Or you can run the broker in the background using:
"/var/opt/amq-broker/mybroker/bin/artemis-service" start
4.2. STARTING THE BROKER INSTANCE
After the broker instance is created, you use the artemis run command to start it.
Procedure
1. Switch to the user account you created during installation.
$ su - amq-broker
2. Use the artemis run command to start the broker instance.
$ /var/opt/amq-broker/mybroker/bin/artemis run
__ __ ____ ____ _
/\ | \/ |/ __ \ | _ \ ||
/ \ | \ / | | | | | |_) |_ __ ___ | | _____ _ __
/ /\ \ | |\/| | | | | | _Red Hat AMQ 7.3 Getting Started with AMQ Broker
4.3. PRODUCING AND CONSUMING TEST MESSAGES
After starting the broker, you should verify that it is running properly. This involves producing a few test
messages, sending them to the broker, and then consuming them.
Procedure
1. Use the artemis producer command to produce a few test messages and send them to the
broker.
This command sends 100 messages to the helloworld address, which is created automatically
on the broker. The producer connects to the broker by using the default port 61616, which
accepts all supported messaging protocols.
$ /opt/redhat/amq-broker/amq-broker-7.2.0/bin/artemis producer --destination helloworld --
message-count 100 --url tcp://localhost:61616
Producer ActiveMQQueue[helloworld], thread=0 Started to calculate elapsed time ...
Producer ActiveMQQueue[helloworld], thread=0 Produced: 100 messages
Producer ActiveMQQueue[helloworld], thread=0 Elapsed time in second : 1 s
Producer ActiveMQQueue[helloworld], thread=0 Elapsed time in milli second : 1289 milli
seconds
2. Use the web console to see the messages stored in the broker.
a. In a web browser, navigate to http://localhost:8161.
b. Log into the console using the default username and default password that you created
when you created the broker instance.
The Attributes tab is displayed.
c. On the Attributes tab, navigate to menu:[addresses > helloworld > queues > "anycast" >
helloworld].
In the previous step, you sent messages to the helloworld address. This created a new
anycast helloworld address with a queue (also named helloworld). The Message count
attribute shows that all 100 messages that were sent to helloworld are currently stored in
this queue.
Figure 4.1. Message count
3. Use the artemis consumer command to consume 50 of the messages stored on the broker.
This command consumes 50 of the messages that you sent to the broker previously.
18CHAPTER 4. CREATING A STANDALONE BROKER
$ /opt/redhat/amq-broker/amq-broker-7.2.0/bin/artemis consumer --destination helloworld --
message-count 50 --url tcp://localhost:61616
Consumer:: filter = null
Consumer ActiveMQQueue[helloworld], thread=0 wait until 50 messages are consumed
Consumer ActiveMQQueue[helloworld], thread=0 Consumed: 50 messages
Consumer ActiveMQQueue[helloworld], thread=0 Consumer thread finished
4. In the web console, verify that the Message count is now 50.
50 of the messages were consumed, which leaves 50 messages stored in the helloworld queue.
5. Stop the broker and verify that the 50 remaining messages are still stored in the helloworld
queue.
a. In the terminal in which the broker is running, press Ctrl+C to stop the broker.
b. Restart the broker.
$ /var/opt/amq-broker/mybroker/bin/artemis run
c. In the web console, navigate back to the helloworld queue and verify that there are still 50
messages stored in the queue.
6. Consume the remaining 50 messages.
$ /opt/redhat/amq-broker/amq-broker-7.2.0/bin/artemis consumer --destination helloworld --
message-count 50 --url tcp://localhost:61616
Consumer:: filter = null
Consumer ActiveMQQueue[helloworld], thread=0 wait until 50 messages are consumed
Consumer ActiveMQQueue[helloworld], thread=0 Consumed: 50 messages
Consumer ActiveMQQueue[helloworld], thread=0 Consumer thread finished
7. In the web console, verify that the Message count is 0.
All of the messages stored in the helloworld queue were consumed, and the queue is now
empty.
4.4. STOPPING THE BROKER INSTANCE
After creating the standalone broker and producing and consuming test messages, you can stop the
broker instance.
This procedure manually stops the broker, which forcefully closes all client connections. In a production
environment, you should configure the broker to stop gracefully so that client connections can be closed
properly.
Procedure
Use the artemis stop command to stop the broker instance:
$ /var/opt/amq-broker/mybroker/bin/artemis stop
2018-12-03 14:37:30,630 INFO [org.apache.activemq.artemis.core.server] AMQ221002:
Apache ActiveMQ Artemis Message Broker version 2.6.1.amq-720004-redhat-1 [b6c244ef-
19Red Hat AMQ 7.3 Getting Started with AMQ Broker
f1cb-11e8-a2d7-0800271b03bd] stopped, uptime 35 minutes
Server stopped!
20CHAPTER 5. RUNNING THE AMQ BROKER EXAMPLES
CHAPTER 5. RUNNING THE AMQ BROKER EXAMPLES
AMQ Broker ships with many example programs that demonstrate basic and advanced features of the
product. You can run these examples to become familiar with the capabilities of AMQ Broker.
To run the AMQ Broker examples, you must first set up your machine by installing and configuring
Apache Maven and the AMQ Maven repository. Then, you use Maven to run the AMQ Broker example
programs.
5.1. SETTING UP YOUR MACHINE TO RUN THE AMQ BROKER
EXAMPLES
Before you can run the included AMQ Broker example programs, you must first download and install
Maven and the AMQ Maven repository, and configure the Maven settings file.
5.1.1. Downloading and installing Maven
Maven is required to run the AMQ Broker examples.
Procedure
1. Go to the Apache Maven Download page and download the latest distribution for your
operating system.
2. Install Maven for your operating system.
For more information, see Installing Apache Maven .
Additional resources
For more information about Maven, see Introduction to Apache Maven .
5.1.2. Downloading and installing the AMQ Maven repository
After Maven is installed on your machine, you download and install the AMQ Maven repository. This
repository is available on the Red Hat Customer Portal.
1. In a web browser, navigate to https://access.redhat.com/downloads/ and log in.
The Product Downloads page is displayed.
2. In the JBoss Integration and Automation section, click the Red Hat AMQ Broker link.
The Software Downloads page is displayed.
3. Select the desired AMQ Broker version from the Version drop-down menu.
4. On the Releases tab, click the Download link for the AMQ Broker Maven Repository.
The AMQ Maven repository file is downloaded as a zip file.
5. On your machine, unzip the AMQ repository file into a directory of your choosing.
A new directory is created on your machine, which contains the Maven repository in a
subdirectory named maven-repository/.
5.1.3. Configuring the Maven settings file
After downloading and installing the AMQ Maven repository, you must add the repository to the Maven
21Red Hat AMQ 7.3 Getting Started with AMQ Broker
After downloading and installing the AMQ Maven repository, you must add the repository to the Maven
settings file.
Procedure
1. Open the Maven settings.xml file.
The settings.xml file is typically located in the ${user.home}/.m2/ directory.
For Linux, this is ~/.m2/
For Windows, this is \Documents and Settings\.m2\ or \Users\.m2\
If you do not find a settings.xml file in ${user.home}/.m2/, there is a default version located in
the conf/ directory of your Maven installation. Copy the default settings.xml file into the
${user.home}/.m2/ directory.
2. In the element, add a profile for the AMQ Maven repository.
jboss-amq-maven-repository
jboss-amq-maven-repository
file:// 1
true
false
jboss-amq-maven-repository
file:// 2
true
false
1 2 Replace with the location of the Maven repository that
you installed. Typically, this location ends with /maven-repository. For example:
file:///path/to/repo/amq-broker-7.2.0-maven-repository/maven-repository
3. In the element, set the AMQ Maven repository to be active:
22CHAPTER 5. RUNNING THE AMQ BROKER EXAMPLES
jboss-amq-maven-repository
...
4. If you copied the default settings.xml from your Maven installation, uncomment the section if it was commented out by default.
5. Save and close settings.xml.
6. Remove the cached ${user.home}/.m2/repository/ directory.
If your Maven repository contains outdated artifacts, you may encounter one of the following
Maven error messages when you build or deploy your project:
Missing artifact
[ERROR] Failed to execute goal on project ; Could not resolve
dependencies for
5.2. AMQ BROKER EXAMPLE PROGRAMS
AMQ Broker ships with more than 90 example programs that demonstrate how to use AMQ Broker
features and the supported messaging protocols.
The example programs are located in /examples, and include the following:
Features
Broker-specific features such as:
Clustered - examples showing load balancing and distribution capabilities
HA - examples showing failover and reconnection capabilities
Perf - examples allowing you to run a few performance tests on the server
Standard - examples demonstrating various broker features
Sub-modules - examples of integrated external modules
Protocols
Examples for each of the supported messaging protocols:
AMQP
MQTT
OpenWire
STOMP
Additional resources
For a description of each example program, see Examples in the Apache Artemis
documentation.
23Red Hat AMQ 7.3 Getting Started with AMQ Broker
5.3. RUNNING AN AMQ BROKER EXAMPLE PROGRAM
AMQ Broker ships with many example programs that demonstrate basic and advanced features of the
product. You use Maven to run these programs.
Prerequisites
Your machine must be set up to run the AMQ Broker examples.
For more information, see Section 5.1, “Setting up your machine to run the AMQ Broker
examples”.
Procedure
1. Navigate to the directory of the example you want to run.
The example programs are located in /examples. For example:
$ cd /examples/features/standard/queue
2. Use the mvn clean verify command to run the example program.
Maven starts the broker and runs the example program. The first time you run the example
program, Maven downloads any missing dependencies, which may take a while to run.
In this case, the queue example program is run, which creates a producer, sends a test message,
and then creates a consumer that receives the message:
$ mvn clean verify
[INFO] Scanning for projects...
[INFO]
[INFO] -------------< org.apache.activemq.examples.broker:queue >--------------
[INFO] Building ActiveMQ Artemis JMS Queue Example 2.6.1.amq-720004-redhat-1
[INFO] --------------------------------[ jar ]---------------------------------
...
server-out:2018-12-05 16:37:57,023 INFO [org.apache.activemq.artemis.core.server]
AMQ221001: Apache ActiveMQ Artemis Message Broker version 2.6.1.amq-720004-redhat-
1 [0.0.0.0, nodeID=06f529d3-f8d6-11e8-9bea-0800271b03bd]
[INFO] Server started
[INFO]
[INFO] --- artemis-maven-plugin:2.6.1.amq-720004-redhat-1:runClient (runClient) @ queue --
-
Sent message: This is a text message
Received message: This is a text message
[INFO]
[INFO] --- artemis-maven-plugin:2.6.1.amq-720004-redhat-1:cli (stop) @ queue ---
server-out:2018-12-05 16:37:59,519 INFO [org.apache.activemq.artemis.core.server]
AMQ221002: Apache ActiveMQ Artemis Message Broker version 2.6.1.amq-720004-redhat-
1 [06f529d3-f8d6-11e8-9bea-0800271b03bd] stopped, uptime 3.734 seconds
server-out:Server stopped!
[INFO] ------------------------------------------------------------------------
[INFO] BUILD SUCCESS
[INFO] ------------------------------------------------------------------------
[INFO] Total time: 48.681 s
[INFO] Finished at: 2018-12-05T16:37:59-05:00
[INFO] ------------------------------------------------------------------------
NOTE
24CHAPTER 5. RUNNING THE AMQ BROKER EXAMPLES
NOTE
Some of the example programs use UDP clustering, and may not work in your
environment by default. To run these examples successfully, redirect traffic
directed to 224.0.0.0 to the loopback interface:
$ sudo route add -net 224.0.0.0 netmask 240.0.0.0 dev lo
25Red Hat AMQ 7.3 Getting Started with AMQ Broker
CHAPTER 6. NEXT STEPS
After you have installed AMQ Broker and created a standalone broker with the default configuration
settings, you can configure it to meet your messaging requirements, connect messaging client
applications to it, and monitor and manage it. Additional resources are available to help you complete
these goals.
Configuring the broker
Use Configuring AMQ Broker to configure the broker to meet your requirements. You can configure:
The broker to accept client connections
The address space (including point-to-point and publish-subscribe messaging)
Message persistence
Broker resource consumption (including resource limits, message paging, and large message
support)
Duplicate message detection
Logging
Securing the broker
Use Configuring AMQ Broker to implement any of the following methods to secure the broker:
Guest/anonymous access control
Basic user and password access control
Certificate-based access control
LDAP integration
Kerberos integration
Setting up clustering and high availability
Use Configuring AMQ Broker to add additional brokers to form a broker cluster and increase
messaging throughput. You can also configure high availability to increase messaging reliability.
Creating messaging client applications
Use AMQ Clients Overview to learn about AMQ Clients and how it can help you to create messaging
client applications that connect to the broker and produce and consume messages.
Monitoring and managing the broker
Use Managing AMQ Broker to monitor and manage your broker (or brokers) once they are running.
26APPENDIX A. USING YOUR SUBSCRIPTION
APPENDIX A. USING YOUR SUBSCRIPTION
AMQ is provided through a software subscription. To manage your subscriptions, access your account
at the Red Hat Customer Portal.
Accessing your account
1. Go to access.redhat.com.
2. If you do not already have an account, create one.
3. Log in to your account.
Activating a subscription
1. Go to access.redhat.com.
2. Navigate to My Subscriptions.
3. Navigate to Activate a subscription and enter your 16-digit activation number.
Downloading zip and tar files
To access zip or tar files, use the customer portal to find the relevant files for download. If you are using
RPM packages, this step is not required.
1. Open a browser and log in to the Red Hat Customer Portal Product Downloads page at
access.redhat.com/downloads.
2. Locate the Red Hat AMQ entries in the JBOSS INTEGRATION AND AUTOMATION category.
3. Select the desired AMQ product. The Software Downloads page opens.
4. Click the Download link for your component.
Registering your system for packages
To install RPM packages on Red Hat Enterprise Linux, your system must be registered. If you are using
zip or tar files, this step is not required.
1. Go to access.redhat.com.
2. Navigate to Registration Assistant.
3. Select your OS version and continue to the next page.
4. Use the listed command in your system terminal to complete the registration.
To learn more see How to Register and Subscribe a System to the Red Hat Customer Portal .
27Red Hat AMQ 7.3 Getting Started with AMQ Broker
APPENDIX B. INTRODUCTION TO APACHE MAVEN
Apache Maven is a distributed build automation tool used in Java application development to create,
manage, and build software projects. You use it to run the AMQ Broker example programs that are
included with the AMQ Broker installation.
Running the AMQ Broker example programs requires you to interact with several Maven components:
Project object model (POM) files
Store information about how the project should be built.
Repositories
Hold build artifacts and dependencies.
The Maven settings file
Stores user-specific configuration information.
B.1. MAVEN POM FILES
Maven uses standard configuration files called Project Object Model (POM) files to define projects and
manage the build process. They ensure that the project is built correctly and uniformly. POM files are
XML files (pom.xml).
Maven favors "convention over configuration". Therefore, POM files require minimal configuration and
default all other values. A POM file can define the following information for a Maven project:
Location of the source, test, and target directories
Project dependencies
Plug-in repositories
Goals that the project can execute
Additional details about the project, such as the version, description, developers, mailing list,
license, and so on.
Example B.1. Sample pom.xml file
This basic pom.xml file demonstrates the minimum requirements for a POM file:
4.0.0
com.jboss.app
my-app
1
Additional Resources
The schema for the pom.xml file is available at http://maven.apache.org/maven-v4_0_0.xsd.
For more information about POM files, see the Apache Maven Project POM Reference .
28APPENDIX B. INTRODUCTION TO APACHE MAVEN
B.2. MAVEN REPOSITORIES
A Maven repository stores Java libraries, plugins, and other build artifacts. Repositories can be either
local or remote.
The default public repository is the Maven 2 Central Repository, but repositories can be private and
internal within a company so that common artifacts can be shared among development teams.
Repositories are also available from third-parties. AMQ includes a Maven repository that contains tested
and supported versions of the AMQ 7.3 Java packages and dependencies.
Additional resources
For more information about Maven repositories, see Introduction to Repositories.
B.3. THE MAVEN SETTINGS FILE
The Maven settings.xml file contains user-specific configuration information for Maven. It contains
information that must not be distributed with the pom.xml file, such as developer identity, proxy
information, local repository location, and other settings specific to a user.
The settings.xml file is found in two locations:
In the Maven installation:
The settings.xml file is located in the /conf/ directory. These settings are
referred to as global settings. The default Maven settings file is a template that you can copy
and use as a starting point for the user settings file.
In the user’s installation:
The settings.xml file is located in the ${user.home}/.m2/ directory. If both the Maven and user
settings.xml files exist, the contents are merged. Where there are overlaps, the user’s
settings.xml file takes precedence.
Example B.2. The Maven settings file
jboss-amq-maven-repository
jboss-amq
file:///path/to/repo/
true
false
29Red Hat AMQ 7.3 Getting Started with AMQ Broker
jboss-amq-maven-plugin-repository
file://path/to/repo
true
false
jboss-amq-maven-repository
Additional resources
The schema for the settings.xml file is available at http://maven.apache.org/xsd/settings-
1.0.0.xsd.
For more information about the Maven settings file, see the Settings Reference.
Revised on 2019-05-07 15:49:23 UTC
30You can also read