SCAN-MEASUREMENT-SYSTEM SPECTRODRIVE SOFTWARE EXPRESSO 4 - MANUAL - TECHKON
←
→
Page content transcription
If your browser does not render page correctly, please read the page content below
Scan-Measurement-System
           SpectroDrive
               Software
             ExPresso 4

                Manual
TECHKON manuals, technical documentation and programs are
copyrighted. Reproduction, translation or transfer to an electronic
medium – in whole or in parts – is prohibited.

TECHKON software is the intellectual property of TECHKON GmbH.
Purchase of the software grants the user a license for the use on one
computer only. Programs may only be copied for back-up purposes.
TECHKON can not be held liable for any damages that may occur by
the use of the software.

The TECHKON team takes great care in producing this manual. Nev-
ertheless, we can not fully guarantee the complete absence of errors.
TECHKON GmbH and the authors can not be held liable neither for
any possibly incorrect statements nor their consequences. TECHKON
can not be held liable for any damages that may occur by the use of
the software.

Products that are not made by TECHKON GmbH are mentioned for
information purposes only and such statements do not represent
trademark infringement. All registered trademarks are recognized.

TECHKON products and product names are registered internationally
under several intellectual patents and trademarks.

Specifications can be subject to change without notice.

Version 3.3, July 2020

You can reach us at the following address:
TECHKON GmbH
Wiesbadener Str. 27 • D-61462 Königstein
T +49 (0) 6174 / 92 44 50 • F +49 (0) 6174 / 92 44 99
info@techkon.com • www.techkon.com

Welcome
We welcome you among the worldwide community of users of TECHKON products.
We are happy that you have selected this high-quality measurement instrument. It will
be a valuable tool for your day-to-day quality control tasks. With this manual we invite
you to learn how to use SpectroDrive, the software ExPresso 4 and SpectroConnect.

The manual is divided into four chapters:

CHAPTER 1: General description of the measurement system

CHAPTER 2: Installation of SpectroDrive and the software ExPresso 4

CHAPTER 3: How to use SpectroDrive and the software ExPresso 4

CHAPTER 4: How to use the Windows software SpectroConnect

You will be fascinated how easy the system is to use. You will know how to work with
SpectroDrive after having read this manual for only a few minutes. The second chapter
describes the assembly of SpectroDrive and the installation of the software ExPresso 4.
The third chapter describes the operation of SpectroDrive and gives detailed informa-
tion about the measurement functions.

Please get the device registered by using the registration card, which you will find in
the appendix of this manual. That way we can keep you updated about product news.

Please visit us as well on the internet at www.techkon.com.
You will find useful information about the complete product range and new software
versions.

Do you have any suggestions for improvements or do you require information that
goes beyond the contents of this manual? We will be glad to hear from you. Your sug-
gestions or questions make an important contribution to the continuous optimization
of our documentation and products.

Your TECHKON Team
Contents

CHAPTER 1: General description of the measurement system
1.1 Product description............................................................................................................................. 5
1.2 Packing list...............................................................................................................................................10

CHAPTER 2: Installation of SpectroDrive and the software ExPresso 4
2.1 Assembly of SpectroDrive.............................................................................................................11
2.2 Installation of the software ExPresso 4..................................................................................12

CHAPTER 3: How to use SpectroDrive and the software ExPresso 4
3.1 Operation of SpectroDrive............................................................................................................13
3.2 Care and maintenance.....................................................................................................................16
3.3 Software overview ExPresso 4.....................................................................................................18
3.4 Software settings.................................................................................................................................21
3.5 Defining and running a print job...............................................................................................41

CHAPTER 4: How to use the Windows software SpectroConnect
4.1 Software description........................................................................................................................ 64
4.2 Installation............................................................................................................................................... 64
4.3 Overview / Software module: Compare colors............................................................... 65
4.4 Software module: SpectroDrive settings............................................................................ 66
4.5 Device update.......................................................................................................................................67
4.6 Software module: Export.............................................................................................................. 68
4.7 Software module: ColorCatcher............................................................................................... 69
4.8 Software module: PhotoLab........................................................................................................70
4.9 Software module: Media Wedge.............................................................................................. 73
4.10 Software module: SpectroCheck..............................................................................................75

APPENDIX:
    Technical specifications
    Manufacturer certificate
    EC-Declaration of Conformity
    Registration card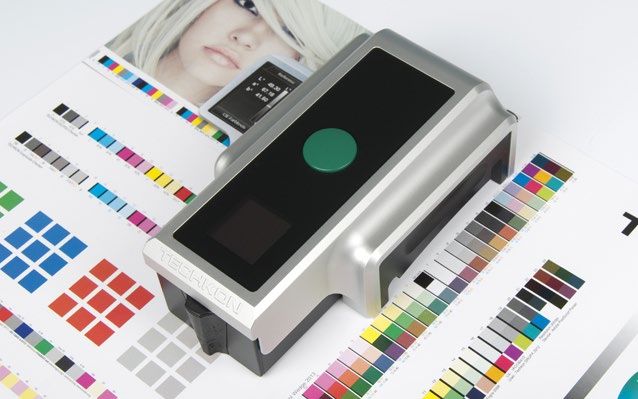
CHAPTER 1 – General Description

Chapter 1
General description of the measurement system

1.1 Product description

High quality and productivity

The new generation of the proven Scan-Measurement System SpectroDrive com-
bines decisive advantages: Precise measurements thanks to an ISO-compliant
measuring head, technical reliability and high measurement speed. It can be fully
integrated into the printing process. The result: a productivity and quality boost
for your printing press.

The system consists of two components: The motorized measurement device scans
the complete color bar on a printed sheet within seconds and simultaneously sends
the spectral measurement data wirelessly to the PC. Here all relevant information for
controlling the printing press is clearly displayed by the TECHKON ExPresso 4 software.

Increase profitability

Due to the trend of smaller print jobs and shorter press runs the time from starting a
press to getting it “in color” and running with consistent quality is cost critical. Spectro-
Drive reduces this “non-productive” and therefore expensive set-up time dramatically.
You will increase profitability thanks to substantially reducing paper and ink waste and
getting more precious time out of your printing press. The system makes your printing
jobs predictable and calculable. In addition, the complaint rate will go down signifi-
cantly and your customers will appreciate the sensible gain and reliability of the print
quality. ISO-compliant printing becomes easier than ever before.

The high rate of return of investment is amazing. The relative low – and only one
time – investment will show in recurring profits almost immediately. Also older print-
ing presses get a productivity boost thanks to SpectroDrive.

Ease of use and high speed measurement

Setting up a printing press can be compared with starting a jet plane. It is a time-
critical process, where the press operator – like a pilot – must observe and perform
a multitude of important tasks at the same time. Hence, during the development of
SpectroDrive great care was taken in delivering a system that is easy to use and fast, to
make working with SpectroDrive even more intuitive and convenient.
                                                                                           5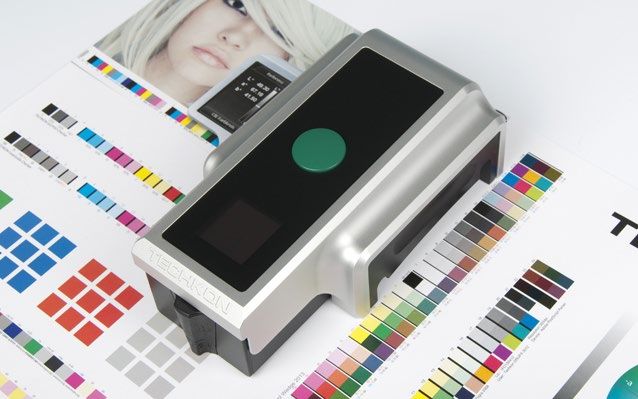
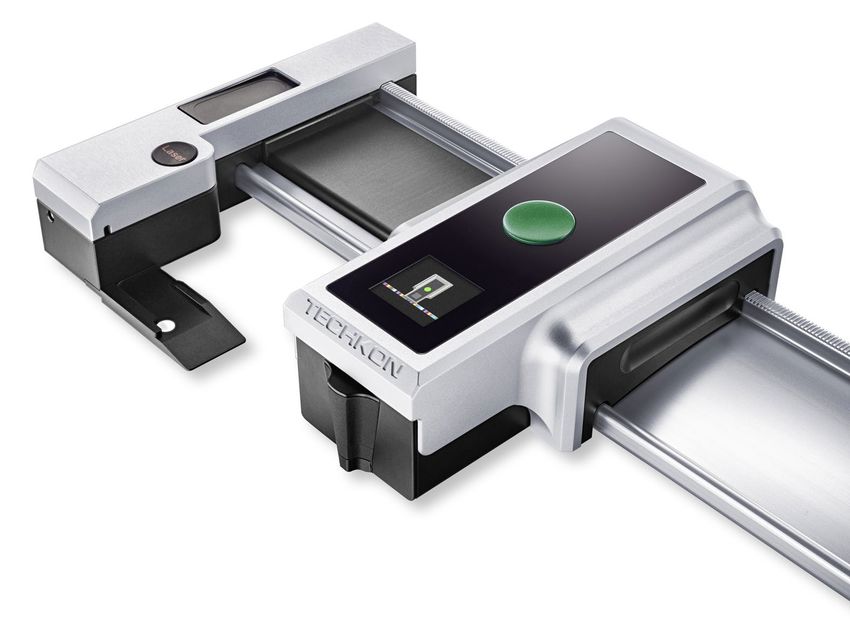
Manual TECHKON SpectroDrive

For example, a laser beam can be activated to support the exact positioning of the
print control strip. Furthermore the measurement device has only one button to start
the measurement process. Installation is simple as well. After a few minutes the system
is operable and ready to take measurements.

Due to its aluminum unibody case the new SpectroDrive is particularly robust and
reliable. Of course SpectroDrive is able to handle variable scan lengths and fits to any
printing press format. The battery charging is inductive, fast and sustainable.

Two measurement systems in one

This statement relates not only to the technical fact that the spectral measurements
allow displaying densitometric and colorimetric data. It also points out that Spectro-
Drive can be used as a scanning device as well as a hand-held instrument for single
measurements. Just take the device from the horizontal track and position it wherever
you want to take a color measurement. SpectroDrive now also features an integrated
display that shows the measurement values of spot measurements directly at the de-
vice.

Software ExPresso

The Windows software TECHKON ExPresso 4 has a self-explanatory user interface
which can be operated via touch-screen. The software offers a comprehensive tool
set comprising measurement of spot colors, support of up to 16 print units, front-side
and reverse printing, display of color density, dot gain, gray balance, CIE L*a*b*-values
and recommendations on how to adjust the ink on the press. This is only an extract of
the complete functionality.

Thanks to its modularity TECHKON ExPresso 4 is expandable and versatile. The mea-
surement data can be exported into other software applications that connect real-
time to printing presses to enable a “closed loop” turn-key solution. In addition, the
ExPresso software can export measured data to standard applications such as Micro-
soft Excel™.

6
CHAPTER 1 – General Description
All advantages at a glance
Easy to handle Easy to install
Fast, motorized scanning by pressing Installation is made within five min-
the green measurement button on utes without any major assembly
the touch-screen or on the device effort
itself Complete system is maintenance free
Automatic white calibration Measurement system can be flipped
Windows-software TECHKON 180°, if the color bar is on the opposite
ExPresso 4 can be operated with or side of the printed sheet
without the touch-screen Wireless, fast data transmission per
The device can easily be used as WLAN
hand-held device for spot measure- No vacuum air suction is necessary to
ments as well hold down the printed sheet
Modular and compact Complete measurement information
Works with any sheet or press format Any color bar can be measured
Horizontal track can be shipped in (patch size has to match aperture size)
any length up to 206 cm Color bar can be at any location on
Space-saving measurement device the printed sheet
fits on any table No limitation in paper thickness
The mounting table can be inclined Automatic polarizing filter function for
up to 45° densitometric and colorimetric mea-
Delivery contains all components surements
supplied
7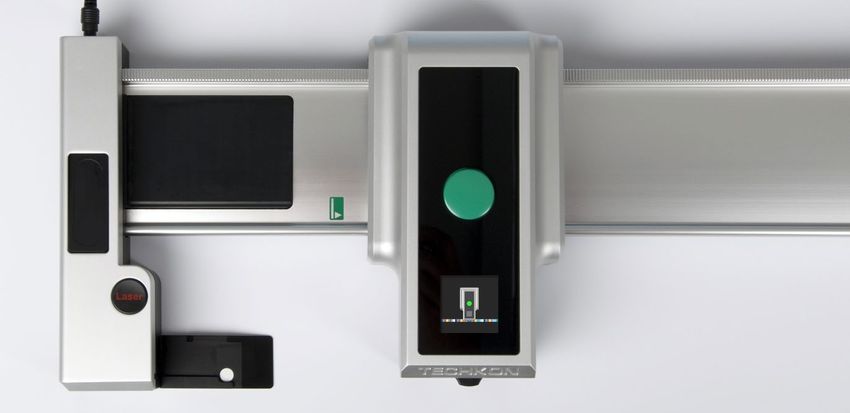
Manual TECHKON SpectroDrive
Accurate Fast
Precise spectral engine with automa- High resolution spectral measure-
tically insertable polarizing filter ment of a complete color bar within
Patented measurement head for easy seconds (e.g. 500 mm sheet length in
positioning conforming to ISO 13655 about 3 seconds!)
Solid aluminium unibody case for reli- Wireless data transmission to the PC
able function in a harsh industrial during scan in real-time
environment Information overview displays all rel-
evant parameters for quality control
Using SpectroDrive as a hand-held unit is
simple. Just position the compact mea-
surement head above the sample and
press the green measurement button.
The measurement value is transmitted
instantly to the PC.
TECHKON SpectroDrive is delivered as a
complete turn-key system. Within a few
minutes the system is up and running.
One unique feature of SpectroDrive is its
flexibility to be used with any press type
or format.
Formats
52: for printed sheet 00 (B3+, 370 x 520 mm)
74: for printed sheet 0B (B2+, 520 x 740 mm)
102: for printed sheet 3B (B1+, 720 x 1020 mm)
105: for printed sheet 3B+ (B1+, 780 x 1050 mm)
Special formats (up to 2100 mm system length/ 2060 mm scan length) on request
8
CHAPTER 1 – General Description
Dimensions
96 mm
105: 780 mm
102: 720 mm
74: 530 mm
52: 370 mm
170 mm
52: 750 mm, 74: 970 mm,
102: 1250 mm,105: 1280 mm
Performance packages
The scan-measurement device SpectroDrive and the Microsoft Windows software Ex-
Presso form a complete quality control system for increasing productivity and quality
of a printing press. There are two different versions available:
SpectroDrive + ExPresso Basic SpectroDrive + ExPresso Pro
consists of the spectral measuring contains the same functions as the Basic
device SpectroDrive and the Microsoft package and additionally:
Windows software ExPresso Basic with Ink zone specific colorimetric CIE
the following functions: L*a*b*and ∆E*a*b* display
Ink zone specific density display ∆L*a*b*, CIE L*C*h*, ∆L*C*h*
Color density for CMYK and spot InkCheck: recommendation for ink
colors (spectral density) key setting
Densitometric gray balance Display and evaluation according to
Dot gain, dot area, printing contrast ISO 12647 (PSO)
Slur/doubling value GrayGuide (gray balance) according to
Target values, tolerances, OK-sheet Gracol G7™
Front- and reverse-printing OBA-Check
Works with any color bar length Supports up to 16 printing units
Display of single measurements when
used as a hand-held device
Measurement data export (e.g. JDF-
format) A post-purchase software-upgrade
Statistical analysis, report generator from the Basic- to the Pro-version can
Supports up to 6 printing units be done easily.
9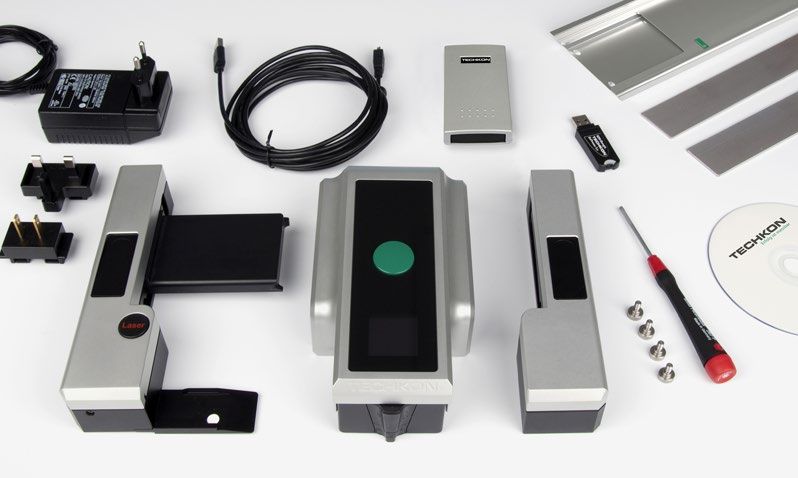
Manual TECHKON SpectroDrive 1.2 Packing list Measurement device SpectroDrive and the supplied system components Contents of delivery Measurement device SpectroDrive Left holder incorporating charging console with white standard and AC adapter with universal plugs Horizontal track, right holder, two vertical bars WLAN-module for wireless data transmission, USB cable Manual with ISO 9000 compliant certificate (pdf on CD), Manufacturer certificate Screwdriver, 4 screws Optional: CD with software ExPresso 3, USB-dongle (software protection key) System requirements: for TECHKON software: Microsoft Windows 7, 8 or 10; 32- and 64-bit, minimum: IBM-compatible PC with Intel Core Duo processor or comparable processor, 4 GB RAM, 2 USB ports; Screen resolution for TECHKON ExPresso: minimum 1280 x 1024 pixel Optional accessories Color reference SpectroCheck for checking the measuring accuracy Print control strips TECHKON TCS, available as EPS- and pdf-files on CD (can be downloaded free of charge at www.techkon.com) Software-upgrades from ExPresso Basic to ExPresso Pro Replacement parts Left holder with charging console and white standard Horizontal track AC adapter Rechargeable battery WLAN-module All parts are easy to exchange. 10
CHAPTER 2 – Installation
Chapter 2
Installation of SpectroDrive and the software ExPresso 4
2.1 Assembly of SpectroDrive
Connect the horizontal track with the left
and right holder as shown on the images. Be-
fore placing the holders upside down, put a soft
material underneath to avoid scratches. Before
tightening the first screw, insert the second
screw and assure that the holder is correctly
aligned.
The two vertical bars are attached vertically
at the right and left side on a flat table. Before
adhering them, it is important to check that
they are parallel and have the right distance to
each other. We advise to mark the position with
a pencil first. Now attach the two vertical bars,
which have self-adhesive tape on the backside
to the table or console. Assure, that the verti-
cal bars are parallel and well aligned in order to
hold the left and right holder which will attach
magnetically to the vertical bars. Preferably the
table will have a lay-on edge for positioning the
printed sheet.
Connect the plug of the AC adapter with the
charging console. The AC adapter can be used
universally for 100 – 240 V.
There are three adapter plugs for different coun-
tries. To change an adapter plug, just unlock the
lock, pull the plug off the AC adapter and push
in the new one. Make sure it is connected firmly.
Connect the mains plug to the power socket.
The socket must be located near the facility and
must be easily accessible. Do not use the power
plug if the power cord is damaged. Always use
the original TECHKON Spectro-Dens AC adapt-
er. The use of other power sources is hazardous.
11Manual TECHKON SpectroDrive
2.2 Installation of the software ExPresso 4
System requirements
Microsoft Windows 7, 8 or 10; 32- and 64-
bit, minimum: IBM-compatible PC with Intel
Core Duo processor or comparable proces-
sor, 4 GB RAM, 2 USB ports; screen resolution
for TECHKON ExPresso: minimum 1280 x 1024
pixel
The software is optimized to be operated
with a touch sensitive screen.
However, working without a touch-screen by
using a conventional mouse / trackpad and
keyboard is also possible.
Recommended color bar:
Print control strip TECHKON TCS Digital
(included in delivery).
Installation
It is important to carry out the following steps
in the right order to make sure that the USB
device drivers will be installed properly.
1. Make sure that the USB-dongle (software
Module for protection key) and the module for wireless
wireless data data transmission are NOT connected to the
transmission PC. Insert the TECHKON CD into the CD drive
PC of the computer.
2. Select ExPresso Installation from the
menu. The installation routine will start auto-
matically. Follow the steps of the installation,
WLAN-module for wireless data transmission until it is completed.
3. Now, after the installation was finished
successfully you can connect the module for
wireless data transmission with the USB cable
and the USB-dongle to the PC.
4. TECHKON ExPresso can now be launched.
12CHAPTER 3 – How to use SpectroDrive
Chapter 3
How to use SpectroDrive and the software ExPresso 4
3.1 Operation of SpectroDrive
Automatic measurements
Place the measurement device on the hori-
zontal track.
WLAN-module
Measurement area
The module for the wireless data transmis-
sion has to be positioned as close as possible
to the measurement device with the front
pointing to the measurement system as
shown on the image. Please connect it to the
PC via the USB cable AFTER the installation of
the software
By pressing the green measurement but-
1. ton the device will move into the charging
station at the left, where it is automatically
charged, which is indicated by an animated
battery symbol in the device display.
You can align the measurement system in
2. vertical direction. By keeping the black but-
tons on the left and right holder pressed you
reduce the magnetic adhesion of the holders.
First, position the printed sheet at the low-
er lay-on edge.
Then move both holders vertically, so that
the measurement head is exactly on top of
the color patches. You can use a red laser
beam for the adjustment. Press the Laser-
button on the charging console. If the laser
beam turns off before you could finish the ad-
justment of the print control strip, just press
the Laser-button again.
Warning: To protect your eyes, do not stare
into the laser beam.
13Manual TECHKON SpectroDrive
It is important that the measurement aper-
ture always covers the color patches com-
pletely during the entire scan.
When using color bars with a patch height
smaller than 4,5 mm, the edge of the mea-
surement head of the device has to be placed
exactly at the upper edge of the color bar, to
ensure that the measurement head is posi-
tioned correctly on the patches.
When using color bars with a patch height
higher than 4,5 mm, the measurement head
has to be placed with the measurement aper-
ture at the bottom edge of the color bar.
Spot measurements
To carry out a spot measurement just re-
move the measurement device from the hori-
zontal track, position it with the measurement
head on a single measurement patch and
press the green measurement button shortly.
The measurement data are shown in the de-
vice display as well as in the window Spot
measurement of the ExPresso software.
Display modes of the device display
Results of a spot measure- Paper white calibration is
ment; densities CMYK and performed
CIE-Lab values; display of the
measurement conditions
Warning: the unit has been After a few minutes of
blocked while driving inactivity on the charging
station the device goes into
the stand-by mode
Scan is in progress Absolute white calibration
is performed
14CHAPTER 3 – How to use SpectroDrive
How to measure
Please ensure that the sample is located on a solid and flat surface. There must not be
a distance between the measurement head and the sample where light could pass
through, because this can influence the measurement. The color of the background
material underneath the measurement sample can have an influence on the measure-
ment result. Different technical standards describe which backing material to use. In
the printing industry the following procedure is widely used: White backing for single
printed papers and black backing for double printed sheets in order to avoid that the
back printed side might shine through the paper and influence the measurement.
Paper white calibration
A paper white calibration can be carried out by keeping the green button pressed for
a few seconds. The measurement aperture has to be on top of a non-printed area of
the sheet.
When SpectroDrive is on the track, the paper white calibration is performed by soft-
ware command (see p. 34).
Charging
Completely charging an empty battery will take approximately four hours. Spectro-
Drive has a regulated charging management. This means it will power-charge an emp-
ty battery, so the device can be used again after a few minutes. On the other hand,
there is no overcharging of full batteries.
Disposal instructions: Please dispose of the battery only in a designated recycling cen-
ter.
Automatic turn off
When the device is not located at the left holder in the charging position and is not in
use, it will switch off automatically after three minutes. It can be reactivated by press-
ing the green button on the device.
Device information and safety instructions
The use of this device in a different way than recommended by TECHKON GmbH
can endanger the device safety.
WARNING: This device may not be used in potentially explosive atmospheres.
15Manual TECHKON SpectroDrive Please protect your eyes and do not look directly into the optics when the device is switched on. Operating conditions: Ambient temperature: 10 to 35 °C, max. 30 to 85 % rel. humidity (non-condensing); storage temperature: -20 to 50 °C. 3.2 Care and maintenance Cleaning SpectroDrive is a highly-precise optical instrument. It is designed to work in harsh, industrial environments. However, it should be handled with care. Avoid mechanical shocks, heat, dusty or humid environments. The measurement head with the optical system is sealed against dust and dirt. Nev- ertheless take care that the visible, open measurement aperture is always free of dust. You can clean the measurement aperture with oil-free, clean compressed air and a brush used for cleaning photographic equipment. Clean the device casing only with a soft cloth and a non-aggressive plastic cleaner. Never use alcohol or chemically ag- gressive solvent-based cleaners which can destroy the surfaces. The same procedure is valid for the white standard which is integrated in the charg- ing console. A soft cloth made of micro-fibers is especially well suited for cleaning the white ceramic tile. If the white standard should be defective, it has to be replaced completely. Please do not stick any labels at the bottom of the device. This could lead to faulty measurements, because the defined distance – which is important for the correct op- tical field of depth – might not be maintained. Error handling Should SpectroDrive do not work properly, first check, if the ExPresso software is running correctly. The status bar in the lower right corner will display, if the device, the module for wireless data transmission and the USB-dongle communicate correctly with the PC. It can be helpful to plug-off and re-connect the module for the wireless data trans- mission from the USB connection when problems occur. Restarting the software ExPresso is also recommended to solve software problems. 16
CHAPTER 3 – How to use SpectroDrive
Check that the right measurement device is selected in the software settings.
If SpectroDrive Simulator is selected, no real measurements will be carried out.
Check if the AC adapter is connected correctly to the mains plug and the charging
station. Check if SpectroDrive is charged in the home position (The battery symbol is
animated during charging).
If the device does not communicate with the software and does not work by press-
ing a button, but the device display is on, move it manually from the charging position.
Now, wait until it switches off automatically after three minutes. Then, turn it on again
by pressing the green button.
Warranty and service
The warranty for TECHKON products is 24 months starting with the date of purchase.
Consumable and wearing parts are excluded from this. The invoice is the certificate
of warranty. The warranty is invalid if the damage is caused by inadequate use of the
device.
Should a TECHKON product do not work according to the specification, please contact
us before sending us the device. In most cases we can solve the problem over the
phone or via E-mail.
Inspection intervals
TECHKON SpectroDrive is to a large extend maintenance free. Nevertheless we rec-
ommend to validate the complete functionality of the devices in a 24 months time
interval in the TECHKON service center. We offer a complete device check as a service
package. Please contact us for details.
For a flat fee the device will be cleaned, checked and recalibrated. In case a repair or
exchange of components should be necessary we will inform you. Please send the
device always securely in the carrying case with complete accessories.
17Manual TECHKON SpectroDrive
3.3 Software ExPresso 4 overview
The software ExPresso is clearly structured. The menu bar comprises the four sections
Print job (blue buttons), Settings (red buttons), Exit (blue button) and Scoring (when
active). The appropriate submenu layers follow this color system.
PRINT JOB:
P. 41
P. 42 P. 43
P. 42
P. 44 P. 46
P. 48 P. 51 (GrayGuide P. 52)
P. 48
P. 53* P. 54*
P. 57* P. 58*
P. 60 P. 61
P. 57
P. 62 P. 63
18CHAPTER 3 – How to use SpectroDrive
SETTINGS:
P. 24 P. 25
P. 24
P. 27
P. 29 P. 31
P. 33 P. 37
P. 29
P. 38
P. 39
P. 39
EXIT:
P. 63
19Manual TECHKON SpectroDrive
By clicking on the device icon in the right section of the menu bar (1.), one gets a
direct access to important device settings. A window is displayed with the submenus
Measurement device, Measurement settings, Export to other applications and Up-
date (see p. 33 – 36).
Below the menu bar the program window (2.) is displayed which is activated by the
appropriate menu item.
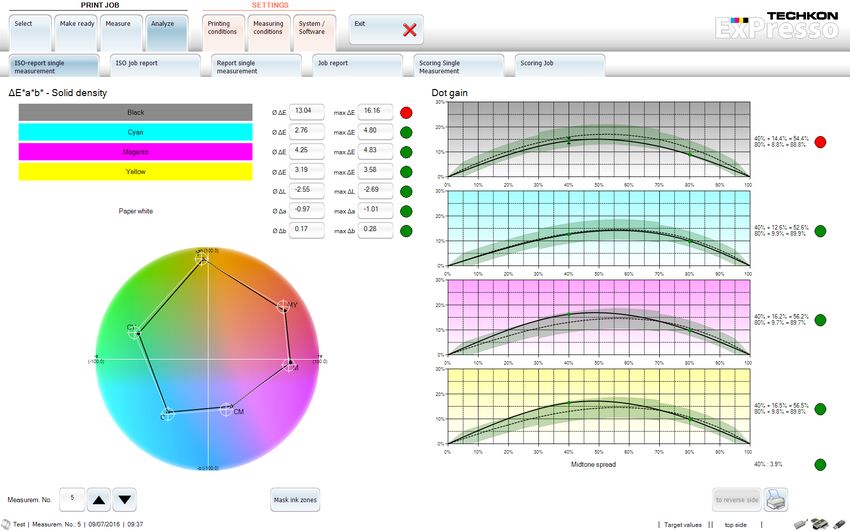
The following example shows the program window Density after a measurement was
carried out. In this program window a click on the bar graph opens a second window
displaying detailed measurement data of the ink zones.
The command line (3.) of the active program window is located at the bottom of the
program window.
1.
2.
3.
4.
The bottom area of the screen is a status line (4.), showing at the right side the con-
nection status of the module for wireless data transmission, of the measurement
device (SpectroDrive, SpectroDrive Simulator or SpectroJet) and of the USB-dongle.
When moving the mouse pointer on the icons of one of these components, you get
additional information, e. g. the density- and colorimetric-settings of the device or the
software version.
20CHAPTER 3 – How to use SpectroDrive
3.4 Software settings
When the software is started by a double click on the TECHKON ExPresso icon, the
software routine checks first, while displaying the intro icon, whether a measurement
device, a dongle and a module for wireless data transmission are connected.
If the software does not detect any measurement device, an information window lets
you know that the ExPresso demo mode is active. This simulator provides only virtual
measuring data for test- and demo-purposes.
21Manual TECHKON SpectroDrive
If you have not defined any printing machine in the menu section Settings Printing
conditions Presses up to now, you will see the following info window:
You can set up a printing machine which fits to your print job, by clicking on the New
button in the menu item Presses. When the data of the machine have been edited in
the pop-up window and are subsequently saved, the new printing machine appears
in a listing in the right section of the menu, where it is at hand if you wish to change
the press settings later.
1.
2.
3.
22CHAPTER 3 – How to use SpectroDrive
Certain settings are done only once, after the software is installed or have to be
changed only occasionally when fundamental parameters have altered. For example
the menu language, the selection of the measurement device or the definition of a
new printing press will be set once and do not have to be set for each and every print
job to be carried out later.
This kind of settings is made by pushing one of the red Settings buttons (1., p. 22) and
then selecting one button from the sublayer (2., p. 22). The referring window opens
and can be edited (3., p. 22).
All settings which were made, can later be recalled when defining a Print job, where
the screen will appear in blue color.
When you start ExPresso, the sublayers Make ready, Measure and Analyze in the sec-
tion Print job are shaded an can not be activated until you have set up all necessary
informations concerning your printing- and measurement-conditions in the Settings.
Finally you have to click on the Select button in the Print job section to define or se-
lect a print job. Now all menu items in the Print job section can be used.
As soon as the sublayer Measure is active, the button Scoring appears, showing the
overall scoring result in percent of the last scan measurement carried out. Thanks to
the green, yellow, orange and red coloring of the button the user knows at a glance,
to which range the result belongs. A double click on this button opens the menu
Scoring Single Measurement displaying detailed scoring results. These values refer to
defaults, set under Settings Measuring conditions Scoring.
23Manual TECHKON SpectroDrive The following settings can be made in the Printing conditions section: Printing conditions – Presses Name: text box to define a name of the printing press Manufacturer: text box (not mandatory) Type: text box (not mandatory) Number of printing units: 1 – 6 for ExPresso Basic, 1 – 16 for ExPresso Pro Number of ink zones: max. 100 Ink zone width: in mm, max. 100 mm Reversing after printing unit: if the printing press has a reversing unit, the location can be set You can set up new printing presses (see p. 22) and edit or delete the ones which are already defined and listed in the right section of the Presses window. TIP: By double clicking on one of the printing presses which are listed in the right section of the main window you switch directly into the appropriate Edit window. You find this possibility of quick editing in all of the Print job- and Settings-windows which contain such listings. The order of the listed elements can be changed by click- ing in the header of the register. 24
CHAPTER 3 – How to use SpectroDrive
Printing conditions – Inks
The list of inks included in the database is displayed. The four process colors C, M ,Y
and K as well as the trapping colors M+Y, C+Y, C+M, C+M+Y (1.) and paper white are
pre-installed. They are stored in the color book CMYK and are already marked by a
screen color. These four process colors resp. color combinations can not be deleted
or duplicated.
But it is possible to edit further inks and to import, duplicate and export them.
By using the Export function you can hand over individually edited inks and color
books easily to another printing machine.
1.
2.
The definition of new inks makes it possible to edit and measure customary spot col-
ors, for example the colors of a HKS color book.
First click on the New button (2.), to open the window Define new ink.
25Manual TECHKON SpectroDrive
1.
2.
3.
4.
5.
Now enter an ink name (1.) for the spot color. Additionally the manufacturer (2.) can
be defined.
You can choose an already existing color book for the new ink or generate a new
one.
You edit a new color book by clicking on the button Edit color books (3.). In the win-
dow which opens now you choose New, enter a name for the new color book and
confirm the process with OK.
Choose Maximum density (4.) for density channel for spot colors.
Now click on the green button to activate the Measure function (5.), after you have
placed the measurement head of the device on the color patch you wish to measure.
The procedure will be carried out and the software adds a screen color to the new ink.
Complete the definition of the spot color by pressing the Save button. The new ink
appears now in the ink list in the right section of the Inks menu.
Thus any customary spot colors or individual colors can be measured and added to
the ink listing.
26CHAPTER 3 – How to use SpectroDrive
Printing conditions – Color bar
In this menu section the list of color bars included in the database is displayed. We
recommend the use of the TECHKON TCS print control strips, because their design is
based on ink zones and covers all relevant measurement patches. Other definitions
can be loaded by using the Import function.
But not only already existing color bars can be used and edited. You can also generate
your own printing definitions in ExPresso.
Please note that the used colors are only placeholders for the printed colors in the
print job.
When you click the New button in the Color bar menu, the window New color bar
opens.
1.
Edit the text boxes Name, Manufacturer, Number of inks, Patch width and Ink
zone width. Then click on the Edit patches button (1.).
27Manual TECHKON SpectroDrive
The window Edit color bar patches opens, which is divided into the three section
Settings (1.), Color bar patches (2.) and Information (3.).
1. 2. 3.
4.
5.
6.
First define in Settings three percentage values for the dot percentage patches and
three for the balance patch (4.), which both are listed in Color bar patches.
In the section Color bar patches now successively compile your individual color bar
by clicking on the color bar patches. The color bar which you are creating is displayed
in the lower part of the window (5.).
If you edited 8 in Number of inks in the previous New color bar window, now you
have the four process colors C, M, Y, K as well as 4 spot colors at your disposal. Each of
these colors is given as solid ink, dot percentage value and slur / doubling patches. The
bottom line offers a balance patch (BAL), the trapping patches (C+M, C+Y and M+Y), a
calibration patch (CAL) and an empty patch (NO).
Accidentally set color bar patches can be marked directly in the color bar (by slid-
ing over them with the mouse button pressed) and then deleted by clicking on the
Delete selected patches button. To add patches later, you can set with a mouse click
a marker in the color bar. To the left of this marker the new patches will be filled in.
Finally the Save button will save the currently generated color bar (6.) and it will be
listed automatically in the first place of the already existing color bars.
28CHAPTER 3 – How to use SpectroDrive
The following settings can be made in the
in the Measuring conditions section:
Measuring conditions – Target values / Tolerances
A list of data sets for target values and tolerances for the paper classes 1 - 5 resp. 1 - 8
will be displayed. It is based on ISO 12647-2:2007 and 12647-2:2013 color values for
CMYK.
Individual target and tolerance settings can be made as well – also for spot colors.
Click on the New button (1.) in the right menu section below the already listed tar-
get values. A new window opens where you can enter the name of the new target set
you want to generate. Confirm the process with OK. The new target set will appear in
the list of the already defined target sets in the menu window (2.), but it does not yet
contain colors.
2.
1.
29Manual TECHKON SpectroDrive
Now click on the New button, which you find on the lower left side of the menu
window. The window Target values / tolerances for ink appears.
Choose from the pull-down-menu the Ink name (1.) of a color, which you have al-
ready defined in Settings Printing conditions Inks (see p. 25).
Additionally you can change the target values and tolerances of this color manually
by editing the text boxes or take the measurement data of SpectroDrive by pressing
the Measure button (2.).
1.
2.
Confirm the color and eventually set changes with OK. Now the color appears in the
left section of the menu window and is added to the new target set.
Thus proceed with all the colors which you want to add to a target set.
Already existing target sets can be duplicated, renamed, imported and exported by
using the buttons in the lower right section of the Target values / Tolerances window
(see picture on p. 29). The target sets of the ISO values can not be deleted.
30CHAPTER 3 – How to use SpectroDrive
Measuring conditions – Scoring
In this menu section the defaults are set, to which the scoring of a measurement refers
to.
The menu window is divided into three sections: Scoring (1.), Scoring Ranges (2.) and
Trapping Settings (3.).
1. 2.
3.
4.
Individual, customer-specific settings can be made by moving the sliders. The total
amount of all sliders is always 100 %. Therefore the sliders are linked with each other
and should be set starting at the top of the Scoring section going downward step-
by-step.
By clicking on the arrow symbols, which are located on the left and the right side of a
slider, an exact gradual change of the numerical values is possible – for integral num-
bers by 1 % steps, for decimal places by 0,1 % steps.
31Manual TECHKON SpectroDrive The section Scoring allows to set parameters which are essential for printing, like for example density, ∆E, substrate and trapping. The sliders can be reset to their initial position quickly and completely by using the button Reset values (4.). The Scoring button which appears in the ExPresso menu after a measurement has been carried out shows one of four different colors. In the section Scoring Ranges the ranges for these four colors are defined. Green indicates a good measurement result. Its minimum value is set in percent using the edit field at the top of the row. In the same way going down the input fields the yellow and the orange range get their percent values. The red color represents all values which are below the minimal value of the orange range. Common user settings are: (Green>) 85 %, (Yellow>) 70 % and (Orange>) 50 %. In the section Trapping Settings the minimum values for trapping are set; from 0,1 % to 100 %. There are no standard values for the trapping measurement. The values which can be obtained depend on the printing process and particularly on the type of ink and paper used. Typical values for standardized print with Paper Class 1 (glossy, coated) are: C+M > 60 %, M+Y > 72 % and C+Y > 85 %. 32
CHAPTER 3 – How to use SpectroDrive

Measuring conditions – Measurement devices

The types of measurement devices which can be connected to the ExPresso soft-
ware are shown. When you have chosen the type of device you wish to connect, an
information window is displayed at the left side of the window. Here you get further
information about the actual device and the connection status.

By clicking on the Settings button in the right lower corner, of the Measurement de-
vices menu, the window TECHKON SpectroDrive opens, which is divided into four
sections and offers basic settings options.

                                                                     3.
                                     1.
                                                                     4.

               2.

The Measurement device window shows all relevant information concerning the
connected device (1.). If there is more than one TECHKON measurement device within
the wireless coverage, you can choose the device you wish to use with Find / select
device within wireless coverage (2.). If you changed the horizontal track, detect the
system length (3.) and define the orientation of the measurement device (4.) by using
the appropriate buttons in the right section of the window.
                                                                                     33
Manual TECHKON SpectroDrive
1. 2.
3.
4. 5.
In Measurement settings the fundamental settings for density- (1.) and colorimetric-
measurements (2.) are displayed.
The standard pre-settings for density measurement are
for Europe: polarization filter on, white reference is paper white, density filter is ISO E,
for the USA: no polarization filter, white reference is absolute white, density filter is
status T.
You can use the Density adjustment / Slope calibration (3.) function, to adjust the
measurement device to the density measurement data of other devices.
Select the window Density adjustment / Slope calibration and follow the instruc-
tions. First you have to carry out a paper white calibration on the paper patch of a
calibration chart (which is optionally available). Then the reference values of the cali-
bration chart have to be entered into the text boxes of the process colors. Now the
color patches (CMYK) of the calibration chart have to be measured. A green checkmark
confirms that the measurement was carried out successfully. The new density adjust-
ment is saved with OK. If the procedure is cancelled or the Reset slope values func-
tion activated, the device will be reset into its factory-made state.
The pre-settings for colorimetric measurements are: polarization filter off, white refer-
ence is absolute white, measurement condition M0, illuminant is D50, observer is 2°
and ∆E formula is CIELAB. One can choose other standards by clicking on the pull-
down-menu if required.
34CHAPTER 3 – How to use SpectroDrive
The buttons Paper white calibration and Absolute white calibration (4. on p. 34)
start the corresponding calibration. The Absolute white calibration function is only
available when the device stands on the track in the home position. After a calibration
has been carried out properly, it will be confirmed by the information window.
TECHKON SpectroCheck (optionally available) is a color reference used to check the
measuring accuracy of the SpectroDrive device.
Connect SpectroCheck via the USB cable with the computer. Then place Spectro-
Drive on the SpectroCheck console. Press the button Start TECHKON SpectroCheck...
(5. on p. 34). The program will now lead step by step through the check procedure of
SpectroDrive. Green checkmarks confirm that the device conforms with the technical
specifications. A final report can be printed as well.
With this module you can measure wedges and other measurement patches aside
from the currently selected color bar and transmit the values into other applications
such as Microsoft Excel™. Just switch to your target application and start the measure-
ment at the device. The values are copied to the target application using the clipboard.
35Manual TECHKON SpectroDrive
1.
The button Start device update (1.) establishes the connection to the hard disk level
of the PC and enables the choice of the directory, in which the update file is located.
You can download the latest firmware for you device free of charge in the internet:
www.techkon.com Support Download area SpectroDrive TECHKON
SpectroDrive Firmware. The firmware version of the connected SpectroDrive can be
seen in the information window Measurement device.
There is no access to the settings windows described on page 33 – 36, when in Set-
tings Measuring conditions Measurement devices SpectroDrive Simulator is
selected. The simulator is a virtual measurement device which can be used for tests
and demonstrations when no real hardware device is connected. The SpectroDrive
Simulator will also be used when no software protection key (dongle) is connected
and the software runs in demo mode.
36CHAPTER 3 – How to use SpectroDrive
Measuring conditions – Measurement export
After each measurement, the values can be exported to other applications. The most
popular export formats e. g. CSV (Microsoft Excel™) are already pre-installed (1.).
In the left section of the window further information about the target file and the
target folder are displayed (2.).
The button Settings (3.) opens a window headed by the name of the selected export
format. Here you can edit format specific settings. For example in Digital Information
Export you can choose between text- and the JDF-format.
For all export formats the option Automatic export (4.) can be activated.
2.
1.
4.
3.
37Manual TECHKON SpectroDrive Measuring conditions – GrayGuide targets If in Settings System / Software the option Gracol G7™ was selected to be the preferred Gray mode display (see picture p. 39), Settings Measuring conditions GrayGuide targets opens now a menu window, which allows to adjust the target values or let them be calculated automatically. Gray patches as well as the hue (a*b*) for the paper white can be edited. If required all values can be reset to the G7™ defaults. 38
CHAPTER 3 – How to use SpectroDrive
The following settings can be made in the System / Software
section:
The menu item is divided into the two sections Information (1.) and Settings (2.).
1. 2.
3.
Information:
Displays the type of software (ExPresso Basic or Pro), the software version, the dongle-
ID, the expiration date of time-limited dongles, and if extension modules are installed.
Settings:
Touchscreen support: Must be active, when a touch-sensitive screen is connected,
to provide a virtual keyboard for the text input.
39Manual TECHKON SpectroDrive
Gray mode display: This selection defines, whether the analysis of the gray balance
shall be carried out densitometrically or according to Gracol G7™.
Printer: Defines the connected printer for printing the report.
Language: Sets the language.
The button Database maintenance (3. in picture p. 39) opens a new window, where
one can decide, after which period of time the print jobs will be archived (1.).
The option Archive when exiting ExPresso can also be selected (2.).
Furthermore older print jobs can be archived instantly by a push of a button and in the
same way already archived print jobs can be restored (3.).
The database is located on the hard disk of the PC in the ExPresso directory. When
Generate database safety backup (4.) is selected, the existing database will be saved
under a given name.
If required the stored database can be restored using the included restore tool (5.). You
have to quit ExPresso for this procedure and start it again after the database has been
restored. Restoring of the database leads to an overwriting of the recently saved data
in ExPresso.
1.
2.
3.
4. 5.
40CHAPTER 3 – How to use SpectroDrive
3.5 Defining and running a print job
Before running a print job, certain selections have to be made. Everything related with
a Print job is indicated by the blue screen color.
ExPresso has an “autosave” function. Every Print job will be saved automatically. This
applies also for Print jobs which are not completed and will be resumed later.
Select
The list (1.) contains Print jobs which have been already made. A Print job can be
stopped at any time and resumed later.
An information box (2.) on the left side of the menu window shows at a glance the
most relevant informations: customer name, date and time stamp of the first and last
measurement, press, number of the measurements, the selected color bars (for the
top side as well as for the reverse side) and the most relevant measurement parameter.
2. 1.
3.
41Manual TECHKON SpectroDrive The Search for function supports the fast research for already existing print jobs. Clicking in the Edit button (3. in picture p. 41) provides a direct access to the submenu Print job Make ready Print job info. TIP: New print jobs similar to old print jobs, can be set up by duplicating. Thus time is saved, because settings can be taken over. By using the duplication function also OK-sheets can be taken over for repeated print jobs. Make ready Certain selections have to be made, before the measurements can be started. Make ready – Print job info Textual information about the print job can be edited in Print job info. The text entered in Print job name will be the title of the data set, which will be au- tomatically saved by ExPresso. It can be selected from the Print job Select menu. During measurements it will be shown in the lower left section of the status bar. The section Customer name and a text box for detailed Remarks concerning the print job can be used optionally. 42
CHAPTER 3 – How to use SpectroDrive
Make ready – Press / Inks
Select a press, which you have already defined in Settings Measuring conditions
Presses (see p. 22 and 25) and fill the printing units virtually with ink (1.).
1.
An inking unit can be kept empty as well (2.). For example, if a 6-color press is used only
for CMYK-print, the last two printing units can remain empty.
2. 3.
43Manual TECHKON SpectroDrive
The picture on page 43 shows an 8-color press, with two empty printing units. Printing
unit no. 7 contains the spot color HKS 17 K (3.), what can be seen at a glance by the
screen color and the color name on the printing unit.
TIP: The virtual filling of the press with ink is not necessary, when an already exist-
ing print job with the same press configuration is selected in Print job Select and
duplicated.
Make ready – Sheet / Color bar
As soon as the press is filled with ink choosing Print job Make ready Press / Inks,
the menu item Sheet / Color bar is unlocked and selectable.
1.
1. On the left side of the window a Color bar can be selected, after having been de-
fined or pre-installed in Settings Printing conditions Color bar (see p. 27 f.).
44CHAPTER 3 – How to use SpectroDrive
If a color bar is selected, whose ink zone width differs from the ink zone width of the
selected press, a warning is displayed.
If the selected color bar does not contain a paper white patch, a paper white calibra-
tion has to be carried out manually, before the function Scan color bar length can be
used.
The green arrow located left from Scan color bar length indicates that the color bar
has to be measured. By pressing the green measurement button (2. in picture p. 44),
SpectroDrive scans the printing sheet an sets the length of the color bar. The green
arrow disappears, if a color bar length has been scanned and captured successfully.
As a default, the color bar will be centrally aligned. Additionally the ink zone for the
first measurement can be defined individually. Use the arrow buttons of the Starts in
ink zone function to define which ink zone of the press will correspond with the first
zone of the color bar (1.).
The selected connection between the color bar and the ink zones of the printing press
is also shown graphically (2.).
If no color bar has been detected, an information window appears (3.) which reminds
the user to position the color bar accurately and to repeat the measurement.
If a printing press with a reversing unit has been defined, there will be a measurement
section for the top side as well as one for the reverse side. This provides the possibility
to capture two different color bars for top- and reverse-printing.
1. 2.
4.
3.
45Manual TECHKON SpectroDrive
The button Change plate assignment (4. on p. 45) opens a new window, where the
assignment of a printing plate in regard to a printing unit can be defined individually.
A change of the plate assignment is always necessary, when the order of the inks has
been changed or if spot colors are used.
In the following example it has been necessary to assign the ink Magenta (1.) to the
spot color HKS 17 K in printing unit no. 7. Thus the color bar will feature a measurement
patch at the right position, which guarantees a proper measurement and analyze of
the color bar.
1.
Make ready – Target values / Tolerances
As the printing units have been filled with ink, now they are assigned with target and
tolerance values; preferably tolerance sets according to the printing standard ISO
12647-2:2007 for the paper classes 1 – 5, which are already pre-installed.
When using scan-measurement-devices of the newer generation which support the
requirement of ISO 13655 including the measurement conditions M0 to M3, the de-
fault values according to ISO 12647-2: 2013 can be selected as well.
46CHAPTER 3 – How to use SpectroDrive
1.
2.
3.
Besides the already pre-installed target sets for the five paper classes (1.), the list can
also contain individual target sets (2.), which have been already edited using Settings
Measuring conditions Target values / Tolerances (see p. 29 f.). The information
box on the left side of the menu window shows all colors which belong to a target set
and their target values.
Individual target values and admissible tolerances can be edited and measured for
each printing unit. When a target set has been confirmed, just click on the button
above the printing unit (3.). It changes into an Edit button, which opens the following
window:
47Manual TECHKON SpectroDrive
Measurement of a print job
Measure – Density
This screen will display all relevant information after a scan measurement. The scan
measurement can be started by pressing either the green measurement button on
the device or the Start measurement button in the left lower section of the screen.
1.
3.
2.
1. Detailed information for every ink zone by pointing on the bar graph.
2. Measurement values out of tolerance will be marked with red top.
3. This section displays in detail the average values of the measurement parameters of
the single printing units.
48CHAPTER 3 – How to use SpectroDrive
The info section of the menu item den-
sity measurement shows in detail the fol-
lowing parameters:
1. Solid density
2. Printing contrast
1. 3. Dot area 80 %
2. 4. Dot area 40 %
3. 5. Slur / doubling factor
4.
5.
In the measurement menus Colorimetric
and InkCheck the relevant parameters
for these measurements are displayed.
Red, yellow and green dots, located
ahead of the average values, show fun-
damental problems. Green dots indicate
values within the tolerance. Red dots
show values out of tolerance. Values
close to the tolerance limit (75 %) are
marked by yellow dots.
Structure of the command line
1. 2. 3. 4. 5. 6. 7. 8.
On the basis of the command line of the menu section Print job Measure Den-
sity all command options will be explained. The order and the availability of the par-
ticular command options can vary in the different measurement menus, but they have
always the same effect.
1. The green button starts a measurement.
2. The white patch shows after each measurement automatically the number of this
measurement. Using the arrow buttons one can navigate through the already made
measurements of a print job.
3. Clicking on the button with the printer icon opens the connection to the printer,
which has been already defined in Settings System / Software. The printer option
allows to print out the displayed window.
49Manual TECHKON SpectroDrive 4. These buttons can optionally delete the current measurement or all measurements of a print job. 5. The button Mask ink zones opens a window, where optionally single inks within the ink zones or complete ink zones can be masked. Please note that the masked ink zones will not be taken into account for the calculation of the report statistics. 6. Export measurement starts the export into another application (see p. 37). 7. Set OK-sheet, defines the OK-sheet, which is set instead of the target set. When set- ting the OK-sheet, it will be numbered to the corresponding measurement and will be displayed in the lower status line. Now the button switches to Delete OK-Sheet and serves for this function. 8. To top side respectively to reverse side switches between top- and reverse-print- ing, if a press with a reversing after a printing unit has been selected. 50
You can also read