Spa Bath Owner's Manual - TO BE REMOVED FOR USE BY THE OCCUPANT Signature Collection
←
→
Page content transcription
If your browser does not render page correctly, please read the page content below

Spa Bath Owner’s Manual
            Signature Collection
         Designer Collection “Elite”
       Designer Collection “Essential”

TO BE REMOVED FOR USE BY THE OCCUPANT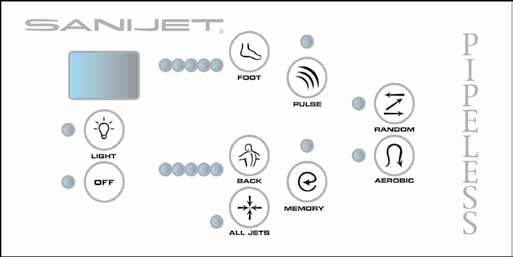
Dear Customer,

     Thank you for purchasing a SANIJET® Pipeless Whirlpool Bath. By selecting a SANIJET® pipeless system,
     we believe that you have chosen the safest, most dependable and luxurious whirlpool bath available.
     This manual will help you learn how to install, operate and maintain your new pipeless whirlpool bath.

     Before proceeding any further, please take a few minutes to complete the warranty registration card
     enclosed in your Owner’s packet and submit it to us at the address provided on the form.

     Your SANIJET® Pipeless Whirlpool Bath has been designed to provide you with safe and soothing
     hydromassage and to serve as a hygienic bathing appliance. As you read along, you will become
     familiar with the features of your specific whirlpool bath model. Please keep this manual after
     your initial reading for future reference.

     Sincerely,
     SANIJET®

02
Table of Contents Letter From Sanijet....................................................................................................... 02 Important Safety Instructions......................................................................................04 Pipeless Whirlpool Bath Operating Instructions............................................................05 Command Pad Functions: Single Bather Spa Baths , 3-Zone..........................................06 Command Pad Functions: Single Bather Spa Baths , 2-Zone.......................................... 07 Command Pad Functions: Two-Person Spa Baths , 3-Zone.............................................08 Command Pad Functions: Two-Person Spa Baths , 2-Zone..............................................09 Command Pad Functions: Designer “Essential ” Spa Bath Command Pad.......................10 Pipeless Whirlpool Bath Installation Instructions............................................................11 Electrical Requirements................................................................................................12 Typical Installations.......................................................................................................13 Plumbing.......................................................................................................................14 Sanijet Pure Pipeless Disinfection Protocol...................................................................15 Warranty-Residential.....................................................................................................16 Warranty-Commercial....................................................................................................17 Customer Service ...........................................................................................Back Cover
Important Safety Instructions
                        Instructions pertaining to a risk of Fire, Electric shock or injury to persons.

                                           SAVE THESE INSTRUCTIONS
                                                        Warning:
                When using this unit, basic precautions should always be followed, including the following:

     1 READ AND FOLLOW ALL INSTRUCTIONS.

     2 WARNING: Risk of accidental injury or drowning: Children should not use a hydromassage bathtub without
         adult supervision.

     3 WARNING: To avoid injury, exercise care when entering or exiting the hydromassage bathtub.

     4 WARNING: Risk of electric shock: Do not permit electric appliances (such as a hair dryer, lamp, telephone, radio,
         or television) to be within 5 ft (1.5m) of this hydromassage bathtub.

     5 DANGER: RISK OF ELECTRIC SHOCK: This unit should be grounded. Connect only to a dedicated 15 amp. circuit
         that is protected by a Ground Fault Circuit Interrupter (GFCI). A GFCI should be provided by the electrician and
         should be tested on a routine basis. To test the GFCI, push the test button. The GFCI should interrupt power. Push
         the reset button. Power should be restored. If the GFCI fails to operate in this manner, there is a ground fault,
         indicating the possibility of electrical shock. DO NOT USE THE UNIT. Have the problem corrected by a qualified
         service representative or an electrician before using.

     6 WARNING: Risk of hyperthermia and possible drowning: Water temperature in excess of 104 º F (38º C)
         may be injurious to your health. Check and adjust water temperature before use.

     7 WARNING: Do not operate this unit without the complete jet assembly installed.

     8 Use the SANIJET Pipeless Whirlpool Bath only for its intended purpose: a fill and drain, hydromassage appliance
         for human bathing. Do not use attachments not recommended by the manufacturer.

     9 Never drop or insert any object into any opening.

     10 Follow closely all applicable Federal , Provincial/State and local building codes and regulations.

04
Pipeless Whirlpool Bath
Operating Instructions
Your SANIJET Pipeless Whirlpool Bath is designed to be filled with DISINFECTION
fresh water then drained after each use. Certification by NSF
International ensures that your Pipeless System can be effectively a. Spray the surface area of the jet assemblies and bathing vessel
cleaned and disinfected by simply following SANIJET’s Pure until thoroughly coated with an EPA–registered disinfectant.
Disinfection Protocol on Page 15. b. Allow to set for the required disinfection contact period
(refer to manufacturer’s specifications) then rinse surfaces
COMMAND PAD DESCRIPTION
with fresh water.
A detailed description of your system’s command pad operation
can be found on the following pages: REASSEMBLY
• Single Bather Signature and Designer “Elite” Spa Baths a. Dry the jet assemblies and bathing vessel.
(Pages 6-7)
• Two-Person Signature and Designer “Elite” Spa Baths b. Reinstall the jet assemblies by aligning with jet case at
(Pages 8-9) 10 o’clock position. Maintain even pressure and rotate jet
• Designer “Essential” Spa Baths (Page 10) assemblies clockwise to lock them in place.
WATER LEVEL NSF CERTIFICATION: NSF International confirmed that SANIJET’s
Close the drain and fill the bath until the water level is at least Pipeless system can be completely cleaned and disinfected, even
2” above the jets. Operating the system without water may if system cleaning has been neglected.
damage the jet assemblies. Never attempt to fill above the
bottom of the overflow. REPAIRS
BATH ADDITIVES TUB SURFACE Minor scratches can be easily removed. Immerse
Bath additives (including oil based products) can be used in a 600-grit wet/dry sandpaper in water and lightly sand the area.
SANIJET Pipeless Whirlpool Bath, since their residue can be easily Repeat sanding with 1000-grit wet/dry sandpaper and water.
cleaned. CAUTION: Use only low foaming additives. To restore the surface gloss, use Gel-Gloss® (found at most
hardware stores). If Gel-Gloss is not available use automotive
CLEANING YOUR SANIJET PIPELESS WHIRLPOOL BATH: rubbing compound followed by an application of automotive
WARNING: Unless thoroughly cleaned after each use, bath residue paste wax. Major scratches and gouges will require professional
will buildup within the system and on the surface area of any refinishing. Contact SANIJET’s customer service department for
whirlpool bath, which can promote the growth of bacteria. To specific instructions.
maintain your SANIJET® Pipeless Whirlpool Bath at a maximum NOTICE: NO OTHER ITEMS ARE OWNER SERVICEABLE.
level of hygiene, thoroughly clean the tub shell and jets after
each use with a nonabrasive antibacterial cleaner, rinse and dry. SUNLIGHT EXPOSURE: In order to prevent discoloration of the
NEVER use abrasive household cleaners on any SANIJET® Pipeless acrylic finish, limit the exposure of the bath to direct sunlight.
Whirlpool Bath. If you use an anti-skid rubber mat in your whirlpool
bath, remove it after every use to properly clean the tub surface TROUBLESHOOTING
and to avoid harm to the surface finish.
If system will not operate: Check the remote GFCI circuit breaker
IMPORTANT! TOTAL DISINFECTION REQUIRES TWO DISTINCT STEPS: to make sure it is in the ON position. Reset the GFCI if necessary.
Cleaning and Disinfection.
NOTICE
PREPARATION & CLEANING Abnormal operation of the whirlpool bath functions may be the
result of a power outage or poor quality power service in your
a. Drain the bathing well of all water. area. The circuit breaker, which supplies electrical power to the
b. Remove and disassemble the jet assemblies and place whirlpool bath, should be reset prior to placing a service call.
them in the sink or other basin suitable for cleaning. Water leakage
c. Use a non-abrasive antibacterial cleaner to clean the bathing Call a plumber to determine the source of the leak. If the leak is
vessel, jet cases, drain stopper and overflow mechanism–rinse from the pipeless whirlpool system, contact SANIJET’s customer
with fresh water. service department for specific instructions.
05Single Bather Spa Baths
Signature
6-JET COMMAND PAD:and Designer “Elite” 3-Zone Command Pad
7 6 8
4
3
2 9
1
COMMAND PAD FUNCTIONS:
5 10
1 1) STANDBY
STANDBY ModeMode LED Indicator:
LED Indicator Indicates the system is ready 9) Pre-Programmed
8 PULSE Button Pulsates Massagethe Modes:
water flow and simultaneously allows
Indicates
to operate.the system is ready to operate. All 6-Jet models
individualhavejet three pre-programmed
pair control via the Foot,massage
Mid, Back buttons. This
2) OFF Button: modes: LINEAR,
function RANDOM
allows all jets, andany
AEROBIC.
two jet pairs or any single jet pair to
2 Turns
OFF the
Button Turns and
jets OFF the jets OFF and
returns thereturns
systemthe to system
STANDBY. to STANDBY. LINEAR Massage Button:
pulse, while the non-pulsing jet pairs can be set at HI or LO speed
3 3) LIGHT
LIGHTButton Button:
Used to control the optional mood light. Activates a massage
or turned OFF. that begins with the back and
Used to turn the optional mood light ON and OFF. Once moves down the body to the feet.
the•mood
Press light
the “Light”
is ON, button to turn will
the system on the mood light turn
automatically 9 Pre-Programmed
RANDOM Massage Button: Massage Modes All three-zone models
it OFF
• Theafter
light2displays
hrs. 7 vivid colors and 2 sequencing settings. Causes the jet pairs to alternate massage
have three pre-programmed betweenmodes: LINEAR, RANDOM
pulse and
4) Display: and AEROBIC.
constant flow.
• To change
Displays the timethe light color, press
remaining the “Light”
for system button (the
operation to turn it off AEROBIC Massage Button:
LINEAR Massage Button: Activates a massage that begins with
timerand after down
counts one second
frompress it again and
20 minutes to turn it on. when
is reset Activates a slowly
the back and moveschangingdownmassage
the body where all jets
to the feet.
leaving
• The the STANDBY
color sequence Mode).
is as follows: Bright White, Aqua Blue, simultaneously alternate between pulses and
5) ALL JETS Button: RANDOM Massage Button: Creates water pulses in patterns of
Soothing Blue, Ocean Blue, Majestic Gold, Shamrock Green, Fiery constant flow.
Simultaneously controls all jetMode
pairs at either HI or LO 10) Personal limitless variation.
Red, Chameleon Mode, Party Memory Modes:
speed. The Personal Memory
AEROBIC modes
Massage allowActivates
Button: you to store and recall
a slowly changing massage
• In the event that the light is left turned on, it will automatically
6) FOOT, MID, and BACK Buttons: the settings of the command pad via a single button (the pulses and
where all jets simultaneously alternate between
turn off after 2 hours continuous operation.
Use to individually control the water flow of the FOOT, state of theconstant
mood light
flow. is not included). All 6-Jet models
4MID, and BACK jets. Each jet pair can be set at either HI can store 10 and recallMemory
two personalized
Modes Thememory Personalsettings
Memory via
Display Displays the time remaining for system operation (the
Personal modes allow you
or timer
LO speed
countsordown turnedfromOFF. Whenand
20 minutes anyisofreset
thesewhenbuttons the Memory
leaving the 1 and Memory 2 buttons.
to store and recall the settings of the command pad via a single
areSTANDBY
pressedMode).
for longer than 1.0 second, the system will button (the state of the mood light is not included). All 3-Zone
automatically
5 ALL JETS Button increase or decrease controls
Simultaneously the water all flow of the
jet pairs MEMORY
at either 1 Button:
models can store and recall two personalized memory settings via
selected jet pair.
High or Low speed. To store your MEMORY
the Memory 1 setting,
1 and Memory press and hold the
2 buttons.
7) Jet Flow LED Indicators: MEMORY 1 button until the MEMORY 1 LED Indicator
6 Displays
Foot, Mid,the Back
waterButtons
flow of the UseFOOT,
to individually
MID, and control
BACK the waterturns ON
MEMORYto acknowledge
1 Button Tothe setting
store your has been1 stored.To
MEMORY setting, press and hold
flow
jets. of the jets. Each jet pair can be set at either HI or LO speedrecall the
MEMORY
MEMORY 1 button until the MEMORY 1 LED 1Indicator
1 setting, press the MEMORY button turns ON to
8) orPULSE
turned OFF. When any of these buttons are pressed for less
Button: for less than 1 second.
acknowledge the setting has been stored. To recall MEMORY 1 setting,
than one
Pulsates the second,
water flow the and
system will automatically
simultaneously allowsincrease or MEMORY 2 Button:
press the MEMORY 1 button for less than 1 second.
decreasejet
individual thepair
water flow via
control of the
theselected
FOOT, MID,jet pair.and BACK To store your MEMORY 2 setting, press and hold
7 buttons.
Jet Flow This
LEDfunction
Indicatorsallows all jets,
Displays any two
the water flowjetof pairs or MID,theMEMORY
the FOOT, MEMORY 22buttonButtonuntil Tothe MEMORY
store your MEMORY2 LED Indicator
2 setting, press and hold
anyand
single jet
BACK jets. pair to pulse, while the non-pulsing jet pairs turns ON to acknowledge the setting has been
the MEMORY 2 button until the MEMORY 2 LED Indicator stored. To turns ON to
can be set at HI or LO speed or turned OFF. recallacknowledge
the MEMORY the2setting
setting,haspress
beenthestored.
MEMORY 2 the MEMORY 2
To recall
buttonsetting,
for less than 1 second.
press the MEMORY 2 button for less than 1 second.
06Single Bather Spa Baths
Signature and Designer “Elite” 2-Zone Command Pad
4-JET COMMAND PAD:
7 6 8
4
3
9
2
1
5 10
COMMAND PAD FUNCTIONS:
9) Pre-Programmed Massage Modes:
1 STANDBY Mode LED Indicator Indicates the system is ready 7 Jet Flow LED Indicators Displays the water flow of the Foot and
1) STANDBY Mode LED Indicator: All 400 Series models have two pre-programmed massage
to operate. Back jets.
Indicates the system is ready to operate. modes: RANDOM and AEROBIC.
2 OFF Button
2) OFF Turns the jets OFF and returns the system to STANDBY.
Button: 8 PULSE Button Pulsates the water flow and simultaneously allows
RANDOM
individual Massage
jet pair controlButton:
via the FOOT and BACK buttons. This
3 LIGHTTurns
ButtontheUsedjets to
OFF andthe
control returns themood
optional system to STANDBY.
light.
3) LIGHT Button: Causes
function the all
allows jetjets
pairs to alternate
or either between
pair to pulse, whilepulse and
the non-pulsing
• Press the to
Used “Light”
turn button to turn mood
the optional on the light
moodON lightand OFF. Once jetconstant flow.
pair can be set at High or Low speed or turned OFF.
AEROBIC Massage Button:
• Thethe mood
light light7 vivid
displays is ON, the system
colors will automatically
and 2 sequencing settings. turn it 9 Pre-Programmed Massage Modes All two-zone models have two
OFF after 2 hrs. Activates a slowly changing massage that increases
pre-programmed massage modes: RANDOM and AEROBIC.
• To change the light color, press the “Light” button to turn it off
4) Display: the water flow from LOW to HIGH and then decreases
andDisplays
after onethesecond
timepress it againfortosystem
remaining turn it on.
operation (the timer the water
RANDOM flow from
Massage HIGH
Button: to LOW.
Creates water pulses in patterns of
limitless variation.
• Thecounts
color down
sequence fromis 20as minutes and is White,
follows: Bright reset when
Aqua leaving
Blue, 10) Personal Memory Mode:
the STANDBY
Soothing Blue, OceanMode).
Blue, Majestic Gold, Shamrock Green, Fiery The Personal
AEROBIC Memory
Massage modeActivates
Button: allows you to store
a slowly and recall
changing massage
Red,5)Chameleon
ALL JETS Mode,Button:
Party Mode thethat
settings of thethe
increases command
water flowpad from
via a LOW
singletobutton (the then
HIGH and
Simultaneously controls all jet pairs at either HI or LO state of the mood
decreases lightflow
the water is not included).
from All 4-Jet models
HIGH to LOW.
• In the event that the light is left turned on, it will automatically
speed. can store and recall a personalized memory setting via the
turn off after 2 hours continuous operation. 10 Personal Memory Modes The Personal Memory mode allows you
6) FOOT and BACK Buttons: Memory button.
to store and recall the settings of the command pad via a single
Used to individually control the water flow of the FOOT
4 Display Displays the time remaining for system operation (the button (the state of the mood light is not included). All control
and BACK jets. Each jet pair can be set at either HI or LO MEMORY Button:
timer counts down from 20 minutes and is reset when leaving the models can store and recall a personalized memory setting via the
speed or turned OFF. When either of the buttons is To store your MEMORY setting, press and hold the
STANDBY Mode). Memory button.
pressed for longer than 1.0 second, the system will MEMORY button until the MEMORY LED Indicator
5 automatically
ALL JETS increase or decrease
Button Simultaneously controls allthejetwater
pairsflow of the
at either turns ON to acknowledge the setting has been stored.
MEMORY Button To store your MEMORY setting, press and hold
High orselected jet pair.
Low speed. To recall the MEMORY setting, press the MEMORY
the MEMORY button until the MEMORY LED Indicator turns ON to
7) JET FLOW LED INDICATORS: button for less than 1 second.
6 Foot and Back Buttons Used to individually control the water acknowledge the setting has been stored. To recall the MEMORY setting,
Displays the water flow of the FOOT and BACK jets.
flow of the jets. Each jet pair can be set at either High or Low press the MEMORY button for less than 1 second.
8) PULSE Button:
speed or turned OFF. When either of the buttons is pressed for
Pulsates the water flow and simultaneously allows
less than one second, the system will automatically increase or
individual jet pair control via the FOOT and BACK buttons.
decrease the water flow of the selected jet pair.
This function allows all jets or either pair to pulse, while
the non-pulsing jet pair can be set at HI or LO speed or
turned OFF.
8
07Two-Person Spa Baths
Signature and Designer “Elite” 3-Zone Command Pad
7 6 8
4
3
2 9
1
12345
5 10
1 STANDBY Mode LED Indicator Indicates the system is ready 8 PULSE Button Pulsates the water flow and simultaneously allows
to operate. individual jet pair control via the BACK, MID, BACK buttons. This
function allows all jets, any two jet pairs or any single jet pair to
2 OFF Button Turns the jets OFF and returns the system to STANDBY.
pulse, while the non-pulsing jet pairs can be set at High or Low
3 LIGHT Button Used to control the optional mood light. speed or turned OFF.
• Press the “Light” button to turn on the mood light
9 Pre-Programmed Massage Modes All three-zone models have
• The light displays 7 vivid colors and 2 sequencing settings. three pre-programmed massage modes: LINEAR, RANDOM
and AEROBIC.
• To change the light color, press the “Light” button to turn it off
and after one second press it again to turn it on.
LINEAR Massage Button: Activates a massage that begins with
• The color sequence is as follows: Bright White, Aqua Blue, the back and moves down the body.
Soothing Blue, Ocean Blue, Majestic Gold, Shamrock Green, Fiery
Red, Chameleon Mode, Party Mode RANDOM Massage Button: Creates water pulses in patterns of
limitless variation.
• In the event that the light is left turned on, it will automatically
turn off after 2 hours continuous operation.
AEROBIC Massage Button: Activates a slowly changing massage
4 Display Displays the time remaining for system operation (the where all jets simultaneously alternate between pulses and
timer counts down from 20 minutes and is reset when leaving the constant flow.
STANDBY Mode).
10 Personal Memory Modes The Personal Memory modes allow you
5 ALL JETS Button Simultaneously controls all jet pairs at either to store and recall the settings of the command pad via a single
High or Low speed. button (the state of the mood light is not included). All 3-Zone
models can store and recall two personalized memory settings via
6 Back, MID, BACK Buttons Use to individually control the water
the Memory 1 and Memory 2 buttons.
flow of the jets. Each jet pair can be set at either High or Low
speed or turned OFF. When any of these buttons are pressed for
MEMORY 1 Button To store your MEMORY 1 setting, press and hold
less than one second, the system will automatically increase or
the MEMORY 1 button until the MEMORY 1 LED Indicator turns ON to
decrease the water flow of the selected jet pair.
acknowledge the setting has been stored. To recall MEMORY 1 setting,
7 Jet Flow LED Indicators Displays the water flow of the BACK, MID, press the MEMORY 1 button for less than 1 second.
BACK jets.
MEMORY 2 Button To store your MEMORY 2 setting, press and hold
the MEMORY 2 button until the MEMORY 2 LED Indicator turns ON to
acknowledge the setting has been stored. To recall the MEMORY 2
setting, press the MEMORY 2 button for less than 1 second.
08Two-Person Spa Baths
Signature and Designer “Elite” 2-Zone Command Pad
7 6 8
4
3
9
2
1
5 10
1 STANDBY Mode LED Indicator Indicates the system is ready 8 PULSE Button Pulsates the water flow and simultaneously allows
to operate. individual jet pair control via the BACK buttons. This function allows
all jets or either pair to pulse, while the non-pulsing jet pair can be
2 OFF Button Turns the jets OFF and returns the system to STANDBY.
set at High or Low speed or turned OFF.
3 LIGHT Button Used to control the optional mood light.
9 Pre-Programmed Massage Modes All two-zone models have two
• Press the “Light” button to turn on the mood light pre-programmed massage modes: RANDOM and AEROBIC.
• The light displays 7 vivid colors and 2 sequencing settings. RANDOM Massage Button: Creates water pulses in patterns of
limitless variation.
• To change the light color, press the “Light” button to turn it off
and after one second press it again to turn it on. AEROBIC Massage Button: Activates a slowly changing massage
that increases the water flow from LOW to HIGH and then
• The color sequence is as follows: Bright White, Aqua Blue,
decreases the water flow from HIGH to LOW.
Soothing Blue, Ocean Blue, Majestic Gold, Shamrock Green, Fiery
Red, Chameleon Mode, Party Mode 10 Personal Memory Modes The Personal Memory mode allows you
to store and recall the settings of the command pad via a single
• In the event that the light is left turned on, it will automatically
button (the state of the mood light is not included). All control
turn off after 2 hours continuous operation.
models can store and recall a personalized memory setting via the
4 Display Displays the time remaining for system operation (the Memory button.
timer counts down from 20 minutes and is reset when leaving the
STANDBY Mode). MEMORY Button To store your MEMORY setting, press and hold
the MEMORY button until the MEMORY LED Indicator turns ON to
5 ALL JETS Button Simultaneously controls all jet pairs at either
acknowledge the setting has been stored. To recall the MEMORY setting,
High or Low speed.
press the MEMORY button for less than 1 second.
6 BACK Buttons Used to individually control the water flow of
the BACK jets. Each jet pair can be set at either High or Low
speed or turned OFF. When either of the buttons is pressed for
less than one second, the system will automatically increase or
decrease the water flow of the selected jet pair.
7 Jet Flow LED Indicators Displays the water flow of the BACK jets.
09Designer “Essential” Spa Bath Command Pad
Your “Essential” Whirlpool Bath provides spa-quality bathing delivered by Pipeless Jets for an
invigorating, strong or soft, soothing experience…
you choose.
High | Low | Off
Simply press the button on the command pad to turn on “All Jets” to their highest flow setting.
Press the button a second time to adjust “All Jets” to the low flow setting.
Press the button a third time to turn the system “Off.”
20-minute timer
All Designer “Essential” Spa Baths are equipped with a 20-minute timer that will turn the system “Off” after 20
minutes of continuous operation.
10Pipeless Whirlpool Bath
Installation Instructions
Warning
When using electrical products, basic precautions should always be followed, including the following:
1 IMPORTANT: Read complete instructions before beginning installation.
2 DANGER: RISK OF ELECTRIC SHOCK. Connect only to a dedicated 15 amp. circuit protected by a ground fault
circuit interrupter. Grounding is required. This unit should be installed by a qualified service representative
and grounded.
3 Each whirlpool bath arrives ready for installation and may include an optional drain/overflow kit.
4 Remove the bath from the carton and retain the shipping carton until satisfactory inspection of the product has
been made. ONLY lift the bath by the shell or base.
5 To help prevent damage from shoes, tools, etc., to the bath unit’s finish during installation, do not remove the
protective sheet of plastic from inside the bath.
6 Immediately upon receipt, inspect the tub shell and operating system for any obvious damage BEFORE installing.
Should inspection reveal any damage or defect in the finish, do not install the bath. SANIJET’s responsibility for
shipping damage ceases upon delivery of the product in good order to the carrier. Refer any claim for damage
to the carrier. For definitions of warranty coverage and limitations, refer to the published warranty information
on pages 16 and 17.
7 All bath units are factory tested for proper operation and watertight connections prior to shipping. Note: Prior
to installation, the bath must be filled with water and operated to check for leaks that may have resulted
from shipping damage or mishandling.
8 Each SANIJET Signature and Designer Collection model has an internal access panel and does not require an
external access panel for service:
9 CAUTION: RISK OF ELECTRIC SHOCK: De-energize from electrical supply before servicing.
11Electrical Requirements
A 115 VAC, 15 AMP, 60 HZ., dedicated circuit connected to a Ground Fault Circuit Interrupter (GFCI) is required. The
GFCI should be mounted for easy access in the event a manual reset is required, and should never be mounted
underneath the tub. If the GFCI is located on a bathroom wall, it should be positioned such that it is not accessible
by the tub’s occupant.
SERVICE LOOP REQUIRED
The electrical installation of the bath unit requires that an electrical Service Loop be provided. The Service Loop
will allow the required electrical connections to be made to the junction box located on the side of the tub prior
to installation. The Service Loop should be a minimum of 8 ft. long as measured from either end of the tub. The
Service Loop should contain the electrical service (3 wire) and the required solid bonding ground wire. Each unit
is manufactured with a safe, convenient OFF button located on the command pad. A remote switch or timer is
not necessary.
ELECTRICAL CONNECTIONS / DANGER: RISK OF ELECTRIC SHOCK
Connect only to a dedicated 15 Amp. circuit protected by a Ground Fault Circuit Interrupter. All electrical connections
should be performed by a licensed electrician. The tub obtains electrical service via an internal power cord and is left
unterminated in the electrical junction box located on the side of the tub. The junction box also provides an external
lug connector to accommodate a #8 AWG solid bonding conductor (ground wire). See Illustration #1.
The required electrical connections to the tub are as follows:
1 The electrical service is hardwire connected (3 wires) to the tub’s power cord, ground wire and optional light cord,
which are all located inside the provided junction box. These connections need to use approved connectors and be
solidly secured.
2 Installation of a #8 AWG solid bonding connector (ground wire) from the lug connector attached to the junction box
to earth ground. The #8 AWG ground wire is not provided with the bath unit.
MOUNTING ACCESSORIES
When mounting valves, spouts, handles, rails,
or grab bars, verify the location of any system
wiring or components located on the back of the
unit to prevent accidental damage from drilling
mounting holes. Verify that the hot and cold
water supply lines and the electrical outlet are
located where there is ample room for proper
connections BEFORE setting the unit in place.
When mounting any fittings on the unit, drill
holes from the finished surface using a fine-tooth
or abrasive grit cutting edge.
12Typical Installations
The entire bottom surface of the tub base must be supported. To accomplish this, a bed of mortar or low shrinkage
plaster can be applied under the tub base at the time of final setting. The amount of material used should be
sufficient only to level the bath unit and not to raise it. Level the bath unit along the top edge of the rim when
the setting bed is applied. Allow the setting material to set completely before applying weight to the bath. This
procedure is essential to ensure the bath unit has proper support and drainage. The rim of the bath unit is not
designed to support weight. If finish material is to overlap or contact the bath unit, the added weight of the
material must be fully self-supporting.
To obtain detailed dimensional, floor loading, capacity, and required system component clearance information for
your particular model, please contact SANIJET toll-free at 877-934-0477.
SERVICE ACCESS
The system does not require an external access panel for service. Access
to the jet motors, the control electronics and the electrical service
connections is accomplished from inside the tub. The command pad,
located on the side of the tub, provides an internal panel through which
the control electronics and electrical service connection can be accessed
for service. An unobstructed clearance area of 2 inches is required to the
left, right, bottom and rear of the box indicated at right in order to allow
service access. This area must not contain any ledger boards, supports or
vertical studs.
FRAMING AND SUPPORT
The drain extends below the bottom of the bath and requires a cutout in the floor. The floor structure beneath
the bath must be able to support the total weight of the bath, water, and bather. The Minimum Floor Structural
Requirement recommended is 100 pounds per square foot.
13Plumbing
All SANIJET® Pipeless Whirlpool Bath units are factory tested for proper operation and watertight connections prior to
shipping. Prior to installation, the bath must be filled with water and operated to check for leaks that may have resulted
from shipping damage or mishandling. If leaks are detected, notify SANIJET’s customer service department. Do not install
the unit.
DRAIN INFORMATION
A drain/overflow assembly must be installed on the bath, water tested, and connected to the sanitary system of the house.
After opening the box that contains the drain / overflow assembly (optional accessory), inspect for damage and verify it
has the proper finish. Follow the installation instructions provided with the drain/overflow assembly kit.
NOTE: Watertight installation of the drain is the installer’s responsibility and is not covered under the product’s warranty.
WATER SUPPLY
Consult local authorities for plumbing code requirements in your area.
IMPORTANT: Proper installation of faucetry and waste/overflow, as well as compliance with local codes are the responsibility
of the installer. SANIJET® does not warrant connections of water supply fittings and piping, faucetry, or waste/overflow
systems. Nor is it responsible for damage to the bath that occurs during installation.
CAUTION: A nonflammable protective barrier must be placed between soldering work and the bath unit to prevent damage
to the bath.
SHOWER INFORMATION
SANIJET® is not responsible for damage to the bath unit or for water damage, which might occur due to improper shower
installation or use.
CLEANING THE BATH UNIT AFTER FINAL INSTALLATION
To avoid dulling and scratching the surface of the bath, never use abrasive cleaners. A mild liquid detergent and warm
water will clean soiled surfaces. Remove spilled plaster with a wood or plastic edge. Metal tools will scratch the surface.
Spots left by plaster or grout can be removed, if lightly rubbed with detergent on a damp cloth or sponge.
Paint, tar, or other difficult stains can be removed with paint thinner, turpentine, or isopropyl alcohol (rubbing alcohol).
To avoid discoloration, cleaners containing petroleum distillates must not remain on surfaces. NEVER use lacquer thinner
or chlorinated solvents.
Minor scratches can be easily removed. Immerse 600-grit wet/dry sandpaper in water and lightly sand the area. Repeat
sanding with 1000-grit wet/dry sandpaper and water. To restore the surface gloss, use Gel-Gloss® (found at most hardware
stores). If that is not available use automotive rubbing compound followed by an application of automotive paste wax.
Major scratches and gouges, which penetrate the acrylic surface, will require refinishing. Contact SANIJET’s customer
service department for specific instructions.
TROUBLESHOOTING
If system will not operate: Check the remote GFCI to make sure it is in the ON position. Reset GFCI if necessary.
NOTICE: Abnormal operation of the whirlpool bath functions may be the result of a power outage or poor quality power
service in your area. The circuit breaker, which supplies electrical power to the whirlpool bath, should be reset prior to
placing a service call.
14Sanijet Pure Pipeless Disinfection Protocol
IMPORTANT! TOTAL DISINFECTION REQUIRES TWO DISTINCT STEPS
Remove residue with Disinfection: Apply an EPA registered
thorough and effective disinfectant, covering 100% of all surface
cleaning. areas for the required contact time, to kill
bacteria, viruses and fungi.
1) PREPARATION & CLEANING 1
a. Drain the bathing well of all water.
b. Rotate the jet assembly to remove from jet case.
d. Disassemble the jet assemblies (3 pieces each) and place them in the sink. Use a non-
abrasive antibacterial cleaner to remove any visible residue - rinse with fresh water.
e. Use a non-abrasive antibacterial cleaner to clean the bathing vessel, jet cases, drain 2
stopper and overflow mechanism–rinse with fresh water.
2) DISINFECTION
a. Spray the surface area of the jet assemblies and bathing vessel until thoroughly
coated with an EPA–registered disinfectant.
12:00
b. Allow to set for the required disinfection contact period (refer to manufacturer’s 3 11:00
specifications) then rinse surfaces with fresh water.
3) REASSEMBLE
a. Dry the jet assemblies and bathing vessel.
b. Reassemble and replace jets by aligning the 11 o’clock position.
IMPORTANT
• Always refer to your state and local guidelines for cleaning requirements.
• NEVER USE abrasive cleaners on any surface area.
• After each use, disinfect the system with the recommended disinfection procedures for maximum sanitation.
• BEFORE USE check the jet assembly is properly installed in the case motor assembly.
• BEFORE USE make sure that water is filled to at least 1” above the jets for proper operation.
• DO NOT attempt to activate the jet system without water present.
Additional Notes
• SANIJET Pipeless™ Hydromassage system cleaning and disinfection takes approximately 5 minutes when using Dispatch® Hospital Cleaner
Disinfectant with Bleach.
• The SANIJET Pipeless Jet System does not require a “fill and drain cycle” during disinfection, for improved water conservation.
• For applications requiring quick cleaning between treatments, we recommend a second set of “clean” jet assemblies for quick replacement.
Recommended Cleaner / Disinfectant
SANIJET recommends the use of DISPATCH® Hospital Cleaner Disinfectant with Bleach - EPA Reg. No. 56392-7; EST. No. 62801-MI-001. Kills bacteria
and viruses in 1 minute and tuberculosis in 30 seconds. Available in 32 oz trigger spray and 64 oz refill bottle.
15LIMITED RESIDENTIAL WARRANTY
Pipeless Spa Baths
Products Covered: Spa baths manufactured by SANIJET and put to residential use.
Persons Covered: The original purchaser for residential use (Customer).
Warranty Period: Signature and Designer Elite Models: Five (5) years on the tub shell and two (2) years on all other parts
and components. Designer Essential Models: Three (3) years on the tub shell and one (1) year on all other parts and components.
The warranty period begins on the date of original purchase for use or two (2) months after the product leaves SANIJET’s
facility, whichever comes first. SANIJET may require Customer to document original purchase and provide serial number(s).
Scope of Coverage: This warranty only covers problems reported to SANIJET during the warranty period. Coverage is
SUBJECT TO the exclusions below. If a tub shell manifests a defect or fails to properly perform under ordinary use within
the warranty period, SANIJET will repair or replace it at SANIJET’s election, but shall have no responsibility with respect to
removal, reinstallation or transport of the tub shell. If any other part or component manifests a defect or fails to properly
perform under ordinary use during the warranty period, SANIJET will provide repair or replacement parts or components
at its election. As a condition to warranty service, SANIJET may require Customer to return defective/malfunctioning parts
and may charge Customer for the repair or replacement parts or components subject to a full refund upon receipt of the
return parts and verification of the problem.
Shipping: SANIJET will pay freight on a least-cost basis to ship repair/replacement parts to destinations within the
continental United States.
Exclusions: This warranty does NOT cover a) metallic plated hardware, light bulbs or fading from exposure to direct
sunlight; b) failure, damage or defect caused by any of the following after the product leaves SANIJET’s factory: mishandling,
abuse, misuse, neglect, accident or natural disaster, normal wear and use that does not affect the product’s function; failure
to maintain the product as recommended by SANIJET (See Owner’s/Installation manual); or c) any part that has been altered
or tampered with, including but not limited to alteration or tampering with any labeling.
Making Claims: Report problems to SANIJET’s customer service department.
Telephone: 877-934-0477 or 972-745-2283 Fax: 214-352-0348 E-mail: info@sanijet.com
Dealer Warranties: No dealer or distributor has any authority to bind SANIJET to any other warranty or any change or
addition to this warranty.
SOLE REMEDY / LIMITATION OF DAMAGES: THE REMEDY PROVIDED ABOVE UNDER “SCOPE OF COVERAGE” IS CUSTOMER’S EXCLUSIVE
REMEDY FOR ANY DEFECT OR MALFUNCTION OF THE PRODUCT. To the fullest extent allowed by law, SANIJET disclaims and
excludes liability for consequential and incidental damages including, but not limited to, loss of use, lost rentals, lost profits,
loss of business reputation, out of pocket expenses, damage to property other than the warranted product, mental anguish
and punitive damages. Some states limit or do not allow the exclusion or limitation of incidental or consequential
damages, so some or all of these limitations may not apply to you.
STATE LAW RIGHTS: This warranty gives you specific legal rights, and you may also have other rights which vary from
state to state. THE DURATION OF ANY IMPLIED WARRANTIES UNDER STATE LAW, INCLUDING THE IMPLIED WARRANTIES OF
MERCHANTABILITY AND FITNESS FOR A PARTICULAR PURPOSE, IS LIMITED TO THE WARRANTY PERIOD DESCRIBED ABOVE. Some
states do not allow limitations on how long an implied warranty lasts, so this limitation may not apply to you.
6200 Maple Avenue, Dallas, TX 75235 Tel: 877.934.0477 Fax: 214.352.0348 SANIJET.COM
16LIMITED COMMERCIAL WARRANTY
Pipeless Spa Baths
Products Covered: Spa baths manufactured by SANIJET and put to commercial use.
Persons Covered: The original purchaser for commercial use (Customer).
Warranty Period: One (1) year on all parts and components beginning on the date of original purchase for use or two
(2) months after the product leaves Sanijet’s facility, whichever comes first. Sanijet may require Customer to document the
date of original purchase and provide serial number(s) of the product(s).
Scope of Coverage: This warranty only covers problems reported to SANIJET during the warranty period. Coverage is
SUBJECT TO the exclusions below. If a tub shell manifests a defect or fails to properly perform under ordinary use within
the warranty period, SANIJET will repair or replace it at SANIJET’s election, but shall have no responsibility with respect to
removal, reinstallation or transport of the tub shell. If any other part or component manifests a defect or fails to properly
perform under ordinary use during the warranty period, SANIJET will provide repair or replacement parts or components
at its election. As a condition to warranty service, SANIJET may require Customer to return defective/malfunctioning parts
and may charge Customer for the repair or replacement parts or components subject to a full refund upon receipt of the
return parts and verification of the problem. THE REMEDY PROVIDED IN THIS SECTION IS CUSTOMER’S EXCLUSIVE REMEDY FOR
ANY DEFECT OR MALFUNCTION OF THE PRODUCT.
Shipping: SANIJET will pay freight on a least-cost basis to ship repair/replacement parts to destinations within the
continental United States.
Exclusions: This warranty does NOT cover a) metallic plated hardware, light bulbs or fading from exposure to direct
sunlight; b) failure, damage or defect caused by any of the following after the product leaves SANIJET’s factory: mishandling,
abuse, misuse, neglect, accident or natural disaster, normal wear and use that does not affect the product’s function; failure
to maintain the product as recommended by SANIJET (See Owner’s/Installation manual); or c) any part that has been altered
or tampered with, including but not limited to alteration or tampering with any labeling.
Making Claims: Report problems to SANIJET’s customer service department.
Telephone: 877-934-0477 or 972-745-2283 Fax: 214-352-0348 E-mail: info@sanijet.com
Dealer Warranties: No dealer or distributor has any authority to bind SANIJET to any other warranty or any change or
addition to this warranty.
SOLE REMEDY / LIMITATION OF DAMAGES: THE REMEDY PROVIDED ABOVE UNDER “SCOPE OF COVERAGE” IS CUSTOMER’S EXCLUSIVE
REMEDY FOR ANY DEFECT OR MALFUNCTION OF THE PRODUCT. TO the fullest extent allowed by law, SANIJET disclaims and
excludes liability for consequential and incidental damages including, but not limited to, loss of use, lost rentals, lost profits,
loss of business reputation, out of pocket expenses, damage to property other than the warranted product, mental anguish
and punitive damages. Some states limit or do not allow the exclusion or limitation of incidental or consequential
damages, so some or all of these limitations may not apply to you.
STATE LAW RIGHTS: This warranty gives you specific legal rights, and you may also have other rights which vary from
state to state. THE DURATION OF ANY IMPLIED WARRANTIES UNDER STATE LAW, INCLUDING THE IMPLIED WARRANTIES OF
MERCHANTABILITY AND FITNESS FOR A PARTICULAR PURPOSE, IS LIMITED TO THE WARRANTY PERIOD DESCRIBED ABOVE. Some
states do not allow limitations on how long an implied warranty lasts, so this limitation may not apply to you.
6200 Maple Avenue, Dallas, TX 75235 Tel: 877.934.0477 Fax: 214.352.0348 SANIJET.COM
17Product Specifications Are Subject To Change Without Notice.
SANIJET® has obtained applicable code listings generally available on a national basis for products of this type. It is the
responsibility of the installer/owner to determine specific local code compliance prior to installation of the product.
SANIJET® makes no representation or warranty regarding, and will not be responsible for, any code compliance.
NSF Protocol P182
Pipeless Hydrotherapy Jets
US Listed by IAPMO Research and Testing, Inc.
PC as meeting the requirements of the Uniform
Swimming Pool, Spa, and Hot Tub Code.
R
Standard for Hydromassage Bathtubs, UL 1795
Standard for Hydromassage Bathtub Appliances
CSA C22.2
For customer service please contact:
SANIJET ® Customer Service Department
Toll Free: 877-934-0477 Toll Free Fax: 214-352-0348 E-mail: info@sanijet.com
6200 MAPLE AVENUE DALLAS, TEXAS 75235
877.934.0477 SANIJ ET.COM
REV101123You can also read