Strato Pi UPS User Guide - Sfera Labs
←
→
Page content transcription
If your browser does not render page correctly, please read the page content below
Strato Pi UPS User Guide
February 2021
Revision 025

SPBU30X Strato Pi UPS board
SPMU30X Strato Pi UPS server with Raspberry Pi 3 Model B
SPMU30XP Strato Pi UPS server with Raspberry Pi 3 Model B+
SPMU30X41 Strato Pi UPS server with Raspberry Pi 4 Model B 1GB
SPMU30X42 Strato Pi UPS server with Raspberry Pi 4 Model B 2GB
SPMU30X44 Strato Pi UPS server with Raspberry Pi 4 Model B 4GB
SPMU30X48 Strato Pi UPS server with Raspberry Pi 4 Model B 8GB
Safety information                                                4
      Qualified personnel                                             4
      Hazard levels                                                   4
      Safety instructions                                             5
         General safety instructions                                  5
         Battery and external rechargeable battery                    5
    Introduction                                                      7
    Features                                                          8
    Usage and connections                                             9
      Device identification                                           9
      Hardware Installation                                          10
         Strato Pi UPS board                                         10
         Strato Pi UPS server                                        10
      The external UPS battery                                       10
      Replacing the RTC backup battery                               11
      Terminal block                                                 13
      Power supply                                                   14
      Auxiliary power supply output                                  15
      Dedicated GPIO pins                                            15
    Software installation and configuration                          16
      Installing the Strato Pi utility                               16
      Installing the Strato Pi kernel module                         16
      Installing the Real Time Clock software                        17
      Testing the Real Time Clock                                    17
      Configuring the serial port                                    18
    Using Strato Pi UPS                                              19
      Real Time Clock                                                19
      ATECC608A secure element                                       19
      Serial port                                                    19
      Buzzer                                                         21
      UPS                                                            21
      Hardware watchdog                                              21
      Power cycle                                                    22
      Advanced configuration                                         22
    Thermal considerations for Strato Pi UPS server                  23
    Block diagram                                                    26

1                                                     Strato Pi UPS User Guide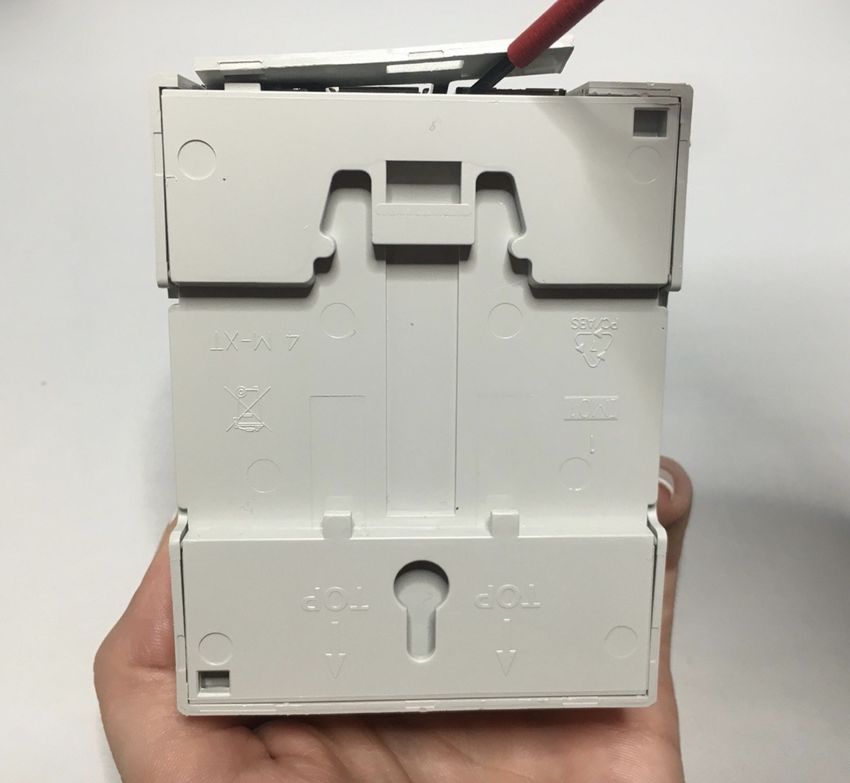
Technical specifications                                 27
    Dimensions                                               29
    Disposal                                                 30
    Installation and use restrictions                        30
      Standards and regulations                              30
      Safety instructions                                    30
      Set-up                                                 30
    Conformity Information                                   31
      EU                                                     31
      USA                                                    31
      CANADA                                                 32
      RCM AUSTRALIA / NEW ZEALAND                            32
    Compliance information for Raspberry Pi                  32
      EU                                                     32
      USA                                                    32
      CANADA                                                 32

2                                             Strato Pi UPS User Guide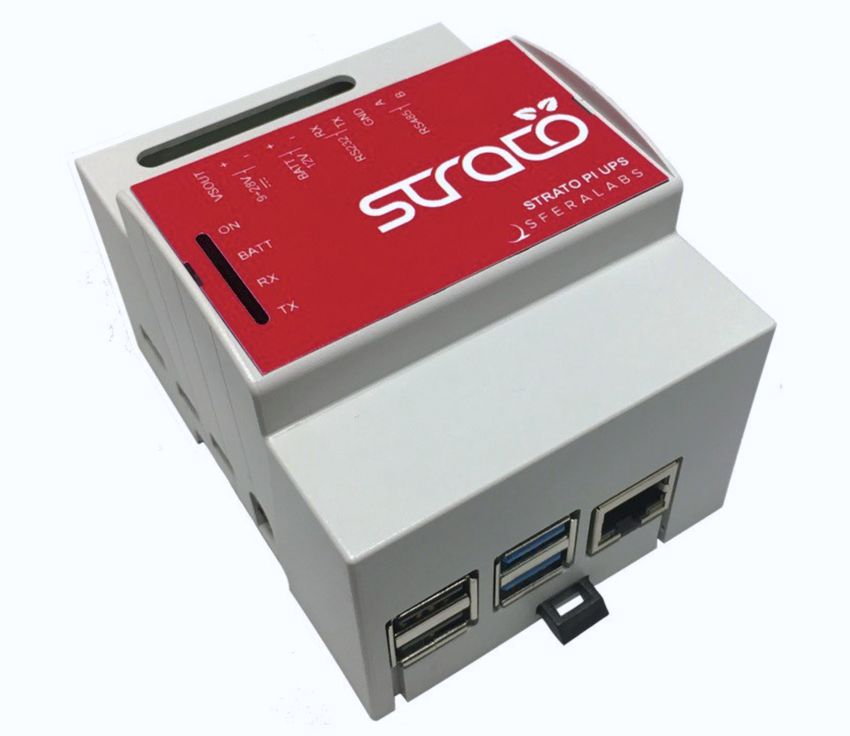
Be sure to always remove the power supply before connecting or
          disconnecting the Strato Pi UPS board to Raspberry Pi.
     Follow all applicable electrical safety standards, guidelines,
specifications and regulations for installation, wiring and operations of
                             Strato Pi UPS.
Carefully and fully read this Strato Pi UPS user guide before installation.

Strato Pi UPS is not authorised for use in safety-critical applications where a failure of the
 product would reasonably be expected to cause personal injury or death. Safety-critical
  applications include, without limitation, life support devices and systems, equipment or
   systems for the operation of nuclear facilities and weapons systems. Strato is neither
designed nor intended for use in critical military or aerospace applications or environments
and for automotive applications or environment. Customer acknowledges and agrees that
  any such use of Strato Pi UPS is solely at Customer's risk, and that Customer is solely
 responsible for compliance with all legal and regulatory requirements in connection with
                                           such use.

Sfera Labs S.r.l. may make changes to specifications and product descriptions at any time,
 without notice. The product information on the web site or materials is subject to change
                                      without notice.

    Please download and read the Sfera Labs Terms and Conditions document available at:
                                http://www.sferalabs.cc

Strato and Sfera Labs are trademarks of Sfera Labs S.r.l. Other brands and names may be
                             claimed as the property of others.

                 Copyright © 2015-2021 Sfera Labs S.r.l. All rights reserved.

3                                                                  Strato Pi UPS User Guide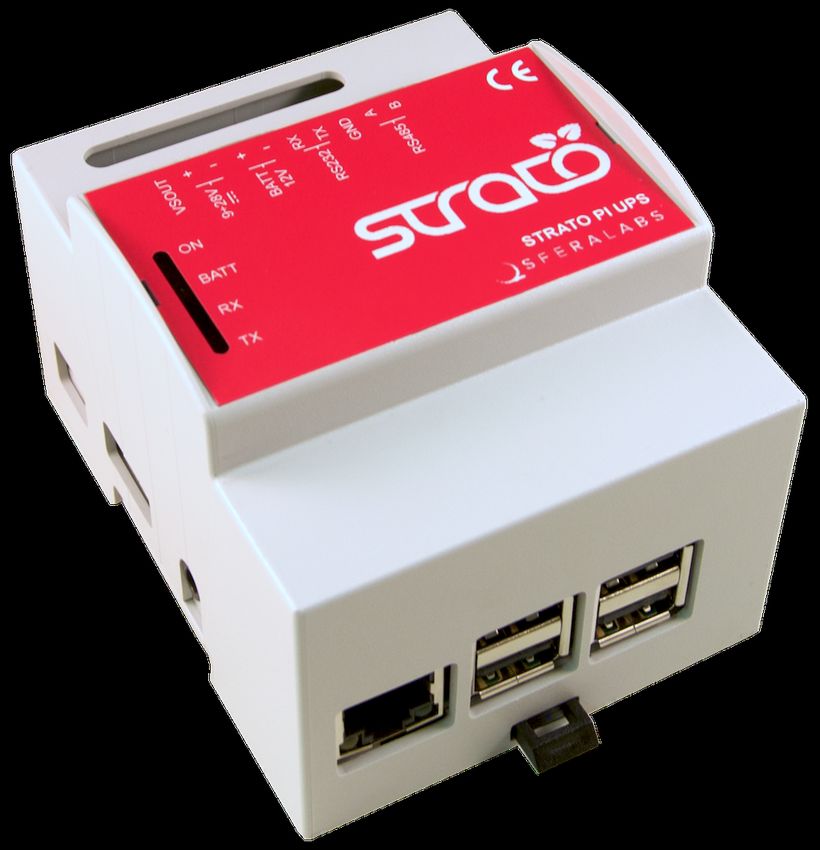
Safety information
Carefully and fully read this user guide before installation and retain it for future reference.

Qualified personnel
The product described in this manual must be operated only by personnel qualified for the
specific task and installation environment, in accordance with all relevant documentation
and safety instructions. A qualified person should be capable of fully identifying all
installation and operation risks and avoid potential hazards when working with this product.

Hazard levels
This manual contains information you must observe to ensure your personal safety and
prevent damage to property. Safety information in this manual are highlighted by the safety
symbols below, graded according to the degree of danger.

          DANGER
Indicates a hazardous situation which, if not avoided, will result in death or serious
personal injury.

          WARNING
Indicates a hazardous situation which, if not avoided, may result in death or serious
personal injury.

          CAUTION
Indicates a hazardous situation which, if not avoided, can result in minor or moderate
personal injury.

NOTICE
Indicates a situation which, if not avoided, can result in damage of property.

4                                                                    Strato Pi UPS User Guide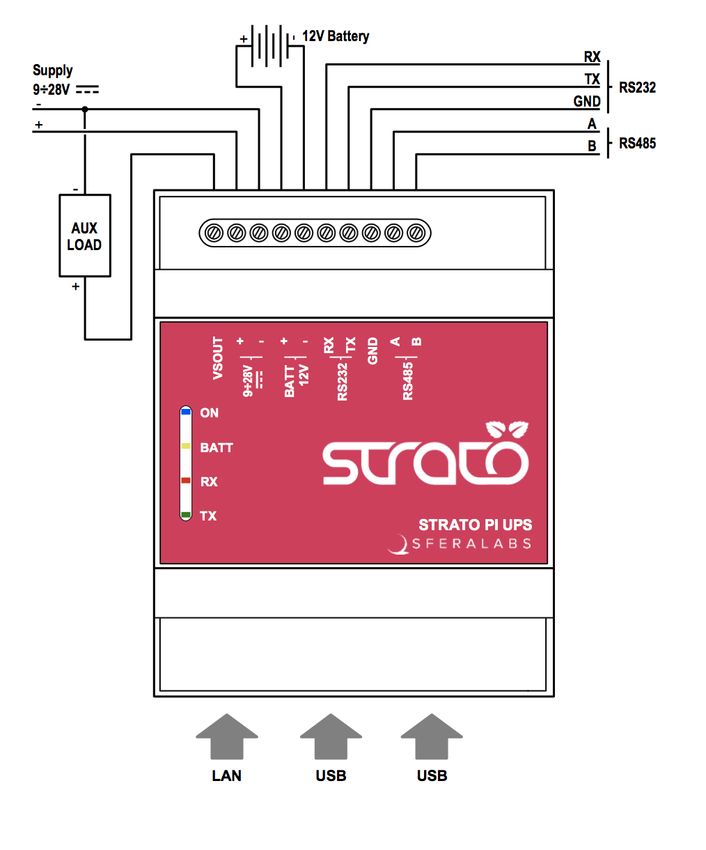
Safety instructions

General safety instructions
Protect the unit against moisture, dirt and any kind of damage during transport, storage
and operation. Do not operate the unit outside the specified technical data.
Never open the housing. If not otherwise specified, install in closed housing (e.g.
distribution cabinet). Earth the unit at the terminals provided, if existing, for this purpose.
Do not obstruct cooling of the unit. Keep out of the reach of children.

          WARNING
Life threatening voltages are present within and around an open control cabinet.
When installing this product in a control cabinet or any other areas where dangerous
voltages are present, always switch off the power supply to the cabinet or equipment.

          WARNING
Risk of fire if not installed and operated properly.
Follow all applicable electrical safety standards, guidelines, specifications and regulations
for installation, wiring and operations of this product.
The Raspberry Pi board could generate a substantial amount of heat when the software
forces the CPU and/or GPU to operate at high load levels. Ensure that the product is
properly installed and ventilated to prevent overheat.

NOTICE
The connection of expansion devices to this product may damage the product and other
connected systems, and may violate safety rules and regulations regarding radio
interference and electromagnetic compatibility.
Use only appropriate tools when installing this product. Using excessive force with tools
may damage the product, alter its characteristics or degrade its safety.

Battery and external rechargeable battery
This product uses a small lithium non-rechargeable battery to power its internal real time
clock (RTC). It also optionally uses an external rechargeable lead-acid battery for the
uninterruptible power supply.

5                                                                     Strato Pi UPS User Guide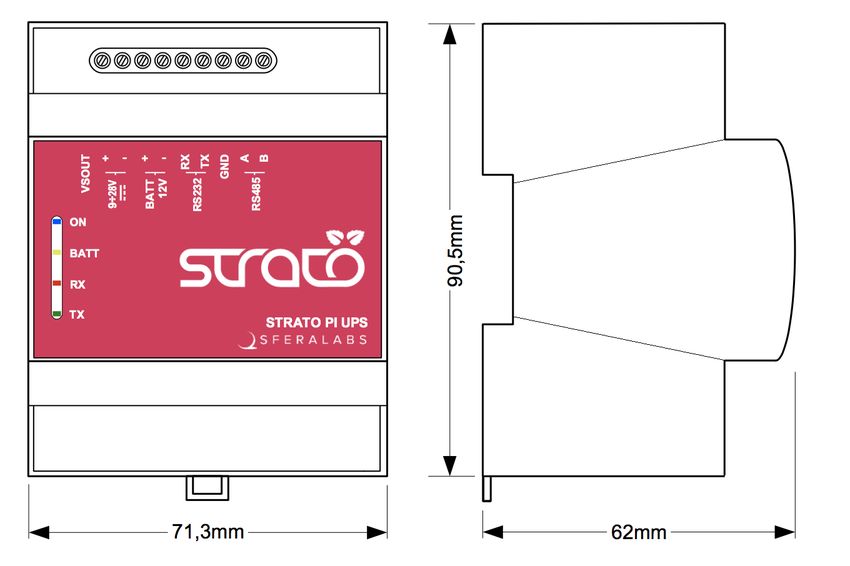
WARNING
Improper handling of lithium and lead-acid batteries can result in an explosion of the
batteries and/or release of harmful substances.
Worn-out or defective batteries can compromise the function of this product.
Replace the RTC lithium battery before it is completely discharged. The lithium battery
must be replaced only with an identical battery. See the "Replacing the RTC backup
battery" section for instructions.
Do not throw lithium batteries into fire, do not solder on the cell body, do not recharge, do
not open, do not short-circuit, do not reverse polarity, do not heat above 100°C and protect
from direct sunlight, moisture and condensation.
Only use a lead-acid battery with electrical ratings recommended in the technical
specifications for this product.
Follow the battery manufacturer's instructions when installing the external UPS battery (not
provided).
Dispose of used batteries according to local regulations and the battery manufacturer's
instructions.

6                                                                 Strato Pi UPS User Guide
Introduction
Strato Pi UPS enhances the Raspberry Pi Model B version 2, 3 and 4 with several
hardware features to make it suitable for use in professional applications where reliability
and service continuity are key requirements.
Strato Pi UPS is available as a bare board or fully assembled unit, including a Raspberry
Pi 3 Model B or B+ or Raspberry Pi 4 Model B, in a standard DIN-rail case. The assembled
unit is also available with the SPBF10X Strato Pi Fan active cooling option.
The information contained in this manual covers all versions, except where explicitly stated
otherwise. The bare board is called “Strato Pi UPS board”, while the assembled unit is
“Strato Pi UPS server”.

                       STRATO PI UPS WITH RASPBERRY PI 3 MODEL B+

                       STRATO PI UPS WITH RASPBERRY PI 4 MODEL B

7                                                                  Strato Pi UPS User Guide
Features Strato Pi UPS board and server: ✓ 9-28Vdc power supply, with surge and reverse polarity protection, and 2.2A resettable fuse ✓ up to 4.0A max current to the 5V Raspberry Pi power supply input pins (at 24Vdc) ✓ real time clock with replaceable CR1025 Lithium / Manganese Dioxide back-up battery ✓ standard RS-232 and RS-485 interfaces to the Raspberry Pi serial line, with opto- isolator and electrostatic discharge protection. ✓ on-board buzzer, connected to a GPIO pin of the Raspberry Pi board, for acoustic feedback ✓ hardware watchdog implemented in the Strato Pi board, fully independent from the Raspberry Pi, controlled via the GPIO pins of the Raspberry Pi board ✓ integrated boot loader for the Strato Pi micro-controller, allowing in-field firmware upgrades directly from the Raspberry Pi ✓ embedded Microchip ATECC608A secure element chip ✓ power supply and serial connections on a screw terminal block ✓ integrated uninterruptible power supply, with external lead-acid 12V battery ✓ 2.2A resettable fuse on battery input ✓ auxiliary power supply output voltage, to power external devices through Strato Pi UPS ✓ simple UPS status and control via the GPIO pins of the Raspberry Pi board ✓ on-board LEDs for power supply, battery operations status and serial line activity. Strato Pi UPS server only: ✓ pre-assembled and tested Raspberry Pi 3 Model B or B+ or Raspberry Pi 4 Model B with Strato Pi board in a standard 4 modules DIN rail case ✓ optional pre-assembled SPBF10X Strato Pi Fan active cooling temperature controlled high performance fan ✓ side access to HDMI and 3.5mm jack for audio and composite video ✓ access to all USB ports and Ethernet port (opposite to the power and serial terminal block). 8 Strato Pi UPS User Guide
Usage and connections

                           STRATO PI UPS CONNECTION DIAGRAM

Device identification
The device can be identified with the information provided in the rating and identification
plate, permanently attached to the side of the case.

                        EXAMPLE RATING AND IDENTIFICATION PLATE

9                                                                  Strato Pi UPS User Guide
Hardware Installation
Strato Pi UPS board
The Strato Pi UPS board is supplied with all connectors pre-installed. No soldering is
required. You should connect Strato Pi to Raspberry Pi through the GPIO connector. Use
appropriate turrets/spacers to firmly bolt the two boards together, ensuring that no
conductive part of one board touches any part of the other board.
Be particularly careful to ensure there is enough clearance between the Ethernet and USB
connectors and the bottom of Strato Pi’s circuit board.
NOTICE
The GPIO connector of the Strato Pi UPS board must be perfectly aligned to the
Raspberry Pi's GPIO pins. Turning on the Raspberry Pi and/or the Strato Pi UPS board
with the GPIO not correctly connected will damage both the Raspberry Pi and Strato Pi
UPS.
Strato Pi UPS server
The Strato Pi UPS server comes pre-assembled with a Raspberry Pi 3 Model B or B+ or
Raspberry Pi 4 Model B board, in a plastic standard DIN-rail case.
There is no need to open the case, unless a change in the RS-485 termination resistors is
required (see below).
The Micro SD card (not provided) can be inserted through a small opening on the side of
the case. Use a small pen or paper clip to gently push the card in its slot.
The external UPS battery
To take advantage of the UPS features of Strato Pi, you can connect an external lead acid
rechargeable battery to the BATT terminals of the Strato Pi UPS terminal block. See the
connection diagram above.
WARNING
Improper handling of lead acid batteries can result in an explosion of the batteries and/or
release of harmful substances.
Worn-out or defective batteries can compromise the function of this product.
Replace the battery every 5 years even if the battery is still working properly.
Only use a lead acid battery with electrical ratings recommended in the technical
specifications for this product (12V 1.2Ah max).
10 Strato Pi UPS User GuideReversing the battery polarity may damage the product and the battery.
Dispose of used batteries according to local regulations and the battery manufacturer's
instructions.
Follow the battery manufacturer's instructions when installing the external UPS battery (not
provided).
Replacing the RTC backup battery
Strato Pi UPS has a hardware real time clock with a dedicated long-life non-rechargeable
back-up battery.
Strato Pi UPS is shipped with a CR1025 Lithium / Manganese Dioxide (Li/MnO2) battery
installed.
The battery is only used to power the RTC chip when the main or UPS battery power is not
available (when the Raspberry Pi is off). Depending on operating conditions it should last
up to two years if the Strato Pi board is not powered, more if the Strato Pi UPS receives
external power.
WARNING
Improper handling of lithium batteries can result in an explosion of the batteries and/or
release of harmful substances.
Worn-out or defective batteries can compromise the function of this product.
KEEP OUT OF REACH OF CHILDREN. Swallowing may lead to serious injury or death in
as little as 2 hours due to chemical burns and potential perforation of the esophagus.
Immediately see doctor.
Replace the RTC lithium battery before it is completely discharged. Replace the battery
every 5 years even if the battery is still working properly. The lithium battery must be
replaced only with an identical CR1025 Lithium / Manganese Dioxide (Li/MnO2) battery.
Do not throw lithium batteries into fire, do not solder on the cell body, do not recharge, do
not open, do not short-circuit, do not reverse polarity, do not heat above 100°C and protect
from direct sunlight, moisture and condensation.
Dispose of used batteries according to local regulations and the battery manufacturer's
instructions.
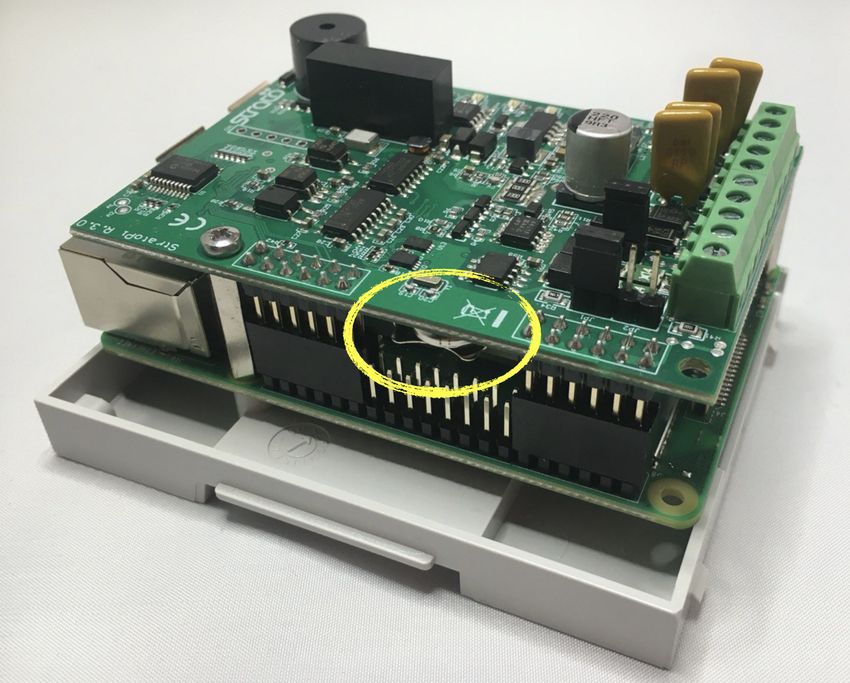
The RTC backup battery holder is soldered to the bottom layer of the circuit board,
between the GPIO connectors. In the Strato Pi UPS server, the battery is not accessible
from the outside. You should first remove the case top body to gain access to the Strato Pi
UPS circuit board.
NOTICE
Before opening the Strato Pi UPS case, disconnect all power sources, any connection to
external devices, including USB cables, and disconnect the UPS external battery.
11 Strato Pi UPS User GuideUse a non-conductive pin or small tool to help extract the battery from its holder. Insert the
new battery with a gentle push. You don't need tools to insert the battery. The battery is
held into place by a spring contact.
Be sure to insert the battery so that the positive (+) terminal of the battery is in contact with
the outer body of the battery holder, and the negative (-) terminal is in contact with the
contact pad of the circuit board, as shown in the photo below.
Reversing the battery polarity may damage the product.
The real time clock will reset its time immediately when the RTC backup battery is
disconnected.
Follow these steps, in the exact order, to open the case and replace the battery:
1. Remove the microSD card (the card will be damaged if you open the case with the
card still inserted)
2. Remove the black plastic DIN rail hook
3. With a small flat screwdriver gently separate the bottom case and boards assembly
from the top cover. Be careful to avoid damage to the USB ports metal frame. Units
with the Raspberry Pi 4 Model B have a different arrangement of the top cover cuts
around the USB and Ethernet ports. Do not flex that part to much to avoid permanent
deformation of damage of the enclosure
4. Use a non-conductive pin or small tool to help extract the battery from its holder
5. Insert the new battery with a gentle push. Respect the battery polarity
6. Replace the case bottom applying a gentle pressure on the corners
7. Replace the black plastic DIN rail hook
8. Insert the microSD card.
RTC BACKUP BATTERY
12 Strato Pi UPS User GuideOPENING THE CASE OF RASPBERRY PI 4 MODEL B MODELS
Terminal block
Strato Pi UPS has a 10 positions terminal block for power, battery, auxiliary power supply
output and serial connections.
The maximum conductor cross section is 1.5 mm2 (16 AWG), or 0.5 mm2 when using
ferrules (highly recommended). Recommended stripping length is 5 mm. Screw thread is
M2. Never exceed 0.25 Nm torque when tightening the screws.
THE STRATO PI UPS CIRCUIT BOARD
13 Strato Pi UPS User GuidePower supply
Strato Pi UPS can be powered with DC voltage only:
✓ DC: nominal voltage range 9.0V to 28.0V.
Respect the correct polarity shown in the schematic diagram (+ -). The power supply
circuit implements reverse polarity protection using an auto resetting fuse and surge
protection up to ±1000V/2ohms 1.2/50μs.
A blue on-board LED, also visible through the front panel of the DIN-rail case, is lit when
power supply is available.
When a Strato Pi UPS board is used, never connect the Raspberry Pi micro-USB power
plug.
The Strato Pi UPS power supply stage is optimised to deliver up to 4A at 5V to the
Raspberry Pi. Because Strato Pi has a 2.2A resettable fuse (polyfuse) on the power supply
line, the maximum current that its regulator can deliver is also limited by this fuse, and
depends on the input voltage. The following table lists the typical measured output current
of the power supply stage at different input voltages and the corresponding input current.
9V 12V 24V
Iout Vout Iin Iin Iin
0.1 5.09 0.13 0.10 0.08
1.0 5.05 0.71 0.52 0.28
1.3 5.04 0.91 0.67 0.35
1.5 5.03 1.05 0.76 0.39
1.8 5.01 1.27 0.91 0.46
2.0 5.00 1.42 1.01 0.51
2.5 4.98 1.80 1.27 0.64
2.7 4.97 1.94 1.38 0.68
2.8 4.96 FUSE 1.43 0.71
3.0 4.95 1.54 0.76
3.5 4.92 1.88 0.89
3.7 4.91 FUSE 0.94
4.0 4.90 1.02
4.2 4.88 1.08
4.3 4.85 1.10
4.4 REG
STRATO PI UPS POWER SUPPLY STAGE TYPICAL IN/OUT VOLTAGE AND CURRENT
14 Strato Pi UPS User GuideA 2.2A resettable fuse is also used to protect the battery input. When Strato Pi UPS works
under battery power, the maximum 5V current delivered to the Raspberry Pi should not
exceed 3.5A when the battery is fully charged.
Auxiliary power supply output
Strato Pi UPS has an auxiliary power supply output pin, labeled VSOUT, to power external
devices.
The aux power supply output is connected to the main power supply input, and switched to
the battery input when there is no power on the main power supply input.
It is not a regulated voltage output and should only be used to power devices that accept a
wide range power supply, compatible to both the battery voltage and the power supply
voltage you are using.
When the Raspberry Pi is turned off by the Strato Pi UPS controller, the aux power supply
output is also switched off.
The maximum current drawn by the loads connected to VSOUT is limited by the current
drawn by the Raspberry Pi, the power supply or battery input voltage, and the 2.2A
resettable fuses that limit the total amount of input current.
Dedicated GPIO pins
Strato Pi uses some of the Raspberry Pi’s GPIO pins. These pins should not be used for
other functions.
GPIO pin Direction Description
GPIO2/SDA I2C SDA line for the real time clock
GPIO3/SCL I2C SCL line for the real time clock
GPIO14/TXD out serial TX line
GPIO15/RXD in serial RX line
GPIO5 out cycle high/low for watchdog heartbeat
GPIO6 out set to high to enable the watchdog
GPIO12 in high on watchdog timeout
GPIO16 out set to high to enable the shutdown cycle
GPIO20 out set to high to sound the buzzer
GPIO26 in high when on battery power
GPIO13 out soft serial TX for Strato MCU configuration
GPIO19 in soft serial RX for Strato MCU configuration
15 Strato Pi UPS User GuideSoftware installation and configuration
All features of Strato Pi UPS are controlled via dedicated GPIO, the I2C bus and a soft
serial RX/TX interface to the embedded micro-controller and can be used with most
operating systems and programming languages.
The following software installation notes are based on the Raspbian operating system.
Installing the Strato Pi utility
The Strato Pi utility is a simple command-line script to control Strato Pi’s buzzer, watchdog
and UPS functions.
Run the following commands to download and install the Strato Pi utility:
$ cd /usr/local/bin
$ sudo wget http://sferalabs.cc/files/strato/strato
$ sudo chmod 755 strato
You can run the Strato Pi utility without arguments to print its options:
$ strato
Usage: strato beep on|off|length_millis|length_millis pause_millis repeats
strato watchdog enable|disable|heartbeat|timeout
strato shutdown
strato battery
All commands should be run as superuser, so always use sudo to run strato.
Installing the Strato Pi kernel module
The Strato Pi kernel module can be used to easily access all of Strato Pi control features
via a sysfs file system.
Run the following commands to download and install the Strato Pi kernel module (see
https://github.com/sfera-labs/strato-pi-kernel-module for detailed installation instructions):
$ sudo apt install git
$ git clone --depth 1 --recursive https://github.com/sfera-labs/strato-pi-
kernel-module.git
$ sudo apt install raspberrypi-kernel-headers
$ cd strato-pi-kernel-module
$ make
$ sudo make install
To have the module automatically loaded at boot add stratopi in /etc/modules:
$ sudo sh -c "echo 'stratopi' >> /etc/modules"
Optionally, to be able to use the /sys/ files not as super user, create a new group "stratopi"
and set it as the module owner group by adding an udev rule:
$ sudo groupadd stratopi
$ sudo cp 99-stratopi.rules /etc/udev/rules.d/
Then add your users to the group, e.g., for user "pi", and reboot:
$ sudo usermod -a -G stratopi pi
$ sudo reboot
You will find all the available devices under the directory /sys/class/stratopi/.
16 Strato Pi UPS User GuideInstalling the Real Time Clock software
The RTC is based on the Microchip MCP79410 module and is connected to the Raspberry
Pi via its I2C serial bus.
Before downloading the installation utility, you should enable I2C and install the “i2c-tools”
package.
To enable I2C, run the “raspi-config” configuration utility:
$ sudo raspi-config
Then go to “Advanced Options”, “I2C” and select “yes” to enable the I2C interface, then
reboot your Raspberry Pi.
To install the “i2c-tools” package:
$ sudo apt-get update
$ sudo apt-get install i2c-tools
With these prerequisite installs completed, you should download and run Strato Pi’s
installation script:
$ cd
$ wget http://sferalabs.cc/files/strato/rtc-install
$ chmod 755 rtc-install
$ sudo ./rtc-install
If the script completes with no errors, delete the installation script and reboot:
$ rm rtc-install
$ sudo reboot
Testing the Real Time Clock
Assuming you are connected to the Internet and your Pi was able to reach a public NTP
(Network Time Protocol) server, you should see the current date and time using the “date”
command:
$ date
Thu Dec 10 18:02:32 CET 2015
Also check the date and time stored in the hardware clock:
$ sudo hwclock -r
Thu 10 Dec 2015 06:03:01 PM CET -0.546570 seconds
If the returned date and time is not correct, or “hwclock” returns an error, use the “-w”
option to set the hardware clock to the current time:
$ sudo hwclock -w
Then recheck the time stored in the hardware clock to ensure it matches. Linux may have
failed to automatically update the hardware clock after the last reboot if its internal
registers contained invalid values.
If the RTC still doesn’t work, you should check if the Pi sees the RTC chip on the I2C bus.
Run these two commands:
$ sudo modprobe -r rtc_ds1307
$ sudo i2cdetect 1
17 Strato Pi UPS User GuideWARNING! This program can confuse your I2C bus, cause data loss and worse!
I will probe file /dev/i2c-1.
I will probe address range 0x03-0x77.
Continue? [Y/n]
0 1 2 3 4 5 6 7 8 9 a b c d e f
00: -- -- -- -- -- -- -- -- -- -- -- -- --
10: -- -- -- -- -- -- -- -- -- -- -- -- -- -- -- --
20: -- -- -- -- -- -- -- -- -- -- -- -- -- -- -- --
30: -- -- -- -- -- -- -- -- -- -- -- -- -- -- -- --
40: -- -- -- -- -- -- -- -- -- -- -- -- -- -- -- --
50: -- -- -- -- -- -- -- 57 -- -- -- -- -- -- -- --
60: 60 -- -- -- -- -- -- -- -- -- -- -- -- -- -- 6f
70: -- -- -- -- -- -- -- —
You should see “6f” in the address list. This is the address of the RTC.
If the RTC address is detected, double check your software installation for issues at the
Linux modules level.
Run the “lsmod” command to list the loaded modules and check that “i2c_dev” and
“i2c_bcm2708” are both listed.
If the RTC address is not detected, the cause could be a hardware problem, on the Strato
board or the Raspberry Pi. If you have another Pi or Strato board, try swapping them to
isolate the faulty board.
Configuring the serial port
On Raspberry Pi 3 and 4, the main UART (ttyAMA0) is used by default for Bluetooth, and
the TX/RX pins on the GPIO connector are controlled by a limited function Mini UART
(ttyS0).
To route the main UART to the RX/TX pins that are connected to the Strato Pi serial ports
you could disable Bluetooth. Edit /boot/config.txt and add these lines at the end of the file:
# Disable Bluetooth
dtoverlay=pi3-disable-bt
You may also run the following command to disable the Bluetooth HCI UART driver:
sudo systemctl disable hciuart
Alternatively, you may use the pi3-miniuart-bt overlay to switch Bluetooth to use the mini
UART (ttyS0), and restore ttyAMA0 to GPIOs 14 and 15. Refer to the Raspberry Pi UARTs
documentation page1 for additional information.
If you are using Strato Pi’s serial ports for your applications, you also need to disable the
Linux serial console, otherwise it will send console data to the serial port.
Disable the ttyAMA0 console service:
sudo systemctl disable serial-getty@ttyAMA0.service
Edit the /boot/cmdline.txt file and delete the serial console configuration:
console=serial0,115200
1 https://www.raspberrypi.org/documentation/configuration/uart.md
18 Strato Pi UPS User GuideUsing Strato Pi UPS
Real Time Clock
Strato Pi UPS has a hardware real time clock with a dedicated long-life non-rechargeable
back-up battery.
Once the RTC modules and configuration files are properly installed, you will simply use
the date and time commands to control the hardware clock.
ATECC608A secure element
Strato Pi UPS embeds the ATECC608A secure element chip from Microchip. The
ATECC608A is connected to the Raspberry Pi Compute Module via the I2C bus (default
address: 0x60).
Its key features are:
✓ Cryptographic co-processor with secure hardware-based key storage
✓ Protected storage for up to 16 Keys, certificates or data
✓ Hardware support for asymmetric sign, verify, key agreement – ECDSA: FIPS186-3
Elliptic Curve Digital Signature
✓ ECDH: FIPS SP800-56A Elliptic Curve Diffie-Hellman
✓ NIST standard P256 elliptic curve support
✓ Hardware support for symmetric algorithms
✓ SHA-256 & HMAC hash including off-chip context save/restore
✓ AES-128: encrypt/decrypt, Galois field multiply for GCM
✓ Networking key management support
✓ Turnkey PRF/HKDF calculation for TLS 1.2 & 1.3
✓ Ephemeral key generation and key agreement in SRAM – Small message
encryption with keys entirely protected
✓ Secure boot support
✓ Full ECDSA code signature validation, optional stored digest/signature –
optional communication key disablement prior to secure boot
✓ Encryption/Authentication for messages to prevent on-board attacks
✓ Internal high-quality FIPS 800-90 A/B/C Random Number Generator (RNG)
✓ Two high-endurance monotonic counters
✓ Guaranteed unique 72-bit serial number.
Serial port
Strato Pi UPS uses the Raspberry Pi standard UART TX/RX pins on the GPIO connector
to implement a standard serial port with support for both RS-232 and RS-485.
19 Strato Pi UPS User GuideSimply connect the RS-232 RX, TX and GND lines to the RS-232 posts of the Strato Pi
terminal block or the RS-485 A, B and GND to the RS-485 posts of the terminal block.
Never connect both RS-232 and RS-485 lines to Strato Pi. Strato implements a single
serial port, not two.
Both interfaces are isolated from the Raspberry Pi’s serial lines using dedicated opto-
couplers and from the main power supply with a high-efficiency DC-DC converter. This
configuration should prevent ground loops between devices connected through the serial
lines.
The RS-485 TX/RX switching is implemented automatically in the Strato Pi’s micro-
controller, based on speed and number of bits detection, and is completely transparent to
the software controlling the UART on Raspberry Pi. See "Advanced configuration" below
for alternative configurations.
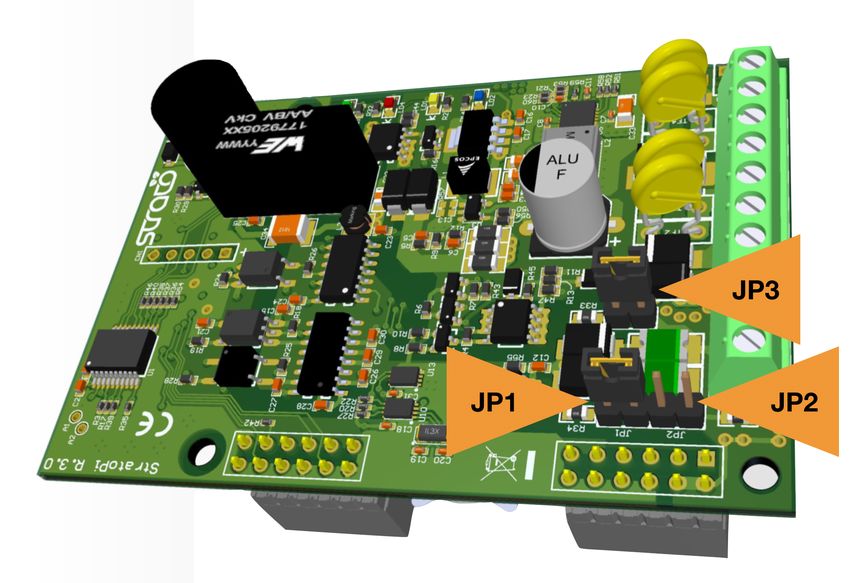
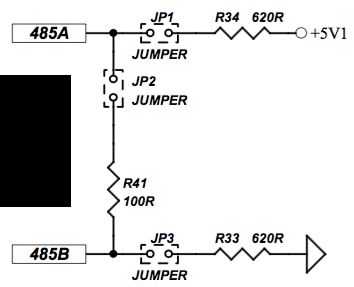
The RS-485 line has 620 Ohm pull-up and pull-down resistors on lines A and B. The
biasing resistors ensure that, during idle periods the data lines are kept at a stable voltage
level and prevent false triggering of receiver input.These resistors can be disabled by
removing jumpers JP1 and JP3 respectively.
A 100 Ohm termination resistor between A and B can be enabled installing jumper JP2.
RS-485 JUMPERS SCHEMATIC
RS-485 JUMPERS POSITION
20 Strato Pi UPS User GuideBuzzer Strato Pi UPS has an on-board buzzer that can be controlled using GPIO20. Simply set GPIO20 to high to emit a continuous sound, and back to low to stop. The buzzer is not intended to emit sound indefinitely and could be damaged doing so. Buzzer on continuously: $ sudo strato beep on Buzzer off: $ sudo strato beep off Buzzer on for 500 milliseconds: $ sudo strato beep 500 Buzzer on for 500 milliseconds, followed by 100 milliseconds pause, repeated three times: $ sudo strato beep 500 100 3 UPS When an external lead-acid rechargeable battery is connected to the Strato Pi UPS board, the Raspberry Pi will remain powered by the Strato Pi board when the main power supply fails, as long as there is enough energy in the battery. When power is available, the external rechargeable battery is slowly charged with a 30mA current. Battery operations status is visually notified with an on-board LED and can be checked reading Raspberry Pi's GPIO26 pin. After being powered off (see "Power cycle" below), the Strato Pi UPS board will supply power to the Raspberry Pi only when the main power source is restored. Starting from a power off condition, the Raspberry Pi will not receive power if only the back-up battery is connected to the Strato Pi board. See "Advanced configuration" below for alternative configurations. To print “1” if Strato Pi is operating from the battery, or “0” if main power is present: $ sudo strato battery; echo $? Hardware watchdog Strato Pi UPS implements a dedicated hardware watchdog circuit that can be used to perform a full power cycle of the Raspberry Pi. The watchdog is normally disabled. To enable it, set GPIO6 pin to high. While GPIO6 is high, the Strato Pi controller will watch for state changes of the GPIO5 heartbeat pin. You should ensure that GPIO5 flips its state between high and low faster than every 60 seconds. 21 Strato Pi UPS User Guide
If the Strato Pi UPS controller doesn’t see GPIO5 changing state for more than 60
seconds, it will initiate a shutdown procedure, rising the GPIO12 timeout pin to high, to
signal that a watchdog timeout has occurred.
If possible, you should immediately initiate a software shutdown on Raspberry Pi, and set
the GPIO16 shutdown pin to high. When GPIO16 is set to high or 60 seconds after the
timeout, Strato Pi will wait 60 seconds more, then power cycle the Raspberry Pi.
Note that Strato Pi UPS will power cycle the Raspberry Pi even if GPIO16 is not set high.
In this case the power cycles occurs 120 seconds after the heartbeat timeout.
See "Advanced configuration" below for alternative configurations.
Enable the watchdog:
$ sudo strato watchdog enable

Disable the watchdog:
$ sudo strato watchdog disable

Send the heartbeat:
$ sudo strato watchdog heartbeat

Print “1” if the watchdog timeout is expired, “0” if not:
$ sudo strato watchdog timeout; echo $?

Power cycle
You can start a delayed power cycle by rising Raspberry Pi’s GPIO16 pin.
When GPIO16 is set to high, Strato Pi UPS will wait 60 seconds and then power off the Pi
board for 5 seconds.
The power cycle also affects the VSOUT auxiliary power supply output.
See "Advanced configuration" below for alternative configurations.

To initiate a delayed power off cycle:
$ sudo strato shutdown

Advanced configuration
The Strato Pi UPS logic controller can be configured from the Raspberry Pi to change the
default behavior and timing parameters of the hardware watchdog, the UPS, and the
power cycle functionalities.
The RX/TX switching mode (TX-Enable control) of the RS-485 serial port is also
configurable. Other than the default automatic switching, passive mode as well as fixed
serial parameters settings are available.
These configuration parameters can be accessed using the Strato Pi kernel module or
implementing the underlying ASCII-based serial protocol described in the "Strato Pi Logic
Controller Advanced Configuration Guide" document.

22                                                                Strato Pi UPS User Guide
Thermal considerations for Strato Pi UPS server
The Raspberry Pi draws power and generates heat proportionally to CPU and GPU load.
The Strato Pi main regulator also generates heat proportionally to the total amount of
current that it has to supply to the Raspberry and, if present, external devices.
The thermal behaviour of Strato Pi UPS server is dynamic and affected by operating
conditions and the external environment temperature.
The Raspberry Pi CPU has the ability to throttle down its clock speed once a certain core
temperature is reached. This prevents CPU overheating, also limiting the temperature
inside the enclosure, when the CPU load is high for a significant amount of time.
The following charts show the thermal behaviour of Strato Pi UPS server in different
conditions, in a typical installation with the device under test installed in a standard, not
ventilated DIN cabinet:
• 35C and 45C ambient temperature (the ambient temperature is measured inside the DIN
  cabinet, so it is the actual air temperature surrounding the Strato Pi UPS server
  enclosure)
• Raspberry Pi 3 Model B+ and Raspberry Pi 4 Model B2
• very low CPU load compared to very high load (all four cores loaded at 100%).
In all cases the Raspberry Pi 4 Model B runs significantly warmer than the Raspberry Pi 3
Model B+. Unless the ambient temperature is low and ventilation is optimal, reducing the
CPU clock speed of the Pi 4 would be highly advisable.
Strato Pi UPS server is also available with the SPBF10X Strato Pi Fan active cooling
option.
The effectiveness of the Strato Pi Fan depends on several factors, including the external
environment conditions, CPU/GPU load, and other electrical loads.
In general terms, the fan will significantly increase the airflow inside the enclosure, and
improve heat transfer away from the CPU and the other nearby components on the
Raspberry Pi board.
The CPU will run cooler than without Strato Pi Fan, and it will take longer and higher loads
to reach its throttling limits.
Under ideal conditions, Strato Pi Fan may reduce both the CPU temperature and the
average air temperature inside the enclosure by up to 15 °C.
Refer to the SPBF10X Strato Pi Fan User Guide for additional information.

2All tests performed with Raspbian Buster Lite and, on Raspberry Pi 4, VL805 firmware version
000137ab.

23                                                                   Strato Pi UPS User Guide
35C AMBIENT TEMPERATURE, LOW CPU LOAD

     35C AMBIENT TEMPERATURE, HIGH CPU LOAD

24                                      Strato Pi UPS User Guide
45C AMBIENT TEMPERATURE, LOW CPU LOAD
45C AMBIENT TEMPERATURE, HIGH CPU LOAD
25 Strato Pi UPS User GuideBlock diagram
STRATO PI UPS BLOCK DIAGRAM
26 Strato Pi UPS User GuideTechnical specifications3
Power supply 9-28 V⎓ (VDC)
Reverse polarity protection with 2.2 A resettable
fuse. Surge protection up to ±1000V/2ohms
1.2/50μs
Battery input 12 V lead acid battery (not provided).
Suggested capacity: 1.2 Ah. Reverse polarity
protection with 2.2 A resettable fuse. Surge
protection up to ±500V/2ohms 1.2/50μs
UPS battery maximum charge voltage 15 V
UPS battery charge current 30...100 mA
Voltage threshold for switching to battery mode 7.2 V, 0.2 V hysteresis
Current consumption at VS+ 12 V⎓ low CPU load: 320 mA
including Raspberry Pi 4, with Ethernet and RS-485 100% CPU load, before throttling: 590 mA
connected, no USB devices 100% CPU load, throttled: 500 mA
SPBF10X fan option, add: 50mA
Actual current consumption may vary based on
working conditions
Current consumption at VS+ 24 V⎓ low CPU load: 190mA
including Raspberry Pi 4, with Ethernet and RS-485 100% CPU load, before throttling: 320mA
connected, no USB devices 100% CPU load, throttled: 260mA
SPBF10X fan option, add: 25mA
Actual current consumption may vary based on
working conditions
Raspberry platform compatibility Pi 4 Model B
Pi 3 Model B+
Pi 3 Model B
Pi 2 Model B
(tested with Pi 4 Model B for regulatory compliance)
Serial communication ports RS-485 Half-Duplex with automatic data direction
management
RS-232 Full-Duplex
Baud Rates on COMM ports 1200 to 115200
ESD-Protection Voltage on RS-232 TX/RX ±15 kV human body model
±8 kV contact discharge
ESD-Protection Voltage on RS-485 A/B ±15 kV human body model
±8 kV contact discharge
Surge protection on RS-485 A/B Surge protection up to ±500V/2ohms 1.2/50μs;
600 W peak pulse power capability at 10/1000μs
waveform
Fail safe feature on RS-485 Yes
3All tests performed with Raspbian Buster Lite and, on Raspberry Pi 4, VL805 firmware version
000137ab.
27 Strato Pi UPS User GuideElectromagnetic immunity compliance EN 61000-4-2 (ESD)
EN 61000-4-3 (Radiated RF Field)
EN 61000-4-4 (Burst/fast transient)
EN 61000-4-5 (Surge)
EN 61000-4-6 (Conducted)
EN 61000-4-8 (Power frequency magnetic field)
Internal RTCC circuit with backup lithium battery.
Only use CR1025 Lithium / Manganese Dioxide (Li/
MnO2) batteries.
Real time clock
Expected battery life without main power supply:
~2 years
Housing standard 4M for DIN rail
Strato Pi UPS board only: -20…+70 °C
Operating temperature Strato Pi UPS server: -20…+50 °C
Strato Pi UPS server with SPBF10X: -20…+65 °C
Storage temperature -30…+70 °C
Protection degree IP20
Fan noise (with SPBF10X fan option) 23.6 dBA
Strato Pi UPS board: 35 g
Weight Strato Pi UPS server: 155 g
Strato Pi UPS server with SPBF10X option: 165 g
28 Strato Pi UPS User GuideDimensions
DIMENSIONS (mm)
29 Strato Pi UPS User GuideDisposal
Waste Electrical & Electronic Equipment
(Applicable in the European Union and other European countries with
separate collection systems). This marking on the product, accessories or
literature indicates that the product should not be disposed of with other
household waste at the end of their working life. To prevent possible harm to
the environment or human health from uncontrolled waste disposal, separate
these items from other types of waste and recycle them responsibly to
promote the sustainable reuse of material resources. Household users
should contact either the retailer where they purchased this product, or their local
government office, for details of where and how they can take these items for
environmentally safe recycling. This product and its electronic accessories should not be
mixed with other commercial wastes for disposal.
Strato Pi UPS contains a small non rechargeable manganese dioxide lithium coin battery.
In the Strato Pi UPS server, the battery is not accessible from the outside. You should first
remove the case top body to gain access to the Strato Pi UPS circuit board. Always
remove the battery before disposing of this product.
Installation and use restrictions
Standards and regulations
The design and the setting up of electrical systems must be performed according to the
relevant standards, guidelines, specifications and regulations of the relevant country. The
installation, configuration and programming of the devices must be carried out by trained
personnel.
The installation and wiring of connected devices must be performed according to the
recommendations of the manufacturers (reported on the specific data sheet of the product)
and according to the applicable standards.
All the relevant safety regulations, e.g. accident prevention regulations, law on technical
work equipment, must also be observed.
Safety instructions
Carefully read the safety information section at the beginning of this document.
Set-up
For the first installation of the device proceed according to the following procedure:
✓ make sure all power supplies and the external battery are disconnected
✓ install and wire the device according to the schematic diagrams on the specific product
user guide
✓ after completing the previous steps, switch on the power supply and other related
circuits.
30 Strato Pi UPS User GuideConformity Information
EU
This device complies with the following applicable European Community harmonised
standards:
✓ 2014/30/EU - Electromagnetic Compatibility Directive (EMC)
✓ 2011/65/EU and 2015/863/EU - Restriction of the use of certain hazardous substances
in electrical and electronic equipment (RoHS)
The following harmonised standards have been used to demonstrate conformity to these
directives:
✓ EN61000-6-2:2019 - EMC Immunity standard for industrial environments
✓ EN 61000-6-3:2007/A1:2011/AC:2012 - EMC Emission standard for residential,
commercial and light-industrial environments
The declaration of conformity is available at: https://www.sferalabs.cc
USA
This equipment has been tested and found to comply with the limits for a Class B digital
device, pursuant to part 15 of the FCC Rules. These limits are designed to provide
reasonable protection against harmful interference in a residential installation. This
equipment generates, uses and can radiate radio frequency energy and, if not installed
and used in accordance with the instructions, may cause harmful interference to radio
communications. However, there is no guarantee that interference will not occur in a
particular installation. If this equipment does cause harmful interference to radio or
television reception, which can be determined by turning the equipment off and on, the
user is encouraged to try to correct the interference by one or more of the following
measures:
• Reorient or relocate the receiving antenna
• Increase the separation between the equipment and receiver
• Connect the equipment into an outlet on a circuit different from that to which the
receiver is connected
• Consult the dealer or an experienced radio/TV technician for help.
Shielded cables must be used with this equipment to maintain compliance with FCC
regulations.
This device complies with Part 15 of the FCC Rules. Operation is subject to the following
two conditions: (1) this device may not cause harmful interference, and (2) this device
must accept any interference received, including interference that may cause undesired
operation.
31 Strato Pi UPS User GuideCANADA This Class B digital apparatus complies with Canadian ICES-003. Cet appareil numérique de la classe B est conforme à la norme NMB-003 du Canada. RCM AUSTRALIA / NEW ZEALAND This product meets the requirements of the standard EN 61000-6-3:2007/A1:2011/ AC:2012 - Emission for residential, commercial and light-industrial environments. Compliance information for Raspberry Pi Strato Pi UPS model SPMU30X contains a standard Raspberry Pi 3 Model B single board computer. Strato Pi UPS model SPMU30XP contains a standard Raspberry Pi 3 Model B+ single board computer. Strato Pi UPS model SPMU30X41, SPMU30X42, SPMU30X44, SPMU30X48 contain a standard Raspberry Pi 4 Model B single board computer. These boards have WiFi and Bluetooth radios. They are user accessible and replaceable. EU Raspberry Pi 3 Model B, Raspberry Pi 3 Model B+ and Raspberry Pi 4 Model B are in conformity with the essential requirements and other relevant requirements of the Radio Equipment Directive 2014/53/EU. USA Raspberry Pi 3 Model B FCC IDENTIFIER: 2ABCB-RPI32 Raspberry Pi 3 Model B+ FCC IDENTIFIER: 2ABCB-RPI3BP Raspberry Pi 4 Model B FCC IDENTIFIER: 2ABCB-RPI4B The antenna(s) used for this transmitter must be installed to provide a separation distance of at least 20 cm from all persons and must not be colocated or operating in conjunction with any other antenna or transmitter, except in accordance with FCC multitransmitter product guidelines. This (WiFi DTS) device has 20 MHz bandwidth mode. CANADA Raspberry Pi 3 Model B IC CERTIFICATION No.: 20953-RPI32 Raspberry Pi 3 Model B+ IC CERTIFICATION No.: 20953-RPI3BP Raspberry Pi 4 Model B IC CERTIFICATION No.: 20953-RPI4B This device complies with Industry Canada license-exempt RSS standard(s). Operation is subject to the following two conditions: (1) this device may not cause interference, and (2) this device must accept any interference, including interference that may cause undesired operation of the device. Le présent appareil est conforme aux CNR d'Industrie Canada applicables aux appareils radio exempts de licence. L'exploitation est autorisée aux deux conditions suivantes: (1) 32 Strato Pi UPS User Guide
l'appareil ne doit pas produire de brouillage, et (2) l'utilisateur de l'appareil doit accepter
tout brouillage radioélectrique subi, même si le brouillage est susceptible d'en
compromettre le fonctionnement.

33                                                                    Strato Pi UPS User Guide
You can also read