TRAVELMATE OWNER OPERATIONAL MANUAL - Serial Number: Date of Purchase: Amigo
←
→
Page content transcription
If your browser does not render page correctly, please read the page content below

TRAVELMATE™
   OWNER OPERATIONAL MANUAL

Serial Number:
Date of Purchase:

TABLE OF CONTENTS
                                            Since Amigo Mobility Founder Al Thieme invented
Safety First                           3    the first power-operated vehicle (POV) in1968 for a
                                            family member with multiple sclerosis, we have been
Location of Controls                   4    committed to Improving Lives Through Mobility®. With
                                            more than 45 years of mobility expertise, our goal is
Identification of Parts                4    to bring comfort, freedom and satisfaction to people
                                            with mobility challenges.
Attaching the Battery to Your Amigo    4
                                            For safe driving, please read this manual carefully
Folding/Unfolding Your Amigo           5    before using your Amigo. You will also find helpful
                                            hints and tips to help you stay as active as ever.
Operating Your Amigo                   6
                                            Thank you for choosing the Amigo TravelMate – we
Driving Your Amigo                    6-7   hope you enjoy many adventures together!
Traveling With Your Amigo              7    Sincerely,
Safety Warnings                        7    Amigo Mobility International, Inc. (AMI)
Battery Information &
Charging Instructions                 8-9
                                            Welcome to our growing family of Amigo owners –
Cleaning Instructions                 10    we hope you are excited to be part of it!

Maintenance                        10-11    Please return your warranty card to sign up to receive
                                            our Friendly Wheels e-newsletter. The monthly
Troubleshooting/Diagnostic Codes      12    newsletter features mobility news, inspiring stories
                                            and accessible travel tips, written especially for
Electromagnetic Interference          13    Amigo owners! It will also keep you informed about
                                            new products, accessories, helpful hints and service
Exploded View                         14    tips.

Parts List                            15
Wiring Diagram                        16
Warranty                              17
                                                    Improving Lives Through Mobility®
                                                               Since 1968

                                             AMI is not responsible for any damage or injury incurred
                                             due to the improper or unsafe use of the POV. AMI
                                             specifically disclaims responsibility for any bodily injury or
                                             property damage that may occur during any use, which
                                             does not comply with applicable federal, state or local
                                             laws or ordinances.
SAFETY FIRST
For your convenience and understanding, signal words are defined below:

				 WARNING IS USED TO INDICATE THE PRESENCE OF A HAZARD, WHICH CAN CAUSE SEVERE
				 PERSONAL INJURY, DEATH OR SUBSTANTIAL PROPERTY DAMAGE IF THE WARNING IS IGNORED

				 CAUTION IS USED TO INDICATE THE PRESENCE OF A HAZARD WHICH WILL OR CAN CAUSE
				 MINOR PERSONAL INJURY OR PROPERTY DAMAGE IF THE WARNING IS IGNORED

Safety Guidelines
Use the following guidelines for the safe operation and use of your Amigo. Should you have any questions about the
safe operation of your vehicle, please contact AMI. If you are in doubt about your ability to operate your Amigo, consult your
personal physician.

 • Read the operating manual before using your Amigo.
 • Always turn your Amigo OFF before getting on or off your vehicle.
 • Always remain seated while the vehicle is in operation.
 • Keep legs on the platform while driving.
 • Allow the Amigo to come to a complete stop before attempting to reverse.
 • Always drive at a slow, sensible speed while around pedestrians.
 • Drive slowly while turning.
 • Always drive straight up and down inclines.
 • Avoid sudden starts while the tiller is turned sharply.
 • Always approach obstacles at a low speed.
 • Be aware of mechanical pinch points, especially when folding, assembling and disassembling your Amigo.
 • Remove battery case before folding tiller down.
 •    Always be careful when maneuvering on inclines or ramps. Not all ramps are constructed according to federal standards.
		 The federal standard for wheelchair ramps is 1 inch (2.5 cm) rise per 12 inches (30 cm) = 5 degrees or 8% grade.

DO NOT
 • Do not exceed the maximum weight capacity of 250 pounds (113 kg). Exceeding the weight capacity voids your warranty and
		 may result in personal injury and damage to your Amigo. Amigo Mobility will not be responsible for injuries and/or property
		 damage resulting from failure to observe weight limitations.
 • Do not drive over or off obstacles more than 1 inch (2.5 cm) high. This could be unsafe and could damage your Amigo.
 • Do not reverse down a steep hill or incline.
 • Do not park on inclines or declines.
 • Do not sit on the Amigo in a moving vehicle.
 • Do not allow anyone to ride with you.
 • Do not operate your Amigo near stairs, steps, curbs or terraces where you might accidentally drop a wheel off the edge.
 • Do not operate your Amigo on streets or other areas with vehicular traffic.
 • Do not use the tiller to assist in transferring.
 • Do not lift rear section of platform by holding the rear wheel.
 • Do not expose your Amigo to spray-on cleaning solutions and excessive moisture such as spraying it with a garden hose,
		 shower or leaving it uncovered in heavy rain.

                                                                                                             www.myamigo.com     3
LOCATION OF CONTROLS
    A.		 Accelerator lever (right and left)
    B.		 Battery status gauge
    C.		 Horn button
    D.		 ON/OFF key switch
    E.		 Battery connector plug
    F.    Retainer cord knob

                                                                               IDENTIFICATION
                                                                               OF PARTS
                                                                                1. Battery case
                                                                                2. Tiller
                                                                                3. Hub motor
                                                                                4. Rear wheels
                                                                                5. Platform
                                                                                6. Seat
                                                                                7. Seat adjustment handle
                                                                                8. Tiller release foot pedal
                                                                                9. Freewheeling lever
          9                                                                    10. Bumper/lifting handle

    ATTACHING THE BATTERY TO YOUR AMIGO
    1. Place battery down into tiller (Figure 1).
    2. Tilt battery towards tiller until latch clicks (Figure 2).
    3. Connect battery using the black battery connector plug (Figure 3).

                      Figure 1                                      Figure 2                             Figure 3
4         1-800-248-9131/ 989-777-0910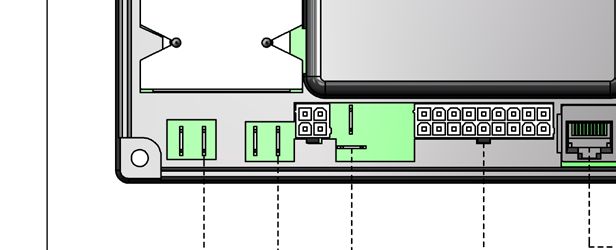
FOLDING/UNFOLDING YOUR AMIGO
Folding

         REMOVE KEY AND BATTERY CASE BEFORE FOLDING

Folding
1.  Remove basket.
2. Disconnect battery using the black battery connector plug. Firmly grip handle and lift straight up to unplug (Figure 4).
   Note: gripping and lifting only the end of the handle will not unplug the battery connection.
3. Lift battery and tilt forward to remove (Figure 5).
       a. A spare battery pack is easily stored under the seat with retainer cord. If you are storing a spare battery, lift retainer cord
            up and over the top of the battery to release. Remove battery from storage area before folding (Figure 5.1).
5. While holding top of tiller, step on tiller release foot pedal (Figure 6). Lift seat adjustment handle and lower seat
   onto platform (Figure 7).
6. Push tiller down to rest on seat (Figure 8).
7. To lock tiller in place, loop retainer cord over black knob in middle of enclosure (Figure 9).

Unfolding

1.  Remove retainer cord from black knob.
2.  Raise tiller until you hear the lower latch click and lock into place.
3.  Raise the seat adjustment handle and pull seat up (Figure 7).
4.  Reposition spare battery pack by placing under seat. Lift retainer cord up and
    over the top of the battery to hold in place (Figure 5.1).
5.  Reinstall battery case, then power connection, followed by basket. Insert key.

                                                                                                                                      N
                                                                                                                           TIO             R
                                                                                                                       CAU          E LEVE
                                                                                                                                LEAS LY
                                                                                                                          ATE RE OT ON
                                                                                                                      OPERWITH FO

           Figure 4                          Figure 5                           Figure 5.1                        Figure 6

                      Figure 7                                 Figure 8                                    Figure 9

                                                                                                                  www.myamigo.com              5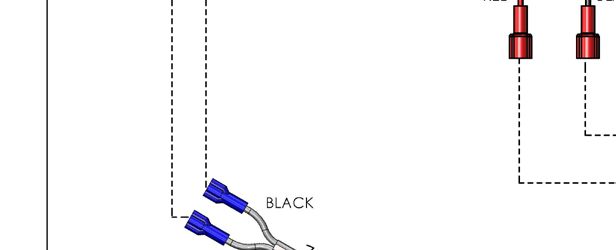
OPERATING YOUR AMIGO
    1. Turn the Amigo ON with ON/OFF key switch located
       on the right side of the handle enclosure.
    2. Press the forward accelerator lever or the reverse accelerator lever to move the Amigo.
       To move forward, pull the right side of the accelerator lever toward you. You can also                         Forward
       move forward by pushing the left side of the accelerator lever away from you. To
       operate in reverse, pull the left side of the accelerator lever toward you (Figure 10) or
       push the right side of the accelerator lever away from you.
    		   Note: For optional “reverse polarity” handles, accelerator lever operation will be
    		   the opposite – to move forward, pull the left side of the accelerator lever toward
    		   you or push the right side accelerator lever away from you. To move in reverse,
    		   pull the right side of the accelerator lever toward you or push the left side
    		   accelerator lever away from you.
    3. To stop, just release the accelerator lever and the vehicle will come to                                       Reverse
       a gradual stop after release.                                                                                 Figure 10
    4. In the unlikely event you lose power, the drive can be put in freewheeling mode. Push
       the freewheeling lever (located on the right side of the front wheel, figure 11) downward
       into the horizontal position (figure 12). Some resistance while pushing in freewheeling
       mode is normal. To resume power mode, push lever back to the angled position. Before
       driving, ensure tiller is locked in an upright position.

    PUSH TOO FAST (PTF) FEATURE
    PTF feature is intended as a safety measure to prevent “run away” situations, when in
    freewheeling mode. The faster the Amigo is pushed (forward or reverse), the more resistance
    is felt. Speed, not distance, engages PTF. PTF will only activate when battery is connected. Do            Freewheeling lever
    not disconnect battery when in freewheeling mode.                                                                 Figure 11

    				 1. TURN KEY SWITCH TO "OFF" WHEN GETTING ON OR OFF THE AMIGO
              2. DO NOT RIDE THE AMIGO WHILE IN FREEWHEELING MODE
              3. PUSH FREEWHEELING LEVER TO "NORMAL" POSITION BEFORE
                 RESUMING NORMAL USE OR TRANSFERRING ON/OFF VEHICLE.                               Freewheeling                 Normal
                                                                                                    (horizontal)                 (angled)
                                                                                                                   Figure 12
    DRIVING YOUR AMIGO
    Steering the Amigo is easy and logical. Give wide clearance when turning so the rear wheels clear any obstacle. Shortcutting a
    sidewalk corner can cause the back wheel to go off the sidewalk. Avoid this situation by steering an exaggerated wide arc around
    the obstacles. If you must steer in a tight spot, such as entering a doorway or when turning around, stop and then apply power
    gently.

    			 TURNING THE KEY SWITCH OFF WHILE IN MOTION WILL BRING THE AMIGO TO A CONTROLLED STOP

    Driving through doorways
    Approach an unfamiliar door slowly. Does it have a knob or push bar? Does it open toward you or away from you? Think in terms of
    using the power of the Amigo to do the work for you. Hold the doorknob or bar in one hand and apply the power with the other
    hand. If the door is self-closing, you can go through allowing the door to close behind you. If it is not a self closing door, stop when
    you are clear of the door and push it closed. If the door opens toward you, hold the knob or bar with one hand and slowly
    accelerate in reverse, letting the Amigo do the work for you. When the door is open wide enough, accelerate forward leaving your
    hand on the door to keep it free from touching the Amigo and letting go as you pass through the door jamb.

6         1-800-248-9131/ 989-777-0910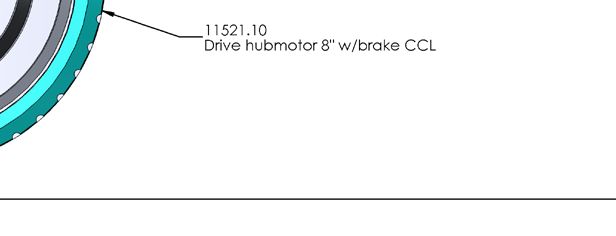
Driving on ramps
With the ADA (Americans with Disabilities Act), buildings require ramps for POV (power-operated vehicle) access.
Some have U-turns in the middle where good cornering is required. Take wide swings with your front wheel around
any tight corners so the rear wheels follow a wide arc to stay clear of the corner. When you have stopped while facing uphill,
starting up again simply requires that you apply forward power. Accelerate gently after stopping on an incline.
When proceeding up a ramp or curb, lean forward in your seat for maximum stability and safety. Drive slowly
when going down any ramp or hill to ensure a safe descent.

TRAVELING WITH YOUR AMIGO
Transport
Amigos are not designed or tested for use as seats in private or public transporting
vehicles. Do not transport POVs in vehicles unless folded and placed in the trunk of a
car, or placed in the vehicle and strapped down. Even when strapped down, Amigos
should not be used as seats in private or public transporting vehicles.

USE A SMALL PIECE OF CARPET OR A HEAVY DUTY TOWEL ON VEHICLE BUMPER WHEN LOADING
THE AMIGO INTO THE TRUNK OF A VEHICLE TO PREVENT MARKING OR SCRATCHING OF VEHICLE
FINISH.

To transport your Amigo TravelMate, please refer to page 5 for folding/unfolding
instructions.

Airline travel
Special handling tags are suggested when transporting your Amigo by airlines.
Nonspillable, sealed batteries are approved for travel on airplanes. When you make
your reservation, notify the airline that you will be requesting escort service.
This will assure that your Amigo will be picked up and delivered at the boarding gate.
For additional helpful hints for airline travel, visit our website at www.myamigo.com.
*Optional lithium batteries require you to take battery pack onboard plane as carry-on luggage.

Public transportation
When utilizing public transportation, do not sit on your Amigo while it is being lifted onto the vehicle or once
the vehicle is in motion.

SAFETY WARNINGS
The driving performance of your Amigo can be influenced by electromagnetic fields, such as those emitted by cell phones and
other devices. We recommend the power on your unit be switched off when using such a device.

 • In some extreme circumstances, your Amigo’s performance could be affected by the
   electromagnetic field emitted from alarm systems in shops (refer to page 13 for additional information).

 • The program settings in the controller should only be altered by factory-trained service
   providers in order to maintain safe driving functions.

                                                                                                              www.myamigo.com    7
BATTERY INFORMATION
AND CHARGING INSTRUCTIONS
Charging frequency
• Charge batteries daily when the Amigo is used.
• If not in use for a long period of time, charge for 24 hours, every 30 days.
• Extended charging is good for the batteries and will not overcharge them.
Battery information
VRLA (Valve Regulated Lead Acid) deep cycle or optional lithium-ion batteries are used for operating your Amigo. They are
maintenance-free and are transportable on aircraft, buses, trains, etc. as there is no danger of spillage. By following the charger and
battery procedures, you can expect extended battery life. For maximum range and life, it is recommended to fully charge the
batteries before using. Amigos have an overcharge protection feature, so charging at every opportunity is encouraged. It is a
common misconception that batteries should be deeply discharged before recharging – this is not true for Amigo batteries.
Batteries may be damaged if they are deeply discharged and left sitting.
Battery range depends on driver weight, terrain, temperature and type of
battery used. Charge your batteries daily and make sure the charger cord is
unplugged from the wall outlet before moving your Amigo. Batteries need
charging if the battery indicator light is blinking while operating or if the
battery gauge drops to two bars or less.
Your battery indicator light may blink prematurely when under a heavy
power demand such as an incline. If it is premature, it will stop blinking when
the unit is stopped, and the power switch is cycled to OFF and back ON. If this
cycle does not stop the blinking, it is time to recharge.
Charging instructions
The battery charger is designed to charge any type of lead acid batteries (gel, sealed, wet, AGM, etc.)
to full charge. The charger can be left connected to the batteries after full charge (green light)
without harming the batteries. The charger uses minimum power in this standby-mode (after
battery is fully charged) and maintains the batteries at full charge for extended battery life.
The battery charger is designed to accept 90-240 volts, 50 or 60Hz AC power input. This
makes it possible to charge on any AC electrical system globally.
Battery must be disconnected from TravelMate to charge. Plug the round end of the charger
into the socket on top of the battery case, and plug the AC cord into a wall outlet.
The charging light (located on the charger) is normally red, yellow or orange when charging and changes to green when the
battery is fully charged.
When disconnecting, remove the AC power first and then disconnect the charger from the battery.
8 1-800-248-9131/ 989-777-0910FAILURE TO FOLLOW THESE SAFETY INSTRUCTIONS MAY RESULT IN PERSONAL INJURY OR PROPERTY DAMAGE.
IF YOUR BATTERIES ARE DAMAGED AND A LEAK IS APPARENT, CALL YOUR AUTHORIZED DEALER IMMEDIATELY.
UNDER NO CIRCUMSTANCES SHOULD YOU TOUCH THE BATTERIES IF THEY ARE LEAKING.
TO AVOID DAMAGE TO BATTERIES DURING STORAGE, DO NOT PLACE THEM END-TO-END
WITH THE POSITIVE (+) AND NEGATIVE (-) TERMINALS NEXT TO EACH OTHER (FIGURE 13).
Charger standard precautions
• Each time you use your charger, read and follow instructions exactly. Working in the vicinity of a battery is dangerous.
Batteries generate explosive gases during normal battery operation.
• Never smoke or allow an open flame in the vicinity of the battery.
• Use charger for charging a 24-volt lead acid or lithium battery pack only. It is not intended to supply power
to an extra-low-voltage electrical system or to charge dry cell batteries.
• Do not operate charger in a closed-in area or restrict ventilation in any way.
• A spark near the battery may cause explosion.
To reduce risk of spark:
• Prevent external damage to AC and DC cords.
• When connecting charger, connect DC charging cord to the battery charge plug before connecting
charger AC cord to electrical outlet.
• When disconnecting charger, always do so in reverse sequence of connecting procedure.
Break first connection as far away from battery as possible.
• Be cautious not to drop a metal tool onto the battery.
• Remove jewelry before handling charger.
Battery storage
If you remove your batteries from the battery case, put them on a surface that cannot be damaged by acid fumes. Whenever a
battery is charged and discharged through a cycle, it breathes. The breathing of the battery emits acid fumes and may mark
surfaces it rests on for long periods of time.
Store batteries indoors in a dry environment, away from any open flames. Temperature range is 0˚C (32˚F) to 40˚C (104˚F).
Figure 13
Circuit breaker replacement instructions
An automatic resetting circuit breaker protects the wiring and battery in the event of a short circuit. If your Amigo stops abruptly,
wait 10 seconds for the circuit breaker to reset. If the breaker does not reset, check for overloads or short circuits.
www.myamigo.com 9Fasteners replacement
Use only Grade 8 (US) or 12.9 DIN (metric) in all applications. For service and
replacement parts, we recommend Amigo authorized parts.
Microprocessor controller (MPC)
Do not attempt to service the MPC or related electronic components, as this will void the
warranty.
Battery replacement instructions
Replacement battery must meet passenger and cargo aircraft travel requirements. Danger of explosion if battery is incorrectly
replaced. Replace only with the new batteries of the same type in your product. Discard used batteries according to the
manufacturer's instructions.
Battery removal
1. Ensure battery pack is not connected to charger or outlet.
2. Remove the four screws as shown in Figure 14 and remove battery case front cover.
3. Remove red wire (#1 in Figure 14) from red terminal on battery (#1 in Figure 14).
4. Remove red wire (#3 in Figure 14) from red terminal on battery (#3 in Figure 14).
5. Remove black wire (#2 in Figure 14) from black terminal on battery (#2 in Figure 14).
6. Remove black wire (#4 in Figure 14) from black terminal on battery (#4 in Figure 14).
7. Lift batteries out of case.
Battery installation
1. Ensure battery pack is not connected to charger or outlet.
2. Place new batteries into battery case, oriented as shown in Figure 14.
3. Install black wire (#2 in Figure 14) to black terminal on battery (#2 in Figure 14).
4. Install black wire (#4 in Figure 14) to black terminal on battery (#4 in Figure 14).
5. Install red wire (#3 in Figure 14) to red terminal on battery (#3 in Figure 14).
6. Install red wire (#1 in Figure 14) to red terminal on battery (#1 in Figure 14).
a. Ensure all wire terminals are fully seated.
7. Install battery front cover and install the four screws as shown in Figure 14.
Battery disposal/recycling instructions
1. For best results, use original OEM batteries.
2. Install only new batteries of the same type in your product.
3. Failure to insert batteries in the correct polarity may shorten the life of the batteries or cause batteries to leak.
4. Do not mix old and new batteries.
5. Do not dispose of batteries in fire.
6. Batteries should be recycled or disposed of as per state and local guidelines.
Figure 14
10 1-800-248-9131/ 989-777-0910CLEANING INSTRUCTIONS
Tires: The tires should be cleaned with ordinary kitchen-type cleaners and a damp cloth.
Don’t use solvents on tires as they cause tire material to break down or become too soft.
Platform: The platform of the Amigo is constructed of aluminum and coated with a durable automotive type finish.
Use cool water with mild soap to remove dirt and oils. Do not spray the entire vehicle with water. The platform
10.9 may
be waxed with car body wax and buffed by hand with a soft cloth.
Seat: The vinyl seat can be cleaned with a mild soap or detergent and a damp cloth. A vinyl cleaner
can also be used. Care should be taken not to soak seats, as the interior foam can hold water.
Floor mat: The floor mat should be cleaned with ordinary kitchen-type cleaners and a damp cloth.
Do not use solvents on the floor mat, as they may cause the floor mat material to break down.
KEEP CLEANING SOLVENTS AWAY FROM ELECTRICAL WIRES AND CONNECTIONS.
MAINTENANCE
Minimum maintenance should prevent unnecessary repairs. Check the following:
Daily
• Charge batteries daily when the Amigo is used. Charge the batteries until fully charged to ensure
Monthly
proper battery operation.
Monthly
• Inspect batteries for any cracks or damage of any kind.
• Check and tighten any exposed fasteners.
• Check static ground wire located under vehicle. Replace if damaged or missing. Wire must be in contact with the floor when
operating vehicle.
Six months
• Check all screws and clips (that are holding wheels) for tightness and wear.
• Check all electrical connections for clean contact.
• Charging connection should be inspected for tight connection.
• Check tires for wear.
• Check and clean battery terminals and the wire connections as needed with a
light piece of emery cloth or brush and soda water.
• Inspect inside the battery case, particularly at the bottom, for liquid.
Yearly
• Have your authorized service center check your Amigo completely.
www.myamigo.com 11DIAGNOSTICS CODES Diagnostic light location
The Amigo controller has a built-in diagnostic feature that will cause the
diagnostic light LEDs (located on either side of the battery gauge) to flash a
numeric code indicating service issues to aid in diagnosis. When indicating a
service problem, the diagnostic light LEDs will flash, hesitate for a moment,
and then flash again. Follow the code listings below to determine the
problem. If the code indicates a service problem, contact your local service
representative or call the Amigo service department at 1-800-248-9131 for
instructions to verify and correct the problem.
**Note: First solution listed for each diagnostic code will fix that problem 80% of
the time. Attempt solutions in the order listed.
CODE CAUSE SOLUTIONS
(1) Unplug handle cable and plug back in.
(2) Check all wiring connections and output.
1-1 EM Brake windings or connections are shorted (3) Disconnect brake and cycle key, if code changes to 1-2, replace brake.
(4) Replace controller.
(1) Ensure EM brake lever is in normal/drive position.
EM Brake windings or connections are open or (2) Unplug handle cable and plug back in.
1-2 EM brake release lever in "freewheeling position" (3) Check all wiring connections and output.
(5) Replace controller.
(1) Check motor wiring connections.
2-1 Motor windings or connections are shorted (2) Disconnect brake and cycle key, if code changes to 2-2, replace motor.
(3) Replace controller.
(1) Ensure EM brake lever is in normal/drive position.
Motor windings or connections are open (2) Check motor wiring connections.
2-2 (3) Replace motor.
(4) Replace controller.
(1) Check / replace batteries.
2-3 Power shortage
(2) Check / replace controller.
(1) Allow to sit idle for 15 minutes, restart and see if code disappears.
3-1 Over temperature condition (2) Ensure EM brake and / or motor is not causing excessive amperage draw.
(3) Replace controller.
Charger is supplying too much voltage (1) Replace battery charger if voltage is 32 volts or higher.
4-1 during the battery charge cycle (2) If 31 volts or lower, replace controller.
Charger not dropping back into "float mode" (1) Replace charger wiring.
4-2 during battery charge cycle (2) Replace battery charger.
(3) Replace controller.
5-1 Controller drive FETS shorted (1) Replace controller.
5-2 Controller regenerative braking FETS shorted (1) Replace controller.
Throttle hall effect or throttle (1) Check to ensure handle cable is in good condition.
5-3 circuitry reading fail band fault (2) Check that throttle lever moves freely and returns to center.
(3) Replace throttle hall effect.
6-1 Bad software revision (1) Replace controller.
12 1-800-248-9131/ 989-777-0910ELECTROMAGNETIC INTERFERENCE
RADIO WAVE SOURCES MAY AFFECT POWER-OPERATED VEHICLE (POV) CONTROL. FOLLOW THE WARNINGS
LISTED BELOW TO MINIMIZE YOUR RISK TO EMI.
The driving performance of your Amigo can be influenced by electromagnetic fields, such as those emitted by cell phones and other
devices. We recommend the power on your unit be switched off when using such a device.
Electromagnetic interference (EMI) from radio wave sources
Powered vehicles may be susceptible to electromagnetic interference (EMI), which is interfering electromagnetic energy
emitted from sources such as radio stations, TV stations, amateur radio (HAM) transmitters, two-way radios and
cellular phones. The interference (from radio wave sources) can cause the powered vehicle to release its brakes,
move by itself, or move in unintended directions. It can also permanently damage the powered vehicle’s control system.
The intensity of the interfering EMI energy can be measured in volts per meter (V/m).
Important information
1. 20 volts per meter (V/m) is a generally achievable and useful immunity level against EMI (as of May 1994). The higher the level, the
greater the protection.
2. The immunity level of this product is not known.
3. In some extreme circumstances, the Amigo's performance may be affected by the electromagnetic field emitted from alarm systems.
4. The program settings in the controller should only be altered by factory-trained service providers in order to maintain safe driving
functions.
The sources of radiated EMI can be broadly classified into three types
1. Handheld portable transceivers (transmitters-receivers) with antenna mounted directly on the transmitting unit. Examples include:
citizens band (CB) radios, security, police transceivers, cellular telephones and other personal communication devices. Note: Some
cellular devices transmit signals while they are ON, even when not in use.
2. Medium-range mobile transceivers, such as those used in police cars, fire trucks and taxis - usually have the antenna mounted on the
outside of the vehicle.
3. Long-range transmitters and transceivers, such as commercial broadcast transmitters (radio and TV broadcast antenna towers)
and amateur (HAM) radios. Note: Other types of handheld devices, such as cordless phones, laptop computers, radios, TV sets and small
appliances such as electric shavers and hair dryers are less likely to cause EMI problems.
Powered vehicle electromagnetic interference (EMI)
Because EMI energy rapidly becomes more intense as one moves closer to the transmitting antenna (source), the EMI fields from
handheld radio wave sources (transceivers) are of special concern. It is possible to unintentionally bring high levels of EMI energy very
close to the powered vehicle’s control system while using these devices. This can affect powered vehicle movement and braking.
Warnings
Follow the warnings listed to reduce the chance of unintended brake release or mobile vehicle movement, which could result in
serious injury.
1. DO NOT operate or turn ON handheld personal communication devices, such as citizens band (CB) radios and cellular phones while
the vehicle is turned on.
2. Be aware of nearby transmitters, such as radio or TV stations, and avoid close proximity.
3. If unintended movement or brake release occurs, turn the vehicle off as soon as it is safe.
4. Adding accessories or modifying the vehicle may make it more susceptible to interference from radio wave sources. Note: There is no
easy way to evaluate their effect on the overall immunity of the vehicle.
5. Report all incidents of unintended movement or brake release to the vehicle manufacturer, noting whether there is a source
of EMI nearby.
www.myamigo.com 13TRAVEL MATE 580004 (EXPLODED VIEW)
NOVEMBER 2015 – PRESENT
7
71
72
47
19
30
39
10 56 37
21 48
36
4 38
5 81
50 75 76
14 51 42
45
74 44
31 43
8 43 66
26 41
69 43 68
33
10
34 66
80 49
65
23 28 73 46
6
11
27 60
77
3
78
17
64
22 17 53 2
54
84 40
16 13
59 12 61 62 70
15 18
55 52 9
82
83 24 63
32
58
14 1-800-248-9131/ 989-777-0910PARTS LIST
TravelMate #580004 – November 2015 to Present
Item Part Description Qty Item Part Description Qty
1 0106 Ty-rap 6" 2 44 11504 Shaft seat pivot short 1
2 1040 Retainer snap ring 2 45 11505 Spring extension .375od 5 lg 2
3 1069 Washer .65id .88od .016thk 2 46 11506 Axle TM3 1
4 1192 Washer .281 ID .63 OD .06 flat 2 47 11507.20 Seat asm vinyl folding low 1
5 1193 Screw 1/4-20 X .75 hx hd 4 48 11508 Latch seat TM3 1
6 1254 Pin .125 x 1.125 roll 1 49 11509 Mat TM3 1
7 1295 Label seat back 1 50 11510.10 Cover TM3.1 handle front 1
8 2433 Screw #8-32 X 1.25 lg rd hd 2 51 11511.10 Cover TM3.1 handle rear 1
9 3622 Nut 1/4-20 hex nylon 1 52 11512 Pivot steering weldment 1
10 4075 Screw 1/4-20 X 2 hx soc fl hd 4 53 11513 Pivot latch handle 1
11 4269 Washer .63id 1.12od .06thk 2 54 11514.10 Link handle pivot TM3.1 2
12 5190 Screw 1/4-28 X .375 shcs hd 1 55 11515.20 Bumper TM3 asm 1
13 5209 Cap black used on pnu 8" & 10" 2 56 11517 Bracket seat mount TM3 1
14 5630 Nut #8-32 hex keps 2 57 11520 Wire TM3 motor 1
15 5893 Washer .281id 1.0od fender 1 58 11521.10 Drive hubmotor 8" w/brake CCL 1
16 5905 Screw 1/4-20 X 2.25 hex hd 1 59 11522 Fork hub motor 1
17 6227 Nut #10-24 nylon-ins hex 3 60 11524 Wheel 09" rer chr hub TM3 2
18 7600 Nut 1/4 stud push 2 61 11527 Screw #10-24X.25 shld X 1.0 1
19 7997 Key extension (key with fob) 1 62 11528 Screw #10-24X.25 shld X 1.5 2
20 8969.11 Cable mpc control short 1 63 11529 Screw 5/16-18 X .25 shld 2
21 9936.10 Handle oval plastic grip 1 64 11530 Spring .72od x 1.0 1
22 10050 Bearing headset 1-1/8" 1 65 11533 Screw 5/16-18 x 1" set 1
23 10060 Nut 1/4-20 hex heavy walled 2 66 11534 Retainer ring .5 dia shaft 8
24 10067 Washer .38id 1.0od .014 mylar 2 67 11535 Wire brake TM3 asm 1
25 10144.20 Wire battery contr neut asm 1 68 11557 Ring spiral .75id .071 wire 2
26 10151 Foam insert adhesive backed 1 69 11564 Strip glide TM3 2
27 10393 Lanyard ground strap 1 70 11566 Trim chrome frame TM3 2
28 10516 Handle boot lower pvc free 1 71 11568 Seat 16" covr lower low back 1
29 10807 Charger 24v 02a 1 72 11569 Seat cover bottom low back blk 1
30 11031.16 Enclosure horn he key TM3.1 1 73 11578 Trim platform column base TM3 2
31 11084 Rivet black push .20" dia 2 74 11592 Spacer .26id .50od .75 plastic 2
32 11125 Retainer wire 4 75 11617TM3.1 Controller TM3.1 1
33 11128 Plug tube 1" round 1 76 11680.10 Handle TM3 wigwag 1
34 11187 Label serial number AMI 1 77 11681.10 Battery 12v 09a TM3 latch 1
35 11289 Wire asm interface 10940/11200 1 78 11695 Label foot release caution 1
36 11311 Washer lock heavy split 1/4" 4 79 11741 Label warning turn TM3 1
37 11463-RAW Bumper rubber .5 X 1.0 2 80 11763.20 Basket TM3 1
38 11481.20 Retaining band 21" TM3 1 81 11830 Clip bowtie cotter for .25 od 2
39 11481.21 Retaining band 14" TM3 1 82 11887 Spring extension .75od x 4 lg 2
40 11500.10 Platform TM3 raw 1 83 11888 Screw #10-24 X .125 shld .125 2
41 11501 Arm asm seat pivot 1 84 11889 Rod .25 dia x 8.75 kg 1
42 11502 Arm asm seat pivot rear 1 85 12061 Label TM3.1 product specs 1
43 11503 Shaft seat pivot long 3 86 12072 Lit owners manual TM3.1 1
www.myamigo.com 15TRAVEL MATE 580004 (WIRING DIAGRAM)
NOVEMBER 2015 – PRESENT
16 1-800-248-9131/ 989-777-0910AMIGO MOBILITY - HEALTHCARE DIVISION
General Warranty Provisions
Amigo Mobility International, Inc. (AMI) warranties the original, completed Amigo it manufactures only to the original owner. If
warranty card or proof of purchase is not received, warranty begins on the date the Amigo was shipped.
The warranties on this page do not cover the failure of any part or accessory due to:
• Shipping damage
• Abuse, misuse, accidental damage, or acts of nature
• Exceeding the specified weight capacity of the model
• Improper installation or opening sealed components
• Modifying the Amigo or installing accessories not authorized by AMI
Warranty Coverage:
AMI will repair or replace a part that is defective in material or workmanship under normal use. AMI may use factory-
remanufactured parts (rather than new parts) for some warranty repairs. Warranty replacement parts are covered for the remainder
of the Amigo unit warranty. AMI covers labor warranty for the first 60 days of ownership.
• Structural components – platform, frame and seat post have a limited lifetime warranty (seven years).
• Main components – controller, charger, motor and transaxle have a two-year warranty.
• Seats and other components have a one-year warranty (cuts and tears in seats are not covered by warranty).
• Batteries supplied by AMI are warranted for one year (freight not included after six months) and carry Amigo brand labels.
- Damage caused by battery moisture, spillage, or leakage is exclusive of warranty.
- Note - Lithium-ion batteries carry the following warranty:
1) Warranty period is 60 months; beginning when the Amigo healthcare model or batteries are
shipped from AMI factory. Serial number of unit/date code on battery will be required.
2) Warranty covers defects in workmanship and material.
3) Failure constitutes a fully recharged battery with less than 50% of its rated capacity under normal operating/
charging conditions and is covered within the 60 month period.
4) Lithium-ion batteries must be returned to AMI. Upon receipt, batteries will be tested to confirm warranty conditions
are met.
• AMI is obligated to repair or replace products/parts returned by the purchaser and found to be defective under warranty at
our factory in Bridgeport, Michigan.
• If inspection determines that a returned part or unit is fully functional or inoperable due to a non-warranty nature, it will be
returned at expense of the owner.
• Parts purchased separately from the original unit, or rebuilt units, carry a one year warranty against defects in material and
workmanship.
Customer Satisfaction:
Complete satisfaction with your Amigo is our main goal. If you are not satisfied with any maintenance or repair work completed by
a local Amigo dealership, please follow these two steps:
Step 1 – Review your concerns with the dealership’s management (service manager or general manager). In most cases, a
satisfactory solution is found.
Step 2 – Occasionally, an Amigo owner will not be fully satisfied with a dealer’s decision or actions. In that case, contact Amigo
customer service at 1-800-248-9131. Having the following information available will expedite response time:
• Serial number of your Amigo
• Name of dealer who sold you the Amigo (city and state)
• Date and reason for each visit to dealership
This warranty supercedes and is in lieu of all other warranties, expressed or implied, and no person, agent or dealer is authorized to give any
warranties on behalf of AMI, nor to assume for AMI any other liability concerning any of its products unless made in writing and signed by an
official of AMI.
This warranty gives you specific rights, with the possibility of other rights, which vary depending upon your locality.
www.myamigo.com 17NOTES
NOTES
AMIGO MOBILITY INTERNATIONAL, INC.
                 Improving Lives Through Mobility®
                6693 Dixie Highway, Bridgeport, MI 48722-9725
Service: 800-248-9131 or 989-777-0910 • Fax: 800-334-7274 • www.myamigo.com
      © 2015 Amigo Mobility International, Inc. Amigo® is a trademark of Amigo Mobility International, Inc  • 1115 - 12072
You can also read