Surface Pro 3 Field Guide
←
→
Page content transcription
If your browser does not render page correctly, please read the page content below
Surface Pro 3 Field Guide
Version 0.1
Introduction
Welcome to the "post-post-PC world," as Microsoft CEO Satya Nadella calls it.

Topic ideas - http://www.microsoft.com/surface/en-us/support/?productId=100411422

Before You Start
ADD

You are going to use a Microsoft account
Before you get started with any recent Microsoft platform—not just Windows, but also Office, Xbox,
Outlook.com, OneDrive and others—you need to comes to terms with the one thing that binds them
together: Your Microsoft account. Originally positioned as a so-called single sign-on for web sites,
Microsoft account has evolved over the years and is now something quite a bit more interesting and
useful.

Note: It's also changed names several times. Some of its previous names include Passport and Windows
Live ID.

Like any other connected account, your Microsoft account is an email address and associated password
that you use to access online services, in this case Microsoft services. It's similar to the Apple ID you may
use to make purchases through iTunes or the Google account you may use to sign in to Gmail or
YouTube. But with the introduction of the new Windows that is included with Surface Pro, your
Microsoft account has gotten much more powerful. Now, you can sign in to Surface Pro with your
Microsoft account. And when you do so, many Windows settings and documents, music, videos and
other data can sync between any PCs and devices you use, providing a more consistent and hassle-free
computing experience.

Power users and business users should note that you do not have to sign-in to Windows with a Microsoft
account. If you're stuck in the past you can still use a local account, as you did in Windows 7, though I
will not be covering that usage explicitly here. And if you need to use Surface Pro with a work-based
account, you can of course still sign in to your employer's domain instead. In both cases, you can still use
most of the most important mobile apps that come with Surface Pro—the communications apps (Mail,
Calendar and People), entertainment apps (Xbox Music, Xbox Video and Xbox Games), the Bing apps—
and any other apps that require this connectivity. Those apps will simply prompt you to sign in to them
separately.

But what you lose in doing so is crucial to the Windows and Surface Pro experiences. First, you lose the
ability to integrate the documents and other files you store in the OneDrive cloud-based storage service
with Windows, so you won't be able to sync key files and folders, which makes them available for offline
use. And you also lose the OneDrive-based settings sync capabilities that let you persist your preferences
across different PCs and devices.

This OneDrive-based content and settings sync functionality is so central to the way Windows works that
I mostly assume you do sign in to Surface Pro with your Microsoft account. That said, I will also explain
how to sign into your company's domain if that's required and then still connect Microsoft services to
your Surface Pro 3 through your Microsoft account. Either way, you're going to need a Microsoft account
to use Surface Pro. So let's figure that out next.

You probably already have a Microsoft account
You probably have a Microsoft account already. Any Hotmail, Live.com, MSN, Outlook.com email address
is a Microsoft account. If you previously created an Xbox Live Gamertag, you have a Microsoft account.
Ditto for users of the now-defunct Zune services, which have evolved into the Xbox Music and Xbox
Video services.

So you may even have multiple Microsoft accounts. And that's fine, except that you should consider
choosing one to use as your primary Microsoft account, the one you'll use to sign in to your Surface Pro,
other Windows PCs and devices, Windows Phone handsets, and Xbox One video game console.

Create a new Microsoft account
If you don't have a Microsoft account or would like to start a new one, you can create a new Microsoft
account at the Microsoft web site using your current PC.

There are two possibilities here: You can use an email address you already own, or you can get a new
email address from Microsoft.

If you use an email address you already have—yourname@gmail.com, perhaps, or bob@aol.com or
whatever—you will continue to use that service for email, calendar and contacts management, and the
email address you're turning into a Microsoft account will simply be your user name. But depending on
which service you're using, you may not have a high-quality experience managing these services in the
Mail, Calendar and People apps on your Surface Pro. (Only Microsoft-type accounts—Exchange,
Outlook.com and so on—work fully.)

If you choose to get a new email address, you will use Microsoft's Outlook.com for email, calendar and
contacts management, and can fully access this service from the Mail, Calendar and People apps. You
can pick between outlook.com and hotmail.com email addresses.
Either way, the account creation process is fairly straightforward. Fill out the form as required, choose a
unique hotmail.com or outlook.com user name if you go with the new email address option, and then
click the Create Account button. The account will be created and the browser will navigate to the
Microsoft Account web site so you can configure it further.

Configure your Microsoft account
You should take the time to correctly configure your Microsoft account before you use it further. You do
so from the Microsoft Account web site.

Note: Some personal information has been grayed out in this and screenshot other screenshots.

There is a lot of information here, but you should consider making the following configuration changes,
many of which are security related.

Create one or more account aliases. Using the Account Aliases link on the left, you can create several
other email addresses that you can use instead of your primary Microsoft account alias. For example,
you may use one alias to subscribe to email newsletters or use with other services you're not so sure of.
If you start getting spam addressed to that alias, just delete it and create a new one. (And reconsider
which services and businesses you trust.)

Complete your personal information. Using the Personal Info link on the left, fill out more of the
personal information that is associated with your account, including your time zone, home address, and
so on.

Verify the phone number you associated with the account. On the Security Info page, click the "Verify"
link under the mobile phone number you've associated with your Microsoft account. Microsoft will send
a code to your mobile phone via SMS text messaging. Enter this code as prompted on the web site to
ensure that the phone number you configured is indeed your phone number. (And make sure you phone
is configured with a PIN for security on the go.)

Create a strong password. Using the Password link on the left, make sure you've configured a strong
password for this important account, one that you do not use elsewhere. You can also configure your
Microsoft account to require you to enter a new password every 72 days.

Set up two-step verification. This one is very important: You should strongly consider setting up two-
step verification for your Microsoft account. This means that many of the times you sign in to your
account on the web or in apps—and the first time you configure your account on Surface Pro—you will
be asked to provide a second form of verification in the form of a security code that can be sent to your
mobile phone using SMS text messaging or generated by an authenticator app. To get started, click the
Security Info link on the left and then click the "Set up two-step verification" link.

Note: On trusted devices—like a Surface Pro or other Windows PC where you sign in with your Microsoft
account—you do not have to enter a security code every time you sign in. Instead, Windows will
sometimes ask you to re-enter your password, such as when you try to make account settings changes or
make a purchase.

Use an authenticator app to get security codes. If you use a Windows Phone, iPhone, or Android smart
phone, you can use an authenticator app to generate security codes for two-step verification. Assuming
your phone is with you all the time, this is a great option, and it may save you some money on SMS text
messaging.
Set up your recovery code. If you enable two-step verification as recommended above, you'll also be
provided with a 25-digit recovery code that can be used to recover access to your account should you
ever get hacked. (This is much less likely with two-step authentication enabled.) But you can create one
at any time—or create a new one—by visiting Security Info and clicking the "Set up" link under Recovery
Code.

Create an app password. If you do configure your Microsoft account securely, you may need to
occasionally generate something called an app password to use that account on devices or apps that are
not compatible with security codes. (Obviously, all of Microsoft's platforms—Windows, Windows Phone,
Office, Xbox, and so on—and recent apps on various platforms are compatible with security codes.) You
can generate app passwords on the fly from the Security Info area of the Microsoft Account web site.

Add a payment option to your account. If you ever wish to make a purchase through your Microsoft
account—a paid Windows game or app, for example, or maybe a rented movie from Xbox Video—you
will need to have at least one payment option associated with your account. This can be a credit card
(Visa, MasterCard, American Express or Discover), PayPal, or a Microsoft gift card balance. (You can have
multiple payment options associated with your account.) To add a payment option, navigate to Billing,
Payment Options.
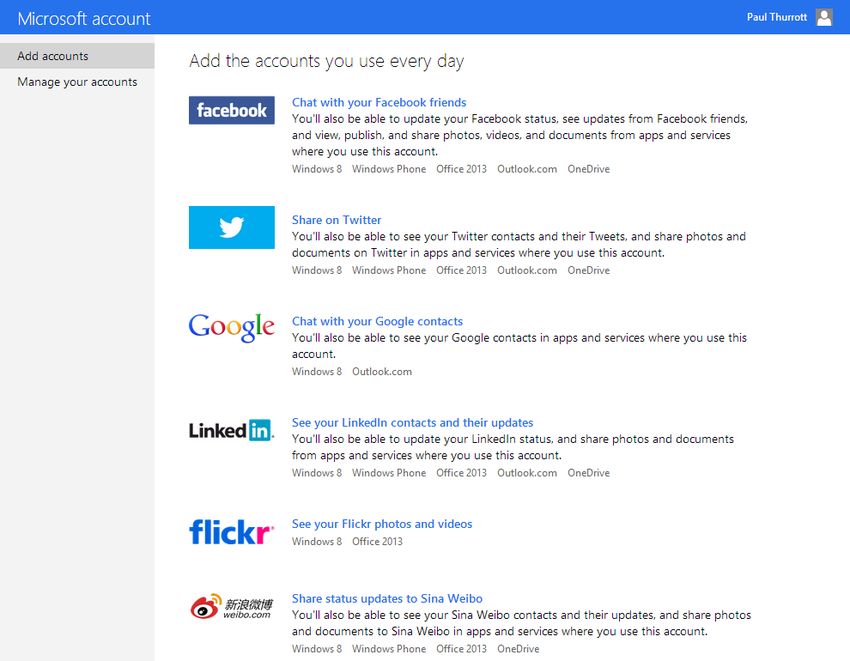
Connect your Microsoft account to other services
If you use other online services you may wish to associate those accounts with your Microsoft account.
While several can be connected in this fashion, the compatible social networking accounts—Facebook
and Twitter—are particularly interesting because you can then post to these services and interact with
others using the People app on your Surface Pro. (This is also possible in Windows Phone 8.)

You can see which accounts can be connected to your Microsoft account, and which capabilities each
provides, by visiting the Microsoft Account web site and navigating to Permissions, Manage Accounts.
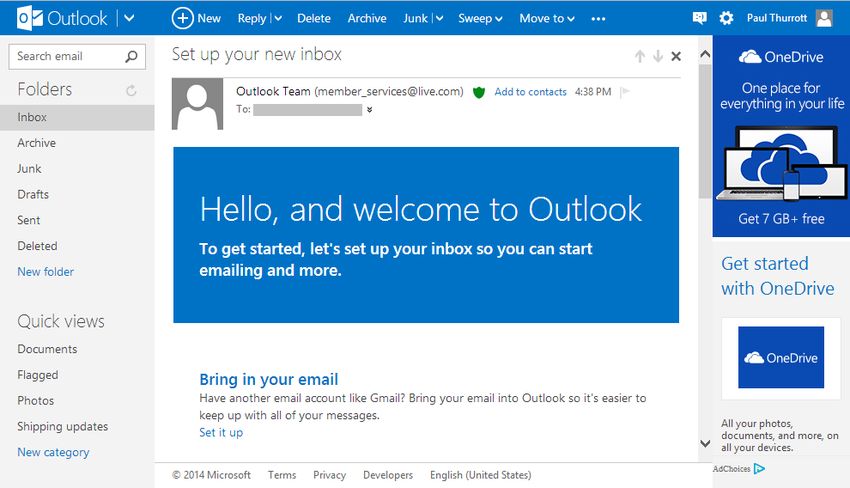
Note: You can of course make this connection later as well.

Use Outlook.com to manage your email, calendar and contacts
While you can use the Mail, Calendar and People apps on your Surface Pro to manage the email,
calendar, and contacts associated with your new (or existing) Microsoft account, you can use
Outlook.com on the web as well.

This full-featured web app provides a handy navigation menu—just click the down-arrow next to the
Outlook title in the upper-left—so you can navigate between the Outlook.com (email), People and
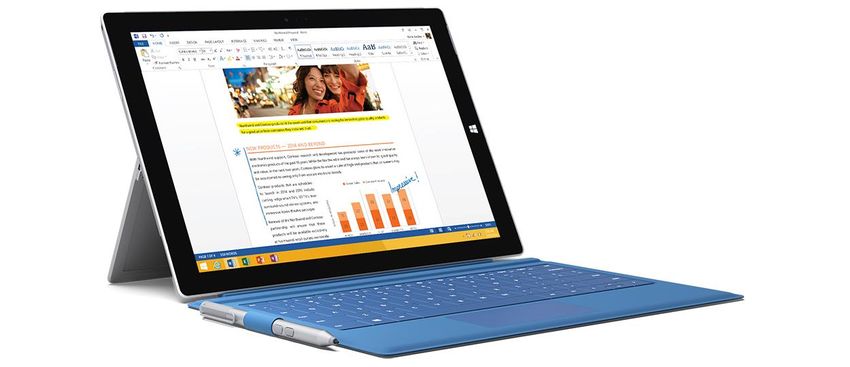
Calendar experiences as well as OneDrive (online storage, with 14 GB to start) and the Word, Excel,
PowerPoint and Outlook.com Online web apps, all of which you get for free with your Microsoft account.

Choose the right Surface Pro model
Surface Pro 3 is a powerful and versatile new kind of PC, but it's still a PC. Underneath its thin and
innovative exterior you'll find some kind of Intel Core processor, 4 or more GB of RAM, 128 GB or more
of fast SSD storage, and other common PC components.

Compared to many PCs, however, Surface Pro is sold a bit differently, and you cannot mix and match
individual components at the time of your order. Instead, it comes only in preconfigured configurations
that each provide a set CPU type, and RAM and storage amounts. And the keyboard is separate: You
have to purchase a Type Cover (which includes an integrated trackpad) or reuse an existing keyboard
(and, potentially, a mouse).

What this also means, of course, that certain Surface Pro components are non-negotiable, in the sense
that they appear in all Surface Pro 3 configurations. So every Surface Pro 3 comes with the same
gorgeous 12-inch screen running at a "pixel-free" resolution of 2160 x 1440, the same wireless
networking capabilities, and the same ports, cameras, sensors and pen.

Here's a breakdown of the Surface Pro 3 specs.

Size. 11.5 x 7.93 x 0.36 inches (292.1 x 201.4 x 9.1mm)

Weight. 1.76 pounds (800 grams)

Display. 12-inch ClearType Full HD Plus (2160 x 1440) multi-touch screen with a 3:2 aspect ratio and 10
touch points

Battery Life. Microsoft claims up to 9 hours of battery life. In real world terms, Surface Pro 3 battery life
is closer to 7 hours on average but varies between the different models
Processor. 4th generation ("Haswell") Intel Core i3, i5, or i7, depending on model, with Trusted Platform
Module (TPM) for enterprise-class security functionality

RAM and storage. 4 GB of RAM with 64GB or 128GB storage, or 8 GB of RAM with 256GB or 512GB
storage, depending on model

Ports/expansion. One full-size USB 3.0 port, microSD card reader, headset jack, mini DisplayPort (video-
out), and cover port

Cameras. 5 megapixel rear-facing and front-facing cameras

Audio. Stereo microphones and stereo speakers with Dolby sound

Networking. 802.11ac/802.11a/b/g/n Wi-Fi, Bluetooth 4.0 Low Energy (LE)

Sensors and location. Ambient light sensor, accelerometer, gyroscope, magnetometer, and digital
compass

Software. Windows 8.1 Pro with an Office 365 sign-up application.

Pen. All Surface Pro 3 devices come with a high-quality active capacitive pen with 256 pressure levels
and three hardware buttons.

Looking over this list, you may notice that a few desirable items are missing. Surface Pro 3 lacks an
integrated GPS, for example, making it a bit less useful for those who need to navigate on the go. And
there are no cellular broadband options, meaning you will need to use a smart phone or other device to
connect Surface Pro 3 to a wireless carrier's data network.

Likewise, some options are a bit limited. Despite plenty of room on the outside bezel, Surface Pro 3
includes just a single USB 3.0 port, limiting expansion. If you purchase the optional Surface Pro 3 Docking
Station, however, you will gain several more USB ports—and other expansion options—albeit only while
you are sitting at a desk.

Still interested? Let's see what the available configurations look like. Microsoft currently offers five.
These are:

Intel Core i3, 4 GB of RAM and 64 GB of solid state storage. This model includes a dual-core 1.5 GHz
Intel Core i3 4020Y processor with Intel HD Graphics 4200. It is available for $799 in the US.

Intel Core i5, 4 GB of RAM and 128 GB of solid state storage. This model includes a 1.6 GHz dual-core
Intel Core i5-4300U processor with Turbo Boost speeds of up to 2.9 GHz and Intel HD Graphics 4400. It is
available for $999 in the US.

Intel Core i5, 8 GB of RAM and 256 GB of solid state storage. This model includes a 1.6 GHz dual-core
Intel Core i5-4300U processor with Turbo Boost speeds of up to 2.9 GHz and Intel HD Graphics 4400. It is
available for $1299 in the US.

Intel Core i7, 8 GB of RAM and 256 GB of solid state storage. This model includes a 1.7 GHz dual-core
Intel Core i7-4650U processor with Turbo Boost speeds of up to 3.3 GHz and Intel HD Graphics 5000. It is
available for $1549 in the US.
Intel Core i7, 8 GB of RAM and 512 GB of solid state storage. This model includes a 1.7 GHz dual-core Intel Core i7-4650U processor with Turbo Boost speeds of up to 3.3 GHz and Intel HD Graphics 5000. It is available for $1949 in the US. Remember that the prices quoted above will vary from country to country and that, regardless, they do not include the purchase of a Type Cover keyboard cover, which I consider mandatory. That accessory costs an additional $129 in the US, and is discussed in the section Choosing the right Surface Pro accessories, below. So how do you choose between these various models? To simplify things, it helps to understand that there are actually only three CPU choices across the five models. The entry level model features an entry-level Core i3 processor that does not support Turbo Boost technology. The two i5 models both feature the same processor, but differ in RAM/storage allotments. And the two i7 models likewise feature the same processor, and differ in RAM and storage. But the i7 models, in addition to offering better inherent performance than the i3 and i5 versions, also come with a much more powerful graphics chipset, the Intel HD Graphics 5000. So the i7 versions offer a big performance improvement, overall, when compared to the other models. In ideal world, you would simply buy the best version of Surface Pro 3, the version with an Intel Core i7 processor, 8 GB of RAM and 512 GB of solid state storage. But that version carries a heady price of almost $2100 when you factor in the Type Cover, making it out of reach for most consumers. The good news? Most people would never need such a device anyway. If you're thrifty, you may be eyeing the i3 model. It's still expensive at about $930 including the Type Cover, but is the cheapest version by far. If there is absolutely no other alternative, and you have modest computing needs, this model would be fine. But Surface Pro 3 isn't really aimed at the audience with modest computing needs. It's a premium product that delivers real PC power, and the expectation is that most users will utilize a combination of powerful desktop applications—like Photoshop, Chrome, iTunes and Visual Studio—and newer, Windows 8.1-based mobile apps. Such an audience would be better served by a more powerful configuration.
In other words, the i5 models are the sweet spot in the Surface Pro 3 lineup. And unless you have
exceptionally high-end needs—where an i7-based version would make the most sense—or simply can't
afford to spend over $1000—in which case there's an i3-based Surface Pro 3 waiting for you—I think you
should focus on the two i5 models.

And in doing so, the decision becomes somewhat simple. You just need to decide whether you need the
more RAM and storage space provided by the higher-end of the two models. The first i5 model includes
4 GB of RAM and 128 GB of storage, which should be fine for most mainstream users, and costs about
$1130 in the US including Type Cover. For a sizable $300 more, you can get a version with 8 GB of RAM
and 256 GB of storage, a $1430 device (with Type Cover) that is aimed at power users.

You may be curious which one I'd buy. I would shoot for the model that I feel is the best overall value,
the i5/4 GB/128 GB model that costs $1130 with Type Cover. This version is just $200 more than the
somewhat underpowered i3 model and would meet my needs nicely. And while I would appreciate the
RAM and storage improvements in the next version up—i5/8 GB/128 GB—I couldn't justify the $300 in
additional costs. It may be just a psychological barrier, but the first i5 model feels like it's just a bit over
$1000, whereas the next one up feels like it's very close to $1500.

But that's just me. Your needs and requirements will of course vary.

Choosing the right Surface Pro accessories
X

How to buy Surface Pro 3
Online, retail stores

Warranty options

Your New Surface Pro
Out of box experience

First Startup, account configuration, sign-in

Update it

Make OneDrive files available offline

Connect the Pen

Windows 101
Excerpts from Windows 8.1 Field Guide

Free offer

Power management
Charging
Work and Productivity
Mail, People, Calendar

Office

Fun and Games
Xbox Music, Video and Games

Type Cover
X

Kickstand

Pen
X

Docking
You can also read