TABS LIST WEB PART SHAREPOINT 2010 INSTALLATION INSTRUCTIONS VEA GMBH VERSION 1.3.0 AUGUST 2011
←
→
Page content transcription
If your browser does not render page correctly, please read the page content below
Tabs List
Web Part
SharePoint® 2010 Installation Instructions

© VEA GmbH
Version 1.3.0
August 2011
Description
This web part helps you to present the content of any lists in a smart and intelligent way.

It groups list items by a group field you select and shows the list items of only one group at a time. Thus is allows to focus the
attention of the user to specific information.

Moreover it allows you to format group fields and list items with HTML-code and add informative words. Thus lists can be
presented in fully customized and user friendly way.

The colors follow the site theme.

This example is based on a task list:

The original task list looks as follows:

A lot of information and not very fancy if a user wants to see what he is about to do.

Using the Tabs List makes a difference:

A click on “Christian Zeh” reveals his tasks:

And a click on “Hermann Löh” shows Hermann’s tasks:

The Tabs List can be used with SharePoint 2010 and MOSS2007. But there are 2 different installation files.
Use Case – 'Daily Lunch Menus'
The use case 'Daily Lunch Menus' is based on a picture library called 'Cafeteria', which apart from the
normal standard contains the following fields:
Meal: Single line of text
Date: Date and Time
Day: Calculated [=IF(DAY(Date)=DAY(TODAY()),"Today",TEXT(WEEKDAY(Date),"dddd"))]
DayNum: Calculated [=IF(DAY(Date)=DAY(TODAY()),0,IF(DAY(Date)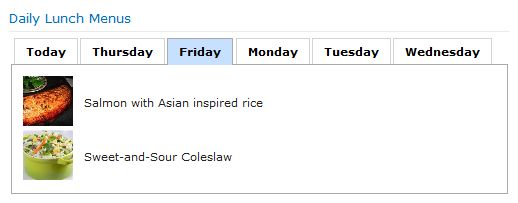
Prerequisites
Before you attempt to install the solutions you need to make sure that you have the following installed on your server(s):
Microsoft SharePoint 2010
Installation
Automatic Installation
1. Unpack the VEATabsList.wsp and install2010.bat files from the Zip Archive and place the 2 files onto your SharePoint
Server.
2. Add the Solution by either running Install2010.bat or manually entering:
stsadm -o addsolution -filename VEATabsList.wsp
3. Deploy the solution by navigating with your browser to “Central Administration > System Settings > Farm
Management > Manage farm solutions
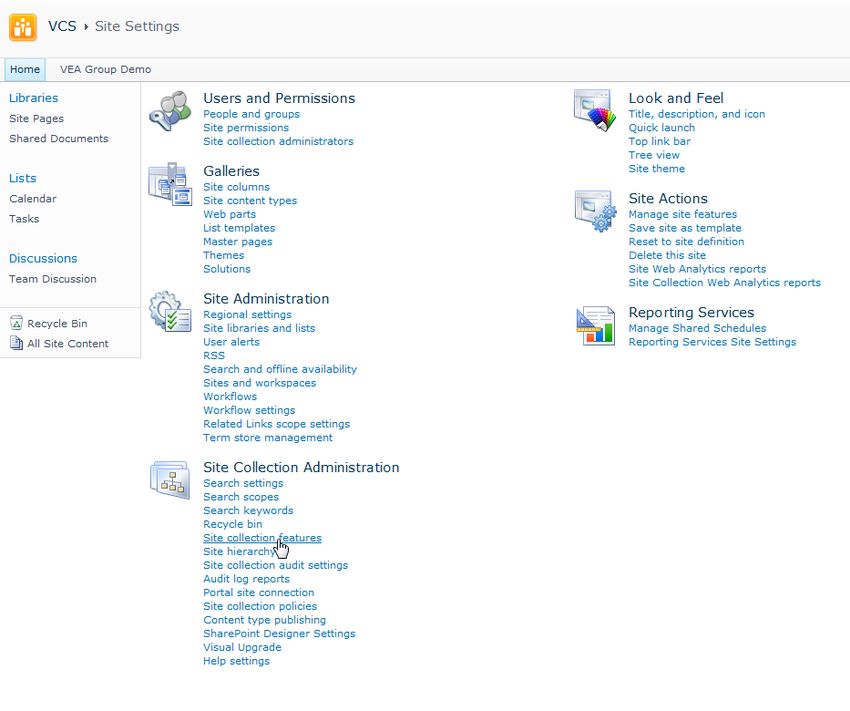
4. You should now see the VEATabsList.wsp in the farm’s solution store:5. Click on “VEATabsList.wsp” to deploy the solution: 6. Proceed to activate the feature by navigating to the “Site Actions/Site Settings” page in your top-level site:
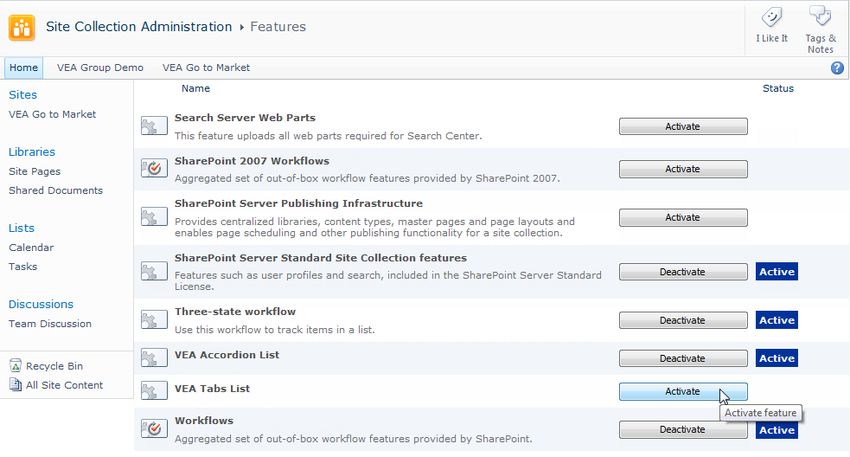
7. Choose “Site collection features” to navigate to the Site Collection Features page:
Activate the “VEA Tabs List” feature
Adding the Web Part to a Page
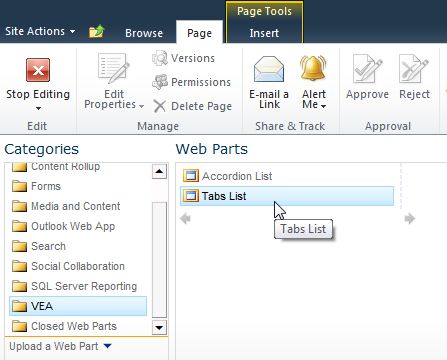
Navigate to a page where you would like to place the web part and choose "Site Actions/Edit Page"
Add the web part to the appropriate zone. The web part is listed in the "VEA" gallery section:
After adding the Tabs List web part, you may proceed to the configuration of the web part.Web Part Configuration
Configure the following Web Part properties in the Web Part Editor "Tabs Connection" and "Tabs List Style" pane section as
needed:
o List Name: Select the list you want to present in the drop-down field
o View Name: List items are filtered according to the selected list view.
o Grouping Field: Select the field by which you want to group the list items.
o Group Sorting Field: Select the field, by which you want the grouping tabs to be sorted.
Default sorting refers to the Grouping Field itself. Select either Ascending or Descending
sorting order.
o Grouping Template: Additionally you may use the Grouping Template to format the
Grouping Field through standard HTML code. The Grouping Field is referenced by:
[WebPart.Group]
You could for example enter the following code: ‘Tasks for [WebPart.Group]’
The result would look like this:
o Content Type: By selecting the option “Field” you will get a drop-down list to select the list
field you want to group.
By selecting the option “Template” you will be offered a text box to enter HTML code.
List fields are represented by: [Row.FieldTitle] or [Row.Index]
The list item is referenced by following codes:
- [Row.ViewUrl] – href reference to open list item details in view mode
- [Row.ViewJavaScript] – onclick action to open list item details in dialog view mode
- [Row.EditUrl] – href reference to open list item details in edit mode
- [Row.EditJavaScript] – onclick action to open list item details in dialog edit mode
In the example we show in the description of this web part, the code is: ‘ [Row.Title] with priority
[Row.Priority] by [Row.Due Date]’
By entering a link in this way, it is possible to click on a list entry in the Tabs List to open it for
editing in a dialog view window.
If you want to present information in columns, you can use tables or row elements of a
table:
[Row.Type of Vehicle] from [Row.Brand]
More information is available here -> [Row.Brand]
o Content Sorting Field: Select the field, by which you want the content to be sorted. Default
sorting refers to the sorting order in the selected view. If no view is selected, you should
select a content sorting field. Select either Ascending or Descending sorting order.
o Title: The title in the “Appearance” pane is automatically set the List Name selected in the
“Tabs Connection” pane. You may choose any other name.
o Title Font Size: This is the font size of the Grouping Field in pixels. The default value is 11.o Title Bold: Select this option to display the Grouping Field in bold letters
o License Key: Here you enter the license key for your purchased web part.
o JQuery: In case you want to use an existing JQuery, add the following key into the
of the web.config file of your SharePoint Site:
. Any other value will disregard existing
JQueries. Setting it ones, applies to all Accordion and Tabs List Web Parts.You can also read