Advanced Screencast-O-Matic - Joe Pacino
←
→
Page content transcription
If your browser does not render page correctly, please read the page content below
Advanced Screencast-O-Matic – Joe Pacino
The main reason to upgrade from the free version of Screencast-O-Matic to the Deluxe editions is the
capability to edit the recordings. You may need to update part of a previous recording without having to
redo the entire thing or you may want to add a section that is missing in the older recording.

This document-tutorial assumes that you are already familiar with making a recording using a webcam
and a microphone and then uploading to YouTube. You may want to review the PDF files on the basic
introduction to Screencast-O-Matic.

CUTTING

Open a recording or make a recording that has an error or just repeat a sentence that will be cut out.
Click the EDIT button on the lower left corner.

Place the timeline cursor at the beginning of the selection to be cut out.

Click Tools to open the Menu List.
From the MENU, select CUT.

DRAG the timeline cursor and select the area to be cut and then click OK.
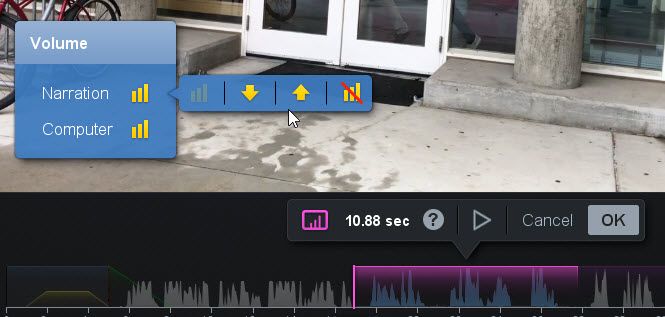
To undo the cut. Place the timeline cursor on the timeline where you performed the cut until the
Scissors icon displays

Click the Scissors icon and the Remove Button.

You will use the CUT TOOL often: to cut out mistakes and long pauses in all your recordings. CUTTING
unwanted segments of your recordings will make your presentations more effective for your viewer.

Volume
There are times when you may need to raise or lower the volume for the entire recording or
just for a specific section.
To modify the audio level of the entire track, select the tiny Bars Icon next to the Narration
item from the right panel under the Audio category.
Use the arrows to raise or lower the volume for the audio track.

Check the boxes next to Reduce Noise and Normalize to enhance the audio quality.

To modify a specific section of the audio track, select Volume from the Tools menu, and drag
the cursor over the timeline to make your selection.

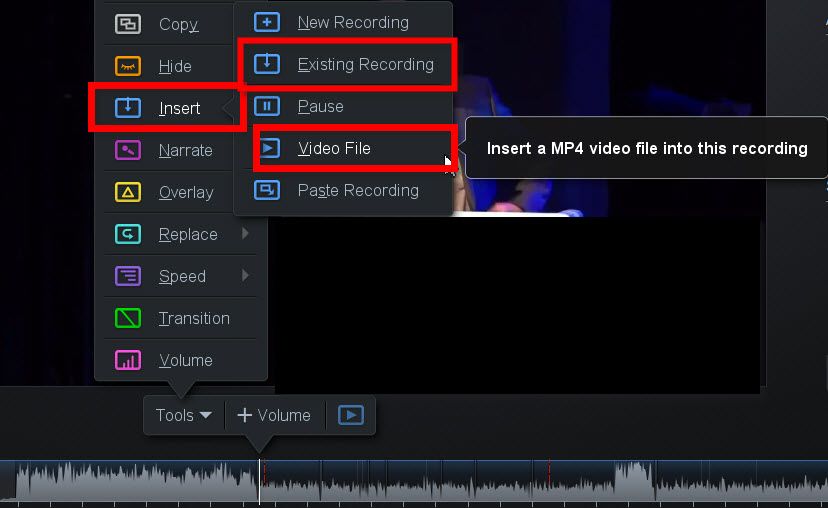
Use the Arrows to raise or lower the volume for the selected segment.

Insert
To add new information to your recordings, select Insert New Recording from the Tools Menu.

The recording panel will display so that you can select the microphone, webcam, and screen for
your new recording. When you finish, the new recording will be inserted where you placed
your timeline cursor. Use undo if you are not happy with the results.
Use the Insert Menu to insert a Pause which freezes the screen for the duration of the pause.

Set the duration of the pause with the arrow keys
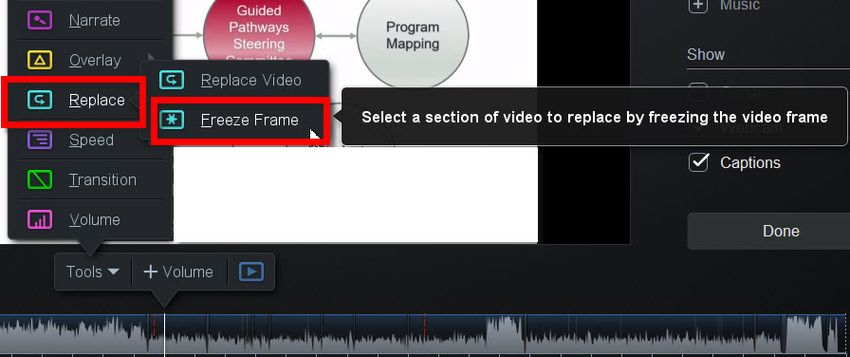
You can also insert an MP4 video or a previous recording you have made with
screencastOmatic.

There may be times when an unexpected pop-up ruins your screen recording. You can insert a
Freeze Frame to hide the screen intrusion. From the Tools menu, select Replace Freeze Frame.
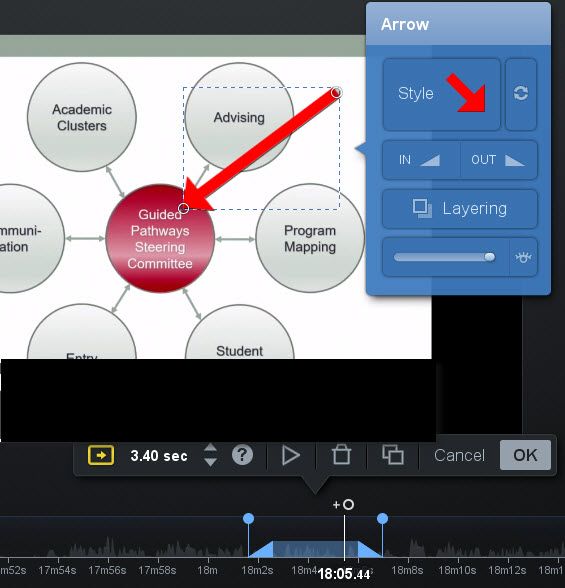
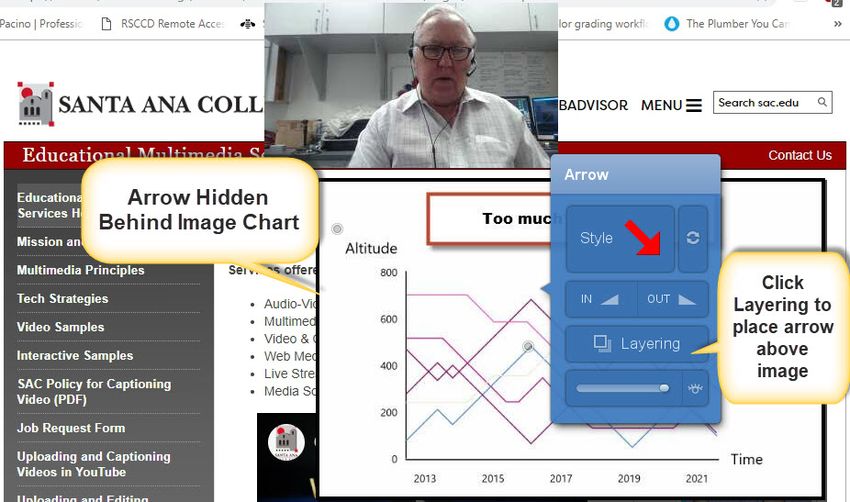
Drag the cursor to set a duration for the freeze frame.

Arrows and Highlights
According to Dr. Ruth Clark and Dr. Richard Mayer, it is good practice to reduce cognitive load by using
arrows and highlights to focus the learner’s attention on essential items of visuals with an overwhelming
amount of information and detail. Click Tools and from the Menu select Overlay and Arrow.
To set the size and position of the arrow, grab the tip or the tail of the arrow and stretch and move in
place.

Set the duration for its display by dragging the two tiny circles in the timeline around the shaded area or
use the arrows next to the seconds/time indicator to increase and decrease the duration.

Click inside the Style frame to change the color, the thickness, and the shadow.
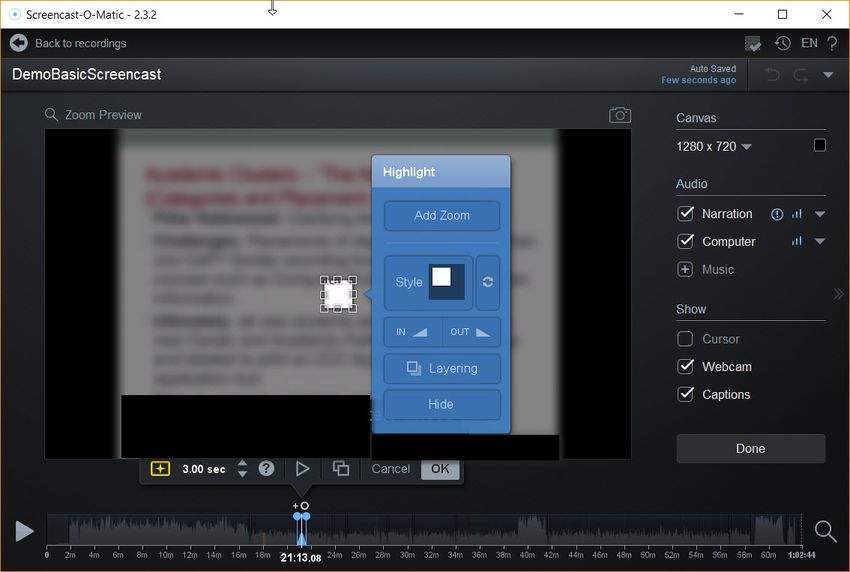
Highlighting part of the screen is another method for focusing the viewer’s attention.

A small, white highlighted square appears on the screen. Grab the corners, resize and position.
Notice that anything outside the highlighted area is blurred so that the focus is directed inside
the highlighted area.
Click inside the Style frame to modify the shape of the highlighted area and to increase or
decrease the opacity and the amount of blur of the areas outside the highlighted shape.

Set the duration of the highlight effect by the seconds/timing indicator or by dragging the tiny
circles around the shaded area of the timeline.
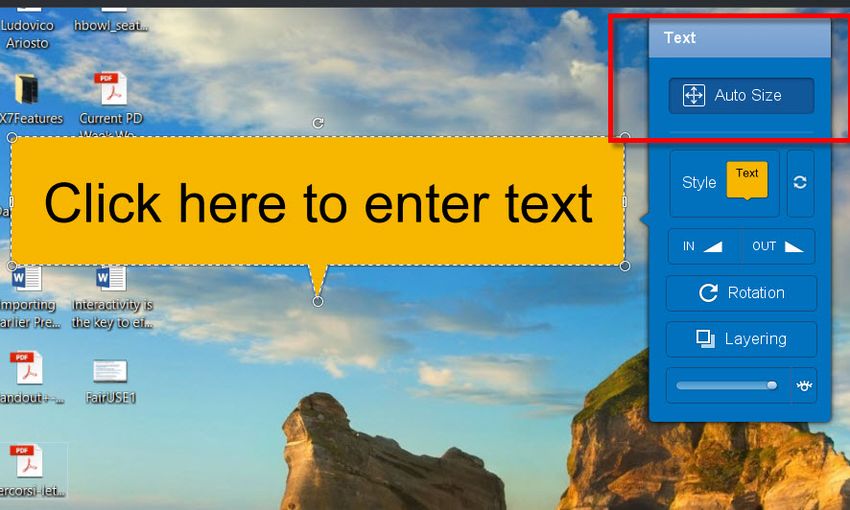
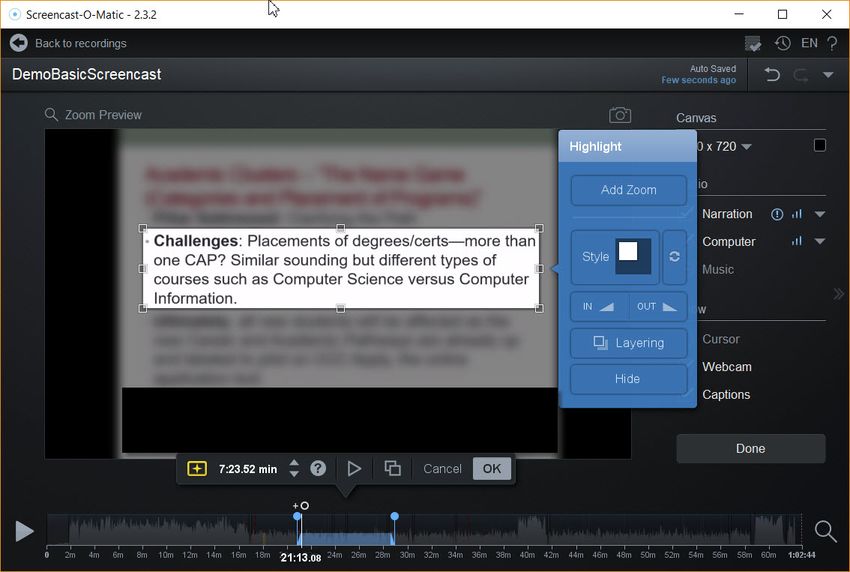
The Overlay Text tool can be useful to add written instructions or labels.

The TEXT PANEL opens. Type in the text window and then use the handles in the text box to resize. The
text panel setting controls whether the text resizes automatically with the resizing of the text box.
Click the STYLE button in the text panel to modify the text and its background. Select the BACKGROUND
button and then toggle the callout (the pointing arrow in the text box) on or off.

Uncheck “use backgound “ to isolate the text.
Now, re-select the TEXT button and now you can change the Text Color to YELLOW.

Finally, in the timeline set the duration of the text overlay by dragging the small circles left or right. You
can also use the up and down arrows next to the TIME IN SECONDS.
Layering
When you introduce other objects such as images, the arrow may be hidden behind these objects. Click
the layering button to view the order of these objects. If the arrow is listed below the image within this
list, drag it above the image and it will display on the screen on top.
Resize Captured Screen
There may be times when you just want to change the overall size of the captured screen to a different
size from the dimensions used to capture it especially if you capture in full screen mode. There is a
menu item labeled CANVAS which controls the final size of your exported recording. Click the tiny arrow
to set the canvas to REDUCE THE SIZE OF THE FINAL RECORDING. NEVER INCREASE THE SIZE BEYOND
THE ORIGINAL RECORDING because the image will become blurred. You can also change the
background color for your recordings with the COLOR SWATCH on the right.
You can also read