Tattoo User's Guide Audio Damage, Inc. Release 1.0
←
→
Page content transcription
If your browser does not render page correctly, please read the page content below
Tattoo User’s Guide
Audio Damage, Inc.
Release 1.0

                      1
The information in this document is subject to change without notice and does not represent a commitment on
the part of Audio Damage, Inc. The software described by this document is subject to a License Agreement
and may not be copied to other media except as specifically allowed in the License Agreement. No part of this
publication may be copied, reproduced or otherwise transmitted or recorded, for any purpose, without prior
written permission by Audio Damage, Inc.

Audio Unit, Macintosh, and OS X are trademarks of Apple Inc. VST is a trademark of Steinberg Media
Technologies GmbH. TR-606, TR-808, TR-909 and DR-110 are trademarks of Roland Corporation. All other
product and company names are trademarks of their respective owners.

Roland Corporation had nothing to do with the creation of the software described in this document. The use of
the trademarked names of their drum machines is intended for purposes of comparison only.

© 2010 Audio Damage, Inc.

All rights reserved.

                                                      2
License Agreement
BY INSTALLING THE SOFTWARE, YOU ARE CONSENTING TO BE BOUND BY THIS AGREEMENT. IF YOU DO NOT
AGREE TO ALL OF THE TERMS OF THIS AGREEMENT, THEN RETURN THE PRODUCT TO THE PLACE OF
PURCHASE FOR A FULL REFUND.
Single User License Grant: Audio Damage, Inc. ("Audio Damage") and its suppliers grant to Customer
("Customer") a nonexclusive and nontransferable license to use the Audio Damage software ("Software") in
object code form solely on a single central processing unit owned or leased by Customer.
Customer may make one (1) archival copy of the Software provided Customer affixes to such copy all
copyright, confidentiality, and proprietary notices that appear on the original.
EXCEPT AS EXPRESSLY AUTHORIZED ABOVE, CUSTOMER SHALL NOT: COPY, IN WHOLE OR IN PART,
SOFTWARE OR DOCUMENTATION; MODIFY THE SOFTWARE; REVERSE COMPILE OR REVERSE ASSEMBLE ALL
OR ANY PORTION OF THE SOFTWARE; OR RENT, LEASE, DISTRIBUTE, SELL, OR CREATE DERIVATIVE WORKS
OF THE SOFTWARE.
Customer agrees that aspects of the licensed materials, including the specific design and structure of
individual programs, constitute trade secrets and/or copyrighted material of Audio Damage. Customer agrees
not to disclose, provide, or otherwise make available such trade secrets or copyrighted material in any form to
any third party without the prior written consent of Audio Damage. Customer agrees to implement reasonable
security measures to protect such trade secrets and copyrighted material. Title to Software and
documentation shall remain solely with Audio Damage.
LIMITED WARRANTY. Audio Damage warrants that for a period of ninety (90) days from the date of shipment
from Audio Damage: (i) the media on which the Software is furnished will be free of defects in materials and
workmanship under normal use; and (ii) the Software substantially conforms to its published specifications.
Except for the foregoing, the Software is provided AS IS. This limited warranty extends only to Customer as
the original licensee. Customer's exclusive remedy and the entire liability of Audio Damage and its suppliers
under this limited warranty will be, at Audio Damage or its service center's option, repair, replacement, or
refund of the Software if reported (or, upon request, returned) to the party supplying the Software to
Customer. In no event does Audio Damage warrant that the Software is error free or that Customer will be
able to operate the Software without problems or interruptions.
This warranty does not apply if the software (a) has been altered, except by Audio Damage, (b) has not been
installed, operated, repaired, or maintained in accordance with instructions supplied by Audio Damage, (c) has
3been subjected to abnormal physical or electrical stress, misuse, negligence, or accident, or (d) is used in
ultrahazardous activities.
DISCLAIMER. EXCEPT AS SPECIFIED IN THIS WARRANTY, ALL EXPRESS OR IMPLIED CONDITIONS,
REPRESENTATIONS, AND WARRANTIES INCLUDING, WITHOUT LIMITATION, ANY IMPLIED WARRANTY OF
MERCHANTABILITY, FITNESS FOR A PARTICULAR PURPOSE, NONINFRINGEMENT OR ARISING FROM A
COURSE OF DEALING, USAGE, OR TRADE PRACTICE, ARE HEREBY EXCLUDED TO THE EXTENT ALLOWED BY
APPLICABLE LAW.
IN NO EVENT WILL AUDIO DAMAGE OR ITS SUPPLIERS BE LIABLE FOR ANY LOST REVENUE, PROFIT, OR
DATA, OR FOR SPECIAL, INDIRECT, CONSEQUENTIAL, INCIDENTAL, OR PUNITIVE DAMAGES HOWEVER
CAUSED AND REGARDLESS OF THE THEORY OF LIABILITY ARISING OUT OF THE USE OF OR INABILITY TO
USE THE SOFTWARE EVEN IF AUDIO DAMAGE OR ITS SUPPLIERS HAVE BEEN ADVISED OF THE POSSIBILITY
OF SUCH DAMAGES. In no event shall Audio Damage's or its suppliers' liability to Customer, whether in
contract, tort (including negligence), or otherwise, exceed the price paid by Customer. The foregoing
limitations shall apply even if the above-stated warranty fails of its essential purpose. SOME STATES DO NOT
ALLOW LIMITATION OR EXCLUSION OF LIABILITY FOR CONSEQUENTIAL OR INCIDENTAL DAMAGES.
The above warranty DOES NOT apply to any beta software, any software made available for testing or
demonstration purposes, any temporary software modules or any software for which Audio Damage does not
receive a license fee. All such software products are provided AS IS without any warranty whatsoever.
This License is effective until terminated. Customer may terminate this License at any time by destroying all
copies of Software including any documentation. This License will terminate immediately without notice from
Audio Damage if Customer fails to comply with any provision of this License. Upon termination, Customer
must destroy all copies of Software.
Software, including technical data, is subject to U.S. export control laws, including the U.S. Export
Administration Act and its associated regulations, and may be subject to export or import regulations in other
countries. Customer agrees to comply strictly with all such regulations and acknowledges that it has the
responsibility to obtain licenses to export, re-export, or import Software.
This License shall be governed by and construed in accordance with the laws of the State of Colorado, United
States of America, as if performed wholly within the state and without giving effect to the principles of conflict
of law. If any portion hereof is found to be void or unenforceable, the remaining provisions of this License
shall remain in full force and effect. This License constitutes the entire License between the parties with
respect to the use of the Software.
4Credits
Software Design and Construction, Documentation
Chris Randall
Adam Schabtach
Field Testing
Wade Alin
Rob Cosh
Sean Costello
Carl Downing
Steve Hamann
Jeff Laity
Made Possible By
Elle
Tracie
Fuzzy Logic
Alfred
Chica
Edwin
Madeline
Pablo
Widget
Zed
5Welcome
Thank you for purchasing Tattoo, Audio Damage's drum synthesizer and sequencer. With twelve voices
inspired by the famous X0X series of analog drum machines and an internal sequencer that is second to none,
Tattoo makes an excellent addition to the arsenal for any electronic music producer.
Each of the twelve internal voices has been created using our proprietary D-Plane synthesis, and each has
been extensively tested and tuned in order to have a broad palette. Every parameter of every voice has its
own modulation sequencer, allowing for extensive motion within a pattern.
The grid sequencer in Tattoo is a whole world unto itself, with comprehensive randomization features and
multiple sync modes, including a MIDI note sync to enable use with virtually any time signature, groove
template, or host swing. The sequencer has MIDI out (VST only) to drive other sound sources, to double or
replace Tattoo's internal sounds.
In short, Tattoo is more than a simple drum synth; it is a complete rhythm programming environment , a
fantasy come true for any fan of vintage drum machines. We hope you enjoy your purchase, and once you've
had a browse around the user interface, please take the time to come back and read this manual to learn how
to fully exploit the feature set of Tattoo.
6System Requirements
To use Tattoo, you'll need a Steinberg VST-compatible host application which conforms to the VST 2.0
specifications, and a computer capable of running it. For the Audio Unit version of Tattoo, you’ll need an
application capable of hosting Audio Unit plug-ins, and a computer capable of running it.
We support the use of Tattoo under Microsoft Windows XP, Vista, or Windows 7; and Apple OS X version 10.4
or newer.
Installation
Installation is straightforward: Double-click the Tattoo Installer icon and follow the instructions. During the
installation process the installer will ask you to enter your registration code. Your registration code uniquely
identifies your purchase, and you will need it if you need to reinstall your plug-in (for example, after
upgrading to a new computer). Keep a copy of the code in a safe location and please don’t share it with your
friends. We’re delighted if you like our products so much that you want to share them, but please ask your
friends to buy their own copy so that we can keep making cool new products.
To un-install from OS X, simply delete the plug-in from your VST folder, which is usually located at
/Library/Audio/Plug-Ins/VST/Audio Damage, and your Audio Units folder, which is located at
/Library/Audio/Plug-Ins/Components/. To un-install from Windows, delete the plug-in from your VST
folder, which is usually at C:\Program Files\Steinberg\VstPlugins\Audio Damage.
Note for MacOS X users: you must be logged in to a user account with administration privileges to run the
Tattoo installer.
7Overview
Here is a picture of Tattoo’s editor window with labels of the sections we’ll describe in the following text:
8Pattern Sequencer
The Sequencer section of Tattoo is the answer to Bootsy Collins' immortal question: "where the party at,
y'all?" at least in the context of this particular instrument. The Sequencer entire consists of the grid that
controls playback of the voices, which we have conveniently named "Sequencer," and the many Mod
Sequencers, which modulate the individual parameters of each voice, as well as controlling the velocity of
individual events.
The main grid should be a fairly obvious paradigm for anyone remotely familiar with electronic music
production, as it is one of the more common ways to create a linear pattern of music. As such, we won't dwell
on the basic tenets of grid (or "piano roll") sequencing. Tattoo's grid sequencer is both incredibly simple in
operation and quite deep in its feature set, and the following sections deal with its dedicated controls. The Mod
Sequencer is joined at the hip with the Sequencer, but has enough features of its own to warrant a separate
chapter.
If you’re really starting from scratch with grid-based composition: time moves from left to right on the grid.
Each horizontal position represents one step in the pattern. Each row represents one instrument; the names
of the instruments appear on the left. Click somewhere on the grid and a white square will appear. This means
that the instrument in that square’s row will play when the sequencer reaches the square’s horizontal position.
Click the square again to make it go away. You can drag horizontally to turn a number of squares on or off at
once.
Pattern Controls
The pattern controls let you switch between the 16 pattern memories present in Tattoo, copy and paste
patterns, and set the step and sequence length of the pattern.
Selector
The pattern selector is the row of 16 numbers beneath the words “Pattern Control” near the lower center of
Tattoo’s window. Tattoo can contain up to 16 independent patterns at a time. Clicking the pattern selector
chooses the current pattern, i.e. the one you hear when Tattoo is playing and the one you can change by
clicking notes on and off in the note grid and manipulating the current instrument’s Channel Controls.
An orange square is drawn on top of the number of the current pattern. If Tattoo is not playing, the pattern
changes immediately when you click on the pattern selector. If Tattoo is playing when you click the pattern
selector, Tattoo waits until it reaches the end of the current pattern before switching to the new pattern. This
9enables Tattoo to stay in sync with the beat and bar of your music. You’ll see a grey square drawn on the
pattern selector after you click it, showing you the pattern that Tattoo will next play.
Clear
The Clear button erases all notes in the pattern grid. One click and boom, they’re all gone. Use with caution.
Copy
The Copy button makes a copy of the current pattern, including both the contents of the pattern grid and the
settings of all of the Channel Controls for all of the instruments. This copy is retained inside Tattoo in a special
place that we’ll call the copy buffer for lack of a better name.
Paste
The Paste button overwrites the current pattern, including both the contents of the pattern grid and the
settings of all of the Channel Controls for all of the instruments, with the contents of the copy buffer. Together
the Copy and Paste buttons let you easily duplicate a pattern and/or move it between any of the 16 pattern
memories. Click the Copy button to make copy of the current pattern, click a destination pattern on the
pattern selector, then click Paste to place a copy of the original pattern in the new location. The first pattern
is left unchanged.
Step Size
The Step Size popup menu determines both how many steps the current pattern has and the rhythmic value
of each step (relative to your host program’s sense of time). There are several choices: 1x32, 2x16, 1x16T,
1x16, and 1x8T where ‘T’ is used to denote triplet values. The choices indicate the length of the pattern and
the rhythmic value as shown in this table:
Setting Step Value Steps per Pattern
1x32 1/32nd 32
2x16 1/16th 32
101x16T 1/16th triplet 24
1x16 1/16th 16
1x8T 1/8th triplet 12
Channel Controls
The Channel Controls create random variations for each instrument. Each instrument has its own set of
channel controls. Click the name of an instrument in the list on the left of the pattern grid to choose which
instrument is affected by the channel controls. The current instrument’s name is shown in bright white while
the other names are shown in grey.
Channel controls are stored within the pattern memories. When you change patterns the channel controls
change also. This lets you create similar patterns with variations created by different settings of the channel
controls.
Clear
The Clear button erases all of the notes for the current instrument. Of course you can also erase notes by
clicking and dragging back and forth in the pattern grid, but the Clear button does it all for you with one click.
Rand
Click the Rand button to randomly turn notes on and off for the current instrument. Each time you click the
Rand button, about half of the notes in the current instrument’s pattern will be turned on and about half will
be turned off.
RND RST
“RND RST” is an abbreviation for “randomize on reset”. When an instrument’s RND RST switch is turned on,
the instrument’s notes are randomized every time Tattoo reaches the beginning of the pattern. RND RST
creates the same result as if you clicked the Rand button exactly at the beginning of each measure as Tattoo
plays.
11Probability Sliders: Selected Beats and Random Beats
The two sliders in the Channel Control section labeled Selected Beats and Random Beats determine the
probability or likelihood that Tattoo will play the instrument on any given step. These sliders let Tattoo
automatically create random variations of the current pattern.
The Selected Beats slider affects notes that you draw in the pattern grid. If the Selected Beats slider is set
all the way to the right, Tattoo behaves as you expect: it plays every note that you’ve drawn in the pattern
grid. As you move the slider to the left, Tattoo will sometimes refrain from playing notes. The position of the
slider determines how likely Tattoo is to play any given note. If you set the slider to its halfway point, Tattoo
will play each note that you’ve drawn in the pattern about half of the time. To put it another way, every time
Tattoo plays the pattern you’ll hear about half of the notes you’ve drawn. Which notes Tattoo plays and which
it leaves out are determined randomly each time the pattern plays. If you move the slider all the way to the
left, Tattoo will omit all of the notes you’ve drawn for the current instrument.
The Random Beats slider adds randomly chosen notes to the pattern for the current instrument. If the slider
is set to its leftmost position, Tattoo doesn’t add any notes to the ones you’ve drawn in the grid. As you move
the slider to the right, Tattoo will add more and more randomly chosen notes to the pattern. Its choice of
notes will change randomly each time the pattern plays.
RAND SIZE
Which notes Tattoo adds are also determined by the RAND SIZE popup menu. The RAND SIZE popup menu
sets the rhythmic value of the randomly chosen notes. The available values are 1/32nd, 1/16th, 1/8th, 1/4th, ½,
and 1/16th and 1/8th triplets. For example if you set the Random Beats slider to the middle of its range and
the RAND SIZE control to 1/8, Tattoo will play eighth notes on the current instrument about half of the time,
each time the pattern plays, regardless of any other notes that you have placed in the instrument’s row in the
pattern grid. If you move the slider all the way to the right, Tattoo will play a steady stream of eighth notes
(or whatever rhythmic value you’ve set with the RAND SIZE control).
Note that the Selected Beats and Random Beats sliders have complementary functions: the Random
Beats slider causes Tattoo to add notes to the pattern while the Selected Beats slider causes Tattoo to
remove notes from the pattern.
12RAND VEL
The RAND VEL control, short for “random velocity”, sets the velocity of all notes played in response to the
Random Beats slider. Sometimes you’ll want your randomly generated beats to be softer or less noticeable
than the beats you’ve entered yourself. Setting the RAND VEL control to a low value ensures that all
randomly generated notes are played relatively quietly. Of course you can also set RAND VEL to a high value
and be pummeled with loud, unpredictable drum hits if that’s the effect you’re looking for. Drag up and down
on the RAND VEL control to change its value.
If you drag all the way downwards on RAND VEL, you’ll see that its value changes from numbers to the word
SEQ. When set to SEQ, the randomly generated notes use the velocities set in the instrument’s velocity
sequencer, i.e. they’ll have the same velocities as the notes you enter in the pattern.
Output Controls
The output controls comprise a simple mixer for setting the relative loudness of Tattoo’s instruments and their
position in the stereo field. Their settings are global, that is, their value is the same across all patterns.
Level
The Level knobs are simple gain controls for each instrument. Click and drag vertically on the knobs to change
their value. As the knob rotates clockwise the instrument becomes louder.
Pan
Beneath each Level knob is a panning slider. Click and drag horizontally on the slider to move the instrument’s
signal back and forth between the left and right channels of the output bus.
Output
Tattoo has six independent output busses so that you can process its instruments differently within your host
application’s mixer. Each output buss is stereo, i.e. it has two channels and the panning controls will behave
as you expect. Of course, you’ll have to connect each buss that you use in your host application or you won’t
hear instruments that are assigned to a buss other than the first one. Consult your host application’s
documentation for setting up a software instrument with multiple output busses; how this is done varies quite
a bit from one host to another.
13The busses are designated with the letters A through F. A is the plug-in’s main output buss and will almost
certainly be connected and audible when you load Tattoo into your host application. Click the appropriate
letter to switch an instrument’s output to another buss.
Mute & Solo
The Mute and Solo buttons, labeled “M” and “S”, appear to the left of the instrument names. Click a Mute
button to silence an instrument altogether, and click a Solo button to hear only the corresponding instrument.
Any number of instruments can be muted at one time but only one can be soloed.
Mod Sequencer
The Mod Sequencer is Tattoo's hidden (or, okay, not-so-hidden, really) secret. It is actually several dozen
sequencers that all share a common interface. There is no modulation routing in Tattoo for the simple reason
that there is no need for it. Every single synthesis control parameter has its own sequencer.
The basic idea is this: click on a Voice control of any sort (e.g. "Kickdrum Tune" or "Cowbell Ratio") and the
Mod Sequencer switches to show modulation for that control. You can draw any shape by clicking and
dragging in the sequence graph, or use one of the provided shapes with the Autofill button. The Mod
Sequencer's default view is Velocity, which you see by clicking on the Voice's name to the left of the main
sequencer grid.
When the mod sequencer displays velocity values, higher bars mean higher velocities. For all other
parameters the mod sequence values are bidirectional, that is, they can either increase or decrease the
parameter’s value. Here’s an example of a mod sequence that increases an instrument’s velocity (i.e,
loudness) over the pattern:
Here’s an example of a mod sequence that makes the pitch of a tom rise then fall over the duration of the
pattern:
14Autofill Buttons
The Autofill buttons above the mod sequencer graph let you fill the sequence with several preset shapes.
Clicking the RAMP, SINE or RAND buttons will produce the following sequence patterns:
Clicking the INVERT button reverses the values of each step in the mod sequence: high values become low
values and vice-versa. For example, if you click the ramp button and then the invert button, you’ll end up with
a ramp that slopes upwards from start to finish, rather than downwards as shown above.
Clear
Clicking the CLEAR button sets all of the values in the sequence to their minimum. It effectively erases the
sequence altogether.
15RND RST
The RND RST (short for “randomize on reset”) switch, when turned on, causes the sequence steps to be set
to random values every time Tattoo reaches the beginning of the pattern. RND RST creates the same result
as if you clicked the RAND Autofill button exactly at the beginning of each measure as Tattoo plays.
Voice Controls
All of Tattoo’s sounds are synthesized in real time, not derived from samples. This means that you can tailor
the drum sounds to fit your tastes and needs, using the voice parameters found near the top of Tattoo’s
window.
The voice parameters are stored globally; that is, they are the same for each of the patterns in Tattoo’s
sequencer. (The voice parameters determine the sound of your drum kit; the patterns determine what you
play on that kit.) However, you can use the parameter mod sequencers to change Tattoo’s drum sounds in
subtle or not-so-subtle ways in each pattern.
Common Parameters
There are some parameters and controls which all (or nearly all) of Tattoo’s percussion synthesizers have in
common. We’ll describe them in general first, and then describe each of the controls for each of Tattoo’s
synthesizers.
Tune
Most of Tattoo’s voices have a Tune knob. This knob controls the frequency, or perceived pitch, of the
percussion sound. Turn the knob clockwise and the sound goes up in pitch, turn it anti-clockwise and the pitch
goes down.
Noise Level
Many of Tattoo’s voices have a noise source. The noise is used in various ways: to add a sharp click to the
attack portion of the sound, to simulate the rattle of snares, to add complexity to the sound of cymbals, etc.
The Noise Level knob controls the loudness of the noise relative to the pitched tone of the sound generator.
Turn the knob clockwise to make the noise louder. You can turn the noise off altogether by rotating the knob
completely anti-clockwise.
16Envelope Generators
Most of Tattoo’s voices have either one or two Envelope Generators (or EGs for short). In a synthesizer, an
envelope generator creates a signal that changes in level over the duration of a single note. At least one EG is
used to shape the overall loudness of the note, but often at one or more other EGs controls some aspect of
the sound’s timbre, for example, by controlling the frequency of a filter.
In Tattoo, the envelope generators are quite simple: they have an attack phase, a fixed peak, and a decay
phase. You can change the duration of the two phases, and their curvature, by clicking and dragging the
envelope with the mouse. Here’s an illustration showing how to use Tattoo’s EGs:
Since Tattoo is a percussion synthesizer its EGs are naturally tailored for generating percussive sounds. They
have a short range of attack times—a few milliseconds at most. The duration and curvature of the attack
phase is just enough to soften the initial transient of the drum sound. On the other hand, the decay segment
of the EGs is quite long in some instruments, such as the cymbal voice.
Kick Drum
Tattoo’s kick drum was primarily inspired by the kick in the TR-909, arguably the most-used kick drum sound
in recent music history. Since the 808’s kick is nearly as ubiquitous, we made Tattoo’s kick flexible enough to
provide accurate emulations of both, as well as any sound in between the two and sounds unlike either.
17Tune
The Tune knob controls the pitch of the kick drum’s tone. You can tune it down to speaker-threatening near-
subsonic lows up to pitches high enough to be a little absurd for this instrument’s role.
Saturation
It’s a popular trick to give an electronic drum sound (either sampled or synthesized) a bit more bite by
deliberately distorting, or saturating, a pre-amp or mixer’s input. Tattoo’s Saturation knob creates a similar
form of distortion. As you rotate the knob clockwise, the kick drum becomes louder and more distorted. If this
knob is rotated all the way to its anti-clockwise extreme, no distortion is added to the tone.
Noise Freq
Tattoo’s kick drum includes a noise generator to add a sharp click at the beginning of its sound. The Noise
Freq knob controls the frequency content of the noise. Turn the knob clockwise and the noise becomes
brighter. At the highest settings you’ll hear the burst of noise quite distinctly; at more moderate settings the
noise blends with the tone of the drum.
Click Level
The Click Level knob controls the loudness of the noise generator described above. You can turn the noise
generator off altogether by rotating this knob fully anti-clockwise. The perceived loudness of the noise is also
affected by the Noise Freq knob, so if you find yourself cranking up the Click Level and not hearing any
change, try giving the Noise Freq knob a nudge.
Pitch Mod
The Pitch Mod (short for “modulation”) knob controls how much the Pitch Envelope changes the frequency of
the tone. Real drums bend slightly sharp when struck hard enough. Tattoo doesn’t particularly aspire to
recreate the sound of real drums, but some amount of pitch bend can make the kick drum’s sound more
prominent. In particular a high setting of the Pitch Mod knob combined with a short Pitch Envelope gives the
kick a nice attack transient.
18Waveform
The tone generator in the TR-909’s kick drum is somewhere in between a sine wave (i.e a pure tone with no
harmonic content) and a triangle wave. While building Tattoo we found that a mathematically correct triangle
wave was too bright-sounding for a good kick sound, so we ended up creating an accurate reproduction of the
output of the TR-909’s tone oscillator.
On the other hand, the oscillator in the TR-808 kick is close to a sine wave. That familiar “booooomm” has
almost no harmonic content. Hence Tattoo has a switch, labeled Waveform, that lets you choose between the
wave shape modeled after the TR-909’s oscillator and a pure sine wave. Click 9-TRI for the 909 waveform,
and click SINE for the 808-style tone.
Amp Envelope and Pitch Envelope
The kick drum has two envelope generators. One controls the overall amplitude or loudness of the sound, the
other controls the pitch of the tone generator. The amount that the pitch changes in response to the pitch EG
is controlled by the Pitch Mod knob as described above.
Snare 8
The Snare 8 voice is modeled directly from the TR-808 snare circuits. We expanded the controls for our
version to give it a wider timbral repertoire.
Tune
The Tune knob controls the pitch of the snare’s tone generator. Turn it clockwise to make the pitch higher,
anti-clockwise to make the pitch lower.
Noise Color
The Noise Color knob controls the filtering of the white-noise generator in the snare synthesizer. Turning the
knob clockwise moves the noise higher in the frequency spectrum, making it sound brighter.
19Noise Level
The Noise Level knob controls the amount of noise in the snare sound. You can turn the noise all the way off
to create a simple, short, electronic-sounding blip from the tone generator.
Noise Decay
The Noise Decay knob controls how long it takes the noise component of the snare sound to fade out to
silence. Turn this knob anti-clockwise to shorten the duration of the noise.
Snare 9
As you probably guessed from its name, Tattoo’s Snare 9 voice was derived from the TR-909 snare sound.
Our version has much more flexibility; while it can recreate the 909 sound accurately, it can produce a wide
range of sounds in its own right.
Tune
The Tune knob controls the pitch of the snare’s tone generator. Turn it clockwise to make the pitch higher,
anti-clockwise to make the pitch lower.
Noise Color
The Noise Color knob controls the filtering of the white-noise generator in the snare synthesizer. Turning the
knob clockwise moves the noise higher in the frequency spectrum, making it sound brighter.
Noise Level
The Noise Level knob controls the amount of noise in the snare sound. You can turn the noise all the way off
to create a simple, short, electronic-sounding blip from the tone generator.
20Noise Amp Envelope
The Noise Amp Envelope controls the loudness of the noise over the duration of the snare sound. You can
lengthen the noise envelope to make the noise dominate the snare’s sound, shorten it so that the noise is
present only in the initial attack of the sound, etc.
The overall loudness of the noise is also controlled by the Noise Level knob, as described above.
Tone Amp Envelope
The Tone Amp Envelope controls the loudness of the tone oscillators over the duration of the snare sound.
Since you can control the noise and tone amplitude envelopes independently, you can create snare sounds
that range from the somewhat realistic to the entirely electronic.
Toms (Low, Mid, High)
Rather than copying any particular drum machine’s tom sounds directly, Tattoo’s tom voices are an Audio
Damage original. The three tom voices have the same sound-generating architecture and differ only in their
pitch ranges. Each has a pair of oscillators for creating the main body of the sound, one for the main tone of
the drum and one for the prominent third harmonic present in drum sounds. A third oscillator and a noise
source are added to strengthen the initial transient of the sound, simulating the click created by the stick
hitting the drum head.
Tune
The Tune knob controls the pitch of the tom’s tone oscillators. Turn it clockwise to make the pitch higher,
anti-clockwise to make the pitch lower. The two oscillators have a fixed frequency ratio so this knob controls
both of them.
Pitch EG
The Pitch EG knob controls how much the tom’s pitch changes over the duration of its sound. If this knob is
rotated fully anti-clockwise, the sound has the same pitch from start to finish. As you turn the knob clockwise,
the tone will start at a higher pitch and bend downwards. Small amounts of pitch bend make the initial portion
of the tom sound more prominent; large amounts of pitch bend recreate the “pyewwww” electronic tom
sounds that fell out of fashion when the disco era ended (probably with good reason).
21Saturation
The Saturation knob applies a variable amount of soft-clipping distortion to the tone generators, making the
tom sound louder and, uh, more distorted.
Click Level, Noise Level and Tone Level
These three knobs control the relative loudness of the different parts of the tom’s sound-generating
components. Turn the knob clockwise to increase the loudness of the corresponding component. By varying
the levels of the three components you can create a wide range of electronic percussion sounds. Obviously, if
you turn all of them fully anti-clockwise the tom voice won’t make any sound at all.
Tone 1 Envelope and Tone 2 Envelope
The two envelope generators control the loudness of the tom’s two tone oscillators over the duration of the
sound. Since the two oscillators have different pitches, blending them with different envelopes creates a sound
that changes slightly in timbre over time. Since Tone 2 has a lower pitch than Tone 1, a shorter Tone 1
Envelope typically creates a more realistic tom sound. However, realism is probably not why you’re using
Tattoo in the first place, so feel free to experiment.
Hi Hats (Open, Closed)
While the TR-606 never achieved the reputation of its larger siblings (at least not yet), it possesses excellent
hi hat sounds. Tattoo’s hi hat voices were designed after careful examination of both the 606’s and the TR-
808’s hi hats.
Tattoo has separate voices for the open and closed hi hat sounds. Their controls are independent but identical
(so yes, your open hat sound can be quite different from the closed hat sound). As usual for drum machines,
the closed hi hat voice will cut off (or “choke”) the open hi hat voice if they overlap.
Tune
The Tune knob controls the overall pitch of the hi hat sound. Turn the knob clockwise and the sound goes up
in pitch.
22Decay
The Decay knob controls how long it takes for the hi hat sound to fade out to silence. Turn the knob clockwise
to make the sound longer, anti-clockwise to make it shorter. As you would probably expect, the decay time of
the open hi hat voice is longer than that of the closed hi hat voice.
BPF Frequency and HPF Frequency
The hi hat voices employ a pair of filters to control their timbre. The hi hat sound is created by a complex tone
generator (modeled directly after circuits found in the TR-606) and a noise generator. The filters, one band-
pass filter and one high-pass filter, remove lower frequencies from this combined sound to create a thin,
metallic-sounding signal. The BPF Freq and HPF Freq knobs control the operating frequencies of the two
filters. Use the BPF Freq knob to change the overall tone of the hi hat; use the HPF Freq knob to remove
lower frequencies making the sound brighter and thinner.
Noise Mix
The Noise Mix knob controls the relative loudness of the tone generator and noise generator in the hi hat
synthesizer. Turn the knob all the way to the left and you’ll hear just the tone generator, turn it all the way to
the right and you’ll hear just the noise generator. If the knob is at its center position the tone and noise
generators are mixed equally.
Cymbal
Synthesizing cymbal sounds is something of an uphill battle. Real cymbals produce extremely complex timbres
that vary dramatically depending on where you hit them, how hard you hit them, what you hit them with, etc.
Apparently displeased with their own efforts, Roland gave up trying to synthesize cymbals and used samples
in the TR-909, with debatable results. Strange as it may seem, we at Audio Damage are most fond of the
cymbal sound in the lowly Boss DR-110 drum machine, so it and the TR-808’s cymbal were the main
inspirations for Tattoo’s cymbal voice. True to the no-samples-allowed design philosophy, it synthesizes a wide
range of metallic timbres.
Tattoo’s cymbal has two sound-producing components: a set of oscillators that produce a dense, harmonically
rich tone, and a noise source. A controllable amount of white noise is added to create unpitched sound. Two
band-pass filters with different center frequencies produce two sound components from this signal. The lower
filter produces the bell-like “ding” sound component of the cymbal heard first when it is struck. The higher
filter produces the shimmering, high-frequency, sustaining portion of the cymbal sound.
23Tune
The Tune knob controls the pitch of the oscillators in the cymbal voice. Turn the knob clockwise and the
sound goes up in pitch.
Noise Level
This knob sets the amount of noise added to the cymbal sound. A small amount of noise makes the voice
sound a little less metallic and more complex. A large amount of noise makes the voice sound like an attempt
to use the noise source in an analog synthesizer to simulate a cymbal.
Ding Level
This knob set the relative loudness of the “ding” component of the cymbal voice, that is, the output of the
lower-frequency band-pass filter. Changing the loudness of this component shifts the balance between the
lower frequencies and the higher frequencies in the overall sound.
Low BPF
This knob controls the center frequency of the lower-frequency band-pass filter which generates the “ding”
component of the cymbal sound. Rotate the knob clockwise to raise the frequency (i.e., raise the pitch), rotate
it anti-clockwise to lower the frequency.
High BPF
This knob controls the center frequency of the higher-frequency band-pass filter which creates the sustaining
component of the cymbal sound. Rotate the knob clockwise to raise the frequency (i.e., raise the pitch), rotate
it anti-clockwise to lower the frequency.
Ding Envelope and High Envelope
The two envelope generators control the overall loudness contours of the “ding” portion and the higher-
frequency portion of the cymbal sound. Typically you’ll use a shorter envelope for the “ding”, since in most
real cymbals it decays more quickly than the sustaining sound, but there’s no reason that you have to stick to
this convention.
24Rimshot
Just like the real thing, rimshot sounds in drum machines usually find roles as rhythmic accents. Tattoo’s
rimshot comes directly from the clever circuits found in the TR-909. It’s a simple sound, short but sweet, and
hence has a simple complement of controls.
Tune
The Tune knob controls the overall pitch of the rimshot sound. Turn the knob clockwise and the sound goes
up in pitch.
HPF Frequency
Tattoo’s rimshot voice employs a high-pass filter to shave off some of the lower frequency components,
making the rimshot sound thinner and brighter. Turn this knob clockwise to emphasize the “click” portion of
the sound and reduce the body tone.
Clap
Put your hands together for electronic handclaps, everyone! Roland used more or less the same circuit for
claps in all of their early drum machines and Tattoo owes its claps to that circuit. It’s a fairly inflexible design
in that if you change its parameters much it ceases to sound anything like hand claps, or even what you
expect electronic hand claps to sound like. Hence Tattoo’s clap voice has only a couple of knobs.
Tone
The Tone knob controls how bright or dark the claps sound. Turn the knob clockwise and the claps become
brighter and crisper.
Reverb
Those clever engineers at Roland came up with an interesting idea: add a little bit of decaying noise to the
clap circuit and it sounds a bit like reverb. (Nowadays reverb is cheap and plentiful, but this was certainly not
the case when the TR-808 was under development, so people did what they could.) Tattoo’s Reverb knob
25emulates this feature. Turn it up and you’ll hear decaying noise simulated reverberation add depth and
spaciousness to the clap sound.
Cowbell
Ah, the TR-808 cowbell. Despite the fact that it doesn’t sound much like a real cowbell, it has become a staple
of dance music rhythm tracks. Tattoo’s cowbell voice is a faithful reproduction of the 808 sound that we all
know if not love, with a number of additional controls for more sonic flexibility.
Tune
The Tune knob—well, by now you can guess what this does, right?
Detune
Tattoo’s cowbell voice starts with a dense signal generated by several oscillators of different pitches. The
Detune knob changes the relative tuning of the oscillators, changing the cowbell’s overall timbre.
Filter Cut and Filter Q
The cowbell voice includes a bandpass filter after the oscillators. Turning the Filter Cut knob changes the
center frequency of this filter, changing the tone of the cowbell. Turning the knob clockwise makes the cowbell
sound brighter. The Filter Q knob changes the width, or resonance (designated by “Q” in engineering circles)
of the filter. Higher settings of the Filter Q knob narrow the filter’s response, emphasizing the electronic
nature of synthesized cowbell sounds.
Amp Envelope
The amplitude envelope controls the cowbell’s overall loudness. Cowbell sounds typically have a short and
rapid decay, but you can lengthen Tattoo’s cowbell sound if you want it to really explore the studio space.
More
If you have a fever, and the only prescription is more cowbell, this is your button.
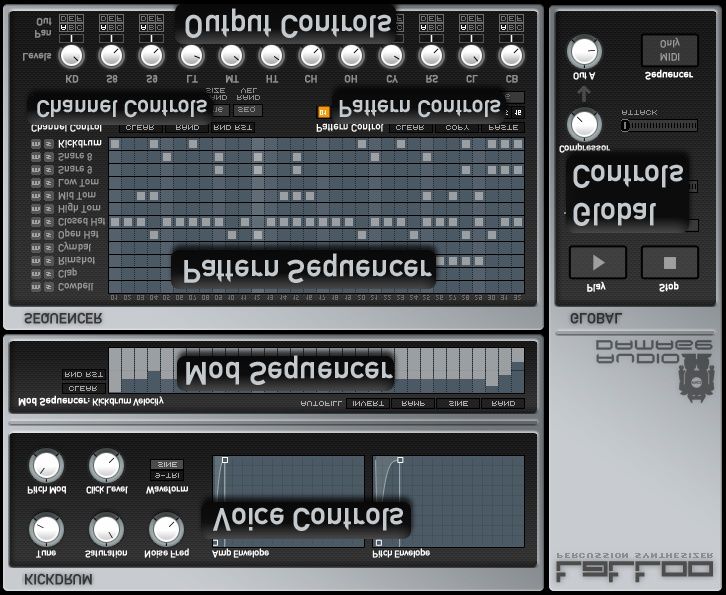
26Global Controls
The global controls, found at the lower-right corner of Tattoo’s window, affect Tattoo’s overall operation. Most
of them will be familiar if you’ve used a drum machine before, and their utility is pretty obvious even if you
haven’t used a drum machine.
Sync
The small popup menu labeled Sync lets you choose one of three operating modes for Tattoo. These modes
are Host, Internal, and MIDI Note.
The Host sync mode locks Tattoo’s sequencer to your host program’s transport. Tattoo’s tempo and timing
will be entirely determined by your host program: when you start your project playing in the usual manner,
Tattoo will start also; when you stop your DAW, Tattoo stops. Tattoo’s sequencers will always be aligned with
the bar lines in your host program. In Host sync mode, Tattoo’s Tempo knob will have no effect since the
tempo is set by the host. Also, the Play and Stop buttons don’t do anything in Host sync mode.
The Internal sync mode lets Tattoo run independently of the host program. Tattoo will play at whatever
tempo you set with the Tempo knob, and will start and stop when you click the Play and Stop buttons. The
Internal sync mode is useful if you’re using Tattoo in a context in which you have no need for another frame
of rhythmic reference, such as running it within Plogue Bidule.
Tattoo’s MIDI Note Sync mode is somewhat tricky to get the hang of, but its usefulness will be immediately
apparent once you understand what it does. In short, the MIDI Note mode lets you use MIDI note messages
to make Tattoo’s sequencers step forwards and backwards.
When Tattoo is in this mode, the sequencer steps forward one step and plays that step every time it receives
a C5 note. If it receives a B5 note, it steps backwards one step and plays that step. If it receives a D5, it goes
to step one and plays that step. If it is on step 32, and it receives a C5, it wraps around to the other side and
plays step 1. If it is on step 1, and it receives a B5, it wraps around and plays step 32.
In this manner, you have full control over the time base the sequencer is operating at. The main usefulness is
to drive a 16-step pattern using a groove template or your host's swing settings. To do that, follow these
steps:
1. Create a 1-measure MIDI clip in Tattoo's MIDI channel.
2. In your host's piano roll editor, put a D5 note at 1/16. At 2/16 onwards put a C5.
273. Quantize this clip as desired, or apply a groove template to it.
4. Put Tattoo in "MIDI Note Sync." Tattoo will now follow along with the host's groove or swing.
The one caveat to using this mode is that you do not get random notes smaller than the step size. Also, the
internal swing of Tattoo has no effect.
Using the steps above, but varying the placement of C5 notes, will enable you to drive Tattoo in virtually any
time signature, as long as your smallest division is less than 32 steps. Want to recreate the 5/8 section of
Tarkus? No problem. Just follow the steps above, but make one D5 followed by 9 C5 notes, and you've got
Tattoo stepping in 10/16 time, easy as that.
Play/Stop
The large, inviting Play and Stop buttons mostly do what you expect: click Play and Tattoo starts playing,
click Stop and Tattoo stops. The manner in which they will not meet your expectations is that they function
only when Tattoo’s Sync control is set to Internal, i.e. when Tattoo is running independently of your host
program’s transport.
The Play button has an extra trick. If Tattoo is playing and you click the Play button again, the sequencer will
jump back from its current position to the first step.
Tempo
The tempo knob sets the tempo at which Tattoo plays when it is in Internal sync mode. When the Host sync
mode is active, this knob has no effect on Tattoo’s operation but the current tempo of your host program’s
transport is displayed above it.
28Swing
What is generally referred to as "Swing" in drum machines is something of a misnomer, but we'll set aside the
semantics of the word for now, and just say that our swing slider does the same thing as the swing control in
a TR-909. It moves every even-numbered 16th note to the right, or "behind the beat," resulting in a
rhythmically pleasing groove that will theoretically set heads to bobbing, toes to tapping, and asses to
shaking.
The swing control in Tattoo is derived directly from the swing of the TR-909. If you have experience with a
909, you'll know that there are 7 distinct swing settings in that storied machine. We've taken all of them and
interpolated between them, resulting in a continuous controller. The left-most position is no swing at all, or
setting 1 on the TR-909, and the right-most position is full swing, or setting 7 on the TR-909.
This control, since it is intrinsically tied to the movement of 16th notes, only works as advertised when the
STEP SIZE is set to 1x16 or 2x16. It has an effect in the other settings, but you'll need to experiment to see if
it suits your needs.
Finally, note that every DAW has a somewhat different idea of what constitutes "swing." Since it is something
of an amorphous concept in the first place, this is an acceptable situation. However, the swing in Tattoo might
not "sit" exactly with the swing in your host. If this turns out to be the case, you can either make a groove
template from an audio recording of Tattoo doing 16th note high-hats and sequence everything else against
that, or drive Tattoo with MIDI Note Sync, so that it is swinging/grooving the same as your host.
Compressor
Tattoo possesses a stereo compressor on its main output buss (buss A). This compressor is optimized for
drum sounds, appropriately enough, and has just two simple controls for making your drums louder and your
beats fatter.
The knob labeled Compressor sets the overall amount of compression applied to Tattoo’s output, changing
several internal parameters at once. If you leave the knob turned fully anti-clockwise the compressor has no
perceptible effect on the sound. As you rotate the knob clockwise Tattoo’s sounds will become louder and
fuller.
The Attack slider changes how quickly the compressor responds to the signals passing through it. Like most
digital compressors, Tattoo’s compressor can respond nearly instantaneously to the sharp transients of
synthesized drum sounds. At high compression settings (i.e. when you crank up the Compressor knob) this
29response can be too fast since the compressor flattens out all of the sound’s shape. By lengthening the attack
time, some of the sound’s initial transient can pass through the compressor unchanged, letting a heavily
compressed sound retain its sharp beginning. As you slide the Attack slider to the right, the compressor’s
attack time becomes longer. At the slider’s leftmost position the attack time is extremely short, enabling you
to squash Tattoo’s sounds nearly flat, should that be the effect you desire.
Note that the compressor is applied only to the main output buss. The other output busses do not pass
through the compressor at all.
Out A
The Out A knob sets the overall loudness of Tattoo’s main outputs. It’s the master volume knob, in other
words. Internally it comes after the compressor, so if you find that turning up the compressor provides a
signal that’s too loud, use the Out A knob to lower Tattoo’s output level.
MIDI Only
The MIDI Only button beneath the word “Sequencer” turns off Tattoo’s voice synthesizers. When this button
is turned on, Tattoo transmits MIDI data as usual but does not generate any sound itself. Tattoo’s sequencer
consumes very little CPU power. If you’re using Tattoo to control other instruments, either hardware or
software instruments, you can turn on the MIDI Only button to free up some of your CPU’s attention to be
used elsewhere.
MIDI Controllers
Tattoo responds to MIDI continuous controller messages. You can use hardware MIDI controllers, such as
MIDI slider boxes or the knobs found on some MIDI keyboards, to adjust Tattoo’s parameters. Most of the
controls in Tattoo’s user interface can be manipulated with a MIDI controller.
Tattoo has a simple “MIDI Learn” mode for assigning its parameters to MIDI controllers. To assign a
parameter to a MIDI controller:
1. Hold down the SHIFT and CTRL keys (SHIFT and COMMAND keys on a Mac) on your computer’s keyboard,
and click once on the parameter’s control. A blue box will be drawn around the control to indicate that
it is ready to learn which MIDI controller it will be assigned to.
302. Move the MIDI controller to send a continuous controller message—turn the knob, press the button,
move the slider, whatever is appropriate.
3. The blue square will disappear. Now Tattoo’s control will move when you manipulate the MIDI
controller.
Tattoo waits until it has received two consecutive continuous controller messages with the same controller
number before it makes an assignment. This filters out extraneous data sent by some MIDI controllers. If you
are assigning a button or switch on a MIDI controller, you may have to press or move the switch twice before
Tattoo recognizes the controller and assigns it to the desired parameter.
To assign a different MIDI controller to a control, repeat the same procedure.
To cancel MIDI Learn mode without assigning a controller, hold down the SHIFT and CTRL keys (SHIFT
and COMMAND keys on a Mac) and click in any empty area in Tattoo’s window (i.e., don’t click on
another control).
To remove a MIDI controller assignment from a control, SHIFT and CTRL keys, (SHIFT and COMMAND keys
on a Mac) click on the control once so that the orange box appears, then click again on the same
control.
Tattoo’s MIDI controller assignments apply to all presets and instances of Tattoo, in all host applications that
you use. The MIDI assignments are stored in a special file on your hard drive. The contents of this file are
read when Tattoo is loaded by your host. If you have two or more instances of Tattoo in use at once, any MIDI
assignments you make will not be propagated to the other instances until the next time that your host loads
the plug-ins.
The Audio Unit version of Tattoo does not provide the same MIDI assignment features as the VST version.
Almost all Audio Unit hosts provide their own mechanism for assigning MIDI controllers to parameters, so it
would be redundant to implement MIDI controller assignments in the plug-in itself. Consult the documentation
for your Audio Unit host to learn how to use its MIDI features.
MIDI Notes, In and Out
Tattoo responds to incoming MIDI note messages and hence can be used as a software synthesizer plug-in.
Tattoo’s instruments are assigned to fixed MIDI note numbers, following the usual mapping convention. The
assignments are as follows:
31Instrument MIDI Note Assignment
Kick C2
Snare 8 D2
Snare 9 E2
Low Tom F2
Mid Tom G2
High Tom A2
Closed Hi Hat F#2
Open Hi Hat A#2
Cymbal C#3
Rimshot C#2
Clap D#2
Cowbell D#3
Since Tattoo is a percussion synthesizer, the duration of incoming MIDI notes are irrelevant and Note Off
messages are essentially ignored.
You can also use MIDI note messages to select Tattoo’s active pattern. When Tattoo receives a note message
in the range C4 through D#5 it will switch to the corresponding pattern. C4 switches Tattoo’s sequencer to
pattern 1, C#4 switches it to pattern 2, and so on. As usual for the Pattern Control, Tattoo changes patterns
when it reaches the end of the current pattern.
The VST version of Tattoo also transmits MIDI note data as it plays, using the same note-number assignments
as shown above. It transmits velocity values as set in each instrument’s velocity sequencer. The Audio Unit
32version does not include this feature since OS X currently lacks the ability to transmit MIDI information from
Audio Units.
Automation
Most of Tattoo’s controls can be automated using your host's automation features. The contents of the main
sequencer grid and the mod sequencers cannot be changed with automation data, but just about every other
individual control will transmit and receive automation data. Consult your host's documentation for
information on how to use these features. Note that Tattoo has over 260 parameters available for automation.
Some hosts deal with a parameter list of this length more gracefully than others.
33We’re On TV!
Well, not really, but we do have a number of tutorial videos available online for your viewing pleasure. Many
of the topics described in this manual are demonstrated with video screencasts available in the Support
section of our website, http://www.audiodamage.com.
And Finally…
Thanks again for purchasing Tattoo. We make every effort to ensure your satisfaction with our products, and
want you to be happy with your purchase. Please write info@audiodamage.com if you have any questions or
comments.
34You can also read