Teacher's Pack - Whitehouse Primary School
←
→
Page content transcription
If your browser does not render page correctly, please read the page content below
Teacher’s Pack
We’re on a mission to get Britain sewing again -
            starting with our schools!

  As part of the Great British Button Challenge, we’re giving
 out free buttons to schools, and challenging teachers to bring
               sewing back into UK classrooms.

  The 2018 Hobbycraft Report found that 1 in 5 people in the
  UK can’t sew on a button, with 52% never taught at school,
    so we’re giving teachers, parents and budding stitchers
    creative inspiration for imaginative button makes, with
   projects suitable for individuals and group activities, and
            ideas that are both fun and educational!

     This pack contains a step by step guide to sewing on a
  button, plus a choice of 8 fantastic projects that use buttons
       in creative makes linked to popular school topics.

 Don’t forget to take photographs of your finished makes and
  share them at www.hobbycraft.co.uk/buttonchallenge to
 win fantastic prizes, including a bumper Creative Classroom
                   bundle worth over £150!

                                       Safety first!
Sewing on a button is a simple process, but it involves the use of both sharp needles and scissors,
 so an appropriate level of supervision is essential. Teachers taking on the Great British Button
Challenge should make a judgement about supervision based on the age of the children involved,
  and manage classroom activities appropriately to avoid any injuries or mishaps. For younger
   children, you may wish to consider using a plastic yarn needle and embroidery thread, and
                       pre-making holes in fabric before pupils get to work.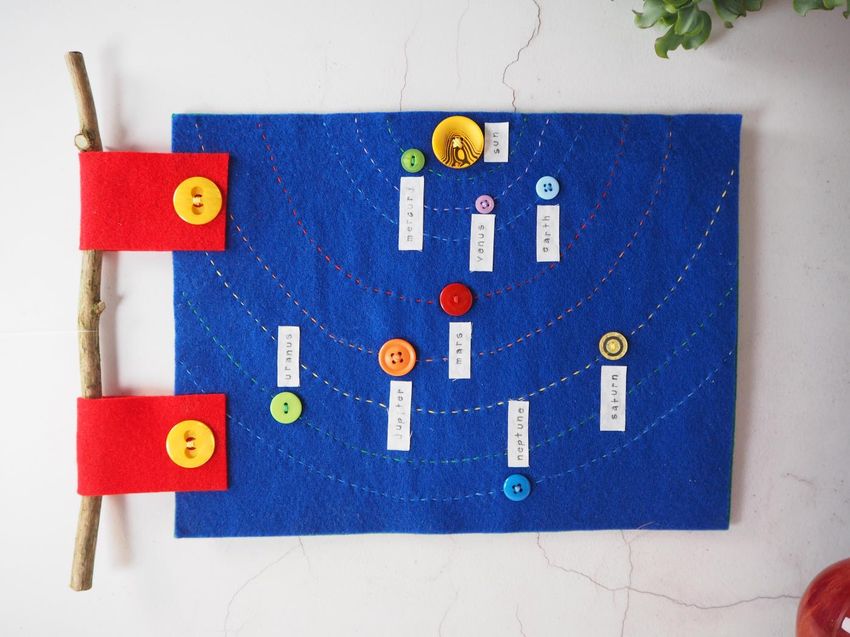
How to sew on a button
 Follow these simple steps to sew on a button securely.
We’ve used an embroidery hoop but it’s not essential – just
 make sure fabric is pulled tight when you start stitching.

 1. Thread the needle. Pull through so
    needle is in the middle of the
    length of thread

 2. Tie a knot at the two thread ends
    so that they are joined

3. Begin to sew the button from the
   back of the fabric

4. Run the stitch through the
   opposite button holes several
   times
5. Move the stitch over to the
   adjacent button holes

6. Run the stitch through the
   opposite button holes several
   times

7. Slide the needle down so that it
   goes underneath all stitches

8. Loop the thread around to form a
   knot. Pull tight, and cut using
   scissors

9. Check that the button is secure.
   And you’re done!
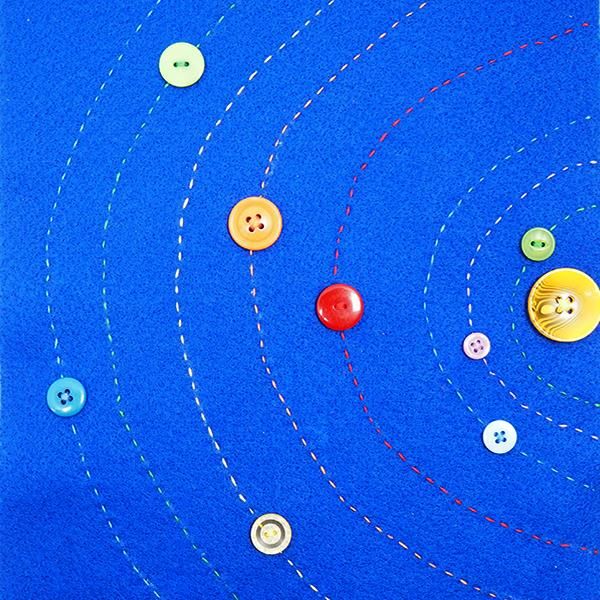
Idea 1: Button solar system

Space is such an exciting and engaging subject to be learning about at school!
This project is a great one for group work in the classroom, and once finished
iy will look absolutely brilliant displayed on a wall. Read the tutorial below to
find out the process of creation.

An original design by Debbie von Grabler-Crozier.
Difficulty level: Easy – a great team project

You will need:
3 pieces of felt each 22cm x 30cm (available in store at Hobbycraft)
1 dark blue or black and the other a bright colour to coordinate. The last piece is for the
back lining.
25cm sq. plain white fabric (available in store at Hobbycraft)
Assorted Valuecraft Buttons »
Red: Mars
Yellow: the Sun and Saturn
Orange: Jupiter
Green: Mercury and Uranus
Blue: The Earth and Neptune
Violet: Venus
Small Alphabet Stamps »
Black Inkpad »
30cm long natural stick or Dowel »
Tailor's Chalk »
Removable Marker »

Craft essentials:
Tacky Glue »
Scissors »
Hand Sewing Needles »

NB: Please read all instructions through and assemble the equipment before beginning.
1. Begin by stamping the names of the planets onto the white fabric.

Top tip! Leave enough room around each word for cutting out.

2. Cut the labels out and put them aside. They are ready to use when we get to that bit.

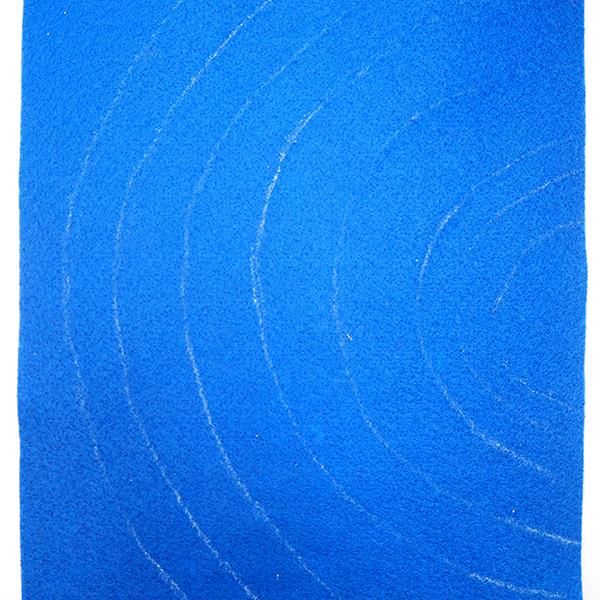
3. Prepare the dark blue felt first. In order to not cram the model in too much. Position the
sun on the right hand side in the middle rather than the centre of the felt and then draw
concentric circles around it for the orbital lines of the planets.

Top tip! You can draw the lines in freehand but if you are a bit wonky, find some round
things and draw around them. They don’t have to be the same distance apart, aim for
around 1- 2.5cm.

4. Sew the orbital lines with a running stitch using three strands of embroidery thread in a
colour to match the planet.
5. The button planets come next. Sew the sun on first and then the planets around it.

Top tip! Stagger the planets on their orbits to leave room for the labels.

6. Glue the labels next to their planets. The order is the Sun, Mercury, Venus, Earth, Mars,
Jupiter, Saturn. Uranus, Neptune.

Did you know? The Earth is in an area called the ‘Goldilocks Zone’ so called because it is not
too hot and not too cold – just the right distance from the sun to allow life.

7. Glue the lining onto the back of the front to hide any threads.
8. Finally, cut two pieces of your coordinating felt 5cm wide x 18cm long and fold them in
half widthwise. Come in 2.5cm from each outer side on the top and make a tab with the felt
stitching it on the front and back and finishing with a button on the front.

9. Thread your stick through the tabs to hang your universe!
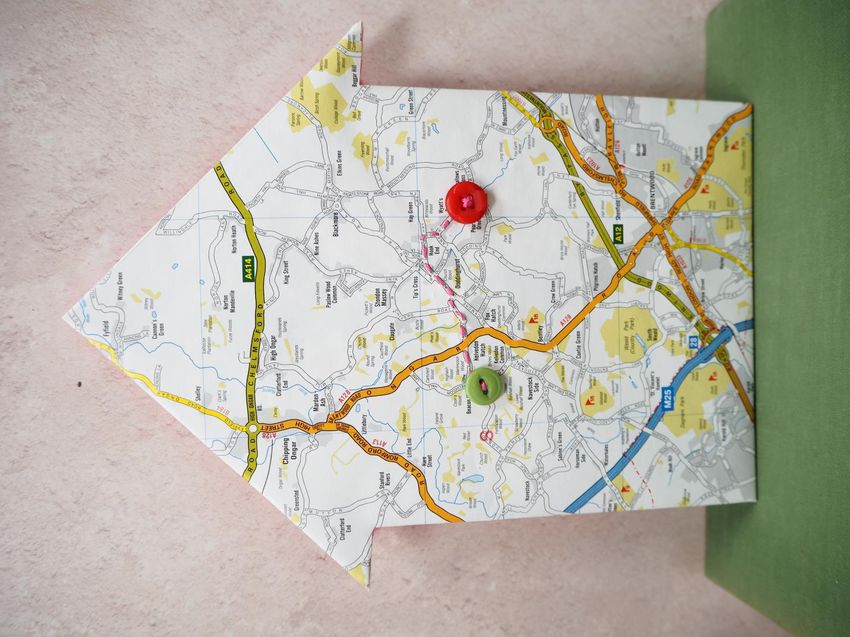
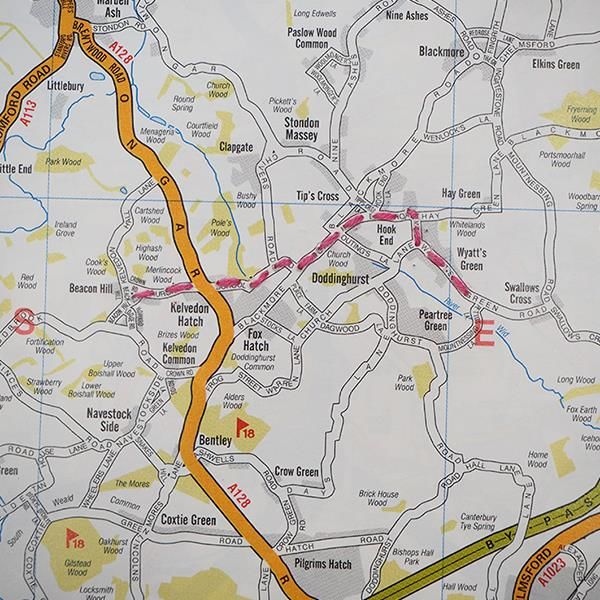
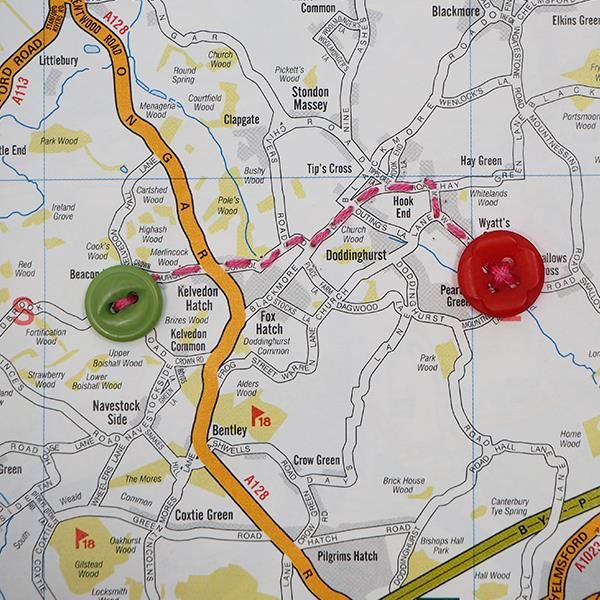
Idea 2: Sew your journey home

Sewn maps look so striking as an educational decoration to hang on the wall,
and these would be fantastic lined up on a board in your classroom! Read the
tutorial below to find out how to teach your class to sew a journey from their
school to their home using buttons that you can collect free in store at
Hobbycraft.
Difficulty level: Easy

An original design by Debbie von Grabler-Crozier

You will need

Street map of your area
Assorted Valuecraft Buttons »
Embroidery Thread »
A4 cardboard »

Craft essentials

Scissors »
Masking Tape »
Hand Sewing Needles »
PVA Glue »

NB: Please read all instructions through and assemble the equipment before beginning.
1. Begin by using the template to make the house shape onto the cardboard. Cut the house
shape out.

2. Take your map and find on it the route that you take to school. Tape the map to a sunny
window with the wrong side facing you (this helps to work out roughly where to put the
tape) and stick some masking tape over the area of your school route.

Top tip! This doesn’t have to be exact. It is simply to reinforce the paper so that the stitches
do not come out when you sew.
3. On the right side of the map, use a simple running stitch to trace the way you get from
your house to your school.

4. Now sew on two different buttons, one for your house and one for your school.

5. Trim the map and glue it to the house shape. You will need to trim on the back to make it
fit the corners.
6. Use a piece of felt to cover the back and trim this to suit the house shape. Add a small
hanging loop to the back with some embroidery thread.
Idea 3: Life cycle bunting

This project will allow the creation of life cycle bunting that will not only look
fantastic hanging up in your classroom, but will aid in the teaching of various
cycles of life! We have chosen to show the life cycle of a flower - what other
cycles can you think of to display?

An original design by Debbie von Grabler-Crozier

Difficulty level: Involved
Templates: Templates for this project can be downloaded from
blog.hobbycraft.co.uk/great-british-button-challenge-sew-a-felt-pencil-case/
Alternatively, why not challenge children to create their own template designs
in paper before starting to stitch?

You will need:
Fat Quarters »
Assorted Valuecrafts Buttons »
Felt Sheets in Green, Brown, Yellow »
Dark Green Bias Binding »
Fusible Bias Tape »
Embroidery Threads in Green and Brown »
Fabric Marker »

Craft essentials
Pinking Shears »
Hand Sewing Needles »
Hot Glue Gun »

NB: seam allowances are all ½ cm (1/4”) unless otherwise stated. Please read all instructions
through and assemble the equipment before beginning.
1. Begin by cutting three bunting flags from the felt using the template. These have a
straight side. Then cut three coloured ones from the fabrics and on the two lower sides, trim
these and decorate with the pinking shears.

Top tip! The idea is that the fabric part of the bunting is slightly smaller than the felt and will
be framed by it when you have finished.

2. Use the flower template to cut the flowers and leaves from the felt. The first one is a bud,
the second full bloom and the third drooping.

Top tip! The first two leaves are green and the third brown. The first two flowers are yellow
and the third brown.
3. On the first flag, draw the stem (using the template as a guide) and stitch the stem with a
running stitch and three strands of green embroidery thread.

4. Add the leaf and make a running stitch centre vein. Repeat this for the other two flags
remembering to do everything in brown on the third one and use the template as a guide
for placement.

5. The flowers are appliqued with a running stitch (three strands) of yellow for the first two
and brown for the third. Use the template to get the bud, full bloom and finished flower.
6. On the first flag only, cut another leaf from green felt and cut in in half. Applique this
either side of the emerging bud.

7. Buttons next! Attach a small one to the bud plus three small ones over the bud, a larger
one to the centre of the full bloom one with eight smaller ones around it and three falling
out of the dying flower with a further three on the ground underneath.

Top tip! The buttons for this make represent the seeds and show how in the dying flower,
the seeds are distributed underneath the plant ready for regeneration the following season.
This takes a little bit of the sting out of the death of an organism because it shows that
death is not really the end. There is new life next spring

8. To make up the bunting, lay a completed fabric flag onto a felt one and sew the sides with
a running stitch using three strands of embroidery thread. Repeat for the other two.
9. Cut a piece of green bias binding 1m long. Lay the flags onto the bias binding in order
(bud, full bloom, drooping) and use the fusible bias tape to adhere them to the bias tape.

Top tip! Centre the flags onto the bias binding so that you have equal amounts left each side
to form the hanging loops.

10. Fold the bias binding over the raw edges and use some more tape to keep the binding
together. Use a running stitch to secure the bias binding together.

Top tip! You can do this on a sewing machine too.

11. Fold the bias binding into loops each end and secure with a button. This will provide a
way to hang the bunting.
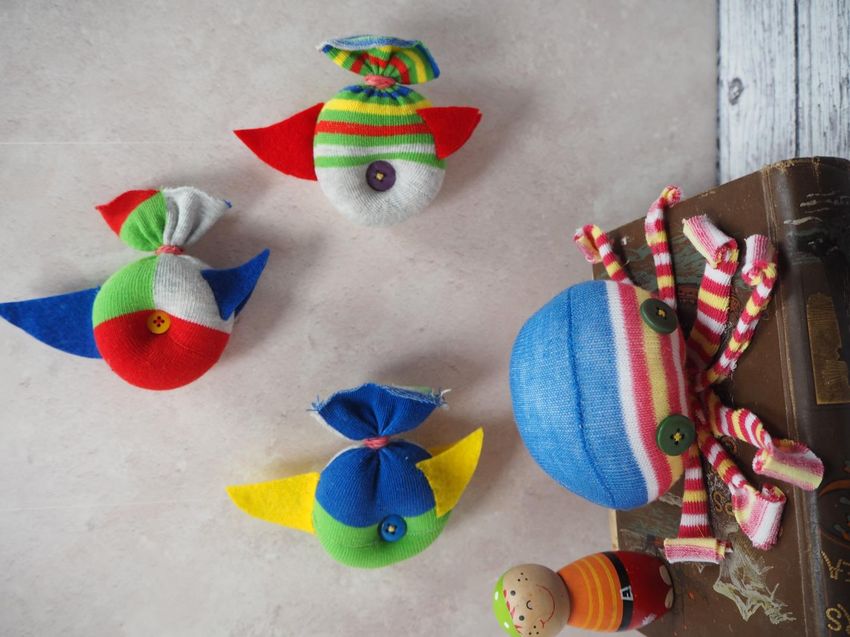
Idea 4: Under the sea

Sew these super easy sea creatures with buttons for eyes with your class this
term. This is a simple, yet effective, and engaging project that will capture
the imagination of any child. Read the tutorial below to find out what you'll
need!

An original design by Debbie von Grabler-Crozier.
Difficult level: Easy – fun individual projects

You will need
Children’s socks – this is a great use for odd socks and favourites which are now too small.
You need smaller socks for the fish and larger for the octopus.
Polyester Toy Stuffing »
Assorted Valuecraft Buttons »
Coloured Elastic Bands »
Felt Sheets »

Craft essentials:
Scissors »
Hand Sewing Needles »

NB: Please read all instructions through and assemble the equipment before beginning.
1. To make a fish – choose your sock and stuff it with polyester filling. Fasten off a ‘tail’ with
an elastic band and trim the sock end back to about 4cm.

2. Choose two buttons and sew them on for eyes one on each side of the head.

Top tip! If you can, sew the buttons on at the same time and draw them in slightly to give
the face a bit of shape. The buttons do not have to match.
3. Cut the fins from the felt using your template and stitch this to the top of the back and
also one to each underside.

Top tip! The dorsal fin is also a handy spot to hang the fish if you want to do that.

4. To make the octopus – choose a larger sock and stuff the end well with polyester stuffing
material. Fasten off with a coloured elastic band.

Top tip! You will not need the whole length of the sock – trim it if you need to.
5. With your sharp scissors, cut eight legs from the sock opening almost all the way to the
elastic band .

Top tip! Some socks work better with this than others and it will weaken the structure of
the sock so the octopus is better in a setting where it will not be handles a lot. Perfect for a
mobile!

6. Choose a couple of buttons. Sew these on for eyes. They do not have to match!
Idea 5: Felt pencil case

This guide will show you how to make a folded pencil case using felt and
round buttons. The guide uses blanket stitch to secure the case. Learn how to
sew a button and buttonhole to make a functional and secure item for your
favourite stationary!

Difficulty level: Medium
You will need:
A4 Felt Sheets »
Embroidery Thread »
Buttons »
Hand Sewing Needles »

Craft essentials:
Pencil »
Scissors »
1. Layer two A4 colour felt sheets

2. Measure 8cm into the sheet and make a pencil mark
3. Fold up the other side to this 8cm mark and pin in place

4. On the unfolded side, mark out curved corners if you wish using a compass, and cut out
using scissors
5. Begin to sew around the edges - this will be using a blanket stitch. Place the needle
through the back of the top layer

6. Loop around to the back and put the needle through the same hole, leaving a loop
7. Put the needle through this loop and pull. Begin the next stitch by putting the needle into
the back again and leaving a loop.

8. Repeat this stitch until all is sewn together, leaving the folded bottom as this is already
sealed!
9. Mark 2in into the top and side of the top flap of the pencil case

10. Place a button on this mark and make another mark on either side of the button
11. Cut from mark to mark in a straight line, and check that the button fits!

12. Stitch around the button hole in small loops to secure and strengthen
13. Make a mark within the buttonhole when the pencil case is closed to see where the
buttons need to be sewn

14. Stitch the buttons onto these marks
Idea 6: Flower garden card If you're looking for a quick and easy card for a birthday, thank you or even if you're wishing someone a speedy recovery, this flower garden card is ideal. Simply grab a card blank, a selection of buttons and a your favourite fine liner and you'll be away! You can adorn your card with as many blooms as you like, if you are planning on including a number of flowers make sure to experiment with different heights of flora to add interest and maximise the space on your card blank. Difficult level: Easy You will need: 5 x 7" Scallop Edge White Card Blanks » 0.8mm UNI Fine Liner » Assorted Pastel Buttons » Gutermann Cream Sewing Thread » White Cardstock »
Craft essentials: Pencil Double-sided Tape » How to make it 1. With the card blank in a landscape orientation, use a pencil to faintly draw out flower stems coming up from the bottom of the card. Mix and match buttons to each of the stems. 2. Once happy with the composition, secure each of the buttons in place with cream sewing thread. Secure the thread on the inside of the card with a small strip of tape. 3. Cover the inside front of the card with a sheet of white cardstock measuring 16.5 x 11.5cm using double-sided tape, to cover the stitching.
Idea 7: Button frame Create a cute and colourful button frame card using a handful of essentials from your craft stash. This card design is super-easy to personalise, simply pick and mix the button colours to suit the lucky recipient! Perfect for New Baby announcements, Save the Dates and Thanks You's, simply slot your hand written message or photo into the top of the frame. It’s also a great project for a class or textile club to take on – scale it up and use the design to display a class photo on the wall. Difficulty level: Medium You will need: 5 x 7" Scallop Edge White Card Blanks » Assorted Pastel Buttons » Gutermann Cream Sewing Thread » A4 Cream Felt Sheet » A4 White Card » Adhesive Foam Sheet »
Craft essentials: Tacky Glue » Scissors » Pencil How to make it 1. Trim a 15 x 10cm rectangle from an A4 sheet of cream felt and an A4 sheet of white card. On one side of the card and felt mark a 2cm border, use a pair of scissors to remove the central aperture so that you're left with a frame. Place the cardstock frame to one side. 2. Take your buttons and start placing them on the frame so that as little of the cream felt is showing through as possible. Once happy with the composition take a quick photo, this will be used when it comes to securing the buttons into place, as all of the buttons will need to be removed prior to stitching them down. 3. With your reference image to hand, begin securing the buttons in place starting in the bottom right-hand corner and working your way around clockwise. 4. Take the cardstock frame created in step one and secure to the reverse of the stitched button frame using tacky glue. Place to one side to dry for at least five minutes. 5. Take a white sheet of adhesive backed foam and trim into 1cm strips. Remove the adhesive backing, and secure two stacked layers on the back of the frame around the edge on both long sides and along the bottom. Secure centrally to the card blank. 6. Add your image or message into the top of the frame.
Idea 8: Sunshine card

Add a little sunshine to someone's day with this cute-as-a-button notelet;
perfect for using up the odd button or three that you might have lying
around your craft space.

If you didn't want to create a sun as the centre point of your card, there's lots
of other designs that can be created with just one button, why not create a
collection of balloons and use embroidery thread to stitch the tails, or
perhaps a flower head, using a button to create the centre of the flower and
then stitching the petals.

Difficult level: Easy
You will need: White 4 x 4" Square Card Blank » Yellow Embroidery Thread » Button » Turquoise Coloured Cardstock » White Cardstock » Craft essentials: Glue Stick » Foam Pads » Sewing Needle » Paper Trimmer » Pencil How to make it 1. Take a sheet of turquoise cardstock and use a paper trimmer to cut to 9.5cm square. Use a glue stick to secure centrally to a white 4 x 4" card blank. 2. Trim a sheet of white cardstock to 8.5cm square; lightly mark the centre with a pencil. Place your yellow button of choice centrally over the top of the pencil mark and stitch into place using yellow embroidery thread. 3. Once secure add sunburst rays coming from the button. 4. Secure the completed panel centrally to the turquoise layer using foam pads.
You can also read