Testing Packages of Animal Bedding and Peat Moss with Compressed/Expanded Volume Declarations
←
→
Page content transcription
If your browser does not render page correctly, please read the page content below
Testing Packages of Animal Bedding and Peat Moss
                                                  with
                       Compressed/Expanded Volume Declarations
                                          Executive Summary

Animal Bedding (Bedding), also called pet or stall bedding, litter or simply bedding, is generally sold by
dry volume in compressed or uncompressed packages. Based on numerous failed inspections of
packaged animal bedding, the Office of Weights and Measures (OWM) conducted a study in which
compressed and uncompressed packages of animal bedding were measured using a variety of procedures
and test equipment. The results from those tests indicate that the current procedures in the 2014 edition of
NIST Handbook 133, “Checking the Net Contents of Packaged Goods,” the dimensional inspection
procedure for testing compressed packages (e.g., peat moss); and the volumetric inspection procedure
(e.g., mulch); are inadequate for use in testing animal bedding. Uncompressed volume measurements of
animal bedding are dependent on a number of factors, including the size and shape of the measuring
container, the method of filling the measuring container, and the means used to break up the bedding prior
to measuring. Based on the findings of this study, a draft procedure was developed for testing the
uncompressed volume of animal bedding. OWM also designed and constructed new test measures to be
used with the procedure, and then brought these measures to several animal bedding packaging plants for
on-site verification of the test methods. Preliminary findings indicate that the draft procedure provides
more consistent measurement results. Further, the study shows that there is no correlation between
compressed and uncompressed volumes of animal bedding, leading to the conclusion that the requirement
for compressed volume statements on the package label is unnecessary. The following proposal includes
recommended changes to the method of sale for Animal Bedding in NIST Handbook 130, “Uniform Laws
and Regulations in the Areas of Legal Metrology and Engine Fuel Quality,” a revised test procedure for
NIST Handbook 133 relating to the verification of the compressed volume of peat moss (which has been
used with animal bedding), new test procedures for measuring the compressed and uncompressed
volumes of animal bedding, suggested test equipment and a gravimetric auditing procedure that allows
inspectors to avoid destroying all of the packages.

The following amendments to the Method of Sale of Commodities Regulation in NIST
Handbook 130 are proposed:

1. For the reasons described in background Section 2(a) (page 27), the OWM recommends that the
method of sale for animal bedding be amended to eliminate the requirement that packages bear a
declaration of compressed volume. If this recommendation is adopted, the method of sale will require
that packages of bedding only have a declaration of the expanded (uncompressed) volume that can be
recovered by the consumer.

2. For the reasons described in background Section 2(b) (page 28) the OWM recommends that a new
definition for animal bedding and a revised method of sale be adopted to replace the current wording in
Section 2.23. Animal Bedding, in the Uniform Method of Sale of Commodities Regulation in NIST
Handbook 130. The proposed definition for animal bedding and recommended revisions to the method of
sale are presented in the following:

    2.23. Animal Bedding. – Packaged animal bedding of all kinds, except for baled straw, shall
    be sold by volume, that is, by the cubic meter, liter, or milliliter and by the cubic yard, cubic
    foot, or cubic inch. If the commodity is packaged in a compressed state, the quantity
    declaration shall include both the quantity in the compressed state and the usable quantity that

May 5, 2015                                                                                     Page 1 of 68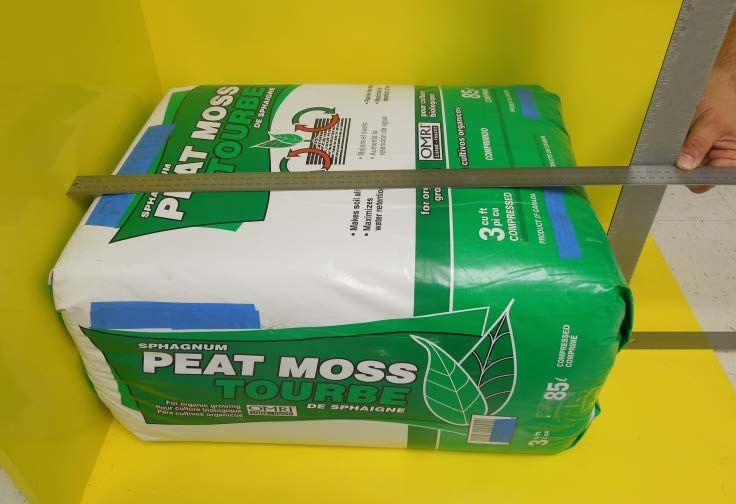
can be recovered. Compressed animal bedding packages shall not include pre-compression
   volume statements.

       Example:
       250 mL expands to 500 mL (500 in3 expands to 1000 in3).

       2.23.1.      Definitions.

              (a)   Animal Bedding – any material, except for baled straw, kept, offered or exposed
                    for sale or sold for primary use as a medium for any companion or livestock
                    animal to nest or eliminate waste.

              (b)   Expanded Volume – the volume of the product that can be recovered from the
                    package by the consumer after it is unwrapped and uncompressed.

       2.23.2.      Method of Sale.

              (a)   Packaged animal bedding shall be advertised, labeled, offered and exposed for
                    sale and sold on the basis of the Expanded Volume. If unit pricing is offered to
                    retail consumers, it shall be in terms of the price per liter.

              (b)   The quantity declaration shall include the terms “Expanded Volume” or wording
                    of similar import that expresses the facts, and shall be in terms of the largest
                    whole unit of the milliliter, liter, or cubic meter. A declaration may also include
                    the quantity in terms of largest whole unit of cubic inches, cubic foot, or cubic
                    yard only.

              (c)   The display of pre-compression volume, compressed volume or supplementary
                    dry measure units (e.g., dry quart, bushel) anywhere on the package is prohibited.

                    Examples: Expanded Volume 41 Liters (1.4 Cubic Feet)

                                   Expanded Volume 1.4 Cubic Feet (41 Liters)

                                   Expanded Volume 27.9 Liters (1700 Cubic Inches)

                                   Expanded Volume 113 L (4 Cubic Feet)

                                   Expanded Volume 8 Cubic Feet (226 L)

      2.23.1.3. Exemption - Non-Consumer Packages of Animal Bedding Sold to Laboratory
      Animal Research Industry. – Packaged animal bedding consisting of granular corncobs and
      other dry (8 % or less moisture), pelleted, and/or non-compressible bedding materials that are
      sold to commercial (non-retail) end users in the laboratory animal research industry (government,
      medical, university, preclinical, pharmaceutical, research, biotech, and research institutions) may
      be sold on the basis of weight.
   (Added 1990) (Amended 2012 and 20XX)

May 5, 2015                                                                                  Page 2 of 68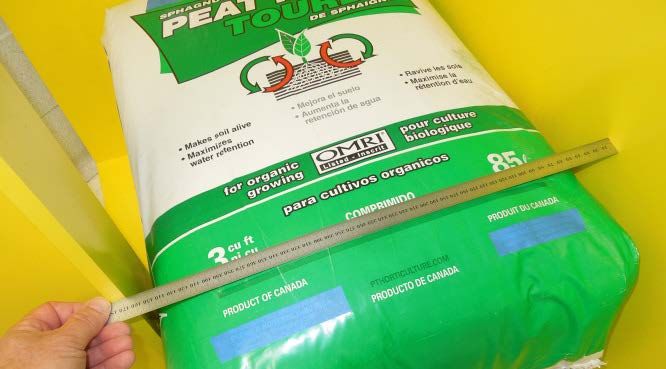
The following test procedures and other amendments are proposed for Chapter 3. “Test
Procedures for Packages Labeled by Volume” in NIST Handbook 133:

1. For the reasons described in the background of Section 4 (page 46), the OWM recommends adoption
of amendments to Section 3.9. “Peat Moss.” The proposed amendments revise the dimensional test
procedure used in verifying compressed volume declarations on packages of peat moss and, if the
requirement that packages bear a declaration of the compressed volume in the package is not eliminated
as recommended above, animal bedding (see page 4).

2. For the reasons described in the background of Section 3 (page 30), the OWM recommends adoption
of a new Section 3.15. that includes a volumetric test procedure for animal bedding (see page 13).

3. For the reasons described in the background of Section 3(b) (page 31), the OWM recommends that no
enforcement action be taken on the 1 % percent Maximum Allowable Variation (MAV) in Table 2-6
(which covers most sizes of the expanded volume declarations on bedding packages) because that value is
unreasonable. Instead, the OWM recommends a tentative MAV of 5 % be applied to single measurement
determinations of bedding volume and a tentative MAV of 10 % be applied when multiple measurements
are used to make volume determinations. OWM recommends these MAV values be used pending further
studies of test data collected using large test measures, single measurement determinations and utilizing
the new test procedure.

4. For the reasons described in the background of Section 3(e) (page 34), the OWM recommends that
test measures not be filled by hand. Instead, the OWM recommends that compressed bedding be
uncompressed in suitable sized chutes and then poured into a test measure (see page 39). As described on
page 36, Section 3(f), pouring the bedding helps the product volume recover from the compression
applied during packaging.

5. For the reasons described in the background of Section 3(h) (page 40), the OWM recommends that
for official inspections the volume of the bedding in the test measure be determined without leveling the
product and using a modified headspace method (based on NIST Handbook 133,
Section 3.7. “Volumetric Test Procedure for Paint…”).

6. For the reasons described in the background of Section 3(i) (page 44), the OWM recommends that
officials use a gravimetric auditing procedure to identify potentially short measure samples to reduce
destructive testing and conserve inspection resources.

7. For the reasons described in the background of Section 3(j) (page 46), the OWM recommends that,
unless the sample packages of animal bedding fail the dimensional test (of the compressed volume, that
the final decision to accept or reject an Inspection Lot be based on the results of a test that verifies the
expanded (uncompressed) volume declared on the package.

The current test procedure in NIST Handbook 133, Section 3.9. “Peat Moss” will be modified as shown:

May 5, 2015                                                                                     Page 3 of 68
3.9. Peat Moss
3.9.1. Dimensional Test Procedure for Verifying the Compressed Packages
3.9.1.1. Test Equipment
• Tape measure
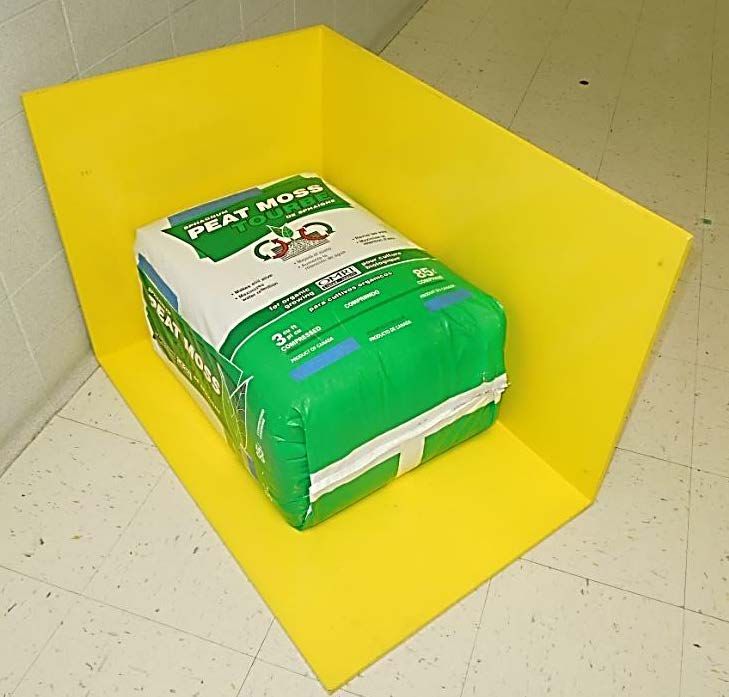
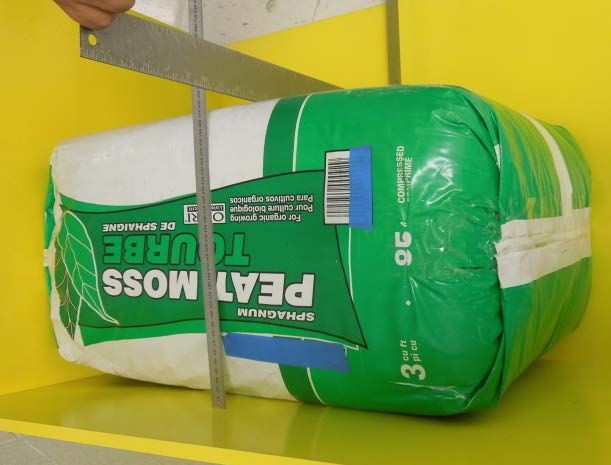
Figure 3-1. Peat Moss
3.9.1.2. Test Procedure
1. Follow Section 2.3.1. “Define the Inspection Lot.” Use a “Category A” sampling
plan in the inspection; select a random sample.
2. For each dimension (length, width, and height) take three equidistant
measurements.
3. Calculate the average of each dimension.
4. Multiply the averages to obtain the compressed cubic volume as follows:
average height × average width × average length = cubic measurement
5. Subtract the labeled volume from the measured volume to determine package
error.
(Amended 2010)
3.9.2. Uncompressed Volume Packages
Use the following method to test peat moss sold using an uncompressed volume as the
declaration of content. The procedure as defined by the latest version of ASTM D2978-03,
“Standard Test Method for Volume of Processed Peat Materials.”
3.9.2.1. Test Equipment
• 12.7 mm (or ½ in) sieve
• Use one of the following measures as appropriate for the package size. (Refer to
Table 3-4. “Specifications for Test Measures for Mulch and Soils” for additional
information on test measure construction.)
May 5, 2015 Page 4 of 68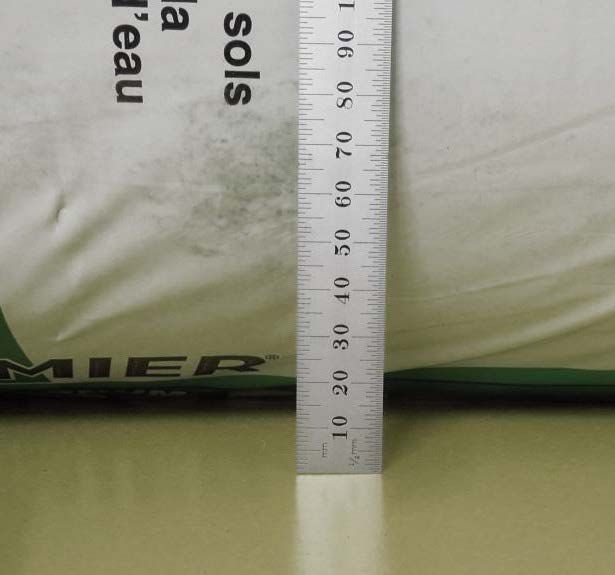
28.3 L (1 ft3) measure with inside dimensions of 30.4 cm (12 in) by 30.4 cm
(12 in) by 30.4 cm (12 in). Mark the inside of the measure with horizontal lines
every 1.2 cm (½ in) so that package errors can be directly determined
100 L (3.5 ft3) measure with inside dimensions of 50 cm (19.68 in) by 50 cm
(19.68 in) by 40 cm (15.74 in). The inside of the measure should be marked with
horizontal lines every 1.2 cm (½ in) so that package errors can be directly
determined
• Straight edge, 50.8 cm (20 in) in length
• Sheet for catching overflow of material
• Level (at least 15.24 cm (6 in) in length)
3.9.2.2. Test Procedure
1. Follow Section 2.3.1. “Define the Inspection Lot.” Use a “Category A” sampling
plan in the inspection; select a random sample.
2. Open each package in turn, remove the contents, and pass them through the sieve
directly into the measuring container (overfilling it). Use this method for
particulate solids (such as soils or other garden materials) labeled in cubic
dimensions or dry volume. Some materials may not pass through the sieve for peat
moss; in these instances, separate the materials by hand (to compensate for
packing and settling of the product after packaging) before filling the measure.
Note: Separated material (product not passing through the sieve) must be included in
the product volume.
3. Shake the measuring container with a rotary motion at one rotation per second for
5 seconds. Do not lift the measuring container when rotating it. If the package
contents are greater than the measuring container capacity, level the measuring
container contents with a straightedge using a zigzag motion across the top of the
container.
4. Empty the container. Repeat the filling operations as many times as necessary,
noting the partial fill of the container for the last quantity delivered using the
interior horizontal markings as a guide.
5. Record the total volume.
6. To compute each package error, subtract the labeled quantity from the total
volume and record it.
3.9.3. Evaluation of Results
Follow the procedures in Section 2.3.7. “Evaluate for Compliance” to determine lot
conformance for either procedure.
3.9.1.1. Test Equipment
• Calculator or Spreadsheet Software (programmed to make volume calculations)
May 5, 2015 Page 5 of 68• Volumetric Package Worksheet (Appendix C at end of this report)
• Non-permanent marking pen.
• Knife or Razor Cutter (for use in opening packages and unwrapping shrink-
wrapped pallets in warehouses)
• Cellophane or Duct Tape (for use in securing packaging tails)
• Dimensional Measuring Frame (see Exhibit 1 and drawings at www.nist.gov/owm
[to be posted])
Exhibit 1. Picture of a Dimensional Measuring Frame.
• Rigid Rulers – Starrett 1 or equal with 1.0 mm graduations. The edges of a ruler
used with a measuring frame must be straight and the edges must be the zero point
(see Exhibit 2).
o 300 mm (12 in)
o 500 mm (19.5 in)
o 1 m (39 inch)
• Carpenter Squares
o 300 mm (12 in)
o 600 mm (24 in)
1
Notice: The mention of trade or brand names does not imply endorsement or recommendation by the U.S.
Department of Commerce over similar products available from other manufacturers.
May 5, 2015 Page 6 of 683.9.1.2. Test Procedure
Note: Test Notes
Rounding: When a package measurement falls between graduations on a ruler, round
the value up. This practice eliminates the issue of rounding from the volume
determination and provides the packager the benefit of the doubt. If a ruler with a
graduation of 1.0 mm is used, the rounding error will be limited to 0.5 mm or less. It is
good practice to circle a measurement that has been rounded up or make a statement to
such effect so that it becomes a part of the record.
Dimension Identification: The following package nomenclature is used to identify the
dimensions measured in this test procedure.
Figure 3-2. Dimension
Height Identification.
Width
Note: Packages of compressed peat moss do not have declaration of expanded volume.
Safety
This procedure does not address all of the safety issues that users need to be aware of in
order to carry out the following tasks. Users are sometimes required to conduct tests in
warehouse spaces or retail stores where fork-trucks are in motion – care must be taken to
warn others to avoid or exercise care around the test site. The procedure requires users to
lift heavy objects including large bulky packages and test measures and includes the use of
sharp instruments to obtain packages from shrink-wrapped pallets. Users may be required
to climb ladders or work platforms to obtain sample packages. When opening and
emptying packages, dust, or other particles may be present or escape from the packages,
which may cause eye injuries and respiratory or other health problems. Users must utilize
May 5, 2015 Page 7 of 68appropriate safety equipment and exercise good safety practices. If safe working conditions
cannot be ensured, suspend testing until the situation is corrected.
1. Follow the Section 2.3.1. “Define the Inspection Lot.” Use a “Category A” Sampling
Plan for the inspection. Collect the sample packages from the Inspection Lot using
random sampling. If the packages are not randomly selected, the sample will not be
representative of the lot and the test results will not be valid for use in enforcement
action. Place the sample packages in a location where there is adequate lighting and
ample space for the packages and test equipment.
2. Examine the package for excess packaging material (i.e., packaging tails). Fold the
packaging material consistent with design of the packaging and tape the material
securely to the package so that its effect on the dimensional measurement is
minimized. If the thickness of packaging tail appears excessive, it is appropriate to
determine its average thickness by making at least three measurements along its
length using a dead weight dial micrometer specified in Section 4.5. “Polyethylene
Sheeting” and subtract the thickness from the measurement of length, width or
height. Any deduction from a measurement should be noted on the inspection
report.
3. If a Dimensional Measuring Frame is used, place it on a solid support. If a table is
used, select one of sufficient load capacity to hold the weight of the frame and the
heaviest package to be tested.
4. Position the frame so that the zero end of the ruler can be placed squarely and
firmly against a surface of the frame and so that the ruler graduations can be read.
Position yourself so that you can read both the ruler and the edge of the carpenter
square in Exhibit 2.
5. Place the package against two sides of the frame without compressing the package.
Place a carpenter square against the package at the point of measurement and align
the ruler perpendicular to the edge of the carpenter square as shown in Exhibit 3
where the package length and Exhibit 4 where the package height are being
determined.
May 5, 2015 Page 8 of 68Using a Measuring Frame for Dimensional Testing
Ruler and Carpenter Square define Zero Reference and Measurement Point
Exhibit 2. The rigid frame allows the observer to Exhibit 3. Length Measurement.
hold the zero reference point firmly in place.
Exhibit 4. Height Measurement – A packaging tail on the Exhibit 5. Width Measurement – the frame
end of the package can affect this measurement so it has is rotated on its end to vertical so that the
been folded over and taped against the end of the carpenter square does not compress the
package. product.
6. Measurements – take at least five measurements* of each of the dimensions as follows:
*On small packages (height or length dimensions of 152 mm [6 in] or less) at least three
measurements are taken using the following the instructions).
May 5, 2015 Page 9 of 68Inspect the package for shape and place the flattest surfaces against the measuring frame.
i. Length (see Exhibit 3):
a. take the first measurement across the center line of
the Length axis of package.
Fifth
b. take the second measurement at half the distance Fourth
between the center Line and either of the package
Center
edges.
Line
Second
c. take the third measurement half the distance between Third
the second measurement and the package edge.
d. take the fourth measurement on the opposite end of Length
the package at half of the distance between the center
line and the package edge.
e. take the fifth measurement at half of the distance
between the fourth measurement and the package
edge.
ii. Height: (see Exhibit 4):
a. take the first measurement across the center line of
the Height axis of the package.
b. take the second measurement at half the distance
between the center line and the package edge.
Height
c. take the third measurement half the distance between
the second measurement and the package edge.
d. take the fourth measurement on the opposite end of
the package at half of the distance between the center
line and the package edge.
CL
e. take the fifth measurement at half of the distance
between the fourth measurement and the package
edge.
May 5, 2015 Page 10 of 68iii. Width: (see Exhibit 5): If using one, turn the measuring
frame on end and place the package on its bottom and against
the frame as shown in the picture and on the right where the
package width is being measured.
a. take the first measurement across the center line of
Width axis of the package.
b. take the second measurement at half the distance CL
between the center line and the package edge.
c. take the third measurement half the distance between
the second measurement and the package edge.
d. take the fourth measurement on the opposite end of
the package at half of the distance between the center
line and the package edge.
Width
f. take the fifth measurement at half of the distance
between the fourth measurement and the package
edge.
7. Record the dimensions of each package in millimeters in a software program or
inspection form that includes the information shown in the sample worksheet
“Calculate the Compressed Volume of the Package in Liters” (below). Enter the
measurements in the appropriate spaces and calculate the volume in liters. Calculate
the package error by following the steps listed in the table and then calculate the
average error for the sample.
Note: The following table is an example of the information from an actual test that is
included in a worksheet for verifying the compressed volume on packages of peat moss.
The Inspection Worksheet for Dimensional Testing (see Appendix C) has space for a
sample of 12 packages and includes the steps for calculating the Average Package
Error. Here, the package error in the dimensional volume was + 6.8 L (+ 0.24 ft3).
Apply a tentative MAV of 5 % to a dimensional measured volume.
SAMPLE WORKSHEET
Calculate the Compressed Volume of the Package in Liters
Unit of Measure = 1.0 mm Length (L) Width (W) Height (H)
1. 482 282 690
2. 490 278 690
3. (Center Line) 493 276 681
4. 499 272 677
5. 493 269 657
a. Average: 491 275.4 679
b. L × W × H = Volume/1 000 000 91.8 L
May 5, 2015 Page 11 of 68SAMPLE WORKSHEET
Calculate the Compressed Volume of the Package in Liters
Unit of Measure = 1.0 mm Length (L) Width (W) Height (H)
c. Labeled Compressed Quantities: 85 L NA cu in 3.0 cu ft
d. Conversion Factors NA (b) × 61.02374 (b) × 0.03531467
e. Converted Volume 85 L NA cu in 3.24 cu ft
f. Package Error = (b – c) 6.8 L NA cu in 0.24 cu ft
3.9.2. Uncompressed Volume Packages
Use the following method to test peat moss sold using an uncompressed volume as the declaration of
content. The procedure as defined by the latest version of ASTM D2978-03, “Standard Test Method
for Volume of Processed Peat Materials.
3.9.2.1. Test Equipment
• 12.7 mm (or ½ in) sieve
• Use a one of the following test measure appropriate for the package size. (Refer to
Table 3-4. “Specifications for Test Measures for Mulch and Soils” for additional
information on test measure size and construction.)
28.3 L (1 ft3) measure with inside dimensions of 30.4 cm (12 in) by 30.4 cm
(12 in) by 30.4 cm (12 in). Mark the inside of the measure with horizontal lines
every 1.2 cm (½ in) so that package errors can be directly determined
100 L (3.5 ft3) measure with inside dimensions of 50 cm (19.68 in) by 50 cm
(19.68 in) by 40 cm (15.74 in). The inside of the measure should be marked with
horizontal lines every 1.2 cm (½ in) so that package errors can be directly
determined
• Straight edge, 50.8 cm (20 in) in length
• Sheet for catching overflow of material
• Level (at least 15.24 cm (6 in) in length)
3.9.2.2. Test Procedure
1. Follow Section 2.3.1. “Define the Inspection Lot.” Use a “Category A” sampling plan in
the inspection; select a random sample.
2. Open each package in turn, remove the contents, and pass them through the sieve directly
into the measuring container (overfilling it). Use this method for particulate solids (such
as soils or other garden materials) labeled in cubic dimensions or dry volume. Some
materials may not pass through the sieve for peat moss; in these instances, separate the
materials by hand (to compensate for packing and settling of the product after packaging)
before filling the measure.
May 5, 2015 Page 12 of 68Note: Separated material (product not passing through the sieve) must be included in the
product volume.
3. Shake the measuring container with a rotary motion at one rotation per second for
5 seconds. Do not lift the measuring container when rotating it. If the package contents
are greater than the measuring container capacity, level the measuring container contents
with a straightedge using a zigzag motion across the top of the container.
4. Empty the container. Repeat the filling operations as many times as necessary, noting the
partial fill of the container for the last quantity delivered using the interior horizontal
markings as a guide.
5. Record the total volume.
6. To compute each package error, subtract the labeled quantity from the total volume and
record it.
3.9.3. Evaluation of Results
Follow the procedures in Chapter 2, Section 2.3.7. “Evaluate for Compliance” to determine lot
conformance.
Note: To determine the value of the MAV look up the labeled quantity in Appendix A,
Table 2-6. Maximum Allowable Variations for Packages Labeled by Liquid and Dry
Volume.
May 5, 2015 Page 13 of 68Section 3.15. Test Procedure for Verifying the Expanded Volume Declaration on Packages
of Animal Bedding
3.15.1. Test Equipment
• Calculator or Spreadsheet Software
• Modified Standard Package Report Form – Appendix D (at end of report).
• Package Inspection Worksheet Appropriate for Test Measure:
Appendix A – 26 Point Measurement Grid and Package Error Worksheet for
Cylindrical Test Measures (at the end of the report)
Appendix B – 25 Point Measurement Grid and Package Error Worksheet for Square
or Rectangular Test Measures (at the end of the report)
• Permanent Ink - Marking Pen.
• Knife or Razor Cutter (for use in opening packages and unwrapping shrink-wrapped
pallets in warehouses)
• Cellophane Tape, Duct Tape (for repairing chutes and sealing packages)
• Polyethylene Bags (49 L to 113.5 L [13 gal to 30 gal]) (to hold product once it is
uncompressed)
• Rigid Rulers – Starrett 2 or equal with 1.0 mm graduations. The edges of a ruler used with
a measuring frame must be straight and the edges must be the zero point (see Exhibit 2).
300 mm (12 in)
500 mm (19.5 in)
1 m (39 in)
• Tarp - Canvas 3 m × 3 m (10 ft × 10 ft)
• Broom and Dust Pan
• Levels – for verifying the level of the test measure and taking headspace readings.
o 152 mm (6 in) Bubble Level
o 1 m (40 in) Carpenter Level
• Scale 15 kg (30 lb) (only used if the audit procedure is utilized.)
2
Notice: The mention of trade or brand names does not imply endorsement or recommendation by the U.S.
Department of Commerce over similar products available from other manufacturers.
May 5, 2015 Page 14 of 68• Chutes for Uncompressing and Pouring the Bedding into a Test Measure
Table 1. Recommended Chute Dimensions
Nominal Capacity Height Width Length
3
70 L (2.5 ft ) 254 mm (10 in) 228 mm (9 in) 1219 mm (48 in)
3
100 L (3.5 ft ) 254 mm (10 in) 279 mm (11 in) 1397 mm (55 in)
3
170 L (6 ft ) 279 mm (11 in) 355 mm (14 in) 1727 mm (68 in)
3
240 L (8.5 ft ) 304 mm (12 in) 406 mm (16 in) 2006 mm (79 in)
3
283 L (10 ft ) 304 mm (12 in) 406 mm (16 in) 2286 mm (90 in)
NOTE: Chutes (see examples below) may be constructed using hinges and pins so that they lie flat for transporting.
They can be constructed of sheet metal or with other slick surface material which enable the bedding to flow easily.
The construction of the chutes used in this study allows the sides to move in or out slightly so that the bedding does
not become clogged at the outlet. The heights and lengths may be adjusted slightly to fit into vehicles for transport
but the widths should not be reduced because narrowing the opening can restrict material flow and result in
“bridging” where the bedding collects and creates a block. Also, the width should be kept smaller than the opening
of the test measure so that spillage does not occur during pouring.
Figure 1. Testing Chutes.
• Test Measures (see Table 2. “Test Measures for Animal Bedding”)
May 5, 2015 Page 15 of 68Table 2. Test Measures for Animal Bedding NOTES: a, b, c, and d
Only Interior Dimensions are Used for Volume Calculations
Must Be Calibrated with Traceable Measurement Standards Prior to Use
Rectangular & Square Test Measures
Interior Wall Dimensions Marked
Actual Volume of the Increment
Surface Area Increments
Measure b & d Length Width Height d Volume
on Ruler
550.6 mL*
31.9 L 213.4 mm 203.2 mm 736.6 mm 43 362 mm2
0.55 L
1.13 ft3 (8.4 in) (8 in) (29 in) (67.2 in2)
(33.6 in3)
28.3 L 304.8 mm 304.8 mm 304.8 mm
1 ft3 (12 in) (12 in) (12 in)
304.8 mm 304.8 mm 685.8 mm
63.7 L (12 in) (12 in) (27 in)
2.25 ft3 92 903 mm2 12.7 mm 1.18 L**
406.4 mm 228.6 mm 685.8 mm
(16 in) (9 in) (27 in) (144 in2) (0.5 in) (72 in3)
304.8 mm 304.8 mm 990.6 mm
92 L (12 in) (12 in) (39 in)
3.25 ft3 406.4 mm 228.6 mm 990.6 mm
(16 in) (9 in) (39 in)
*1.0 mm = 43 mL (2.6 cu in) ** 1.0 mm = 92 mL or 0.09 L (5.6 cu in)
Square Test Measures
Interior Wall Dimensions Marked
Actual Volume of the Increment
Surface Area Increments
Measure b & d d Volume
Length Width Height On Ruler
77.4 L 381 mm 381 mm 533.4 mm 145 161 mm2 0.14 L
(2.73 ft3) (15 in) (15 in) (21 in) (225 in2) (8.5 in3)
144 L 508 mm 508 mm 558.8 mm 258 064 mm2 1.0 mm 0.25 L
(5.09 ft3) (20 in) (20 in) (22 in) (400 in2) (0.03937 in) (15.2 in3)
283 L 609.6 mm 609.6 mm 762 mm 371 612 mm2 0.37 L
(10 ft3) (24 in) (24 in) (30 in) (576 in2) (22.5 in3)
May 5, 2015 Page 16 of 68Table 2. Test Measures for Animal Bedding NOTES: a, b, c, and d
Only Interior Dimensions are Used for Volume Calculations
Must Be Calibrated with Traceable Measurement Standards Prior to Use
Cylindrical Test Measures
These dimensions are based on the tube having a ¼ inch wall thickness. Other tube thicknesses may be used.
Actual Volume Interior Diameter Surface Area Increment
Height Increment
Volume = πr2h (Outside Diameter) Area = πr2 Volume
52 L 292.1 mm (304.8 mm) 780 mm 67 012 mm2 0.06 L
(1.8 ft3) 11.5 in (12 in) (30.70 in) (103.8 in2) (4 in3)
124 L 444.5 mm (457.2 mm) 800 mm 155 179 mm2 1.0 mm 0.15 L
(4.3 ft3) 17.5 in (18 in) (31.49 in) (240.52 in2) (0.03937 in) (9.4 in3)
279 L 596.9 mm (609.6 mm) 1000 mm 279 829 mm2 0.27 L
(9.8 ft3) 23.5 in (24 in) (39.37 in) (433.76 in2) (16.4 in3)
Notes for Table 2:
a. Rectangular and Square Based Dry Measures are typically constructed of 12.7 mm to 19.05 mm (0.5 in to
0.75 in) Marine Plywood. A 4.76 mm (3/16 in) transparent sidewall is useful for determining the level of fill,
but must be reinforced or be made of thicker material if it distorts when the measure is filled. If the measure
has a clear front, place the level gage at the back (inside) of the measure so that the markings are read over
the top of the animal bedding. Any of these measures may be made without an attached bottom for ease of
emptying if they are placed on a solid level base during filling and measurement.
b. Other size measures may be used if calibrated and the volume equivalence of the increment of 1.0 mm is no
greater than 1/6 the MAV. Widening the base of a measure reduces the column height of the product and will
reduce compression but the trade-off is that the larger surface area increases the volume so the potential for
measurement errors increase. One of the benefits of the cylindrical design is that, in addition to eliminating
the 90 degree angles of the corners where gaps in fill frequently occur, the surface area of a cylinder is less
than an equal volume square measure and that results in better resolution in the volume measurements
(i.e., compare the readability of a 24 in sq box which has a surface area of 576 in2, to the 24 in cylinder which
has a surface area of 433 in2). The height of the test measure may be reduced, but this will limit the volume
of the package that can be tested.
c. If lines are marked in any test measures, they should extend around all sides of the measure if possible to
improve readability. It is recommended that a line indicating the MAV level also be marked to reduce the
possibility of reading errors when the level of the product is at or near the MAV.
d. If the measures are built to the dimensions shown above, the actual volume of most of the measures will be
larger than the nominal volume so that plus errors (overfill) can be measured accurately.
3.15.2. Test Procedure
Test Notes:
Rounding: When a volume measurement falls between graduations on a ruler, round the
value in the direction that favors the packer. This practice eliminates the issue of rounding
from the volume determination and provides packagers the benefit of the doubt. The ruler
May 5, 2015 Page 17 of 68graduation is 1.0 mm so the rounding error will be limited to 0.5 mm or less. It is good
practice to circle a measurement that has been rounded up or make a statement to such effect
so that it becomes a part of the inspection record.
Safety:
This procedure does not address all of the safety issues that users need to be aware of in order
to carry out the following tasks. Users are sometimes required to conduct test in warehouse
spaces or retail stores where fork-trucks are in motion – care must be taken to warn others to
avoid or exercise care around the test site. The procedure requires users to lift heavy objects
including large bulky packages and test measures and includes the use of sharp instruments to
obtain packages from shrink-wrapped pallets. Users may be required to climb ladders or
work platforms to obtain packages. When opening and emptying packages, dust, and other
particles may be present or escape from the packages which may cause eye injuries and
respiratory or other health problems. Users must utilize appropriate safety equipment and
exercise good safety practice. If safe working conditions cannot be ensured, suspend testing
until the situation is corrected.
1. Follow the Section 2.3.1. “Define the Inspection Lot,” select “Category A – Sampling Plan”
in this Inspection. Determine the Sample Size based on the size of the Inspection Lot using
Category A. Collect the sample packages from the Inspection Lot using
Section 2.3.4. “Random Sampling Selection.”
Test Note: Place the test equipment and sample packages in a location where there is adequate
lighting and ample space around the packages and equipment so the packages can be opened and
the chutes and test measures used safely.
Optional – Audit Screening by Weight
The full test procedure requires that all of the packages be opened for testing. Regardless of
the type of bedding, the product cannot be returned to the original package. An alternative
gravimetric auditing procedure may be used to reduce the amount of destructive testing and
conserve inspection resources.
Audit Procedure: After randomly selecting the sample packages from the Inspection Lot,
obtain the gross weight for each package. Select the lightest and heaviest packages and
conduct an expanded volumetric test on these two packages. If the lightest and heaviest
packages pass (i.e., each contains at least the expanded volume declared on the label), it is
highly likely that the remaining packages in the sample will also pass. Accept these two
package samples as an AUDIT TEST and move on to inspect other types of bedding or
Inspection Lots of other types or brands of bedding. If either of the two packages is found to
have a minus error that exceeds the Maximum Allowable Variation, the sample fails. No
further testing is required (i.e., assuming no MAV is allowed for the sample size (see
Appendix A, Table 2-1. “Sampling Plans for Category A”). If either of the packages is found
to have a minus error that does not exceed the MAV, continue to test all of the packages and
take action based on the final results from the complete sample.
May 5, 2015 Page 18 of 68Test Note: If the gravimetric audit procedure is used, ensure that the scale is placed on a solid
level support and that its accuracy has been verified to a test load that is at least 10 percent more
than the gross weight of the packages (e.g., to estimate that load, place one of the packages on the
scale and then test the scale with a load above the package’s gross weight). See Section
2.2. “Measurement Standards and Test Equipment” for additional information.
2. Select the appropriate test measure for the package size.
Spread a tarp large enough to hold a chute and test measure.
Place the chute and test measure on the tarp. Verify that the test measure is level.
3. Select a chute of appropriate capacity (see Table 1) for the package size and position it on the
tarp.
4. Open the Packaging, Uncompressing and Pouring the Bedding into the Test Measure Twice.
Open Package: Place the package in the chute and use a knife or box cutter to open and
remove the wrapper. Spread the bedding uniformly along the length of the chute. The
bedding is uncompressed in two steps. The first step is to loosen the clumps of bedding
by gently pulling them apart (do not tear the fibers of cellulose bedding or “grind” any
bedding between your hands because these practices break the material down). Spread
your fingers and pick the material up using your hands from beneath to loosen it up.
There should be no clumps of bedding in the chute. If any bedding has fallen out of the
chute onto the tarp, collect it and return it to the chute. The following pictures illustrate
this step of the procedure. The second step of the expanded volume recovery process is
to pour the bedding into a test measure as described in Step 2.
Exhibit 6. Exhibit 7.
May 5, 2015 Page 19 of 68Exhibit 8. First pour into the test measures.
First Pour: The first pour into the test measure is only used to further un-compress the
bedding so no measurements are taken. Hold the chute above the test measure and tilt it
so that you pour the bedding into the center of the test measure. The bedding should be
poured slowly into the test measure in one continuous stream and not “dumped” (if it is
“dumped” or poured too quickly some of the bedding will blow out of the measure or the
bedding will be packed down and its volume reduced). The flow rate should be
controlled by the tilt angle of the chute. The chute itself can be shaken but DO NOT HIT
OR SHAKE THE TEST MEASURE. (Do not adjust the flow by closing the opening of
the chute as that may cause the bedding to heap up and then fall into the measure in
clumps which may result in impact compression). Empty the bedding back into the chute
and spread it out evenly along its length.
Exhibit 9. Showing how to hold a chute for the pour. Exhibit 10. Showing how to cradle the chute on
one arm and holding it with one hand while
tilting it with the other hand.
Second Pour: The second pour into the test measure is used to make the volume
determination. Hold the chute above the test measure and tilt it so that you pour the
bedding into the center of the test measure. The bedding should be poured slowly into
the test measure in one continuous stream and not “dumped.” The flow rate should be
May 5, 2015 Page 20 of 68controlled by the tilt angle of the chute. The chute can be shaken but DO NOT HIT OR
SHAKE THE TEST MEASURE.
Test Note: Stop filling the measure if it appears that the test measure will overflow. The
overflow product should be measured separately (use a smaller test measure of adequate size and
capacity if one is available) and the multiple measurement volumes are added. If pouring into a
square test measure, pour at an angle to two corners for the widest opening (see Exhibit 12).
Exhibit 11. Filling a 44 L Test Measure. Exhibit 12. Filling a Square Test
Measure at an Angle to use the Larger
Opening.
5. Volume Determination.
DO NOT HAND LEVEL THE SURFACE OF THE BEDDING AS MANUAL
LEVELING “PACKS” THE BEDDING AND REDUCES ITS VOLUME. DO NOT
JAR OR SHAKE THE TEST MEASURE
Test Note: Before using a test measure for volume determinations, place a level of adequate
length on top of the test measure at five approximately equal measuring points across the top.
A permanent marking pen can be used to evenly space the marks across the top edge of the
test measure so that it can be positioned to take the measurements (see Exhibit 13).
May 5, 2015 Page 21 of 68Exhibit 13. Marking the evenly spaced measuring
points across the top of the test measure.
Place a rigid level or straight edge of adequate size on top the test measure and select a
ruler of adequate length to reach to the lowest level of the top surface of the bedding.
Start at the measuring points to your left or right, place the ruler against the side of the
level, and hold it with either hand. The zero graduation is pointed down so the ruler can
be lowered into the test measure for measurement. Lower the ruler into the test measure
slowly until its end is at the surface level of the bedding (see Exhibits 14 and 15).
Exhibit 14. Placing ruler into the test measure with Exhibit 15. Ruler shown with zero end at surface of
zero end down. the bedding.
Determine the depth of each measurement point from the surface of the bedding to the
bottom edge of the straight edge and record the value in the appropriate space on the
worksheet. Take a minimum of 25 measurements (at least 26 for cylindrical measures)
across the top of the test measure in a grid pattern. Read the graduations on the ruler
from a position that minimizes errors caused by parallax.
May 5, 2015 Page 22 of 68Table 2. Illustrations of Depth Determinations
with Cylindrical Test Measures
The picture on the left (Figure1) shows how to read the
depth from the bottom of the straightedge (top edge of
measure) down to the to bedding in a 44 L test measure
from a position that reduces parallax. The graphic below
(Figure 2) illustrates the actual worksheet with the
headspace procedure on the 44 L cylinder test measure
(its internal radius is 151.5 mm and its height is
610 mm). The bedding was poured into the test measure
but not leveled. Then 26 measurements were made at the
locations shown on the grid to determine the depth of the
product from the top edge of the measure. The average
of the 26 values was 500.7 mm which was subtracted
from the height of the test measure to obtain 109.3 mm
for the average height of the column of bedding in the
measure.
The volume was calculated using:
Volume in liters = πr2h 3.14159265 × 22952 × 109.3 mm =
7.88 L*
Figure 1. Shows how to read the depth of
*After the calculation was completed the result was
container. divided by 1 000 000 to obtain the volume in liters.
413 367 390
439 439 430 419 432
Figure 2. Illustration of
Worksheet. 478 475 492 462 478
552 542 528 532 530
578 580 577 569 565
589 590 573
May 5, 2015 Page 23 of 68Table 2. Illustrations of Depth Determinations
with Cylindrical Test Measures
Figure 3. Using the headspace measurement on a
279 L test measure. The ruler is read from the bottom
edge of a straight edge or level from a position that
reduces parallax.
Figure 4. Illustrating how the ruler is placed on the
bedding with the headspace method. The ruler is red
from the bottom edge of a straight edge or level from
a position that reduces parallax.
May 5, 2015 Page 24 of 68Table 3. Illustrations of Depth Determinations with Square Test Measures
246 162 81 132 177
195 115 43 46 112
111 77 51 95 146
220 138 46 98 131
264 193 118 148 180
Figure 1.
Figure 2.
The picture on the left (Figure 1) shows how to read the depth from the bottom of the straightedge (top edge of
measure) down to the bedding in a 283 L square test measure from a position that reduces parallax. The graphic on
the right (Figure 2) illustrates the actual worksheet with the headspace procedure on the square test measure (its
internal dimensions are 609.6 mm × 609.6 mm × 762 mm (24 in × 24 in × 30 in). The bedding was poured into the
test measure but not leveled. Then 25 measurements were made at the locations shown on the grid to determine the
depth of the product from the top edge of the measure. The average of the 25 values was 133 mm that was
subtracted from the height of the test measure to obtain 629 mm for the average height of the column of bedding in
the measure.
The volume was calculated using: Volume in liters = lwh 609.6 mm × 609.6 mm × 629 mm = 233.74 L*
*After the calculation was completed, the result was divided by 1 000 000 to obtain the volume in liters.
Figure 3. Using the headspace measurement on
56.6 L (2 cu ft) test measure. The ruler is read from
the bottom edge of a straight edge or level from a
position that reduces parallax.
May 5, 2015 Page 25 of 68Table 3. Illustrations of Depth Determinations with Square Test Measures
Figure 4. Showing how the ruler is placed on the
bedding with the headspace method. The ruler is
read from the bottom edge of a straight edge or
level from a position that reduces parallax.
6. Using a Worksheet for Volume Calculation
Enter the sample number of the package on the worksheet along with its labeled
expanded volume.
Test Measure Information
• For a cylindrical test measure, enter its interior height and radius in the spaces labeled
A and B.
• For a square or rectangular test measure enter its interior height and the area of its
base (i.e., length × width) in spaces labeled A and B.
Sum the measurements in the grid, divide the value by the number of measurements (i.e.,
25 or 26), and enter this value in the space labeled C, Average Depth.
Calculate the Average Height of the Bedding (subtract C [Average Depth] from A
[Interior Height of Test Measure]) and enter this value in the space labeled D.
Calculate the Volume of Bedding in the Package:
• For a cylindrical test measure, the formula (Volume in Liters = πr2h) is shown in E on
the worksheet. It is Volume (Liters) = 3.14159265 × r2 (B2) ____ × Average Height
(D)____ ÷ 1 000 000. Enter the package volume in the space provided for this value
in E.
• For a square or rectangular test measure the formula (Volume in Liters = LWH) is
shown in E on the worksheet. It is Volume (Liters) = B (Area of Test Measure Base)
___ × D (Average Height) ___ ÷ 1 000 000. Enter the package volume in the space
provided for this value in E.
Calculate the Package Error using the following formula:
May 5, 2015 Page 26 of 68• Package Error = Labeled Expanded Volume (Liters) ____ − E Package Volume
(Liters) ____
Package Error (Liters) = Labeled Expanded Volume – Package Volume
Transfer the individual package errors (verify whether they are positive or negative) to
the “Modified Standard Package Report for Animal Bedding” in Appendix D. Fill in the
required header information. For Box 7, “Number of Unreasonable Package Errors
Allowed for Sample Size,” use Appendix A, Table 2-1. “Sampling Plans for Category A,
Column 4.” Based on the sample size, determine how many packages may have minus
package errors that exceed the MAV (i.e., unreasonable package error).
Then:
Calculate the Total Error (Enter in Box 8 “Total Error”).
7. Evaluation of the Test Results and Determination of Pass or Fail
Determine if any of the minus package errors exceeds the MAV. Apply a tentative MAV
value of 5 % (0.05 × labeled expanded volume) to single measurement volume
determinations and a tentative MAV value of 10 % (0.10 × labeled expanded volume) on
multiple-measurement volume determinations (enter in Box 4 “MAV”). If none of the
minus package errors exceeds the MAV, go to Step 3. If any of the minus package errors
exceed the MAV, enter the number of packages in Box 9 “Number of Unreasonable
Minus Errors.” Go to Box 10 “Is Box 9 Greater than Box 7?” and determine if the value
exceeds the number in Box 7 “Number of Unreasonable Package Errors Allowed for
Sample Size.” If the number of packages with unreasonable errors exceeds the number
permitted in Box 7 “Number of Unreasonable Package Errors Allowed for Sample Size,”
the sample fails. Go to Box 17 “Disposition of the Inspection Lot” and reject the
Inspection Lot.
Calculate the Average Error for the sample by dividing Box 8 “Total Error” by Box 6
“Sample Size” and enter the value in Box 11 “Calculate Average Error,” then go Box 12
“Does Box 11 equal Zero or Plus?” If the Average Error is zero or a positive number, the
sample passes, go to Box 17 “Disposition of the Inspection Lot” and approve the
Inspection Lot. If the Average Error is a negative value go to Step 4.
Calculate the Sample Standard Deviation and enter in Box 13 “Compute Sample
Standard Deviation.” To obtain the Sample Correction Factor for the sample size use
Appendix A, Table 2-1. “Sampling Plans for Category A,” Column 3 “Sample Correction
Factor” and enter that in Box 14 “Sample Correction Factor.” Then calculate the Sample
Error Limit by multiplying Box 13 “Compute Sample Standard Deviation” and Box 14
“Sample Correction Factor.” Enter the value in Box 15 “Compute Sample Error Limit.”
Disregarding the signs, determine if the minus in Box 11 “Calculate Average Error” is
larger than the value in Box 15 “Compute Sample Error Limit.”
• If yes, the sample fails, go to Box 17 “Disposition of Inspection” and reject the
Inspection Lot.
May 5, 2015 Page 27 of 68• If no, the sample passes, go to Box 17 “Disposition of Inspection” and approve the
Inspection Lot
Prepare a comprehensive report of the test results and enforcement action taken and
present the information to the party responsible for the product.
May 5, 2015 Page 28 of 68Background
1. Animal Bedding
Animal Bedding (Bedding), also called pet or stall bedding, litter or simply bedding, is generally sold by
dry volume in compressed or uncompressed packages. A survey of several Internet retailers and retail
stores conducted near the NIST revealed that a few packers sell bedding (e.g., pelletized) by net weight,
which is prohibited by the current method of sale. Quantity declarations are often presented in a mixture
of customary volume measurements including dry quart, cubic inch, and the cubic foot. Quantity
declarations in metric units are predominantly by the liter and milliliter. For compressed packages, a
declaration of both the compressed volume and uncompressed volume is required according to the NIST
Handbook 130, Section B. Uniform Method of Sale of Commodities, 2.23. “Animal Bedding.” Package
sizes vary widely. For example, compressed volumes can range from about 4 L (230 cu in) to 85 L (3 cu
ft). The uncompressed (expanded) volumes can range from about 6 L (600 cu in) up to 340 L (12 cu ft).
It is consumer preference that determines how much bedding is used to “surface” a cage or stall. Unlike
compressed peat moss, which is also labeled in volume, there are no user instructions on packages of
bedding recommending a specific depth for a consumer to fill a cage or litter box or to “surface” a stall
(see Section 2. “Method of Sale and Terminology” for more on this subject). Also, unlike packages of
peat moss, the shape of packages of bedding is subject to wide variations due to the packaging stretching
and plumping because of the pressure exerted by the compressed material they hold. Several
manufacturers describe the “ideal” bedding as having minimal dust and “fines” (small particles of the
bedding material), a moisture of 8 % to 15 %, and good “loft” so that the product provides good
absorption of liquids.
2. Method of Sale and Terminology
a. Compressed Volume Declaration
The presence of a declaration of compressed volume is of little or no value to consumers. Several
packers were asked what value was the compressed volume information to consumers. The
unanimous response was that a compressed volume declaration does not help consumers to make
value comparisons and it is ineffective in preventing unfair competitive practices. The packers agreed
that it is the expanded volume declared on packages of bedding that is the most useful information for
consumers. The primary reason is that it helps the purchaser estimate the size of package to buy or
how many packages are needed to “bed” a cage or “surface” a stall. The area coverage obtained from
a compressed package depends in large part on the characteristics of the material and the packaging
process (e.g., force of compression). An expanded volume declaration is the only quantity
declaration that is reliable and that aids consumers. Even a net weight declaration on bedding
packages would not be useful. This is because the bedding in a heavier package may not expand as
much as the bedding in a lighter package. For example, in this study packages of one product were
found to vary in weight by only one or two grams but differed in volume yields by almost two liters.
For bedding the weight/volume relationship is counter-intuitive because of variations in the raw
material, moisture content; the size of the material, “fines” or small particles, and the amount of
“dust” that varies from package to package. Packers and consumers alike would benefit if the
National Conference on Weights and Measures (NCWM) would remove the requirement for a
compressed volume declaration from the method of sale regulation and require bedding to be
advertised, sold and unit priced on the basis of the expanded (uncompressed) volume declaration.
NOTE: At the beginning of this study the OWM reviewed the existing dimensional test procedures
in Section 3.9. “Peat Moss” and found the procedures lacked some generally accepted good practices
inherent in dimensional metrology to reduce measurement uncertainty. As a result, OWM developed
May 5, 2015 Page 29 of 68a new dimensional test procedure for use in verifying the compressed volume of packages of bedding
that is a significant improvement over the current method in Section 3.9. “Peat Moss.” It was only
during the second phase of the study that it became clear that it was the expanded volume test that
was critical in ensuring that consumers receive full measure. If the recommendation to remove the
compressed volume declaration requirement for packages of bedding is not accepted, the proposed
dimensional test methods and equipment recommendations will improve the measurement process
and increase the accuracy of volumetric results for packages of bedding and peat moss alike. If the
requirement for bedding packages to include a compressed volume declaration is eliminated, the
OWM recommends Section 3.9. “Peat Moss” be amended to adopt the proposed dimensional test
procedure.
b. Proposed Terminology and Prohibited Terms
Typically bedding is a material offered for sale for use with pets, animals, reptiles, birds or other
creatures but it may be offered for sale for other purposes such as providing a ‘surface’ for stalls,
paddocks or arenas. Bedding or surfacing materials may be used with horses, dogs, cats, birds,
ferrets, rabbits, guinea pigs, exotic animals, chinchillas, hamsters, rats, gerbils, mice, turtles, snakes
and many other creatures from the wild or domesticated pets and farm animals. The following
suggested definition is written to include any material intended for use with any creature that is
labeled by volume but is not intended to apply to straw or hay sold by the bale.
Definition of Animal Bedding
In 2013 the NCWM considered the following definition for Animal Bedding but did not accept it. The
NCWM’s reticence was only due to concerns that the proposal might not cover all types of animal
bedding.
Animal bedding is defined as “any product or material, except for baled straw or peat
moss, that is advertised, offered for sale, or sold for primary use as a medium for animals
to bed, nest or eliminate waste, such as compressed wood pulp or cellulose fibers
(confetti, granules, or pellets), softwood shavings, shredded paper, compressed coconut
fiber, ground corn cob, pelleted paper or wheat straw, cotton fibers, and bamboo
products or any other material.”
While an all-encompassing list of raw materials helps improve clarity, manufacturers are always
identifying new raw materials for use as bedding. The NCWM usually chooses open-ended definitions
for products to be covered by a method of sale. This places more emphasis on the way that the product is
used to be determinative of whether or not a product falls under a method of sale so there are no
“loopholes” and packers understand what is expected. Adopting a definition that is all inclusive of the
raw materials that are currently used to make bedding as well as still being able to encompass new
materials that may enter the stream of production is the most flexible and efficient approach.
The OWM recommends the following:
Animal Bedding – any material, except baled straw, that is kept , offered or exposed for sale or
sold for primary use as a medium for any companion or livestock animal to nest or eliminate
waste.
May 5, 2015 Page 30 of 68Units of Measure
The Federal Trade Commission considers “pet care” products to be exempt from its regulatory control
under the Fair Packaging and Labeling Act. Because the labeling of bedding falls solely under the
jurisdiction of states who have adopted the Uniform Packaging and Labeling Regulation (UPLR) in NIST
Handbook 130, “Uniform Laws in the Areas of Legal Metrology…,” 3 the display of customary units is
optional. Since 1999 the UPLR has required metric units to be declared on all packages which fall under
its regulations but it also allows packagers the option of displaying customary units such as the cubic foot
or cubic inches. As a result, quantity declarations may be shown on packages of bedding in terms of the
milliliter (mL), liter (L), or cubic meter (m3). As currently written, the method of sale for bedding in
Section 2.23. of the Method of Sale of Commodities Regulation in NIST Handbook 130 requires units in
both systems of measurement to be displayed. That provision is inconsistent with the requirements in the
UPLR that were adopted to encourage the use of voluntary metric only labeling. Also the current
regulation does not prohibit the use of other customary dry measurements such as the dry quart or bushel
which, if used instead of liters, cubic inches, or cubic feet, may frustrate value comparisons since most
consumers may not know the volume of a dry quart and bushel are equivalent to 0.388 cubic foot and
1.244 cubic feet respectively.
Proposed Method of Sale
A proposal to revise the current method of sale in Section 2.23. “Animal Bedding” is presented below.
The proposal includes a new definition for “animal bedding,” limits the units of measure that can be used,
and includes other restrictions to ensure that label terms are used consistently. The requirement for a
“compressed volume” declaration of quantity is eliminated. The proposal replaces the term “usable” with
the term “expanded volume.” The term “expanded volume” is preferred because it informs consumers
that the quantity declaration represents the volume of product to be recovered once it is unwrapped and
uncompressed. The proposal requires the use of the term “expanded volume” only in conjunction with
the quantity statement on the lower 30 % of the Principal Display Panel and does not prohibit the use of
the terms “compressed,” “expands to,” or “usable” elsewhere on the label. However, the proposed
language prohibits the display of “pre-compression” and “compressed” volume declarations anywhere on
the package. Finally, it clarifies that metric units are required to appear on the Principal Display Panel
and that specific customary units such as cubic inches and cubic feet (e.g., dry quart and bushel are not
permitted to appear on the package) may be included at the option of the packer. Because these products
will all bear expanded volume in metric units and because consumers have a good comprehension of the
volume contained in a liter, OWM is recommending that the method of sale include a provision that,
while it does not require unit prices be posted, requires all unit pricing when it is voluntarily provided by
the retailer be unit priced on the basis of price per liter.
2.23. Animal Bedding.
2.23.1. Definitions.
(a) Animal Bedding – any material, except for baled straw, kept, offered or
exposed for sale or sold for primary use as a medium for any companion or
livestock animal to nest or eliminate waste.
(b) Expanded Volume – the volume of the product that can be recovered from
the package by the consumer after it is unwrapped and uncompressed.
3
http://www.nist.gov/pml/wmd/pubs/hb130-14.cfm
May 5, 2015 Page 31 of 68You can also read