THE NEXT GENERATION OF VIDEO ENTERTAINMENT IS HERE - DEVICE SETUP AND Q TV APP INSTALLATION GUIDE - Quadro
←
→
Page content transcription
If your browser does not render page correctly, please read the page content below

THE NEXT GENERATION
OF VIDEO ENTERTAINMENT
IS HERE

          DEVICE SETUP AND Q TV APP
          INSTALLATION GUIDE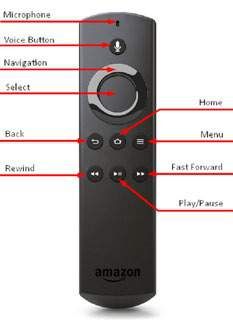
2 / DEVICE SETUP AND APP INSTALLATION GUIDE

      Q tv From Quadro is the future of video entertainment, providing you with fast buffer
      free streaming to all of your favorite smart devices when connected to your home Wi-
      Fi. A highly trained support staff is available at 519.229.8933, option 1 to answer
      questions or provide the exceptional customer assistance that Quadro customers
      have become accustomed to receiving.

BRING YOUR OWN DEVICE
       Q tv works on your favorite devices, like Amazon Firestick or Apple TV. That means
       you don’t need to rent set-top boxes OR pay those monthly fees. With Q tv, you can
       Bring Your Own Device (BYOD) and access your local content using a simple app that
       resides right next to your favorite streaming apps.

       SIMPLE AND QUICK SELF INSTALLATION
       Hate waiting for the cable guy? Good news... with Qtv you don’t have to. If you
       know how to plug a SUB into a port, and download an app, you can self-install and
       enjoy Qtv today!

       DEVICES WE SUPPORT
       •Amazon Fire TV                                       • Web Browsers
              - Amazon Fire TV (3rd Gen) Pendant                    - Chrome (latest version)
              - Amazon Fire 4k Cube                                 - Firefox
              - Amazon Fire TV Stick (2nd Gen)                      - Microsoft Edge/ Internet Explorer
                                                                    - Safari

       • Apple TV
                                                             • Television
              - Apple TV 4k (5th Gen)
                                                                    - Android TV
              - Apple TV (4th Gen)
                                                                    - Amazon TV

       • Android TV
              - Nvidia Shield TV

       • Mobile
              - Android
              - Smartphones / Tablets running Android
                7.0 or higher

       •IOS
              - Apple devices running IOS 10 or
                higher
DEVICE SETUP AND APP INSTALLATION GUIDE / 3
SET UP FIRE TV STICK
HERE’S WHAT YOU NEED
• Compatible TV (not included) - Fire TV Stick devices are compatible
with high-definition and ultra-high-definition TVs with an HDMI input
port.
• Internet Connection (not included) - You must connect your device to
a Wi-Fi network, so you can complete setup and access all of the
content available on Amazon Fire TV.
• Amazon Account - You must register your device to your Amazon
account to make sure you can access your content and all the latest
software, features, and functionality that power Amazon Fire TV. If you
don’t already have an Amazon account, you can create one during the
setup process.
SETUP
Follow these steps to set up your Fire TV Stick:
1. Connect the power adapter — Plug the small end of the USB power cord into
the Micro-USB port on your Fire TV Stick, and the other end into the power
adapter. Then, plug the power adapter into a power outlet.
Note: We recommend that you use the included power adapter when setting up
your device. Although some TVs have powered USB ports, there may not be
enough power for Fire TV Stick to work properly. Do not connect Fire TV Stick
through an unpowered HDMI hub or switch, as this can affect the device’s
performance.
2. Connect to your TV — Plug your Fire TV Stick into an available HDMI port on
your TV. We recommend using the included HDMI extender or adapter to make
sure that your Fire TV Stick fits securely into your TV.
Tip: Remember which HDMI port you used to connect your Fire TV Stick. You
must select the corresponding input channel on your TV for the next step.
3. Select the input channel for your Fire TV Stick — Turn on your TV and select
the HDMI input channel for the port you used to connect your Fire TV Stick. A
loading screen appears with the Fire TV Stick logo.4 / DEVICE SETUP AND APP INSTALLATION GUIDE
SETUP continued
4. Set up your remote — Insert the included batteries into your remote. Use your
thumbs to apply pressure on the “arrow” on the back of the remote. Press up
until the entire back cover slides up slightly.
Back of Remote Control
5. Pair your remote — After you insert the batteries, your remote automatically
pairs with your Fire TV Stick. If your remote doesn’t pair right away, press and
hold the HOME button for up to 10 seconds to send it to “discovery mode”
so you can complete the pairing process.
Tip: Remember which HDMI port you used to connect your Fire TV Stick. You
must select the corresponding input channel on your TV for the next step.
6. Connect to the Internet — Follow the on-screen instructions to connect your
Fire TV Stick to the internet, via a Wi-Fi connection.
7. Register your device — Follow the on-screen instructions to register your Fire
TV Stick to your Amazon account.
Registration connects your device to your Amazon account so you can access
and manage your content. It also makes sure your Fire TV device has access
to the latest software and features available.
As part of first-time setup, you see on-screen instructions on how to register
your device by entering your Amazon account information.
If you are receiving a password error or if you’ve forgotten your password, you
can request a personalized “password reset” link.
You can also view or change the account your device is registered to from
Settings.DEVICE SETUP AND APP INSTALLATION GUIDE / 5
REGISTER / DEREGISTER YOUR DEVICE
A. Select Settings from the Fire TV menu.
B. Go to My Account.
C. Register your device.
If your device isn’t registered, a Register option displays on this
screen. Select Register and enter your Amazon account information
when prompted.
D. Deregister your device
If your device is currently registered, the name associated with your
account displays in this section. If you select it, you see a Deregister
option you can use to connect your Fire TV device to a different Amazon
account.
After you deregister, it prompts you to register again by entering
your preferred Amazon account information.
If you received your device as a gift, it may need to be deregistered if the
gifter did not select “this is a gift” at checkout. Once deregistered, you
can re-register the device to your Amazon account using the above
information.
Note: When you deregister, all of your Amazon content is removed from
your device, and many Fire TV features will no longer work.
8. Get started — After you complete setup, a quick “Welcome” video shows tips
on how to use your Fire TV Stick. That’s basically all you have to do in order to
set up the Fire TV. You will then need to go to the APP Store:.6 / DEVICE SETUP AND APP INSTALLATION GUIDE
8. Enter the name Quadro, select the
Select Q tv From Quadro app and install it. Once the app is installed, you will
launch the app, you will then need to enter your Username and Password.
Now you are ready to experience “Next Generation Video Entertainment.”
KNOW YOUR REMOTEDEVICE SETUP AND APP INSTALLATION GUIDE / 7
SET UP YOUR APPLE TV
To get started with your Apple TV, follow these steps:
HERE’S WHAT YOU NEED
• An Apple TV 4K or Apple TV (4th generation)
• Personal Internet
• A TV or other display with an HDMI port
• An HDMI cable (Apple recommends using an HDMI 2.0 or later compatible
cable)
If you get stuck on a step, or want to step back, press Menu. To start over at any
time, unplug your devide from power, then plug back in.
PLUG INTO POWER
Plug your Apple TV into power. If you want to connect to the Internet using
Ethernet, connect your Apple TV to your router with an Ethernet cable. (Wi-Fi
setup comes later.)8 / DEVICE SETUP AND APP INSTALLATION GUIDE
CONNECT TO YOUR HOME THEATRE DEVICES
With an HDMI cable, plug your Apple TV directly into your television. On Apple TV
4K, make sure that you’re using an HDMI 2.0 or later cable. Or, if you use a
receiver or HDMI switchbox, use an HDMI cable to plug your Apple TV directly into
your receiver or switchbox. If you’re connecting an Apple TV 4K to a receiver, make
sure that it also supports HDMI 2.0 or later. Then use a second HDMI cable to
connect the receiver or switchbox to your television.
TURN ON YOUR TELEVISION TO FIND
THE SETUP SCREEN
Turn on your television (and receiver or switchbox) to see the Apple TV setup
screen.
Don’t see the setup screen? On your television, check that you selected the same
input that you connected your Apple TV to. For help, use your television manual.
the receiver or switchbox to your television.DEVICE SETUP AND APP INSTALLATION GUIDE / 9
CONNECT YOUR REMOTE
To connect your devices, press to click the Touch surface of your remote.
Need help? If your remote won’t connect, press and hold the Menu and Volume
Up buttons for five seconds. Or if a message says that you aren’t close enough,
set your remote on top of your Apple TV.
PICK LANGUAGE SETTINGS
Swipe on the Touch surface of your remote to find your language and country or
region. To choose an option, click the Touch surface. If you see the wrong
language, press the Menu button to return to the previous screen and try again. Or,
if you want to start over, unplug your Apple TV from power, then plug it back in.
If asked, choose whether to use Siri.
GET HELP
• If you get stuck, press the Menu button on your remote to return to the
previous screen.
• If your remote won’t respond, press and hold the Menu and Volume Up
buttons for two seconds.
• If your Apple TV won’t respond or you get stuck during setup, unplug it from
power, then plug it back in.
• If you have other issues, contact Apple Support.10 / DEVICE SETUP AND APP INSTALLATION GUIDE
SET UP USING YOUR IPHONE OR OTHER DEVICE
To transfer settings from your iOS device to your Apple TV, like login information
for iTunes, iCloud, and Wi-Fi, choose Set Up with Device. Follow the onscreen
steps on your iOS device and Apple TV.
If you have issues with the “Set Up with Device” process, press Menu on your
remote to return to the previous screen and choose Set Up Manually.
GET THE MOST OUT OF YOUR TV
If you have an Apple TV 4K connected to a 4K television that supports HDR or
Dolby Vision, you may be prompted to run a short display test for these formats.
Follow the onscreen instructions to run the test, and confirm that you have a clear
picture.
SET UP ONE HOME SCREEN ACROSS EVERY APPLE TV
One Home Screen keeps your apps and Home screens the same across every
Apple TV you own just by signing into iCloud. If you see a message that asks if
you want to use One Home Screen, choose Match Home Screens. If you
choose Not Now, you can turn it on later in Settings > Accounts > iCloud > One
Home Screen.
FINISH UP
Finish the on screen steps to choose settings for Location Services, screensavers,
and analytics sharing. Then you can open the App Store from your Home screen to
find and download the Q tv Fron Quadro, App.
Once the app is installed, you will open the app, you will then need to enter your
Username and Password. Now you are ready to experience “Next Generation
Video Entertainment.”DEVICE SETUP AND APP INSTALLATION GUIDE / 11
IOS AND ANDROID MOBILE DEVICES
iOS devices running iOS 10 or later and Android devices running Android 7.0 or later are compatible
with the Q tv From Quadro App.
INSTALLING THE Q tv APP ON AN APPLE DEVICE
1. From your iOS device, open the App Store.
2. Select Search and enter Quadro.
3. Select the Q tv from Quadro App.
4. To begin downloading, select Get.
5. Enter the password for your Apple ID, if requested.
6. When the download completes, open the application and sign in.
INSTALLING THE Q tv APP ON AN ANDROID DEVICE
1. Go to your Home screen.
2. Tap the Google Play Store icon.
3. Go to Search, and type Quadro.
4. Tap the white Q tv icon.
5. Tap the Install button, then confirm by tapping OK.
6. When the download completes, open the application and sign in.
WEB INTERFACE
Q tv From Quadro can also be streamed to most popular browsers including
Chrome, Edge/IE, Firefox, and Safari. To sign-in to the web interface:
1. Type www.quadrotv.net into your search engine.
2. When your sign up for an account, an email will be sent to the address
provided with a password for the Q tv from Quadro App.
3. Sign in to the Q tv From Quadro App — Use the provided credentials to
login.
4. You are now ready to enjoy your streaming experience.12 / DEVICE SETUP AND APP INSTALLATION GUIDE
TROUBLESHOOTING
POOR RECEIVER SIGNAL STRENGTH
1. Move the receiver closer to the wireless access point.
2. Move the receiver to minimize the solid material, especially glass and
metals, between the access point and receiver.
3. Reboot the access point. This will cause the device to recheck the RF
environment and choose the wireless channel with the best performance.
4. Perform factory reset and setup procedure on access point.
5. Perform factory reset and setup procedure on receiver.
6. Replace access point.
7. Replace receiver.
INTERMITTENT VIDEO ISSUES
1. Reboot all devices.
2. Run speed test at receiver location to check for issues.
3. Perform factory reset and setup procedure on access point.
4. Perform factory reset and setup procedure on receiver.
5. Replace access point.
6. Replace receiver.
FIRE TV FACTORY RESET PROCEDURE
1. Choose Settings from the home scree, next select System, and Reset to Factory
Defaults.
2. A dialog will appear asking you to confirm, choose Reset. The process should take
5-10 minutes to complete.
3. The device will have to be setup again and the customer’s amazon account
information will have to be reentered.
APPLE TV FACTORY RESET PROCEDURE
1. Select Settings (the icon that looks like a cog) from the home screen, then
System, and Reset. On Apple TV 4K or Apple TV 4th generation or later choose
the Reset and Update option. On older devices choose the Restore option.
2. The device will have to be setup again and the customer’s Apple ID will have
to be reentered.You can also read