TIBCO ACTIVEMATRIX BUSINESSWORKS PLUG-IN FOR SNOWFLAKE USER GUIDE - VERSION 6.1.0 JULY 2021
←
→
Page content transcription
If your browser does not render page correctly, please read the page content below
TIBCO ActiveMatrix
BusinessWorks™ Plug-in for
Snowflake

User Guide
Version 6.1.0
July 2021

     Copyright © 2020-2021. TIBCO Software Inc. All Rights Reserved.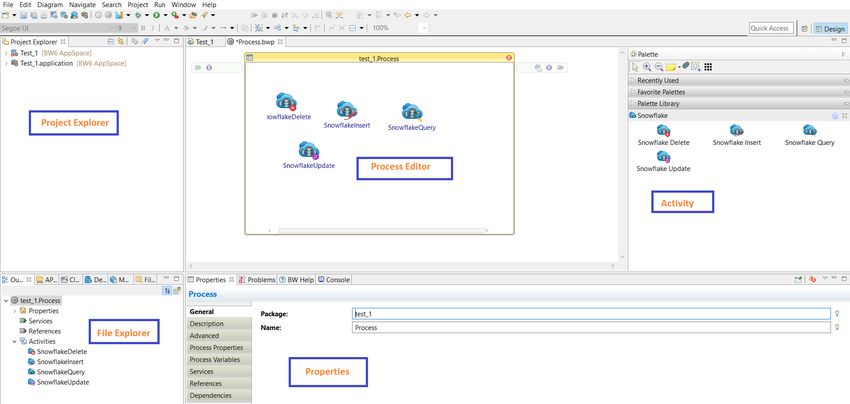
2

Contents
Figures . . . . . . . . . . . . . . . . . . . . . . . . . . . . . . . . . . . . . . . . . . . . . . . . . . . . . . . . . . . . . . . . . . . . . . . . . . . . . . . . . . . . . . . . . . . . . . . .3
TIBCO ActiveMatrix BusinessWorks™ Plug-in for Snowflake Overview . . . . . . . . . . . . . . . . . . . . . . . . . . . . . . . . . . . . .4
Getting Started . . . . . . . . . . . . . . . . . . . . . . . . . . . . . . . . . . . . . . . . . . . . . . . . . . . . . . . . . . . . . . . . . . . . . . . . . . . . . . . . . . . . . . . . 5
      TIBCO Business Studio for BusinessWorks Overview . . . . . . . . . . . . . . . . . . . . . . . . . . . . . . . . . . . . . . . . . . . . . . . . . . . . . . . . . . . . . . . . . . . . . . . 5
      Creating a Project . . . . . . . . . . . . . . . . . . . . . . . . . . . . . . . . . . . . . . . . . . . . . . . . . . . . . . . . . . . . . . . . . . . . . . . . . . . . . . . . . . . . . . . . . . . . . . . . . . . . . . . . . . 6
      Creating and Configuring the Snowflake JDBC Connection Resource . . . . . . . . . . . . . . . . . . . . . . . . . . . . . . . . . . . . . . . . . . . . . . . . . . . . . . . 7
      Configuring a Process . . . . . . . . . . . . . . . . . . . . . . . . . . . . . . . . . . . . . . . . . . . . . . . . . . . . . . . . . . . . . . . . . . . . . . . . . . . . . . . . . . . . . . . . . . . . . . . . . . . . . . 9
      Testing a Process . . . . . . . . . . . . . . . . . . . . . . . . . . . . . . . . . . . . . . . . . . . . . . . . . . . . . . . . . . . . . . . . . . . . . . . . . . . . . . . . . . . . . . . . . . . . . . . . . . . . . . . . . . 9
      Deploying Applications . . . . . . . . . . . . . . . . . . . . . . . . . . . . . . . . . . . . . . . . . . . . . . . . . . . . . . . . . . . . . . . . . . . . . . . . . . . . . . . . . . . . . . . . . . . . . . . . . . . . 10
              Generating an EAR File . . . . . . . . . . . . . . . . . . . . . . . . . . . . . . . . . . . . . . . . . . . . . . . . . . . . . . . . . . . . . . . . . . . . . . . . . . . . . . . . . . . . . . . . . . . . . . 10

TIBCO ActiveMatrix BusinessWorks Plug-in for Snowflake Connection . . . . . . . . . . . . . . . . . . . . . . . . . . . . . . . . . . . 12
      Configuration . . . . . . . . . . . . . . . . . . . . . . . . . . . . . . . . . . . . . . . . . . . . . . . . . . . . . . . . . . . . . . . . . . . . . . . . . . . . . . . . . . . . . . . . . . . . . . . . . . . . . . . . . . . . . 12
      Schema . . . . . . . . . . . . . . . . . . . . . . . . . . . . . . . . . . . . . . . . . . . . . . . . . . . . . . . . . . . . . . . . . . . . . . . . . . . . . . . . . . . . . . . . . . . . . . . . . . . . . . . . . . . . . . . . . . 14

The Snowflake Palette . . . . . . . . . . . . . . . . . . . . . . . . . . . . . . . . . . . . . . . . . . . . . . . . . . . . . . . . . . . . . . . . . . . . . . . . . . . . . . . . .17
      The Snowflake Insert Activity . . . . . . . . . . . . . . . . . . . . . . . . . . . . . . . . . . . . . . . . . . . . . . . . . . . . . . . . . . . . . . . . . . . . . . . . . . . . . . . . . . . . . . . . . . . . . . 17
      The Snowflake Query Activity . . . . . . . . . . . . . . . . . . . . . . . . . . . . . . . . . . . . . . . . . . . . . . . . . . . . . . . . . . . . . . . . . . . . . . . . . . . . . . . . . . . . . . . . . . . . . 19
      The Snowflake Update Activity . . . . . . . . . . . . . . . . . . . . . . . . . . . . . . . . . . . . . . . . . . . . . . . . . . . . . . . . . . . . . . . . . . . . . . . . . . . . . . . . . . . . . . . . . . . . 21
      The Snowflake Delete Activity . . . . . . . . . . . . . . . . . . . . . . . . . . . . . . . . . . . . . . . . . . . . . . . . . . . . . . . . . . . . . . . . . . . . . . . . . . . . . . . . . . . . . . . . . . . . . 22

Working with Sample Projects . . . . . . . . . . . . . . . . . . . . . . . . . . . . . . . . . . . . . . . . . . . . . . . . . . . . . . . . . . . . . . . . . . . . . . . . . 25
      Importing Sample Projects . . . . . . . . . . . . . . . . . . . . . . . . . . . . . . . . . . . . . . . . . . . . . . . . . . . . . . . . . . . . . . . . . . . . . . . . . . . . . . . . . . . . . . . . . . . . . . . . 25
      Setting Up a Project . . . . . . . . . . . . . . . . . . . . . . . . . . . . . . . . . . . . . . . . . . . . . . . . . . . . . . . . . . . . . . . . . . . . . . . . . . . . . . . . . . . . . . . . . . . . . . . . . . . . . . . 25
      Running the Project . . . . . . . . . . . . . . . . . . . . . . . . . . . . . . . . . . . . . . . . . . . . . . . . . . . . . . . . . . . . . . . . . . . . . . . . . . . . . . . . . . . . . . . . . . . . . . . . . . . . . . . 26
      The MultipleOperations Project . . . . . . . . . . . . . . . . . . . . . . . . . . . . . . . . . . . . . . . . . . . . . . . . . . . . . . . . . . . . . . . . . . . . . . . . . . . . . . . . . . . . . . . . . . . . 26
      The BatchOperations Project . . . . . . . . . . . . . . . . . . . . . . . . . . . . . . . . . . . . . . . . . . . . . . . . . . . . . . . . . . . . . . . . . . . . . . . . . . . . . . . . . . . . . . . . . . . . . . 26

Troubleshooting . . . . . . . . . . . . . . . . . . . . . . . . . . . . . . . . . . . . . . . . . . . . . . . . . . . . . . . . . . . . . . . . . . . . . . . . . . . . . . . . . . . . . . 28
Managing Logs . . . . . . . . . . . . . . . . . . . . . . . . . . . . . . . . . . . . . . . . . . . . . . . . . . . . . . . . . . . . . . . . . . . . . . . . . . . . . . . . . . . . . . . 29
      Log Levels . . . . . . . . . . . . . . . . . . . . . . . . . . . . . . . . . . . . . . . . . . . . . . . . . . . . . . . . . . . . . . . . . . . . . . . . . . . . . . . . . . . . . . . . . . . . . . . . . . . . . . . . . . . . . . . . 29
      Setting Up Log Levels . . . . . . . . . . . . . . . . . . . . . . . . . . . . . . . . . . . . . . . . . . . . . . . . . . . . . . . . . . . . . . . . . . . . . . . . . . . . . . . . . . . . . . . . . . . . . . . . . . . . . 29
      Exporting Logs to a File . . . . . . . . . . . . . . . . . . . . . . . . . . . . . . . . . . . . . . . . . . . . . . . . . . . . . . . . . . . . . . . . . . . . . . . . . . . . . . . . . . . . . . . . . . . . . . . . . . . 30

Error Codes . . . . . . . . . . . . . . . . . . . . . . . . . . . . . . . . . . . . . . . . . . . . . . . . . . . . . . . . . . . . . . . . . . . . . . . . . . . . . . . . . . . . . . . . . . 31
TIBCO Documentation and Support Services . . . . . . . . . . . . . . . . . . . . . . . . . . . . . . . . . . . . . . . . . . . . . . . . . . . . . . . . . . . 36
Legal and Third-Party Notices . . . . . . . . . . . . . . . . . . . . . . . . . . . . . . . . . . . . . . . . . . . . . . . . . . . . . . . . . . . . . . . . . . . . . . . . . 37

                                                                                             TIBCO ActiveMatrix BusinessWorks™ Plug-in for Snowflake User Guide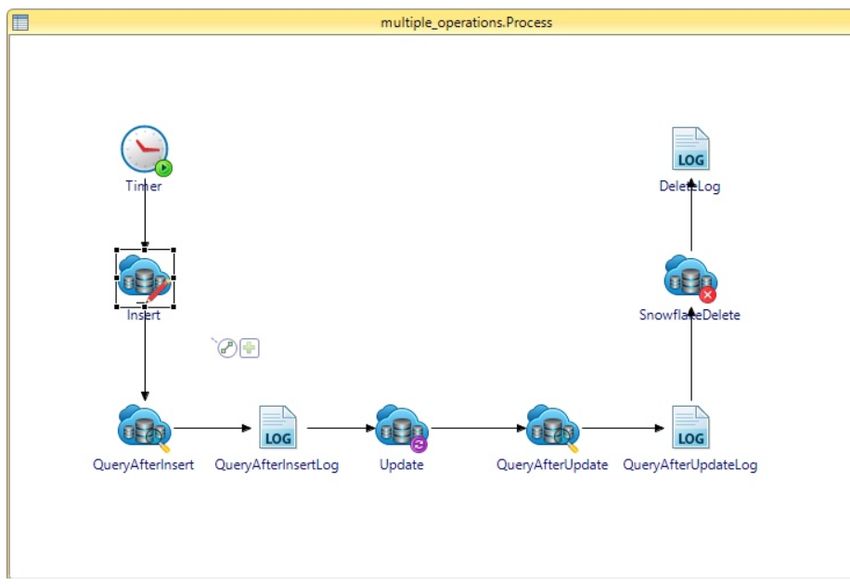
3

Figures
Snowflake JDBC Connection: Configuration Tab . . . . . . . . . . . . . . . . . . . . . . . . . . . . . . . . . . . . . . . . . . . . . . . . . . . . . . . . . . . . . . . . . . . . . . . . . . . . 8
Snowflake JDBC Connection: Schema Tab . . . . . . . . . . . . . . . . . . . . . . . . . . . . . . . . . . . . . . . . . . . . . . . . . . . . . . . . . . . . . . . . . . . . . . . . . . . . . . . . . 8
Searching for an Entity . . . . . . . . . . . . . . . . . . . . . . . . . . . . . . . . . . . . . . . . . . . . . . . . . . . . . . . . . . . . . . . . . . . . . . . . . . . . . . . . . . . . . . . . . . . . . . . . . . . . . . 16

                                                                                          TIBCO ActiveMatrix BusinessWorks™ Plug-in for Snowflake User Guide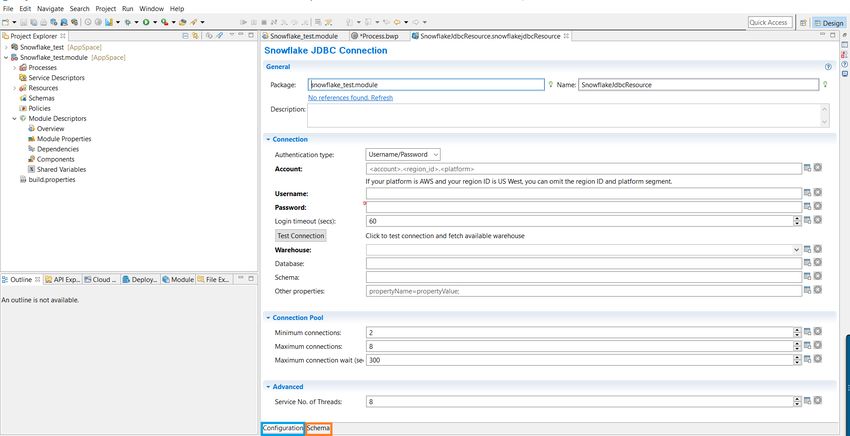
4

TIBCO ActiveMatrix BusinessWorks™ Plug-in for Snowflake
Overview
    TIBCO ActiveMatrix BusinessWorks™ is an easy to use integration product suite for enterprise, web, and
    mobile applications. TIBCO ActiveMatrix BusinessWorks uses the Eclipse graphical user interface (GUI)
    and TIBCO Business Studio for BusinessWorks™ for defining business processes and the process engine to
    execute the business processes.
    TIBCO ActiveMatrix BusinessWorks™ Plug-in for Snowflake provides the interoperability between TIBCO
    ActiveMatrix BusinessWorks and Snowflake. With this plug-in, you can perform operations on the
    Snowflake data warehouse entities using JDBC. The Snowflake data warehouse uses a new SQL database
    engine with an architecture designed for the cloud.
    TIBCO ActiveMatrix BusinessWorks Plug-in for Snowflake extends TIBCO ActiveMatrix BusinessWorks
    and adds a Snowflake JDBC connection shared resource and a Snowflake Palette to TIBCO Business
    Studio™ for BusinessWorks™ (hereinafter referred to as "TIBCO Business Studio").
    With this plug-in, you can perform operations using services supported by Snowflake. The plug-in
    supports the following features:

    ●   ActiveMatrix BusinessWorks Plug-in for Snowflake Connection Shared Resource: You can use this
        feature to connect to the Snowflake data warehouse.
    ●   ActiveMatrix BusinessWorks Plug-in for Snowflake Palette: The palette supports the following
        activities:

        —   The Snowflake Insert Activity: Use this activity to run the insert SQL statements on the Snowflake
            data warehouse.
        —   The Snowflake Query Activity: Use this activity to run the query SQL statements on the Snowflake
            data warehouse.
        —   The Snowflake Update Activity: Use this activity to run the update SQL statements on the
            Snowflake data warehouse.
        —   The Snowflake Delete Activity: Use this activity to run the delete SQL statements on the Snowflake
            data warehouse.

                                        TIBCO ActiveMatrix BusinessWorks™ Plug-in for Snowflake User Guide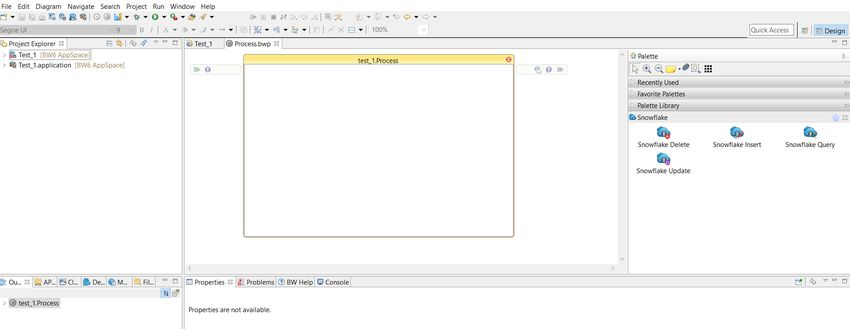
5

Getting Started
      A typical workflow for the plug-in (to achieve different goals) includes creating a process, testing it in the
      debugger, and deploying the application.
      Most procedures in a typical workflow are performed in TIBCO Business Studio for BusinessWorks. See
      TIBCO Business Studio for BusinessWorks Overview if you are not familiar with it.
      The following list has the sequence of topics that can help you get started with TIBCO ActiveMatrix
      BusinessWorks Plug-in for Snowflake:

      1. Creating a Project
      2. Creating and Configuring the Snowflake Connection Resource
      3. Configuring a Process
      4. Testing a Process

      When configuring the shared resources or activities, some fields might inherit the module properties. To
      modify the value of such fields, you must specify the values on the Module Properties tab of the Module
      Properties editor.

TIBCO Business Studio for BusinessWorks Overview
      TIBCO Business Studio for BusinessWorks is an Eclipse-based integration development environment that is
      used to design, develop, and test ActiveMatrix BusinessWorks applications. The studio provides a
      workbench in which you can create, manage, and navigate resources in your workspace. A workspace is the
      central location on your computer where all data files are stored.

      The following table introduces the workbench UI elements highlighted in the image:

       UI Element                            Description

       Menu                                  Contains menu items such as File, Edit, Navigate, Search, Project,
                                             Run, Window, and Help.

                                           TIBCO ActiveMatrix BusinessWorks™ Plug-in for Snowflake User Guide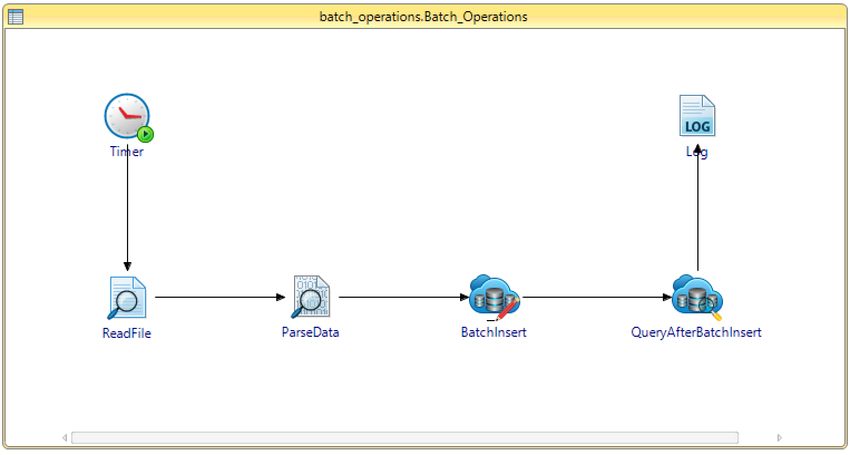
6

       UI Element                          Description

       Toolbar                             Contains buttons for frequently used commands such as:

                                           ●   New

                                           ●   Save

                                           ●   Enable/Disable Business Studio Capabilities

                                           ●   Create a new BusinessWorks Application Module

                                           ●   Debug

                                           ●   Run

       Perspectives                        Contains an initial set and layout of views that are required to
                                           perform a certain task. TIBCO Business Studio for BusinessWorks
                                           launches the Design perspective by default. Use the Design
                                           perspective when designing a process and the Debug perspective
                                           when testing and debugging a process. To change the perspective,
                                           select Window > Open Perspective > perspective_name from the
                                           main menu. Or, you can click the icon at the top right-hand side of
                                           the workbench and select the perspective to open.

       Views                               Lists the resources and helps you navigate within the workbench.
                                           For example, the Project Explorer view displays the ActiveMatrix
                                           BusinessWorks applications, modules, and other resources in your
                                           workspace, and the Properties view displays the properties for the
                                           selected resource. To open a view, select Window > Show View >
                                           view_name from the main menu.

       Editors                             Provides a canvas to configure, edit, or browse a resource. Double-
                                           click a resource in a view to open the appropriate editor for the
                                           selected resource. For example, double-click on a process
                                           (MortgageAppConsumer.bwp) in the Project Explorer view to open
                                           the process in the editor.

       Palette                             Contains a set of widgets and a palette library. A palette groups
                                           activities that perform similar tasks, and provides quick access to
                                           activities when configuring a process.

Creating a Project
      Projects are TIBCO ActiveMatrix BusinessWorks application modules that are created in TIBCO Business
      Studio for BusinessWorks. Begin by creating a project, and then add resources and processes.
      An Eclipse project is an application module configured for TIBCO ActiveMatrix BusinessWorks. An
      application module is the smallest unit of resources that is named, versioned, and packaged as part of an
      application.

      When importing an existing project to the current workspace of TIBCO Business Studio for BusinessWorks,
      if you click Select root directory in the Import Projects dialog box, you must select the Copy projects into
      workspace check box.

                                          TIBCO ActiveMatrix BusinessWorks™ Plug-in for Snowflake User Guide
7
Procedure
1. Start TIBCO Business Studio for BusinessWorks in one of the following ways:
● Microsoft Windows: Click Start > All Programs > TIBCO > TIBCO_HOME > TIBCO Business
Studio > Studio for Designers.
● macOS and Linux: Run the TIBCO Business Studio executable file located at TIBCO_HOME/studio/
/eclipse.
On macOS, to load the environment variables in the launchd.conf file correctly, ensure
that the shell is bash when you start TIBCO Business Studio on a command line.
2. From the menu, click File > New > BusinessWorks Resources to open the BusinessWorks Resource
wizard.
3. On the Select a wizard page, click BusinessWorks Application Module and click Next to open the
Project page.
4. On the Project page, configure the project that you want to create:
a) In the Project name field, enter a project name.
b) If you do not want to use the default location (current workspace) for the project, clear the Use
default location check box and click Browse to select a new location.
c) In the Version field, retain the default version of the application module or enter a new version.
d) To automatically create an empty process and an application when creating the project, ensure that
the Create empty process and Create Application check boxes are selected.
e) Optional: To create a Java module, select the Use Java configuration check box.
f) Click Finish.
Result
The project with the specified settings is displayed in the Project Explorer view.
Creating and Configuring the Snowflake JDBC Connection Resource
After creating a project, you can add a Snowflake JDBC connection shared resource to establish connection
between the plug-in and the Snowflake data warehouse.
Procedure
1. In the Project Explorer view, right-click Resources folder and select New > Snowflake JDBC
Connection.
Hint: The project must be expanded to display all the folders.
TIBCO ActiveMatrix BusinessWorks™ Plug-in for Snowflake User Guide8
2. In the Snowflake JDBC Connection Resource dialog box, fill the Resource Name field and click Finish.
To create the shared resource in a resources folder of a different project or in a different package, select
Resource Folder or Package accordingly.
The Snowflake Connection shared resource is created. The shared resource consists of two tabs:
Configuration and Schema.
Snowflake JDBC Connection: Configuration Tab
Snowflake JDBC Connection: Schema Tab
3. Configure the Snowflake JDBC Connection resource in the displayed editor, as described in Snowflake
Connection and download the required table metadata in the Schema tab..
TIBCO ActiveMatrix BusinessWorks™ Plug-in for Snowflake User Guide9
Configuring a Process
A newly created project contains an empty process. Configure the process by adding activities, conditions,
and services to complete a task.
Prerequisites
1. Ensure that an empty process is created when creating a project. See Creating a Project for details.
2. Ensure that you have established a Snowflake connection. See Snowflake Connection for details.
Procedure
1. In the Project Explorer view, click the created project and open the empty process from the Processes
folder.
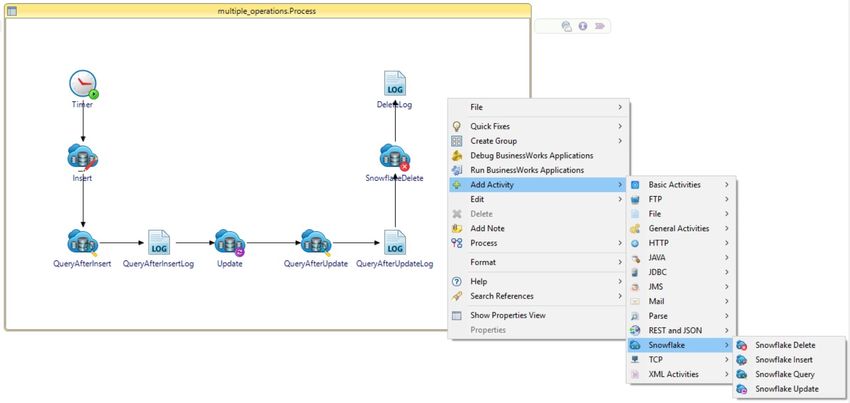
2. Select an activity from the Palette view and drag it to the Process editor.
For example, select and drop the Timer activity from the General Activities palette.
3. Click and drag to create the new activity. In this manner, create links between the activities and
configure the condition types.
4. Configure the added Snowflake activity. See as described in Snowflake Palette.
A Snowflake Connection shared resource is required when configuring the activities. For
details on creating the Snowflake Connection shared resource, see Configuring the Snowflake
Connection Resource.
5. Save the project.
Testing a Process
After configuring a process, you can test the process to check whether the process completes the defined
task.
Prerequisites
Ensure that you have configured a process. For details, see Configuring a Process.
TIBCO ActiveMatrix BusinessWorks™ Plug-in for Snowflake User Guide10
Procedure
1. On the toolbar, click Debug > Debug Configurations.
2. Click BusinessWorks Application > BWApplication in the left pane.
By default, all the applications in the current workspace are selected on the Applications tab. Ensure
that only the application you want to debug is selected on the Applications tab in the right pane.
3. Click Debug to test the process in the selected application.
TIBCO Business Studio for BusinessWorks changes to the Debug perspective. The debug information is
displayed in the Console view.
4. On the Debug tab, expand the running process and click an activity.
5. In the upper-right corner, click the Job Data tab, and then click the Output tab to check the activity
output.
Deploying Applications
After testing, if the configured process works as expected, you can deploy the application that contains the
configured process to a runtime environment. After deploying applications, you can manage TIBCO
®
ActiveMatrix BusinessWorks applications by using TIBCO Enterprise Administrator.
Prerequisites
The following tasks are required before deploying applications:
● While deploying application, add the following property in the app node's TRA file:
java.property.javax.xml.datatype.DatatypeFactory=com.sun.org.apache.xerces.internal.j
axp.datatype.DatatypeFactoryImpl
● Creating a Project
● Generating an EAR File
You can deploy an application EAR file in the command-line mode with the bwadmin utility. See TIBCO
ActiveMatrix BusinessWorks Administration for more details about how to deploy an application.
Deploying an application involves the following tasks:
Procedure
1. Upload an EAR file.
2. Deploy an application.
3. Configure an application.
4. Start an application.
Generating an EAR File
Application archives are enterprise archive (EAR) files that are created in TIBCO Business Studio for
BusinessWorks. An EAR file is required when deploying an application.
Prerequisites
Create a project by following the steps described in Creating a Project.
Apart from the method described here, there are other ways to generate an EAR file, the following is one
method. For more information, see TIBCO ActiveMatrix BusinessWorks Administration.
TIBCO ActiveMatrix BusinessWorks™ Plug-in for Snowflake User Guide11
Procedure
1. In the File Explorer view, click the Open Directory to Browse icon.
2. Select the folder where you want to generate the EAR file and click OK.
The new folder is displayed in the File Explorer view.
3. Drag the application from the Project Explorer view to the new folder in the File Explorer view.
The EAR file is generated with the name ._.ear.
TIBCO ActiveMatrix BusinessWorks™ Plug-in for Snowflake User Guide12
TIBCO ActiveMatrix BusinessWorks Plug-in for Snowflake
Connection
You can use the Snowflake JDBC Connection shared resource to connect to the Snowflake data warehouse
system using the Snowflake JDBC driver and download the entity metadata at design time.
The plug-in Connection window has two tabs - Configuration and Schema.
The plug-in connection created in the shared module is not set to default when the Plug-in for Snowflake
activities are created in the application module. You must manually select the Plug-in for Snowflake
connection from the shared module.
Configuration
On the Configuration tab you can specify information to connect to Snowflake data warehouse. The
Configuration tab has the following sections: General, Connection, Connection Pool, and Advanced.
TIBCO ActiveMatrix BusinessWorks™ Plug-in for Snowflake User Guide13
General
The General panel fields are described below.
Field Module Property Description
Package No The name of the package where the shared
resource is added.
Name No The name to be displayed as the label for the
shared resource in the process.
Description No A short description for the shared resource.
Connection
The Connection panel has the following fields:
Field Module Property Description
Authentication type No Select authentication mechanism, in this version basic
username and password is supported.
Account Yes Snowflake account name to be used for connection. It must
be specified in the format [ account.regionid.platform ]. You
can skip the regionid and platform if your region is US West
and platform is Amazon Web Services (AWS).
Username Yes The user name to connect to the Snowflake data warehouse.
TIBCO ActiveMatrix BusinessWorks™ Plug-in for Snowflake User Guide14
Field Module Property Description
Password Yes The password to connect to the Snowflake data warehouse.
Login timeout (secs) Yes The time (in seconds) to wait for a successful database
connection. The default value is 60 seconds.
Warehouse Yes The warehouse to run queries which is selected from a list
of warehouses.
Database Yes Default Database name to be used. Optional.
Schema Yes Default Schema name to be used. Optional.
Other Properties Yes Additional connection properties in the format
[PropertyName=PropertyValue;]. Optional.
Connection Pool
Module
Field Property Description
Minimum Yes The initial number of connections that are created when the pool
connections is started. The default value is 2.
Maximum Yes The maximum number of connections that can be allocated from
connections the connection pool at the same time. The default value is 8.
Maximum Yes The maximum number of seconds that the pool must wait for a
connection wait connection to be returned before throwing an exception. The
(secs) default value is 300 seconds.
Advanced
In the Advanced panel of the Configuration tab, you can specify additional information about the number
of threads needed for processing requests.
Field Module Property Description
Service No. of Yes The number of concurrent threads for processing requests
Threads to the activity.
Default value: 8. (A value less than 1 is automatically
changed to the default value).
Schema
The Schema tab lists the entities that have a downloaded metadata. To filter for specific Entities, enter the
search string for the Entity column.
For this release, only the TABLE entity is supported.
TIBCO ActiveMatrix BusinessWorks™ Plug-in for Snowflake User Guide15
You can perform the following tasks on the Schema tab:
● Retrieve Entity: Search for entities and download the metadata.
● Refresh Entity List: Update the entity list and metadata of the entities previously downloaded.
For the changes to reflect in the activity, click on the activity once.
● Remove Entity: Remove the downloaded entity from the list.
Only one entity can be removed at a time.
TIBCO ActiveMatrix BusinessWorks™ Plug-in for Snowflake User Guide16
Searching for an Entity
After clicking Retrieve Entity, the Entity Search page is displayed. You can search an entity here by
selecting the database, schema, and entity name pattern.
TIBCO ActiveMatrix BusinessWorks™ Plug-in for Snowflake User Guide17
The Snowflake Palette
A palette groups the activities that connect the same external applications together.
An ActiveMatrix BusinessWorks Plug-in for Snowflake palette is added after installing TIBCO ActiveMatrix
BusinessWorks Plug-in for Snowflake. The palette contains the following activities:
● Snowflake Insert
● Snowflake Query
● Snowflake Update
● Snowflake Delete
The Snowflake Insert Activity
You can use this activity to run the insert SQL statements on the Snowflake data warehouse. You can insert
multiple rows in the database in batches. Error in one batch does not stop the execution of the subsequent
batch. The failure record of a batch depends on the behavior of the underlying Snowflake JDBC driver and
Snowflake data warehouse engine. If a batch fails to insert one or more records, the detailed message is
displayed in logs including the batch number, reason of failure, and rows that failed to insert. The insertion
operation results in the formation of total rows attempted and total rows affected.
General
The General tab contains the following fields.
Module Visual
Field Property? Diff? Description
Name No Yes Specify the name to be displayed as the label for the activity
in the process.
Snowflake Yes Yes
Connection Click to select a Snowflake JDBC Connection shared
Resource resource. If no matching Snowflake JDBC Connection
shared resource is found, click Create Shared Resource to
create one. For more details, see Creating and Configuring
the Snowflake JDBC Connection Resource.
Entity No Yes
Click to select an entity. The entities downloaded in
Snowflake JDBC Connection shared resource's Schema tab
is available for selection.
Batch Size Yes Yes All incoming mesages are inserted performing SQL, number
specified here defines how many SQL statements can be
batched together that can be represented as a single SQL.
The default value is 100.
TIBCO ActiveMatrix BusinessWorks™ Plug-in for Snowflake User Guide18
Module Visual
Field Property? Diff? Description
Time Out Yes Yes Defines activity timeout in seconds. Default value is 0,
means activity timeout disabled.
Insert activity works in multiple batches, so per
batch timeout is evaluated using timeout value
specified. Refrain from using smaller timeout
value.
Description
On the Description tab, provide a short description for the activity.
SQL Builder
The SQL Builder tab displays the metadata of the entity selected in the General tab.
Field Editable Description
Field Name No Displays name of the column.
Data Type No Displays the data type of the column.
Primary Key No Displays if the column is a primary key.
Not Null No Displays if the column accepts null value.
Dimension No Displays the dimension of the column.
Values Yes Displays the fields that must be part of the Values clause for an
insert SQL statement. By default, Values column is selected for all
the fields.
Advanced
This tab has the following fields:
Field Module Property? Visual Diff? Description
Override Database Yes Yes Overrides Database name
Name specified in
snowflakejdbcResource.
Override Schema Name Yes Yes Overrides Schema name
specified in
snowflakejdbcResource.
Interpret Empty String Yes Yes If this check box is selected,
as NULL empty string is interpreted as
NULL value.
TIBCO ActiveMatrix BusinessWorks™ Plug-in for Snowflake User Guide19
Input
All the fields in the SQL Builder tab that have Values column selected are a part of the Input tab. The Input
tab displays the input schema of the activity as a tree structure. The information in the schema depends on
the fields selected on the SQL Builder tab.
Output
The Output tab displays the rowsAttempted and rowsAffected fields. The rowsAttempted field holds the
count of number of rows that were attempted by Snowflake Insert activity and the rowsAffected field holds
the count of number of rows inserted successfully after the Snowflake Insert activity is invoked. The
difference between these two is the number of rows that failed to insert. The Output tab displays the output
schema of the activity as a tree structure. The output is read-only.
Fault
The Fault tab lists exceptions that are thrown by this activity.
The Snowflake Query Activity
Use this activity to run the query SQL statements on the Snowflake data warehouse.
General
The General tab contains the following fields.
Module Visual
Field Property? Diff? Description
Name No Yes Specify the name to be displayed as the label for the
activity in the process.
Snowflake Yes Yes
Connection Click to select a Snowflake JDBC Connection shared
Resource resource. If no matching Snowflake JDBC Connection
shared resource is found, click Create Shared Resource to
create one. For more details, see Creating and Configuring
the Snowflake JDBC Connection Resource.
Entity No Yes
Click to select an entity. The entities downloaded in
Snowflake JDBC Connection shared resource's Schema tab
is available for selection.
Maximum Yes Yes The maximum number of rows to retrieve. To retrieve all
Rows rows, specify 0. The default value is 100.
Time Out Yes Yes Defines activity timeout in seconds. The default value is
100 seconds.
Description
On the Description tab, provide a short description for the activity.
TIBCO ActiveMatrix BusinessWorks™ Plug-in for Snowflake User Guide20
SQL Builder
The SQL Builder tab displays the metadata of the entity selected in the General tab.
Field Editable Description
Field Name No Displays name of the column.
Data Type No Displays the data type of the column.
Primary Key No Displays if the column is a primary key.
Not Null No Displays if the column accepts null value.
Dimension No Displays the dimension of the column.
Selected Yes Displays the fields that must be part of the SELECT query of an
SQL statement. By default, the Selected column is selected for all
the fields.
Parameter Yes Displays the fields that must be part of the WHERE clause of a
query SQL statement.
Advanced
This tab has the following fields:
Field Module Property? Visual Diff? Description
Override Database Yes Yes Overrides Database name
Name specified in
snowflakejdbcResource.
Override Schema Name Yes Yes Overrides Schema name specified
in snowflakejdbcResource.
Interpret Empty String Yes Yes If this check box is selected,
as NULL empty string is interpreted as
NULL value.
Input
All the fields in the SQL Builder tab that have Parameter column selected are a part of the Input tab. The
Input tab displays the input schema of the activity as a tree structure. The information in the schema
depends on the fields selected on the SQL Builder tab.
Output
All the fields in the SQL Builder tab that have the Selected column selected are a part of the Output tab.
Output of Snowflake Query activity holds multiple records. The Output tab displays the output schema of
the activity as a tree structure. The output is read-only. The information in the schema depends on the fields
selected on the SQL Builder tab.
TIBCO ActiveMatrix BusinessWorks™ Plug-in for Snowflake User Guide21
Fault
The Fault tab lists exceptions that are thrown by this activity.
The Snowflake Update Activity
Use this activity to run the update SQL statements on the Snowflake database. You can update multiple
rows in the database. This activity returns the information in the form of total rows affected.
General
The General tab contains the following fields.
Module Visual
Field Property? Diff? Description
Name No Yes Specify the name to be displayed as the label for the
activity in the process.
Snowflake Yes Yes
Connection Click to select a Snowflake JDBC Connection shared
Resource resource. If no matching Snowflake JDBC Connection
shared resource is found, click Create Shared Resource
to create one. For more details, see Creating and
Configuring the Snowflake JDBC Connection Resource.
Entity No Yes
Click to select an entity. The entities downloaded in
Snowflake JDBC Connection shared resource's Schema
tab is available for selection.
Time Out Yes Yes Defines activity timeout in seconds. Default value is 0,
means activity timeout disabled.
Description
On the Description tab, provide a short description for the activity.
SQL Builder
The SQL Builder tab displays the metadata of the entity selected in the General tab.
Field Editable Description
Field Name No Displays name of the column.
Data Type No Displays the data type of the column.
Primary Key No Displays if the column is a primary key.
Not Null No Displays if the column accepts null value.
Dimension No Displays the dimension of the column.
TIBCO ActiveMatrix BusinessWorks™ Plug-in for Snowflake User Guide22
Field Editable Description
Values Yes Displays the fields that must be a part of the SET clause for an
update SQL statement. By default Values column is selected for all
the fields.
Parameter Yes Displays the fields that must be part of the WHERE clause of an
update SQL statement.
Advanced
This tab has the following fields:
Field Module Property? Visual Diff? Description
Override Database Yes Yes Overrides Database name
Name specified in
snowflakejdbcResource.
Override Schema Name Yes Yes Overrides Database name
specified in
snowflakejdbcResource.
Interpret Empty String Yes Yes If this check box is selected,
as NULL empty string is interpreted as
NULL value.
Input
All the fields in the SQL Builder tab that have Values and Parameter columns selected are a part of the
Input tab. The Input tab displays the input schema of the activity as a tree structure. The information in the
schema depends on the fields selected on the SQL Builder tab.
The columns which are not mapped are ignored automatically from the SQL query.
Output
The Output tab displays the rowsAffected field which holds the count of number of rows affected after the
Snowflake Update activity is invoked. The Output tab displays the output schema of the activity as a tree
structure. The output is read-only.
Fault
The Fault tab lists exceptions that are thrown by this activity.
The Snowflake Delete Activity
You can use this activity to remove a single or all rows from a table in Snowflake Data warehouse.
General
The General tab contains the following fields.
TIBCO ActiveMatrix BusinessWorks™ Plug-in for Snowflake User Guide23
Module Visual
Field Property? Diff? Description
Name No Yes Specify the name to be displayed as the label for the
activity in the process.
Snowflake Yes Yes
Connection Click to select a Snowflake JDBC Connection shared
Resource resource. If no matching Snowflake JDBC Connection
shared resource is found, click Create Shared Resource to
create one. For more details, see Creating and Configuring
the Snowflake JDBC Connection Resource.
Entity No Yes
Click to select an entity. The entities downloaded in
Snowflake JDBC Connection shared resource's Schema tab
is available for selection.
Time Out Yes Yes Defines activity timeout in seconds. Default value is 0,
means activity timeout disabled.
Description
On the Description tab, provide a short description for the activity.
SQL Builder
The SQL Builder tab displays the metadata of the entity selected in the General tab.
Field Editable Description
Field Name No Displays name of the column.
Data Type No Displays the data type of the column.
Primary Key No Displays if the column is a primary key.
Not Null No Displays if the column accepts null value.
Dimension No Displays the dimension of the column.
Parameter Yes Displays the fields that must be part of the WHERE clause of a
query SQL statement.
Advanced
This tab has the following fields:
Field Module Property? Visual Diff? Description
Override Database Yes Yes Overrides Database name
Name specified in
snowflakejdbcResource.
TIBCO ActiveMatrix BusinessWorks™ Plug-in for Snowflake User Guide24
Field Module Property? Visual Diff? Description
Override Schema Name Yes Yes Overrides Schema name
specified in
snowflakejdbcResource.
Interpret Empty String Yes Yes If this check box is selected,
as NULL empty string is interpreted as
NULL value.
Input
All the fields in the SQL Builder tab that have Parameter column selected are a part of the Input tab. The
Input tab displays the input schema of the activity as a tree structure. The information in the schema
depends on the fields selected on the SQL Builder tab.
It is not mandatory to provide values for fields on the Input tab for Snowflake Delete activity. A default
mapping is displayed at the ActivityInput element when the activity is created for the first time. In case the
required symbol is visible, then right-click the ActivityInput element and click Show Check > Repair >
Select ActivityInput field and click OK.
Output
The Output tab displays the rowsAffected field. The rowsAffected field holds the count of number of rows
inserted successfully after the Snowflake Delete activity is invoked. The Output tab displays the output
schema of the activity as a tree structure. The output is read-only.
Fault
The Fault tab lists exceptions that are thrown by this activity.
TIBCO ActiveMatrix BusinessWorks™ Plug-in for Snowflake User Guide25
Working with Sample Projects
The plug-in packages sample projects with the installer which help to understand how TIBCO ActiveMatrix
BusinessWorks Plug-in for Snowflake works.
The sample projects are located at TIBCO_HOME/bw/palettes/snowflake//samples
directory. The following sample projects are available:
● MultipleOperations
● BatchOperations
Importing Sample Projects
Before running the project, you need to import the sample projects to TIBCO Business Studio for
BusinessWorks.
Procedure
1. Start TIBCO Business Studio for BusinessWorks using one of the following ways:
● Microsoft Windows: Click Start > All Programs > TIBCO > TIBCO_HOME > TIBCO Business
Studio > Studio for Designers.
● macOS or Linux: Run the TIBCO Business Studio executable file located in the TIBCO_HOME/
studio//eclipse directory.
2. From the menu, click File > Import.
3. In the Import dialog box, expand the General folder and select the Existing Studio Projects into
Workspace item. Click Next.
4. Select the Select archive file radio button and then click Browse to locate the sample project. The
sample project is located in the TIBCO_HOME/bw/palettes/snowflake//samples
directory.
5. Locate the sample project ZIP file and click Open.
6. Click Finish.
Setting Up a Project
Before running the project you must configure it.
Prerequisites
Run the DDL statement provided in the DDL_worksheet.txt in PUBLIC schema under TEST_DB database
of your snowflake account. DDL_worksheet.txt can be located in the TIBCO_HOME/bw/palettes/
snowflake//samples directory.
Procedure
1. In TIBCO Business Studio for BusinessWorks, expand the imported project in the Project Explorer view.
2. Expand the Module Descriptors resource, and then double-click Module Properties.
3. In the Module Properties panel, set the values for Account, Username, Password and Warehouse fields.
4. For the BatchOperations sample, additionally set value for the Filename field as the absolute path of
employees.csv file, which can be located in the TIBCO_HOME/bw/palettes/snowflake/
/samples directory.
TIBCO ActiveMatrix BusinessWorks™ Plug-in for Snowflake User Guide26
5. From the menu bar, click File > Save to save the project.
Running the Project
After setting up the sample project, you can run the project to see how the plug-in works.
Prerequisites
Ensure that you have set up the sample project to TIBCO Business Studio as described in Setting Up a
Project.
Procedure
1. To run the selected process, from the menu, click Run > Run Configurations .
2. In the Run Configurations dialog box, expand BusinessWorks Application, and then click
BWApplication.
3. On the Applications tab, all the sample applications are selected. You can clear the sample applications
that you do not want to run.
4. Click Run to run the process.
5. Click the icon to stop the process.
The MultipleOperations Project
The MultipleOperations project contains the Multiple_Operations process. This ActiveMatrix
BusinessWorks process provides an example where multiple operations like Insert, Query, Update, and
Delete are performed sequentially on the following Snowflake table TEST_DB.PUBLIC.EMPLOYEES.
The BatchOperations Project
The BatchOperations project contains the Batch_Operations process. This ActiveMatrix BusinessWorks
process provides an example where a batch of 456 records is inserted in the following Snowflake table
TEST_DB.PUBLIC.EMPLOYEES.
TIBCO ActiveMatrix BusinessWorks™ Plug-in for Snowflake User Guide27 TIBCO ActiveMatrix BusinessWorks™ Plug-in for Snowflake User Guide
28

Troubleshooting
    This topic contains basic troubleshooting information for a project.
    If errors occur when you run a process in TIBCO Business Studio for BusinessWorks, first clean up the
    project. Cleaning deletes all the old files and reorganizes the project.

    Procedure

    1. In the Project Explorer view, right-click the project and click Refresh.
    2. Select Project > Clean to start the cleaning process.

                                         TIBCO ActiveMatrix BusinessWorks™ Plug-in for Snowflake User Guide
29
Managing Logs
Logs are used to trace and troubleshoot plug-in exceptions.
When an error occurs, you can check the logs to trace and troubleshoot the plug-in exceptions. By default,
error logs are displayed in the Console view when you run a process in the Debug mode. You can change
the log level of the plug-in to trace different messages and export logs to a file. Different log levels
correspond to different messages. For details, see Log Levels.
A logback.xml file is located in the TIBCO_HOME\bw\\config\design\logback
directory.
Log Levels
The plug-in captures logs at different levels.
Log Level Description
Info Indicates normal plug-in operations. No action is needed. A tracing message
tagged with Info indicates that a significant processing step is reached and logged
for tracking or auditing purposes. Only info messages preceding a tracking
identifier are considered as significant steps.
Warn Indicates that an abnormal condition is found. Processing continues, but special
attention from an administrator is recommended.
Error Indicates that an unrecoverable error has occurred. Depending on the error
severity, the plug-in may continue with the next operation or may stop altogether.
Debug Indicates a developer-defined tracing message.
Trace Includes all the information regarding the running process.
Setting Up Log Levels
By default, the log level is Error. You can set the log level to change the log level to trace different
messages.
If neither the plug-in log nor the ActiveMatrix BusinessWorks log is configured in the logback.xml file, the
error logs of the plug-in will be displayed in the Console view by default.
If the plug-in log is not configured but the ActiveMatrix BusinessWorks log is configured in the
logback.xml file, the configuration for the ActiveMatrix BusinessWorks log is implemented by the plug-in.
Procedure
1. Navigate to the TIBCO_HOME\bw\\config\design\logback directory and open the
logback.xml file.
2. Add the following node in the Console Appender area to specify the log level for the plug-in.
The level tag defines the log level and the value is one of the values mentioned in Log Levels.
When the level is set to Debug, the input and output for the plug-in activities are also
displayed in the Console view. See Log Levels for more details regarding each log level.
TIBCO ActiveMatrix BusinessWorks™ Plug-in for Snowflake User Guide30
3. Optional: Optional: Add one of the following nodes in the BusinessWorks Palette and Activity.
Loggers area to specify a log level for the activity.
The activities that are not configured with specific log levels also inherit log level configured
for the plug-in or ActiveMatrix BusinessWorks.
4. Optional: To control the debug log level for the Snowflake JDBC shared resource, set the following
parameters:
5. Save the file.
Exporting Logs to a File
Modify the logback.xml file to export plug-in logs to a file.
Procedure
1. Navigate to the TIBCO_HOME\bw\\config\design\logback directory and open the
logback.xml file.
When deploying an application in TIBCO Enterprise Administrator, you must navigate to the
TIBCO_HOME/bw//domains/domain_name/appnodes/space_name/
node_name directory to find the logback.xml file.
2. Add the following node to specify the file location.
c:/bw6-snowflake.log
%d{HH:mm:ss.SSS} [%thread] %-5level %logger{36}-%msg%n
The file tag defines the location to which the log is exported and its value is the absolute path to the
file.
The file path must include the file name.
3. Add the following node to the root node at the bottom of the logback.xml file to enable exporting the
logs to a file.
4. Save the file.
TIBCO ActiveMatrix BusinessWorks™ Plug-in for Snowflake User Guide31
Error Codes
The exceptions that are thrown by the plug-in are listed with corresponding descriptions and resolutions.
Error Code Role Category Messages Description
TIBCO-BW-PALETTE- Error BW-Plug-in Unexpected error Message is shown
SNOWFLAKE_DATABASE_JDBC occurred.{0} when an
-500001 unidentified error
occurs while
executing the
activity.
TIBCO-BW-PALETTE- Error BW-Plug-in Failed to initialize Message is shown
SNOWFLAKE_DATABASE_JDBC activity.{0}\nActivity when
-500002 Name={1}\nProcess={2 initialization fails
} for an activity.
\nModule={3}\nDeplo
ymentUnit={4}:{5}
TIBCO-BW-PALETTE- Error BW-Plug-in Failed to decrypt Message is shown
SNOWFLAKE_DATABASE_JDBC obfuscated password when decryption
-500003 for field : {0} of obfuscated
password fails.
TIBCO-BW-PALETTE- Error BW-Plug-in Failed to create Message is shown
SNOWFLAKE_DATABASE_JDBC Prepared Statement. when prepared
-500005 {0} statement creation
fails.
TIBCO-BW-PALETTE- Error BW-Plug-in Failed to set max rows. Message is shown
SNOWFLAKE_DATABASE_JDBC {0} for Snowflake
-500006 database Query
activity if error
occurs when
setting maximum
rows.
TIBCO-BW-PALETTE- Error BW-Plug-in Failed to set Message is shown
SNOWFLAKE_DATABASE_JDBC parameters in when error occurs
-500007 prepared statement. while setting
{0} parameters in
prepared
statement.
TIBCO-BW-PALETTE- Error BW-Plug-in Failed to retrieve Message is shown
SNOWFLAKE_DATABASE_JDBC values from ResultSet. for Snowflake
-500008 {0} database Query
activity if error
occurs when
retrieving values
from ResultSet.
TIBCO ActiveMatrix BusinessWorks™ Plug-in for Snowflake User Guide32
Error Code Role Category Messages Description
TIBCO-BW-PALETTE- Error BW-Plug-in Failed to execute Message is shown
SNOWFLAKE_DATABASE_JDBC query: {0}\n Error when error occurs
-500009 Message: {1} in executing a
query.
TIBCO-BW-PALETTE- Error BW-Plug-in Failed to close Message is shown
SNOWFLAKE_DATABASE_JDBC ResultSet. {0} for Snowflake
-500010 database Query
activity if error
occurs in closing a
ResultSet.
TIBCO-BW-PALETTE- Error BW-Plug-in Failed to close Message is shown
SNOWFLAKE_DATABASE_JDBC Prepared Statement. when error occurs
-500011 {0} in closing
prepared
statement.
TIBCO-BW-PALETTE- Error BW-Plug-in Failed to close Message is shown
SNOWFLAKE_DATABASE_JDBC Snowflake Database when error occurs
-500012 Connection. {0} in closing closing
connection.
TIBCO-BW-PALETTE- Error BW-Plug-in Error occurred when Message is shown
SNOWFLAKE_DATABASE_JDBC generating XML when error occurs
-500013 Output for activity. {0} while generating
output for an
activity.
TIBCO-BW-PALETTE- Error BW-Plug-in Invalid number of Message is shown
SNOWFLAKE_DATABASE_JDBC maximum rows for Snowflake
-500014 entered in Activity: database Query
{0}. Value must be activity if you
greater than or equal input negative
to 0, value was {1} value for
maximum rows.
TIBCO-BW-PALETTE- Error BW-Plug-in {0} Message is shown
SNOWFLAKE_DATABASE_JDBC for Snowflake
-500016 database Insert
activity if insert of
one or more
records fails.
TIBCO-BW-PALETTE- Error BW-Plug-in Snowflake driver class Message is shown
SNOWFLAKE_DATABASE_JDBC not found. {0} when Snowflake
-500017 JDBC driver class
is not found
TIBCO-BW-SR- Error BW-Plug-in Creating Shared Message is shown
SNOWFLAKE_DATABASE_CONN Resource {0} failed due when error occurs
ECTION-500001 to [{1}] during creation of
shared resource.
TIBCO ActiveMatrix BusinessWorks™ Plug-in for Snowflake User Guide33
Error Code Role Category Messages Description
TIBCO-BW-SR- Error BW-Plug-in Failed to decrypt Message is shown
SNOWFLAKE_DATABASE_CONN obfuscated password when decryption
ECTION-500002 for field : {0} of obfuscated
password fails.
TIBCO-BW-SR- Error BW-Plug-in Failed to initialize Message is shown
SNOWFLAKE_DATABASE_CONN connection pool for when connection
ECTION-500003 Shared Resource : {0} pool initialization
{1} fails.
TIBCO-BW-SR- Error BW-Plug-in Failed to close Message is shown
SNOWFLAKE_DATABASE_CONN Snowflake Database when error occurs
ECTION-500004 Connection. {0} in closing
connection.
TIBCO-BW-SR- Error BW-Plug-in Failed to destroy Message is shown
SNOWFLAKE_DATABASE_CONN connection pool for when error occurs
ECTION-500005 Shared Resource: {0} in destroying
{1} connection pool.
TIBCO-BW-PALETTE- Trace BW-Plug-in {0} Message is shown
SNOWFLAKE_DATABASE_JDBC while printing
-100001 events for activity.
TIBCO-BW-PALETTE- Trace BW-Plug-in Connection successful Message is shown
SNOWFLAKE_DATABASE_JDBC with Snowflake on successful
-100002 database using connection with
DatabaseURL: {0} Snowflake
Database.
TIBCO-BW-SR- Trace BW-Plug-in {0} Message is shown
SNOWFLAKE_DATABASE_CONN while printing
ECTION-100001 events for shared
resource.
TIBCO-BW-PALETTE- Debug BW-Plug-in \nStart of the Activity Prints activity
SNOWFLAKE_DATABASE_JDBC {0}, \nInput received: input.
-200001 \n {1} \n
TIBCO-BW-PALETTE- Debug BW-Plug-in \nActivity {0}, Output Prints activity
SNOWFLAKE_DATABASE_JDBC data: \n {1} \n Exit of output.
-200002 Activity {2}
TIBCO-BW-PALETTE- Debug BW-Plug-in Query formed: {0} Prints query
SNOWFLAKE_DATABASE_JDBC formed
-200003
TIBCO-BW-PALETTE- Debug BW-Plug-in Batch Size entered: {0} Message is shown
SNOWFLAKE_DATABASE_JDBC for Snowflake
-200004 database Insert
activity and prints
batch size.
TIBCO ActiveMatrix BusinessWorks™ Plug-in for Snowflake User Guide34
Error Code Role Category Messages Description
TIBCO-BW-PALETTE- Debug BW-Plug-in Maximum rows Message is shown
SNOWFLAKE_DATABASE_JDBC entered: {0} for Snowflake
-200005 database Query
activity and prints
maximum rows
entered.
TIBCO-BW-SR- Debug BW-Plug-in Creating Shared Message is shown
SNOWFLAKE_DATABASE_CONN Resource {0} while creating the
ECTION-200001 shared resource.
TIBCO-BW-SR- Debug BW-Plug-in Starting Shared Message is shown
SNOWFLAKE_DATABASE_CONN Resource {0} while executing
ECTION-200002 the shared
resource.
TIBCO-BW-SR- Debug BW-Plug-in Stopping Shared Message is shown
SNOWFLAKE_DATABASE_CONN Resource {0} while stopping the
ECTION-200003 shared resource.
TIBCO-BW-SR- Debug BW-Plug-in Deleting Shared Message is shown
SNOWFLAKE_DATABASE_CONN Resource {0} while deleting the
ECTION-200004 shared resource.
TIBCO-BW-SR- Debug BW-Plug-in Number of thread is Message is shown
SNOWFLAKE_DATABASE_CONN {0} to print number of
ECTION-200005 thread.
TIBCO-BW-SR- Debug BW-Plug-in Minimum pool size is Message is shown
SNOWFLAKE_DATABASE_CONN {0} to print minimum
ECTION-200006 pool size.
TIBCO-BW-SR- Debug BW-Plug-in Maximum pool size is Message is shown
SNOWFLAKE_DATABASE_CONN {0} to print maximum
ECTION-200007 pool size.
TIBCO-BW-SR- Debug BW-Plug-in Connection pool Message is shown
SNOWFLAKE_DATABASE_CONN initialized for Shared while initializing
ECTION-200008 Resource {0} connection pool
TIBCO-BW-SR- Debug BW-Plug-in Connection pool Message is shown
SNOWFLAKE_DATABASE_CONN destroyed for Shared while destroying
ECTION-200009 Resource {0} connection pool
TIBCO-BW-PALETTE- Warn BW-Plug-in No input received for Message is shown
SNOWFLAKE_DATABASE_JDBC activity : {0} for Snowflake
-400001 database Insert
activity and
Snowflake
database Update
activity if no input
is received for
values node.
TIBCO ActiveMatrix BusinessWorks™ Plug-in for Snowflake User Guide35
Error Code Role Category Messages Description
TIBCO-BW-SR- Warn BW-Plug-in Number of thread is Message is shown
SNOWFLAKE_DATABASE_CONN invalid, default to 8 when number of
ECTION-400001 thread entered is
less than 1.
TIBCO-BW-SR- Warn BW-Plug-in Invalid minimum pool Message is shown
SNOWFLAKE_DATABASE_CONN size entered. Value when minimum
ECTION-400002 must be greater than pool size entered
or equal to 0, value is less than 0.
was {0}, defaulted to 0
TIBCO-BW-SR- Warn BW-Plug-in Invalid maximum pool Message is shown
SNOWFLAKE_DATABASE_CONN size entered. Value when maximum
ECTION-400003 must be greater than 0, pool size is less
value was {0}, than 1.
defaulted to {1}
TIBCO-BW-SR- Warn BW-Plug-in Minimum pool size: Message is shown
SNOWFLAKE_DATABASE_CONN {0} should be less than when minimum
ECTION-400004 or equal to Maximum pool size is greater
pool size: {1}. Setting than maximum
Maximum pool size to pool size.
{2}
TIBCO ActiveMatrix BusinessWorks™ Plug-in for Snowflake User Guide36
TIBCO Documentation and Support Services
How to Access TIBCO Documentation
Documentation for TIBCO products is available on the TIBCO Product Documentation website, mainly in
HTML and PDF formats.
The TIBCO Product Documentation website is updated frequently and is more current than any other
documentation included with the product. To access the latest documentation, visit https://docs.tibco.com.
Product-Specific Documentation
The following documentation for TIBCO ActiveMatrix BusinessWorks™ Plug-in for Snowflake is available
on https://docs.tibco.com/products/tibco-activematrix-businessworks-plug-in-for-snowflake:
● TIBCO ActiveMatrix BusinessWorks™ Plug-in for Snowflake Release Notes
● TIBCO ActiveMatrix BusinessWorks™ Plug-in for Snowflake Installation
● TIBCO ActiveMatrix BusinessWorks™ Plug-in for Snowflake User Guide
How to Contact TIBCO Support
You can contact TIBCO Support in the following ways:
● For an overview of TIBCO Support, visit http://www.tibco.com/services/support.
● For accessing the Support Knowledge Base and getting personalized content about products you are
interested in, visit the TIBCO Support portal at https://support.tibco.com.
● For creating a Support case, you must have a valid maintenance or support contract with TIBCO. You
also need a user name and password to log in to https://support.tibco.com. If you do not have a user
name, you can request one by clicking Register on the website.
How to Join TIBCO Community
TIBCO Community is the official channel for TIBCO customers, partners, and employee subject matter
experts to share and access their collective experience. TIBCO Community offers access to Q&A forums,
product wikis, and best practices. It also offers access to extensions, adapters, solution accelerators, and
tools that extend and enable customers to gain full value from TIBCO products. In addition, users can
submit and vote on feature requests from within the TIBCO Ideas Portal. For a free registration, go to
https://community.tibco.com.
TIBCO ActiveMatrix BusinessWorks™ Plug-in for Snowflake User Guide37
Legal and Third-Party Notices
SOME TIBCO SOFTWARE EMBEDS OR BUNDLES OTHER TIBCO SOFTWARE. USE OF SUCH
EMBEDDED OR BUNDLED TIBCO SOFTWARE IS SOLELY TO ENABLE THE FUNCTIONALITY (OR
PROVIDE LIMITED ADD-ON FUNCTIONALITY) OF THE LICENSED TIBCO SOFTWARE. THE
EMBEDDED OR BUNDLED SOFTWARE IS NOT LICENSED TO BE USED OR ACCESSED BY ANY
OTHER TIBCO SOFTWARE OR FOR ANY OTHER PURPOSE.
USE OF TIBCO SOFTWARE AND THIS DOCUMENT IS SUBJECT TO THE TERMS AND CONDITIONS
OF A LICENSE AGREEMENT FOUND IN EITHER A SEPARATELY EXECUTED SOFTWARE LICENSE
AGREEMENT, OR, IF THERE IS NO SUCH SEPARATE AGREEMENT, THE CLICKWRAP END USER
LICENSE AGREEMENT WHICH IS DISPLAYED DURING DOWNLOAD OR INSTALLATION OF THE
SOFTWARE (AND WHICH IS DUPLICATED IN THE LICENSE FILE) OR IF THERE IS NO SUCH
SOFTWARE LICENSE AGREEMENT OR CLICKWRAP END USER LICENSE AGREEMENT, THE
LICENSE(S) LOCATED IN THE “LICENSE” FILE(S) OF THE SOFTWARE. USE OF THIS DOCUMENT IS
SUBJECT TO THOSE TERMS AND CONDITIONS, AND YOUR USE HEREOF SHALL CONSTITUTE
ACCEPTANCE OF AND AN AGREEMENT TO BE BOUND BY THE SAME.
This document is subject to U.S. and international copyright laws and treaties. No part of this document
may be reproduced in any form without the written authorization of TIBCO Software Inc.
TIBCO, the TIBCO logo, and the TIBCO O logo are either registered trademarks or trademarks of TIBCO
Software Inc. in the United States and/or other countries.
Java and all Java based trademarks and logos are trademarks or registered trademarks of Oracle and/or its
affiliates.
All other product and company names and marks mentioned in this document are the property of their
respective owners and are mentioned for identification purposes only.
This software may be available on multiple operating systems. However, not all operating system platforms
for a specific software version are released at the same time. See the readme.txt file for the availability of
this software version on a specific operating system platform.
THIS DOCUMENT IS PROVIDED “AS IS” WITHOUT WARRANTY OF ANY KIND, EITHER EXPRESS OR
IMPLIED, INCLUDING, BUT NOT LIMITED TO, THE IMPLIED WARRANTIES OF MERCHANTABILITY,
FITNESS FOR A PARTICULAR PURPOSE, OR NON-INFRINGEMENT.
THIS DOCUMENT COULD INCLUDE TECHNICAL INACCURACIES OR TYPOGRAPHICAL ERRORS.
CHANGES ARE PERIODICALLY ADDED TO THE INFORMATION HEREIN; THESE CHANGES WILL
BE INCORPORATED IN NEW EDITIONS OF THIS DOCUMENT. TIBCO SOFTWARE INC. MAY MAKE
IMPROVEMENTS AND/OR CHANGES IN THE PRODUCT(S) AND/OR THE PROGRAM(S) DESCRIBED
IN THIS DOCUMENT AT ANY TIME.
THE CONTENTS OF THIS DOCUMENT MAY BE MODIFIED AND/OR QUALIFIED, DIRECTLY OR
INDIRECTLY, BY OTHER DOCUMENTATION WHICH ACCOMPANIES THIS SOFTWARE, INCLUDING
BUT NOT LIMITED TO ANY RELEASE NOTES AND "READ ME" FILES.
This and other products of TIBCO Software Inc. may be covered by registered patents. Please refer to
TIBCO's Virtual Patent Marking document (https://www.tibco.com/patents) for details.
Copyright © 2020-2021. TIBCO Software Inc. All Rights Reserved.
TIBCO ActiveMatrix BusinessWorks™ Plug-in for Snowflake User GuideYou can also read