Trilogy 100 Ventilator Information and User Guide for Home Care Workers - RBH LTV service
←
→
Page content transcription
If your browser does not render page correctly, please read the page content below
Trilogy 100 Ventilator
                       Information and User
                        Guide for Home Care
                                                 Workers

            Children’s Long-Term Ventilation Service
Email: childrensltv@rbht.nhs.uk | Telephone: 0207 352 8121 x 84411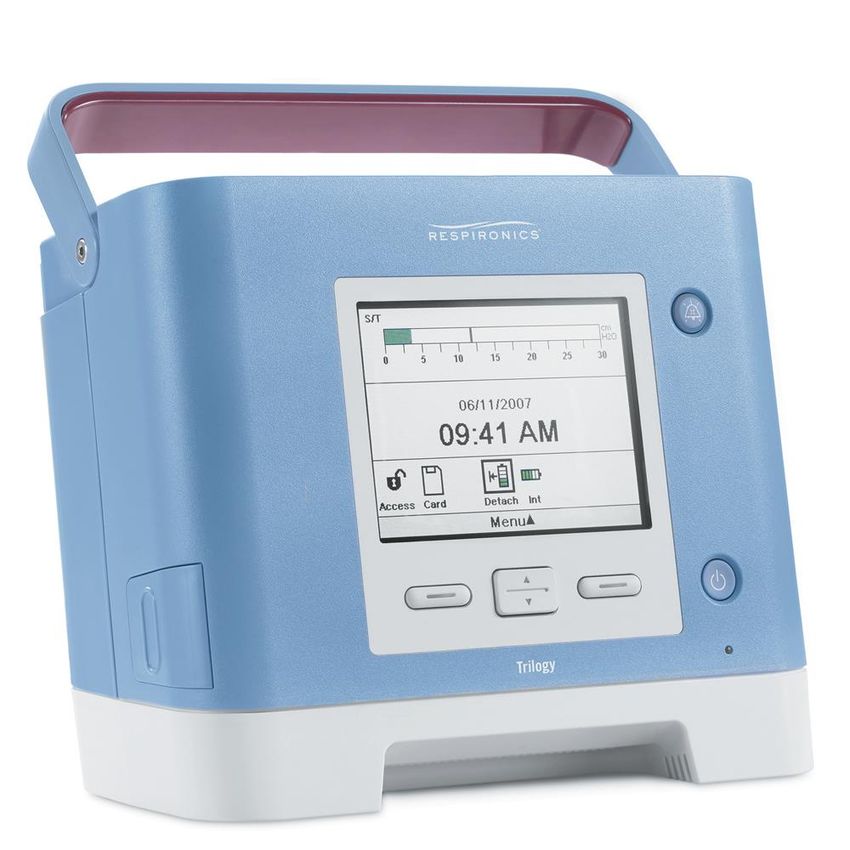
V. 6: March 2020         Page 2 of 18
For review: March 2022
Author: LTV Team/
Contents

                           Description of Outside of the Ventilator                     Page 3
                           Understanding the Screen                                     Page 4
                           Power                                                        Page 5
                           Types of Ventilation Circuits                                Page 8
                           Turning On/Off                                               Page 9
                           Nebuliser Function                                           Page 9
                           Alarm/Event Information                                      Page 9
                           Entraining Oxygen                                           Page 10
                           Starting and Stopping Ventilation                           Page 11
                           Monitoring Ventilation                                      Page 11
                           Switching between two programmes                            Page 12
                           Testing Alarms                                              Page 12
                           Activated Alarms                                            Page 13
                           Understanding Alarms                                        Page 14
                           Troubleshooting Trilogy 100 Alarms                          Page 15
                           Giving Nebulisers                                           Page 16
                           Consumables                                                 Page 17
                           Ventilator Tips                                             Page 17
                           Useful Contact Information                                  Page 17

  Please Note: This user guide is designed for use by home care workers who have received appropriate training to use the
  ventilator for in the home setting. It does not include guidance on setting and altering ventilation parameters. For qualified
  members of staff please use the alternative user guide titled ‘Trilogy 100 Ventilator Information and User Guide for
  Qualified Health Care Professionals’ for additional information. This document will be reviewed on annual basis and the
  reader should take note of the review dates on the document. The information contained was true at the time of review.

V. 6: March 2020                                                                                                         Page 3 of 18
For review: March 2022
Author: LTV Team/
Description of the Outside of the Ventilator

             Routine maintenance.
             Under normal usage the grey foam filter should be cleaned once a week and
             replaced with a new filter every six month.

             To replace filter:
             1. Ensure device is off and disconnect the device from the power source.
             2. Remove the filter from the enclosure by gently squeezing the filter in the center
             and pulling it away from the device.
             3. Examine the filter for cleanliness and integrity.
             4. Wash the grey foam filter in warm water with a mild detergent. Rinse thoroughly
             to remove all detergent residue. Allow the filter to air dry completely before
             reinstalling it. If the foam filter is torn or damaged, replace it. (Only Respironics-
             supplied filters should be used as replacement filters.)
             5. Reinstall a dry filter.

             Note: Pollen Filter to be added for the patient in the case of allergies or smoking
             household. The filter needs to be replaced every 30 days.

V. 6: March 2020                                                                                      Page 4 of 18
For review: March 2022
Author: LTV Team/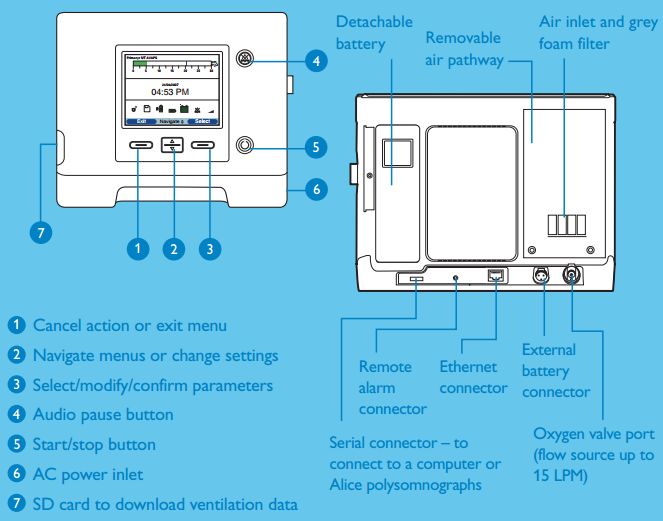
Optional: Pollen Filter placed
under the grey foam filter
with the print facing into the
device
Grey Foam Filter
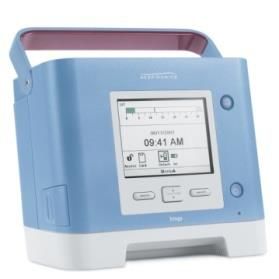
Understanding the Screen
1
9
2
8
3 7
4 5 6
1. Ventilation Mode. Displays which mode is currently set up for use.
If more than one programme of ventilation is set the words ‘Primary’ or ‘Secondary’ also
appear to indicate which programme is in use
V. 6: March 2020 Page 5 of 18
For review: March 2022
Author: LTV Team/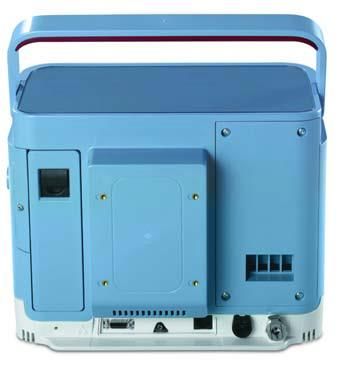
2. Pressure bar graph. Next to the bar graph the below symbol is displayed each time there is
     a patient triggered breath

     Patient breath indicator

3. Padlock. Indicates the access that the operator has. The operator can choose to allow the
     patient full access (can see and change settings) or limited access (can view but not change
     settings). The open padlock indicates ‘full’ access
4.   SD card. This symbol will show when an SD card is in situ in the machine.
5.   Battery use indicators
6.   Alarm mute indicator (icon appears on screen when the alarm mute is active)
7.   Ramp. In CPAP, S, S/T, T and PC modes there is an option to set a ramp meaning the
     pressure will gradually increase to the prescription pressure. This symbol indicates that the
     ramp feature is set.
8.   Real time ventilation monitoring
9.   Date and time

Power

The ventilator mains cable attaches to the side of the machine

The ventilator also has an internal battery and a detachable external battery.

It takes approximately 8 hours to charge the internal and detachable batteries. The internal
and detachable batteries last for approximately 4 hours each.

Note: Battery life may differ depending on the amount of charge and the ventilation
parameters set.

V. 6: March 2020                                                                                     Page 6 of 18
For review: March 2022
Author: LTV Team/
It is also possible to attach the ventilator to a separate 12V battery if required. The length of
time this will last will depend on the battery being used.

The following battery symbols will be displayed on the monitoring screen if they are in use:

Whenever the ventilator is attached to the mains power the internal and detachable batteries
will charge.

The outside of the detachable battery has as set of LED’s that indicate the amount of charge
left on the battery.

The following power indicators will be displayed on the monitoring screen to indicate the level
of charge in the battery or batteries in use:

V. 6: March 2020                                                                                    Page 7 of 18
For review: March 2022
Author: LTV Team/
V. 6: March 2020         Page 8 of 18
For review: March 2022
Author: LTV Team/

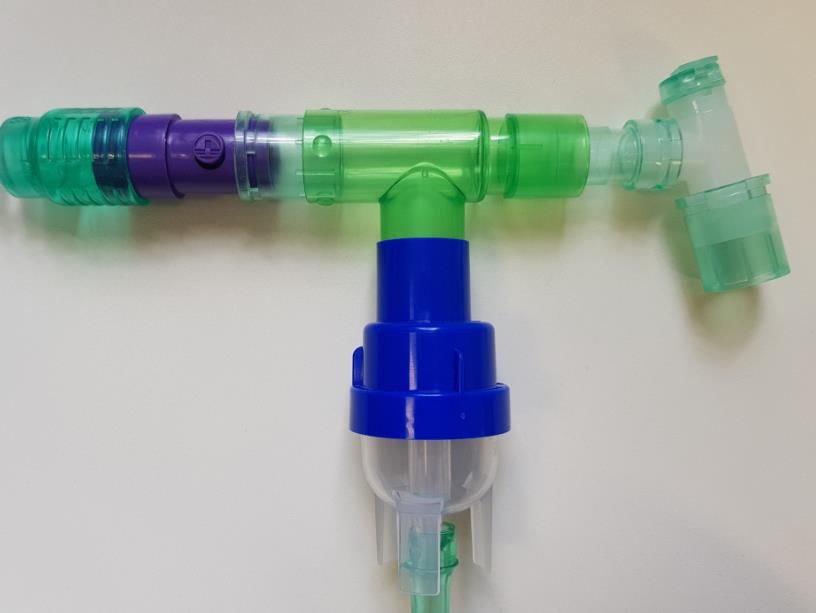
Types of Ventilation Circuits

There are 2 types of circuit that may be used with the trilogy ventilator. A ‘passive’ circuit with
controlled expiratory leak and an ‘Active PAP’ circuit with a proximal pressure line and
expiratory valve. These circuits may be sourced from a variety of suppliers (please see Trilogy
Ventilator Equipment List for details of compatible circuits). The decision regarding the circuit
used should be made by the treating professionals.

             Turning On/Off

V. 6: March 2020                                                                                      Page 9 of 18
For review: March 2022
Author: LTV Team/
To turn the machine on and off, press the power button on the front of the machine. Ventilation will start immediately. When turning off, you will be asked to confirm you wish to power down the ventilator. Nebuliser function When giving a nebuliser you can enable the nebuliser function to reduce nuisance alarms that could be triggered by the nebuliser. This alarm remains active for 20 minutes while the nebuliser is given. To activate enter the ‘primary or secondary settings and alarm menu’ depending on which programme you are on (see page 11). Scroll down using the down arrow key to nebuliser enabled, select modify and select on prior to starting the nebuliser. Once the nebuliser has been given turn off the nebuliser function by scrolling down using the down arrow key to nebuliser enabled, select modify and select off. If using aeroneb nebuliser you will not need to use this button, only for jetsream nebulisers. Alarm/Event Information Alarm Log Entering this part of the menu allows you to view the last 20 alarms which have been activated on the ventilator. Event Log Entering this part of the menu allows you to see actions that have occurred for example, attaching the battery, starting therapy, changing settings, etc. Information V. 6: March 2020 Page 10 of 18 For review: March 2022 Author: LTV Team/
This part of the menu allows you to observe the ventilator parameters which are set but it is
not possible to change them in this part of the menu.

Entraining Oxygen

Supplemental oxygen can be delivered via 2 routes:
1. Connect oxygen tubing via the nozzle at the back of the machine. Oxygen flow should be
    manipulated via the flow meter on the oxygen delivering device you are using.

2. Deliver oxygen directly into the ventilator circuit using oxygen connector before the
    humidification device.

                                                                        Oxygen Connector

                         Humidifier

Starting and Stopping Ventilation

V. 6: March 2020                                                                                Page 11 of 18
For review: March 2022
Author: LTV Team/
To start ventilation, press the power button located on the front of the ventilator. Ventilation will start straight away. To stop ventilation again press the power button on the front of the ventilator. When turning off, you will be asked to confirm you wish to power down the ventilator. Monitoring Ventilation During ventilation the screen will display real time ventilation information. If you wish to see trends or monitoring information over time, this information can be downloaded onto SD card and viewing on a computer providing the user has the relevant software. V. 6: March 2020 Page 12 of 18 For review: March 2022 Author: LTV Team/
Switching between two programmes (if applicable)

If you have two progammes set up on the ventilator you will see Primary and Secondary before the
mode of ventilation it is delivering. Otherwise it will look like the screen above.
If you need to switch between two programmes go into the menu bar and select secondary
settings and alarms. It will ask you to confirm this.
It will look similar to below:

Testing Alarms

Alarm Checks - Must be carried out at the beginning of/during each shift.

•     When tubing is first disconnected check that low pressure, disconnection or low tidal
      volume alarms are triggered

•     Occlude the ventilator circuit whilst running and check the high pressure, occlusion or low
      tidal volume alarms are triggered

Activated Alarms

V. 6: March 2020                                                                                    Page 13 of 18
For review: March 2022
Author: LTV Team/
When an alarm is activated the ventilator will provide both audible and visual alerts. A
message is also displayed detailing the nature of the alarm.
When an alarm occurs the LED indicator on the alarm mute button lights up, there is also an
audible sound and a message appears on the screen describing the type of alarm.
There are 3 alarm priorities:
• High Priority: Require immediate response by the operator, the alarm mute button will
flash red and the screen message will appear red.
• Medium Priority: Require prompt response by the operator, the alarm mute button will
flash yellow and the screen message will appear yellow.
• Low Priority: Require operator awareness, a solid yellow light appears on the alarm mute
button and the screen message also appears yellow
If an alarm is manually reset by the user the alarms and messages screen disappears. If an
alarm self-cancels, the alarms and messages screen remains displayed but the highlighted
colour disappears, the LED behind the mute button is unlit and the sound stops. It is therefore
possible to see what the last alarm was if it self resolves.
If multiple alarms are activated, all alarms are shown in the alarms and messages box with the
most recent at the top.
To mute an alarm press the alarm mute button on the top right hand corner of the ventilator.
The alarm will be silenced for 60 seconds and then will sound again if the cause of the alarm
has not been corrected. When the alarm is muted this will be indicated on the screen by this
icon
After a situation causing an alarm has been resolved press the reset button to clear the alarms
from the display.
Understanding Alarms
Trilogy 100: Possible Alarm Causes and Actions
V. 6: March 2020 Page 14 of 18
For review: March 2022
Author: LTV Team/Low minute ventilation alarm, Low High minute ventilation alarm, High
Inspiratory Pressure Alarm, Low Expiratory Pressure Alarm, High
Expiratory Pressure Alarm, circuit Inspiratory Pressure Alarm, Low Vti
disconnection alarm may indicate a Alarm, Check Circuit may indicate a
leak/ disconnection blockage or obstruction
Assess child Action Assess child Action
Accidental • Immediately insert Increased work of • Suction, consider
decannulation tracheostomy If breathing need for nebulisers,
(i.e. difficultly follow (Respiratory rate is physiotherapy
tracheostomy • Emergency increased is this • Refer to advanced
has come out) algorithm due to child being treatment plan
unwell) • D/w community or
medical team
(Respiratory rate • Monitor child.
increased due to • Address issues if
excitement, crying, possible, e.g.
upset, coughing, reposition,
hiccups, pain or administer pain
discomfort) relief
Assess child Action Assess child Action
Leak around • Some leak may be Retained • Suction, consider
tracheostomy tolerated and may secretions/ need for nebulisers,
(particularly when be due to position of increased physiotherapy
asleep) child so can try pulmonary • Refer to advanced
repositioning resistance etc treatment plan
• D/w community or
medical team
Assess equipment Action Assess equipment Assess child
Disconnection within • Reconnect any loose Circuit blockage • Correct fault
circuit (Follow circuit connections (Follow circuit from • Re-assess
from child through to • Re-assess child through to
ventilator and ensure ventilator and ensure it
everything is is not kinked or
connected obstructed)
Is the alarm set Check alarm settings Is the alarm set Check alarm settings
appropriately (i.e. as are as prescribed and appropriately (i.e. as are as prescribed and
previously recorded re-set if any previously recorded re-set if any
and checked at start of discrepancies and checked at start of discrepancies
shift) shift)
Low circuit leak alarm-Check exhalation value is not blocked or covered and within circuit.
If the child is compromised and you can’t resolve the issue rapidly –
hand ventilate and call for help
V. 6: March 2020 Page 15 of 18
For review: March 2022
Author: LTV Team/Troubleshooting Trilogy 100 Alarms
Check alarms at the start of each shift and document.
- When tubing is first disconnected check Low Inspiratory Pressure Alarm, Low Expiratory
Pressure Alarm, circuit disconnected
- Occlude the vent circuit whilst running and check the High Expiratory Pressure Alarm, High
Inspiratory Pressure Alarm, Low Vti Alarm Check Circuit Alarm
Ventilator alarm goes off
Ensure the child is ventilated, if necessary attach the ambu bag to the tracheostomy to
ventilate the child whilst the problem is resolved
ALARMS ALARMS
Low Inspiratory Pressure Alarm, Low High Expiratory Pressure Alarm, High
Expiratory Pressure Alarm, circuit Inspiratory Pressure Alarm, Low Vti Alarm,
disconnected, Low Vte Alarm Check Circuit Alarm
May indicate a leak or disconnection May indicate blockage or obstruction
Assess child Assess child
Possible causes include: Possible causes include:
• Leak around tracheostomy • Blocked tracheostomy
(particularly when asleep) • Kinked/obstructed circuit
• Decannulation • Retained secretions/ increased
Assess equipment pulmonary resistance etc
• Follow circuit from child through to Assess equipment
ventilator (ensure all connected – • Follow circuit from child through to
NB humidifier connectors etc may ventilator (ensure not kinked or
be slightly loose) obstructed)
• Is the alarm set appropriately (i.e. • Is the alarm set appropriately (i.e.
as previously recorded and checked as previously recorded and checked
at start of shift) at start of shift)
NB: If disconnection alarm sounds with the patient and circuit attached to the
ventilator this could indicate a blockage/obstruction.
V. 6: March 2020 Page 16 of 18
For review: March 2022
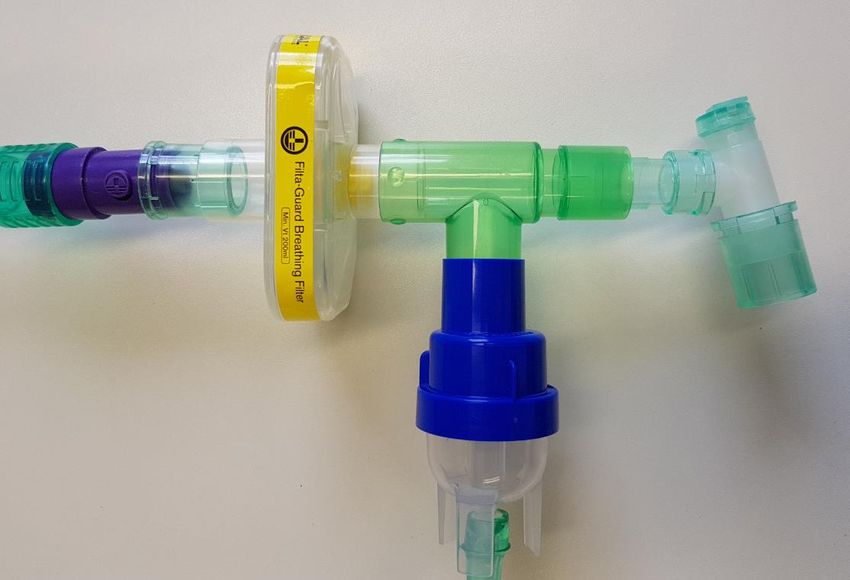
Author: LTV Team/Giving Nebulisers
Leak Valve T-piece Connector
Swivel Elbow
Attaches to
tracheostomy
Nebuliser Pot
Attach to
air compressor
For Nebulised Antibiotics. (Please check your local policy on whether antibiotic
nebulisers require filtering)
Antibacterial Filter T-piece Connector
Leak Valve
Swivel Elbow
Attaches to tracheostomy
Nebuliser Pot
Attach to air compressor
V. 6: March 2020 Page 17 of 18
For review: March 2022
Author: LTV Team/Consumables:
• Antibacterial filter should be changed weekly at home – see local policy for hospital
setting
• Dust filters should be checked weekly and washed with warm water with a mild
detergent. Changed every 6 months or sooner if needed
• Breathing circuit should be changed weekly
• As optional, pollen filter should be changed monthly or sooner if needed
NOTE: Please see equipment list for ordering information
Ventilator Tips:
• Allow a period for a ventilator to do it self test prior to connecting to the child
• Check the alarms prior to connecting the child to the ventilator.
• If 24-hour ventilation is required, the patient should have a back-up ventilator
ensuring equal usage to both ventilators.
• Machine is locked and on the appropriate settings
Useful Contact Information
For further advice on the Trilogy ventilator machine on the phone during week working hours:
Philips Healthcare
Chichester Business Park, City Fields Way, Tangmere, West Sussex, PO20 2FT
Customer Services: +44 800 1300 845
Check your service agreement for your options.
V. 6: March 2020 Page 18 of 18
For review: March 2022
Author: LTV Team/You can also read