Updated September 2021 - ECi Software ...
←
→
Page content transcription
If your browser does not render page correctly, please read the page content below
ECinteractivePLUS®:
Administration Guide

      Updated September 2021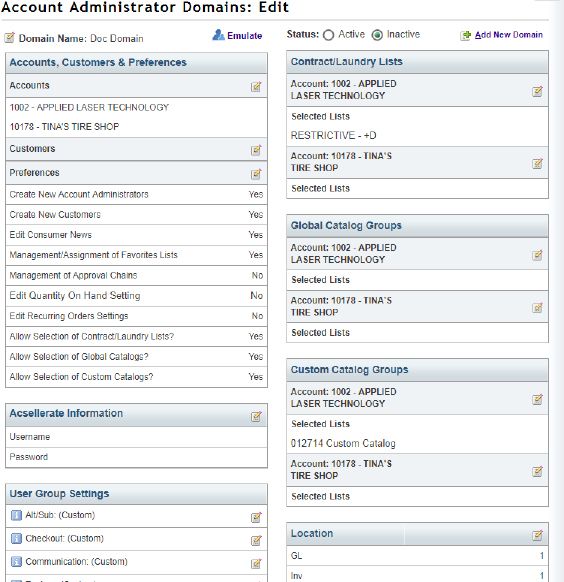
Contents
   Site Config......................................................................................................................4
        Change Password............................................................................................................................... 4
        Change Security Q/A......................................................................................................................... 4
        Site Selection...................................................................................................................................... 4
        Admin User Maintenance................................................................................................................. 4
        Site Appearance................................................................................................................................. 6
        Image Management.......................................................................................................................... 6
        Site Info............................................................................................................................................... 6
        Site Preferences................................................................................................................................. 8
        Contacts Management.................................................................................................................... 17
        Site Text Assignment/Text Editor/Error Text.................................................................................. 17
        Location Management.................................................................................................................... 17
        Account Management..................................................................................................................... 18
        Remit A/R Settings........................................................................................................................... 20
        Site Maintenance............................................................................................................................. 20
        Help Files.......................................................................................................................................... 21
        Live Support..................................................................................................................................... 21
   Product Management................................................................................................... 22
        Custom Product Management........................................................................................................ 22
        Manufacturer Management........................................................................................................... 22
        Web Specials.................................................................................................................................... 22
        Preferred Items................................................................................................................................ 24
        Merchandising Products.................................................................................................................. 24
        Contract/Laundry Lists.................................................................................................................... 26
        Provider Priority Mgmt.................................................................................................................... 27
        Find Catalogs by SKU....................................................................................................................... 28
        Flyer Management........................................................................................................................... 28
        Uncataloged Items........................................................................................................................... 28
              Before You Import..............................................................................................................................29
              Using the Uncataloged Items Page....................................................................................................29
              Importing Uncataloged Items............................................................................................................30
   Consumer Config........................................................................................................... 32
        Shipping Management.................................................................................................................... 32
        Alternate/Substitutes...................................................................................................................... 33
        Checkout........................................................................................................................................... 33
        Communication................................................................................................................................ 34
        Feature............................................................................................................................................. 35
        Marketing......................................................................................................................................... 36
        Price ............................................................................................................................................... 36
        Favorites Lists/Favorite Item Mgmt................................................................................................ 37

 © 2021 ECI and the ECI logo are registered trademarks of ECI Software Solutions, Inc. All rights reserved.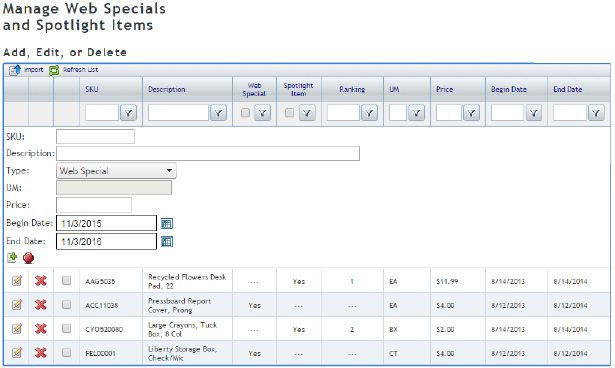
Rewards............................................................................................................................................ 37
Consumer Admin.......................................................................................................... 37
Customer Records............................................................................................................................ 37
Search................................................................................................................................................38
Recent Site Customers.......................................................................................................................39
Customer Records..............................................................................................................................39
Site Sales............................................................................................................................................39
Customer Maintenance................................................................................................................... 39
Customer View...................................................................................................................................39
Add Customers...................................................................................................................................41
Copy Customers.................................................................................................................................42
Customer Log.....................................................................................................................................42
Approval Management: Approval Groups..................................................................................... 42
Add Approval Groups.........................................................................................................................43
Account Administrators (Domain Management)........................................................................... 45
Adding a Domain...............................................................................................................................45
Editing a Domain................................................................................................................................47
Maintaining Domains on the Domain Administration Page...............................................................49
Using Account Administrator Options on the Front-end Site............................................................50
Edit Guest Customer........................................................................................................................ 50
Favorites Assignment....................................................................................................................... 50
Account News.................................................................................................................................. 50
Mass Setting Management............................................................................................................. 50
Customer Groups............................................................................................................................. 51
Parameter Maintenance.................................................................................................................. 51
Customer Account Management.................................................................................................... 52
User Types........................................................................................................................................ 53
Site Info ...................................................................................................................... 53
User Usage Reports......................................................................................................................... 53
Order Management......................................................................................................................... 53
Login Errors...................................................................................................................................... 54
Orphaned Users............................................................................................................................... 55
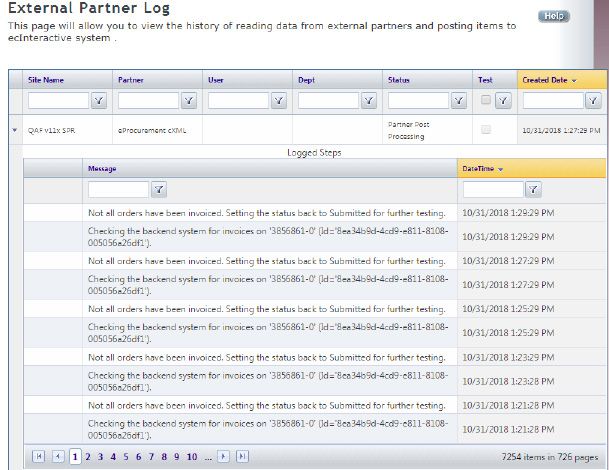
External Partner Log........................................................................................................................ 55
Catalog Combination Index Management..................................................................................... 57
ECP CCI Log....................................................................................................................................... 57
Online Sales Reports........................................................................................................................ 57
© 2021 ECI and the ECI logo are registered trademarks of ECI Software Solutions, Inc. All rights reserved.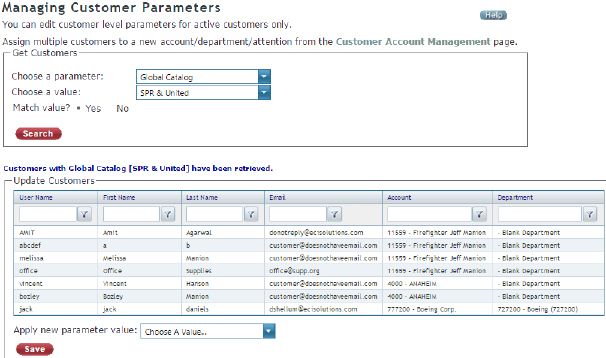
ECinteractivePLUS®: Administration Guide
ECinteractivePLUS® represents next-generation web storefronts and online customer service solutions for
your business system. These solutions feature an e-commerce storefront application that runs on a platform
designed from the ground up to provide you with a significant advantage in competing for online business.

Site Config
This section of your administrative website includes setting your passwords, security information, admin
users, site and image management, and your company information.

Change Password
  1. Click the Site Config training toolbar and select Change Password.
  2. Click the Password box and enter your current password.
  3. Click the New Password box and enter the new password. You must specify at least six alphanumeric
     characters.
  4. Click the Confirm New Password box and enter the new password again.
  5. Click Change Password.

Change Security Q/A
When changing your password, you must correctly answer a security question. You select your security
question and set the answer on the Change Security Q/A page.
  1. Click the Site Config training toolbar and select Change Security Q/A.
  2. Enter you password in the Current Password box.
  3. Click the Security Question drop-down menu and select a question.
  4. Enter the answer for the security question in the Security Answer box.
  5. Click Update.

Site Selection
This page is useful when you have multiple sites. It lets you choose a site as the default when logging in.
  1. Click the Site Config training toolbar and select Site Selection. The system displays a list of available
     sites.
  2. Check the Make the Selected Site My Default Site When I Login box.
  3. Under the Site Name heading, click the site to select as the default when logging in.
  4. Your changes are saved. The system returns to the Admin Home page.

Admin User Maintenance
  1. Click the Site Config training toolbar and select Admin User Maintenance.

  Note:    To refresh the page, click    .

                                                        4                                  continue to next page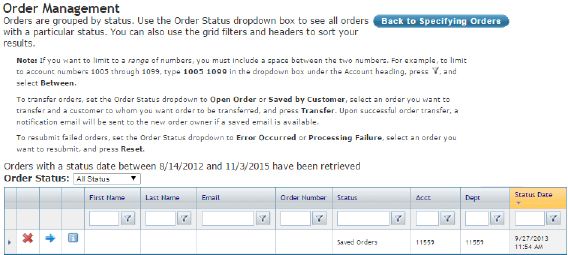
ECinteractivePLUS®: Administration Guide
2. On the Current Admin Users page, you can:

     •     Click    to edit existing admin users.

     •     Click   to delete existing admin users who no longer require access. At the Delete This User
           prompt, click OK. Those users that display as Online cannot be deleted.

     •     Click     to unlock admin users. To determine if a user account is locked, look for a check mark
           in the Locked column. Accounts are locked after five unsuccessful attempts to log in.

3. Click     to add an additional admin user.

   3.1     Click the UserName box. Enter a name for this user.
   3.2     Click the Email box and enter the user’s email address.
   3.3     Click the Password box and enter a password for this user. You must specify at least six
           alphanumeric characters.
   3.4     Click the Confirm Password box and re-enter the password.
   3.5     Click the Security Question drop-down menu and select a security question for the user. If the
           administrative user forgets the password, you can email this security question to the user.
   3.6     Click the Security Answer box and enter the answer to the security question.
   3.7     Enter any comments about this user in the Comments box.
   3.8     If the user is approved, click Approved. To deny the user access, clear the box.
   3.9     In the Roles section, select the role for this user. You can assign a user to the Dealer role (senior
           or upper level management) or to the Dealer Support (sales managers, customer service
           managers, and so on) role.
                                                      5                                   continue to next page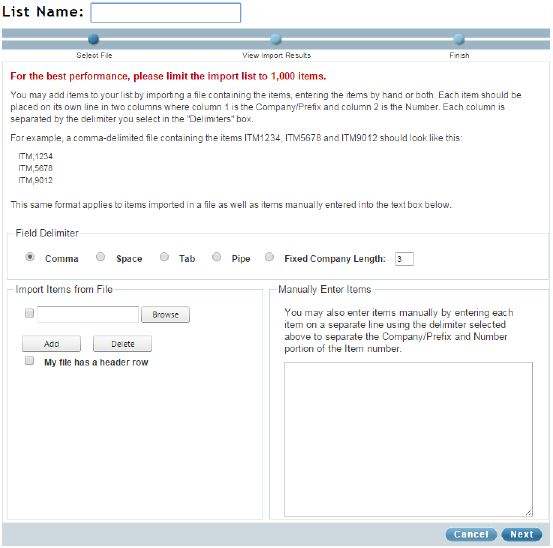
ECinteractivePLUS®: Administration Guide
      3.10 In the Sites Allowed section, check the box next to each site to which to grant the user access.
      3.11 Click the Comments box and enter any comments about this admin user.
      3.12 Check the Approved box to mark this user as approved. This box is checked by default.

      3.13 When finished, click       .

Site Appearance
You can use this page to choose the theme and layout for the front-end site. To refresh the page, click    .
  1. Click the Site Config training toolbar and select Site Appearance.
  2. Click the Update Theme drop-down menu and select a color theme for the front-end site.
  3. Click the Layout drop-down menu and select a site layout for the front-end site. You can select Framed
     Site or No Frames. This option allows you to frame the storefront site within your company’s existing
     website.

Image Management
You can use the Image Management feature to load a logo image for your administrative and end user home
pages. This tool is just another way to customize your site to appeal to your customers.
  1. Click the Site Config training toolbar and select Image Management.
  2. To load logos, do the following:
      2.1    Click Choose File to locate the logo to upload.
      2.2    Click Upload New Image. The image is added to the Existing Image List. It is also saved to the
             image server.
      2.3    Once you have uploaded the image, place it on the website. In the Existing Image List section,
             click the name of the image to place, LOGO.gif, for example. The image opens.
      2.4    To make the image display as your logo throughout the front-end website, click Save As Logo
             Image.
  3. For images other than logos, you can do the following:
         •   Upload image files. These files can be used when you create various pages using Text Editor.

         •   Delete image files. To do so, click the image to highlight it and click   .

Site Info
You can use the Site Info page to provide your company information.
  1. Click the Site Config training toolbar and select Site Info.
  2. Click Edit.

                                                        6                                  continue to next page
ECinteractivePLUS®: Administration Guide

3. Click the Dealer Name box and enter a new name for the site.
4. Click the Dealership Initials box and enter the new initials for the site.
5. Click the Phone Number box and enter a new phone number. You must enter numeric characters in
   this box. If you enter alpha characters, the phone number displays as (000) 000-0000 on emails and
   remittance forms.
6. Click the Fax Number box and enter a new fax number. You must enter numeric characters in this box.
   If you enter alpha characters, the fax number displays as (000) 000-0000 on emails and remittance
   forms.
7. Click the Address Type drop-down menu and select an address type, Billing or Shipping, for example.
   Since online accounts receivable features are available, we recommend that you do not select the
   Remit A/R option.
8. Click the Address Line 1 box and enter Line 1 of your address.
9. Click the Address Line 2 box and enter Line 2 of your address, if applicable.
10. Click the City box and enter your city’s name.
11. Click the State drop-down menu and select your state.
12. Click the Postal Code box and enter your postal code.
13. Click the Main Website Address box and enter a new site name. This main Web address is
    automatically identified when the front-end page is created. This website address prints on remittance
    forms and when printing information from the Order History page.

                                                      7                              continue to next page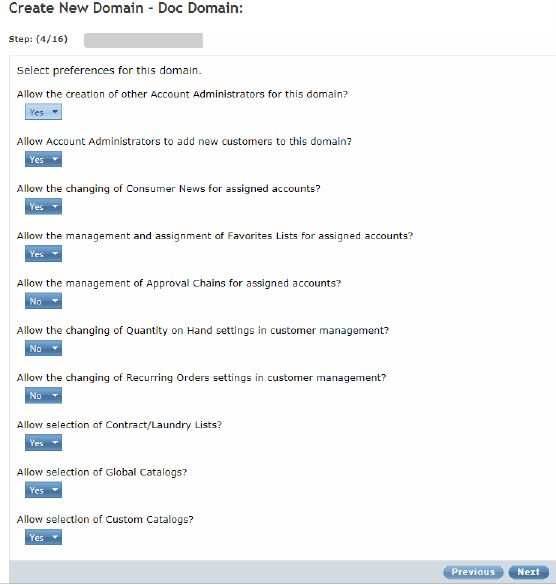
ECinteractivePLUS®: Administration Guide
  14. Click the Sales Contact Name box and enter a new sales contact name. The information in this box
      displays on confirmation emails as the From addressee name.
  15. Click the Sales Email box and enter a new salesperson’s email address. The information in this box
      displays on confirmation emails as the From addressee email address.
  16. Click the Service Contact Name box and enter a new service contact person. The information in this
      box displays on confirmation emails under the dealer’s address.
  17. Click the Service Email box and enter a new service email address. The information in this box displays
      on confirmation emails under the dealer’s address. If you allow shoppers to add, edit, and delete
      credit cards on the back-office business system, an email is sent to the address specified in this box
      whenever credit cards are added or changed. Make sure an email address is set up in this box if you
      intend to use this feature.
  18. Click Update.

Site Preferences
This page allows you to view and edit the preferences for your site.
  1. Click the Site Config training toolbar and select Site Preferences.

  2. Click     next to the section to edit. Enter new information over the existing information. When you
     finish changing information in each section, click Save.
       General Preferences
         •   Include Product Descriptions in Search: You can use this box to specify that the system include
             or exclude the item’s description when the shopper searches for products. To include the prod-
             uct description, check this box. To exclude the product description, clear this box.
         •   Edit Budget Link Text: Click this box to change the text of the link that displays on the shopper’s
             top menu. This link displays in the My Account drop down menu. This box defaults to Edit Bud-
             get. You could change it to Edit Your Budgets, for example.
         •   Local Time Zone: Use this drop-down menu to set the time zone for your front-end site.
         •   Default Primary Wholesaler: Use this drop-down menu to select your default primary whole-
             saler. The default you select here can be used with microsites.
         •   Acsellerate® Account: Click this box and enter your Acsellerate dealer ID. This allows your shop-
             pers the ability to access Acsellerate on the front-end site and review report information. After
             you enter your dealer ID in this box, retrieve the shopper’s account on the Customer View page
             and assign an Acsellerate user name and password.
         •   Deleted Favorite Items Text: Click this box and enter the button text to display on the front-end
             site for deleted favorite items. When a favorite list containing a deleted item is viewed on the
             front-end site, a button displays. The default button text is Discontinued Items. When a shopper
             clicks the button, a dialog box opens and displays the deleted items.
         •   Number of Days to Display Changed Favorite Items: Click this drop-down menu and select how
             many days a changed favorite item number displays on the front-end site. You can select Not
             Shown, 30, 60, or Never Expires.

                                                       8                                  continue to next page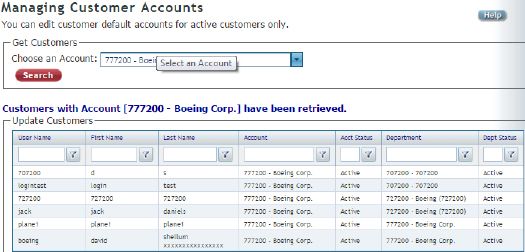
ECinteractivePLUS®: Administration Guide
•   Number of Days to Retain Carted Item’s Price: Click this box and enter the number of days item
    prices are retained for carted or saved orders. Normally, saved or open orders are re-priced ac-
    cordingly when the shopper checks out. This ensures that if you have loaded a pricing update,
    for example, updated item prices are reflected. However, if you enter a number of days in this
    box, the item’s original price is retained for the number of days you specify. For example, if you
    set this box to three days, item prices for carted or saved orders are retained for up to three
    days. After the fourth day, all item prices are recalculated. Since it allows shoppers to retain the
    item’s original price, this feature is especially helpful when using governmental accounts and
    requisitions.
•   Show HON Microsite Custom Link: Check this box to display the HON Furniture link at the top of
    the front-end website, along with Shopping and Featured Items.
•   Sort by Price: Check this box to enable the Sort By Price feature on the front-end website. When
    shoppers use standard content, S.P. Richards Enhanced Content, or Essendant™ Smart Search
    features, this function lets them sort by price. You can also enable or disable this feature for
    specific customers in their Price settings. This box only displays if the Sort by Price feature is en-
    abled.
•   Page Title Text (Browser Tab): Most Internet browsers display website names or pages in the
    title bar or tab. This box lets you create custom browser tab text for the front-end website that
    displays after the page name. Click this box and enter custom browser tab text to display on the
    front-end site. You can enter up to 70 characters. This box also works with the Page Title Text Po-
    sition (Browser Tab) drop-down menu. For example, if you enter ABC Company in this box, and
    the user navigates to the Home page, the tab would read Home | ABC Company or ABC Compa-
    ny | Home, depending on your selection in the Page Title text Position (Browser Tab) drop-down
    menu.
•   Page Title Text Position (Browser Tab): Most Internet browsers display website names or pages
    in the title bar or tab. This menu works with the Page Title Text (Browser Tab) box to create
    custom browser tab text for the front-end website that displays after the page name. Click the
    drop-down menu and select Before or After.
•   Meta Tag Description: ECinteractivePLUS uses search engine optimization (SEO) to promote
    your website’s visibility on the internet and bring more traffic to your site. SEO allows users of
    web search engines like Google and Yahoo® to find your site more easily than websites that do
    not use SEO. Your site’s optimized information includes product details and a customizable site
    description linked to your Home page. Click this box and enter a description for your site. This
    description is linked to your site’s Home page.
•   Search Bar Text: Click this box and enter custom text that displays in the Search box on the
    front-end website. You can enter up to 50 characters in this box. If you leave it blank, the text in
    the Search box remains Enter Keyword or Item #.
•   Display Product Health Warnings: Click this drop-down menu and specify for whom to display
    product warnings on the shopper’s site. You can select California Only or All States/Provinces.
    This setting defaults to California Only. Product warning messages are intended to inform shop-
    pers about exposures to chemicals known to cause cancer, birth defects or other reproductive
    harm. The warning messages are required by law in the State of California and is known as
    California Proposition 65, the Safe Drinking Water and Toxic Enforcement Act of 1986. For more
    information go to www.P65Warnings.ca.gov.

                                               9                                   continue to next page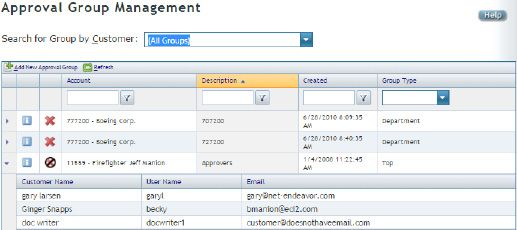
ECinteractivePLUS®: Administration Guide
 •    Allow Shared Cart: Check this box to enable the Shared Cart feature.
 •    Show Product Detail Email: Check this box to enable the Email link on the Product Detail page.
 •    Disable Pay Invoice Emails: Check this box to disable confirmation emails when shoppers pay
      invoices.
Customer Registration
 •    Allow Customer Registration: You have several options when setting this feature. Select from
      one of the following:
        •   Create Online Account: Allow shoppers to register an account on the front-end site.
            This setting can be used when potential shoppers already have an account set up on the
            back-office business system. Selecting this option forces them to supply their back-office
            account information before proceeding. It prevents them from creating a back-office
            account during the account creation process.
        •   Create Back-office and Online Account: Allow shoppers to register an account on the
            front-end site and on the back-office business system. This setting can be used for
            potential shoppers who are not already assigned to a back-office business account.
            Selecting this option forces them to create a new back-office account before proceeding.
        •   Allow Both Methods: Allow shoppers to register an account on the front-end site and the
            back-office business system. This setting combines both settings described above. It allows
            shoppers to supply an existing back-office account if they are already assigned to one
            or it allows the shopper to create a new back-office account before proceeding. For this
            method, an additional prompt asks shoppers which method they prefer to use to create a
            new account.
        •   No Automatic Account Creation: Do not allow shoppers to register. If you select
            this option, the shopper enters information which is sent to you as an email but the
            information is not entered into the back-office business system nor is a shopper account
            created on the front-end site. This gives you the option of adding the shopper to the back-
            office and front-end systems. This is the default response.
 •    User Type Selection During Registration: This section works with the Allow Customer Registra-
      tion section and lets the shopper select a user type from a list of user types when creating a
      new account. You can set up multiple user types using the User Types page. Click the Allow User
      Type Selection option to allow shoppers the ability to select a user type when creating an ac-
      count. To deny users the ability to choose a user type when creating a new account, click the
      Use Default User Type option.
 •    Add Custom Registration Questions: Use these boxes to add up to three custom questions for
      new end users. Click each box and enter the question to ask. You can also check the Required
      box next to a question to mark it as required on the front-end site. Required questions are indi-
      cated by a red asterisk on the front-end site.
Credit Cards
 •    Accepted Credit Cards: Check the box next to each credit card shoppers can use when paying
      for purchases. You can also check the box at the top of the column to select all credit cards. The
      card types you select display in a drop-down menu on the Checkout and Remit A/R pages on the
      front-end website. No card types are selected by default.

                                              10                                  continue to next page
ECinteractivePLUS®: Administration Guide
• Credit Card Polling Frequency: If you receive a failure when trying to communicate your credit
card information, this drop-down menu lets you specify the number of additional times to try.
Click the drop-down menu and select the number of times. You can choose from 1, 2, 3, 4, 5, 10,
15, 30, or 60 times. If you set this box to 4, for example, the system tries 4 additional times to
poll or communicate and authorize the card.
• Manage Credit Card Link Text: This box applies to the shopper’s Credit Card Editor page. If you
allow shoppers to add, edit, or delete credit cards, this box lets you specify the link text that
displays on the site. Click this box to change the text of the link that displays on the shopper’s
top menu. This link displays in the My Account drop-down menu. This box defaults to Manage
Credit Cards. You could change it to Manage Your Credit Cards, for example.
Tax Fields
• Use and Display Multiple Tax Fields: Check this box to display more than one line of tax infor-
mation in the Order Summary section on the Checkout page. If you check this box, multiple tax
information also displays in order confirmation emails. This is a useful feature for Canadian cus-
tomers who use GST and PST taxation. If you check this box, use the Tax Label 1 and Tax Label 2
boxes to define the text labels for the tax lines that display on the front-end website.
• Tax 1 Label/Tax 2 Label: These boxes work with the Use and Display Multiple Text Fields box.
Click each box and enter the text for the tax that displays in the Order Summary section on the
Checkout page and in order confirmation emails. This is a useful feature for Canadian customers
who use GST and PST taxation.
Category Display Order
• Expand Category Display on Home and Browse Catalog Pages: Check this box to expand the
content provider categories on the shopper’s Home and Browse Catalog pages. If you check this
box and the total number of first-level categories is greater than six, all content providers’ first-
level categories are displayed in alphabetical order. Second level categories are not displayed.
Each category acts as a link allowing the user to click it to open the next level categories.
• Regular Categories: In this tab, check the box next to each content provider to use. Click Get
Categories to display the first-level categories for all selected providers. Then, click the Rank box
and enter the order the selected provider displays in this list.
• Enhanced Categories: In this tab, use the Rank box next to each category to set the display or-
der for the top-level categories set by your enhanced content provider. Check the Hide In Verti-
cal Menu box next to each category to hide in the vertical menu. Check the Show In Horizontal
Menu box next to each category to show in the existing horizontal menu.
Google Analytics
• Google Analytics ID: Use this box to enter the identification number for use with the Google
Analytics™ feature. You can use Google Analytics to learn which online marketing initiatives are
cost effective and see how visitors actually interact with your site. Doing so can help you make
informed site design improvements, drive targeted traffic, and increase your conversions and
profits. This online tool is offered by Google free of charge. For more information, see www.
google.com/analytics/features.html. You must sign up for Google Analytics before you can use
this tool on your administrative site. Once you have signed up with Google, input the tracking
code provided by Google in the Google Analytics ID box.
11 continue to next pageECinteractivePLUS®: Administration Guide
• Enable Site Linking for Google Analytics: Check this box to enable site linking for use with the
Google Analytics feature. You can use Google Analytics to learn which online marketing initia-
tives are cost effective and to see how visitors actually interact with your site.
States and Provinces
• Restrict Shipping States for Guest Shopper Only: Check this box to restrict guest shoppers to
certain shipping states/provinces. Then, drag the states/provinces to exclude from the Allowed
States/Provinces box and drop them in the Restricted Sales/Provinces box. When you move a
state/province to the Restricted States/Provinces box, that state/province is not included in the
shipping address options for the shopper. If a shopper uses a restricted state/province on an or-
der, an email notification is sent to the email address specified in the Sales Email box on the Site
Info page. If you leave the Restrict Shipping States For Guest Shopper Only box unchecked and
move states/provinces to the Restricted States/Provinces box, all shoppers are restricted from
shipping to those states/provinces.
Checkout Settings
• Always Land User on Checkout Edit Page: This box is cleared by default. If this box is checked,
when shoppers click Checkout on the front-end site, they are taken to the Edit Order Details
page instead of the default Review Order Details page.
• Allow Change Payment Method on Checkout Review Page: Click this box to allow shoppers to
select a payment method on the Review Order Details page (shoppers can still select a payment
method on the Edit Order Details page). If a shopper enters new credit card information on the
Review Order Details page, the Place Order button is temporarily removed while the credit card
is validated. Once the card is validated, the Place Order button reappears and the shopper can
place the order.
Max Quantity/Dollars
• You can also specify Max Quantity/Dollars settings at the account level by clicking the Consumer
Admin training toolbar, Account Management, Account Management, and clicking Max Quan-
tity/Dollars Management.
• Max Quantity Per Line Item: Enter a maximum quantity shoppers can purchase of any single
line item. The default is 9999 line items. If you leave this box blank, there is no maximum quan-
tity amount. Your shoppers can order an unlimited number of any single line item.
• Error Message When Max Quantity Exceeded: Click this box and enter the text the user sees
when exceeding the maximum item quantity allowed for each item. If the shopper exceeds the
item amount, the system displays a warning message on the Checkout page. This box defaults to
display the text You Have Exceeded the Maximum Allowed Quantity.
• Max Dollars Per Invoice: Enter a maximum (pre-tax) dollar limit for each order your users place.
Enter the amount all in one string. For example, to place the maximum order limit at $1,000,
you would enter 1000 in this box. This box defaults to $9,999.000. The system checks the order
total when the shopper opens the Checkout page.
• Error Message When Max Dollars Exceeded: Click this box and enter the text the shopper sees
when exceeding the maximum dollars allowed for each invoice. If the shopper exceeds the total
amount, the system displays a warning message on the Checkout page. This box defaults to the
text You Have Exceeded the Maximum Dollars Per Invoice.
12 continue to next pageECinteractivePLUS®: Administration Guide
Quantity On Hand
• Edit Quantity On Hand Setting: Specify how to display your available on hand quantities to the
shopper.
• Do Not Display Quantity On Hand: Disable the ability to view on hand quantities. If
you select this option, the Quantity On Hand feature is disabled for the entire site. Any
shopper-specific on-hand quantity settings you specified are ignored.
• Use an Icon to Display Quantity On Hand: Display an icon for in-stock and out-of-stock
items. The system defaults to use as the in-stock icon and as the out-of-stock icon.
You can customize the default icons using the Quantity On Hand Icon section. If you are
using the Essendant Inventory Awareness feature, the system defaults to use as the
Sufficient Quantity icon.
• Use Text to Display Quantity On Hand: Display text for in-stock and out-of-stock items.
The system defaults to use In Stock and Out of Stock as the default text. You can customize
the default text using the Quantity On Hand Text section.
• Edit Blank Quantity On Hand Setting: Specify how to handle items you don’t stock (non-stock).
For DDMS/DDMSPLUS, when an ECinteractivePLUS shopper orders an item you don’t stock, the
system returns a blank on hand quantity. You can specify how the system should display this in-
formation to the shopper on the front-end site.
• Do Not Display: Do not display on hand quantities for non-stock items.
• Out of Stock: Display the out-of-stock icon or Out of Stock text for non-stock items.
• In Stock: Display the in-stock icon or In Stock text for non-stock items. You can use this
option for non-stock items since you can easily purchase them to complete the shopper’s
order.
• Quantity On Hand Icon/Text: Use this section to specify your icon and text preferences.
• Use an Icon to Display Quantity on Hand: If you selected this option, the Quantity On
Hand Icon section displays and lets you choose the icon that displays for in-stock and out-
of-stock items. You can also choose to not display an icon for out-of-stock items. You can
enter the tooltip text the user sees when the cursor hovers over the icon. When editing
text, click to insert the text [[inventory_count]] that is replaced on the front-end site
with the item’s on hand quantity. If you are using the Essendant Inventory Awareness
feature, the Sufficient Quantity icon setting also displays.
• Use Text to Display Quantity on Hand: If you selected this option, the Quantity On Hand
Text section displays and lets you customize the text that displays for in-stock and out-of-
stock items. You can also choose to not display text for out-of-stock items. When editing
text, click to insert the text [[inventory_count]] that is replaced on the front-end site
with the item’s on hand quantity. If you are using the Essendant Inventory Awareness
feature, the Sufficient Quantity text setting also displays.
• Wholesaler Quantity On Hand: Check this box to include wholesaler on hand quantities in
search results. To view the wholesaler item with the settings you selected, click the Test Item #
box and enter a wholesaler item number. Click Test Pipeline. If the test is unsuccessful, contact
ECI Support.
13 continue to next pageECinteractivePLUS®: Administration Guide
• Essendant Inventory Awareness Function: Use this section to specify your Essendant Inventory
Awareness preferences.
• Enable Essendant Inventory Awareness: Check this box to enable the Essendant Inventory
Awareness feature. Once you check this box, three additional boxes display: Filter Out of
Stock Items, Bury Out of Stock Items, and Include Dealer Quantity On Hand.
• Filter Out of Stock Items: Check this box to remove out-of-stock Essendant items from the
search and navigation results on the front-end site. This box is cleared by default.
• Bury Out of Stock Items: Check this box to bury out-of-stock Essendant items in the search
and navigation results on the front-end site. This option places out-of-stock items at the
end of the search and navigation results. This option is enabled by default.
• Include Dealer Quantity On Hand: Check this box to merge your stocked inventory counts
with the Essendant inventory counts. This option is enabled by default.
• Essendant Inventory Awareness Settings: Use this section to specify your Essendant Inventory
Awareness preferences. This section only displays if you have checked the Enable Essendant In-
ventory Awareness box in the Essendant Inventory Awareness Function section.
• Email: Click this box and enter an email address where you can be notified of any changes
to the list of available Essendant facilities. This box is optional.
• Sufficient Quantity: Click this box and enter a numeric value that specifies the item
quantity that can be in-stock before an item is considered low-stock. The default value for
this box is five. This means that any item with a quantity of less than five displays a low-
stock message on the front-end site. The low-stock message can be customized using the
Quantity On Hand Icon/Text section. The Sufficient Quantity includes both your stocked
inventory counts and Essendant’s inventory counts.
• Essendant Inventory Awareness Facilities: Update the Essendant Facilities section, if needed.
This section allows you to manage which Essendant facilities to use with the Inventory Aware-
ness feature. If no facilities are selected, all facilities are used with the Inventory Awareness fea-
ture. This section only displays if you have checked the Enable Essendant Inventory Awareness
box in the Essendant Inventory Awareness Function section.
ERP Preferences
• Default Order Taker: Enter a default order-taker for all the orders that come through the sys-
tem. You can specify up to four alphanumeric characters. The order-taker you specify must be
set up in the Salesperson Database on your back-office system. This box is blank by default.
• Journal Limit for Order History: This box displays the number of months shoppers can search
for order history. This box is set to 6 months by default. To change it, click the drop-down menu
and select the number of months. You can choose from 0 months to 12 months. If you set this
box to 0, shoppers can only view orders from the existing P-MASTER and JOUR-PO files.
• Use Back-office Categories in Contract/Laundry List: Check this box to use the back-office busi-
ness system category headers for contracts and laundry lists. Leave this box blank to use whole-
saler categories for contracts and laundry lists. This box is blank by default.
• Allow Advanced Manifest: Check this box to allow shoppers to use the Advanced Manifest fea-
ture.
14 continue to next pageECinteractivePLUS®: Administration Guide
Enhanced Content Provider
• S.P. Richards/SPR Canada: Select this option to set S.P. Richards or SPR Canada as your en-
hanced content provider. Click the Content Provider drop-down menu and select S.P. Richards
or SPR Canada. Click the site ID box and enter your identification number. Contact S.P. Richards/
SPR Canada for this information.
• Essendant: Select this option to set Essendant as your enhanced content provider. Then, click
the Dealer ID and Password boxes to enter your Essendant ID and password. Contact Essendant
for this information.
• None: Select this option to not use an enhanced content provider.
Display Item Savings/Discount
• Enable Display Item Savings/Discount: Check this box to display item savings/discounts on the
front-end site. This box is cleared by default.
• Display Savings/Discount As: Select the Amount option to display savings as a dollar amount.
Select the Percentage option to display discounts as a percentage.
• Do Not Show Savings/Discount Message If Savings/Discount Is Less Than: Click this box and
enter a numeric threshold for the savings/discount amount. For example, if you are displaying
savings as a dollar amount and you enter 5 in this box, items with savings of less than 5 dollars
do not display a savings message on the front-end site. Similarly, if you are displaying discounts
as a percentage and you enter 5 in this box, items with discounts of less than 5% do not display
a savings message on the front-end site. When displaying discounts as a percentage, you must
enter the percentage as a numeric value between 1 and 100.
• Customized Savings/Discount Text: Click this box and enter the text to use for the savings/dis-
count message. You can enter up to 15 characters in this box. The default value for this box is
Save.
• Custom Customer Price Text: Click this box and enter the text to use for the customer price. You
can enter up to 15 characters in this box. The default value for this box is Sale.
S.P. Richards Analytics (This section does not display if SPR Canada is selected as the ECP.)
• Campaign Advantage Analytics: Select this option to use S.P. Richards Campaign Advantage
Analytics.
• Anonymous Analytics: Select this option to use S.P. Richards Anonymous Analytics.
Essendant Digital Analytics
• Settings for Essendant Digital Analytics: View the settings for Essendant’s Digital Analytics fea-
ture. To change the alias, click the Digital Analytics Alias box and enter the alias to view.
ERP Connection
• This section displays the IP Address, Port, Rest Port, and Terminal IP for the connection. This in-
formation is for display only.
15 continue to next pageECinteractivePLUS®: Administration Guide
Recurring Orders Preferences
• Enable Recurring Orders: Check the Enable Recurring Orders box to enable the Recurring Orders
feature on the shopper’s front-end site. Clear the Enable Recurring Orders box to deny access.
This feature is disabled by default in Site Preferences. You must check this box to allow shoppers
to place recurring orders. If you enable the Recurring Orders feature and later disable it for the
site, or for an account, or for a shopper, all recurring orders are deleted for the site, account,
and/or shopper.
• Discount Percentage Per Item: Click this box and enter the percentage by which to discount
recurring items. For example, to allow a 10% discount, you would enter 10.00 in this box. The
system uses the following order to determine the discount percentage: customer level, account
level, and site level. If the customer level is different than the account, the customer-level dis-
count is used. If the account level is different than the site, the account-level discount is used. If
both the customer level and account level are not changed, the site-level discount is used.
• Apply Discount Qualifications: Click this drop-down menu and specify the orders to which the
discount applies. You can select 1st Order Only or All Orders. If you select 1st Order Only, the
discount only applies to the first instance of each recurring order the shopper creates. For ex-
ample, supposed a shopper creates a new recurring order. The discount is applied to that first
instance of the order, but not to the next instance. For example, suppose the shopper creates
a new recurring order. The discount is applied to the first instance of that order. If the shopper
later creates a different recurring order, the discount is also applied to the first instance of that
order, and so on.
• Number of Days for Advance Email Notification: Click this box and enter the number of days
before shoppers receive an email notifying them that the recurring order date is approaching.
• Item Company: Click this box and enter the item company to use for the Recurring Orders fea-
ture on the front-end website. The item company you enter must exist in the back-office system.
This option is only available when changing recurring orders settings for the entire site.
• Item Number: Click this box and enter the item number to use for the Recurring Orders feature
on the front-end website. The item number you enter must exist in the back-office system. This
option is only available when changing recurring orders settings for the entire site.
SMTP Settings
• SMTP Host: Enter the IP address from your email provider.
• SMTP Port: Enter the port number from your email provider.
• User Name: Enter the user name for the email address to be used for outgoing messages.
• Password: Enter the password to use. This box is encrypted. You can use this box to change your
password after you set it by entering a new password.
• Use an Encrypted Connection (SSL): Check this box if required by your email host.
• From Email: Enter the email address from which emails are sent. This is also used as a Reply-To
address.
• Default Email From Address: Enter the default email address from which emails are sent.
• Log On to Incoming Mail Server First: Check this box if required by your email host.
16 continue to next pageECinteractivePLUS®: Administration Guide
• Incoming Mail Server (POP): Enter the IP address if required by your email host.
• Incoming Mail Server Port: Enter the port number if required by your email host.
• To Email Address: Enter an email address for which you can access the Inbox.
• Email Subject: Use the default subject: Test Email from ECI SMTP Settings.
• Email Body: Use the default body: This is a test email only. This email signifies a successful test
of the SMTP Settings for your ECI site.
Contacts Management
This page stores the information about the contact person for the site. The contacts you specify display on the
front-end Contact Us page.
1. Click the Site Config training toolbar and select Contacts Management. The Manage Site Contacts page
opens.
2. Click to add a contact.
2.1 Click the Contact Name box and enter the name of the person to act as contact for the site. This
name displays to the shopper. You must enter a contact in this box.
2.2 Click the Email box and enter an email address associated with the contact’s name you
specified. You must enter an address in this box.
2.3 Click to save your changes.
3. You can also do the following on this page:
• Click next to a contact to edit it.
• Click next to a contact to delete it. At the Are You Sure prompt, click OK.
Site Text Assignment/Text Editor/Error Text
For more information on customizing site text and messages, see Customizing Site Text and Messages and
Managing Images in Text Editor.
Location Management
You can manage a G/L location, an inventory location, and a printer ID as a group. The information for each
location displays in the grid. You can sort the locations by description, G/L, inventory, or printer ID. Click the
column heading to re-sort the grid.
1. Click the Site Config training toolbar and select Location Management.
2. Click .
3. Click the Description box and enter a descriptive name for the group.
4. Click the GL Location box and enter the general ledger location.
5. Click the Inventory Location box and enter the inventory location.
6. Click the Printer ID box and enter the logical name of the printer to use.
17 continue to next pageECinteractivePLUS®: Administration Guide
7. Click .
Account Management
Once you have your groups set up, you can assign accounts to locations. The information for each account
displays in the Account Management page. In this page, you can sort the accounts by account code,
description, or printer.
1. Click the Site Config training toolbar, Location Management, and select Account Management.
Note: Active customers display with a green icon, inactive customers display with a red icon and gray
icons indicate an O/E exempt customer. You can view inactive customer information in the Inactive
Customers tab.
2. Click the Select Location drop-down menu and choose the location to use.
3. Click .
4. Click the Account Nbr box and enter the customer’s account number. The account number you specify
must exist in the back-office business system.
5. Click the Account Printer box and enter the logical name of the printer to use, P1, for example.
6. Click . The Account Added Successfully message displays. Departments queue for synchronization to
the back-office system automatically.
18 continue to next pageECinteractivePLUS®: Administration Guide
Note: You can manually sync departments, if needed. To do so, check the Sync Departments box next
to the account you added, and click Sync Departments for Checked Accounts. At the Are You
Sure prompt, click OK. This brings over all departments associated with the account from the
back-office system. We recommend you perform this function after regular business hours, as this
function can slow your system down and affect your server’s performance.
7. Repeat Steps 3-6 to add as many accounts, as needed.
8. After the departments have been synchronized, you can assign different general ledger and inventory
locations to an account’s department. The locations you assign do not have to exist in the Location
Management page. The master account defaults to the general ledger and inventory locations unless it
is changed.
8.1 Click beside the account number to view the existing departments.
8.2 Click beside the department to change.
8.3 Click the GL box to assign a general ledger location for this department. The general ledger
location you enter overrides the location set up for the account to which this department
belongs.
8.4 Click the Inv box to assign an inventory location for this department. The inventory location you
enter overrides the location set up for the account to which this department belongs.
8.5 Click the Printer box to enter the printer to use for this department.
8.6 When finished, click .
9. You can use the Sync Schedule tab to specify when the system should sync your accounts in the back-
office business system. You can specify to sync accounts on a daily, weekly, monthly, or single time
basis. This page helps you better manage your customer accounts. To do so, do the following:
9.1 When the Account Management page opens, click the Sync Schedule tab.
9.2 Using the Sync Schedule options, choose how often the system should sync accounts. You can
choose from Daily, Weekly, Monthly, or One Time. Click the appropriate option.
9.3 Click the Next Sync Date box and enter the date when the system should sync accounts. You can
also click to open the calendar and select the date.
9.4 Click the Begin Sync Time (EST) box and enter the time when the system should sync accounts.
This box defaults to Eastern Standard Time.
9.5 When finished, click Update.
10. You can use the Sync History tab to view the status of synchronization with the back-office system.
11. You can use the Inactive Customers tab to view customers that are currently marked as inactive. Active
customers display with a green icon, inactive customers display with a red icon and gray icons indicate
an O/E exempt customer. You cannot change information in this tab; it is for display only.
11.1 From the Account Management page, click the Inactive Customers tab.
11.2 View the accounts that are currently inactive. To access the Customer Account Management
page, click the link.
19 continue to next pageECinteractivePLUS®: Administration Guide
Remit A/R Settings
The Remittance Address page lets you enter the address that customers use when mailing payments.
You must enter a separate remittance address for each G/L location. G/L locations are set up in Location
Management. For more information, see Setting Up Shoppers to Pay A/R Invoices Online.
Site Maintenance
You can use the Site Maintenance page to specify information on your end user’s site when the system
is down for maintenance. For example, during the software update maintenance period, your website
storefront is unavailable. You can schedule your site to be Offline for Maintenance using these instructions. To
refresh the page, click .
1. Click the Site Config training toolbar and click Site Maintenance. The Site Status box displays whether
the site is currently up or down and the current time. It displays the current time zone and daylight
savings time you have selected and cannot be manually changed. This box is automatically updated
when the Time Zone and Use Daylight Savings Time boxes are adjusted. The time displays in AM and
PM format, not military format. It also displays whether you have the automatic maintenance feature
enabled or disabled.
2. The Time Zone box defaults to Eastern Time. To change the time zone, click the Time Zone drop-down
menu and select the appropriate time zone.
3. Check the Use Daylight Savings Time box to indicate whether to use the daylight savings time feature.
4. Use the Unscheduled Maintenance box to toggle your e-commerce site off or on for system
maintenance whenever necessary. This change affects the e-commerce site within one to two minutes.
• Display Page: Click the Display Page drop-down menu to select the website shoppers view when
the site is in unscheduled maintenance mode. To view detail, click the drop-down menu and se-
lect the page to view and click . To create a new page, click the Create Pages link.
• Shutdown Site: When you click this button, the shopper’s site is turned off. All shoppers access-
ing the site are unable to open any page or perform any function.
• Startup Site: When you click this button, the shopper’s site is turned on.
5. The Automatic Scheduled Maintenance box lets you specify that all your e-commerce sites be
automatically shut down for maintenance.
• Automatic Maintenance Mode On: To activate the automatic maintenance mode feature, click
this button. At the This Could Inactivate Your Website for Customers Are You Sure prompt, click
OK. To deactivate this feature, click the Auto Maintenance Mode Off button.
• Weekdays Time Off/Time On/Display Page: Click the Weekdays Time Off box and enter the be-
ginning maintenance time for Monday through Friday, 11:00 PM, for example. Click the Week-
days Time On box and enter the ending maintenance time for Monday through Friday. These
boxes default to 12:00 AM. The time is displayed in AM and PM format, not military time. Click
the Display Page drop-down menu to select the page end users view when the site is in weekday
maintenance mode. To view detail concerning a page, click . To create a new page, click the
Create Pages link.
20 continue to next pageYou can also read