USER MANUAL - Tavolario Forni Experience
←
→
Page content transcription
If your browser does not render page correctly, please read the page content below
USER MANUAL
Write in this section the data of your product.

			Oven Model:

			Serial number:

			Purchase date:

NB: The identification label is located on the back of the product.

          Visit www.alfaforni.com and register your oven today.

                 1                                    2                               3
           12345678901234

   Identifies the serial number,          Visit our web site and click on
                                                                             Enter your information
 the identification label is located     “register your product” or type
                                                                                  and register
   on the back of the product.         “alfa1977.it/product-registration/”
Alfa Forni participates in the SAVE THE PLANET initiative;
that’s why the manual has been printed only in English and Italian.
To download the other languages, scan the QR code or click the link below.

Alfa Forni partecipa all’iniziativa SAVE THE PLANET,
per questo il manuale è stato stampato esclusivamente il lingua inglese e italiana.
Per scaricare le altre lingue scansione il QRcode oppure digita il link qui sotto.

Alfa Forni nimmt an der SAVE THE PLANET-Initiative teil. Die gedruckte Anleitung
ist deswegen nur auf Englisch und Italienisch verfügbar. Um die anderen Sprachen
herunterzuladen, scannen Sie den QR-Code oder geben Sie den Link hier unten ein

Alfa forni participe à l’inititiative SAUVER LA PLANÈTE
et pour cela le manuel à été imprimé seulement en anglais et en italien.
Pour télécharger les autres langues, flashez le code QR ou cliquez sur ce lien.

Alfa forni participa en la iniciativa SALVAR EL PLANETA,
por eso el manual fue publicado solo en inglés y en italiano.
Para descargar los otros idiomas escanea el código QR o haz clic aquí.

                             LINK DOWNLOAD
                       alfaforni.com/user-manual.php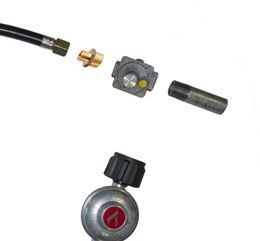
02   WARNINGS

05   WARRANTY

06   INSTALLATION

07   GAS CONNECTION
10   GAS CONNECTION NORTH AMERICA

13   GAS CONVERSION

16   OVEN USE

18   COOKING

26   MAINTENANCE AND CARE

29   TROUBLESHOOTING

                                    1
GENERAL WARNINGS
RETAIN THIS MANUAL FOR FUTURE REFERENCE
Additional copies of this manual at www.alfaforni.com
For US go to alfaovens.com
WARNING: improper installation, adjustment, alteration, service
or maintenance can cause property damage, injury or death. read
the installation, operating and maintenance instructions thoroughly
before installing or servicing this equipment.
PLEASE READ THE FOLLOWING INFORMATION FOR PROPER
INSTALLATION AND OPTIMUM PERFORMANCE OF THE OVEN.
-- The identification plate, with technical data, lot number and brand
name is visibly applied on the device. Do not remove this label
-- Remove all protective film before putting the unit into operation. To
facilitate the separation, use warm air (for example, a hairdryer)
-- Never use steel sponges or sharp scrapers, it can damage the
surfaces. Use ordinary non-abrasive products. If necessary, use
wood or plastic tools. Rinse thoroughly and dry with a soft cloth or
microfiber cloth.
-- Do not use dishes or containers made of plastic material. The high
temperatures inside the oven could melt the plastic, damaging the
appliance.
-- Use tools and utensils that are resistant to high temperatures.
-- Position the oven on a flat and level surface.
-- Due to the temperature, the color of the surfaces may vary in time.
-- Do not paint or apply objects to the oven.
-- Installation of the product must allow for easy access for cleaning.
-- Use the special wheel-stop included or locking castors to prevent the
oven from moving once positioned.
-- Never store, use or put flammable liquids or objects in or near the
oven.
-- Alfa stainless steel ready-to-use ovens can become hot on the outside
even with two layers of high quality insulation
2-- Always remove the oven door by gripping the handles and using
-- gloves when hot.
-- Closing the door when the oven is lit with flame can cause the flame
to go out from lack of oxygen
-- Do not touch the surfaces of the chimney flue during use.
-- Keep any electrical wiring and fuel lines away from hot surfaces.
-- Do not use the oven if it’s not working properly or you suspect a fault
in operation.
-- Do not move the oven during use or when it is hot.
-- Do not lean on or rest objects on the oven, this may compromise its
stability.
-- Never extinguish the flame with water.
-- In the event that a grease fire occurs, turn off the gas and leave the
door closed until the fire is extinguished.
-- When using the oven wear heat resistant oven gloves.
-- The parts that are sealed by the manufacturer should not be modified
by the user.
-- Do not block the openings and slots provided for ventilation and heat
dissipation.
-- When using charcoal, only use high quality natural lump wood
charcoal. Do not use briquettes, lava rock, liquid fuels, accelerants or
anything other than that expressly indicated.
-- Do not lift the oven from the sill or shelf
3SAFETY WARNINGS
READ ALL INSTRUCTIONS BEFORE INSTALLING AND USING THIS APPLIANCE
Please read this entire manual before you install the oven.
Contact your local building or fire officials about restrictions
and installation inspection in your area.
FOR YOUR SAFETY: Do not store or use gasoline or other flammable vapors or
liquids in the vicinity of this or any other appliance. Also, always keep the area
under and around this appliance free and clear of any and all combustible materials.
WARNING:Improper installation, adjustment, alteration, service or
maintenance can cause property damage, injury or death.
SAFETY WARNINGS
ONLY FOR GAS VERSION
GAS LEAKS MAY RESULT IN FIRE OR EXPLOSION AND CAUSE SERIOUS
PERSONAL INJURY OR DEATH, OR PROPERTY DAMAGE.
IF YOU SMELL GAS:
1. Turn the gas off.
2. Put out any live fire or flames.
3. Open the door to the oven.
4. Consult a licensed gas professional
ATTENTION! The gas oven may be converted from LPG to natural gas and
viceversa using the Alfa Ovens supplied conversion kit. Follow the supplied
instructions or contact a qualified andn licensed gas professional.
WARNING: If the gas oven is not used
close the gas supply valve.
WARNING: Do not store unused gas cylinders near the oven.
4WARRANTY
Alfa ovens fully comply with the Italian and European proposed regulations.
The oven is guaranteed for 2 (two) years against defects and craftsmanship;
good maintenance and proper use can make sure that the oven lasts much
longer.
Warranty covers parts and components for wood and 1 (one) year for labor
on natural gas and LPG ovens. Shipping and assembly costs are charged to
the customer.
PLEASE RETAIN YOUR SALES RECEIPT OR INVOICE
WRITE HERE UNDER THE SERIAL NUMBER ON THE PRODUCT
IDENTIFICATION TAG
_______________________________________________________________
The warranty does not apply in the following options:
• If the oven is not properly used and installed as described in this manual.
• If the oven has been damaged either voluntarily or involuntarily in any way.
• In the event the equipment is improperly or inadequately maintained. Burner
problems resulting from debris or ash in the burner well will not be covered by
the warranty.
• If the oven, for any cause, has been altered and is no longer in the condition
detected at delivery of the product.
• If products have been used other than suggested. Do not use liquid fire starters
for barbecues, other chemicals or products that contain liquid fuels.
• If the damage is the result of the use of chemicals inside or outside the oven.
• Normal wear of the burner, thermometer, ignition, electrodes, ignition cable, gas
hose and refractory stones.
• Damage caused by exceeding the temperature limit of 500°C / 1000°F.
• Void if replacement components not produced or approved by Alfa are
installed.
• Damage to parts not functional and decorative that do not affect the normal use
of the oven, including scratches and colors differences.
• In the event that the rating plate has been removed, altered or obliterated.
We recommend the exclusive use of spare parts recommended by Alfa.
5POSITIONING THE OVEN
THE OUTER WALLS OF OVEN MAY REACH
HIGH TEMPERATURES GREATER THAN 50°C / 120°F.
ANY FLAMMABLE MATERIAL SHOULD BE KEPT
AT LEAST 1 METRE (3 FEET) AWAY FROM THE OVEN.
50 cm - 20 in 50 cm - 20 in
100 cm - 40 in
CAUTION! When being used,
place the oven at a safe distance
from flammable materials
or substances that may be
damaged by heat.
CAUTION - Put the oven in a
place sheltered from wind or
strong drafts.
CAUTION! Place the oven on a
flat, stable surface to prevent it
from moving during use.
CAUTION: Position the oven at a minimum distance of 20
cm (8 in) from the walls and from any other equipment.
TOP VERSION OVENS SHOULD BE PLACED ON FIXED TABLES OR TABLES
WITH LOCKING WHEELS OR OTHER FIREPROOF SURFACES WITH
ADEQUATE LOAD-BEARING CAPACITY. IF NEEDED, ADJUST THE LEGS TO
LEVEL THE SUPPORTING SURFACE.
6CONNECTION
ONLY FOR LPG VERSION
Your Oven comes from the factory set up for LPG.
LPG cylinder is not supplied with the oven.
Your Oven comes from the factory set up for natural gas.
LPG cylinder is not supplied with the oven.
WARNINGS: Follow the following advises for a correct use of the gas cylinder.
-- Use the supplied conversion kit, pressure regulator and hose. - ONLY IN NORTH
AMERICA
-- Use a suitable pressure regulator and hose according to the regulations in force.
-- LPG is heavier than air. Any losses of LPG may collect in a lover part of the
environment.
-- The LPG cylinder must always be installed, transported and stored in a vertical
position. Handle with care and do not drop the LPG cylinders.
-- Make sure the gas tank is placed in a ventilated place that it is away from other
objects.
-- Never store a spare gas cylinder near the gas oven.
-- Do not leave or transport the LPG cylinders in places where temperatures can reach
50°C / 120°F (too hot to handle. For example: Do not leave the cylinder in the car
on hot days).
-- Treat “empty” LPG cylinders with the same attention as full ones. Even if there is no
more liquid in the cylinder there may always be gas
-- Always close cylinder valve before disconnecting as there could still be pressure
-- Always check all gas connections before using the oven.
-- Make sure to use the proper PTFE gas piping tape for all threaded connections.
-- Pressure left in the cylinder. Always close the cylinder valve before disconnecting it.
-- It is recommended that all gas connections are checked before using the oven.
-- Make sure that the valve on the LPG cylinder or the regulator is closed. Replacement
of the cylinder must be performed away from sources of heat and ignition.
-- It is advisable to replace the gas pipe every 2-3 years.
-- Only use LPG cylinders.
-- Do not twist the hose.
-- Before each use check that the hose does not have any marks, cracks, abrasions or
cuts. If the hose is damaged in some way, do not use the oven.
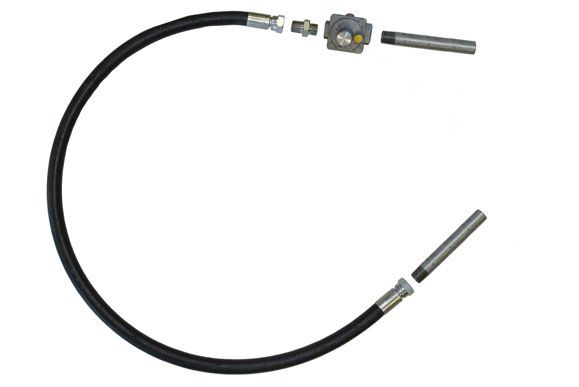
7CONNECTION
ONLY FOR LPG VERSION
FOR NORTH AMERICAN
CONNECTION PLEASE REFER TO PAGE 12
CONNECT THE LPG CYLINDER
(only for LPG oven)
Connect the flexible hose to the back of the oven.
PRESSURE REGULATOR:
- gas flow:
10 kg/h - 22 lbs/h
- outlet pressure:
butane G30: 28 - 30 mbar
propane G31: 30 - 37 mbar
FLEXIBLE HOSE:
Diameter 1/2’’
Length 1,5 meters
CYLINDER:
Recommend a cylinder between 10kg (22lbs) and 30kg (66lbs)
Pressure regulator, flexible hose and cylinder are not supplied with the oven.
8CONNECTION
ONLY FOR NATURAL GAS VERSION
FOR NORTH AMERICAN
CONNECTION PLEASE REFER TO PAGE 10
NATURAL GAS SUPPLY
-- Connect the flexible hose to the back of the
oven.
-- The natural gas supply must be delivered
through a galvanized pipe Ø 1/2’’ or
equivalent copper pipe, located at the
burner inlet hole.
-- Install the gas shut-off valve in a suitable
position up-line.
ATTENTION! Follow our advice to correctly use your oven.
-- We recommend checking gas connection before using the oven.
-- Make sure the gas tap is turned off when the oven is not being used and
during maintenance or cleaning operations.
-- Replace the gas hose every 2-3 years. Do not kink the gas hose.
-- Before using the oven, check out the hose searching for cracks, cuts or any
wearing sign. If the hose is damaged, do not use the oven.
9NORTH AMERICA ONLY
GAS CONNECTION AND INSTALLATION
THIS OVEN COMES FROM THE FACTORY SET UP FOR NATURAL GAS HOOK UP
OVEN
C1
B
A
D
C2
CONNECTION KIT
A - Regulator connect to oven
B - BSPP - NPT adapter
C1 - Gas hose to oven
C2 - Gas hose to gas supply
D - Gas supply piping
10C1 B A
OVEN
Mount the adapter (B) on the gas inlet (C1), followed by the regulator (A).
D C2
Connect the gas supply (D) to the gas hose (C2)
E
CAUTION
IN OUT
Respect the direction indicated by
the arrow to connect the regulator.
11NORTH AMERICA ONLY
CONNECTION TO THE GAS CYLINDER
A
EN
E OV
F1
F2
CONNECTION KIT
A - Regulator connect to oven
E - 1/2” male gas fitting (3/8” OD Flare x 1/2” MIP - Tapped 3/8” FIP
F1 - LPG hose connect to oven
F2 - LPG hose/regulator connect to propane gas cylinder.
Connect Regulator (A) to the oven.
Connect Propane Hose (F1) to the Regulator (A) using 1/2” Male Gas
Fitting (E) - 3/8” OD Flare x 1/2” MIP - Tapped 3/8” FIP.
Connect Propane Hose/Regulator to Propane Gas Cylinder
12
*use gas seal tape or pipe thread sealant where neededCONVERTING YOUR OVEN
Begin by Converting the Regulator to LPG
-1-
Natural gas supply (H)
A
1
-2-
Unscrew the cap to access the
regulator adjustment.
2
-3-
The plastic adapter should be turned
upside down depending on the type
of gas supply.
3
-4-
H LPG NATURAL G
GAS
4
-5-
Refit the cap.
5 13CONVERSION
LPG - METHANE
ONLY USE THE COMPONENTS AND PARTS SUPPLIED
WITH THE CONVERSION KIT
WARNING: The following conversion must be performed by
authorized professionals when the oven is completely cold.
Improper installation, adjustment, alteration can
cause property damage or injury.
1 GAS KIT DISASSEMBLY
b
Remove the gas kit a
according to the
instructions in the
appropriate section of the
manual.
2 REPLACEMENT OF THE
MAIN NOZZLE
Unscrew the fixing screw (a)
and remove the plate (b)
covering the nozzle.
Unfasten the main nozzle
(e) to the holder screw (d) d
by using an 11 mm spanner.
Replace the nozzle with
orifice supplied in the kit and
screw it back to the holder
(d).
During these operations, e
secure lock the nozzle
holder (d) to keep it from
rotating.
143.1 REPLACEMENT OF
THE PILOT NOZZLE.
Unscrew the fixing screw
(h) of the pilot light tube.
h
3.2
Remove the tube (i) from
the seat.
i
3.3
Remove the pilot nozzle (j)
from the cone-like support
(o) and replace it with the
spare component supplied j
in the kit. Reassemble
everything following the
same steps in reverse o
order.
Following the conversion, apply the new label
on the product and check that the size of the nozzle
corresponds to that shown on the label.
15OVEN USE
ONLY FOR WOOD VERSION
WARNING: Follow the instructions before turning on the oven.
-- Do not use flammable liquids or other fuels to light the oven.
-- Make sure that there are no flammable materials near the oven and that the minimum safety
distance is respected.
LIGHTING
- STEP 1 - Make a small pile of wood in the centre of
the oven with small pieces of dry wood.
- STEP 2 - When the wood is well-lit, add two larger
logs and move the fire to one side.
- STEP 3 - After a few minutes of continuous burning,
never excessive, the temperature of 400°C/750°F
will be reached, burning to a dark soot. This is the
moment the oven is ready to be used.
TURNING OFF
-- To turn the oven off, close the oven door and wait for ash to form.
-- When the fire is out and oven has been completely shut down off for 60 minutes you
can remove the ashes into a fire safe metal ash can.
-- Never put hot coals or ashes on the ground, patio, deck or near plants or trees.
DIFFERENT TYPES OF WOOD
-- Use small sized wood pieces that are very dry for lighting.
-- Treated wood, pine, resin or scrap woods are strictly prohibitied.
-- Wet or damp wood can be difficult to start and can pop due to the increased volume
of water. This will produce a lot of smoke and ash and less than optimal heat and
performance.
FOR YOUR SAFETY:
-- Do not exceed the temperature limit of 500°C / 1000°F
-- Do not leave the oven unattended when the fire is going.
-- To keep constant temp, throw in small quantities of firewood at regular
intervals; do not keep adding more logs to avoid a dangerous rise in
16 temperature or flames spilling out of the oven that might damage people or
property.OVEN USE
ONLY FOR GAS VERSION
WARNING: Follow the instructions before turning on the oven.
-- Check all gas connections for gas leak before starting your oven.
-- Use the proper PTFE gas piping tape for all threaded connections
-- Do not lean over the oven when lighting. Keep your face and body at a safe distance from the
oven door.
-- When lighting the oven, the oven door must be open.
-- The burner control knob must be in the off position before turning on the LGP cylinder valve.
-- Do not move the oven while it is in use.
- STEP 1 - Push IN the burner knob and turn it
counterclockwise to the star symbol on the control
panel, to ignite pilot flame.
- STEP 2 - While KEEPING the burner knob pushed in,
push the ignitor button at the same time to light the
burner pilot flame.
NOTE: Lighting the pilot flame for the first time or
after it has cooled could take a few attempts due to
air in the supply line. Be patient.
- STEP 3 - Once the pilot flame is lit properly you
will see a small flame inside (rear left corner) the
oven. You can then release the ignition button BUT
will need to KEEP the burner knob pushed in for 15
seconds. This will insure that the thermocouple is hot
enough to allow the pilot flame to stay on.
- STEP 4 - Release the burner knob and turn it
counter- clockwise to the larger dual flame symbol
on the control panel. The oven burner is now on high
and you can start preheating the oven.
FOR YOUR SAFETY:
-- Do not close the door when the oven is lit with the flame at the maximum position.
-- Do not exceed the temperature limit of 500°C / 1000°F. 17
-- Never disconnect the gas pipe or other fittings when using the oven.LIGHTING THE OVEN
-- 1.1 For Neapolitan pizza
Pizza needs both flame and very hot sustained temperature (floor and dome).
Use small dry pieces of wood to start your fire and control your flame and
temperature:
Start the fire with small After fire has fully started Continue to add wood as
pieces of wood in the center and burning thoroughly needed (one or two pieces)
of the oven floor. move to the left side using to keep temperature around
the wood or pizza turner 400°C (750°F).
tools.
-- 1.2 For grilling
Grilling uses more embers to get the smoke flavor in the oven and less flame to
prevent burning. Larger pieces of wood or lump charcoal (not briquettes) can help
control temps.
Start the fire with small Wait for the oven temps to stabilize around 180°C
pieces of wood in the center (350°F), a good temperature for grilling. Higher temps
of the oven floor. Add larger can be achieved with more flame for searing.
pieces of wood or lump
charcoal making sure to
keep the flame low unless
searing.
181.3 For baking / tray
The stainless steel ovens are made to light up and increase temperature in a short
time and hold temps for extended periods of time.
Start the fire with small Add larger pieces of wood When 180°C (350°F) is
pieces of wood in the center or lump charcoal making reached and at least 1/3
of the oven floor. sure to have glowing of the cooking floor is full
embers and no flame. of embers insert the tray
Stabilizing your oven around or the bread and close the
180°C (350°F) or your door. If temp lowers, insert
desired baking temperature. a small piece of wood or
lump charcoal, if temp rises
slightly open door (par.2)
SMOKE
-- 2.1 Manage the smoke
Smoke can be desired for traditional barbeque but also can be to much for certain
foods and for the people that you are entertaining – both taste wise and vision/
smell wise
1. Use dry wood (wet wood doesn’t burn well and makes smoke)
2. Try to keep the flame always on
3. If you have embers (no flame) insert a small piece of paper or starters and then
put a small piece of wood, paying attention to let the air enter among embers
and wood
4. To avoid the smoke do not use the door - more air enters, less smoke you’ll have
5. Place the oven strategically so smoke is manipulated to flow away from
your entertaining area – the wind can affect smoke as wellespecially on an
abnormally breezy day
-- 2.2 Looking for the smoke
For the people who want to cook with smoke we suggest to:
1. Try to close the door when the flame is on
2. Use big pieces of wood or lump charcoal
3. If the flame is high break the flame to produce embers (and then use the door
or big pieces of wood)
4. Incorporate a smoker box filled with soaked wood chips of desired flavor
19USE THE DOOR AND SMALL PIECES OF WOOD TO STABILIZE
-- 3.1 Stabilize the temperature
The wood fired oven is designed to let the user choose the right temperature
depending on what they are cooking. Stabilizing the temperature is the biggest
challenge for the user but with experience it becomes much easier.
There are 3 elements designed to assist in Temperature stabilization:
OR
DO
The Door (use the door The Fuel: Small pieces of Rotation -Control and
to control the internal wood or lump charcoal check distance of food from
temperature, open more to (once temperature is the flame and embers to
cool down and close more consistent and stable , add prevent burning your meal
to raise it up). Completely small pieces of lump coal or (closest to flame/embers
Close to smother the fire wood chunks to maintain is the highest temperature)
the desired temperature and Rotation is a key technique
to avoid either temperatures
that are too low or creating
sudden jolts of high
temperatures or flames)
-- 3.2 Cool down the oven
The wood fired oven is a machine that can easily reach temps over 500°C (1000°F)
but with no possibility to switch off (never use the water as it can cause the oven
floor fire bricks to be damaged). We suggest doing these 3 actions:
OR
DO
Open the oven door Use the pizza turner or Spread the embers over the
gradually keeping the flame wood rake to break the fire cooking floor.
exiting through the chimney and wood.
flue, the more you can open
the more the oven can cool
down.
20-- 3.3 Raise the temperature up
The wood fired oven is a machine that can also raise the temperature quickly, with
stainless steel dome oven, it’s simply and easy to do.
FROM 150°C (300°F) TO 250°C (480°F) FROM 200°C (400°F) TO 300°C (570°F)
Insert 1 small piece of wood and close the Insert 2-3 small pieces of wood and leave
door partially on the opposite side of the the door open to let the air enter
flame
FROM 200°C (400°F) TO 400°C (750°F) RAISE 50°C (100°F)
Insert 3-5 small pieces of wood and leave Close the door and check the
the door open to let the air enter temperature
21FLAME INTENSITY, COOKING FLOOR AND TEMPERATURE
-- 4.1 Flame and cooking floor for Neapolitan pizza
The flame for the Neapolitan Pizza has to be strong. Use laser
thermometer to measure the temperature of the oven floor. The
ambient and oven floor temps should both be about 700°F. The
flame should go across the top of the dome ceiling in the oven.
-- 4.2 Flame for roman and focaccia pizza
The focaccia (also called roman pizza) needs lower temperature
than the Neapolitan pizza. Reaching this temperature is easy: you
need a small flame that reaches the highest point of the dome.
-- 4.3 Deep Dish Pizza/Detroit Style Pizza
Pizza in a tray/pan is made for more toppings and a thicker pan
crust. Cast Iron, stainless steel or mixed-use heavy trays are
recommended. The difficulty in cooking this kind of pizza is to
cook the bottom of the pizza: we suggest covering the pizza with
an aluminum foil with flame. After 10 minutes, check the bottom of
pizza: if it is almost brown, you can remove the aluminum paper and
leave the pizza to be cooked on top.
-- 4.4 Small bread (rest of the pizza dough)
It is common to have some leftovers when you make many dough
balls.
We suggest freezing them. Otherwise, you can give them as a
present to your party guests and cook for them before they go. Put
a small piece of wood, close the door partially and reach 450°F.
Stretch to lengthen the dough, put the oil on top and place it on the
cooking floor; after 15 minutes your bread should be ready. Do not
cut it till it gets cold (we know the smell will attract you so much).
-- 4.5 Big bread (rest of the pizza dough)
If you want to cook a larger loaf of bread (at least 4 pizza
dough, 1 Kg) you want to have lot of embers. With temperature
approximately 400°F and the cooking floor is around 400°F you
can insert the bread dough.
We suggest closing the door and checking the temperature every
5-10 minutes. The oven should cool down to 325°F in one hour and
the bread should be ready (do not cut it till it’s cold).
22TIPS TO ORGANIZE A PIZZA PARTY
-- 5.1 How many people there are at the party?
You can organize parties from 3 to 100 people, just don’t panic and remember some
small tips:
1. If less than 10 people you can make a more sophisticated menu (many different
kinds of pizza); if more people we suggest being really focused on basic Neapolitan
pizza and minimal toppings
2. We usually count 1-2 10” pizzas for each guest (then 250-300 grams of flour each)
3. Always keep in mind your guests: if they have any special requirements or food
allergies you need to plan in your menu
4. You can include appetizers to let people eating while waiting and give to the oven
maestro enough time to get everything ready
-- 5.2 Am I alone or do I have any assistant at the party?
When you organize a pizza party with more than 10 guests, we suggest you to have an
assistant to help with your preparations or cooking.
1. Fire up and take care of the oven
2. Cut all the pizza ingredients
3. Set up the table
-- 5.3 Weeknights after work?
If you are hosting the party during weekdays with a better need to organize your time.
The ALFA oven is ready to cook 30 minutes! We suggest making the pizza dough
1-2 days ahead of the party. You can also make the pizza dough weeks before and
freeze the dough balls. Remember to take it out from the freezer 24-48 hours before
your event and slow thaw in the fridge. Remove dough immediately when home as its
necessary for the pizza dough to acclimate to room temperature, usually 1-2 hours.
-- 5.4 Make your party unforgettable! Include your guests in the
party — let them make pizza!
During the pizza party people love to be involved, so keep in mind they can be your
assistants. Teach your friends, family and guests to enjoy the ALFA Oven just like you
do. Cutting finished pizzas, adding fresh toppings and taking care of the oven… but
most of all they love to stretch pizzas and make their own special pizza like the oven
maestro does. Stretching the pizza will be the funniest game for adults and children,
let’s try! Cooking pizzas for friends, family and guests is all about the lifestyle and
entertaining. Talk, cook, have a drink and most of all HAVE FUN!
23YOUR TO-DO LIST FOR A PERFECT PIZZA PARTY
(WITH BRUSCHETTA)
Make the pizza dough well Prepare the dough balls in Light up the oven 30
in advance before the party* room temperature 1 to 2 minutes before and in
hours before the party* the meantime cut the
ingredients
Cook some bruschettas Start the pizza party, using Finish the party giving
(with tomatoes and basil your imagination to invent people the leftover dough
on top) while waiting for original pizzas or cooked pizzas!
the oven to reach the
temperature
*These timings depend on the season and the outside temperature: in Summer can be
lower; in Winter you will need to find the hottest room of your house to wait for the
pizza dough to raise.
“Cooking with a wood fired oven
is to celebrate our roots, where we “Everytime friends organize a pizza
come from, what we love more, party I try to stay away from the
spending time with our families and cooking stage: but the oven at-
friends, smelling a wonderful perfu- tracts me too much. All the parties
me of flour, meat and wood. I think finish in the same way: me, enjoying
there is no any better emotion we that time using the Alfa oven.”
can enjoy in life.”
— Marcello Ortuso, founder
— Rocco Lauro founder
24ALFA SPECIAL RECIPE FOR THE PERFECT PIZZA DOUGH
Recipe for 5 medium or 4 big pizzas
INGREDIENTS
Flour: 1 Kg (look for an Water: 630 grams or ml Brewer Yeast (not dried):
Italian brand: “5 Stagioni” (we suggest to use a good quantity depends on the
or “Caputo” are the most mineral water) weather - 1gr and 6h if in
famous in the States) Summer, 3gr and 24 hour if
in Winter
Salt: 30 gr Oil: a spoon or more if you like Honey or malt: a spoon
a softer dough; we suggest
Italian cold pressed oil.
PREPARATION
You start from putting all Then you take half flour Then you put salt and other
the warm water in a bowl. and you mix it till it gets a 50% of flour and mix till you
Then you take the oil, the cream. can see a smooth dough
yeast and the honey and (the secret to make it really
you melt them together. smooth is to leave it resting
for 5 minutes while you’re
pulling the dough).
You wait till the dough has Then you cut it with a knife You wait till they have
raised 2-3 times its original and you make dough balls raised again and then you
volume (we always choose (around 250-300 grams just have to enjoy! We
the coldest place in the each). suggest semolina flour to
house during the Summer; stretch the dough.
if it’s really hot you can put
it in the fridge). 25REGULAR MAINTENANCE
1. Clean the combustion chamber
Pyrolysis 500°C-1.000°F
The Alfa oven can be cleaned by the fire itself
through a process called “pyrolysis” (pyro “fire”
+ lysis “separating”). It is one of the processes
involved in charring wood and it has a function of
thermal cleaning, which removes organic substances
from products or production components. During
the thermal cleaning process, organic material is
converted by pyrolysis and oxidation into volatile
organic compounds, hydrocarbons and carbonized
gas. Inorganic elements remain. To clean the oven with pyrolysis we suggest to
keep the temperature at 500°C / 1.000°F for 2-3 minutes.
2. Clean the cooking floor
After the pyrolysis you need to wait the oven to
cool down and then take the ashes away. (ALWAYS
to use a fire resistant bin to hold the used ashes).
When you are 100% certain the ashes are cold you
can empty them or you can also use the ashes as a
fertilizer for the trees. If you wish you can also draw
the ashes from the holes of the cooking floor with an
outdoor shop vac.
3. Clean the oven outside
Like all 304 stainless & powder coated products,
these are built to withstand and resists many
environments including coastal salt marine, but will
need regular care and maintenance. Wash with a
soft cloth and a solution of soap and water or use a
cleaning solution mixture of 50/50 Baking Soda and
Dish Washing liquid detergent. With scouring side
of sponge, scrub WITH THE GRAIN of the stainless
steel and rinse with clean water. We recommend
Barry’s Restore It All products for ALFA Stainless
Steel >> www.barrysrestoreitall.com.
26PERIODIC MAINTENANCE
1. Clean the stainless steel
Alfa ovens are made with high quality 304 stainless
steel outside and 441 inside. To clean the stainless
steel we suggest using an stainless steel cleaner.
Be sure to read the instructions reported on the
product.
2. Protect stainless steel
To better protect the stainless steel, we suggest
using Vaseline or oil (some people use olive or baby
oil)
3. Cover the oven
Don’t forget to use the Alfa covers to protect your
oven.
EVERY 2-3 YEARS
1. Clean some rust spot
Stainless steel is rust-proof but in some case
(humidity, sea salt, etc.) some rust spots may
appear. You can use a rust remover to get your
stainless steel perfect again.
27ONLY FOR WOOD VERSION
CLEANING
-- When the fire has gone out and the oven is not hot enough, collect the
ashes left over from previous cooking with a metallic brush and a pan.
ONLY FOR GAS VERSION
MAINTENANCE
-- The gas burner should be cleaned periodically by carefully sucking up any
cooking residues.
-- When cleaning valves and burners, be careful not to damage the burner.
-- Remove any residues from the burners with a brush.
-- Do not enlarge burner holes (openings).
GAS KIT DISASSEMBLY
-- The gas burner should be cleaned periodically by carefully sucking up any
cooking residues.
-- When cleaning valves and burners, be careful not to damage the burner.
-- Before cleaning is necessary to remove the burner from the oven by
following the procedure in the assembly instructions.
STORING THE OVEN
-- If the gas oven is not used close the supply valve of the gas cylinder.
-- If the gas oven is placed in a closed space, disconnect the gas supply. The
gas cylinder must be left outside in a well-ventilated area.
-- In the event that the cylinder is not removed from gas oven, place the
entire device and the cylinder in a well-ventilated outdoor area.
-- The gas cylinders must be stored outdoors in a well-ventilated area and
out of the reach of children. Cylinders not in use must not be stored in a
building, garage or other enclosed space.
28TROUBLESHOOTING
Contact us directly for expert advice on the web site www.alfaforni.com
For United States go to alfaovens.com
-- Check that the wood is not too moist and the embers are not
unburned.
-- Make sure that you have started a fire with vivid flames, gradual
THE OVEN
but steady, in order to avoid incomplete combustion.
PRODUCES SMOKE
-- If the oven is installed indoors, check the chimney flue and any
air inlets in the room.
-- It is recommended to close the oven door.
-- Check that the fire is on one side of the oven and not near the
WOOD VERSION
mouth.
THE OVEN DOES
-- Fire with vivid flames for 20 minutes.
NOT HEAT
-- Do not amass the wood over the embers.
-- Gradually add the wood to the fire.
-- Check that no moisture or water has infiltrated the oven.
THE OVEN COOLS -- It may be lit for the first time or after a long idle period.
DOWN QUICKLY -- Avoid sudden short fires that do not warm the bottom of the
oven.
THE FLAMES COME -- Avoid excessive fires and immediately dampen the flames that
OUT OF THE MOUTH reach out of the oven by resting the door over
OR CHIMNEY CAP -- the mouth of the oven, leaving a gap of 2 or 3 cm.
-- Ensure the oven is at the right temperature.
THE OVEN DOESN’T -- Ensure the oven maintains the desired temperature for the
COOK AS YOU duration of the cooking time; use the counter to
WOULD LIKE -- Adjust the heat intensity as well as the flame adjuster: open and
close it to raise or lower the temperature as necessary.
-- Make sure that neither moisture nor water have gathered inside
the oven.
-- Firing the oven for the first time or after a long period of
GAS VERSION
THE OVEN COOLS
idleness.
DOWN TOO EARLY
-- Do not build a powerful but short-lived fire that won’t heat the
oven thoroughly.
-- Verify that the burner is working and close the door.
-- Ensure the oven is at the right temperature.
-- Fire with high vivid flames for 10 minutes.
IF THE OVEN
-- Ensure the oven maintains the desired temperature for the
DOESN’T COOK
duration of the cooking time; use the counter
AS YOU WOULD
-- To adjust the heat intensity as well as the flame adjuster: open
LIKE
and close the counter to raise or lower the temperature as
necessary.
Alfa Forni is not responsible for veins, cracks,
hairline cracks of the floor as they are an intrinsic
characteristic of the material.
2930
02   AVVERTENZE

06   GARANZIA

07   POSIZIONAMENTO

08   COLLEGAMENTO GAS

10   CONVERSIONE GAS

12   USO DEL FORNO

14   COTTURA

22   MANUTENZIONE E
     CURA DEL PRODOTTO

25   RISOLUZIONE ANOMALIE

                            1
AVVERTENZE GENERALI
CONSERVARE QUESTO MANUALE PER FUTURE CONSULTAZIONI
Ulteriori copie di questo manuale sono disponibili sul sito www.alfaforni.com
ATTENZIONE: Un allacciamento improprio nonché eventuali
alterazioni o una manutenzione inadatta possono causare danni
materiali a cose o persone e persino la morte nei casi estremi.
Leggere attentamente le istruzioni prima di installare ed usare
l’apparecchio.
LEGGERE ATTENTAMENTE LE SEGUENTI INFORMAZIONI PER UNA
CORRETTA INSTALLAZIONE ED UN FUNZIONAMENTO OTTIMALE DEL
FORNO.
-- La targhetta di identificazione, con i dati tecnici, il numero di matricola
e la marcatura è visibilmente applicata all’apparecchio. La targhetta
non deve mai essere rimossa.
-- Prima di mettere in funzione l’apparecchio, è obbligatorio rimuovere
tutti i film protettivi presenti.
-- Evitare nel modo più assoluto l’uso di spugne in acciaio e raschietti
taglienti per non danneggiare le superfici. Usare i normali prodotti,
non abrasivi, servendosi eventualmente di utensili in legno o materiale
plastico. Risciacquare accuratamente e asciugare con uno straccio
morbido o con un panno in microfibra.
-- Non utilizzare stoviglie o contenitori costruiti con materiale plastico.
Le temperature elevate raggiunte all’interno del forno potrebbero
fondere questo materiale recando danni all’apparecchio.
-- Usare posate ed attrezzi resistenti ad alte temperature.
-- Posizionare il forno su una superficie piana.
-- Per effetto della temperatura il colore delle superfici può variare.
-- Non colorare o applicare nessun oggetto sul forno.
-- L’istallazione del prodotto deve garantire facile accesso per la pulizia.
-- Ove presente, utilizzare l’apposito ferma-ruota in dotazione per
bloccare il forno una volta posizionato.
-- Mai immettere oggetti infiammabili nel forno: qualora venisse
incidentalmente acceso potrebbe innescarsi un incendio.
2-- Non permettere ai bambini di avvicinarsi all’apparecchio durante il
funzionamento o di farne oggetto di gioco.
-- Non inserire oggetti metallici appuntiti (posate o utensili) nelle feritoie
dell’apparecchio.
-- I forni pronti in acciaio inox Alfa, pur comprendendo del materiale
isolante tra i due strati d’acciaio, potrebbero surriscaldarsi all’esterno.
-- Assicurarsi che il forno sia posizionato distante da oggetti e materiali
che possono essere danneggiati dal calore. Non posizionare materiali
infiammabili nella zona del pavimento antistante il forno, proteggere
con materiale adeguato il pavimento se è costituito da materiale
infiammabile.
-- Non riporre materiale infiammabile nel primo ripiano sotto la camera
del forno.
-- Manovrare lo sportello impugnando i manici.
-- Non chiudere lo sportello quando il forno è acceso con fiamma al
massimo.
-- Non toccare le superfici esterne e la canna fumaria durante l’uso.
-- Non usare liquidi infiammabili vicino al forno.
-- Tenere eventuali cavi elettrici e tubi di alimentazione carburante
lontano dalle superfici calde.
-- Non utilizzare il forno in caso di funzionamento anomalo o sospetto di
rottura.
-- Non spostare il forno durante l’utilizzo o quando è caldo.
-- Non appoggiarsi né appoggiare oggetti al forno, potrebbe esserne
compromessa la stabilità.
-- Non usare fiamme libere vicino al forno.
-- Nel caso di fiammate incontrollate, spostare il cibo lontano dalle
fiamme fino al loro spegnimento.
-- Nel caso in cui il grasso prendesse fuoco, interrompere l’alimentazione
e lasciare lo sportello chiuso fino a quando il fuoco si estingue.
-- Durante l’utilizzo del forno indossare guanti da cucina resistenti al
calore.
-- Le parti sigillate dal costruttore non devono essere modificate
dall’utilizzatore.
-- Non lasciare incustodito l’apparecchio durante le cotture che possono
liberare grassi od oli. I grassi e gli oli possono incendiarsi.
-- Non ostruire le aperture, le fessure di ventilazione e di smaltimento
del calore.
-- Durante l’uso, per i forni con base integrata, ricordare di bloccare le
ruote coll’apposito freno.
-- Quando si utilizza carbone di legna, utilizzare solo carbone
di legno naturale di alta qualità. Non usare bricchette, pietra
lavica, combustibili liquidi o qualsiasi altra cosa diversa da quella
espressamente indicata.
-- Non sollevare il forno dal Davanzale o dal Frontale
3AVVERTENZE SICUREZZA
LEGGERE TUTTE LE ISTRUZIONI PRIMA DI INSTALLARE E UTILIZZARE IL PRODOTTO
Leggere l’intero manuale prima di procedere con l’installazione. La mancata
osservazione di queste procedure potrebbe causare danni a cose e persone ed
eventualmente morte. Contattare le autorità competenti in merito a eventuali
restrizioni sull’installazione.
UNA DELLE MAGGIORI CAUSE DI INCENDIO RELATIVE AL FORNO E’ DOVUTA AL
MANCATO RISPETTO DELLE DISTANZE MINIME DA MATERIALI COMBUSTIBILI O DA
ERRATA INSTALLAZIONE. È OLTREMODO IMPORTANTE CHE QUESTO FORNO SIA
INSTALLATO IN ACCORDO CON QUESTE ISTRUZIONI.
PER LA VOSTRA SICUREZZA: Non depositare o usare benzina o altri vapori o
liquidi infiammabili nelle vicinanze di questo o altri apparecchi. Mantenere l’area
sottostante e circostante l’apparecchio libera da materiali combustibili.
ATTENZIONE: Un allacciamento improprio nonché eventuali
alterazioni o una manutenzione inadatta possono causare danni
materiali a cose o persone e persino la morte nei casi estremi.
AVVERTENZE SICUREZZA
SOLO PER MODELLI A GAS
LE FUGHE DI GAS POSSONO PROVOCARE INCENDI O ESPLOSIONI E CAUSARE
LESIONI PERSONALI GRAVI O MORTALI, O DANNI ALLE COSE.
ATTENZIONE SE SI AVVERTE ODORE DI GAS:
1. Chiudere immediatamente il gas.
2. Spegnere eventuali fiamme libere.
3. Aprire lo sportello del forno.
4. Consultare un tecnico specializzato
ATTENZIONE: Il forno può’ essere convertito da Metano a Gpl e viceversa tramite
l’apposito kit fornito da Alfa Forni, la conversione deve essere effettuata da personale
specializzato e con solo materiale ALFA, in caso contrario la garanzia non sarà più valida.
ATTENZIONE: Se il forno a gas non viene utilizzato chiudere la
valvola di alimentazione del gas.
ATTENZIONE: Non riporre nelle vicinanze bombole di gas non utilizzate.
4GARANZIA
I forni Alfa sono pienamente rispondenti al progetto di norme italiane ed
europee. Il forno è garantito per 2 (due) anni, una buona manutenzione ed
un uso corretto possono far in modo che il forno duri molto di più.
La garanzia copre solo la componentistica, il costo del trasporto e il
montaggio sono da intendersi a carico del cliente.
SI RICHIEDE DI CONSERVARE LO SCONTRINO O LA FATTURA
D’ACQUISTO. VI CONSIGLIAMO DI ANNOTARE QUI SOTTO IL NUMERO
SERIALE PRESENTE SULLA TARGHETTA IDENTIFICATIVA DEL
PRODOTTO.
_______________________________________________________________
La garanzia NON viene applicata nelle seguenti opzioni:
-- Nel caso in cui il forno sia NON propriamente utilizzato e installato come
descritto nel presente manuale.
-- Nel caso in cui il forno sia stato manomesso in qualsiasi modo, volontariamente o
involontariamente.
-- Nel caso in cui non sia stata effettuata adeguata manutenzione. Danni al
bruciatore dovuti a residui di cottura o all’utilizzo di altri combustibili non sono
coperti dalla garanzia.
-- Nel caso in cui il forno, per qualsiasi causa, sia stato alterato e non sia più nella
condizione riscontrata alla consegna del prodotto.
-- Nel caso in cui NON si sia usato il solo combustibile raccomandato. Non usare
carbone liquido per barbecue, prodotti chimici o altro combustibile.
-- Nel caso in cui il danno sia il risultato dell’uso di prodotti chimici all’interno o
all’esterno del forno.
-- Normale usura del bruciatore, termometro, accensione, elettrodi, cavo di
accensione, tubo del gas e tavelle refrattarie.
-- Lo sportello non è in garanzia.
-- Danni dovuti al superamento della temperatura limite di 450°C.
-- Nel caso in cui si utilizzino componenti non prodotte o consigliate da Alfa Forni.
-- Danni a parti non funzionali e decorative che non influiscono sul normale uso del
forno, inclusi graffi e differenze di colore.
-- Nel caso in cui la targhetta venga rimossa, alterata o cancellata
-- Le tavelle non sono coperte da garanzia, i nostri forni vengono comunque
corredati da una tavella sostitutiva, ulteriori ricambi possono essere acquistati su
richiesta.
Si raccomanda l’utilizzo esclusivo di parti di ricambio consigliate da Alfa Forni.
5POSIZIONAMENTO
ATTENZIONE: LE PARETI ESTERNE DEL FORNO POSSONO
RAGGIUNGERE TEMPERATURE SUPERIORI AI 50°C
EVENTUALI MATERIALI INFIAMMABILI NON DEVONO
TROVARSI NEL RAGGIO DI 1 METRO DAL FORNO
50 cm 50 cm
100 cm
IMPORTANTE: Si raccomanda
di posizionare il forno durante
l’utilizzo a sufficiente distanza
da materiali infiammabili o che
possano danneggiarsi con il
calore
IMPORTANTE: Posizionare il
forno al riparo da vento
o forti correnti d’aria
PER LA VOSTRA SICUREZZA:
Posizionare il forno su una
superficie pianeggiante e
assicurarsi che sia perfettamente
stabile. Movimenti involontari
durante l’utilizzo possono
risultare molto pericolosi per
cose e persone
IMPORTANTE: Posizionare il forno ad una distanza minima
di 20 cm dalle pareti e da eventuali altre apparecchiature.
I FORNI IN VERSIONE TOP VANNO POSIZIONATI SU TAVOLI O ALTRE
SUPERFICI IGNIFUGHE DI ADEGUATA CAPACITÀ PORTANTE, SE PRESENTI
REGOLARE I PIEDINI PER LIVELLARE IL FORNO SUL PIANO DI APPOGGIO.
67
COLLEGAMENTO
                              SOLO PER MODELLI A GPL

         COLLEGARE LA BOMBOLA DI GPL
         (solo per il forno in versione gpl)
         Collegare il tubo flessibile sul retro del prodotto.

         REGOLATORE DI PRESSIONE:
         - portata:
                    10 kg/h
         - pressione di uscita:
                    gas G30 tra 28 e 30 mbar
                    gas G31 tra 30 e 37 mbar

         TUBO FLESSIBILE:
         Diametro 1/2’’
         Lunghezza 1,5 metri

         BOMBOLA:
         Consiglia una bombola tra i 10 kg e i 30 kg

         Il Tubo flessibile e il regolatore di pressione non sono forniti in dotazione.

    ATTENZIONE: Seguire questi consigli per l’utilizzo di una bombola a gas GPL.

    -- Utilizzare un regolatore di pressione e un tubo flessibile adeguati in conformità alle
       normative vigenti.
    -- Il GPL ha un peso superiore a quello dell’aria. Eventuali perdite di GPL potrebbero
       raccogliersi in basso evitandone la dispersione.
    -- La bombola di GPL deve sempre essere installata, trasportata e riposta in posizione
       verticale. Maneggiare con attenzione e non lasciar cadere le bombole di GPL.
    -- Assicurarsi che la bombola di gas sia posizionata in ambienti ventilati e che sia
       lontana da altri oggetti.
    -- Non tenere mai una bombola di gas di ricambio vicino al forno a gas.
    -- Non lasciare né trasportare mai le bombole di GPL in luoghi in cui le temperature
       possono raggiungere i 50 °C (troppo calde da maneggiare. Ad esempio: non lasciare
       la bombola in auto in giornate molto calde).
    -- Trattare le bombole di GPL “vuote” con la stessa attenzione di quelle piene. Anche
       se nella bombola non c’è più liquido potrebbe sempre essere rimasto del gas in
       pressione. Chiudere sempre la valvola della bombola prima di scollegarla.
    -- Si raccomanda di controllare tutti gli allacciamenti del gas prima dell’utilizzo del
       forno.
    -- Assicurarsi che la valvola della bombola di GPL o del regolatore sia chiusa. La
       sostituzione della bombola deve essere fatta lontano da fonti di calore e accensione.
    -- È consigliabile sostituire il tubo del gas ogni 2-3 anni.
    -- Utilizzare solo bombole GPL.
    -- Non attorcigliare il tubo flessibile.
    -- Prima di ogni utilizzo controllare che il tubo flessibile non presenti tacche, crepe,
       abrasioni o tagli. Se il tubo flessibile risulta in qualche modo danneggiato, non
       utilizzare il forno.

8
COLLEGAMENTO
SOLO PER MODELLI A METANO
ALIMENTAZIONE
-- L’alimentazione del gas metano deve essere
effettuata con tubo zincato Ø 1/2’’ o tubo
rame equivalente, in corrispondenza del foro
d’ingresso bruciatore.
-- Prevedere d’installare a monte in posizione
adeguata il rubinetto di intercettazione gas.
-- Collegare il tubo sul retro del prodotto.
ATTENZIONE: Seguire questi consigli per l’utilizzo corretto del vostro forno.
-- Si raccomanda di controllare tutti gli allacciamenti del gas prima dell’utilizzo del
forno.
-- Assicurarsi che il rubinetto di intercettazione gas sia chiuso nei momenti di inutilizzo
e durante le fasi di pulizia e manutenzione.
-- È consigliabile sostituire il tubo del gas ogni 2-3 anni.
-- Non attorcigliare il tubo del gas.
-- Prima di ogni utilizzo controllare che il tubo non presenti tacche, crepe, abrasioni o
tagli. Se il tubo risulta in qualche modo danneggiato, non utilizzare il forno.
9CONVERSIONE
GPL - METANO
UTILIZZARE LA SOLA COMPONENTISTICA FORNITA DA ALFA
ATTENZIONE: L’operazione di conversione deve essere effettuata da un
tecnico qualificato quando il forno è spento e completamente freddo. Un
allacciamento improprio nonché eventuali alterazioni o una manutenzione
inadatta possono causare danni materiali a cose e persone.
Il tuo forno viene fornito in versione GPL o Metano.
Utilizzare le seguenti istruzioni per convertire.
La bombola GPL non è fornita con il forno.
1 SMONTAGGIO
BRUCIATORE b
a
Smontare il kit gas
attenendosi a quanto
prescritto nelle istruzioni
di montaggio.
2 SOSTITUZIONE UGELLO
PRIMARIO
Svitare la vite di fissaggio
(a) e rimuovere la
piastrina di copertura
dell’ugello (b).
Svitare l’ugello primario (e) d
dal portaugello (d) utilizzando
una chiave da 11 mm.
Sostituire l’ugello con il
corrispondente fornito
nel kit riavvitandolo al
portaugello (d) senza e
serrare.
Durante tali operazioni
occorre bloccare il
partaugello (d) per
evitarne la rotazione.
103.1 SOSTITUZIONE
UGELLO PILOTA
Svitare la vite di fissaggio
(h) del tubo fiamma pilota.
h
3.2
Estrarre il tubo (i) dalla
sede.
i
3.3
Rimuovere l’ugello (l)
pilota dal supporto
conico (o) e sostituirlo col
corrispondente fornito
nel kit. Rimontare il tutto
seguendo la procedura
inversa. o
Dopo aver effettuato la conversione applicare sul
prodotto la nuova etichetta e accertarsi che il diametro
dell’ugello corrisponda a quanto indicato sull’etichetta.
11ACCENSIONE
MODELLI A LEGNA
ATTENZIONE: Prima di accendere il forno attenersi alle seguenti indicazioni.
-- Non utilizzare liquidi infiammabili o altri combustibili per l’accensione del forno
-- Assicurarsi che nelle vicinanze del forno non vi siano materiali infiammabili e che le distanze
minime di installazione siano rispettate
ACCENSIONE
1. Fare un piccolo cumulo di legna al centro del for-
no con legna di piccolo taglio e secca.
2. Appena la legna ha preso bene, inserire tronchetti
di dimensioni più grandi e spostare il fuoco da un
lato.
3. Dopo pochi minuti di fuoco continuo, mai eccessi-
vo, il forno raggiungerà la temperatura di 400°C,
bruciando la fuliggine scura. È questo il momento
in cui il forno è pronto per essere utilizzato.
SPEGNIMENTO
-- Per spegnere il forno chiudere lo sportello e attendere che si formi la cenere.
-- Quando il forno è completamente spento da 60 minuti si può togliere la cenere.
-- Non mettere mai carboni ardenti o ceneri sul terreno, sul patio, sul ponte o vicino a
piante o alberi.
DIFFERENTI TIPI DI LEGNA
-- Usare legna di piccolo taglio e molto asciutta soprattutto per l’accensione.
-- Legna trattata, resinosa o avanzi di legna sono da escludere tassativamente.
-- La legna bagnata o leggermente umida potrà far scaturire scoppiettii che sono
conseguenza dell’aumento del volume dell’acqua. Questo produrrà molto fumo e
meno calore.
PER LA VOSTRA SICUREZZA:
-- Non superare la temperatura limite di 500°C
-- Non lasciare incustodito il forno quando la fiamma è accesa
-- Per mantenere la temperatura è sufficiente inserire esigui quantitativi di legna di
piccolo taglio ad intervalli regolari, l’uso di una quantità eccessiva di legna può
provocare un pericoloso innalzamento della temperatura e una fuoriuscita di fiamme
dalla bocca, con possibilità di danni a cose e persone.
12ACCENSIONE
MODELLI A GAS
ATTENZIONE: Prima di accendere il forno attenersi alle seguenti indicazioni.
-- Si raccomanda di controllare tutti gli allacciamenti del gas prima dell’utilizzo del forno.
-- Non chinarsi sul forno durante l’accensione del gas; tenersi con il viso ed il corpo ad una
distanza non inferiore a 50 cm dallo sportello del forno.
-- Al momento dell’accensione la bocca del forno deve essere aperta.
-- La manopola di controllo del gas deve essere in posizione di zero.
-- Non muovere il forno durante l’uso.
1. Per accendere la fiamma pilota occorre pigiare e
ruotare la manopola sul simbolo della scintilla.
2. Mentre si tiene premuta la manopola del bruciatore,
premere contemporaneamente il pulsante
dell’accenditore per accendere la fiamma del pilota.
NOTA: l’accensione della fiamma pilota per la
prima volta o dopo il suo raffreddamento potrebbe
richiedere alcuni tentativi a causa dell’aria nella linea di
alimentazione. Sii pazientare.
3. Una volta che la fiamma pilota è accesa vedrai una
piccola fiamma. È quindi possibile rilasciare il pulsante
di accensione MA sarà necessario MANTENERE la
manopola del bruciatore premuta per 15 secondi. Ciò
assicurerà che la termocoppia sia sufficientemente
calda da consentire alla fiamma pilota di rimanere
accesa.
4. Rilasciare la manopola del bruciatore e ruotarla
in senso antiorario fino al simbolo più grande. Il
bruciatore del forno è ora a fiamma alta e puoi iniziare
a preriscaldare il forno.
PER LA VOSTRA SICUREZZA:
-- Non chiudere lo sportello quando il forno è acceso con la fiamma nella posizione
massima.
-- Non superare la temperatura limite di 500°C
-- In nessun caso si dovrà tentare di scollegare il tubo del gas o altri raccordi durante
l’utilizzo del forno.
13ACCENSIONE DEL FORNO
-- 1.1 Pizza napoletana
La cottura della pizza richiede una fiamma vivace e una temperatura elevata
(platea e cielo). Usare piccoli pezzi di legna secca per accendere il fuoco e
controllare la fiamma e la temperatura.
Accendere il fuoco con Dopo che il fuoco ha preso, Continuare ad aggiungere
piccoli pezzi di legna al spostare la legna sul lato legna (uno o due pezzi) per
centro del piano cottura. sinistro del forno usando un mantenere la temperatura
pezzo di legno o la pala per intorno ai 400°C.
pizza.
-- 1.2 Grigliata
Per fare le grigliate, usare la brace per ottenere il gusto affumicato nel forno e
meno fiamma per evitare un’eccessiva combustione. Usando pezzi di maggiore
dimensione o la carbonella (non i bricchetti) si ottiene un maggior controllo della
temperatura.
Accendere il fuoco con Attendere che la temperatura si stabilizzi attorno ai 180°C
piccoli pezzi di legna al (350°F) per poter grigliare. Aumentando la fiamma si può
centro del piano cottura. alzare la temperatura per cuocere a fuoco vivo.
Alimentare il fuoco
con pezzi di maggiore
dimensione o con della
carbonella facendo
attenzione a mantenere
bassa la fiamma a meno
che non si voglia cuocere
a fuoco vivo.
141.3 Cottura in teglia
I forni in acciaio inossidabile sono realizzati per un’accensione rapida e per
mantenere a lungo la temperatura.
Accendere il fuoco Alimentare il fuoco con Quando il forno ha
mettendo piccoli pezzi di pezzi più grandi o con della raggiunto i 180°C e la
legna al centro del piano carbonella per avere una brace occupa al meno un
cottura del forno. brace incandescente senza terzo della superficie di
fiamma. Stabilizzare il forno cottura, inserire il pane
attorno ai 180°C o alla o la teglia e chiudere lo
temperatura desiderata per sportello. Se la temperatura
la cottura. si abbassa, aggiungere un
pezzo di legna o un poco
di carbonella. Se aumenta,
aprire leggermente lo
sportello (par.2).
SMOKE
-- 2.1 Gestione del fumo
Il fumo è un ospite gradito del barbecue tradizionale sia da un punto di vista
spettacolare che gustativo ma occorre poterlo controllare perché non si trasformi
in una seccatura.
1. 1Usare legna secca (quella umida brucia male e produce molto fumo).
2. Mantenere sempre la fiamma.
3. In caso di brace senza fiamma, aggiungere un pezzo di carta o usare uno starter
e in seguito inserire un piccolo pezzo di legna, lasciando lo spazio necessario
alla circolazione dell’aria.
4. Per evitare di far fumo, non usare lo sportello; più aria entra, meno fumo si
ottiene.
5. Mettere il forno in una posizione tale che il fumo non penetri nell’area dedicata
agli ospiti tenendo conto dell’azione del vento.
-- 2.2 Per chi vuole il gusto affumicato
Per quelli che vogliono dare un sapore affumicato ai loro piatti suggeriamo di:
1. Chiudere lo sportello in presenza della fiamma.
2. Usare pezzi di legna grandi o carbonella.
3. Se la fiamma è troppo alta, ridurla per ottenere la brace e in seguito usare lo
sportello o pezzi di legna di grande dimensione.
4. Inserire la smoker box con le chips dell’aroma preferito.
15You can also read