Users' manual for your Thermo dog trailer from WT-Metall
←
→
Page content transcription
If your browser does not render page correctly, please read the page content below

Users’ manual for your Thermo dog trailer from
                     WT-Metall
Chassis number:                 W0901                                         0W46

Construction year :                                  Model:

Trailers’ key number:

WT-Metall says thank you,
Thank you, for having chosen a Thermo dog trailer from WT-Metall. We would like to help you with
the following explanations and descriptions to get familiar with your trailer, so you can bring to
yourself the joy and happiness about having this trailer for a long time.
Obviously is the Thermo dog trailer the right mean to transport the dogs in the safest and most
confortable way. Whether you are on your way to training, or you travel to competitions and
exhibitions, your dogs will find the rest they need in the trailer, as well as the ideal temperature to be
in top shape!
However, you should always think of your dogs: taking them for a walk, spending time with them and
making sure that they have enough water at their disposal at any time.
We do strongly recommend that you check the welfare of the dogs every two hours while travelling.
According to the pets’ protection laws, it is not allowed for the dogs to spend a whole night
unwatched in a trailer all on their own. Therefore the dogs should also be checked at least every two
hours.

Good ventilation makes the maximum comfort much easier to reach.
                                                     Referring to dog trailers, the word THERMO
                                                     means, that the outside walls as well as the roof
                                                     and the floor of the trailer are thermally isolated,
                                                     so very little cold or heat can get inside from the
                                                     outside. Through the rosters on the doors and
                                                     the ventilation grills on the walls of the boxes can
                                                     enter fresh air. The air already used can go up
                                                     and leave the trailer through the extractor.

Through the extraction we create a circuit that renews the air inside the boxes. When the trailer is
being stopped and the dogs are inside, we do strongly recommend the further use of the ventilation
system.
In the models equipped with temperature regulator, the thermostat can control the extraction
function. Given optimal conditions we reach the outside shadow temperature (minimal temperature
in the environment). For the use of the thermostat, proceed as follows:
Turn the knob of the thermostat until it points a high temperature, e.g. 45°C, in this position the
ventilation system will not start automatically. Start turning it downwards until you hear a “click”.
That is the current inside temperature of the boxes. We leave the wheel at a position of e.g. 22°C and
the thermostat will run automatically when the actual temperature inside the boxes rises higher than
that. The best result to achieve will be the outside shadow temperature – if this temperature is e.g.
25°C, this will be the best result inside the trailer and the ventilation will not stop. If your trailer is not
equipped with a battery on board, you need the trailer to be connected to the car. Otherwise it
won’t be able to get power supply for the extractor and the light in the boxes.
In trailers with adjustable ventilation grills in the doors (Royal), these should always be open when
the dogs are inside.
While driving, and due to the speed, usually enough fresh air comes inside the boxes through the
ventilation grills. Therefore, the use of the ventilator/s is not always necessary under such conditions.
Exceptions: During traffic jams and by excessively slow driving.

Your number plate
Each different trailer model has two screws to hold the number plate when it is located on the back
left door. In case the number plate is located below the doors, between the reverse and the fog
light, the trailer has 3 screws to hold it.

Coupling
        -   Maneuver with the wheel of the trailer until it is straightened behind your vehicle.
        -   Pull the lever upwards with the index finger and the handle forward (open clasp).
        -   The open hook with the raised handle rest softly over the ball, at the same time that we
            push down in order to fit the clasp with the ball.
        -   The coupling is ready with just a small pressure. The handle is moved downwards until it
            is blocked. The coupling is perfectly accomplished when we hear a small “click”, when the
            red part can be seen and the handle is once again in a 90° angle.
        -   The electrical circuit is being connected when we put the plug from the trailer into the
            socket of the car.
        -   Before travelling, you must ensure that the lights and the ventilation system work
            correctly.
        -   On trailers with brakes, the security chain of the clasp must always be mounted and be
            used.
        -   On trailers with just one axle, the support bar located in the back of the trailer must be
            put as high as possible and fastened with its holder.
        -   The jockey wheel must now be put back into its holder. Move it as high as possible and
            secure it parallel to the tow bar.
        -   The wheel chocks are now to be removed from the wheels and brought back to their
            holders.
Uncoupling

     -   Before uncoupling the trailer, we have to secure it with the wheel chocks so we can be
         sure that it won´t start rolling on its own once free from clasp.
     -   We move the support wheel downwards until it touches the ground and the weight of
         the trailer rests on it. We secure it.
     -   We unplug the trailers’ electric plug from the car and we put it in its guard, located on
         the tow bar.
     -   Now we pull from the handle forward and the tow bar upwards, or we lift the tow bar by
         turning the crack. One way or the other, the tow bar will raise and it will be set free from
         the coupling.
     -   We lower the support bar in the back of the 1-axle-trailer to avoid that the trailer knocks
         over itself when dogs jump in and out of the trailer.

The locking system in the trailer
                                                   Your trailer is usually equipped with lockable
                                                   key locks. You are able to lock/unlock all the key
                                                   locks with just the same key.

                                                   Please, write down the number of your trailers’
                                                   key on the first page of this manual. In case you
                                                   lose them you can order a new set by using this
                                                   number.
The key lock on the roof

This lock doesn´t only close the roof of your trailer, but also keeps the roof hermetically closed.

      Closing the roof

        -   You have to check the state of the lock cylinders (if they are closed, you open them).
        -   Lower the roof slowly, holding the holder with both hands until it rests on the lower part
            of the lock and it is ready to be closed.
        -   Push down with soft pressure over the lower part of the lock until you hear a click when
            it gets completely closed.
        -   Check that it is well closed and turn the key cylinder to the horizontal position.
        -   The roof must be always closed and locked while driving.
        -   Never lock the key lock while the roof is in fully opened position.

      Opening the roof

        -   Open the lock cylinder with the key.
        -   Once opened, open the key lock of the roof.
        -   Push the roof upwards by holding the roof holder with two hands.
        -   Do not leave the roof open without a reason for a long time, to avoid damages on the
            roof hydraulic lifters.

Depending on the model you have, different electric options and configurations will
be found:

The functions « light in the roof » and « light in the boxes » are both controlled by a switch with the
positions on/off.

                                                     These switches, together with the one from the
                                                     extractor, will usually be found on the console
                                                     located in the roof.

                                                     If the extractor is connected to a thermostat, you
                                                     can control it by means of its wheel. In order to
                                                     reach the optimal ventilation when using the
                                                     thermostat, you have to meet the wheel with the
                                                     minimum outside temperature.

Height of the tow bar / hook device

In order to achieve perfect driving, we have to make sure that the tow bar and the hook device are
set to the optimal height to be hooked to the vehicle. This is particularly important for twin axle
trailers.
Unless otherwise advised, the tow bar of the trailer will be serially adjusted to 46cm.

The tow bar is hooked on to a device located under the main body of the trailer. This device allows
four different positions for the tow bar to be hooked, allowing us to obtain different heights for the
tow bar.

Tire pressure

For a four boxes trailer we recommend a maximum tire pressure of 1,8 bars.

For smaller trailers or roads in bad condition, we recommend a lower tire pressure to be used.

Please, contact us should further assistance be required.

The trailer should drive softly behind the car, without jumping, bumping or sliding to the sides.

Wheel covers

An overweight such as someone sitting down on them, to rest boxes with drinks or any other heavy
weights on them are to be avoided.

There is danger of the wheel covers to be stripped off, which would also cause severe damage to the
side walls.

First check-up after 300 to 500 km (186 to 310 miles).

        -   Check that the screws which keep the axle and the trailers’ profile together are tight, by
            using a 19 mm wrench.
        -   Check that the screws which unite the tow bar with the axle are tight, by using a 19mm
            wrench.
        -   Control that the two screws of the tow bar holder are tight, by using a 19mm wrench.
        -   Check the bolts of the tires with a 19mm wrench. (Maximum pressure allowed 110 Nm).
        -   Control that the screws of the support wheel holder are tight, by using a 17mm wrench.
        -   Check the inside doors with a 13mm wrench. The holding hinge with an 8mm wrench.
        -   Check the screws of the outside doors with an 8mm wrench.

Regular maintenance

        -   Keep the hydraulic roof lifters and the door holders free of dirt. Apply grease on the
            joints and oil such as Balistol or WD 40 on the moving parts.
        -   All moving parts, the screws and the nuts must be kept free of dirt and greased regularly.
        -   The lock cylinder must be sprayed at least once in a month using oil such as Balistol or
            WD 40.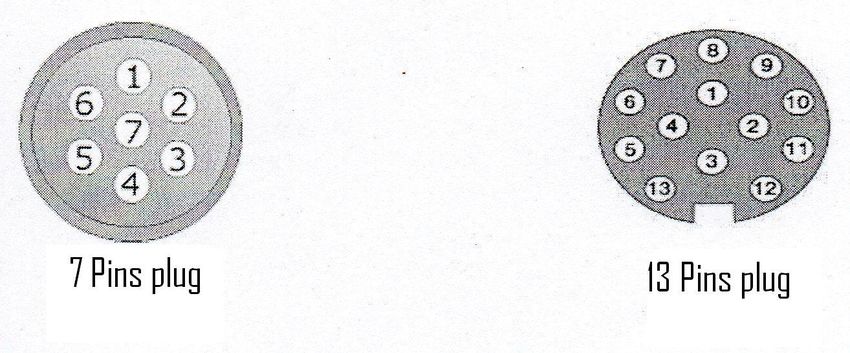
-   The rubber seals located in the inner side of the outside doors, must be treated with
           talcum powder or silicone spray in order to prevent them from getting broken due to the
           winter low temperatures.
       -   Check the air pressure of the tires and make sure that the minimum depth in their profile
           is at least 1,6mm.
       -   After buying a new car, please check that the tow bar is still at the right height.
       -   Once a year, you should go over all the indications on the first check-up.
       -   Check that the bearings work properly. The maintenance-free bearings used on our
           trailer have to be replaced completely if repair is required.

Cleaning and taking care of the trailer

Inside cleaning

       -   Take away the rubber mats or the wooden floor covering the floor in the boxes and clean
           them individually.
       -   Sweep or vacuum all the dirt and hair from inside the boxes.
       -   Move the jockey wheel upwards as far as possible, until the trailer is in a slanting
           position.
       -   Take away the screw which holds the middle wall between the rear boxes and take it out
           of the trailer.
       -   Clean the inside of the front box/boxes (trailers with +2 boxes) or the front boxes (trailers
           with 2 boxes) using water from a hose. By doing so, the hair, dust and any other filth will
           move downwards until it leaves the trailer.
       -   Let the inside walls get absolutely dry before using them again.
       -   In the meantime until the inside of the trailer is dry, apply some multipurpose oil on the
           roof hydraulic lifters and on the door holders.
       -   Clean and grease all of the movable parts, screws, bolts and nuts using grease.

Outside cleaning

The outside of the trailer can be washed by using none aggressive products.
Aggressive and corrosive products may cause the insulating effect of the walls from the trailer to get
lost. In case of using a hose with pressured water, make sure you always keep a roughly correct
distance from the trailer before using this pressured water. The water reaching the trailer with a too
high pressure will cause the insulating glue which keeps water away from seeping. As of that time,
the trailer will be permeable and will allow water to seep inside the trailer.

The trailer should undergo outside cleaning every three months.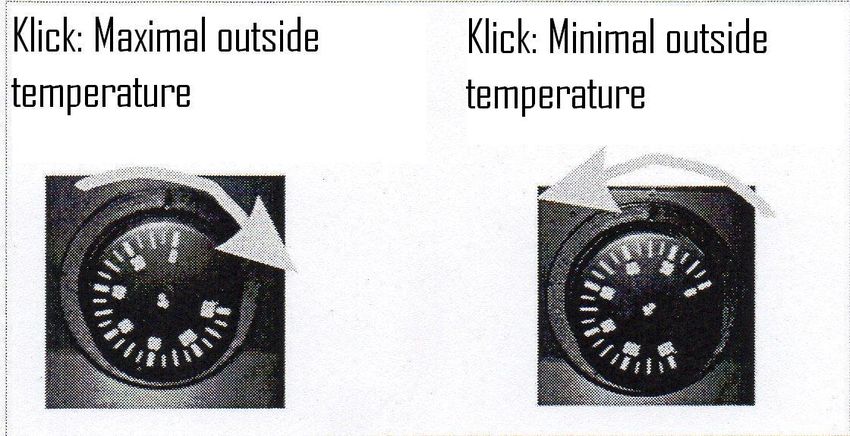
Door adjustment

In order to guarantee that the water splashed by the tires doesn´t seep inside the trailer, it is
mandatory that the outside doors are tight and in the right position.

In case the outside doors are unevenly positioned or they have been moved or displaced, you can
bring them back into the right position by moving them a little bit in the desired direction. You need
a 8mm wrench in order to do that. With this wrench in hand, you shall untighten the outside screws
on the hinges slightly and bring the door back into place. Once the door is back into place, you
tighten the screws again. Very important: Don´t loosen the screws completely! They could fall back
inside the trailer’s framework.

If the inside doors are also displaced, you have to untighten the screws with a 13mm wrench and
bring them back into the right position.

Additional maintenance on trailers with brakes

If you have a trailer with brakes, there is no further maintenance to be carried out but to grease
those moving parts within the breaking system.

The greasing of such parts is required each 5000km (3100 miles) or once a year.

In addition to this greasing, you must oil the joints of the breaking cables (red cables), located under
the trailer. Such operation should be carried out once a year, ideally in spring.

The handling and specialized maintenance of the breaking system must be performed by authorized
and specialized personnel only.

In case you need to order spare parts for your trailer, do not hesitate to get in touch
with us at:

WT-Metall GmbH Kronacher Straße 96 D-96052 Bamberg

Phone: 0049- (0) 951 46046 Fax: 0049- (0) 951 46047

info@wt-metall.de     www.wt-metall.de

We would appreciate if you gave us the trailers’ chassis number, year of construction and its Modell
at the time of placing the order for spare parts.

       -   The trailer shall be used in accordance with the indications written within this Users’
           manual.
       -   The trailer meets all of the official traffic directives as well as all the legal requirements
           required for its registration and allowance to get insured.
       -   The repair of the trailer or of any of its components must be carried out by personnel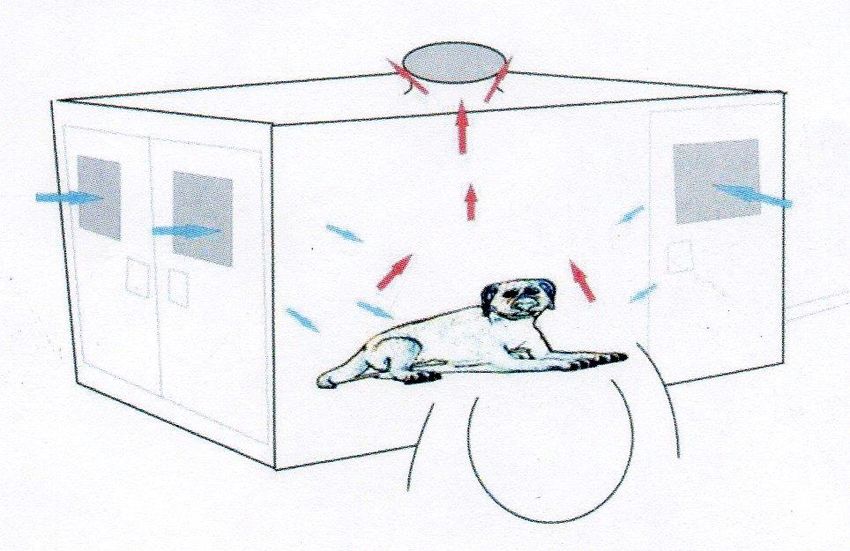
authorized by WT-Metall. If a third party carries out these works, the warranty will
           automatically be lost.
       -   The mudguards or the aluminum bumpers are never to be used as support to stand up or
           to sit on. There are pieces specifically designed with such purposes.

Definition of warranty

From the day of purchase, and as long as the trailer has been used, maintained and being taken care
for in accordance with this Users’ manual, the trailer has a 2 years warranty.

The warranty covers:

If the trailer is correctly used and maintained, all problems which might occur due to building defects
or the use of faulty materials.

It’s exclusively up to the manufacturers’ criteria to replace the faulty parts with new ones or to have
them repaired.

Preconditions

The warranty can only be claimed if all the instructions within this Users’ manual have been strictly
followed.

Under certain circumstances the manufacturer will offer a demonstration of how the regular
maintenance must be carried out.

Only original spare parts will be used to repair the trailer.

The repairs can only be carried out by authorized personnel.

Claims will not be accepted in the following assumptions:

The instructions of this Users’ manual are not followed.

The use of the trailer or its handling under own criteria neither recommended nor asked to the
manufacturer.

Any variation done to the trailer by people not working for WT-Metall, or not authorized by us, will
automatically bring the cancelation of the warranty.
Electrical scheme for the Thermo Dog Trailers by WT-Metall
Plugs’ contact

       Contact           Cable 7 pins     Cable 9 pins      Cable 13           Current´s circuit
7 pins / 9 pins
1                    1                    3              Yellow          Turning left
2                    2                    2              Blue            Fog light
3                    Green/Yellow         Green/Yellow   White           Mass
4                    4                    4              Green           Turning light right
5                    5                    5              Brown           Right light
6                    6                    6              Red             Brakes
7                    3                    7              Black           Left light
8                                         8              Grey            Reverse light
9                                         1              Blue          / Permanent supply
10                                                       Purple          Battery charge
11                                                       Pink            Free
12                                                       Brown         / Free
13                                                       White         / Mass for current contacts 8-
                                                         Black           12

Multi-socket connector in cable conduit
Contact in the plug          Board in     the Cable colour    Contact
3                            O                White           Mass
3                            O                White           Mass
9                            O                Green           Permanent supply
8                            O                Green           Reverse light
2                            O                Blue            Fog light
1                            O                Yellow          Turning left
7                            O                Black           Left light
6                            O                Red             Brakes
3                            O                White           Mass
3                            O                White           Mass
5                            O                Brown           Right light
4                            O                Green           Turning right

Clamps

Cable colour         Cable with     Circuit   board Cable     Tester
White                Green/Yellow   O               Blue      Mass
Green                1              O               Brown     Current for lights and ventilator
Red                  2              O               Brown     3rd brake light
Brown                3              O               Free      Free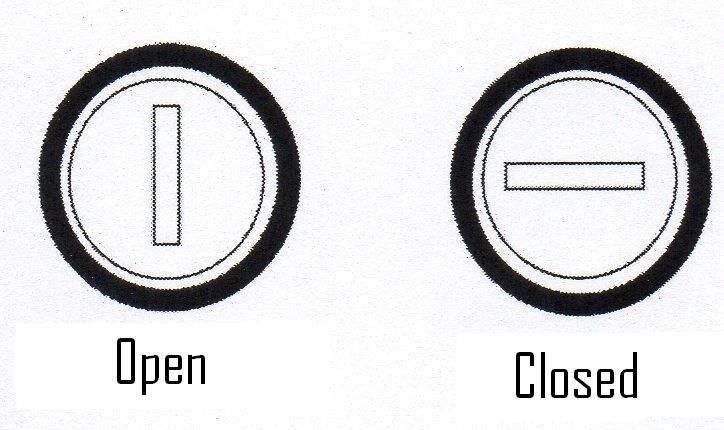
You can also read