2018 QuietKat Electric Mountain Bike Owner's Manual - This manual contains important safety, performance and service information. Read it before ...
←
→
Page content transcription
If your browser does not render page correctly, please read the page content below
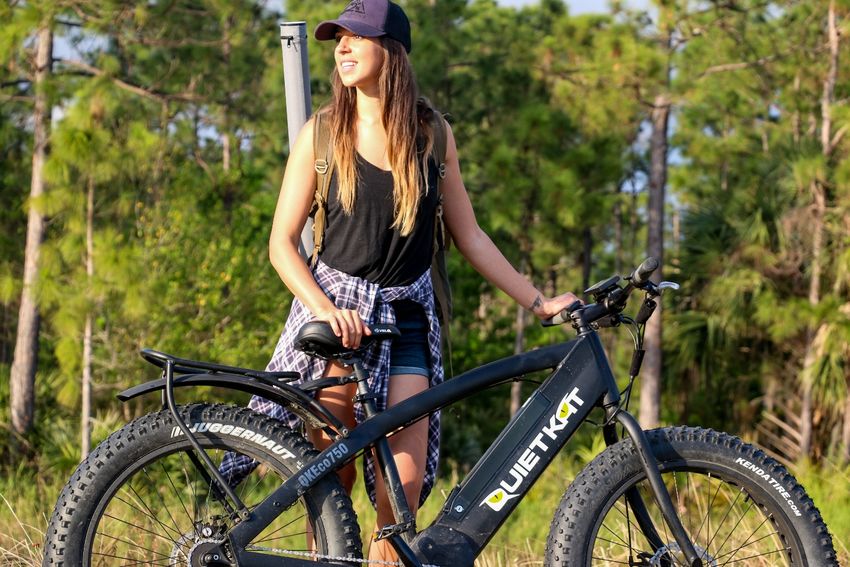
2018 QuietKat Electric Mountain Bike
          Owner’s Manual
This manual contains important safety, performance and service information.
        Read it before you take the first ride on your new QuietKat.
                              Do Not Discard
TABLE OF CONTENTS
INTRODUCTION                                             3
Jake Roach, CEO Of QuietKat

FOREWORD ON SAFETY                                       4

THE QUIETKAT BIKE                                        5

CHAPTER 1 – Unboxing And Assembly                        6

CHAPTER 2 – How To Charge And Power On                   11

CHAPTER 3 – Safe Operation, Maintanence And Inspection   16

CHAPTER 4 – Warnings                                     18

CHAPTER 5 – Warranty Information                         19

CHAPTER 6 – Shipping Damage Claims                       20

CHAPTER 7 – Return Policy                                20

                                                              2
Introduction
Thank you for purchasing an electric mountain bike by QuietKat.

This is a serious piece of machinery designed for use by adults in fully controlled and safe
environments. As the purchaser/owner of the bike, you are responsible with the task of
keeping the rider safe at all times. Your bike has great capabilities and can grow with the skills
of the rider to high levels, but it is imperative that the responsible adult is in control during the
entire learning process and gives full attention at all times.

The QuietKat is designed for off-road use, but can also be ridden on the road. Please obey all
laws regarding Electric Assisted Bicycles and/or Motorized Vehicles and their usage in your
area. QuietKat may only be ridden in safe areas where all laws are being followed and all
required permissions are given. QuietKat recommends the use of a DOT (Department of
Transportation) rated helmet at all times.

Because it is impossible to anticipate every situation or condition which can occur while riding,
this manual makes no representation about the safe use of the bicycle under all conditions.
There are risks associated with the use of a bicycle which cannot be predicted or avoided, and
which are the sole responsibility of the rider.

This Owner’s Manual provides important information regarding safety and maintenance of your
FatKat bike. Please read through the entire manual prior to operating your machine and save
this manual for future reference. Visit quietkat.com for updated information.

If at any time you have questions or need assistance with the maintenance of your QuietKat
product, please contact us using the contact information below and throughout the Owner’s
Manual.

Thanks again for purchasing a Quietkat product. We hope you enjoy the ride!

Jake Roach, President – QuietKat

                                          QuietKat Contact Information:
                                          Service & Support - customerservice@quietkat.com
                                          Accounting - accounting@quietkat.com
                                          General Info - info@quietkat.com
                                          Sales - sales@quietkat.com
                                          (970) 328-2399

                                                                                                        3
Foreword on Safety
An electric bicycle can be a great way to access terrain that may be impossible by any other
means. It can also be dangerous, especially if you ride terrain above your ability level or beyond
the capability of the bike itself. If you are headed into the backcountry, be prepared. QuietKat
recommends bringing a bike-specific multi-tool that includes various Allen Keys, Screwdrivers,
and a Bicycle Chain Tool. Bring water, food and clothing appropriate for the season and the
environment. A dry trail with good traction may turn impassible with a little rain, meaning you
will need to walk the bike. Always practice proper backcountry safety protocols.
The bicycle will not protect you in an accident. There are no seat belts or air bags, and therefore
a crash even at low speeds can result in injury or death. If you are in an accident, inspect the
bike thoroughly before continuing with your ride. If you aren’t sure, do not ride the bike; take it
to a professional bicycle mechanic or repair shop for a professional inspection.
If you experience any mechanical problems while on a ride, immediately turn off the electric
power at the battery prior to attempting any repairs. Repairs include anything such as putting
the chain back on, adjusting brakes, or adjusting accessories. Attempting to replace or re-
engage the chain while the power is on could result in injury.
Secure all cargo, and ensure loose straps are secured to avoid interference with the moving
parts on the bike. Be aware of loose clothing, especially on the drive side (Right Side) of the
bicycle, as to avoid interference between your clothes and the drivetrain. Be sure the wheels
spin freely and there is nothing that could get caught in the spokes or prevent the wheels from
turning freely. If you get a piece of clothing or equipment caught in the front chainring, first
turn the power off. The chainring is not on a freewheel system and won’t go backwards like a
typical bike. You may need to be prepared to cut or remove clothing that gets caught in the
drivetrain in order to remove it from the system.
The QuietKat bike is a fun and exciting ride! Always be aware of your surroundings and your
environment. Be cautious of other riders and pedestrians. Always stay in control and within
your ability. QuietKat always recommends the use of a DOT (Department of Transportation)
Rated helmet at all times.

                                                                                                      4
5

Chapter 1 – Unboxing and Assembly
QuietKat recommends that the bike be assembled, inspected and adjusted by a certified
bicycle mechanic before riding. For a more in-depth assembly guide, check out our assembly
and maintenance videos at www.QuietKat.com.
You Will Need:
4mm Hex Key
5mm Hex Key
15mm Wrench or Pedal Wrench
Phillips Head or JIS Screwdriver
Cable Cutters
General Purpose Grease
Optional Tools:
Torque Wrench

1- Carefully remove the bike from the box.
      a. Use caution when opening the box as there may be
          staples exposed when opening the lid.
      b. It is easier to clip the zip ties attaching the front wheel
          to the bike and remove the front wheel from the box
          first.
      c. Take out all the accessories and the box with pedals and
          other miscellaneous parts, and the Battery Charger
          before removing the bike.

2- Remove all bubble wrap and other packaging materials and place
   them back in the box.

3- Install the seat-post into the seat-tube and hang the bike from a
   bike repair stand (if possible).
       a. If you do not have a repair stand, place the bike on the floor
            and engage the kickstand. Use caution as the bike could tip
            over prior to installing the front wheel, even with the
            kickstand engaged.

                                                                                             6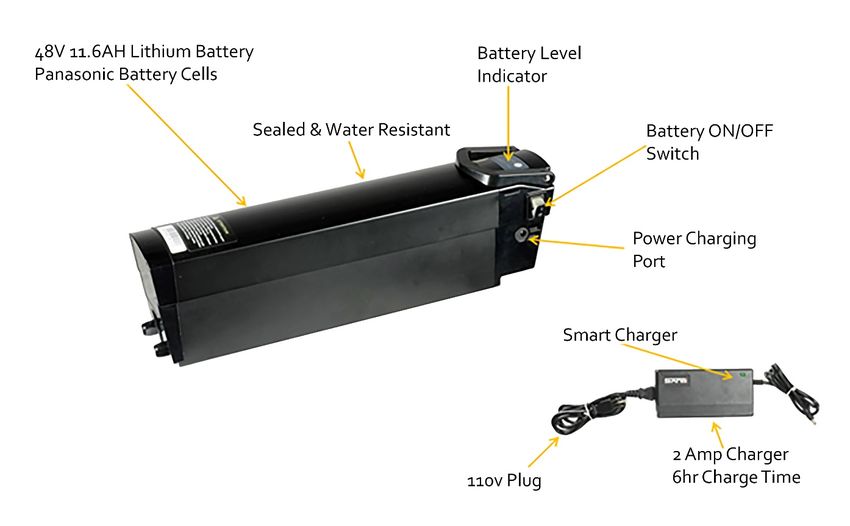
4- Start by attaching the handlebars.
       a. Using a 4mm allen wrench, remove the 4 screws from the front of the stem and
          remove the bracket.
       b. Place the handlebars on the stem, with REAR brake on the riders RIGHT, and put the
          bracket and 4 screws back into place.
               i. Don’t worry about aligning the handlebars right away. Tighten the screws
                  until snug. DO NOT OVERTIGHTEN!

5- Attach the front wheel
      a. Place the axle into the dropouts on the front fork
               i. Make sure the washer is on the
                  outside of the dropouts and inside of
                  the 15mm nut.

               ii. Make sure the wheel is centered in the fork.
                   The tire should have equal space on each side.
              iii. If the wheel is not centered, loosen the 15mm
                   nuts on the axle, and straighten. It can help to
                   put the bike on the floor (if on a stand) and let
                   gravity help lower the dropouts around the
                   axle.

                                                                                               7
b. Use your 15mm wrench to tighten axle nut until snug. DO NOT OVERTIGHTEN!

6- Attach the front brake caliper.
      a. Loosen the bolts attaching the Brake Caliper to the Disc Brake Adapter.

       b. Separate the Caliper from the Disc Brake Adapter as shown in the photo above.

       c. Align and bolt on the Disc Brake Adapter to the fork.
          The adapter is directional, look for the “UP” scribed
          on the adapter and ensure the “UP” is towards the
          sky. Bolt the Disc Brake Adapter to the Fork, be
          careful not to cross thread the bolts! The thread
          locker will add a little resistance, but overall the
          bolts should thread in easily.

                                                                                          8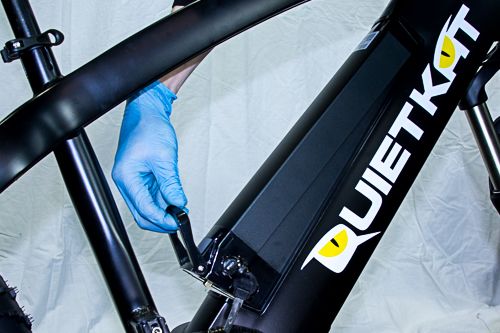
d. Align the caliper with the disc rotor, placing the caliper
          with the rotor between the brake pads.
       e. Mount the Caliper to the Disk Brake Adapter. Once
          the bolts are tight, loosen ¼ to ½ turn so the Caliper is
          slightly loose on the adapter to allow for easier
          alignment.
               i. If the brake lever was squeezed, or the pistons
                  have squeezed the brake pads together, use a
                  Brake Pad Spreader to push the pistons back to
                  their open position (Hydraulic Brakes Only). If
                  you don’t have a spreader, you can carefully
                  use a clean flat head screwdriver.

       f. With the Brake Caliper slightly loose, squeeze the
          front brake lever to engage the pistons and squeeze the rotor with the pads; keep it
          squeezed while tightening the Brake Caliper bolts. Release the brake lever and spin
          the wheel to ensure the rotor is centered within the pads. You can make fine
          adjustments to the inside pad position with a 5mm Allen key on the side of the
          brake caliper.

7- Attach the pedals
      a. The pedals are left and right side specific. The end near
          the threads will have an L or R on them, indicating Left
          and Right.
      b. Put a small dab of grease on the threads of each pedal
          before inserting into the crank.
      c. The right side is threaded normally, and the left is
          reverse threaded. This must be screwed in opposite to
          the right (to the left).The greased pedal should thread
          on smoothly, DO NOT CROSSTHREAD!

                                                                                                 9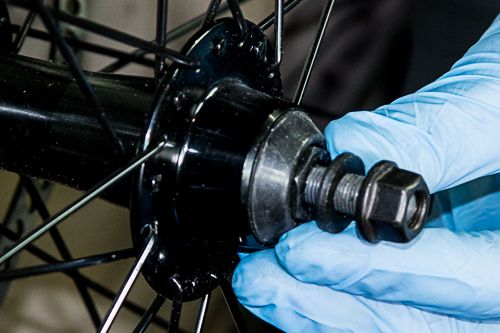
8- Pump tires to desired pressure
      a. The range for the tires is from 5psi to 30psi.
               i. 5psi is the lowest the tire is rated for.
              ii. 5-15psi is for very soft sand or snow.
             iii. 15-25psi is the recommended range for most
                  off-road riding, depending on your
                  preferences and the specific terrain you are
                  travelling.
             iv. 25-30psi is for pavement or hard, smooth
                  surfaces.
              v. Lower pressures can provide more traction,
                  however increase the risk of punctures, and
                  decrease the range of the motor. Higher
                  pressures can decrease the possibility of a
                  puncture, but also can decrease grip on
                  softer and varied terrain.
             vi. We recommend using a 2psi difference between the Front tire and Rear Tire
                  (+2psi in the Rear tire) to maximize traction in the front and stability in the
                  rear. Example: 15psi Front, 17psi Rear)
      b. If you are in an area with a lot of thorns we recommend adding a tube/tire sealant.

9- Align the Handlebars and Brake Levers.
       a. Once the wheels are installed and tires inflated, the
           bike can be set on the floor.
       b. With the bike on the floor, align the handlebars to
           the correct angle. To adjust, ensure the handlebars
           are centered left to right, then roll them forward
           and/or backwards to get the angle correct. The up-
           sweep and back-sweep of the handlebars is designed
           to adjust the bars for comfort. The handlebars are
           properly aligned when the handlebar grips are
           parallel to the ground. A rotational difference of +/-
           15 degrees is acceptable for comfort.
       c. Align your brake levers to a position of comfort. You
           should be able to reach the brake levers with either
           One or Two Fingers (Index or Index and Middle
           fingers)
       d. Using your 5mm Allen key or Torque Wrench, tighten all stem bolts to 7nm (Newton
           Meters).

                                                                                                    10
10- Check all bolts for tightness, including
a. Stem (handlebar and steer-tube bolts)
b. Wheel axles
c. Crankarms
d. Chainring
e. Kickstand
f. Accessories
11Chapter 2 – How to Charge and Power On
1- Battery
a. The battery will be mostly charged when you
receive it. It is better to use it first to drain it down
and then charge it. This is also the case if you
haven’t used the bike for a few months.
b. To charge the battery, remove the rubber plug
from LEFT side of the bike. Plug the charger into
the power outlet and wait until the light on the
charging unit is illuminated. Plug the other end of
the cord into the bike. The light will change to
green when it’s charged.
c. Allow approximately 4-8 hours to fully charge.
d. The battery does not have to be installed in the bike to charge
i. Remove the battery from the bike by inserting the key, turning it 90
degrees and pulling firmly on the handle.
ii. The charger will get hot, so make sure to keep it away from all
flammable materials and surfaces.
iii. During normal use you can charge it after every ride regardless of
battery level, there is no battery memory and therefore consistent
charging won’t damage the battery.
iv. The charging unit will automatically stop charging once the battery is
full for safety.
v. Always charge in dry, ventilated conditions away from sunlight,
ideally 50-80 degrees Fahrenheit.
vi. Only use the original charger, DO NOT use any aftermarket chargers
or charging accessories.
12e. For long term battery storage, it is best to leave
the battery at about 20% (1/4 lights). Always store
the battery in a cool place (colder than 65*F). For
best results, do not store for longer than 4 months
without cycling the battery; use it to de-charge,
then re-charge to 20%.
2- Powering the Unit On
a. Make sure the battery is fully inserted and locked into the bike.
b. Get on the bike, ready to ride.
c. Turn the battery on (I) using the power switch on the Left side of the bike.
d. Press and hold the power button on the keypad for a couple seconds until
the display turns on.
e. When the power comes on the power level will be set to 1, and therefore
engaged for throttle or pedal assistance.
f. Use the + or – key on the keypad to change your pedal assist power level
from 0-5 (0 is the lowest assistance, 5 is maximum assistance)
g. To turn off, press and hold the power button again for a couple seconds. You
can also turn the bike off at the battery (O).
133- Display Screen (Analyst)
a. Five Button Keypad
i. Power Button – Turns power and display on and
off
ii. (+) Increases power
iii. (-) Decreases power
iv. Light button – changes level of backlight
v. (i) button – scrolls through information screens on
the Analyst Display.
b. The Analyst displays the following information:
i. Current speed
ii. Total distance
iii. Trip distance
iv. Battery level
v. Power level
vi. Watts output
vii. USB charging
c. Use the (i) button to scroll through the different screens
on the Analyst Display.
4- How to Adjust the Front Suspension Fork (If
Equipped)
a. The Red dial is to lock out the fork.
Turn toward lock symbol to lock the
suspension travel. Turn the opposite
direction to activate the spring and
allow the suspension to travel.
b. On Coil Sprung Forks, the Left side
Black knob adjusts the preload on the
spring. The preload adjustment will
change the characteristics of the
spring, more tension (tighter) will
stiffen the initial travel, while less
tension will allow for more supple
initial stroke of the spring.
c. Air Forks have a cap covering a Schrader Valve to adjust the pressure in the
Air Spring. Use a Shock Pump to adjust the air spring pressure.
145- Riding Tips to Maximize Your Battery
a. To increase battery life and reduce wear on the components, follow these
tips:
i. Use the pedals as often as possible, especially when starting. DO NOT
simply rely on the throttle for power.
ii. Start in a low gear and low power. This means looking ahead, and
possibly shifting to a lower gear before coming to a stop, so you are in
the right gear to resume riding again.
iii. Use low gears for climbing steep hills. Avoid putting unnecessary
torque into the transmission.
iv. Minimize starts and stops by looking ahead and planning the route.
v. Use higher tire pressure
b. Bicycle “break in”:
i. In the first 20 miles or so the cables and system components will
settle and therefore may need to be adjusted. If you are unfamiliar
with adjusting the derailleur or mechanical brakes, go to our Video
Assembly Page or bring it to your local bike shop.
15Chapter 3 – Safe Operation, Maintenance and Inspection
1- Before First Ride (After Initial Build and Inspection):
a. Adjust seat to comfortable height.
b. Adjust the saddle rails fore/aft positioning for comfort.
c. Adjust the handlebar, shifter and brake lever position to your liking.
d. Read Chapter 2 of this manual to become familiar with the components and
how the motor and analyst work.
e. Squeeze brake levers and test the braking power with the bike in a stand, or
just walking alongside the bike. DO NOT attempt to ride the bike if the brakes
are not adjusted properly.
2- Before Every Ride:
a. Check tire pressure and tread wear. Check the sidewalls for damage.
b. Check the brakes, ensure brakes have adequate power and appropriate
amount of brake pad remaining.
c. Check that wheels are straight and turning freely. Ensure spokes are
consistently tight.
d. Check the Chain tension and lube the chain to reduce friction and increase
shifting precision.
e. Check that the handlebars and stem are secure; and tighten all stem bolts to
7nm.
3- After every ride:
a. Wipe down frame with soap and water. DO NOT use a power washer or high-
pressure hose, this could damage the motor and electrical components.
b. Mud and dirt can be washed away with a low-pressure hose, avoiding direct
flow with the electrical components and motor assembly.
4- Monthly Maintenance:
a. Check frame for any damage.
i. Look for any dents, cracks or chips to the frame. Although some may
only be cosmetic, a small crack in the frame can be a serious safety
hazard. DO NOT ride the bike if you identify any cracks in the frame.
b. Check for loose spokes.
i. Squeeze the spokes together to check the spoke tension. Spokes
should flex slightly and return to their original position. See your local
bike shop for wheel truing and spoke replacements if necessary.
Tighten any loose spokes with a spoke wrench.
16c. Check forks for damage and air pressure (if applicable).
i. The fork legs should move freely. Check the seals where the
stanchions enter the lower legs of the forks. These seals can wear
over time, and if not kept clean can damage the fork stanchions as
well.
d. Check cassette and chainring for wear/damage.
i. Ensure the chain flows freely around the front chainring and each gear in the
rear. Inspect the teeth in the front chainring as well as each individual cog in
the rear. It is typical for grease and dirt to build up along the sides of the
chainring, cassette cogs, and pully wheels on the rear derailleur.
ii. Use a bicycle degreaser or chain cleaner and a brush to clean and degrease
the chain and drivetrain components. Re-Lube with bicycle specific chain
lube, and wipe off excess.
5- General Safety Tips
a. The user assumes the responsibility for the risk of injury or death as a result
of riding or using QuietKat products. It is the responsibility of the user to
know and obey all local laws, rules, and regulations regarding the use of
electric assisted bicycles.
b. Always wear an appropriate helmet when riding. QuietKat recommends the
use of a DOT (Department of Transportation) rated helmet at all times.
c. Your bike is designed for use by persons 16 years of age and older. Always
follow local laws and regulations regarding age restrictions and the use of
electric bicycles.
d. Riders must have the physical coordination, reaction time and mental
capacity to ride and manage traffic, road conditions, sudden situations, as
well as respect and obey the local laws governing bicycle and electric bicycle
use.
e. If you have an impairment or disability, consult your physician before riding
any bicycle.
f. Avoid baggy or loose clothing while operating your QuietKat.
g. Turn off battery before performing any repairs or maintenance. Any turning
of the cranks will cause the motor to engage, which could result in injury.
h. ALWAYS OBEY ALL LAWS, RULES AND/OR REGULATIONS REGARDING THE
USE OF ELECTRIC ASSISTED BICYCLES.
17Chapter 4 – Warnings
1- Adult Supervision Required
a. QuietKat is designed for riders 16 years of age or older. Adult supervision is
required for any operator under the age of 18.
b. Never allow a child to alter the settings or to ride without adult supervision.
c. Begin in a safe area and become familiar with all aspects of the bike before
heading out on a ride.
d. ALWAYS OBEY ALL LAWS, RULES AND/OR REGULATIONS REGARDING THE
USE OF ELECTRIC ASSISTED BICYCLES.
2- Follow Safe Riding Practices
a. The QuietKat is designed for ONE (1) rider only.
b. Long hair, loose clothing or loose items worn by the rider must be secured to
prevent interference with moving parts or the surroundings.
c. Do not exceed the weight limit. Heavier riders may significantly reduce
performance and / or render the vehicle unstable and/or exceed the
capability of the brakes and other control devices. Exceeding the weight limit
may cause structural damage not covered by the warranty.
d. Do not touch any moving parts.
e. Be aware, some parts such as brake rotors can become extremely hot during
use. Avoid contact with these components until properly cooled.
f. Do not ride at night or under low visibility conditions without proper lighting
and safety practices. Follow all local laws regarding the use of electric
bicycles at night.
g. Do not submerge this vehicle in water.
h. Do not ride on steep or uneven surfaces.
i. Do not ride faster than the conditions permit, or beyond your ability.
j. The rider should be securely seated on the unit ready to ride before turning
the power on.
k. ALWAYS OBEY ALL LAWS, RULES AND/OR REGULATIONS REGARDING THE
USE OF ELECTRIC ASSISTED BICYCLES.
3- Wear Protective Equipment
a. Off-road riding presents many hazards such as loose dirt, obstacles and
varied conditions. Always wear a helmet.
b. Other personal safety items highly recommended are gloves, wrist, elbow,
knee/shin and eye protection. Failure to use appropriate safety equipment
can increase the risk of injury.
c. ALWAYS OBEY ALL LAWS, RULES AND/OR REGULATIONS REGARDING THE
USE OF ELECTRIC ASSISTED BICYCLES.
184- Proper Maintenance Is Required
a. Failure to maintain your QuietKat and keep your bike in proper operating
condition can lead to an accident resulting in injury, death, and/or property
damage.
b. If you have any questions about the proper care and maintenance of this
vehicle consult your dealer/distributor or contact QuietKat Customer Service
at customerservice@quietkat.com or by phone at 970-328-2399 Ext. 25.
Chapter 5 – Warranty Information
Every QuietKat comes with a Lifetime Limited Warranty against manufacturing defects
in materials and workmanship on its frame, and a One-Year Limited Warranty on the battery,
controller and motor assembly. This warranty only applies to the original registered owner of
the QuietKat and is not transferable. Original purchase receipt or invoice is required for all
warranty claims.
The limited warranty does not apply to normal wear and tear, malfunctions or failures
due to abuse, neglect, improper use or repair, improper maintenance, alteration, modification,
or other improper use.
The limited warranty does not apply to damage sustained in a crash.
The one-year warranty on QuietKat’s lithium ion batteries does not include damage
from a power surge, use of improper charger, improper maintenance or other such misuse,
normal wear or water damage.
If a component is deemed to be defective or damaged without user error or other
improper use, QuietKat will assist in replacing the frame or specific part in question. This
includes any parts damaged in shipping. We will not replace any part deemed to be damaged
by the user in a crash.
In the case of repair or parts replacement under warranty, we will work with the owner to find
a local certified bicycle repair shop to make the necessary fix. QuietKat will also cover the
associated repair labor fees that are directly associated with the specific warranty situation. The
owner may also return the unit to QuietKat to make the needed repairs, but will be responsible
for the shipping costs.
All warranty claims must be made through QuietKat, Inc., and can be submitted to
info@quietkat.com. Original proof of purchase is required with any warranty request. Before
making a claim, please contact our service department at customerservice@quietkat.com for
repair and/or warranty information. The warranty period extends one (1) calendar year from
the date of purchase.
19Chapter 6 – Shipping Damage Claims
Upon delivery, immediately inspect your products for damage. Freight damage claims are
extremely time sensitive, and we will not accept any freight damage claims later than 3
business days from delivery. If possible, make notes of any damage to your products on the Bill
of Lading before you and the delivery driver sign-off on the shipment. Take any photos of
damage and date the images when possible. Report shipping damage claims to QuietKat inc., at
970-328-2399 Ext. 25 or customerservice@quietkat.com immediately to file a claim.
Chapter 7 – Return Policy
QuietKat will accept the return or cancellation of an order under the following conditions:
1- Items that are purchased and cancelled before shipping are subject to a 15%
processing fee
2- Items that are shipped may be returned within 30 days if there are fewer than 10
miles on the odometer. Those returns are subject to a 15% restocking fee on the
purchase price, as well as return shipping fees. A 1% fee is added for every mile over
10. The original shipping charges are non-refundable.
3- Under the “QuietKat Test Ride Guarantee Program,” a customer pays an additional
non-refundable fee ($150 for bikes and $225 for all terrain trikes) to test ride the
vehicle for up to 30 days and for fewer than 10 miles. Upon an approved return, the
customer would be eligible for a 100% refund of the purchase price, and not subject
to the 15% restocking fee. However, a 1% fee would be added for every mile over
ten miles of testing. QuietKat would arrange for and cover the return shipping fees.
The original shipping costs paid by the customer are not refunded.
4- QuietKat will not accept the returns of products after 30 days.
5- In the event of a product return, QuietKat will not accept the return of promotional
items associated with that sale. The MSRP value of the promotional items will be
deducted from the refund.
6- Before a return is made, the customer must receive written approval of the return
and a Return Authorization Number from QuietKat Inc. If a customer sends a return
without the written consent of the company, a refund will not be issued. The
customer who sends a unit back without consent will be responsible for shipping
costs back to them; or will sacrifice the item. Once a return is approved by QuietKat
Inc., you may receive an exchange, company credit or a refund.
7- All purchases made through authorized QuietKat retailers are subject to the dealer’s
return and refund policies; QuietKat does not accept direct returns of products sold
through authorized retailers. All products sold through dealers must be returned to
the original reseller.
20You can also read