7" LCD Television Owner's Manual
←
→
Page content transcription
If your browser does not render page correctly, please read the page content below
®

                7” LCD Television
                         Owner’s Manual
                            Model: PTV 7000
     READ THESE OPERATING INSTRUCTIONS CAREFULLY
               SAVE THESE INSTRUCTIONS

                  For product questions or service,
                        CALL 1-919-585-6435
                     or go to www.AccessHD.tv
Have the following information ready when you call:
Date of Purchase:        _______________________
Location of Purchase:    _______________________
Serial #:                _______________________
Model #:                 _______________________

        Mailing Address                           Fax Number
        7868 US Hwy 70, Suite C                   1-919-550-3277
        Clayton, NC 27520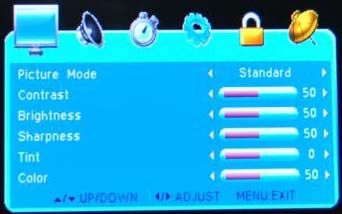
Replacement Parts and Accessories
             Part Name                    Part Number       Price

TV Antenna                                    TVAnt         $24.99

TV Remote                                    RCD-TV         $19.99

Power Supply                               PowSup9V         $14.99

TV Battery-1200mHa (1 hr life)                BattTV        $29.99
TV Extended Life Battery (2.5 hr life)
                                            BattTV-ext      $39.99
Upgrade for a longer battery life
12V Car Charger Adapter                      CarChrg        $19.99

Mounting Bracket                             MtBrack        $24.99

                          To place an order:
                       Visit www.AccessHD.tv
                        or call 1-919-585-6435
           Mailing Address                     Fax Number
           7868 US Hwy 70, Suite C             1-919-550-3277
           Clayton, NC 27520

                          ATTENTION
        To begin watching this TV, you MUST do a channel
         scan to search for available channels. For more
            information on channel scans, see page 7.

                 The remote control is located in the
              storage slot on the back of the television.

                    AccessHD® 7” LCD Panel Television       Rev: 09/2009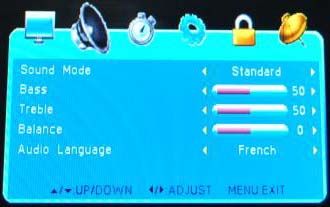
Contents:
Important Safety Instructions ....................................1
Component Identification ..........................................2
Operating Instructions ...............................................3
Getting Started ..........................................................5
TV Setup Menu Settings ...........................................5
Mounting Options ......................................................8
Troubleshooting ........................................................9
Technical Specifications ...........................................9
Limited Warranty & Service ....................................10

 Copyright© 2009 by AccessHD, LLC. All rights reserved.
 No part of this publication can be reproduced or distributed without the prior
 written permission of AccessHD, LLC Clayton, NC.

 AccessHD® is a registered trademark of AccessHD, LLC Clayton, NC

 AccessHD, LLC reserves the right to discontinue or change specifications or
 design at any time without notice and without incurring any obligation
 whatsoever.

 The information and specifications included in this publication were in effect at
 the time of approval for printing.

Rev: 09/2009                   AccessHD® 7” LCD Panel Television
Important Safety Instructions
Read these instructions.
Keep these instructions.
Heed all warnings.
Follow all instructions.
Do not use this apparatus near water.
Clean only with a dry cloth.
Do not block any ventilation openings. Install in accordance with the manufacturer’s
instructions.
Do not install near any heat sources such as radiators, heat registers, stoves, or other
apparatus (including amplifiers) that produce heat.
Do not defeat the safety purpose of the polarized or grounding-type plug. A polarized
plug has two blades with one wider than the other. A grounding-type plug has two
blades and a third grounding prong. The wide blade or the third prong are provided for
your safety. If the provided plug does not fit into your outlet, consult an electrician.
Protect the power cord from being walked on, pinched or bent, particularly plugs,
convenience receptacles, and at the point where it exits from the device.
Only use attachments/accessories specified by the manufacturer.
Use only with the cart, stand, tripod, bracket, or table specified by the
manufacturer, or sold with the apparatus. When a card is used, use caution
when moving the cart/apparatus combination to avoid injury from tip-over.
Unplug this device during lightning storms or when not in use for long periods
of time.
Refer all servicing to qualified personnel. Servicing is required when apparatus has
been damaged in any way, such as power-supply cord or plug is damaged, liquid has
been spilled or objects have fallen into the apparatus, the apparatus has been exposed
to rain or moisture, does not operate normally, or has been dropped.
CAUTION: To reduce risk of fire, do not place any heating or cooking apparatus
beneath this unit.
WARNING: Do not expose batteries (battery pack or batteries installed) to excessive
heat such as sunshine, fire, or the like.
Where the main plug or an appliance coupler is used as the disconnect device, the
disconnect device shall remain readily operable.
The apparatus shall not be exposed to dripping or splashing and that no objects filled
with liquids, such as vases, shall be placed on the apparatus.
This device complies with Part 15 of the FCC Rules. Operation is subject to the following
two conditions: (1) this device may not cause harmful interference, and (2) this device must
accept any interference received, including interference that may cause undesired
operation.
1 AccessHD® 7” LCD Panel Television Rev: 09/2009Component Identification
Front View
1. LCD Screen
2. Speakers
3. Remote Sensor
1
3
2
Bottom View
1. Power Indicator
2. Battery Charging Indicator
1 2
Left View
1. Video In
2. Left Audio In
3. Right Audio In
1 2 3 4 4. Headphone Jack
Right View
1. DC In 6. Auto/OK
2. Power Switch 7. Channel +
3. Mode 8. Channel –
123456789 4. Volume + 9. Menu
5. Volume –
Rear View 1 2
1. Antenna
2. Mounting Holes
3. Viewing Stand
4. Remote Control Storage
The remote control storage slot is
located on the back panel behind the
viewing stand. The remote control is
shipped in this slot. 3 4
Rev: 09/2009 AccessHD® 7” LCD Panel Television 2Remote Control Buttons
1 2 3
1. Power 9. Volume –
4 5
2. Mode 10. Enter
9 6 3. Mute 11. Menu
11 8
4. MTS 12. Exit
7 12
5. Zoom 13. Previous
13 6. Channel + 14. Guide
10
14 7. Channel – 15. Info
16
15 8. Volume + 16. CC
Operating Instructions
Do not connect the power supply until all connections have been made.
Powering the Unit
There are two ways to power this device.
AC Adapter
A standard PSU is included with the unit. An
adapter that can be plugged into the cigarette
lighter in a vehicle is available for purchase as an
accessory.
Built-in Lithium Rechargeable Battery
Note: Be sure to charge the battery fully before the initial use.
When the charge of the battery is weak, a low power indicator will
appear on the LCD screen. The unit will turn off automatically several
minutes later.
CAUTION: Danger of explosion if battery is incorrectly replaced. Replace
only with the same or equivalent battery.
To order a cigarette lighter adapter, an
additional battery or an extended life
battery, go to www.AccessHD.tv
3 AccessHD® 7” LCD Panel Television Rev: 09/2009Connecting to External AV Sources
The unit supports an AV signal input function. Use the audio/
video cable to connect the unit to an external audio/
video signal source such as a DVD player, VCR, etc.
Be sure to observe the color code when connecting
audio/video cables. (Cables not included.)
Note: Noise may occur in speakers when there is an
external audio signal input while playing a DVD.
Unplug the audio cord to clear the noise.
Connecting Headphones
Plug headphones into the headphones jack. The
speakers turn off automatically when headphones are
connected. (Headphones not included.)
Note: Excessively loud volume can damage your
hearing. Turn down the volume before you connect
headphone, and then raise the volume to comfortable level.
Using Remote Control
Remove the remote control from the storage slot located on the back
panel behind the viewing stand. Point the remote control unit at the
remote sensor within a range of 5 meters and angles of 60 degrees, and
without obstacles between remote control and remote sensor.
Notes:
Improper use of the battery may cause
overheating, explosion or ignition,
which can result in an injury or a fire.
Battery leakage may damage the
remote control.
Do not expose the remote control unit
to direct sunlight.
Do not recharge, disassemble, deform
or heat the battery.
Do not put the battery in fire or water.
Immediately replace the exhausted
battery.
Remove battery when the remote is not
in use for a long time.
To order a replacement remote
control, go to www.AccessHD.tv
Rev: 09/2009 AccessHD® 7” LCD Panel Television 4Getting Started
Follow these steps the first time you use this unit:
1. Retrieve the remote control from the
storage slot located on the back panel
behind the viewing stand.
2. Connect the PSU to the DC
jack on the TV and plug it into
a power socket.
3. Extend the antenna or connect an external antenna. You can also
remove the antenna and plug in an analog cable (in that case you can
skip Steps 5 and 6).
4. Turn the TV power on.
5. Press the Menu button and navigate the TV Setup Menu to the
Channel settings to start a channel scan.
6. Scan channels for 2 to 3 minutes, then navigate up and down through
the channels.
TV Setup Menu Settings
All buttons and controls are described on the board unless otherwise
specified.
After connection, press the Menu button to
enter the TV SETUP menu. Press the
button to move to the desired submenu and
select the setting to adjust. Press Menu to
select it.
Picture Settings
Picture Mode
Press the button to select Personal, Standard, Dynamic or Soft.
Contrast, Brightness, Sharpness, Tint, Color
Press the button to adjust the value.
Press the Menu button to return to the previous menu. Press the Menu
button again to exit the TV SETUP menu.
5 AccessHD® 7” LCD Panel Television Rev: 09/2009Audio Setting Sound Mode Press the button to select Personal, Standard, Movie or Music. Treble, Bass, Balance Press the button to adjust the value. Audio Language Press the button to select English, French or Spanish. Press the Menu button to return to the previous menu. Press the Menu button again to exit the TV SETUP menu. Time Settings OSD Duration Press the button to set the desired time the menu will be displayed on the screen. Sleep Timer Press the button to select On or Off. Time Zone Press the button to select Eastern, Central, Mountain, Pacific, Alaska or Hawaii. Daylight Saving Time Press the button to select On or Off. Clock Clock displays the system time. Note: This item is only available under signal mode. Option Settings Menu Language Press the button to select English, French or Spanish. Color Mode Press the button to select Normal, Warm or Cool. Zoom Mode Press the button to select Normal or Wide. Rev: 09/2009 AccessHD® 7” LCD Panel Television 6
Closed Caption Press the button to enter the Closed Caption submenu. 1. CC Mode Press the button to select Off, On or CC on Mute. Press the Menu button to return to the previous menu. 2. Basic Selection Press the button to select CC1, CC2, CC3, CC4, Text1, Text2, Text3 or Text4. Press the Menu button to return to the previous menu. 3. Advanced Selection Press the button to select Service1, Service2, Service3, Service4, Service5 or Service6. Press the Menu button to return to the previous menu. Note: The item is only available under ATSC signal. Restore Setting Press the button to select Yes or No. Choose Yes and press the Menu button to restore default settings. Choose No and press the Menu button to cancel and return. Lock Settings This feature allows specific channels to be locked. It is a V-chip function and is not available on all models. The password can be any four-digit number between 0000 and 9998. 9999 is a super key. Once the password is set, press the Menu button to return to the previous menu. Channel Settings Antenna Press the button select CATV or Air. Auto Scan Press the button to enter the Auto Scan submenu. 1. Cable System Press the button to select Auto, Std, IRC or HRC. Note: This item is only available when Antenna is set to CATV. 7 AccessHD® 7” LCD Panel Television Rev: 09/2009
2. Start to Scan
Press the button to start the scanning. The unit will automatically
memorize the programs searched in sequence and tune the first searched
channel. During scanning, press the Menu button to cancel the scan and
exit.
Show/Hide
Press the button to enter the Show/Hide submenu. Press the
button to select the channel setting you want to change. Press the
button to select Show or Hide. Press the Menu button to exit the
submenu.
Channel No.
Press the button to select the channel number.
Channel Label
Press the button to enter the Channel Label submenu. Press the
button to highlight the label position and then press the button to
select the desired character or symbol for that position.
Press the Menu button to return to the previous menu.
Mounting Options
The TV can be mounted to the L-bracket included
with the unit or directly to a wall.
Use a square socket drive and three pan head wood
screws (recommended size #6,
maximum size #8) to attach the
L-bracket to the bottom surface of a
kitchen cabinet. Mount the unit to the
L-bracket.
Use a square socket drive to attach two
pan head wood screws (recommended
size #6, maximum size #8) directly to a
wall. Mount the unit to these screws.
An undercabinet apparatus is provided
with means for routing the
power-supply cord and with cord storage.
Rev: 09/2009 AccessHD® 7” LCD Panel Television 8Troubleshooting
Symptom: There is no sound.
Check that the system connections are correct.
Make sure the speakers are not muted.
In the TV mode, set the correct sound mode.
Symptom: There is no picture or the picture is unsteady.
Make sure the power adapter is correctly connected.
Check that connections with external AV signal sources are correct.
Check that settings in the Picture menu are correctly set.
Check that the video type input signal is corresponding to the unit.
Make sure the unit is turned on and in the correct video type.
Symptom: The remote control does not work.
Make sure there are no obstructions between the remote control and
the player.
Make sure the remote control is pointing at the player within defined
distance and angle ranges.
Make sure batteries are inserted and the polarity is correct.
Make sure batteries are not weak.
Other Notes:
Static or other external interference may cause the unit to behave
abnormally. If this occurs, unplug the power-supply cord from the outlet
and plug it in again to reset the player. If the problems persist, then
disconnect the power and consult a qualified technician.
Technical Specifications
Display: 7” TFT LCD
Resolution: 480X234
Size: 186x29x144 (WxDxH)
Power consumption:Limited Warranty & Service To Qualify for this Warranty The product must be purchased in the United States or Canada from a retailer authorized by AccessHD, LLC to sell this product. This warranty applies only to the first retail purchaser/ owner during the applicable warranty time period. Warranty Length: 90 days AccessHD, LLC will repair this product, free of charge in the USA or Canada in the event of defect in materials or workmanship as follows: AccessHD, LLC will provide replacement parts without charge for ninety (90) days from the date of original retail purchase. Certain parts are excluded from this warranty. AccessHD, LLC will provide the labor without charge for a period of ninety (90) days from the date of original purchase. A purchase receipt or other proof of original retail purchase is required together with the product to obtain service under this warranty. This warranty is void if serial numbers are altered, replaced, or missing. To locate your nearest authorized service center, warranty and parts, or for general customer service, please call 1-919-585-6435. What Access HD Will Repair or Replace under Warranty: Access HD will repair or replace, at its option, any part that is proven to be defective in material or workmanship under normal use during the applicable warranty time period subject to the exclusions stated herein. This warranty is void if the owner fails to follow the prescribed maintenance, installation and operating procedures described in this manual. Access HD has the right to recover warranty administration costs from the owner if the root cause of the malfunction was found to be other than defective material or workmanship. In particular, this warranty does not cover: damage caused by not following the prescribed warnings and operating practices; physical damage due to shipping or handling or storage. Anything replaced under warranty becomes the property of Access HD. Parts replaced under warranty will be considered as part of the original product and any warranty on those parts will expire coincident with the original product warranty. EXCLUSIONS: THIS WARRANTY DOES NOT EXTEND TO PARTS AFFECTED OR DAMAGED BY ACCIDENT AND/OR COLLISION, DAMAGE DURING SHIPPING, FLOOD, FIRE, LIGHTING OR OTHER ACTS OF GOD, NORMAL WEAR, USE IN AN APPLICATION FOR WHICH THE PRODUCT WAS NOT DESIGNED OR ANY OTHER MISUSE, NEGLECT, INCORPORATION OR USE OF UNSUITABLE ATTACHMENTS OR PARTS, UNAUTHORIZED ALTERATION, OR ANY CAUSES OTHER THAN DEFECTS IN MATERIAL OR WORKMANSHIP OF THE PRODUCT. NOTE: BATTERIES ARE EXCLUDED FROM THIS WARRANTY. DISCLAIMER OF CONSEQUENTIAL DAMAGE AND LIMITATION OF IMPLIED WARRANTIES: ACCESS HD / ACCESSHD, LLC DISCLAIMS ANY RESPONSIBILITY FOR LOSS OF TIME OR USE OF THE PRODUCT, TRANSPORTATION, COMMERCIAL LOSS, OR ANY OTHER INCIDENTAL OR CONSEQUENTIAL DAMAGE. ANY IMPLIED WARRANTIES ARE LIMITED TO THE DURATION OF THIS WRITTEN LIMITED WARRANTY. AccessHD, LLC 7868 US Hwy 70, Suite C, Clayton, NC 27520 1-919-585-6435 www.AccessHD.tv Rev: 09/2009 AccessHD® 7” LCD Panel Television 10
You can also read