A Concise Guide to Your New Model Year 2023 Volvo - With Google built-in and more
←
→
Page content transcription
If your browser does not render page correctly, please read the page content below
A Concise Guide to
Your New Model Year
     2023 Volvo
   With Google built-in and more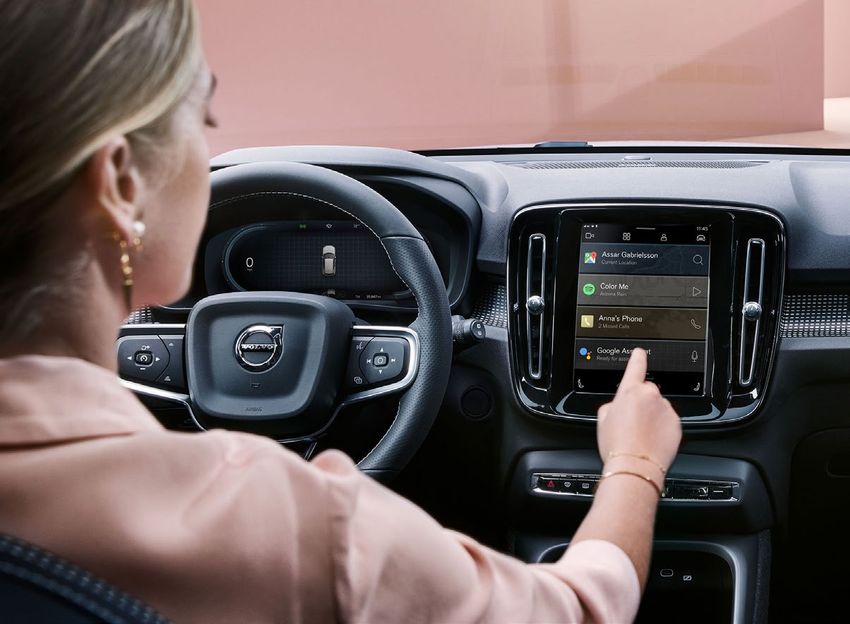
Table of Contents
      Click on any topic to jump to that page; use the Home icon
              on the lower left of each page to return here

Key Google Services                                                 3

Interacting with the Infotainment System
with Google built-in                                                4

Driver Profile Setup                                                5

Basic Navigation: Center Display                                   8

Pairing Your Car with the Volvo Cars App                           11

Adding, Changing, and Deleting Profiles in the Car                 15

Pairing and Deleting Keys                                          18

Screen Lock                                                        19

Hands-Free, Foot-Activated Tailgate                                20

Charging a Twin Engine Plug-In Hybrid                              21

One-Pedal Drive                                                    22

Recharge Plug-In Hybrid Drive Modes                                23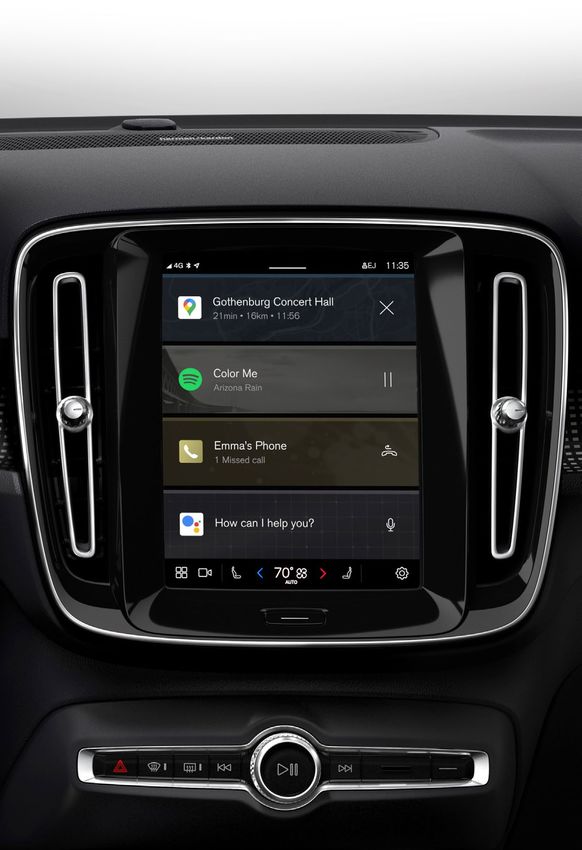
Key Google Services

                   Google Assistant
                   Allows driver to control in-car functions and much
                   more by voice.

                   Google Maps
                   Helps keep drivers up to date with real-time data,
                   alternative routes and charging stations.

                   Google Play
                   Allows drivers to easily download apps and have them
                   appear within the car center touchscreen.

An Active Google Account Will Enable Access to Key Features
Signing into your own Google account provides a personalized experience,
such as directions to work or home, saved Google Maps destinations,
and Google Map search history. This makes trip planning very easy.
The system will still function without being signed in with Google.
We recommend you set up a Google account, if you don’t already have
one. You can do that here.

Google, Google Play, and Google Maps are trademarks of Google LLC. Google services
are included in the 4-year Digital Services package.

                                                                                     3
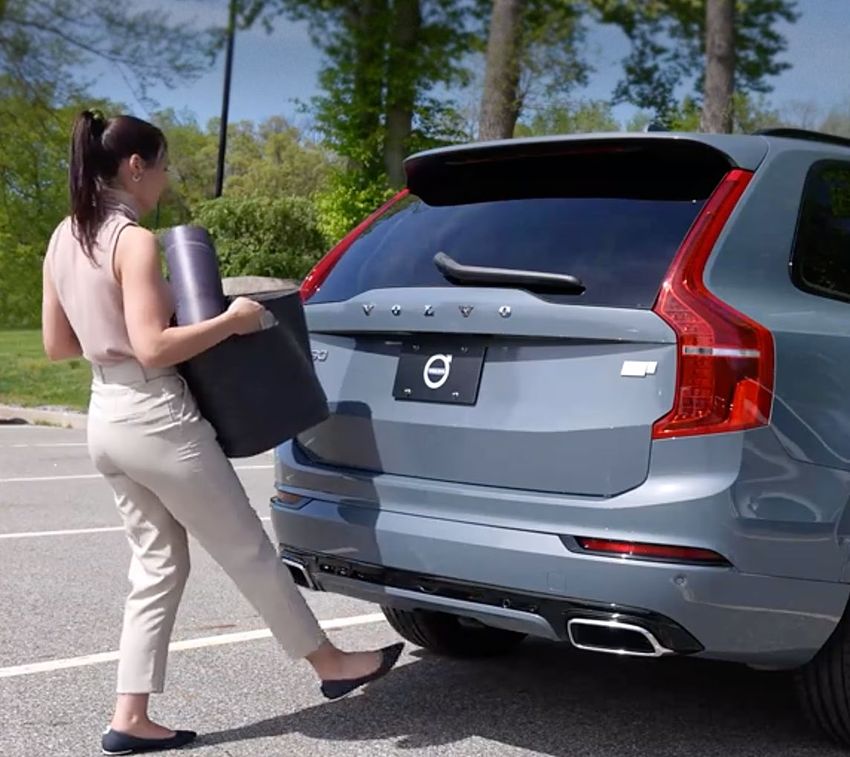
Interacting with the Infotainment System
            with Google built-in

Interacting with the new Infotainment system is easy and as familiar
as using your smartphone
• Google Assistant supports natural speech. Simply say “Hey Google”
  or “OK Google” and state your command – anything from navigation
  to most things that can be answered by the internet.
• Google can also control some in-car features, such as climate settings,
  heated seats and steering wheel.
• Our new navigation system, Google Maps, is based on the Google
  Maps app for smartphones, now adapted for in-car usage. Maps
  are always up to date and cached in the car while driving. The route
  to your destination is pre-cached in case of limited connectivity, and
  the system will assist you with Real Time Traffic Information, automatic
  rerouting, and voice control. When logged in with your Google account,
  saved favorites such as home, work, and recent destinations are shared
  between smartphone and car.

                                                                            4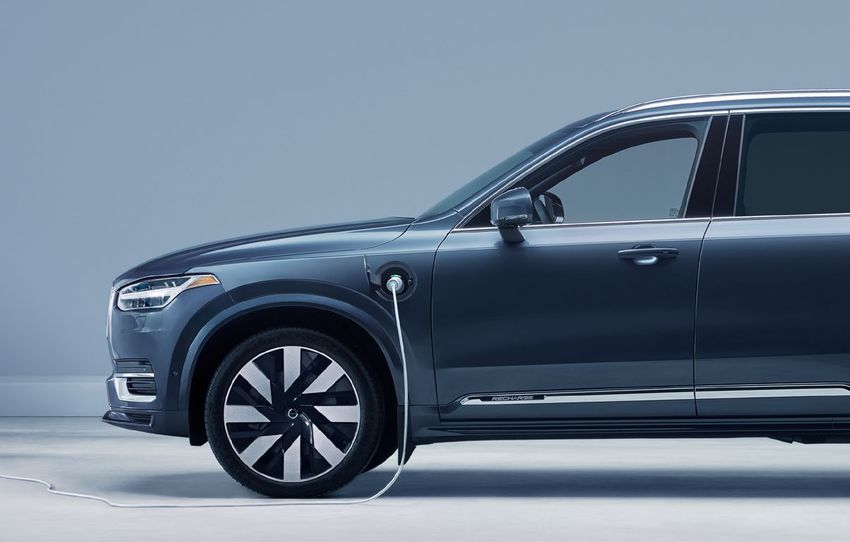
Driver Profile Setup
Completing the Driver Profile is the first step in customizing the
car settings to set you up for a more intuitive driving experience.
We recommend each driver create their own profile in the car.
Before you can set up Driver Profiles, you will need both your Volvo ID
and your Google account login.
If you don’t yet have a Volvo ID, your Volvo Retailer Sales Consultant can
help you to create it, or you can do it yourself by downloading the Volvo
Cars app with which you can create a Volvo ID login and password.
You also can do it by clicking here and following the steps.

1. Link Volvo ID

                                      On the center display, click on
 A                                    Settings (the trackwheel at the
                                      bottom right corner of the screen).

        Profiles
 B                                    Once in Settings, select Profiles.
        Accounts, privacy

                                      Once in Profiles, select
 C      Complete Profile Setup
                                      Complete Profile Setup.

 D      Follow prompts to set up Volvo ID and complete step one.

                                                                           5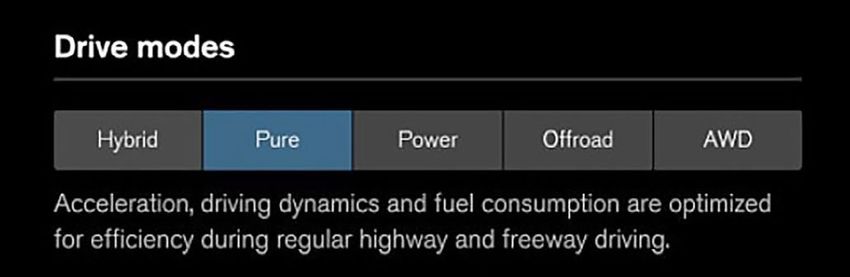
Driver Profile Setup (continued)

2. Pair Phone

                                               Make sure to have your mobile
 A                                             device with you in the car and
                                               ensure that Bluetooth is enabled.

                              Next
                                               The Pair Phone screen should
 B                                             appear on the center display;
                                               select Next.
                Pair phone

           Available devices
                                              Available devices will appear.
 C                                            Select your device on the
               iPhone                         center display.

         Make sure the code displayed in the vehicle matches the one
         displayed on your phone and confirm.
         Once pairing is completed, go to the phone’s Bluetooth settings*
 D
         • Press (i) by your car’s model name
         • Enable Show Notifications and Sync Contacts for access
           to text messages and phone contacts in the car.

*iPhone user only, no action needed for Android users.

                                                                                   6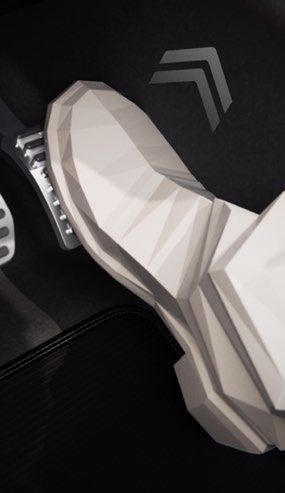
Driver Profile Setup (continued)

3. Google Sign-In

                               Accept        On the center display, accept
 A      Automatic software download
                                             automatic software download
                                             to enable over the air updates.
        Keep your vehicle up to date.

                               Accept
                                             Review and accept Google
 B                                           terms and conditions.
               Google Services

        Follow prompts to sign in and view tutorials, turn
 C      on personal results and select Google Play apps,
        then your profile is complete!

A short tutorial on Google Assistant is available here, and you are able
to turn on personal results for access to your calendar and contacts.
A short tutorial on Drive Profile Setup is available here.

Google Assistant, Google Play and Google Maps are trademarks of Google LLC.

                                                                                7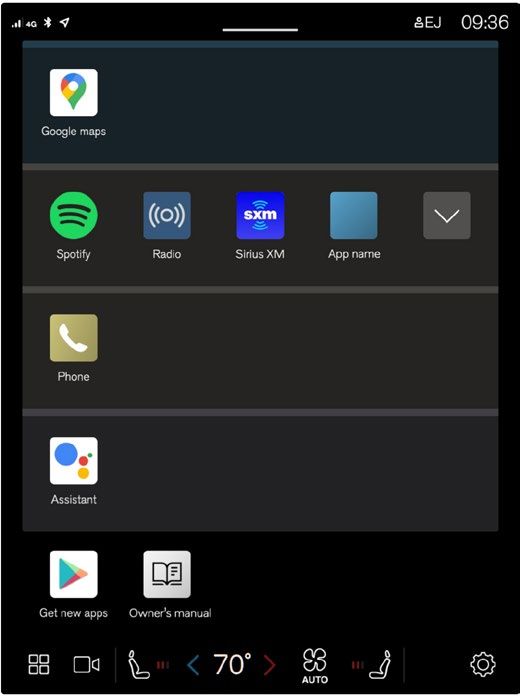
Basic Navigation: Center Display

                                        Home View
                                        Home view is displayed
                                        when the screen is activated.
                                        It consists of four tiles.
                                        You can choose which apps
                                        will be shown in Home view tiles.
                                        An app that is selected from App
                                        view starts in the respective tile
                                        in Home view.
                                        The tiles are dynamic and show
                                        the last-used apps, such as
                                        navigation, media, phone, etc.
                                        Tap an app to expand it or swipe
                                        from the left in the tile to view
                                        additional apps.
                                        Note, when the vehicle is moving:
                                        • Certain applications (e.g.
                                          the Owner’s Manual) may
                                          be deactivated.
                                        • Certain messages
                                          (e.g. those generated
                                          by apps) will be shortened.

Status Bar
Current vehicle activities are shown at the top of the screen
in the status bar: information such as active user profile,
network and Bluetooth connection status, and the clock.

                                                                        8
Basic Navigation: Center Display (continued)
Notifications View
Pull the tab down to access Notifications view, which shows missed
calls, vehicle information, and provides access to User Profiles. To leave,
tap outside of Notifications, press the Home button, or swipe upwards.
User Profiles
To access User Profiles, swipe
down on the Home Screen to
reach notifications.
Select (tap) the profile in use
(upper left corner).
Only the profile that is signed-in
will appear. A new car will default
to the name “Owner” as the primary
and only profile.
On the Profiles screen you can
update or delete an existing profile,
or add a new one.
Many driver personal preference
settings can be saved in different
user profiles, including screens,
mirrors, front seat, navigation,
audio and media system,
language and voice control.
9Basic Navigation: Center Display (continued)
Climate View
Buttons for App view, Camera view, Settings view, and the most common
climate settings are at the bottom of the center display. Tap the blue or
red arrow to adjust the temperature when left and right side temperature
is synchronized. Tap the temperature button to open Climate view and
additional settings options. Tap the Home button to close Climate view.
App View
App view provides access to the vehicle’s preinstalled
and downloaded apps. From App view, you can download
and install additional apps and access the Owner’s Manual.
Tap an app to open it in full-screen mode.
Camera View
Camera view starts automatically when gear selector
position R is used. It shows the Park Assist Cameras,
and separate views for each of the four cameras:
rear, front, left and right.
Camera view closes automatically when the vehicle
reaches a certain speed or can be closed manually
by tapping or the Home button.
Settings View
Selecting Settings view allows you to make changes that
include system units of measurement, system language,
door lock and unlock settings, and resetting user data.
10Pairing Your Car with the Volvo Cars App
The Volvo Cars app pairing process is completed in the car. Please
make sure you are signed into your driver profile in the car and have
all car keys with you. Don’t have a driver profile yet? Please follow
the instructions on page 5.
1. Download the Volvo Cars app and Sign In
Download the Volvo Cars app by
visiting the appropriate app store.
A Available for iOS 8 or higher and
Android 4.0 or higher.
Sign In Next, create your Volvo ID. If you
B already created your Volvo ID, go
Create Volvo ID directly to Sign In.
Position your Volvo in an open area
with network coverage to both your
C phone and your car. You are now ready
to pair the app to the car.
11Pairing Your Car with the Volvo Cars app (continued)
The Volvo Cars app pairing process is completed in the vehicle.
2. Within Car: Share Car Data
On the center display, click on
A Settings (the trackwheel at the
bottom right corner of the screen).
Profiles
B Once in Settings, select Profiles.
Accounts, privacy
Privacy
C Volvo privacy settings
Select Volvo Privacy Settings.
Privacy Settings
Volvo Cars app Select Volvo Cars app and
D make sure it is turned On.
On
12Pairing Your Car with the Volvo Cars app (continued)
The Volvo Cars app pairing process is completed in the vehicle.
3. Within Car: Pairing app Part 1
On the center display, click on
A Settings (the trackwheel at the
bottom right corner of the screen).
Profiles
B Once in Settings, select Profiles.
Accounts, privacy
Profile Details
C Volvo On Call devices
Select Volvo On Call devices.
Volvo on Call devices
D Click Pair phone.
Pair phone
13Pairing Your Car with the Volvo Cars app (continued)
The Volvo Cars app pairing process is completed in the vehicle.
4. Within Car: Pairing App Part 2
Open app while sitting in your
A Add your car vehicle. If you are new to the Volvo
Cars app, press Add your car.
Enter the full VIN found on the
center display into the mobile app.
B VIN-number
Follow the steps on the screen to
complete pairing.
Press Next on the center touch-
screen. Verify the numbers on
C screen match the numbers in the
Volvo Cars app. Pairing complete.
A short tutorial on Volvo Cars app pairing is available here.
14Adding, Changing, and Deleting
Profiles in the Car
To add, change or delete a Driver Profile, please follow the steps below.
Access Profiles & Change
12:00
To start, swipe down on the
A line that is located at the top
of the car’s center display.
Select the profile in use.
The only profile that is signed
B Owner in will appear. A new car will
default to the name “Owner”
as the primary and only profile.
Profile 1
Now you are in the list of
profiles. To change between
C Profile 2
profiles, simply select the
profile you would like to use.
New Profile
15Adding, Changing, and Deleting Profiles in the Car (continued)
Add Profile
Profile 1
Once in List of profiles,
C Profile 2
select New Profile.
New Profile
Next
C Welcome to Volvo Press Next to default to English.
Choose language
English (United States)
Next
Press Next to link your
C Volvo ID and follow prompts.
Set up Volvo ID
16Adding, Changing, and Deleting Profiles in the Car (continued)
Delete Profile
Log into the profile you want to delete.
A By deleting a profile, all settings associated
with that profile will be deleted.
On the center display, click on
B Settings (the trackwheel at the
bottom right corner of the screen).
Profiles
C Once in Settings, select Profiles.
Accounts, privacy
Scroll all the way down
D and click Delete this profile.
Then click Confirm.
Delete this profile
17Pairing and Deleting Keys
Pairing your key fob into your driver profile will ensure that your
personal settings for seat, climate, audio, and navigation will auto-
matically adjust each time you enter the car with the paired fob.
Follow these easy steps on the center touchscreen to pair or remove
a key fob in your profile.
Access Profiles
Make sure you’re logged into the
profile you want to disconnect the
A key from. On the center display,
click on Settings.
Profiles
B Once in Settings, select Profiles.
Accounts, privacy
PAIR Key OR REMOVE Key
Profile Details Profile Details
Connect Key to Profile Connect Key to Profile
C
Select Connect Key to Select Connected Key
Profile. If you have more
than one key, place the key
C
you would like to connect
Disconnect key from profile
with your profile in the front
cupholder. The key with you No Yes
in the vehicle will pair to the
Profile, and the name will D A pop-up will appear
be shown on screen.
asking you to disconnect
key from profile. Confirm
Yes.
Profile Details
Connect Key Key 1
D
See the key’s name
on the screen; pairing
is completed.
18Screen Lock
With your Driver Profile set up, you can easily lock the screen when
someone outside your household will be driving your car (e.g. a valet).
This protects your personal information, past destinations, and apps.
Access Screen Lock
On the center display, click on
A Settings (the trackwheel at the
bottom right corner of the screen).
Profiles
B Once in Settings, select Profiles.
Accounts, privacy
Profile Details Select Screen Lock. Continue
C Screen Lock
to steps below to either Activate
or Remove a screen lock.
PAIR Key OR REMOVE Key
Choose a lock type Choose a lock type
Pattern None
D
PIN Enter your PIN or Pattern
D to unlock. Select None to
Select the type of screen
lock you prefer, PIN or disable screen lock.
Pattern. Enter your PIN or
Pattern and Confirm.
19Hands-Free, Foot-Activated Tailgate
Both hands full? You can open or close the tailgate with a single foot
kick movement under the rear bumper.
Pro tip: Aim for the center left parking sensor or the first “V” of the
“Volvo” lettering for best results.
The ‘kick’ should be smooth during the inward and outward motion –
no waving or holding your foot in place as this won’t activate the sensor
to open /close the tailgate.
Immediately after the kick, take a step back to ensure that the tailgate
will open or close.
A short tutorial on the foot-activated tailgate is available here.
20Charging a Recharge Plug-In Hybrid
Recharge Plug-In Hybrid
Volvo Twin Engine Plug-in Hybrid vehicles feature the “Three Layer”
18.8 kWh high-voltage battery. That means you can do longer fully
electric journeys with zero tailpipe emissions on a single charge.
The Charging Cable
The standard dual-voltage (110V & 220V) charging cable has two
connectors – one side plugs into the vehicle using an industry-standard
J1772 connector. The other connector has a special adaptor that allows
it to plug into either a 110V or a 220V wall outlet.
Using a 110V outlet, you can expect to charge the battery in 10 to 15 hours.
Using a 220V outlet or a commercial charging station, you can charge
the battery in 5 to 8 hours.
Two-Step Regenerative Braking System
The regenerative braking system recovers and transmits energy back
into the high-voltage battery, either to recharge it or for immediate use.
You can press the “Hold” button on the center display to keep the current
battery charge for later use, or the “Charge” button for the gasoline
engine to charge the battery up to 90 percent.
21One-Pedal Drive
In Recharge Plug-In Hybrid vehicles, one pedal
drive gives you intuitive, seamless control of
the car’s acceleration and braking just by using
the accelerator pedal. Press the pedal for instant
acceleration, and release it to instantly reduce
speed or to brake the car to standstill (on Recharge
with Google built-in). This adds to more relaxed
driving, more fun, and an enhanced feeling of
control – especially in stop-and-go city traffic.
Brake energy regeneration also adds to a longer
range – every time you release the pedal, electric
energy is generated and fed back to the car’s
battery. The level of regenerative brake force
is determined by moving the shifter between “D” mode and “B” mode.
In “B” mode the car has a high level of brake energy regeneration,
and it activates one pedal drive. One pedal drive can also be controlled
via Google Assistant. In “D” mode one pedal drive is turned off, and
it provides a lower level of energy regeneration. When driving in one
pedal drive you can activate “Creep” mode –“Creep On” to allow you
to continue driving at low speeds without the car coming to a complete
stop, such as in precision parking situations. “Creep” mode can easily
be turned on or off via the settings menu in the center display or
simply by using a voice command with the help of Google Assistant:
“Hey Google, turn on/off creep mode.”
22Recharge Plug-In Hybrid Drive Modes
The drive mode settings in our Plug-In Hybrid are different from those
in our gasoline engine cars. The drive mode settings allow the driver
to choose different settings for the engine via the center display.
Hybrid Mode (Default) utilizes the electric motor and gasoline
engine, either individually or in parallel. Their operation is optimized
for performance, fuel consumption, and comfort. The engine
and automatic gearbox are programmed for maximum comfort.
This is the default mode when the engine is started.
Pure Electric Mode prioritizes electric operation and low energy
consumption. It helps to maximize driving on the hybrid battery.
The dynamic performance is reduced, and air-conditioning is partly
disengaged but can be activated manually. This mode sets a maximum
speed of 87 mph using only electric propulsion. (When Hybrid Mode is
active, the car’s maximum speed is 78 mph on electric propulsion only.)
Power Mode combines the gasoline engine and the electric motor
to ensure the strongest performance, sporty characteristics, and
quick response.
Launching from a stop, this mode takes advantage of the electric motor’s
instant maximum torque while the combustion engine gets up to speed.
eAWD (All-Wheel Drive) Mode provides constant all-wheel drive
on demand. Used primarily at low speeds and in slippery conditions,
it activates all-wheel drive to improve traction. You can select this
mode when needed, or choose to save energy for later. There is always
enough power to use AWD mode, even when the battery is depleted.
Off-Road Mode (XC90 & XC60 only) can be set at speeds below
approximately 12 mph to maximize traction and control on poor
roads. Above 25 mph Off-Road mode is disconnected and will not
be connected automatically again, even if speed is reduced. In this
mode, Hill Descent Control is automatically activated, steering is set
to comfort mode, the Electronic Stability Control is set to Traction/
Sport, and the Stop/Start function is deactivated.
2324
You can also read