Alpha 200i with Training - Owner's Manual - Garmin ...
←
→
Page content transcription
If your browser does not render page correctly, please read the page content below
Alpha 200i with Training
     ®

         Owner’s Manual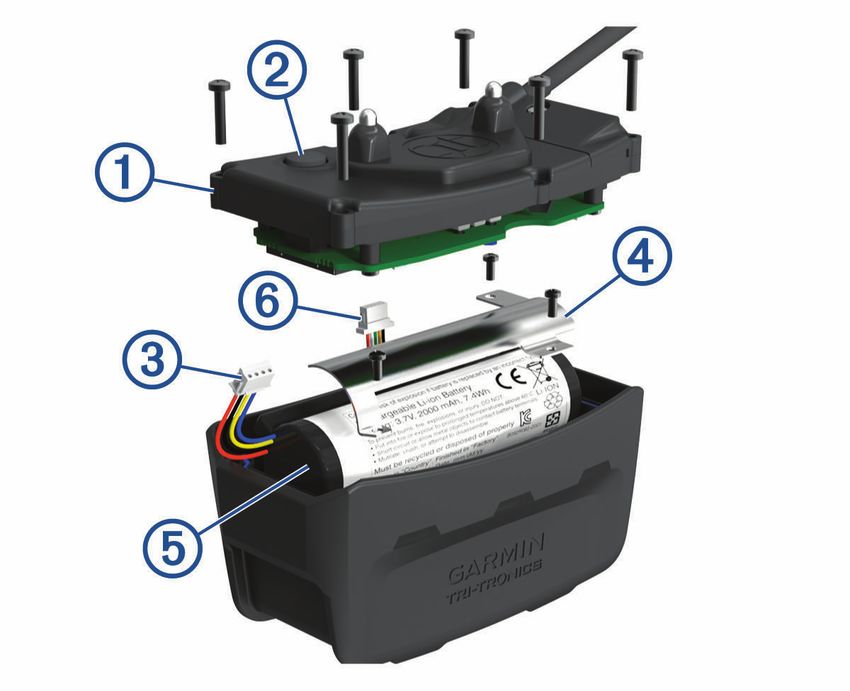
© 2020 Garmin Ltd. or its subsidiaries
All rights reserved. Under the copyright laws, this manual may not be copied, in whole or in part, without the written consent of Garmin. Garmin reserves the right to change or
improve its products and to make changes in the content of this manual without obligation to notify any person or organization of such changes or improvements. Go to
www.garmin.com for current updates and supplemental information concerning the use of this product.
Garmin , the Garmin logo, Alpha , ANT , ANT+ , City Navigator , inReach , and Xero are trademarks of Garmin Ltd. or its subsidiaries, registered in the USA and other countries.
         ®                      ®        ®     ®               ®         ®           ®

BaseCamp™, Garmin Explore™, Garmin Express™, Garmin HuntView™, MapShare™, tempe™, and TT™ are trademarks of Garmin Ltd. or its subsidiaries. Powered by Garmin IERCC.
                                                                                                                                                                              ®

These trademarks may not be used without the express permission of Garmin.
Apple and Mac are trademarks of Apple Inc., registered in the U.S. and other countries. The BLUETOOTH word mark and logos are owned by the Bluetooth SIG, Inc. and any use
     ®         ®                                                                                            ®

of such marks by Garmin is under license. Iridium is a registered trademark of Iridium Satellite LLC. microSD and the microSDHC logo are trademarks of SD-3C, LLC. Wi‑Fi is a
                                                   ®                                                            ®                                                                 ®

registered mark of Wi-Fi Alliance Corporation. Windows is a registered trademark of Microsoft Corporation in the United States and other countries. Other trademarks and trade
                                                        ®

names are those of their respective owners.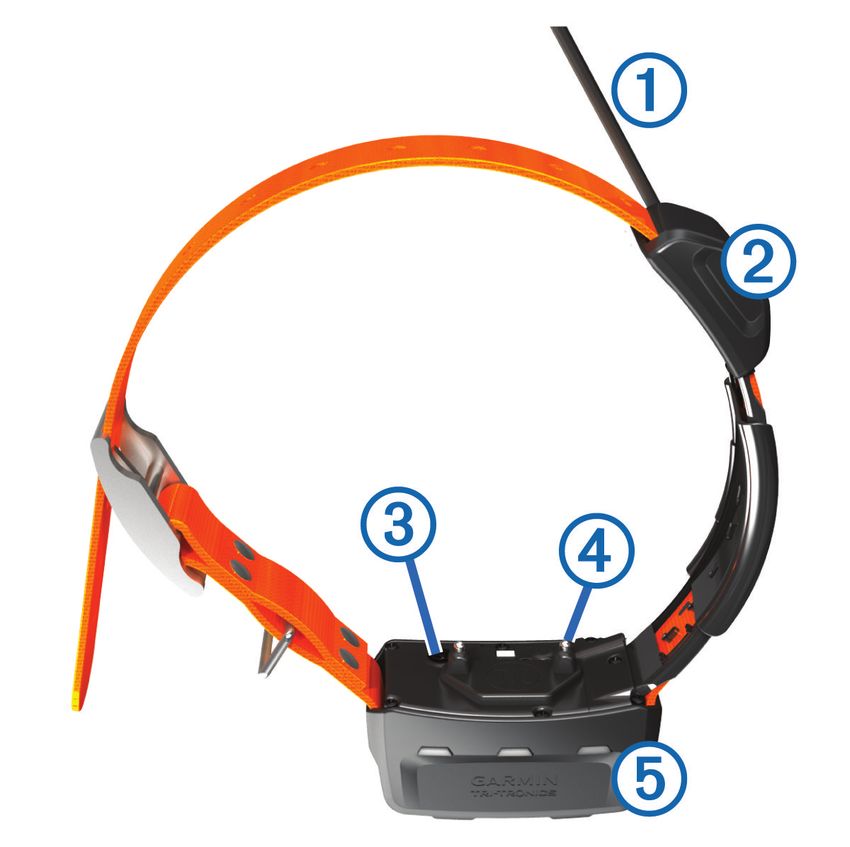
Table of Contents                                          Dog Tracking Compass........................ 14
                                                                          Navigating to Your Dog......................... 14
Getting Started................................. 1                        Changing the Length of the Dog's
                                                                          Track...................................................... 14
      Setting Up the Alpha System.................. 1                     Location Alerts...................................... 14
      Device Overviews.................................... 2                Setting Location Alerts..................... 15
         Alpha Handheld Device....................... 2                     Editing Location Alerts...................... 15
         Dog Collar Device................................ 4              Disabling Dog Data Broadcast............. 15
      Installing the Battery Pack...................... 5
      Charging the Handheld Device............... 5                   Dog Training................................... 15
      Charging the Dog Collar Device.............. 6
                                                                          Selecting and Installing the Contact
      Turning On the Device............................. 6                Points..................................................... 16
         Turning Off the Device........................ 6                   Removing the Contact Points........... 16
      Selecting a Language.............................. 6                Training Methods.................................. 16
      Using the Touchscreen........................... 6                    Linear and Traditional Stimulation... 16
      Using the Status Page............................. 7                  Choosing the Correct Intensity
      Acquiring Satellite Signals...................... 7                   Level................................................... 16
      Iridium® Satellite Network..................... 7                   Customizing the Training Keys............ 17
                                                                          Using the Hard Keys for Training
Activating the Device........................ 7                           Adjustments.......................................... 17
                                                                          Default Training Settings...................... 17
Dog Collar Device Setup................... 8                              Collar Training....................................... 18
      Methods to Add a Dog Collar Device to a
      Handheld Device..................................... 8          inReach Features............................ 18
         Adding a Dog to the Alpha Handheld                               Messages.............................................. 18
         Using Wireless Pairing........................ 8
                                                                            Sending a Preset Message............... 18
         Sharing a Dog Wirelessly.................... 9
                                                                            Sending a Text Message.................. 19
         Adding a Dog Using the Track and
                                                                            Replying to a Message...................... 19
         Control Codes...................................... 9
                                                                            Checking for Messages.................... 19
         VHF Radio Information....................... 9
                                                                            Viewing Message Details..................19
      Managing a Group................................. 10
                                                                            Navigating to a Message Location.. 19
      Editing Dog Information........................ 10
                                                                            Including Location Coordinates in a
         Resetting a Dog's Statistics and
                                                                            Message............................................ 20
         Track.................................................. 10
                                                                            Deleting Messages............................ 20
         Changing the Dog Name................... 10
                                                                            Messages Settings............................ 20
         Changing the Color of the Dog's
         Track.................................................. 10       Tracking................................................. 20
         Changing the Dog Type..................... 10                      Starting Tracking............................... 20
         Changing the Dog ID......................... 11                    Stopping Tracking............................. 20
         Removing a Dog................................ 11                  Sharing Your MapShare Web Page.. 20
      Fitting the Collar on Your Dog.............. 11                       inReach Tracking Settings................ 20
      Communication with the Collar............ 12                        SOS.........................................................21
      Entering Sleep Mode............................. 12                   Initiating an SOS Rescue................... 21
         Exiting Sleep Mode............................ 12                  Sending a Custom SOS Message.... 21
                                                                            Canceling an SOS Request............... 22
Dog Tracking.................................. 12                         Weather.................................................. 22
                                                                            Requesting an inReach Weather
      Tracking Your Dog on the Map............ 13
                                                                            Forecast............................................. 22
      Dog Status Icons................................... 13

Table of Contents                                                                                                                      i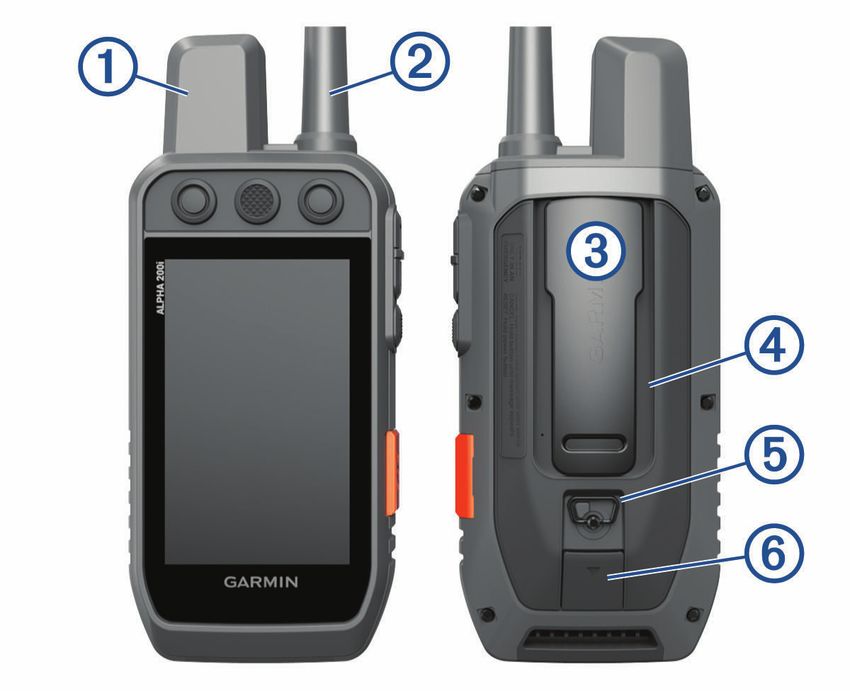
Testing the Device.......................... 23                              Creating a Route................................ 29
                                                                             Editing the Name of a Route............. 29
Connected Features....................... 23                                 Navigating a Saved Route................. 29
     Pairing a Smartphone with Your                                          Editing a Route.................................. 29
     Device.................................................... 23           Reversing a Route............................. 29
     Connecting to a Wireless Network.......23                               Viewing the Active Route.................. 29
     Garmin Explore...................................... 23                 Deleting a Route................................ 29
                                                                           Recordings............................................. 29
Syncing inReach Data..................... 24                                 Recording Track Logs....................... 30
                                                                             Viewing Details about the Track.......30
Contact Tracking............................ 24                              Viewing the Elevation Plot of a
     Turning On and Off the Transmitter..... 24                              Track.................................................. 30
     Methods to Add a Contact to a Handheld                                  Navigating to the Start of a Track.... 30
     Device.................................................... 24           Changing the Track Color................. 30
     Adding a Contact Using Wireless                                         Saving the Current Track.................. 30
     Pairing.................................................... 24          Clearing the Current Track................ 30
     Adding a Contact Using a Contact ID.. 25                                Deleting a Track.................................30
     Initiating an Emergency Alert............... 25
     Sending a Message to Your                                        Navigation...................................... 31
     Contacts................................................ 25           Map........................................................ 31
     Tracking a Contact................................ 25                 Measuring Distance on the Map.......... 31
     Finding Your Contact ID........................ 25                    Compass................................................ 31
     Changing Your Contact ID.................... 25                         Calibrating the Compass.................. 31
     Updating a Contact ID........................... 26                     Navigating with the Bearing
                                                                             Pointer................................................ 31
Hunting with the Alpha System....... 26                                    Where To? Menu................................... 31
     Marking Your Truck Location............... 26                           Finding a Waypoint by Name............ 31
     Marking a Covey.................................... 26                Navigating with Sight 'N Go.................. 32
     Active Hunt Metrics.............................. 26                  Elevation Plot.........................................32
     Turning On the Collar Light................... 26                       Calibrating the Barometric
     Turning On Rescue Mode..................... 27                          Altimeter............................................ 32
     Pausing Dog Tracking........................... 27                      Navigating to a Point on the Plot..... 32
                                                                             Changing the Plot Type..................... 32
Waypoints, Routes, and Tracks....... 27                                      Resetting the Elevation Plot..............32
     Waypoints.............................................. 27            Trip Computer....................................... 32
       Marking Your Current Location........ 27                              Customizing the Trip Computer Data
       Marking a Waypoint Using the                                          Fields.................................................. 32
       Map.................................................... 27            Resetting the Trip Computer............ 32
       Editing a Waypoint............................ 27
       Repositioning a Waypoint to Your                               Applications................................... 33
       Current Location................................ 28                 Setting a Proximity Alarm..................... 33
       Moving a Waypoint on the Map........ 28                             Calculating the Size of an Area............ 33
       Increasing the Accuracy of a Waypoint                               Setting an Alarm.................................... 33
       Location............................................. 28            Using the Competition Timer............... 33
       Projecting a Waypoint....................... 28                     Satellite Page........................................ 33
       Deleting a Waypoint.......................... 28                      Changing the Satellite View.............. 33
     Routes.................................................... 28           Turning Off GPS................................. 33

ii                                                                                                                     Table of Contents
Simulating a Location....................... 34 Transferring Dog Tracks to
Downloading BirdsEye Imagery........... 34 BaseCamp™....................................... 43
Deleting Files..................................... 43
Customizing Your Device................ 34 Disconnecting the USB Cable........... 43
Customizing the Main Menu................ 34 Resetting Data and Settings............. 43
Customizing the Data Fields................ 34
System Settings.................................... 35 Appendix........................................ 44
Display Settings.....................................35 Accessories and Replacement Parts... 44
Accessibility Settings........................ 35 Purchasing Accessories................... 44
Setting the Device Tones...................... 35 tempe................................................. 44
Setting Dog Alerts............................. 35 Tips for Pairing ANT+ Accessories
Map Settings......................................... 35 with Your Garmin Device...................44
Tracked Devices Map Settings......... 36 Dog Collar Device Battery
Advanced Map Settings.................... 36 Replacement Instructions................. 45
Tracks Settings..................................... 36 Replacing the Mini Dog Collar Device
Auto Save Settings............................ 36 Battery................................................ 47
Routing Settings.................................... 37 Replacing the Collar Strap................ 47
Sensors Settings................................... 37 Replacing the VHF Antenna in the Dog
Changing the Units of Measure............ 37 Collar Device...................................... 48
Position Format Settings...................... 37 Changing the Fuse in the Vehicle
Power Cable....................................... 49
Device Information......................... 37 Data Field Options................................. 50
Viewing E-label Regulatory and Index.............................................. 53
Compliance Information....................... 37
Support and Updates............................ 38
Product Updates................................ 38
Device Care............................................ 38
Cleaning the Device........................... 38
Cleaning the Touchscreen................ 38
Specifications........................................ 39
Alpha Handheld Device
Specifications.................................... 39
Dog Collar Device Specifications..... 39
Mini Dog Collar Device
Specifications.................................... 40
Battery Information............................... 40
Long-Term Storage........................... 40
Maximizing the Battery Life.............. 40
Saving Energy While Charging the
Device.................................................... 41
Data Management................................ 41
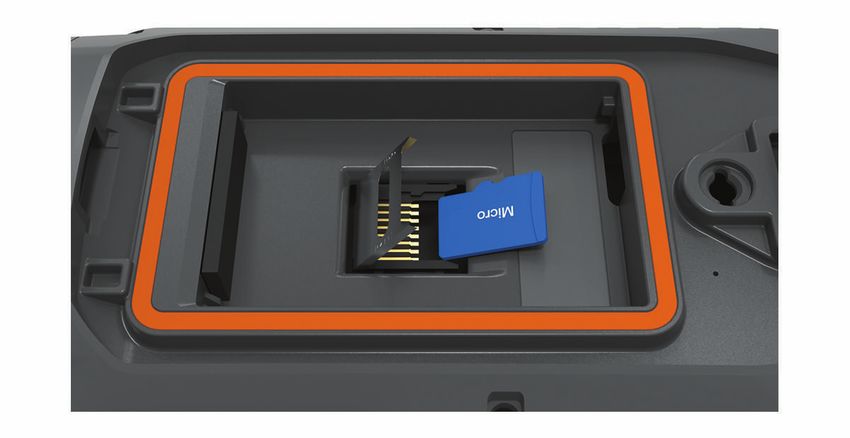
Installing a Memory Card.................. 42
Connecting the Handheld Device to a
Computer........................................... 42
Connecting the Collar to a
Computer........................................... 43
Table of Contents iii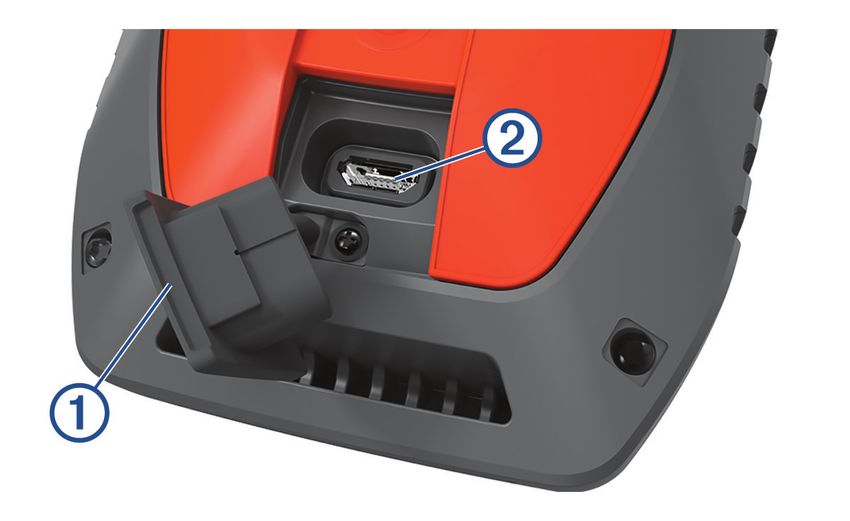
Getting Started
                                                    WARNING
See the Important Safety and Product Information guide in the product box for product warnings and other
important information.

Setting Up the Alpha System
Before you can use the Alpha system, you must set up the devices.
1 Charge the handheld device (Charging the Handheld Device, page 5).
2 Charge the dog collar device (Charging the Dog Collar Device, page 6).
3 Turn on the devices (Turning On the Device, page 6).
4 Select a language (Selecting a Language, page 6).
5 If necessary, pair the dog collar device with the handheld device (Methods to Add a Dog Collar Device to a
   Handheld Device, page 8).
6 If necessary, calibrate the compass on the handheld device (Calibrating the Compass, page 31).

Getting Started                                                                                                1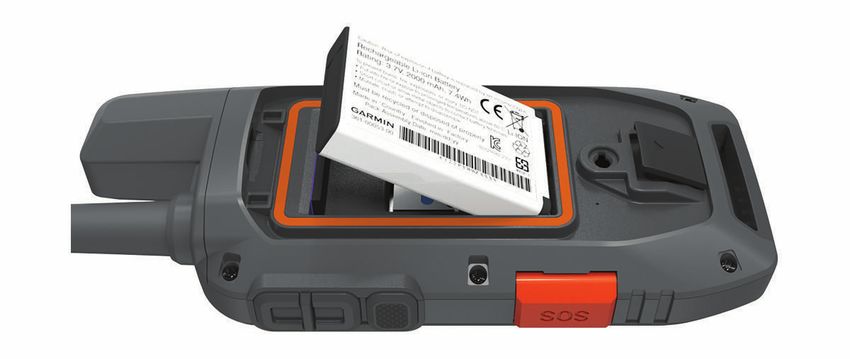
Device Overviews
Alpha Handheld Device
                                                   NOTICE
Avoid using a high-powered radio (greater than 5 W) in close proximity to the handheld device. It may cause
irreversible damage to the handheld device.

            Satellite antenna

            VHF radio antenna

            Mounting spine

            microSD memory card slot (under battery)
                     ®

            Battery cover D-ring

            Micro-USB port (under weather cap)

2                                                                                                  Getting Started
Alpha Device Keys

                  Power key

                  Customizable training keys

                  Training up

                  Training down

                  Training enter

                  SOS key (under protective cap)

Getting Started                                    3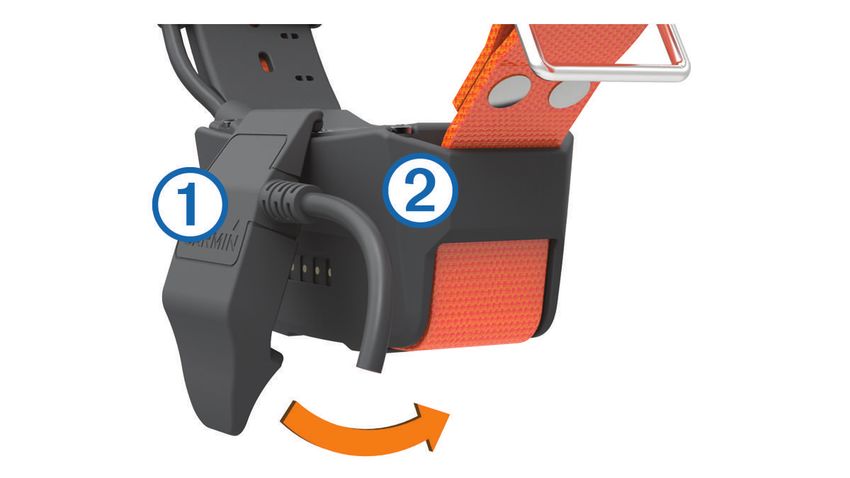
Dog Collar Device
NOTE: Your dog collar device may look different than the device pictured.
VHF antenna
GPS antenna
Power key
Contact points
Status LED and flashing beacon LEDs
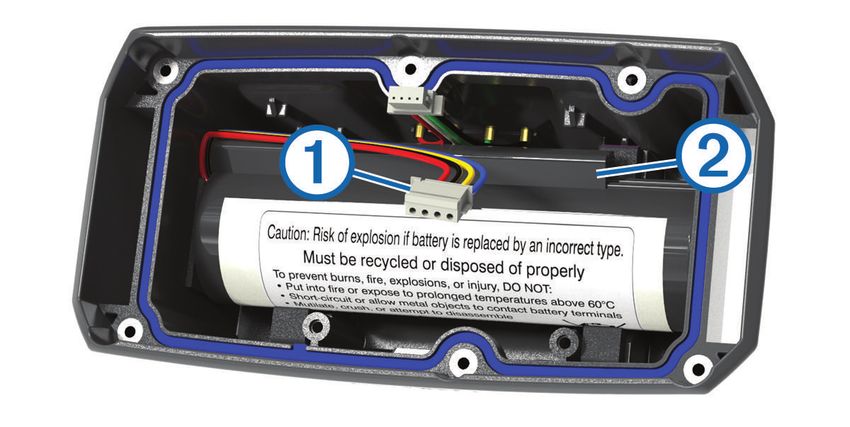
4 Getting StartedInstalling the Battery Pack
1 Turn the D-ring counter-clockwise, and pull up to remove the cover.
2 Locate the metal contacts on the end of the lithium-ion battery.
3 Insert the battery into the compartment, contacts first.
4 Press the battery into place.
5 Replace the battery cover, and turn the D-ring clockwise.
Charging the Handheld Device
NOTICE
To prevent corrosion, thoroughly dry the USB port, the weather cap, and the surrounding area before charging or
connecting to a computer.
NOTE: The device does not charge when it is outside the approved temperature range (Alpha Handheld Device
Specifications, page 39).
You should fully charge the battery before you use the device for the first time. Charging a fully depleted battery
takes about 4 hours.
1 Lift the weather cap .
2 Plug the small end of the power cable into the USB port on the device.
3 Plug the other end of the power cable into an appropriate power source.
The LCD display on the handheld device shows the current battery charge level.
Getting Started 5Charging the Dog Collar Device
NOTICE
To prevent corrosion, thoroughly dry the contacts on the collar and the surrounding area before connecting the
charging clip.
NOTE: Your dog collar device may look different than the device pictured.
You should fully charge the battery before you use the device for the first time. Charging a fully depleted battery
takes about five hours.
1 Snap the charging clip onto the device .
2 Plug the small end of the power cable into the mini-USB port on the charging clip cable.
3 Plug the power cable into a power source.
The status LED is solid red when the collar is charging.
4 After the status LED turns solid green, remove the charging clip from the collar.
Turning On the Device
• On the handheld device, press the power key.
• On the dog collar device, hold the power key until the status LED flashes and the collar beeps.
Turning Off the Device
• On the handheld device, hold the power key until the LCD screen turns off.
• On the dog collar device, hold the power key until the status LED turns red.
Selecting a Language
When you turn on your device for the first time, you will select the device language from a list of available
languages. You can change the language setting from the System settings.
1 From the main menu, select Setup > System > Language.
2 Select a language.
Using the Touchscreen
• Select to open a menu.
• Select to return to the home screen.
• Select to return to the previous page.
• If you are more than one menu away from the home screen, select and hold to return to the home screen.
• If scroll controls are enabled, select and to scroll (Accessibility Settings, page 35).
6 Getting StartedUsing the Status Page
The status page displays the time, your GPS signal strength, and the device battery life. It also allows you to
adjust settings and access shortcuts. You can open the status page from any other page by pressing the power
key.
Screen brightness: Adjusts the brightness of the screen.
Messages: Allows you to send inReach messages and view received messages.
®
Lock Screen: Locks the touchscreen to prevent inadvertent screen touches.
Lock Keys: Locks the device keys to prevent inadvertent key presses.
My ID: Displays your device ID and allows you to transmit your device information to a compatible handheld
device. You can also turn the transmitter on and off.
Alerts: Displays unread dog alerts.
Acquiring Satellite Signals
Both the collar and handheld device must acquire satellite signals before you put the collar on your dog.
Acquiring satellites can take a few minutes.
1 Go outdoors to an open area.
2 Turn on both devices (Turning On the Device, page 6).
in the status bar shows the GPS signal strength.
When the collar has acquired satellite signals, the status LED flashes a double-blink or triple-blink in green.
Iridium Satellite Network
®
Your device requires a clear view of the sky to transmit messages and track points over the Iridium satellite
network. Without a clear view of the sky, your device attempts to send the information until it acquires satellite
signals.
TIP: For the best connection with satellites, hold the device with the antenna pointed toward the sky.
Activating the Device
WARNING
Before you can use the inReach features of your Alpha 200i device, including messaging, SOS, tracking, and
inReach Weather, you must activate it.
1 From your computer or smartphone, go to explore.garmin.com to create an account and activate a service
plan.
2 Turn on the device.
3 Select Activate.
4 Follow the on-screen instructions.
NOTE: You must enter the device IMEI number and authorization code to complete the online portion of
activation before you go outdoors.
5 Go outdoors to an open area with a clear view of the sky, and point the antenna on the device toward the sky
for optimal performance.
6 Wait while the device communicates with the Iridium satellite network.
NOTE: It may take up to 20 minutes to activate your device. The device must send and receive several
messages, which takes longer than sending a single message during regular use. Your device should remain
outdoors until activation completes.
Activating the Device 7Dog Collar Device Setup
Methods to Add a Dog Collar Device to a Handheld Device
You can add up to 100 devices to one handheld device by using MURS/VHF, entering the track and control
codes, or by sharing wirelessly using ANT+ technology. Up to 20 devices can be active at one time.
®
Using MURS/VHF: Allows you to add a dog collar device after you have placed the dog collar device into pairing
mode by pressing the power key.
This method is helpful when you are adding a new accessory collar to the system prior to leaving for the hunt
(Adding a Dog to the Alpha Handheld Using Wireless Pairing, page 8).
Entering the track and control codes: Allows you to add a dog collar device that you do not own and that is not
in the area. The dog's owner must determine if you can only track the dog or can track and control the dog.
This method requires the dog's owner to find and communicate the codes to the person adding the dog collar
device.
This method is helpful when you would like to add a dog collar device during a hunt, but you are not near the
dog. For example, you are adding another member of your hunting party's dog collar device to your handheld
device, but you do not own the dog collar device (Adding a Dog Using the Track and Control Codes, page 9).
NOTE: This feature varies based on dog collar device type and feature availability in your area. You may see
track codes only or track and control codes.
Sharing wirelessly using ANT+ wireless technology: Allows you to add a dog collar device that you do not own
and that is not in the area. The dog's owner must determine if you can only track the dog or can track and
train the dog. This method does not require the dog's owner to find and communicate the codes to the
person adding the dog collar device. This method also adds dog information, such as the dog's name,
communication settings, and initial position, from the sending handheld device to your device. The two
handheld devices must be within range 3 m (10 ft.) to share data wirelessly.
This method is helpful when you want to add a dog collar device during a hunt, but you are not near the dog.
For example, the dogs have already been let loose, and you are near the dog owner, who can share the dog
wirelessly (Sharing a Dog Wirelessly, page 9).
Adding a Dog to the Alpha Handheld Using Wireless Pairing
1 If the dog collar device is on, turn off the dog collar device (Turning Off the Device, page 6).
2 Hold the power key on the dog collar device until the device emits two series of beeps (about 2 seconds),
and then release the power button.
The status LED flashes rapidly in green. The dog collar device is now ready to be linked, or paired, with a
handheld device.
3 On the handheld device, select Dog List > Add Dog.
4 Select an option:
• If you are near the dog collar device, select Pair Collar, and follow the on-screen instructions.
• To pair a dog collar device by receiving the information from another handheld device, select Receive
from Handheld.
NOTE: To successfully pair the device, the other handheld device must be wirelessly sharing the dog collar
device information (Sharing a Dog Wirelessly, page 9).
5 After successfully adding the dog collar device, enter the name of the dog, and select .
8 Dog Collar Device SetupSharing a Dog Wirelessly
Before you can share data wirelessly over ANT+, you must bring your Alpha handheld device within 3 m (10 ft.)
of the other handheld device.
1 Select Dog List.
2 Select the dog to share.
3 Select > Share Wirelessly.
4 Select an option:
• To allow the other person to track your dog's location with the map and dog tracking compass, select
Track Only.
• To allow the other person to track your dog and correct your dog's behavior, select Track and Train.
To successfully share the dog collar device, the other handheld device must be receiving the device
information (Adding a Dog to the Alpha Handheld Using Wireless Pairing, page 8).
Adding a Dog Using the Track and Control Codes
NOTE: This feature varies based on dog collar device type and feature availability in your area.
Before you can add a dog using the track and control codes, the dog owner must find the track and control
codes (Finding the Dog ID and Track and Control Codes, page 9) and tell them to you.
You can use track and control codes to authorize a handheld device to interact with your dog collar device. If
you are not near the dog you want to add or you cannot put the collar into pairing mode, you can add the dog
using the track and control codes.
1 Select Dog List > Add Dog.
2 Select Enter Track or Control Code.
3 Enter the track or control code for the collar, and select .
The dog’s track code allows you to track the dog. The dog’s control code allows you to both track and train
the dog.
4 Enter the name of the dog, and select .
Finding the Dog ID and Track and Control Codes
You can share a dog’s track code so another person can track your dog. Also, you can share a dog’s control
code so another person can track and train your dog.
1 Select Dog List.
2 Select a dog.
The track code and the control code are displayed under the dog's name.
VHF Radio Information
This product may be used only on specific radio frequencies, which vary depending on the country of use. The
handheld device and the dog device allow the user to install a different antenna. Changing the antenna can
result in improved radio performance and higher radiated power. You must not use the device with a third party
antenna or an antenna not approved by Garmin . Go to www.garmin.com/tracking-legal for details about the
®
performance and radio frequency of this product, lawful accessories, and power limits for countries.
Dog Collar Device Setup 9Managing a Group Before you can create a group, you must pair one or more dog devices to your handheld. 1 Select Dog List. 2 Select . 3 If necessary, select Create Group, and enter a group name. 4 Select a group from the list. 5 Select an option: • To activate the group, select Activate Group. • To deactivate the group, select Deactivate Group. • To add a device to the group, select Manage Group > Add Device. • To rename the group, select Rename, and enter a new name. • To delete the group, select Delete Group. Editing Dog Information Resetting a Dog's Statistics and Track You might want to clear the dog statistics and track before a new hunt. 1 Select Dog List. 2 Select a dog. 3 Select > Reset. Changing the Dog Name 1 Select Dog List. 2 Select a dog. 3 Select the dog’s name. 4 Enter the name, and select . Changing the Color of the Dog's Track You can change the track color of the dog. It is helpful to have the track color match the color of the collar strap, if possible. 1 Select Dog List. 2 Select a dog. 3 Select the colored square next to the dog’s name. 4 Select a color. Changing the Dog Type Before you can change the dog type, the collar must be turned on and within range of the handheld device. 1 Select Dog List. 2 Select a dog. 3 Select > Change Dog Type. 4 Select a dog type. 10 Dog Collar Device Setup
Changing the Dog ID
Before you can change the dog ID, the collar must be turned on and within range of the handheld device.
If you are experiencing interference from other collars or handheld devices in the area, you might need to
change the ID for the dog.
1 Select Dog List.
2 Select a dog.
3 Select      > Change ID.
4 Select an available ID.
If another handheld device is tracking this dog, for best results, remove the dog from the device, and use the
track and control codes to add the dog again (Adding a Dog Using the Track and Control Codes, page 9).

Removing a Dog
1 Select Dog List.
2 Select a dog.
3 Select     > Remove.

Fitting the Collar on Your Dog
                                                        CAUTION
To prevent irritation from the contact points, remove the collar for at least eight hours out of every 24-hour
period.
This device is not intended for human use. Do not attempt to use on any person.
Do not spray the device or collar with harsh chemicals including but not limited to flea or tick spray. Always
ensure that any flea or tick spray that is applied to the dog is completely dry before placing the collar on the dog.
Small amounts of harsh chemicals can damage the plastic components and collar laminate.
In order to effectively train the dog, the collar and device must fit the dog properly. If the collar is too loose or
positioned incorrectly, stimulation may be inconsistent. This can delay or prevent successful training.
1 Position the device at the front of the dog's neck, with the status LED facing toward the dog's chin and the
    contact points against the throat.
2 Tighten the strap so that it is very snug around the dog's neck, and fasten the buckle.
    NOTE: The collar should fit tightly and should not be able to rotate or slide on the dog's neck. The dog must
    be able to swallow food and water normally. You should observe your dog's behavior to verify that the collar
    is not too tight.

3 Wiggle the device to work the contact points through the dog's coat.
  NOTE: The contact points must have contact with the dog's skin to be effective.
4 If the strap is too long, cut off the excess, leaving at least 8 cm (3 in.) to spare.
  TIP: You can mark the hole used to fasten the buckle for future reference.

Dog Collar Device Setup                                                                                             11
Communication with the Collar
You should keep an unobstructed line of sight between your handheld device and the dog collar device to
produce the best communication signal. To achieve the best line-of-sight conditions, you should move to the
highest elevation point in your area (for example, on the top of a hill).
Best
Good
Poor
Entering Sleep Mode
NOTE: This feature is not available with all dog collar device models.
Before you can enter sleep mode, you must track your dog's location using the compatible dog collar device.
When connected with the handheld device, the dog collar device can be put into sleep mode to conserve the
battery when you are not actively tracking your dog.
1 Select Dog List.
2 Select a dog.
3 Select > Adjust Collar Sleep Mode > Sleep.
Exiting Sleep Mode
NOTE: This feature is not available with all dog collar device models.
You can exit sleep mode on the compatible dog collar device while you are not actively tracking your dog.
1 Select Dog List.
2 Select a dog.
3 Select > Adjust Collar Sleep Mode > Wake.
Dog Tracking
The handheld device allows you to track your dog or multiple dogs, using the tracking compass or map. The
map displays your location and your dog's location and tracks. The compass pointer indicates the direction of
the dog's current location.
12 Dog TrackingTracking Your Dog on the Map
Before you can track a dog on the map, you must add it to the handheld device (Adding a Dog to the Alpha
Handheld Using Wireless Pairing, page 8).
You can view the dog's location on the map.
1 From the home screen, select .
2 If necessary, select and to zoom in and out of the map.
TIP: You can select to track the dog using the dog tracking compass (Dog Tracking Compass, page 14).
Dog Status Icons
Sitting
Running
On point
Treed
Unknown1
1 The unknown status icon indicates that the collar has not acquired a satellite signal and that the handheld device cannot determine the location of the dog.
Dog Tracking 13Dog Tracking Compass To open the dog tracking compass, select . You can use the dog tracking compass to view the direction and distance to your dog, your vehicle, and any paired devices. The dog tracking compass also shows the dog's status, such as running or on point (Dog Status Icons, page 13). The color of the pointer corresponds to the color of the track. The dog tracking compass is most accurate when the dog, vehicle, or paired device is more than 9.1 m (30 ft.) away. When the dog, vehicle, or paired device is less than 9.1 m (30 ft.) away, "Near" appears. TIP: You can open an alternative view of the compass by selecting > Pro View. Navigating to Your Dog 1 Select Dog List. 2 Select the dog. 3 Select > Go. 4 Follow the colored line to the dog. Changing the Length of the Dog's Track You can adjust the length of time the dog track appears on the map. Reducing the duration of the track can reduce the clutter on the map. Changing the map does not affect the tracks stored in the handheld device. 1 Select Setup > Map > Tracked Devices > Dog Tracks on Map. 2 Select a time frame. Location Alerts Location alerts notify you when your dogs enter or exit a particular location. You can create a custom geofence or use a radius around your current location. A geofence is an invisible boundary around an area and is created using points on the map. The virtual boundaries of a geofence are accurate up to approximately 3 m (10 ft.). Geofences perform best when sized to cover an area encompassing an average sized backyard (approximately ¼ acre). 14 Dog Tracking
Setting Location Alerts
1 Select Location Alerts > Add Alert.
2 Select an option:
  • To create a geofence alert, select Geofence, select a point for the first corner of the geofence, select Use,
    and select additional points to define the geofence boundary.
    You must select at least 3 points to create a geofence alert.
  • To create a radius alert, select Radius, select the unit of measurement, and enter the radius distance.

Editing Location Alerts
1 Select Location Alerts.
2 Select an alert.
3 Select an option:
  • Select Disable to turn off notifications for this alert.
  • Select Set Alert Type to set the way the device notifies you for this alert.
  • Select Set Alert Mode to set the notification to sound on exit, entrance, or both.
  • Select View Map to view a geofence on the map.
    NOTE: This feature is not available for the radius alert type.
  • Select Delete to remove the alert.

Disabling Dog Data Broadcast
By default, the handheld device broadcasts dog data to compatible devices. You can disable data broadcasting
to keep your data from being seen on other compatible devices. See the owner's manual for your compatible
device for more information.
    Select Setup > System > Broadcast Dog Data > Off.

                                               Dog Training
                                                     NOTICE
You should research and investigate the training methods best suited for you, your dog, and your needs. This
manual provides some basic guidelines for training, but each dog has unique training needs.
When used properly, the Alpha training system is a very effective training tool to aid your dog in reaching its full
potential. The use of the training system should be part of an overall training program.
Begin training your dog on a leash, without the Alpha training system. You should train your dog how to heel, sit,
and come to you. After the dog understands these three basic commands, you can begin training with the dog
collar device and the leash. Finally, when the dog consistently obeys commands using the leash and collar, you
may be able to remove the leash to train with only the dog collar device.

Dog Training                                                                                                       15
Selecting and Installing the Contact Points
CAUTION
To prevent irritation from the contact points, remove the collar for at least eight hours out of every 24-hour
period.
Do not spray the device or collar with harsh chemicals including but not limited to flea or tick spray. Always
ensure that any flea or tick spray that is applied to the dog is completely dry before placing the collar on the dog.
Small amounts of harsh chemicals can damage the plastic components and collar laminate.
For best results, select the correct contact points based on your dog's coat.
1 Select the correct contact point length for your dog's coat type:
• For dogs with thicker coats, use the longer contact points.
• For dogs with shorter coats, use the shorter contact points.
2 If necessary, use the included wrench to remove the contact points.
3 Twist the contact points into the collar.
4 Tighten with the included wrench, but do not overtighten.
When you put the collar on the dog, make sure the contact points are tight against the neck.
Removing the Contact Points
When you are not training the dog using the training keys, remove the contact points.
1 Use the included wrench to remove both contact points.
2 Place the cap over the contact point holes.
Training Methods
NOTE: Training features are not available in all areas for tracking collars.
Momentary stimulation: Applies a brief stimulation when you press the training key, regardless of how long the
key is depressed.
Continuous stimulation: Applies stimulation to the dog the entire time you press the training key, for a
maximum of 8 seconds. Your stimulations should typically be much shorter than 8 seconds.
Tone: Activates an audible tone the entire time you press the training key.
Vibration: Applies vibration to the dog the entire time you press the training key, for a maximum of 8 seconds.
The effectiveness of vibration may vary based on the dog's temperament and experience.
Linear and Traditional Stimulation
You can use linear or traditional stimulation to customize your training experience. The default intensity method
is linear, which allows progressive stimulation from level 1 to level 18. Traditional stimulation allows you to
make quick changes using low, medium, and high settings within predetermined stimulation levels (1 through
6).
Choosing the Correct Intensity Level
1 Set the intensity to the lowest level (Customizing the Training Keys, page 17).
2 Select a training key.
3 Observe the dog for a reaction, such as a head shake, neck movement, or just a change in expression.
Sometimes dogs will vocalize due to the surprise of the electrical stimulation. If the dog vocalizes more than
once, the intensity level is too high for beginning training.
4 If there is no reaction, increase the intensity level by one level until the dog has a slight but recognizable
reaction to the stimulation.
The intensity level that causes a slight but recognizable reaction is your dog's baseline level for beginning collar
training. You do not need to, and should not, apply this intensity selection test again.
After you begin training, the dog’s performance guides your intensity selection. As the dog advances in training,
you may need to change the level depending upon the training situation.
16 Dog TrainingCustomizing the Training Keys You can assign an application, device action, or utility to a training key. If a compatible dog collar is paired, you can also add a dog training command to a training key. You can add multiple pages of training key settings. For example, this is useful when training multiple dogs. 1 Select Training Setup > Training Keys. 2 Select Add Item Here below the empty key you are customizing. 3 Select a command category. 4 Select a command or, if selecting a training command, select the name of the dog to command. 5 If selecting a dog training command, select momentary (M), continuous (C), tone (T), vibration (V), or light (L). 6 Select or to choose the intensity level. 7 If you are using traditional stimulation mode, select LOW, MED, or HI. 8 If you want to customize more than three keys, use the additional rows to add another page of training key commands. Using the Hard Keys for Training Adjustments Before you can use this feature, you must customize your training keys with dog training commands (Customizing the Training Keys, page 17). You can access and adjust training commands using the device's hard keys. 1 From any screen, press the training up and down keys until the command page you want to adjust appears. 2 Press the training enter key to select the command page. 3 Use the training up and training down keys to highlight the training command you want to change, and press the training enter key. 4 Select the command mode, and press the training enter key. 5 If necessary, use the training up and down keys to adjust the command setting. 6 Press the training enter key to return to the previous screen. Default Training Settings From the main menu, select Training Setup > Training Defaults. Add When Paired: Automatically sets default training modes for each button when a new dog collar is paired. Left Button: Sets the default training mode for the left training button. Center Button: Sets the default training mode for the center training button. Right Button: Sets the default training mode for the right training button. Dog Training 17
Collar Training
Begin training your dog on a leash, without using the Alpha training system. After the dog shows a grasp of the
commands "heel," "sit," and "here," you can begin training with the collar and the leash.
During the initial stage of collar introduction, the dog learns that collar stimulation means the same thing as a
tug on the leash. At first, the dog may be alarmed by the electronic stimulation. The key is to be patient and
consistent and not to start off at too high of an intensity. Be fair and consistent, and use repetition and praise
when using the collar as a training tool.
If the dog does not respond to the stimulation level you have selected (Choosing the Correct Intensity Level,
page 16), increase the stimulation one level at a time until you achieve the appropriate response. After you
achieve the desired response, you can lower the stimulation level as long as the dog maintains consistency.
As the dog becomes more proficient with the commands, you can begin to introduce distractions, such as
rolling a ball in front of the dog or walking him in the presence of others.
After the dog begins to respond consistently to the command during collar training, you can remove the leash
and train with just the collar.
NOTE: You should train without a leash only when it is appropriate for your environment and your dog's
temperament. You should follow all laws and regulations for your area regarding the use of dog leashes.
Eventually in most training situations, your commands will not require stimulation to be given with the
command. You should only use stimulation when you need to repeat a command because the dog did not obey
the first one.
As the dog becomes better trained, you can decrease the use of collar training. Continue to have the dog wear
the collar until you feel certain that it is no longer needed to reinforce known commands. Abandoning the collar
too early can lead to problems in the future.

                                          inReach Features
                                                       WARNING
Messaging, tracking, and SOS functions require an active satellite subscription. Always test your device before
you use it outdoors.
Ensure you have a clear view of the sky when using the messaging, tracking, and SOS functions, because these
features require satellite access to operate properly.
To get the most out of your device, you should activate it. Activating the device allows you to use inReach
features, including messaging, SOS, tracking, and inReach Weather.

Messages
Your Alpha 200i device sends and receives text messages using the Iridium satellite network. You can send
messages to an SMS phone number, an email address, or another device that uses inReach technology. Each
message you send includes your location details where allowed.

Sending a Preset Message
Preset messages have predefined text and predetermined recipients. Preset messages must be set up on the
Garmin Explore™ website at explore.garmin.com.
1 Select inReach > Messages > Send Preset.
2 Choose a preset message, and select Send Preset.

18                                                                                                  inReach Features
Sending a Text Message
1 Select inReach > Messages > New Message.
2 Select an option:
• To start with a pre-written message, select Send Quick Text.
NOTE: You can add and edit quick text messages on the Garmin Explore website.
• To write a custom message, select Type Message.
3 Choose recipients from your contacts list, or enter a recipient's contact information.
4 After you have finished your message, select Send Message.
Replying to a Message
1 Select inReach > Messages.
2 Select a conversation.
3 Select Reply.
4 Select an option:
• To write a custom message, select Type Message.
• To start with a pre-written message, select Send Quick Text and select a message.
5 When you have finished your message, select Send Message.
Checking for Messages
When you send a message, your device listens for replies for 10 minutes. The device also checks for new
messages every hour. When you are using the inReach tracking feature, your device automatically checks for
messages at your tracking interval.
NOTE: Your device must have a clear view of the sky and be in view of a satellite at the time of the listen to
receive messages.
You can force a check for messages by manually checking for messages, sending a message, or sending a
track point. During a check, your device connects to satellites and receives messages waiting to be sent to your
device.
Select inReach > inReach Utilities > Mail Check > Check Mailbox.
Viewing Message Details
1 Select inReach > Messages.
2 Select a conversation.
3 Select a message.
4 Select the information tab.
Navigating to a Message Location
When you receive a message from another device with inReach technology, the message may include location
information. For these messages, you can navigate to the location from which the message was sent.
1 Select inReach > Messages.
2 Select a conversation.
3 Select a message with location information.
4 Select the map tab.
5 Select Go.
inReach Features 19Including Location Coordinates in a Message
If you are sending a message to a recipient who may not have internet access, you can include your location
coordinates in the message. For example, if your recipient has an older model cell phone that does not support
viewing maps or is outside of a mobile data coverage area and cannot view a web page.
1 Select inReach > Messages > New Message > Send Location.
2 Enter one or more recipients.
3 If necessary, enter a message.
4 Select Send Message.
Deleting Messages
1 Select inReach > Messages.
2 Select a conversation.
3 Select > Delete Thread.
Messages Settings
Select Setup > inReach > Messages.
Ring Until Read: Sets the device to ring until you read a new message. This feature is helpful if you are in a noisy
environment.
Notifications: Alerts you to incoming inReach messages.
Show On Map: Displays inReach messages on the map.
Tracking
You can use the tracking feature on your Alpha 200i device to record track points and transmit them over the
Iridium satellite network at the specified send interval. Track points appear on the Garmin Explore website and
the MapShare™ tracking page.
Starting Tracking
Select inReach > Tracking > Start Tracking.
Stopping Tracking
Select inReach > Tracking > Stop Tracking.
Sharing Your MapShare Web Page
You can enable MapShare at explore.garmin.com.
You can share a link to your MapShare web page with other people. The system automatically adds text,
including link information, to the end of your message.
1 Select inReach > Tracking > Send MapShare > Share.
2 Choose recipients from your contacts list, or enter a recipient's contact information.
3 Select Send Message.
inReach Tracking Settings
Select Setup > inReach > Tracking.
Auto Track: Sets the device to start tracking when you turn on the device.
Moving Interval: Sets the frequency at which the device records a track point and transmits it over the satellite
network when you are moving. If you are on a professional plan, you can specify the interval when you are
stationary.
20 inReach FeaturesSOS During an emergency, you can use your Alpha 200i device to contact the Garmin International Emergency Response Coordination Center (IERCC) to request help. Pressing the SOS button sends a message to the Garmin IERCC, and they notify the appropriate emergency responders of your situation. You can communicate with the Garmin IERCC during your emergency while you wait for help to arrive. You should only use the SOS function in a real emergency situation. Initiating an SOS Rescue NOTE: While in SOS mode, the device cannot be turned off. 1 Lift the protective cap from the SOS button . 2 Hold the SOS button. 3 Wait for the SOS countdown. The device sends a default message to the emergency response service with details about your location. 4 Reply to the confirmation message from the emergency response service. Your reply lets the emergency response service know that you are capable of interacting with them during the rescue. If you do not reply, the emergency response service will still initiate a rescue. For the first 10 minutes of your rescue, an updated location is sent to the emergency response service every minute. To conserve battery power after the first 10 minutes, an updated location is sent every 10 minutes when moving, and every 30 minutes when stationary. Sending a Custom SOS Message After pressing the SOS button to initiate an SOS rescue, you can reply with a custom message using the SOS page. 1 Select inReach > SOS > Reply. 2 Select Type Message to compose a custom SOS message. 3 Select Send Message. Your reply lets the emergency response service know that you are capable of interacting with them during the rescue. inReach Features 21
Canceling an SOS Request
If you no longer need assistance, you can cancel an SOS request after it is sent to the emergency response
service.
1 Lift the protective cap, and hold the SOS button.
2 Select Cancel SOS.
3 When prompted to confirm your cancellation request, select Cancel SOS.
    Your device transmits the cancellation request. When you receive a confirmation message from the
    emergency response service, the device returns to normal operation.

Weather
Your device can receive weather information.
inReach Weather: You can receive weather information through your inReach subscription. Your device can
   send an inReach message to request basic, premium, or marine weather forecasts. You can receive weather
   forecasts for your current location, a waypoint, GPS coordinates, or a location you choose on the map.

Requesting an inReach Weather Forecast
For the best results, you should ensure your device has a clear view of the sky when you request an inReach
weather forecast.
Your device can send a message to request a basic, premium, or marine weather forecast using your inReach
subscription. You can receive weather forecasts for your current location, a waypoint, GPS coordinates, or a
location you choose on the map. Weather forecasts incur data charges or additional charges on your inReach
subscription.
1 Select inReach > inReach Weather > New Forecast.
2 If necessary, select Forecast Type, and select a Basic or Premium weather forecast.
3 If necessary, select Location, and select a location.
   By default, the device requests weather for your current location.
4 If necessary, select Marine to request a marine weather forecast.
   NOTE: For best results, you should only request a marine forecast for a location away from shore and over a
   large body of water. Marine forecasts are not available for land locations or inland lakes.
5 Select Get Forecast.
The device sends a request for the forecast. It may take several minutes to receive the weather forecast data.
After the device finishes downloading the data, you can view the forecast at any time until all the information in
the forecast has expired. You can also update the forecast at any time.
Updating an inReach Weather Forecast
You can update an inReach weather forecast that has expired or contains outdated information. Updating a
forecast incurs the same data charges or additional charges as requesting a forecast.
1 Select inReach > inReach Weather.
2 Select a location with an outdated weather forecast.
3 Select Update Forecast.
The device requests an updated forecast. If you update the My Location forecast, the device requests an
updated forecast for your current location. It may take several minutes to receive the updated weather forecast
data.
Deleting an inReach Weather Forecast
You can delete an expired forecast or a forecast for a location that you no longer need.
1 Select inReach > inReach Weather.
2 Select a weather location.
  NOTE: You cannot delete the My Location forecast.
3 Select     > Delete.

22                                                                                                  inReach Features
Testing the Device
CAUTION
You should test the device outdoors before using it on a trip to ensure your satellite subscription is active.
Select inReach > inReach Utilities > > Test.
Wait while the device sends a test message. When you receive a confirmation message, your device is ready
to use.
Connected Features
Connected features are available for your Alpha device when you connect the device to a wireless network or a
compatible smartphone using Bluetooth technology. Some features require you to install the Garmin Explore
®
app on your smartphone. Go to garmin.com/apps for more information.
BirdsEye imagery: Allows you to download BirdsEye Satellite Imagery directly to your device when connected to
a Wi‑Fi network.
®
Garmin Explore: The Garmin Explore app syncs and shares waypoints, tracks, and routes with your device. You
can also download maps to your smartphone for offline access.
Tracking: Allows you to record track points and transmit them over the Iridium satellite network. You can invite
contacts by sending them an inReach message from the field. This feature allows your contacts to view your
live data on a MapShare tracking page using your Garmin Explore account.
Software Updates: Allows you to receive updates for your device software when connected to a Wi‑Fi network.
Pairing a Smartphone with Your Device
1 Bring your compatible smartphone within 10 m (33 ft.) of your device.
2 From the main menu on your device, select Setup > Bluetooth.
3 On your compatible smartphone, enable Bluetooth technology, and open the Garmin Explore app.
4 From the Garmin Explore app, select Devices > Pair Device.
5 Follow the on-screen instructions in the Garmin Explore app to pair your device.
Connecting to a Wireless Network
1 Select Setup > Wi-Fi.
2 Select the toggle switch to enable Wi‑Fi technology, if necessary.
3 Select Add Network.
4 Select a wireless network from the list and enter the password, if necessary.
The device stores the network information and connects automatically when you return to this location.
Garmin Explore
The Garmin Explore website and mobile app allow you to plan trips and use cloud storage for your waypoints,
routes, and tracks. They offer advanced planning both online and offline, allowing you to share and sync data
with your compatible Garmin device. You can use the mobile app to download maps for offline access, and then
navigate anywhere without using your cellular service.
You can download the Garmin Explore app from the app store on your smartphone, or you can go to
explore.garmin.com.
Testing the Device 23Syncing inReach Data
You can sync data from your Garmin Explore account to your device using the Garmin Explore app. After you
make edits to your data, such as plan changes, contacts, preset messages, or quick text messages, you must
sync them to your device using the mobile app.
Open the Garmin Explore app.
Changes made to data such as collections, waypoints, routes, and tracks update automatically.
You can now sync your data to your Alpha 200i device.
Contact Tracking
You can track other hunters so you know where they are at all times. You can also send messages to your
contacts. One Alpha handheld device can track up to 20 devices, including compatible dog collar devices and
Alpha handheld devices.
Turning On and Off the Transmitter
Before you can add a contact or initiate an emergency alert, you must ensure the transmitter is enabled.
NOTE: In cold temperatures, if you transmit when the battery is low, the device may shut down.
1 Press to open the status page.
2 Select My ID > Transmitting.
Methods to Add a Contact to a Handheld Device
Using MURS/VHF: Allows you to add a handheld device contact after you have placed your handheld device into
pairing mode.
This method is helpful when you are adding a new device to the system prior to leaving for the hunt (Adding a
Contact Using Wireless Pairing, page 24).
Entering the device ID: Allows you to add a handheld device contact that is not in the area. This method
requires the contact to find and communicate their handheld device code to the person adding the device
contact.
This method is helpful when you would like to add a handheld device contact during a hunt, but you are not
near the device. For example, if you are adding another member of your hunting party to your handheld
device, but you do not own the device (Adding a Contact Using a Contact ID, page 25).
Sharing wirelessly using ANT+ wireless technology: Allows you to add a handheld device that you do not own
as a contact. This method does not require the contact to find and communicate their device code to the
person adding the device. The two handheld devices must be within a range of 3 m (10 ft.) to share data
wirelessly.
This method is helpful when you want to add a handheld device during a hunt without entering the device ID
(Adding a Contact Using Wireless Pairing, page 24).
Adding a Contact Using Wireless Pairing
Before you can add a contact wirelessly, you should be near the contact's handheld device.
1 Select Dog List > .
2 Select an option:
• On your handheld device select Add > Pair Handheld, and follow the on-screen instructions.
• To add a contact by receiving the information from the contact's handheld device, select Add > Receive
from Handheld.
3 After successfully adding the contact, enter the name of the contact, and select .
The contact is added to your handheld device.
You can repeat this procedure using another hunter's handheld device to add your contact ID to that device.
24 Syncing inReach DataYou can also read