Amortization Calculator for Salesforce Administration Guide - AMCalc ver. 1.5 By
←
→
Page content transcription
If your browser does not render page correctly, please read the page content below

Amortization Calculator for Salesforce®
        Administration Guide
             AMCalc ver. 1.5

                   By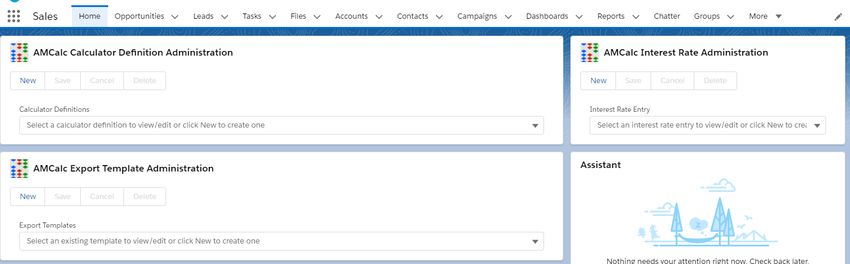
©
                                                                                                                       3 Creeks Technologies LLC       2020 – 2021

Table of Contents
Introduction .................................................................................................................................................. 3
   Before You Get Started ............................................................................................................................. 3
Setting Permissions for AMCalc Object Access ............................................................................................. 3
   Assigning Permissions Sets to Users ......................................................................................................... 6
Relating AMCalc Schedules to Salesforce Objects ........................................................................................ 6
   Creating Parent Object Relationships ....................................................................................................... 7
   Compact Page Layouts .............................................................................................................................. 9
Add the AMCalc Calculator to Page Layouts ............................................................................................... 10
   Configuring Amortization Schedule Headers .......................................................................................... 13
AMCalc Administration Tools...................................................................................................................... 15
   AMCalc Interest Rate Administration ..................................................................................................... 16
   AMCalc Calculator Definition Administration ......................................................................................... 18
       Definition Attributes ........................................................................................................................... 19
       Calculator Definition ........................................................................................................................... 19
       Saved Schedule Definition .................................................................................................................. 23
   AMCalc Export Template Administration ............................................................................................... 24
AMCalc Calculators for Salesforce Communities ........................................................................................ 25
   Configuring an AMCalc Calculator for a Communities Site..................................................................... 26
       Examples of AMCalc Communities Component Attributes Displayed on Screen.............................. 31
   Configuring the Communities Guest User Account to Run AMCalc Calculators .................................... 33
AMCalc and Salesforce Process Builder ...................................................................................................... 37
AMCalc Reports and Dashboards................................................................................................................ 38
   Modifying AMCalc Reports ..................................................................................................................... 38
   Using AMCalc Dashboards ...................................................................................................................... 38

                                                                               2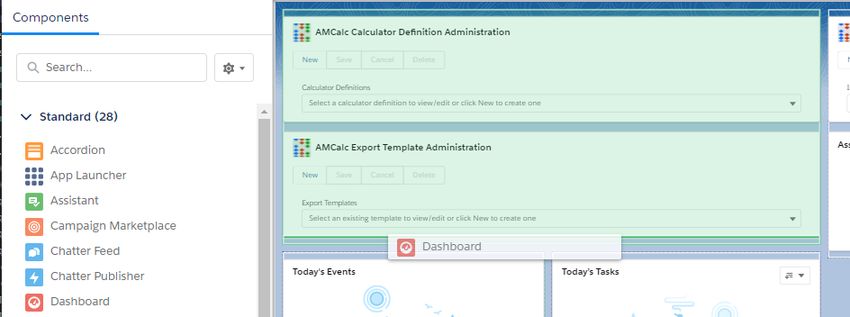
©
3 Creeks Technologies LLC 2020 – 2021
Introduction
This guide will walk you through the steps to configure the different types of AMCalc amortization
calculators as well as how to administer other features of the AMCalc package. In order to perform the
steps in this guide, your Salesforce user account should have system administration privileges and you
should be familiar with standard Salesforce administration tasks such as creating custom fields, editing
page layouts, and creating and configuring Salesforce Communities pages.
It is also recommended that you read the AMCalc User Guide to familiarize yourself with how AMCalc
operates.
If you are interested in learning about the AMCalc web service, you can find all of the information that
you will need in the AMCalc Web Services Developer Guide.
Before You Get Started
This guide assumes that your company is using Salesforce in Lightning Experience. Later you will be
walked through how to update Lightning Experience page layouts with AMCalc custom components. In
order to do this, your Salesforce org must have My Domain deployed. If you are unfamiliar with
Salesforce My Domain, see the Salesforce Identity Implementation Guide.
If your company has not transitioned to Salesforce Lightning Experience yet, please email
support@3creekstech.com for help with this guide.
Setting Permissions for AMCalc Object Access
AMCalc comes with pre-defined Permission Sets you can use to give your users access to the AMCalc
components that they will be using. Salesforce permission sets are packaged bundles of user privileges
that are assigned to users. Using permission sets to assign user privileges is a fast and easy way to give
your users access to the data in Salesforce that they need to do their job.
The following permission sets are included in the AMCalc install.
Permission Set Name Description
AMCalc Amortization Schedule Create and Edit This permission set should be assigned to users that
will be creating, editing, or deleting amortization
schedules. These users include those that use the
advanced AMCalc Calculator (See the Add the
AMCalc Calculator Page Layouts section for
details).
The following privileges are assigned with this
permission set:
Read, create, edit, delete access to tables
that store amortization schedule
information
3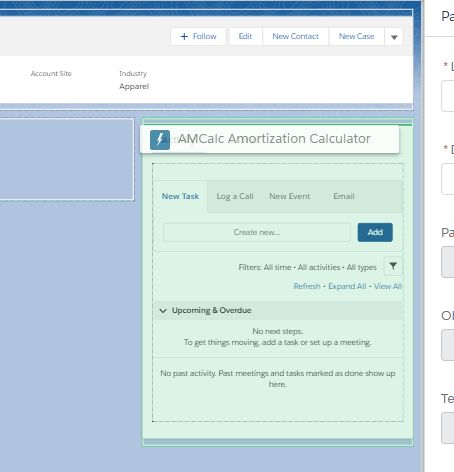
©
3 Creeks Technologies LLC 2020 – 2021
Read access to tables that hold calculator
definitions
Read access to tables the hold interest rate
information
Read access to tables that contain export
templates
AMCalc Amortization Schedule View and Report Assign this permission set to users that will only
view amortization schedules or run reports.
The following privileges are assigned with this
permission set:
Read access to tables that store
amortization schedule information
Read access to tables the hold interest rate
information
AMCalc Amortization Schedule Create This permission set should be assigned to users that
(Communities user) will be using AMCalc calculators on Salesforce
Communities sites (see the AMCalc Calculators for
Salesforce Communities section for details).
This may include guest user accounts if you intend
to have a publically available communities site with
an AMCalc calculator on it. See the Configuring
Guest User Access for AMCalc Calculators section
for information on using a guest user.
For communities sites that require logins, if the
user accounts that will be accessing the site have
profiles with the AMCalc Amortization Schedule
Create and Edit permission set assigned to them,
there is no need to also assign this permission set.
The following privileges are assigned with this
permission set:
Read and create access to the standard
Salesforce object Lead
Read and create access to tables that store
amortization schedule information
Read access to tables that hold calculator
definitions
Read access to tables the hold interest rate
information
AMCalc Calculator Definition Administrator Assign this permission set to users that will be
4
©
3 Creeks Technologies LLC 2020 – 2021
creating and maintaining AMCalc calculator
definitions (see the AMCalc Calculator Definition
Administration section for details).
The following privileges are assigned with this
permission set:
Read, create, edit, delete access to tables
that hold calculator definitions
AMCalc Export Template Administrator Assign this permission set to users that will be
creating and maintaining AMCalc export templates
(see the AMCalc Export Template Administration
section for details).
The following privileges are assigned with this
permission set:
Read, create, edit, delete access to tables
that hold export templates
AMCalc Interest Rate Administrator Assign this permission set to users that will be
creating and maintaining AMCalc interest rate
entries (see the AMCalc Interest Rate
Administration section for details).
The following privileges are assigned with this
permission set:
Read, create, edit, delete access to tables
that hold interest rate entries
Note that the permission sets that are included for administrative tasks do not have access to tables that
hold amortization schedules. Conversely, the permission set with the most privileges to amortization
schedule tables, AMCalc Amortization Schedule Create and Edit, does not have write access to
administrative tables.
If you have a user that will need full access (read, create, edit, delete) to amortization schedules and will
also need to maintain AMCalc administrative information, you will need to assign the user the AMCalc
Amortization Schedule Create and Edit permission set and the appropriate administration permissions
set or sets.
5
©
                                                                                3 Creeks Technologies LLC       2020 – 2021

Assigning Permissions Sets to Users
Permission sets are assigned at the Salesforce user level.

    1. Go to the Setup menu and type Users in the quick find box, and then click the Users menu item.
    2. Select the user to assign the permission set to and scroll down to the related list portion of the
       screen until you see the Permission Set Assignment related list. Click the Edit Assignments
       button

    3. Move the permission sets to assign to this user from the left-hand box to the right-hand box and
       click Save.

Relating AMCalc Schedules to Salesforce Objects
AMCalc generates amortization schedules that are then associated with Salesforce objects. The
Salesforce object that it is associated with is referred to as the parent record and the saved amortization
schedule record can be generically referred to as the child record. As the parent-child relationship
implies, multiple amortization schedule records can be saved to a single parent Salesforce record.

One of the first steps to configuring your AMCalc installation is to create this parent-child relationship
between AMCalc schedules and other Salesforce Objects. The object or objects that you select as
parents can be standard Salesforce objects, such as Account or Lead, or custom objects that have been
created in your system.

You may already know which of your Salesforce objects will be parent objects to AMCalc schedules. If
not, you should take a moment to think about how AMCalc Schedules will be used. If your users will
need to create amortization schedules while in the Opportunities screen, then you will want to make
Opportunity a parent object. If you have a custom loan package installed, or have created you own loan
processing objects, perhaps one of these objects should be a parent object.

                                                     6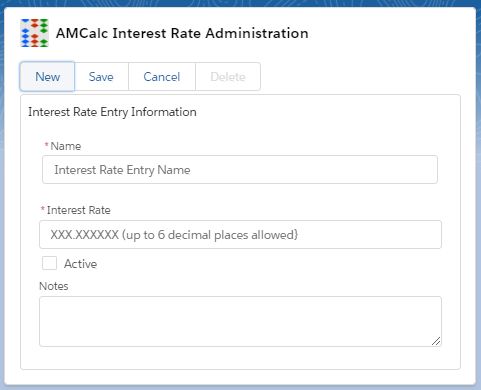
©
                                                                               3 Creeks Technologies LLC       2020 – 2021

You have the ability to configure more than one Salesforce object as the parent of AMCalc schedules.
However, you will want to limit the number of parent objects to those that are absolutely necessary.
Creating too many parent objects will lead to user confusion as they will not know which screen to go to
if they are creating or looking for a particular amortization schedule.

If you are planning to use AMCalc calculators on Salesforce Communities sites, and you plan to collect
lead information through them, it is required that the Lead object is a parent to AMCalc. This is so that
amortization schedules created by prospects can be associated with the lead record that is created
when they submit their contact information.

Later, once the lead is “qualified”, your users will convert the lead to a contact. When this happens,
Salesforce creates not only the contact record from the lead, but also an account record and an
opportunity record. When you configure an AMCalc calculator for a communities site, you will indicate
which of these Salesforce objects the amortization schedule created by the lead is converted to. So, in
addition to the Lead object, you will likely make the Contact, Account, or Opportunity object a parent to
AMCalc as well. This will all be covered later in this guide. To learn more about the Salesforce Lead
conversion process, see this Salesforce documentation.

Creating Parent Object Relationships
To add a Salesforce object to AMCalc as a parent, follow the steps below.

    1. Navigate to the Setup menu, type Object Manger into Quick Find box, and then click on the
       Object Manager menu item.
    2. Find the object called Amortization Schedule in the Label column and select it. Then select the
       Fields & Relationships item from the menu on the left, and then click the New button in the
       upper right-hand side of the screen.
    3. You should now be in the New Custom Field screen and can now define a custom field that will
       relate AMCalc to a parent object. Click the radio button next to Lookup Relationship and then
       click the Next button.

    4. From the drop down, select the object the will be the parent to AMCalc and click Next.

                                                     7
©
                                                                          3 Creeks Technologies LLC       2020 – 2021

5. On the screen titled New Relationship, we will configure the field label, field name, and
   relationship name, among other things, for the new field. You can either accept the labels and
   names that have been defaulted for you or make up one of your own.

    If there are selections displayed under the Child Relationship Name dropdown, make sure that
    the Required checkbox is not selected and keep the defaulted selection of Clear the value of this
    field. Click the Next button.

6. Now you will indicate which user profiles have access to this lookup relationship field. Earlier in
   this guide you applied AMCalc permission sets to user account records. Since the lookup
   relationship fields that you are creating now are new, the permission sets that came with the
   AMCalc package will not reference them, so you will need to indicate the permissions to the
   lookup field on this screen. For users that will be creating and saving amortization schedules, be

                                                8
©
3 Creeks Technologies LLC 2020 – 2021
sure that the check box is selected in the Visible column next to their profile and the Read-Only
box is NOT checked. When complete, click Next.
7. You should now be on the page titled Step 5. Add reference field to Page Layouts. Accept the
defaults on this page and click Next to get to the screen titled Step 6. Add custom related list.
This page allows you to add the AMCalc related list to the page layouts of the parent object. The
related list is where users will go to view saved amortization schedules. For example, when in
the opportunity screen, the user can see if there are amortization schedules created for that
opportunity by looking at the AMCalc related list.
Select page layouts for those pages that should have the AMCalc related list on them and
deselect those that should not.
When done, either click Save & New to create another relationship field, or click Save to go back
to the object manager.
Compact Page Layouts
While you are in the Object Manager page for the AMCalc object, now would be a good time to
configure the compact page layout. Compact layouts are groups of fields that will be displayed when a
user hoovers a mouse pointer over a saved AMCalc schedule. By default only the schedule name is in
the compact layout, so you may want to add additional fields that may be useful for your users.
1. Click on Compact Layout from the left-hand side menu of Object Manager.
2. Salesforce does not allow you to modify the System Default compact layout so click the New
button to create a new one.
3. Input a name for the layout and tab through the Name field. Select fields from the Available
Fields box and use the Add button to move them to the Selected Fields box. Use the up and
down buttons to adjust the field order and when complete, click the save button.
4. Click the Compact Layout Assignment button, click the Edit Assignment button, select the
compact layout you created and click the Save button.
9©
3 Creeks Technologies LLC 2020 – 2021
Add the AMCalc Calculator to Page Layouts
Now that you have created parent and child relationships, you can add the AMCalc calculator to the
parent object’s page layouts. The AMCalc package comes with two types of calculator, an advanced
calculator that is designed for use by logged in Salesforce users and a calculator with a configurable
interface for use with Salesforce Communities (Communities users can be named users that need to
login in or guest users that do not need to log in). This section will explain how to configure the first
type of calculator mentioned. Later sections in this guide will detail how to configure and use the
Communities calculator.
1. Navigate to any record page of the parent object that will have the calculator on it. The record
page will show the details of the parent record and will typically have tabs labeled Related and
Details. Below is an example of an account record page.
Click the gear icon in the upper right-hand corner of the screen and select Edit Page.
10©
3 Creeks Technologies LLC 2020 – 2021
On the left-hand side of the app builder page will be a list labeled Components. Scroll down
until you see the Custom section, then click and drag the entry called AMCalc Amortization
Calculator on to the page.
Note: If you do not see the called AMCalc Amortization Calculator component, it could be for
one of two possible reasons:
First, the AMCalc package may not be installed. To validate that it is installed, go to the Installed
Packages page within Setup and ensure that AMCalc is listed and that, if you are demoing the
package, the demo period is not expired (if it is expired, email support@3creekstech.com and
we may be able to extend trial period for you).
Second, by sure that you have My Domain deployed within your Salesforce org. If you do not
have it deployed, custom components will not be shown in the Lightning App Builder. If you are
unfamiliar with Salesforce My Domain, see the Salesforce Identity Implementation Guide.
As you drag the AMCalc component onto the page, you will see green highlights over the areas
of the page where you are allowed to drop the component.
11©
3 Creeks Technologies LLC 2020 – 2021
You can place the AMCalc calculator into any section that is highlighted green, but the calculator
fits best on the right-hand side of the screen where the section is a little thinner. In this section
the calculator is always visible even while the user is viewing the details of the parent record.
Once the calculator has been dropped on the screen, the page builder should look something
like this:
2. If required, use the Add Filter button on the right-hand side of the screen to create rules that
will show or hide the AMCalc calculator based on different parent record criteria. For example,
if you are adding the calculator to the account screen, you can set criteria that will only show
the calculator on the screen if the account is a customer.
3. Click the Save button to save the changes that you have made to the screen. In the pop up, be
sure to click the Activate button to make the changes that you have made available to your
users. Follow the instructions in the Activation screens to activate the screen for different
profiles.
Once you have completed these steps, you should be able to go out to the record page, generate
amortization schedules, save them (see note below), and then view them again by clicking on the
amortization record in the Amortization Schedule related list on the page.
12©
3 Creeks Technologies LLC 2020 – 2021
Note: You are able to add the AMCalc calculator to just about any object’s detail page and use it to
generate viewable amortization schedules. However, if you add the calculator to an object’s detail page
that does not have a lookup relationship with AMCalc, you will not be able to save the schedule. See the
Creating Parent Object Relationships sections to understand lookup relationships and how to create
them.
Configuring Amortization Schedule Headers
When the AMCalc calculator is used to generate an amortization schedule or when a user views a saved
amortization schedule, the schedule comes up in a modal dialog box. It is sometimes useful to your
users to also see details of the underlying parent record while viewing the amortization schedule.
AMCalc gives you the ability to easily create customized headers for amortization schedules that will
display parent record information to your users. The above example shows a header that displays the
account name, industry, account type, and address of the underlying parent account record.
You can create different headers for each type of parent record that is associated with AMCalc, each
displaying the information that is most useful for that particular type of parent record. This is done
through Salesforce Field Sets. To create a field set for a parent object, follow the below instructions:
1. In the Quick Find box of the Set Up menu, type Object Manager, and then click on the Object
Manager menu item. Next, click the name of the parent object that you are creating a header
for and then select the Field Sets menu item on the left-hand side menu.
2. Click the New button (upper right-hand side). In the Field Set Label field input AMCalcHeader,
press the tab button twice to get into the Where is this used? Box (accept the default Field Set
Name value) and type a description in the box. Click the Save button to go to the next page
13©
3 Creeks Technologies LLC 2020 – 2021
Important: In order for AMCalc to find the field set, it must be named AMCalcHeader. If you
have multiple Salesforce objects that are parents to AMCalc, Salesforce allows you to have a
field set in each parent object called AMCalcHeader.
3. Drag and drop the fields that you would like to display in the header down to the In the Field Set
box
When you have all of the fields that you would like to display to the users in the In the Field Set
box, click the Save button in the upper left-hand corner.
Repeat the above three steps for each parent object that you would like to create a header for.
14©
3 Creeks Technologies LLC 2020 – 2021
AMCalc Administration Tools
The AMCalc package has three administration tools that allow the creation and maintenance of AMCalc
supporting data. These three tools are described below.
AMCalc Calculator Definition Administration
This tool allows you to create calculation definitions that are used by AMCalc calculators that
are added to Salesforce Communities pages. Calculator definitions drives the type of loan that a
calculator on the communities page generates, which calculator fields are shown on-screen and
are editable by the users, the labels displayed on the screen, and other attributes of the
calculator.
AMCalc Interest Rate Administration
Interest rate administration lets you create named interest rate entries. Once saved and
activated, interest rate entries can be selected from AMCalc calculators. When an interest rate
entry is selected by a user, the most current rate for that entry is used to generate the payment
schedule.
AMCalc Export Template Administration
The export template administration tool allows you to create export definitions that users can
then select from when exporting amortization schedule information. See the AMCalc User
Guide for information on how amortization schedule exports can be used.
These administration tools are independent of each other, so they can be placed on different Salesforce
screens depending on which of your users will be responsible for each portion of the AMCalc
administration. Typically though, these tools would be placed on a Salesforce app’s home page.
As can be seen in the above screen shot, we recommend that the AMCalc Calculator Definition
Administration tool and AMCalc Export Template Administration tools be placed on the wider left-hand
column of the screen. The right-hand side of the page layout provides plenty of room to display the
AMCalc Interest Rate Administration tool.
15©
3 Creeks Technologies LLC 2020 – 2021
Adding any of the administration tools to a Salesforce home page screen follows the process that you
went through to add the AMCalc Calculator to a record page, but you will need to be on a Salesforce
app’s home page instead of a record detail page. Once on an app home page, click the gear icon, select
edit page, drag and drop the component s onto the page (they will be under the Custom heading in the
Components listing), save and activate the screen.
An AMCalc Lightning app was installed with the package (see below) and you have the option of placing
these administration tools in the home page of it. If you do, you can restrict user access to the AMCalc
admin tools by limiting the profiles that have access to the AMCalc Lightning app.
AMCalc Interest Rate Administration
The AMCalc Interest Rate Administration tool allows you to create predefined interest rate entries that
can then be used to get the latest interest rate values by amortization calculators and the AMCalc web
service. From the AMCalc calculator user perspective, interest rate entries allow your users to not be
concerned with what the most current interest rate value is. Instead, they just pick from a list of named
interest rates and the latest interest rate value is inserted into the calculator for them.
With the AMCalc Interest Rate Administration tool, you have a central place to quickly and easily create
and maintain the interest rate values that your company uses. Additionally, as interest rate entries are
updated with the latest value, the old interest rate is archived. This allows you to report on historical
interest rates that your company has used. Your AMCalc package came with a number of predefined
interest rate reports. You can use these to report on historical interest rates or create your own reports.
To create a new interest rate entry, select the New button in the AMCalc Interest Rate Administration
tool or select an existing interest rate entry from the drop down to edit it.
16©
3 Creeks Technologies LLC 2020 – 2021
The below table describe the fields for an Interest rate entry.
Field Name Description
Name The name of the interest rate entry. This is the name that users will see
when selecting the entry while in a calculator.
Interest Rate The interest rate value for the entry.
Active Checking active makes the interest rate available for selection by a user
while in a calculator, a calculator definition, and available for retrieval via the
AMCalc web service.
Note: You will not be allowed to mark an active interest rate entry inactive
if it is being used in an AMCalc Calculator Definition (see the AMCalc
Calculator Definition Administration). You must remove the reference to
the interest rate entry from the calculator definition before you are
allowed to unchecking the active box. If you uncheck the active box,
AMCalc will automatically validate all calculator definitions and display the
names of any definitions where the interest rate entry was found.
Notes Provide any other information necessary for the entry in the text area.
Once you have entered or updated your interest rate entry, click the Save button to save your changes.
If you no longer require an interest rate entry, you can delete it by clicking the Delete button. However,
similar to inactivating an active interest rate entry, you will not be allowed to delete an entry if it is
referenced on an AMCalc Calculator Definition.
17©
3 Creeks Technologies LLC 2020 – 2021
Caution! Be aware that if you delete an interest rate entry you are deleting not only the current
interest rate value, but also all historical rates in the system for that entry.
Also keep in mind that deleting interest rate entries only deletes the interest rate entry records in the
system. All saved amortization schedules that have used that interest rate entry in the past will not be
affected by the deletion of the interest rate entry.
AMCalc Calculator Definition Administration
Calculator definitions are used to configure how an AMCalc calculator on a Salesforce Communities page
behaves. The AMCalc Calculator Definition Administration tool allows you to create and modify these
definitions. This section will explain how to use the tool.
Note: Depending on your Salesforce system, Digital Experiences may be listed in the Setup menu
instead of Communities. Although this guide uses the term Communities, it is synonymous with the
term Digital Experiences.
Once you have created calculator definitions, see the AMCalc Calculators for Salesforce Communities
section in this document to learn how to apply the definitions to a Salesforce Communities AMCalc
calculator.
If you are not familiar with Salesforce Communities, it is highly recommended that you read the
Salesforce help pages on them here. Additionally, you can get hands-on Communities administration
training with Salesforce Trailhead.
To create a calculator definition, click the New button, the calculator definition screen will be displayed.
This screen is broken into three sections; Definition Attributes, Calculator Definition, and Saved Schedule
Definition.
18©
3 Creeks Technologies LLC 2020 – 2021
Definition Attributes
Fill in the definition attribute fields that are described below.
Calculator Definition Name
Give the calculator a descriptive name. This name will be shown in a drop down list that the user will
select from to apply the definition to a Communities page.
Active?
When the active box is checked, the definition will be shown in the drop down list and the user
configuring the Communities page will be able to select the definition for the page. If you want to save
the definition but are not done defining it, keep this box unchecked so that it cannot be selected on the
communities definition pages.
Note: If an active calculator definition is applied to a communities page calculator and then the
definition is made inactive, the definition will not be removed from the communities page and the
calculator will still function on the communities page. Before de-activating a definition that was
previously active, be sure to remove it from any Salesforce Communities page.
Caution: You are able to delete a calculator definition, but if that definition is used in a Salesforce
Communities site, the calculator will display an error when a user goes to the site. For this reason,
before deleting a definition, be sure to remove the calculator definition from all Communities sites.
Description
Provide any additional information about the calculator definition in the Description section.
Calculator Definition
This section allows you to defining what type of amortization schedule your communities AMCalc
calculator will generate, the fields that will be displayed, whether they are editable by the user, and a
number of other aspects of the calculator.
19©
3 Creeks Technologies LLC 2020 – 2021
The top portion of the section is shown below.
All of the input fields in this section are required to have a value to save the definition. Below is
description of the fields in this section of Calculator Definition.
Field Name Description
Loan Type Select the loan type that will be calculated.
Term Period Time Unit Select either month or year for the time unit that will be used to specify the
length of the loan.
Calculation Results The calculation results field specifies what is displayed to the communities
user once the amortization calculation is complete. You can specify whether
the user sees only a single fixed payment amount, or whether all payments
are displayed to the user. See below for more information.
Below are examples showing the differences between selecting each of the two Calculation Results
options.
Show single fixed payment amount Show all schedule payments
Whether a communities calculator can or cannot show a single fixed payment depends on the loan type
selected. A number of the loan types that AMCalc generates amortization schedules for have variable
loan payments. If you select a loan type that generates a variable payment schedule, and select Show
single fixed payment amount from the Calculation Result drop down list, AMCalc will ignore your
selection and instead show all schedule payments to the Communities user. If your calculator definition
selections results in this situation, you will receive a warning message.
20©
3 Creeks Technologies LLC 2020 – 2021
The next section of the Calculator Definition screen contains a cell for each calculator input that applies
to the loan type that has been selected. Within each cell are the attributes that can be applied to the
input.
Below are descriptions of all of the possible attributes that you may see in a field cell. Note that not all
attributes are applicable to all field types.
Attribute Name Description
Label This is the label for the field that the Communities user will see when using
the calculator.
You will only be required to provide a Label value if the field is displayed on
screen.
Default Value The default value that this field will have when the calculator that this
definition is applied to is used on the Communities site.
If User Editable is checked, the default value can be changed when the
calculator is used. If User Editable is not checked, the value cannot be
changed by the communities user and the default value indicated in this field
is what will be used to calculate the amortization schedule.
Default Value For interest rate, you can select one of two possible ways to define a default
(Interest Rate cell only) value:
1. Select a pre-defined interest rate entry from the drop down list.
21©
3 Creeks Technologies LLC 2020 – 2021
When you use an interest rate entry, AMCalc will dynamically insert
the current interest rate into the calculator when it is used by the
communities user. This allows you to change interest rates in the
background through the AMCalc Interest Rate Administration tool
without having to modify the calculator definition.
2. Input a Manually Entered Rate in the space provided. The rate
entered will be static for this definition and you will have to come
back to the calculator definition to update the interest rate.
These two ways to define a default value for interest rate are mutually
exclusive to each other. Only indicate a value for one of the two options.
No matter which way you define a default value for interest rate, the same
behavior applies in regards to whether User Editable is or is not checked as
was described above.
Default Value For a communities calculator, the loan start date defaults to the date that the
(Start Date cell only) calculator is being used by the communities user. You have the option to
dynamically change the start date by adding up to 100 days to the current
date by using the slider.
For example, if you define your calculator by setting the slider to 45 days, and
a communities user runs the calculator on October 1st, the start date of the
loan will be set to November 15th.
Again, checking User Editable or not has the same behavior as described
before.
Allowable Range For fields that take a number value, you can indicate a minimum and
maximum value in order to restrict input within a certain range.
Allowable range is optional and only relevant when the field is user editable.
User Editable? Indicates whether the user can or cannot edit the field when they are using
the calculator on a communities site.
If User Editable is checked, Display On Screen must also be checked.
Display On Screen? Indicates if the field will be displayed on the screen to the communities user.
If Display On Screen is checked and User Editable is checked, the field will be
displayed, along with any default value, in the appropriate input field for the
data type of the field.
22©
3 Creeks Technologies LLC 2020 – 2021
Note: all calculator inputs require a value when the communities user attempts to run the calculator.
What this means from the calculator definition perspective is that either:
Each cell must be set to Display On Screen and User Editable so that the communities user can
input a value.
-Or-
The field’s value must be provided by saving a default value when the calculator definition is
created.
Also be aware that the cells shown on the calculator definition screen may vary slightly from one loan
type to another, as some loan types require additional input values.
Saved Schedule Definition
When you collect leads through a communities calculator, AMCalc saves an amortization schedule with
the lead’s contact information. This section allows you to define how the amortization schedule is
saved.
The below table describe the fields in Saved Schedule Definition section.
Field Name Description
Saved Schedule Name Indicate the name that will be set for the saved amortization schedule. You
can utilize the merge fields to have AMCalc name the schedule dynamically
in order to better identify the schedule with the lead. The merge fields that
you can use are:
The lead’s first name: {!LeadFirstName}
The lead’s last name: {!LeadLastName}
The lead’s company name: {!LeadCompany}
The calculator definition name: {!CalculatorDefinition}
Save Schedule Status Indicate the status to be given to the saved schedule
23©
3 Creeks Technologies LLC 2020 – 2021
Once the calculator definition is complete, be sure to click the Save button at the top of the tool.
AMCalc will validate your definition to ensure that all input values are correct and do not conflict with
one another. For instance, if a calculator input field is marked as user editable but the Display on Screen
box is not checked, an error message will be displayed so that the issue can be corrected.
AMCalc Export Template Administration
When viewing a saved amortization schedule, users have the option to export information from the
schedule. Your users may want to export amortization schedule information so that the amortization
schedule can be formatted and included in customer presentation packets, or to quickly upload
payment amounts and dates to a payment processing system. To perform the export they will pick a
saved export template and select either an email or record attachment as the export method. See the
AMCalc User Guide for details on how export templates are used.
The AMCalc Export Template Administration tool allows you to define export templates that users can
select from. The table below explains the input fields required to create an export template.
24©
3 Creeks Technologies LLC 2020 – 2021
Field Name Description
Name The name of the export template. This is the name that users will see when
selecting the template to use.
Delimiter Select either a comma as the field delimiter to create a CSV file or a tab to
create a tab delimited export file.
File Extension Select either .TXT or .CSV for the default file extension
Include Header in When selected the column headings specified in the Configure Export File
Export File Format section are included in the export file. To include only schedule
information with no headers, keep this box unchecked.
Notes Include any additional information about the template in the text area
Configure Export File To include a specific column heading in the file include it here. If you leave
Format – Headings this field blank, the heading value will be defaulted when the data field for
the column is selected. Note that even though values are shown in the
headings fields, they will not be included in export files if the Include Header
in Export File check box is not checked.
Configure Export File Select the data that will go into each column of the export file in the order in
Format – Data which you would like it to appear in the file.
You are not required to select data for each available column. If you want an
export file that contains only the payment date and the payment amount
then only configure those two columns.
If you would like to have blank columns in the export file select Blank (no
data) from the drop down.
To remove a column from a previously saved export template, select the
Remove Column entry. Once saved, the column will be removed from the
template and columns to the right will be shifted left.
When you have completed your export template, click the Save button at the top of the form.
AMCalc Calculators for Salesforce Communities
Earlier in this document you learned how to create AMCalc Calculator Definitions. In this section you
will learn how to apply those definitions to an AMCalc Calculator for Communities component.
Communities calculators are fully configurable not only in how the calculator operates (as defined by the
Calculator Definition that it uses), but also in what is displayed to the communities user. Button labels,
on-screen messages, whether lead information is collected or not, and much more can all easily be
configured. This allows you to use wording that makes sense to your prospects or users, as well as
company branding within your communities sites.
AMCalc calculators for communities can be added to Salesforce Communities sites that are publicly
available (for example, Internet users can access them without having to login to Salesforce), or they can
25©
3 Creeks Technologies LLC 2020 – 2021
be added to Communities sites that named users login to. Additionally, multiple calculators can be
deployed on either the same communities site or on different communities sites. Each can generate a
specific type of schedule, as well as have its own look and feel.
This section assumes that you already know how to create and administer Salesforce Communities sites.
If you do not, please familiarize yourself with the Salesforce documentation on the subject which can be
found here. Additionally, you can get hands-on Communities administration training with Salesforce
Trailhead.
The sections that follow assume that you already have a Communities site created. If you do not, create
one or see the Salesforce documentation on Communities referenced above.
Configuring an AMCalc Calculator for a Communities Site
To add an AMCalc calculator to your site, navigate to the site’s Builder by typing All Communities into
the Setup menu’s quick find box. Remember some Salesforce orgs use the term Digital Experiences
instead of Communities. If yours does, type All Sites into the Quick Find box instead.
In the component list, scroll down to the Custom Components section and drag and drop the AMCalc
Amortization Calculator component onto the page.
26©
3 Creeks Technologies LLC 2020 – 2021
The AMCalc calculator component will prompt you to select one of the calculator definitions that you
created earlier from the component attribute menu.
Use the table below to configure all of the component attributes for your AMCalc calculator. While
filling in the attribute information, you can also hover your mouse pointer over the information icon
next to each attribute to view information about the attribute.
Attribute Name Description
Calculator Definition Select the saved AMCalc Calculator definition that you created earlier to
apply to this calculator.
As stated before, the calculator definition drives the type of amortization
schedule that will be generated and the inputs into the amortization
calculator.
Once you have selected a calculator definition from the drop down, the
AMCalc Amortization Calculator component will refresh and you will see
the calculator fields that are in the definition.
Calculator Title The title that display at the top of the component.
Calculator Button Label The label on the button that the user will click to run the calculator
Payment Dialog Pop-Up The title at the top of the pop up dialog that is shown when the results of
Title the calculation are complete.
Display Loan Description? To display a short description of the loan terms in the results pop up, select
the check box.
An example of a loan description is “$10,000.00 for 10 years at 2.5%
interest”.
Payment Amount Label The label next to the calculated payment amount.
Display Payment Check the box to display a short description of the payment terms in the
Description? result pop up.
An example of a payment description is “Total of 120 Monthly payments”.
Additional Payment Add any additional text that you would like to display to the user in the
Information results dialog such as disclaimers and legal notices in this field.
Payment Pop-up Dialog The label on the button that the user clicks to close the result dialog and go
27©
3 Creeks Technologies LLC 2020 – 2021
Close Button Label back to the calculator.
Calculator Error Message Input a generic error message that the users sees if there are any issues
running the calculator.
Tip: Keep this attribute blank while you are configuring and testing your
site. Then, if there are issues running the calculator, error specific
messages will be returned by the AMCalc calculator engine. This will
make it easier to resolve the issue. Once you are ready to go live, the
error specific messages may not make sense to your end users, so you
can add a generic error message here along with information on how
the user can contact your company for help.
Collect Leads? Check this box if you will be collecting lead information with this calculator.
Important! Remember that in order to collect leads, you must have a
relationship created between AMCalc and the Salesforce standard
object Lead. See the Relating AMCalc Schedules to Other Salesforce
Objects section at the beginning of this guide for details.
All attributes below the collect leads checkbox are only relevant when you
are collecting leads.
Lead Input Form Button The label on the button that the user will click to open up the lead
Label information input form.
If you are not collecting leads, this button will not be displayed on screen.
Lead First Name Label The label for the lead first name input field.
Leave this field blank to not display the lead first name input field on the
form.
Lead Last Name Label The label for the lead last name field.
This field is required to create a lead record, so a value must be input in
this field.
Lead Company Label The label for the lead’s company name.
This field is required to create a lead record. If your users are individuals
that are not associated with a company, change the default value of this
attribute to “none” to not display the company field on the lead input
form. AMCalc will then replicate the lead’s last name to the company
name field on the lead record.
Lead Email Label The label for the lead email input field.
Leave this field blank to not display the lead email input field on the form.
28©
3 Creeks Technologies LLC 2020 – 2021
Note: There must be at least one contact method displayed for the
lead. If you do not display the email field, you must display the lead
phone number field.
Lead Phone Number Label The label for the lead phone number input field.
Leave this field blank to not display the lead phone number input field on
the form.
Note: there must be at least one contact method displayed for the lead.
If you do not display the phone number field, you must display the lead
email field.
Lead Additional To provide a text area field for the lead to input any additional
Information information, input a field label here. Leave blank to not display the field on
the form.
Lead Source When creating a lead record in Salesforce, the Lead Source is a required
field. Select the lead source from the drop down to assign to lead records
created from this AMCalc calculator.
If your company gets leads through multiple sources, the Lead Source field
is a good way to uniquely differentiate how a lead was collected.
Lead Status Lead Status is another field that is required to create a lead record. Select
the Lead Status to assign to a lead from this calculator.
Submit Lead Button Label The label on the button that the user clicks to submit their lead
information.
Submit Lead Button Click The title of a message box that pops up when the user click the submit
Message Title button.
Submit Lead Button Click The text in the message box that pops up when the user click the submit
Message Text button.
Convert Schedule To Select the Salesforce object that the amortization schedule created by this
lead will be converted to when a Salesforce user converts the lead record.
When the AMCalc user clicks the button to submit their lead information, a
lead record is created and details of their loan is associated with that lead
record. When a Salesforce user later converts the lead record to a contact,
AMCalc moves that amortization schedule to the Salesforce object
indicated here. See the AMCalc and Process Builder section for more
information. If you are unfamiliar with the Salesforce lead conversion
process, see these Salesforce help pages.
Note that only those Salesforce objects that already have a relationship
with AMCalc will be listed in the Convert Schedule To drop down list. To
29©
3 Creeks Technologies LLC 2020 – 2021
add a relationship, see the Relating AMCalc Schedules to Other Salesforce
Objects section at the beginning of this guide.
30©
3 Creeks Technologies LLC 2020 – 2021
Examples of AMCalc Communities Component Attributes Displayed on Screen
The diagrams below are provided to help you understand how the attribute values set for AMCalc
communities calculators look on screen.
The calculator fields
displayed and how
they act are defined
by the calculator
definition
AMCalc Communities
Calculator
Calculation Results Dialog
31©
3 Creeks Technologies LLC 2020 – 2021
Lead Info Input Form
32©
3 Creeks Technologies LLC 2020 – 2021
Configuring the Communities Guest User Account to Run AMCalc Calculators
Salesforce Communities sites can be configured so that they are accessible by users that are not
authenticated by Salesforce (i.e. they are not required to login). Communities site that do not require a
login are public sites available to any Internet user with a link to the site. This is one of the most
common ways to use AMCalc calculators to collect leads.
This type of communities site uses a special Salesforce guest user account when they access the
communities’ web pages. Each Salesforce communities site that you create within your Salesforce org
will have its own unique guest user account and all unauthenticated users coming to a site share the
guest user account when they access its pages. To learn more about guest users, see this Salesforce
documentation.
For security reasons, the guest user account is treated and administered differently from typical
Salesforce user accounts. This section will describe how to give the proper permissions to a guest user
account so that AMCalc schedules can be generated and contact information can be gathered when
unauthenticated site users, your company’s leads, run the AMCalc calculator.
The following table describes the specific access that will be granted to a site’s guest user once you have
completed all of the steps in this section.
Object Name Access
Lead Record create access so that the prospect can leave their contact
information.
Amortization Schedule Record create access so that the loan details that the prospect is
requesting can be saved.
Calculator Definition Read only access so that the calculator definition that is configured for the
communities site can be read and the calculator displayed on the screen
for the prospect.
Interest Rate Entry Read only access so that any interest rate entries configured within the
calculator definition can be read and used in the amortization calculation.
Configuring the guest user account is a three step process. Since each separate communities site has its
own unique guest user account, if you are deploying AMCalc on more than one communities site, you
will need to perform these three steps for each guest user account.
33©
3 Creeks Technologies LLC 2020 – 2021
Step 1: Add the AMCalc permission set to the guest user account
Navigate to the communities builder for the site and click the settings icon on the bottom of the left-
hand side of the screen:
A profile with the same name as your communities site will be shown under the Guest User Profile
heading. Click the profile name to open up the profile page, and then click the View Users button at the
top of the profile page. Now click on the Site Guest User name listed for the site. Scroll down to the
Permission Set Assignments list, click the Edit Assignments button, add the AMCalc Amortization
Schedule Create (Communities user) permission set to the Enabled Permission Set box, and click the
Save button.
Step 2: Grant create access to the Lead object
While still in the guest user account page, click the profile name link for the guest user to go to the
profile page and then click the Edit button. Scroll down the page to the Standard Object Permissions
section and click the check box under the Create column next to the Lead object.
When you check the Create box, the Read check box will automatically be selected too. This is standard
behavior. Scroll down to the bottom of the page and click the Save button
Step3: Create sharing rules
For the final step, type the word Sharing into the Quick Find box in the Setup menu and then click the
Sharing Settings menu item shown under the Security heading. Scroll down the page until you find the
sections labeled CalculaterDefinition Sharing Rules and Interest Rate Entry Sharing Rules.
34©
3 Creeks Technologies LLC 2020 – 2021
For both the CalculatorDefinition Sharing Rules and the Interest Rate Entry Sharing Rules, perform the
following steps:
1. Click the New button to create a new sharing rule.
2. Enter a label for the rule such as “AMCalc Communities read access”, press the tab button to
copy the label to the Rule Name field, and add a description.
3. In the Step 2: Select your rule type section, select the Guest user access, based on criteria option.
4. In the Step 3: Select which records to be share section you will be entering one criteria. In the
Field drop down, select IsActive. In the Operator drop down, select equals. Click the magnifying
icon next to the Value field and select True.
5. In the Step 4 section, select the Communities guest user name that this sharing rule will apply
to. If you only have one communities site, the guest user name should already be defaulted.
6. Lastly, ensure that Read Only is selected in the Step 5 section and then click Save.
A confirmation box should come up asking you to confirm your changes, click Ok. Your
Salesforce system will now run a background process to apply the sharing rule you just created
to data in your system. When the background process is complete you will receive an email
indicating so.
Below is a screen print of a completed sharing rule.
35©
3 Creeks Technologies LLC 2020 – 2021
Your communities site’s guest user account should now have the permissions that will allow Internet
users to access AMCalc Amortization Calculators on the site, generate payment information, and submit
their contact information as a lead.
Once you activate your communities site and publish it, you can test that the site is publically accessible
from the Internet. If you are having trouble accessing or using the site, ensure that you have completed
all of the following:
1. Your communities site has been Activated and published successfully.
2. You have completed all of the steps in the Configuring the Communities Guest User Account to
Run AMCalc Calculators section above and received a confirmation email from Salesforce that
the sharing rules that you created have successfully been saved.
3. An AMCalc Amortization Calculator has been added to your communities’ web page and the
web page it is on does not require a login for it to be accessed.
4. A lookup relationship has been created between the Amortization Schedule object and the Lead
object.
36©
3 Creeks Technologies LLC 2020 – 2021
AMCalc and Salesforce Process Builder
When the AMCalc package was installed, a Salesforce Process Builder process called Convert AMCalc
Schedule with Lead was created. As the name implies, this process triggers when a lead that was
created by an AMCalc calculator is converted to a contact. The purpose of this process is to move the
amortization schedule created by the lead to either a contact, account, or opportunity record during
lead conversion.
This process uses the logic in an Apex class that came with the AMCalc package to move the
amortization schedule. The logic behind this process is not very complex. It basically determines if the
lead record was converted and, if so, moves the amortization schedule to the Salesforce object that was
indicated in the Convert Schedule To attribute of the AMCalc communities calculator (see the AMCalc
Calculators for Salesforce Communities section).
37You can also read