Best Practices Guide for Microsoft SQL Server with ONTAP - NetApp
←
→
Page content transcription
If your browser does not render page correctly, please read the page content below

Technical Report

 Best Practices Guide for Microsoft SQL Server
 with ONTAP
 Pat Sinthusan, NetApp
 March 2019 | TR-4590

Abstract
This best practices guide enables storage administrators and database administrators to
successfully deploy Microsoft SQL Server on NetApp® storage.
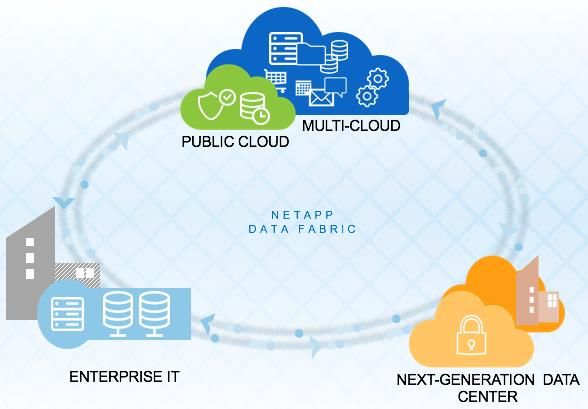
TABLE OF CONTENTS

1   Introduction ........................................................................................................................................... 4
    1.1    Purpose and Scope ........................................................................................................................................4

    1.2    Intended Audience ..........................................................................................................................................4

2   SQL Server Workload Types ............................................................................................................... 4
    2.1    Testing Benchmark .........................................................................................................................................5

3   SQL Server Configuration ................................................................................................................... 5
    3.1    Shared Instance Versus Dedicated Instance ..................................................................................................5

    3.2    CPU Configuration ..........................................................................................................................................6

    3.3    Memory Configuration .....................................................................................................................................7

4   Database Files and Filegroups.......................................................................................................... 12

5   Database and Storage ........................................................................................................................ 16
    5.1    Aggregates....................................................................................................................................................16

    5.2    Volumes ........................................................................................................................................................16

    5.3    LUNs .............................................................................................................................................................17

    5.4    SMB Shares ..................................................................................................................................................19

    5.5    Data Storage Design .....................................................................................................................................20

    5.6    Virtualization .................................................................................................................................................23

6   Storage Efficiency and Manageability .............................................................................................. 27
    6.1    Snapshot Copies...........................................................................................................................................27

    6.2    Thin Provisioning ..........................................................................................................................................28

    6.3    Space Guarantee ..........................................................................................................................................28

    6.4    Space Reclamation .......................................................................................................................................29

    6.5    Fractional Reserve ........................................................................................................................................29

    6.6    NetApp FlexClone .........................................................................................................................................30

    6.7    Compression, Compaction, and Deduplication .............................................................................................30

    6.8    NetApp SnapMirror .......................................................................................................................................32

7   Data Fabric and SQL Server .............................................................................................................. 33
    7.1    Introduction ...................................................................................................................................................33

    7.2    Cloud Volumes ONTAP ................................................................................................................................34

    7.3    Cloud Volumes Service .................................................................................................................................37

8   Conclusion .......................................................................................................................................... 43

2         Best Practice Guide for Microsoft SQL Server with ONTAP                                                            © 2019 NetApp, Inc. All rights reserved.
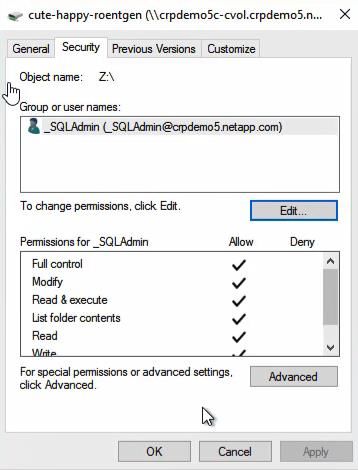
Appendix .................................................................................................................................................... 43

Where to Find Additional Information .................................................................................................... 50

LIST OF TABLES
Table 1) Typical SQL Server workloads. ........................................................................................................................5
Table 2) Volume guarantee set to none. ......................................................................................................................29
Table 3) Setting up volume with autodelete and autogrow. ..........................................................................................30
Table 4) Example of quotas and service level for workload with 16,000 IOPS. ............................................................41

LIST OF FIGURES
Figure 1) Log entries indicate number of cores being used after SQL Server startup. ...................................................6
Figure 2) Adjusting minimum and maximum server memory using SQL Server Management Studio. ..........................8
Figure 3) Configuring max worker threads using SQL Server Management Studio. ......................................................9
Figure 4) Configuring index create memory and min memory per query using SQL Server Management Studio........11
Figure 5) Filegroups. ....................................................................................................................................................13
Figure 6) Option for granting perform volume maintenance task privilege during SQL Server installation. ..................15
Figure 7) Basic SQL Server database design for NetApp storage for SMSQL or SnapCenter.....................................21
Figure 8) SQL Server database design for NetApp storage using SMSQL or SnapCenter. .........................................22
Figure 9) Server database design for NetApp storage using SMSQL or SnapCenter. .................................................23
Figure 10) Example of simple database layout on VMDKs with VMFS or NFS datastores. .........................................26
Figure 11) Example of database layout on VMDKs with VMFS or NFS datastores. .....................................................27
Figure 12) NetApp Data Fabric – helping you to transform seamlessly to a next-generation data center. ...................34
Figure 13) Assign _SQLAdmin account, which is SQL Server Service Account, to have full access to the volumes. ..38
Figure 14) Example of deploying SQL Server data and log files to Cloud Volumes Service with SMB protocol. .........39
Figure 15) SQL Server Always On with Cloud Volumes Service. .................................................................................42

 3           Best Practice Guide for Microsoft SQL Server with ONTAP                                                        © 2019 NetApp, Inc. All rights reserved.
1 Introduction
SQL Server is the foundation of Microsoft's data platform, delivering mission-critical performance with in-
memory technologies and faster insights on any data, whether on the premises or in the cloud. Microsoft
SQL Server builds on the mission-critical capabilities delivered in prior releases by providing
breakthrough performance, availability, and manageability for mission-critical applications. The storage
system is a key factor in the overall performance of a SQL Server database. NetApp provides several
products to allow your SQL Server database to deliver enterprise-class performance while providing
world-class tools to manage your environment.

1.1         Purpose and Scope
This document describes best practices and offers insight into design considerations for deploying SQL
Server on NetApp storage systems running NetApp ONTAP® software, with the goal of achieving effective
and efficient storage deployment and end-to-end data protection and retention planning. The scope of this
guide is limited to technical design guidelines based on the design principles and preferred standards that
NetApp recommends for storage infrastructure when deploying SQL Server. The end-to-end
implementation is out of the scope of this report.
The best practices and recommendations described in this guide enable SQL Server architects and
NetApp storage administrators to plan a highly available and easy-to-manage SQL Server environment
and to meet stringent SLAs. NetApp assumes that the reader has working knowledge of the following:
•       NetApp ONTAP software
        −    NetApp SnapCenter® as backup software, which includes:
             −    SnapCenter Plug-in for Microsoft Windows
             −    SnapCenter Plug-in for SQL Server
        −    SnapManager® for SQL Server as backup software, which includes.
             −    SnapDrive for Windows
             −    SnapManager for SQL Server
•       Microsoft SQL Server architecture and administration
For configuration compatibility across the NetApp stack, see the NetApp Interoperability Matrix Tool
(IMT).

1.2         Intended Audience
This technical report is intended for NetApp customers, partners, employees, and field personnel who are
responsible for deploying a SQL Server database solution in a customer environment. NetApp assumes
that the reader is familiar with the various components of the listed solution previously.

2 SQL Server Workload Types
The SQL Server database platform can support several applications. Before deploying SQL Server, you
must understand the database workload requirements of the applications that your SQL Server instances
support. Each application has different requirements for capacity, performance, and availability, and
therefore, each database should be designed to optimally support those requirements. Many
organizations classify databases into multiple management tiers, using application requirements to define
SLAs. SQL Server workload can be described as follows:
•       OLTP databases are often also the most critical databases in an organization. These databases
        usually back customer-facing applications and are considered essential to the company’s core
        operations. Mission-critical OLTP databases and the applications they support often have SLAs that
        require high levels of performance and are sensitive to performance degradation and availability.

    4        Best Practice Guide for Microsoft SQL Server with ONTAP           © 2019 NetApp, Inc. All rights reserved.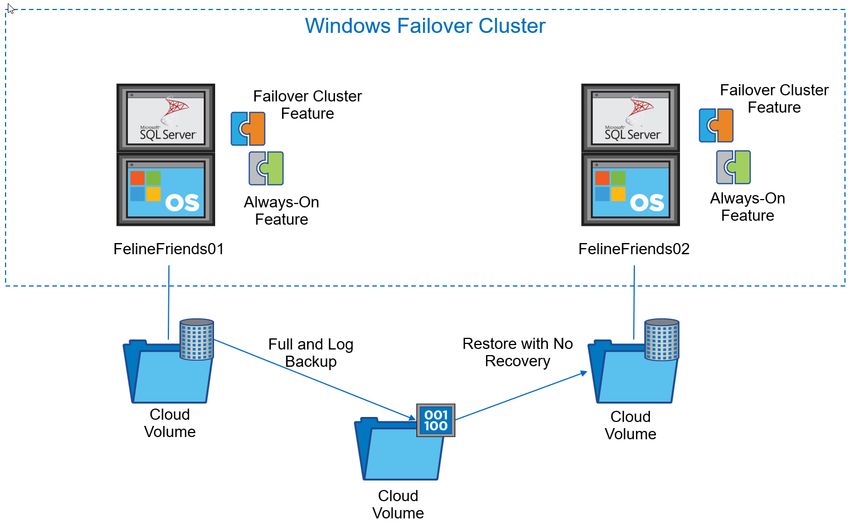
They might also be candidates for clustering with Windows failover cluster or Always On Availability
        Groups. The I/O mix of these types of databases is usually characterized by 75% to 90% random
        read and 25% to 10% write.
•       Decision support system (DSS) databases can be also referred to as data warehouses. These
        databases are mission critical in many organizations that rely on analytics for their business. These
        databases are sensitive to CPU utilization and read operations from disk when queries are being run.
        In many organizations, DSS databases are the most critical during month, quarter, and year end. This
        workload typically has a 100% read I/O mix.

2.1       Testing Benchmark
The Transaction Process Council (TPC) is a nonprofit corporation founded to define transaction
processing and database benchmarks and to disseminate objective, verifiable TPC performance data to
the industry. TPC tests simulate complete compute environments where a population of users executes
transactions against databases. Table 1 summarizes the typical SQL Server testing workloads.

Table 1) Typical SQL Server workloads.

 Workload Type                                      TPC Test               Read/Write Ratio (Percentages)

 OLTP                                               TPC-C                  ~75/25

                                                    TPC-E                  ~90/10

 DSS                                                TPC-H                  ~100/0

Although various workload generation options are available, we generally focus our efforts on measuring
the performance of SQL Server databases when handling transactional workloads and use the TPC-E
tools from Microsoft or TPC-H using HammerDB (HammerDB.com). The detailed instructions on how to
use these specific benchmarks are beyond the scope of this document.

3 SQL Server Configuration
This section provides general guidance about how to configure SQL Server settings that should be
considered before and after installing SQL Server.

3.1       Shared Instance Versus Dedicated Instance
If an application has many schemas/stored procedures, it could potentially affect other apps that share
SQL Server instance. Instance resources could potentially become divided/locked, which in turn causes
performance issues for any other apps with databases hosted on the shared SQL Server instance.
Troubleshooting performance issues can be complicated because you must figure out which instance is
the root cause. This question is weighed against the costs of operating system and SQL Server licenses.
If application performance is paramount, then a dedicated instance is highly recommended.
Microsoft licenses SQL Server at the server level per core and not per instance. For this reason,
database administrators are tempted to install as many SQL Server instances as the server can handle,
to save on licensing costs, which can lead to major performance issues later.
To obtain optimal performance NetApp, recommends choosing dedicated SQL Server instances
whenever possible.

    5       Best Practice Guide for Microsoft SQL Server with ONTAP              © 2019 NetApp, Inc. All rights reserved.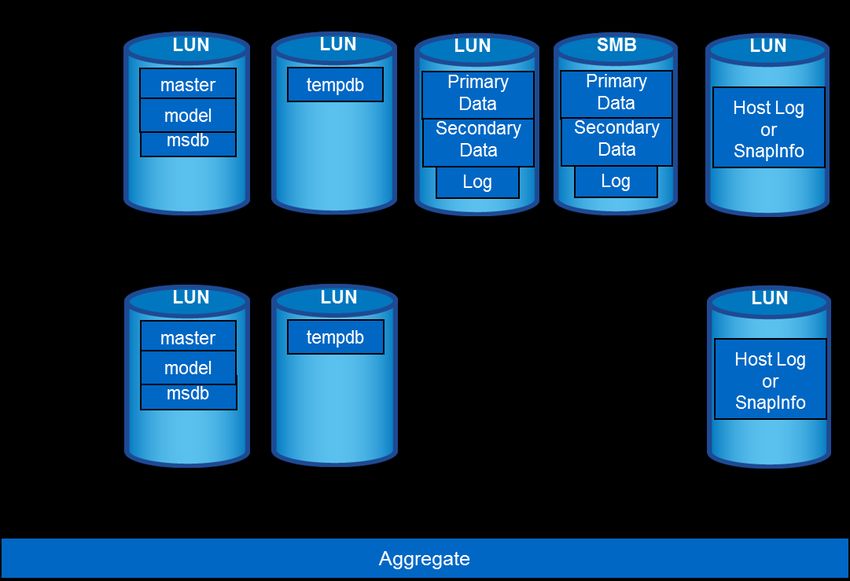
3.2   CPU Configuration

Hyperthreading
Hyperthreading is Intel’s proprietary simultaneous multithreading (SMT) implementation, which improves
parallelization of computations (multitasking) performed on x86 microprocessors. Hardware that uses
hyperthreading allows the logical hyperthread CPUs to appear as physical CPUs to the operating system.
SQL Server then sees the physical CPUs, which the operating system presents and so can use the
hyperthreaded processors.
The caveat here is that each SQL Server version has its own limitations on compute power it can use. For
more information, consult Compute Capacity Limits by Edition of SQL Server.
There are essentially two main schools of thought when licensing SQL Server. The first is known as a
server + client access license (CAL) model; the second is the per processor core model. Although you
can access all the product features available in SQL Server with the server + CAL strategy, there’s a
hardware limit of 20 CPU cores per socket. Even if you have SQL Server Enterprise Edition + CAL for a
server with more than 20 CPU cores per socket, the application cannot use all those cores at a time on
that instance. Figure 1 shows the SQL Server log message after startup indicating the enforcement of the
core limit.

Figure 1) Log entries indicate number of cores being used after SQL Server startup.

 6      Best Practice Guide for Microsoft SQL Server with ONTAP               © 2019 NetApp, Inc. All rights reserved.
Therefore, to use all CPUs, you should use the per-processor core license. For detailed information about
SQL Server licensing, see SQL Server 2017 Editions.

Nonuniform Memory Access
Nonuniform memory access (NUMA) is a memory-access optimization method that helps increase
processor speed without increasing the load on the processor bus. If NUMA is configured on the server
where SQL Server is installed, no additional configuration is required because SQL Server is NUMA
aware and performs well on NUMA hardware.

Processor Affinity
You are unlikely ever to need to alter the processor affinity defaults unless you encounter performance
problems, but it is still worth understanding what they are and how they work.
SQL Server supports processor affinity by two options:
•       CPU affinity mask
•       Affinity I/O mask
SQL Server uses all CPUs available from the operating system (if per-processor core license is chosen).
It creates schedulers on all the CPUs to make best use of the resources for any given workload. When
multitasking, the operating system or other applications on the server can switch process threads from
one processor to another. SQL Server is a resource-intensive application, and so performance can be
affected when this occurs. To minimize the impact, you can configure the processors such that all the
SQL Server load is directed to a preselected group of processors. This is achieved by using CPU affinity
mask.
The affinity I/O mask option binds SQL Server disk I/O to a subset of CPUs. In SQL Server OLTP
environments, this extension can enhance the performance of SQL Server threads issuing I/O operations.

Max Degree of Parallelism (MAXDOP)
By default, SQL Server uses all available CPUs during query execution (if per-processor core license
chosen). Although this is great for large queries, it can cause performance problems and limit
concurrency. A better approach is to limit parallelism to the number of physical cores in a single CPU
socket. For example, on a server with two physical CPU sockets with 12 cores per socket, regardless of
hyperthreading, MAXDOP should be set to 12. MAXDOP cannot restrict or dictate which CPU is to be
used. Instead, it restricts the number of CPUs that can be used by a single batch query.
For DSSs such as data warehouses, NetApp recommends starting with this setting at 50 or so and tuning
up or down as appropriate. Make sure you measure for the critical queries in your application and adjust if
necessary.

3.3       Memory Configuration

Max Server Memory
The max server memory option sets the maximum amount of memory that the SQL Server instance can
use. It is generally used if multiple applications are running on the same server where SQL Server is
running and you want to guarantee that these applications have sufficient memory to function properly.
Some applications only use whatever memory is available when they start and do not request more even
if needed. That is where the max server memory setting comes into play.
On a SQL Server cluster with several SQL Server instances, each instance could be competing for
resources. Setting a memory limit for each SQL Server instance can help guarantee best performance for
each instance.

    7       Best Practice Guide for Microsoft SQL Server with ONTAP          © 2019 NetApp, Inc. All rights reserved.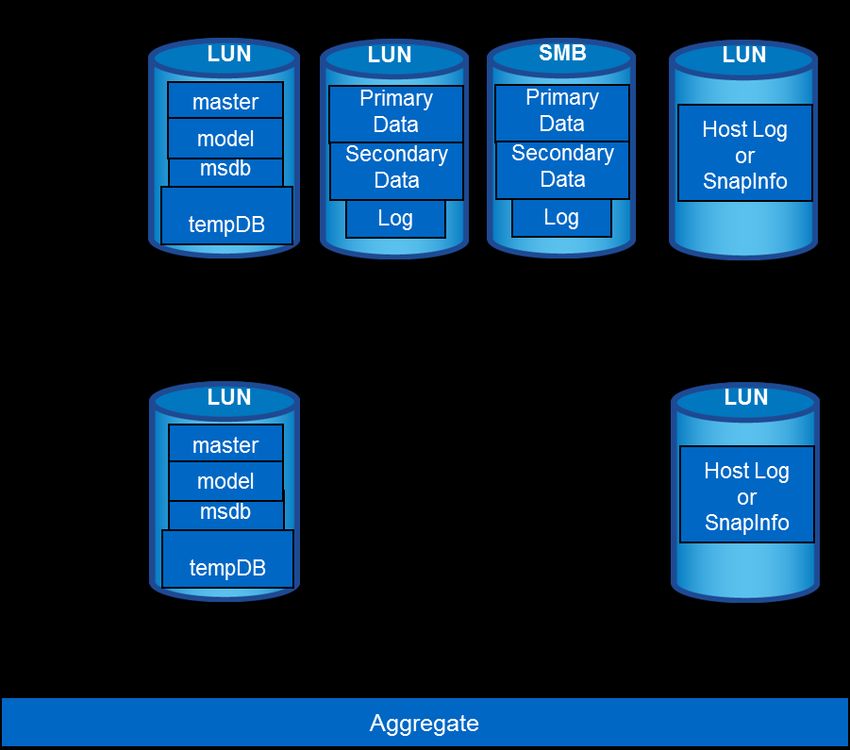
NetApp recommends leaving at least 4GB to 6GB of RAM for the operating system to avoid performance
issues. Figure 2 displays how to set up minimum and maximum server memory.

Figure 2) Adjusting minimum and maximum server memory using SQL Server Management Studio.

Using SQL Server Management Studio to adjust minimum or maximum server memory requires a restart
of the SQL Server service. You can adjust server memory using transact SQL (T-SQL) using this code:
EXECUTE sp_configure 'show advanced options', 1
GO
EXECUTE sp_configure 'min server memory (MB)', 2048
GO
EXEC sp_configure 'max server memory (MB)', 120832
GO
RECONFIGURE WITH OVERRIDE

Max Worker Threads
The max worker threads option helps to optimize performance when large numbers of clients are
connected to SQL Server. Normally, a separate operating system thread is created for each query
request. If hundreds of simultaneous connections are made to SQL Server, then one thread per query

 8      Best Practice Guide for Microsoft SQL Server with ONTAP           © 2019 NetApp, Inc. All rights reserved.
request consumes large amounts of system resources. The max worker threads option helps improve
performance by enabling SQL Server to create a pool of worker threads to service a larger number of
query requests.
The default value is 0, which allows SQL Server to automatically configure the number of worker threads
at startup. This works for most systems. Max worker threads is an advanced option and should not be
altered without assistance from an experienced database administrator (DBA).
When should you configure SQL Server to use more worker threads? If the average work queue length
for each scheduler is above 1, you might benefit from adding more threads to the system, but only if the
load is not CPU-bound or experiencing any other heavy waits. If either of those is happening, adding
more threads will not help because they end up waiting for other system bottlenecks. For more
information about max worker threads, see Configure the max worker threads Server Configuration
Option. Figure 3 indicates how to adjust maximum worker threads.

Figure 3) Configuring max worker threads using SQL Server Management Studio.

The following shows how to configure the max work threads option using T-SQL.
EXEC sp_configure 'show advanced options', 1;
GO

 9      Best Practice Guide for Microsoft SQL Server with ONTAP              © 2019 NetApp, Inc. All rights reserved.
RECONFIGURE ;
GO
EXEC sp_configure 'max worker threads', 900 ;
GO
RECONFIGURE;
GO

Index Create Memory
The index create memory option is another advanced option that usually should not be changed. It
controls the maximum amount of RAM initially allocated for creating indexes. The default value for this
option is 0, which means that it is managed by SQL Server automatically. However, if you encounter
difficulties creating indexes, consider increasing the value of this option.

Min Memory per Query
When a query is run, SQL Server tries to allocate the optimum amount of memory for it to run efficiently.
By default, the min memory per query setting allocates >=1024KB for each query to run. Best
practice is to leave this setting at the default value of 0 to allow SQL Server to dynamically manage the
amount of memory allocated for index creation operations. However, if SQL Server has more RAM than it
needs to run efficiently, the performance of some queries can be boosted if you increase this setting.
Therefore, as long as memory is available on the server that is not being used by SQL Server, any other
applications, or the operating system, then boosting this setting can help overall SQL Server
performance. If no free memory is available, increasing this setting likely hurts overall performance rather
than helps it.

 10     Best Practice Guide for Microsoft SQL Server with ONTAP               © 2019 NetApp, Inc. All rights reserved.
Figure 4) Configuring index create memory and min memory per query using SQL Server Management
Studio.

Buffer Pool Extensions
The buffer pool extension provides seamless integration of an NVRAM extension with the database
engine buffer pool to significantly improve I/O throughput. The buffer pool extension is not available in
every SQL Server edition. It is available only with the 64-bit SQL Server Standard, Business Intelligence,
and Enterprise editions.
The buffer pool extension feature extends the buffer pool cache with nonvolatile storage (usually SSDs).
The extension allows the buffer pool to accommodate a larger database working set, forcing the paging of
I/Os between the RAM and the SSDs and effectively offloading small random I/Os from mechanical disks
to SSDs. Because of the lower latency and better random I/O performance of SSDs, the buffer pool
extension significantly improves I/O throughput.
The buffer pool extension feature offers the following benefits:
•        Increased random I/O throughput
•        Reduced I/O latency
•        Increased transaction throughput

    11       Best Practice Guide for Microsoft SQL Server with ONTAP         © 2019 NetApp, Inc. All rights reserved.
• Improved read performance with a larger hybrid buffer pool
• A caching architecture that can take advantage of existing and future low-cost memory
For buffer pool extensions, NetApp recommends:
• Make sure that an SSD-backed LUN (such as NetApp AFF) is presented to the SQL Server host so
that it can be used as a buffer pool extension target disk.
• The extension file must be the same size as or larger than the buffer pool.
The following is a T-SQL command to set up a buffer pool extension of 32GB.
USE master
GO
ALTER SERVER CONFIGURATION
SET BUFFER POOL EXTENSION ON
(FILENAME = 'P:\BUFFER POOL EXTENSION\SQLServerCache.BUFFER POOL EXTENSION', SIZE = 32 GB);
GO
4 Database Files and Filegroups
A SQL Server database is a collection of objects that allow one to store and manipulate data. In theory,
SQL Server (64-bit) supports 32,767 databases per instance and 524,272TB of database size, although
the typical installation usually has several databases. However, the number of the databases SQL Server
can handle depends on the load and hardware. It is not unusual to see SQL Server instances hosting
dozens or even hundreds or thousands of small databases.
Each database consists of one or more data files and one or more transaction log files. The transaction
log stores the information about database transactions and all data modifications made by each session.
Every time the data is modified, SQL Server stores enough information in the transaction log to undo (roll
back) or redo (replay) the action. SQL Server’s transaction log is an integral part of SQL Server’s
reputation for data integrity and robustness. The transaction log is vital to the atomicity, consistency,
isolation, and durability (ACID) capabilities of SQL Server. SQL Server writes to the transaction log as
soon as any change to the data page happens. Every Data Manipulation Language (DML) statement (for
example, select, insert, update, or delete) is a complete transaction, and the transaction log makes sure
that the entire set-based operation takes place, making sure of the atomicity of the transaction.
Each database has one primary data file, which, by default, has the .mdf extension. In addition, each
database can have secondary database files. Those files, by default, have .ndf extensions.
All database files are grouped into filegroups. A filegroup is the logical unit, which simplifies database
administration. They allow the separation between logical object placement and physical database files.
When you create the database objects tables, you specify in what filegroup they should be placed without
worrying about the underlying data file configuration.
12 Best Practice Guide for Microsoft SQL Server with ONTAP © 2019 NetApp, Inc. All rights reserved.Figure 5) Filegroups. The ability to put multiple data files inside the filegroup allows us to spread the load across different storage devices, which helps to improve I/O performance of the system. The transaction log, in contrast, does not benefit from the multiple files because SQL Server writes to the transaction log in a sequential manner. The separation between logical object placement in the filegroups and physical database files allows us to fine-tune the database file layout, getting the most from the storage subsystem. For example, independent software vendors (ISVs) who are deploying their products to different customers can adjust the number of database files based on underlying I/O configuration and expected amount of data during the deployment stage. Those changes are transparent to the application developers, who are placing the database objects in the filegroups rather than database files. It is generally recommended to avoid using the primary filegroup for anything but system objects. Creating a separate filegroup or set of filegroups for the user objects simplifies database administration and disaster recovery, especially in cases of large databases. You can specify initial file size and autogrowth parameters at the time when you create the database or add new files to an existing database. SQL Server uses a proportional fill algorithm when choosing into what data file it should write data. It writes an amount of data proportionally to the free space available in the files. The more free space in the file, the more writes it handles. NetApp recommends that all files in the single filegroup have the same initial size and autogrowth parameters, with grow size defined in megabytes rather than percentages. This helps the proportional fill algorithm evenly balance write activities across data files. Every time SQL Server grows the files, it fills newly allocated space in the files with zeros. That process blocks all sessions that need to write to the corresponding file or, in case of transaction log growth, generate transaction log records. SQL Server always zeroes out the transaction log, and that behavior cannot be changed. However, you can control if data files are zeroing out or not by enabling or disabling instant file initialization. Enabling instant file initialization helps to speed up data file growth and reduces the time required to create or restore the database. A small security risk is associated with instant file initialization. When this option is enabled, unallocated parts of the data file can contain the information from the previously deleted OS files. Database administrators are able to examine such data. 13 Best Practice Guide for Microsoft SQL Server with ONTAP © 2019 NetApp, Inc. All rights reserved.
You can enable instant file initialization by adding SA_MANAGE_VOLUME_NAME permission, also
known as “perform volume maintenance task,” to the SQL Server startup account. This can be done
under the local security policy management application (secpol.msc), as shown in the following figure.
You need to open properties for “perform volume maintenance task” permission and add the SQL Server
startup account to the list of users there.

To check if permission is enabled, you can use the code from the following example. This code sets two
trace flags that force SQL Server to write additional information to the error log, create a small database,
and read the content of the log.
DBCC TRACEON(3004,3605,-1)
GO
CREATE DATABASE DelMe
GO
EXECUTE sp_readerrorlog
GO
DROP DATABASE DelMe
GO
DBCC TRACEOFF(3004,3605,-1)
GO

When instant file initialization is not enabled, the SQL Server error log shows that SQL Server is zeroing
the mdf data file in addition to zeroing the ldf log file, as shown in the following example. When instant file
initialization is enabled, it displays only zeroing of the log file.

 14     Best Practice Guide for Microsoft SQL Server with ONTAP                  © 2019 NetApp, Inc. All rights reserved.
The perform volume maintenance task is simplified in SQL Server 2016 and later as an option is provided
during the installation process. Figure 6 displays the option to grant the SQL Server database engine
service the privilege to perform the volume maintenance task.

Figure 6) Option for granting perform volume maintenance task privilege during SQL Server installation.

 15     Best Practice Guide for Microsoft SQL Server with ONTAP               © 2019 NetApp, Inc. All rights reserved.
Another important database option that controls the database file sizes is autoshrink. When this option is
enabled, SQL Server regularly shrinks the database files, reduces their size, and releases space to the
operating system. This operation is resource-intensive and rarely useful because the database files grow
again after some time when new data comes into the system. Autoshrink must never be enabled on the
database.

5 Database and Storage
The combination of NetApp storage solutions and Microsoft SQL Server enables the creation of
enterprise-level database storage designs that can meet today’s most demanding application
requirements. To optimize both technologies, it is vital to understand the SQL Server I/O pattern and
characteristics. A well-designed storage layout for a SQL Server database supports the performance of
SQL Server and the management of the SQL Server infrastructure. A good storage layout also allows the
initial deployment to be successful and the environment to grow smoothly over time as the business
grows.

5.1        Aggregates
Aggregates are the primary storage containers for NetApp storage configurations and contain one or
more RAID groups consisting of both data disks and parity disks.
NetApp has performed various I/O workload characterization tests using shared and dedicated
aggregates with data files and transaction log files separated. The tests show that one large aggregate
with more RAID groups and spindles optimizes and improves storage performance and is easier for
administrators to manage for two reasons:
•        One large aggregate makes the I/O abilities of all spindles available to all files.
•        One large aggregate enables the most efficient use of disk space.
For high availability (HA), place the SQL Server Always On Availability Group secondary synchronous
replica on a separate storage virtual machine (SVM) in the aggregate. For disaster recovery purposes,
place the asynchronous replica on an aggregate that is part of a separate storage cluster in the DR site,
with content replicated by using NetApp SnapMirror® technology.
NetApp recommends having at least 10% free space available in an aggregate for optimal storage
performance.

5.2        Volumes
NetApp FlexVol are created and reside inside aggregates. Many volumes can be created in a single
aggregate, and each volume can be expanded, shrunk, or moved between aggregates with no user
downtime.

Volume Design Considerations
Before you create a database volume design, it is important to understand how the SQL Server I/O
pattern and characteristics vary depending on the workload and on the backup and recovery
requirements. The following are NetApp recommendation for flexible volumes:
•        Use flexible volumes to store SQL Server database files and avoid sharing volumes between hosts.
•        Use NTFS mount points instead of drive letters to surpass the 26–drive letter limitation in Windows.
         When using volume mount points, a general recommendation is to give the volume label the same
         name as the mount point.
•        Configure a volume autosize policy, when appropriate, to help prevent out-of-space conditions.

    16       Best Practice Guide for Microsoft SQL Server with ONTAP                  © 2019 NetApp, Inc. All rights reserved.
• Enable read reallocation on the volume when the SQL Server database I/O profile consists of mostly
large sequential reads, such as with decision support system workloads. Read reallocation optimizes
the blocks to provide better performance.
• If you install SQL Server on an SMB share, make sure that Unicode is enabled on the SMB/CIFS
volumes for creating folders.
• Set the NetApp snapshot copy reserve value in the volume to zero for ease of monitoring from
an operational perspective.
• Disable storage Snapshot™ copy schedules and retention policies. Instead, use SnapCenter or
SnapManager for SQL Server to coordinate Snapshot copies of the SQL Server data volumes.
• For SnapManager for SQL Server, place the SQL Server system databases on a dedicated volume or
VMDK, because colocating system databases with user databases, including availability group
databases, prevents Snapshot backups of the user databases. Backups of system databases are
streamed into the SnapInfo LUN. This LUN is typically the same volume or VMDK that hosts the
Windows operating system files and SQL Server binaries, which are random read/write workloads.
• tempdb is a system database used by SQL Server as a temporary workspace, especially for I/O-
intensive DBCC CHECKDB operations. Therefore, place this database on a dedicated volume with a
separate set of spindles. In large environments in which volume count is a challenge, you can
consolidate tempdb into fewer volumes and store it in the same volume as other system databases
after careful planning. Data protection for tempdb is not a high priority because this database is
recreated every time SQL Server is restarted.
• Place user data files (.mdf) on separate volumes because they are random read/write workloads. It is
common to create transaction log backups more frequently than database backups. For this reason,
place transaction log files (.ldf) on a separate volume or VMDK from the data files so that
independent backup schedules can be created for each. This separation also isolates the sequential
write I/O of the log files from the random read/write I/O of data files and significantly improves SQL
Server performance.
• Create the host log directory (for SnapCenter) or SnapManager share (for SMSQL) on the dedicated
FlexVol volume in which SnapManager or SnapCenter copies transaction logs.
5.3 LUNs
tempdb Files
NetApp recommends proactively inflating tempdb files to their full size to avoid disk fragmentation. Page
contention can occur on global allocation map (GAM), shared global allocation map (SGAM), or page free
space (PFS) pages when SQL Server has to write to special system pages to allocate new objects.
Latches protect (lock) these pages in memory. On a busy SQL Server instance, it can take a long time to
17 Best Practice Guide for Microsoft SQL Server with ONTAP © 2019 NetApp, Inc. All rights reserved.get a latch on a system page in tempdb. This results in slower query run times and is known as latch
contention. A good rule of thumb for creating tempdb data files:
• For 8 cores: 8 tempdb data files
The following is the script to modify tempdb by creating 8 tempdb files and move tempdb to mount point
C:\MSSQL\tempdb for SQL Server 2012 and later.
use master
go
-- Change logical tempdb file name first since SQL Server shipped with logical file name called
tempdev
alter database tempdb modify file (name = 'tempdev', newname = 'tempdev01');
-- Change location of tempdev01 and log file
alter database tempdb modify file (name = 'tempdev01', filename =
'C:\MSSQL\tempdb\tempdev01.mdf');
alter database tempdb modify file (name = 'templog', filename = 'C:\MSSQL\tempdb\templog.ldf');
GO
-- Assign proper size for tempdev01
ALTER DATABASE [tempdb] MODIFY FILE ( NAME = N'tempdev01', SIZE = 10GB );
ALTER DATABASE [tempdb] MODIFY FILE ( NAME = N'templog', SIZE = 10GB );
GO
-- Add more tempdb files
ALTER DATABASE [tempdb] ADD FILE ( NAME = N'tempdev02', FILENAME =
N'C:\MSSQL\tempdb\tempdev02.ndf' , SIZE = 10GB , FILEGROWTH = 10%);
ALTER DATABASE [tempdb] ADD FILE ( NAME = N'tempdev03', FILENAME =
N'C:\MSSQL\tempdb\tempdev03.ndf' , SIZE = 10GB , FILEGROWTH = 10%);
ALTER DATABASE [tempdb] ADD FILE ( NAME = N'tempdev04', FILENAME =
N'C:\MSSQL\tempdb\tempdev04.ndf' , SIZE = 10GB , FILEGROWTH = 10%);
ALTER DATABASE [tempdb] ADD FILE ( NAME = N'tempdev05', FILENAME =
N'C:\MSSQL\tempdb\tempdev05.ndf' , SIZE = 10GB , FILEGROWTH = 10%);
ALTER DATABASE [tempdb] ADD FILE ( NAME = N'tempdev06', FILENAME =
N'C:\MSSQL\tempdb\tempdev06.ndf' , SIZE = 10GB , FILEGROWTH = 10%);
ALTER DATABASE [tempdb] ADD FILE ( NAME = N'tempdev07', FILENAME =
N'C:\MSSQL\tempdb\tempdev07.ndf' , SIZE = 10GB , FILEGROWTH = 10%);
ALTER DATABASE [tempdb] ADD FILE ( NAME = N'tempdev08', FILENAME =
N'C:\MSSQL\tempdb\tempdev08.ndf' , SIZE = 10GB , FILEGROWTH = 10%);
GO
Beginning with SQL Server 2016, the number of CPU cores visible to the operating system is
automatically detected during installation, and, based on that number, SQL Server calculates and
configures the number of tempdb files required for optimum performance.
SnapInfo Directory and Host Log Directory
SnapManager for SQL Server (SMSQL) uses the SnapInfo directory as the main repository to store all
metadata related to the SMSQL instance installed on a host (such as SnapManager backup metadata,
stream-based backups of system databases, and transaction log backups).
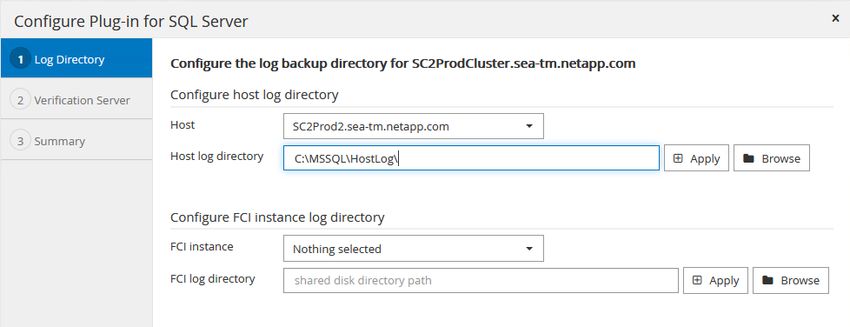
SnapCenter uses a host log directory to store transaction log backup data. This is at the host and
instance level. Each SQL Server host used by SnapCenter needs to have a host log directory configured
to perform log backups. SnapCenter has a database repository, so metadata related to backup, restore,
or cloning operations is stored in a central database repository.
The sizes of the SnapInfo LUN and host log directory are calculated as follows:
Size of SnapInfo LUN or host log directory = ((system database size + (maximum DB LDF size × daily log
change rate %)) × (Snapshot copy retention) ÷ (1 – LUN overhead space %)
The SnapInfo LUN and host log directory sizing formula assumes the following:
• A system database backup that does not include the tempdb database
• A 10% LUN overhead space
18 Best Practice Guide for Microsoft SQL Server with ONTAP © 2019 NetApp, Inc. All rights reserved.Place the SMSQL SnapInfo directory or host log directory on a dedicated volume or LUN. The amount of
data in the SnapInfo directory or host log directory depends on the size of the backups and the number of
days that backups are retained. The SnapInfo directory can be configured at any time by running the
configuration wizard. Although using a single SnapInfo directory reduces complexity, separate SnapInfo
directories offer flexibility for applying varying retention and archiving policies to databases. Host log
directories can be configured from SnapCenter > Host > Configure Plug-in.
You can back up SQL Server databases to a NetApp SnapVault® location and perform the following
operations:
• Restore all LUNs in a volume.
• Restore a single LUN from the vault.
• Access the latest Snapshot copy of a LUN directly from the backup vault.
The following are NetApp recommendations for SnapInfo directories and host log directories:
• Make sure that the SMSQL SnapInfo LUN or SnapCenter host log directory is not shared by any
other type of data that can potentially corrupt the backup Snapshot copies.
• Do not place user databases or system databases on a LUN that hosts mount points.
• Always use the SMSQL or SnapCenter configuration wizards to migrate databases to NetApp storage
so that the databases are stored in valid locations, enabling successful SMSQL or SnapCenter
backup and restore operations. Keep in mind that the migration process is disruptive and can cause
the databases to go offline while the migration is in progress.
• The following conditions must be in place for failover cluster instances (FCIs) of SQL Server:
− If using failover cluster instance, the SnapInfo or SnapCenter host log directory LUN must be a
cluster disk resource in the same cluster group as the SQL Server instance being backed up by
SnapManager.
− If using failover cluster instance, user databases must be placed on shared LUNs that are
physical disk cluster resources assigned to the cluster group associated with the SQL Server
instance.
• Make sure that the user database and the SnapInfo or host log directory are on separate volumes to
prevent the retention policy from overwriting Snapshot copies when these are used with SnapVault
technology.
• Make sure that SQL Server databases reside on LUNs separate from LUNs that have nondatabase
files, such as full-text search-related files.
• Placing database secondary files (as part of a filegroup) on separate volumes improves the
performance of the SQL Server database. This separation is valid only if the database’s .mdf file does
not share its LUN with any other .mdf files.
• If any database filegroups share LUNs, the database layout must be identical for all databases.
However, this restriction is not applicable when the unrestricted database layout (UDL) option is
enabled.
• Create LUNs with SnapCenter Plug-in for Microsoft Windows whenever possible. If you want to
create LUNs with DiskManager or other tools, make sure that allocation unit size is set to 64K for
partitions during formatting the LUNs.
5.4 SMB Shares
SMSQL supports databases on SMB shares only for SQL Server 2012 and later residing on ONTAP.
SnapCenter currently does not support backup, restore, or cloning for databases on SMB shares. NetApp
recommends layouts as shown in the following table.
19 Best Practice Guide for Microsoft SQL Server with ONTAP © 2019 NetApp, Inc. All rights reserved.Content SMB Shares
SQL Server binaries and system databases \\systemdb
User database files \\\userdb_data
User log files \\\userdb_log
SnapInfo \\\SnapInfo
The following are NetApp recommendations for SMSQL and databases on SMB shares:
• Configure the Transport Protocol Setting dialog box in SnapCenter Plug-in for Microsoft Windows with
the information for connecting to the SVM (SVM IP address, user name, and password) to view all
SMB shares on its CIFS server, which then becomes visible to SnapManager for SQL Server.
• Disable the automatic Snapshot copy scheduling configured by SnapCenter Plug-in for Microsoft
Windows.
• For SnapManager to be able to recognize the database file path as a valid file path hosted on NetApp
storage, you must use the CIFS server name on the storage system in the SMB share path instead of
the IP address of the management LIF or other data LIF. The path format is \\\. If the database uses the IP address in the share name, manually detach and
attach the database by using the SMB share path with the CIFS server name in its share name.
• When provisioning volumes for SMB environments, you must create the volumes as NTFS security-
style volumes.
• Make sure that all database files (the data files, in addition to the transaction log files) reside on SMB
shares instead of placing them across LUNs and SMB shares.
• Make sure that no antivirus scanning is performed on the SMB/CIFS shares in which SQL Server
data is stored to avoid failed transactions due to latency.
• Make sure that Windows host caching is disabled on the SMB/CIFS share in which SQL Server data
is stored to avoid corruption caused by caching.
• When you use availability groups, the transaction logs are streamed to a shared network location that
is a SnapManager SMB share accessible by all the replicas. Therefore, verify that this CIFS share is
sized to accommodate the transaction logs.
5.5 Data Storage Design
This section contains a few examples of SQL Server designs for NetApp storage and considerations for
environments that use SnapManager for SQL Server and SnapCenter.
Design Example 1
This configuration can be used for SQL Server instances that require basic performance and contain
multiple small databases. The database storage design has the following characteristics:
• Contains one aggregate for SQL Server instances.
• Uses a dedicated volume and LUN for the SQL Server system databases, including the
tempdb database.
• Uses a dedicated LUN for each database.
• Uses a single volume for both data and log.
• Uses dedicated SMB shares for both data and log (if using SMSQL for backup).
• Has a relatively lower recovery time objective (RTO) because data and log reside in the same
volume.
20 Best Practice Guide for Microsoft SQL Server with ONTAP © 2019 NetApp, Inc. All rights reserved.• Is suited for small-size databases in which medium to low performance is sufficient.
Figure 7) Basic SQL Server database design for NetApp storage for SMSQL or SnapCenter.
Because system databases, including tempdb databases, reside in the same volume, the database
backup is performed using native SQL Server but not SMSQL or SnapCenter.
Design Example 2
This configuration is designed to be used for SQL Server instances that require basic performance and
contain multiple databases that are backed up using either SMSQL or SnapCenter. The database storage
design has the following characteristics:
• Contains one aggregate for SQL Server instances.
• Uses a dedicated volume and LUN for the SQL Server system databases.
• Uses a dedicated volume and LUN for tempdb database.
• Uses a dedicated LUN for each database.
• Uses a single volume for both data and log.
• Uses dedicated SMB shares for both data and log (if using SMSQL for backup).
• Has a low to medium RTO because the data and log reside in the same volume.
• Is suitable for medium-size databases where medium performance required.
21 Best Practice Guide for Microsoft SQL Server with ONTAP © 2019 NetApp, Inc. All rights reserved.Figure 8) SQL Server database design for NetApp storage using SMSQL or SnapCenter.
Design Example 3
This configuration is designed to be used for SQL Server instances that require high performance and
contain a few databases that are backed up using either SMSQL or SnapCenter. The database storage
design has the following characteristics:
• Contains one aggregate for SQL Server instances.
• Uses a dedicated volume and LUN for the SQL Server system databases.
• Uses a dedicated volume and LUN for tempdb database.
• Uses a dedicated LUN for each user database.
• Uses dedicated volumes for primary and secondary data and log files.
• Has a relatively high RTO because data and log reside in separate volumes.
• Is suitable for medium to large size databases where high performance required.
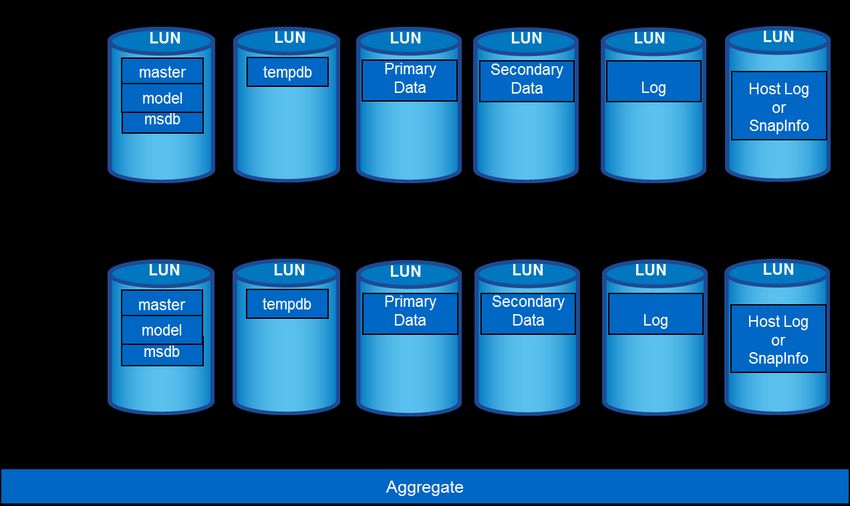
22 Best Practice Guide for Microsoft SQL Server with ONTAP © 2019 NetApp, Inc. All rights reserved.Figure 9) Server database design for NetApp storage using SMSQL or SnapCenter.
5.6 Virtualization
SQL Server virtualization enables consolidation, which boosts efficiency. Recent developments have
brought about very powerful virtual machines that can manage larger capacities and provide faster
provisioning of the database environment. In addition, SQL Server virtualization is cost-effective and
convenient. There are three things to consider when virtualizing SQL Server: disk throughput, memory,
and processors. This document focuses on disk only. The two major hypervisors that are commonly used
to virtualize SQL Server are Hyper-V and VMware. Information about each hypervisor is covered in the
following section.
Hyper-V
The improvements in Windows Server 2012 Hyper-V and its expanded virtual machine capabilities
eliminated most of the limits related to performance in a virtualized environment. Windows Server 2016
Hyper-V provides better consolidation of workloads that are traditionally more complex and that tend to
saturate resources and contend for other system resources and storage.
SQL Server 2016 and Windows Server 2016 provide a host of new features that can be used to
effectively virtualize demanding complex database workloads such as online transaction
processing/analysis (OLTP/OLTA), data warehousing, and business intelligence, which were not
previously considered for virtualization.
All virtual hard disks (VHDs) are just files. They have a specialized format that Hyper-V and other
operating systems can mount to store or retrieve data, but they are nothing more than files. There are
three basic types of VHDs that you can use with VMs. These are fixed VHDs, dynamic VHDs, and pass-
through disks:
• Fixed VHDs. When creating fixed VHDs, operating systems allocate 100% of the indicated space on
the underlying physical media. There is no block allocation table to be concerned with, so the extra
I/O load above a pass-through disk is only what occurs within the virtualization stack. Fixed VHD
benefits are:
− Fastest VHD mechanism
− No potential for causing overcommitment collisions
23 Best Practice Guide for Microsoft SQL Server with ONTAP © 2019 NetApp, Inc. All rights reserved.− Always same fragmentation level as at creation time
Fixed VHD drawbacks include:
− VM-level backups capture all space, even unused.
− Larger size inhibits portability.
Realistically, the biggest problems with this system appear when you need to copy or move the VHD.
The VHD itself doesn’t know which of its blocks are empty, so 100% of them have to be copied. Even
if your backup or copy software employs compression, empty blocks aren’t necessarily devoid of
data. In the guest’s file system, “deleting” a file just removes its reference in the file allocation table.
The blocks themselves and the data within them remain unchanged until another file’s data is saved
over them.
• Dynamic VHDs. A dynamic VHD has a maximum size but is initially small. The guest operating
system believes that it just a regular hard disk of the size indicated by the maximum. As it adds data
to that disk, the underlying VHD file grows. This technique of only allocating a small portion of what
could eventually become much larger resource usage is also commonly referred to as thin
provisioning. The following are some benefits of dynamic VHD:
− Quick allocation of space. Because a new dynamic VHD contains only header and footer
information, it is extremely small and can be created almost immediately.
− Minimal space usage for VM-level backups. Backup utilities that capture a VM operate at the
VHD level and back it up in its entirety no matter what. The smaller the VHD, the smaller (and
faster) the backup.
− Overcommitment of hard drive resources. You can create 20 virtual machines with 40GB boot
VHDs on a hard drive array that only has 500GB of free space.
• Pass-through disks. These are not virtualized at all, but hand I/O from a virtual machine directly to a
disk or disk array on the host machine. This could be a disk that is internal to the host machine or a
LUN on an external system connected by FC or iSCSI. This mechanism provides the fastest possible
disk performance but has some restrictive drawbacks. The following are some benefits of pass-
through disks:
− Fastest disk system for Hyper-V guests.
− If the underlying disk storage system grows (such as by adding a drive to the array) and the
virtual machine’s operating system allows dynamic disk growth, the drive can be expanded within
the guest without downtime.
The following are some drawbacks of pass-through disks:
− Live migrations of VMs that use pass-through disks are noticeably slower and often include an
interruption of service. Because pass-through disks are not cluster resources, they must be
temporarily taken offline during transfer of ownership.
− Hyper-V’s VSS writer cannot process a pass-through disk. That means that any VM-level backup
software has to take the virtual machine offline while backing it up.
− Volumes on pass-through disks are nonportable. This is most easily understood by its contrast to
a VHD. You can copy a VHD from one location to another, and it works the same way. Data on
pass-through volumes is not encapsulated in any fashion.
The following are NetApp recommendations regarding disk storage for SQL Server on Hyper-V guests:
• Always use a fixed VHD for high-I/O applications such as Exchange and SQL Server. Even if you
won’t be placing as much burden on these applications as they were designed to handle, these
applications always behave as though they need a lot of I/O and are liberal in their usage of drive
space. If space is a concern, start with a small fixed VHD; you can expand it if necessary.
• If you aren’t certain, try to come up with a specific reason to use fixed. If you can’t, then use dynamic.
Even if you determine afterward you made the wrong choice, you can always convert the drive later.
It takes some time to do so (dependent upon your hardware and the size of the VHD), but you
probably won’t need to make the conversion.
24 Best Practice Guide for Microsoft SQL Server with ONTAP © 2019 NetApp, Inc. All rights reserved.• A single virtual machine can have more than one VHD, and it is acceptable to mix and match VHD
types. Your virtualized SQL Server can have a dynamic VHD for its C: drive to hold Windows and a
fixed VHD for its D: drive to hold SQL Server data.
• If using dynamic drives in an overcommit situation, set up a monitoring system or a schedule to keep
an eye on physical space usage. If the drive dips below 20% available free space, the VSS writer
might not activate, which can cause problems for VM-level backups. If the space is ever completely
consumed, Hyper-V pauses all virtual machines with active VHDs on that drive.
• For a high-performance production virtual SQL Server instance, it's important that you put your OS
files, data files, and log files on different VHDs or pass-through disks. If you're using a shared storage
solution, it's also important that you be aware of the physical disk implementation and make sure that
the disks used for the SQL Server log files are separate from the disks used for the SQL Server data
files.
VMware
VMware virtual machines include a set of files in typically one of two given formats: virtual machine file
system (VMFS) or raw device mapping (RDM). Both formats enable you to access the virtual machine's
disk (VMDK), but they differ in approach to storage, and VMware recommends VMFS for most VMs. With
VMFS, the VMDK files also hold the data, while with RDM, the data is stored on an external disk system
similar to Hyper-V pass through disks. VMFS holds disk data from multiple VMs; RDM does not.
VMFS was designed specifically to support virtualization. Although RDM is sometimes recommended for
I/O-intensive operations, with VMFS, a storage volume can support one or many VMs. This volume can
change without affecting network operations. Because they share storage volumes, VMs are easier to
manage, and resource utilization remains high. Various ESXi servers can read and write to the file system
simultaneously, because it stores information at the block level.
The following are NetApp recommendations for VMDK:
• Use separate VMDKs for primary (.mdf) and log (.ldf) files for user databases. Make sure that these
VMDKs reside in a datastore placed on a separate volume from the volume containing system
databases and the operating system VMDKs.
• Use separate VMDKs for system databases (master, model, and msdb). Make sure that these
VMDKs reside in a datastore placed on a separate volume from the volume containing user
databases and the operating system VMDKs.
• Use separate VMDKs for the tempdb database.
• Use NetApp Virtual Storage Console (VSC) for VMware vSphere to provision VMDKs.
• Create user databases directly on the VSC-provisioned VMDKs.
• Data files (tables and indexes) are the primary files that are used by the SQL Server storage engine.
Each database might have multiple files and be spread across multiple VMDKs.
• If possible, avoid sharing volumes and datastores between different Windows Server machines.
ESXi can access a designated NFS volume on a NAS server, mount the volume, and use it for its storage
needs. You can use NFS volumes to store and boot virtual machines in the same way that you use VMFS
datastores. ESXi supports the following shared storage capabilities on NFS volumes:
• vMotion
• VMware DRS and VMware HA
• ISO images, which are presented as CD-ROMs to virtual machines
• Virtual machine snapshots
ESX 5.0 and later support up to 256 NFS datastores. The default value is 8, but this value can be
increased to the maximum number that is specific to the version of ESX or ESXi being used. The
following are NetApp recommendations for NFS datastores:
25 Best Practice Guide for Microsoft SQL Server with ONTAP © 2019 NetApp, Inc. All rights reserved.You can also read