BLM's Lotic Assessment, Inventory, and Monitoring (AIM) Technology Manual - 2021 Field Season
←
→
Page content transcription
If your browser does not render page correctly, please read the page content below
BLM’s Lotic Assessment, Inventory, and
Monitoring (AIM)

Technology Manual – 2021 Field Season

VERSION 2.0

Produced by BLM National Operations Center (NOC) and the BLM/USU National Aquatic
Monitoring Center (NAMC) – 4/1/2021

                                                                                    1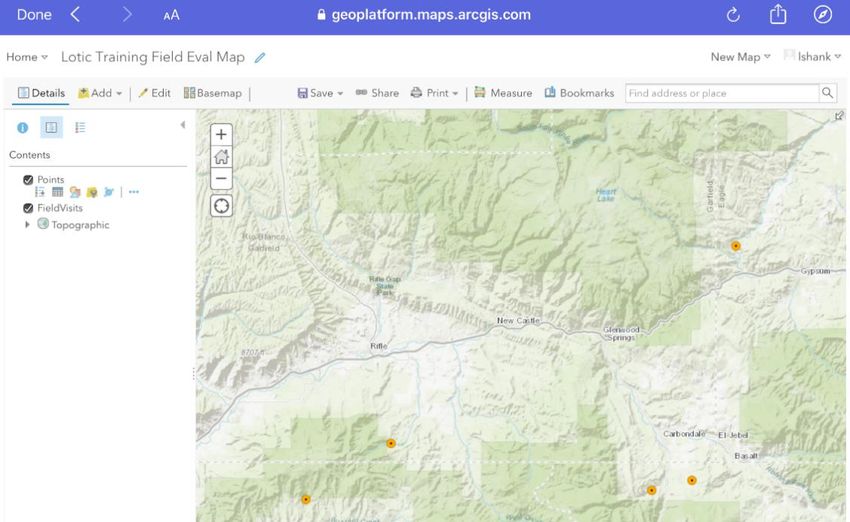
Contents
MANUAL OVERVIEW ....................................................................................................................... 5
HOW TO USE THIS MANUAL .......................................................................................................... 5
DOWNLOAD AND SET UP APPS..................................................................................................... 7
   Overview ........................................................................................................................................... 7
   Review iPad Setup and Settings ........................................................................................................ 7
   Download Applications ..................................................................................................................... 7
   Sign Into Applications ....................................................................................................................... 7
      Microsoft Teams ............................................................................................................................ 7
      Field Maps, Companion and Survey123 ....................................................................................... 8
      Disabling Field Maps Auto-Sync .................................................................................................. 9
      Setting Your Tablets GPS Accuracy ........................................................................................... 10
      Disabling Survey123 Auto Update .............................................................................................. 10
SHARE FILES AND COMMUNICATE WITH TEAM MEMBERS............................................... 12
   Overview ......................................................................................................................................... 12
   General Teams Information: ........................................................................................................... 12
   Teams Channel and File Organization ............................................................................................ 12
   Teams Chat ...................................................................................................................................... 13
   Teams Maintenance on iPads .......................................................................................................... 13
PREPARING FOR FIELD VISITS .................................................................................................... 14
   Overview ......................................................................................................................................... 14
   Add Base Maps ............................................................................................................................... 14
      Option 1: USB Drive (recommended) ......................................................................................... 15
      Option 2: Teams .......................................................................................................................... 15
   Remove Base Maps ......................................................................................................................... 15
      Files App...................................................................................................................................... 16
   Create a Trip Map ........................................................................................................................... 17
      General Use of ArcGIS Companion ............................................................................................ 17
      Finding and Saving Webmaps in ArcGIS Companion ................................................................ 18
   Take Your Trip Map Offline ........................................................................................................... 22
      General Use of Field Maps for ArcGIS ....................................................................................... 22
      How to Take Your Trip Map Offline .......................................................................................... 23
      Updating Offline Areas ............................................................................................................... 24
                                                                                                                                                       2
Updating Offline Areas ............................................................................................................... 24
     Removing an Offline Area .......................................................................................................... 25
         Error Logging.......................................................................................................................... 25
  Download, Update, or Delete Survey123 Forms ............................................................................ 27
     Downloading Survey123 Forms .................................................................................................. 27
     Updating Survey123 Forms ......................................................................................................... 28
     Deleting Survey123 Forms .......................................................................................................... 29
     Deleting Sent Survey123 Forms and Drafts ................................................................................ 29
FIELD EVALUATE AND COLLECT DATA .................................................................................. 30
  Overview ......................................................................................................................................... 30
  Changing Base maps and Navigating to a Point in Field Maps ...................................................... 30
  Create a Field Visit in Field Maps .................................................................................................. 30
  Editing a Field Visit in Field Maps ................................................................................................. 32
  Collect Data Using Survey123 ........................................................................................................ 33
     General Use of Survey123 ........................................................................................................... 33
         Launching Survey 123 Forms from Field Maps ..................................................................... 33
         Layout and Form Elements ..................................................................................................... 34
         Data Checks and Warnings ..................................................................................................... 35
         Saving Forms in Your Outbox ................................................................................................ 37
         Saving Forms in Drafts ........................................................................................................... 38
     Detailed Form Descriptions ......................................................................................................... 40
         Verification ............................................................................................................................. 40
         Water Quality and Macroinvertebrates .................................................................................. 41
         Transects ................................................................................................................................. 41
         Pools and Large Wood............................................................................................................ 44
         Floodprone Width ................................................................................................................... 44
         Slope........................................................................................................................................ 45
         Vegetation and Human Influence............................................................................................ 45
         Photos and Reach Coordinates ............................................................................................... 46
BACKUP AND SUBMIT DATA ...................................................................................................... 48
  Overview ......................................................................................................................................... 48
  Field Maps ....................................................................................................................................... 48
     Backing Up Field Maps Data to a USB Drive............................................................................. 48
                                                                                                                                                       3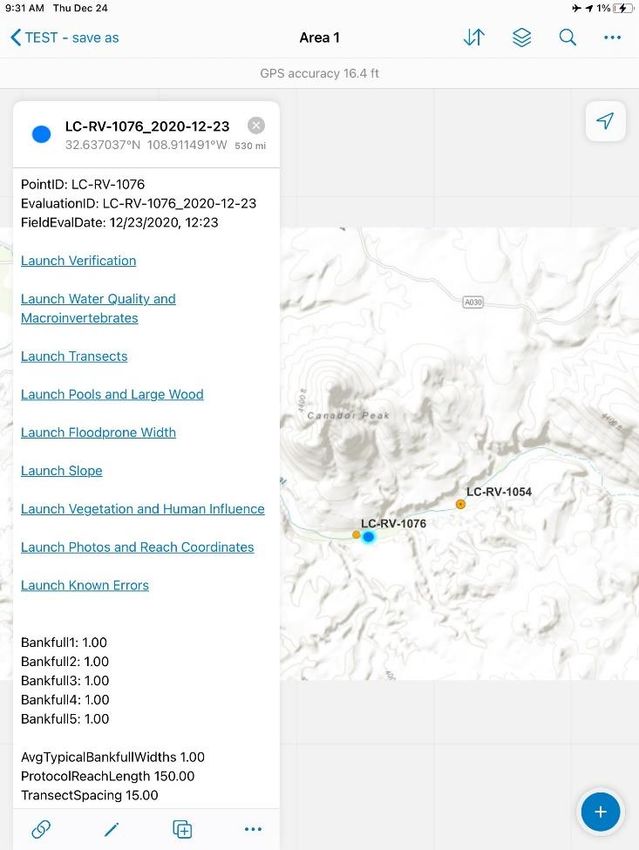
Sync Field Visits to the Office Webmap ..................................................................................... 49
 Survey123........................................................................................................................................ 50
    Backing Up Survey123 Form Data ............................................................................................. 50
    Submitting Forms ........................................................................................................................ 50
APPENDIX A. FREQUENTLY ASKED QUESTIONS AND TROUBLESHOOTING.................. 52

                                                                                                                                                   4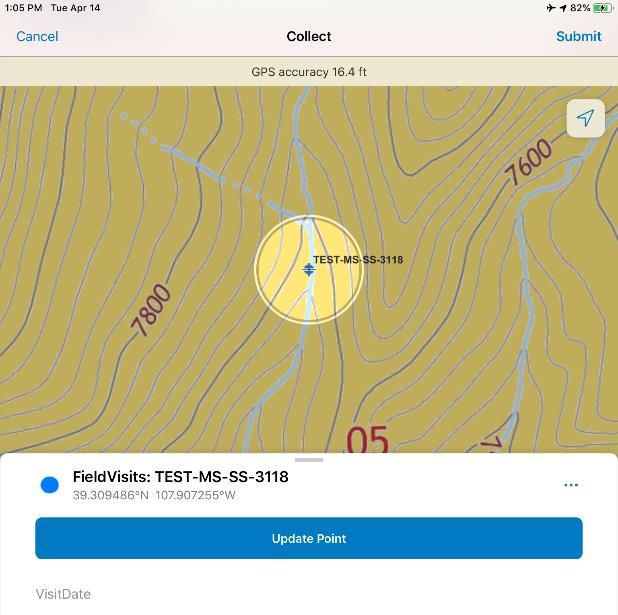
MANUAL OVERVIEW

All lotic AIM data (including photos and GPS coordinates) will be collected electronically using an
iPad (see here for requirements). Lotic AIM data collection utilizes two main iPad applications:
ArcGIS Survey123 and ArcGIS Field Maps. Survey123 is used to record all lotic AIM field data,
while Field Maps is used to navigate to point coordinates and to record basic field visit information
such as the evaluation status. Data collected in the Survey123 and Field Maps applications are then
synced to ArcGIS Online and instantly displayed in our webmaps and dashboards that are used to
manage designs and QC data.

Other programs used for electronic data collection include ArcGIS Companion and Microsoft
Teams. ArcGIS Companion is an ESRI application that allows users to view ArcGIS Online Content
on a tablet and should be used to prepare trip maps if no computer is available. Microsoft Teams will
serve as a way for crews to share files and communicate with project leads, crew managers, and the
National AIM Team during the field season.

This manual will detail how to set up and use each of the above applications. Figure 1 outlines the
overview of the process from how to download and set up applications, communicate with the AIM
team, prepare to field visit points by creating electronic maps and updating Survey123 forms, and
finally collect and submit field data. Users may test Field Maps or Survey123 at any time using the
links to the “Practice Maps” listed on the BLM Natl Lotic AIM AGOL group home page.

If questions remain after reading this protocol and reviewing the frequently asked questions
appendix, please reach out to your contract lead, BLM Project Lead, or State Lead. If you need
additional support, please contact the appropriate National AIM Team member:

   •   Design related questions: Nicole Cappuccio (ncappuccio@blm.gov; 303-236-6112)
   •   General project coordination and implementation support: State Lead and Kate Lunz
       (klunz@blm.gov; 303-236-0473)
   •   Field data collection questions (e.g., Survey123 and protocol): Logan Shank
       (lshank@blm.gov; 303-236-1161)
   •   Technology and applications questions (e.g., Teams, Field Maps, Companion): Jacob
       Shipman (jshipman@blm.gov; 303-236-0476)
   •   If someone from the list above is not available and there is an immediate issue please contact
       Jennifer Courtwright (jennifer.courtwright@usu.edu; 985-502-7530) or Nicole Cappuccio.

                               HOW TO USE THIS MANUAL

This manual is organized by workflow so that it can be easily referenced throughout the season.
Crews are the primary target audience and this manual is not recommended to be read from cover to
cover. Rather, use the clickable table of contents to find the appropriate section. Each main section
in the table of contents is also hyperlinked in Figure 1, which gives a summary of the electronic data
collection workflow.
                                                                                                      5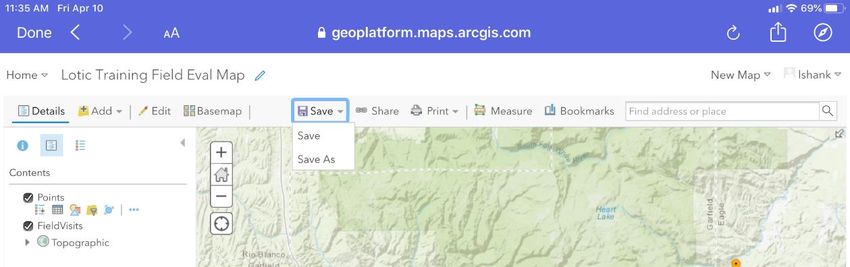
Download and Set Up Apps
                                         Tools: Apple Store
                 Apps: Field Maps, Companion, Survey123, Teams, USB Drive Software
                                 Completed once at the start of season

                   Share Files and Communicate with Team Members
                                                  Teams
                                         Throughout the field season

                                      Preparing for Field Visits
                                      Add and Remove Base maps
                              iTunes, Teams or USB Drive (Recommended)
                  Ideally completed once at start of season but depends on storage space.

                                            Create a Trip Map
                         Office Webmap via Desktop computer or Companion on an iPad
                                              Before each trip

                                      Take Your Trip Map Offline
                                                Field Maps
                                              Before each trip

                                    Done iteratively for each ‘Trip’
                          Download, Update, or Delete Your Survey123 Forms
                                                Survey123
                                              Before each trip

                                  Field Evaluate and Collect Data
                                         Field Maps and Survey123
                                              During each trip
After submitting final
 data, crews prepare
  for the next trip.
                                      Backup and Submit Data
                                  Field Maps, Survey123, USB Drive, Teams
                                          At least every two reaches

             Figure 1. Summary of the electronic data collection and management workflow.
             For each step utilized applications and frequency of completion are specified.

                                                                                              6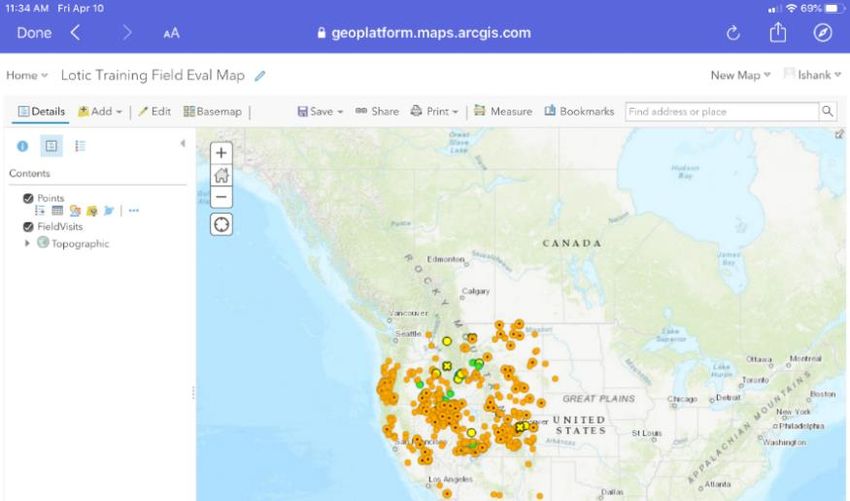
DOWNLOAD AND SET UP APPS
Overview
iPads and data collection applications should be set up two weeks prior to field training so that crews
can use the device and follow along during pre-training videos. The time needed to set up a device
varies, but may take one hour for the first device. Prior to downloading applications, iPads should be
double checked to ensure that they have the proper iOS and settings. Seven applications will be
downloaded from the Apple Store, and several of the applications require log in information before
they can be used.

Review iPad Setup and Settings
   • Ensure you have iOS of 13 or more. If not, go to settings, “General” and then “Software
      Update” to update your iOS. If your device only supports iOS 12, please contact the National
      AIM team for more information.
   • Ensure your iPad has a data plan and is cellularly enabled. You will not be able to take GPS
      coordinates otherwise.
   • Ensure you have a waterproof case for your iPad.
   • The iPad battery lasts for approximately one reach worth of data collection and iPads will
      overheat if the temperature gets above 95 degrees. Therefore, care should be taken to
      maximize battery life and keep iPads out of direct sunlight.
   • Review your settings
          o Ensure you know how to save battery life by adjusting screen brightness, setting
             airplane mode on, and turning off Bluetooth.
          o Note that battery saving settings such as turning the screen off after 1 minute will
             need to be reset when running any processes that take a long time because most iPad
             processes only run when the screen is on and active.

Download Applications
Use the Apple App Store to download the following applications:
   • ArcGIS Field Maps
   • ArcGIS Survey123
   • ArcGIS Companion
   • Microsoft Teams
   • Application to interact with flash drive (varies depending on the flash drive but SanDisk
       iXpand Drive is used as an example in this document)
   • Recommended but not required
          o Adobe PDF reader
          o Email specific application

Sign Into Applications
Microsoft Teams
   1. If you already have a Microsoft Teams account, sign-in and skip to Step 3.

                                                                                                     7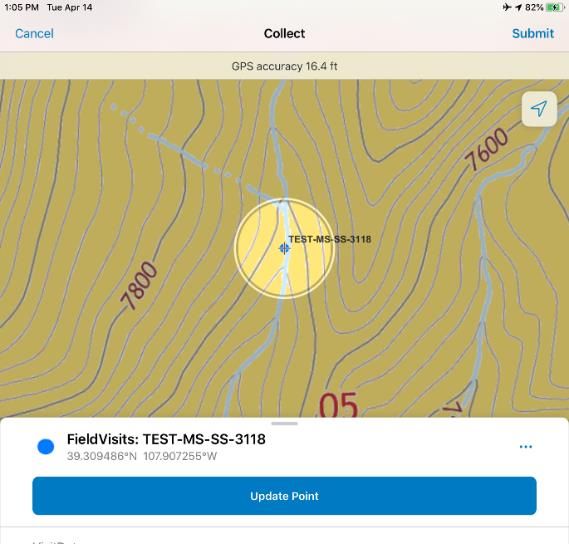
2. If you do not have a Teams account, open the Teams app and click “Sign up for free”. Follow
      the on-screen steps to create an account. Once you have created a free Microsoft Teams
      account, sign into the app.
   3. Once you have signed into Teams, send Kate Lunz (klunz@blm.gov) an email with your
      Microsoft Teams username, and she will then add you to our Lotic AIM Field Work Team.
      The user MUST sign into their Teams account on an iPad or computer before sending Kate
      their username.
   4. Once you have been added to the Lotic AIM Field Work Team, you will get an auto
      generated email from Microsoft sent to the email linked to your Teams account letting you
      know that you have been added to a Team. Do NOT launch teams from this email link.
      Instead launch the Teams app and find the menu stack in the upper left-hand corner of the
      screen.
   5. Scroll down until you see “Accounts and Orgs”. Locate “DOI (Guest)” and click it.
   6. In the next window, a popup will ask “Redeem invite to DOI?”. Hit “Redeem”. It will ask
      you to log into your teams account again. After you have logged in again, click “Open” to
      open the page in Teams. When it asks to “Switch to DOI”, hit “OK”.
   7. As an external guest to the DOI network, you will be forced to review your Terms of Use.
      Click “Guest Access” to open the Terms. Then hit “Accept”.
   8. You are now signed into Teams.

Field Maps, Companion and Survey123
    1. Set up a geoplatform account following these instructions. Send your username to Jacob
       Shipman (jshipman@blm.gov) to get added to the AIM Lotic AGOL Group.
    2. Locate and open “ArcGIS Field Maps”. Once the app opens, select the button for “Sign in
       with ArcGIS Enterprise”. In the popup window asking for your Enterprise URL, enter
       “geoplatform.maps.arcgis.com” and hit “ok”.

   3. A new screen will appear with a blue button to sign into Geoplatform.gov’s Enterprise
      ArcGIS Online (AGOL) account. Click this. On the following page, enter the Geoplatform
      registered email and password that you set up above and hit ok. Be patient as it may take a
      while to actually complete the log in request and may not look like it is doing anything.
   4. Locate “ArcGIS Companion” and launch the app. Once the app opens, hit the “Sign in”
      button at the bottom of the screen.
   5. On the following screen, select “+ Add account”. A popup should appear near the bottom of
      the screen asking if you want to sign in with ArcGIS Online or ArcGIS Enterprise. Select
      “ArcGIS Enterprise”.
   6. The following screen will ask for your ArcGIS Enterprise Organization URL. Enter
      “geoplatform.maps.arcgis.com” and hit Next in the upper right-hand corner of the screen.
      The next window that will launch will be the Geoplatform Enterprise Log Screen. Click the
      “GeoPlatform.gov Registered Account” and sign in using the same credentials as above. Be

                                                                                                    8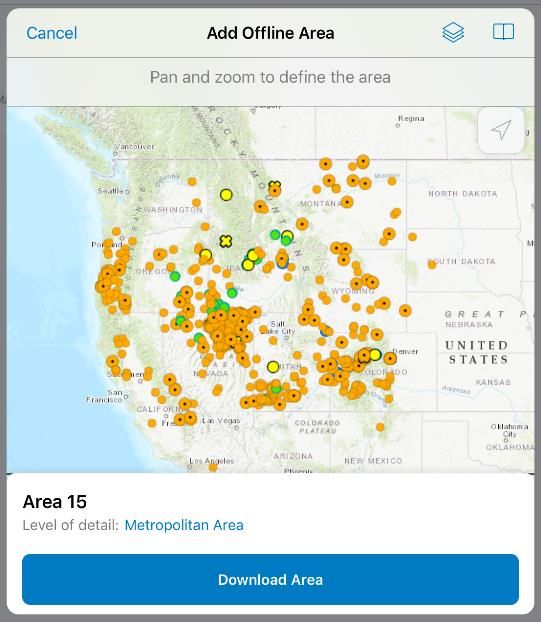
patient as it may take a while to actually complete the log in request and may not look like it
       is doing anything.

   7. Locate “Survey123” and launch the app. Once the app opens, hit “Sign into ArcGIS Online.”
   8. On the following page, locate the dropdown that says “Your ArcGIS organizations URL.”
      Click this. In the available text box before where it says “.maps.arcgis.com” enter
      “geoplatform”.
   9. On the following page, follow guidance provided in step 3 to sign into your geoplatform
      account.

Disabling Field Maps Auto-Sync
The first time users open Field Maps they should disable auto-sync. Auto-Sync is a feature in Field
Maps that tries to automatically sync maps and data continuously. This works great if you are in an
urban environment; however, it presents some issues when you are working in the backcountry.
When you do come across cell service, you do not want your Field Maps app to choke itself trying to
send and receive new data. Syncing is covered later in this document; however, it should be noted
that syncing should only occur when the user has a strong, stable, reliable internet connection.
    1. On the main screen of Field Maps, locate the “Account” icon in the upper left-hand corner.
    2. In the popup, scroll down until you locate “Auto-Sync”. Click the slider button to turn off.

   3. While on this page, you may also want to turn on “Cellular Data” if you intend on syncing
      data using your cellular provider. Note if this is turned off, you will be forced to only sync
      data when you are connected to a WiFi signal.

                                                                                                         9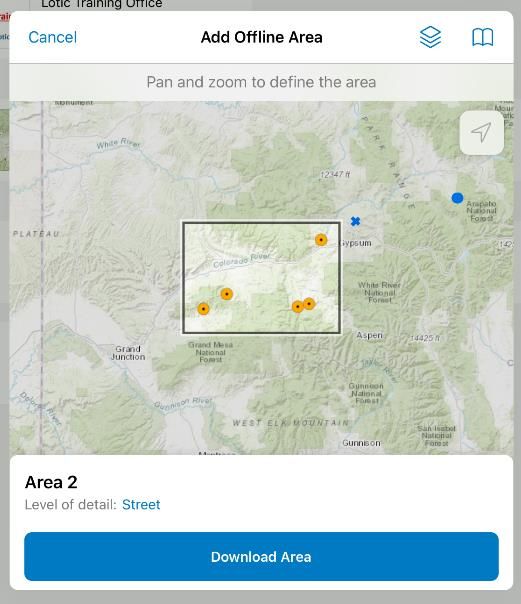
Setting Your Tablets GPS Accuracy
Field Maps allows users to specify GPS accuracy thresholds that the user must meet in order for the
application to allow them to collect data. By default, the app is set at 30 ft accuracy (9.144m). For
most users, this should be fine, however this can cause problems if you are in a confined valley with
limited view of the sky. To avoid any potential hiccups during your trip, we recommend that users
change this setting so that it is extremely high. Essentially, we want to tell the device to allow you to
collect data regardless of how poor your GPS accuracy is.
   1. On the main screen of Field Maps, locate the “Account” icon in the upper left-hand corner.
   2. In the popup, choose the second option “Collection.” On the following page select the first
      option “Accuracy.”
   3. Click where it says “Distance (feet)”, delete the default value of 30, and type in 1000.

Disabling Survey123 Auto Update
Disabling the Survey123 app store auto update feature is CRITICAL for successful data
collection throughout the field season. ESRI periodically releases new versions of the Survey123
application throughout the year. By default, your device will try to automatically update your app to
this latest version like any other app. Our forms have been created and tested for the version of
Survey123 that is available to the public at the time of training. Updating this version could change
how the app works and break our forms completely preventing any data collection. If this occurs,
DO NOT count on the National AIM Team to fix this problem overnight. Users are UNABLE to
download older versions of Survey123 than what is available in the app store so there is no going
back. This is a BIG DEAL and should not be taken lightly. If a crew accidentally updates their app,
they risk being sidelined for a week while we rebuild the entire project from scratch. The National
AIM Team will send out a message to all users on Teams if and when users should update their
version of Survey123.
It is essential that that individual setting up the iPads for their crews knows to change this setting. It
is also very important that all crew members are aware of this as well so they know not to tinker with
these settings.
To disable Automatic Updates:
   1. Go to your iPads Settings
   2. On the left side of your screen, locate “App Store”
   3. “Automatic Downloads” should be the first option you see. Below that, ensure that “App
      Updates” is disabled.

In order to update other applications on your device, you will need to manually choose to update it in
the app store. As a reminder, you should never update your version of Survey123 unless advised by
the National AIM Team.
To update apps:

                                                                                                       10
1. Go to the Apple App Store on your iPad
2. Locate the “profile” icon in the upper right corner. It may have a red number on it. Click this.
3. Locate the “Available Updates” section. DO NOT HIT the “Update All” button.
4. Any apps with available updates can be manually updated by hitting the “Manual” button
next to each item.
11SHARE FILES AND COMMUNICATE WITH TEAM MEMBERS
Overview
Microsoft Teams will be used throughout the field season to share files and communicate with team
members. The chat feature can be used to send messages to anyone within a given state or to anyone
on the National AIM Team. This means that State leads, project leads, contract leads, crew
managers, and crew members will all need to have access to Teams.
General Teams Information:
Within the Lotic Field Work Team directory, each state has its own channel, in addition to a
National (WRSA) channel, a Boating channel, and a General channel. Within each state channel,
there are several tabs:
• Posts: Commonly referred “Chat”, this tab can be used as a communication tool to chat with
others associated with Implementation of Lotic AIM. Please see below for more information.
• Files: The Files tab within each Channel is essentially a “Sharepoint file explorer” nested into
the Teams application. See the below “Project Folder” section for more information on the
structure and files to store and access on Teams.
• Crew Sharepoint: This is only needed for use on iPads, but will access the same files in the
Teams File folder, but you will have more functionality to interact with those files.
• BLM SharePoint: For BLM users ONLY and links to the National AIM SharePoint.
Teams Channel and File Organization
• General Channel: This channel is set up for communication with the National Lotic AIM
Team. The AIM Team will use the “Posts” tab to send out general information and updates
that apply to all users. The “Files” tab will be used to store:
o Critical Documents and Tools file that links to many of the needed protocols and
tools for Lotic AIM Implementation.
• State Channels
o Base maps
o Vegetation and Geomorphic Guides
o Project specific folder contains
▪ Archive: This folder contains historic documents from previous iterations of a
specific project.
▪ Backup Files: This folder is intended to be used to organize and store backed
up data and if desired Photos and other data/information. We recommended
implementing a file organization structure to keep these files tidy. An example
is a folder for each “Trip” with subsequent folders for each “Field visit”
utilizing both Point ID and Stream Name in the folder name.
▪ Mid and End Season Checks: This folder should be used to store Check-In
and Project Close-Out notes, files, any photos, and any other documents that
are pertinent to these meetings.
▪ MIM: This folder should be used to organize, back up and store MIM data
sheets if the crew is collecting MIM data.
12▪ Other Files: This folder should be used for crews to organize and store files
not directly related to one of the other folders.
▪ Post-training Calibration: This folder has a spreadsheet to record post-
training calibration data in. Additionally, any photos associated with post-
training field calibration should be uploaded to this folder.
▪ Revisit Packets: This folder should be used for files associated with and
finalized revisit packets for sites to be revisited each year.
Teams Chat
• Each channel has its own chat.
o The general channel chat should be used for everything that is nationally applicable.
▪ The National AIM team will use this for field updates. For example: “We had
a server go down, for any data and photos submitted yesterday (May 1st)
please resubmit”.
▪ You can also post questions to the National AIM team, or photos. For
example: “This link no longer works, can someone point me to the correct
one”.
o State channels should be used for any project or state level communication. For
example: “We’re seeing a lot of reaches that look like this (Post photo) and we want
to see if others are having trouble identifying bankfull in these systems”.
• To tag a specific person type “@” and then start typing their email or name. This sends them
an email to let them know they were tagged in a post.
• Be professional --all posts are recorded by the BLM, as are all emails.
Teams Maintenance on iPads
• When documents are opened or shared in Teams, the application creates data caches on your
iPads memory which serve little purpose and slow down your iPad. We recommend clearing
the cache as part of your pre- or post-trip process.
• To Clear Teams Cache:
1. Open Teams and click the “Stack” icon in the upper left-hand corner of your screen.
2. On the pane that appears on the left side of your screen, select “Settings”. Under
General, select “Data and Storage”
3. Finally click “Clear app data”.
13PREPARING FOR FIELD VISITS
Overview
Field crews will use the Field Maps application and provided map layers to efficiently navigate to
sample reaches and to track what points have and have not been visited throughout a field season.
This section goes through the steps to prepare and use these tools and maps. The instructions below
assume that trips were planned and the ‘Trip’ column has been filled out in the Points layer. For
guidance on how to plan trips, please refer to the Evaluation and Design Management Protocol.
Base maps are a map layer provided to the crew (viewed via Field Maps app) that integrates many
different layers into one. This integrated layer provided by the BLM is much more informative than
the default base map on the Office Webmap. Most of the base maps provided will contain
information such as BLM land ownership, road layers, topographic layer, gate, etc. These base maps
are provided to help a crew navigate to points. The base maps are formatted as Vector Tile packages
(.tpk or .vtpk) to save space on the iPad. They can be downloaded to the iPad ideally once at the
beginning of the field season, but it may depend on available iPad storage and the spatial extent of
your trip. Because of space limitations, we also provide instructions to delete base maps from the
iPad throughout the season.
In addition to base maps, Points, Field Visit, and NHD layers need to be available offline for crews
to navigate and record field visit information. So that crews can easily visualize exactly which points
to visit, crews should subset the west wide Points layer by filtering by a specific trip to create a “trip
map”. A trip map simply refers to a map that only displays the points that a crew intends to visit
during a given field “trip”. Crews can prepare their trip maps using a computer or the Companion
application. Then they take these trip maps offline using Field Maps so they can record field visits
while at a reach.
The final step of preparing for a field visit is to ensure that you have the latest Lotic Survey123
forms downloaded to your device.
Add Base Maps
Crews will be supplied with tile package or vector tile package base maps that were created by each
BLM state for their field crews to use while navigating in the back country. The user will need to
download these base maps and add them to Field Maps. There are two ways that a user can add base
maps to their iPad for use in in Field Maps:
1. USB thumbdrive (Recommended)
o Requires a lightning compatible flash drive, but all base maps should be loaded onto the
external drive at the beginning of the season.
o Ideal for crews that are working across large areas or will be working in areas with poor
cell service/WiFi accessibility so that base maps can be switched out at any time during a
field trip.
2. Teams
o Requires very good cell service to download new maps.
o Ideal for crews that have good cell service/WiFi accessibility.
14Option 1: USB Drive (recommended)
1. Most iPad compatible USB drives will require you to download their software to interact
with data on the USB drive. In the example below, a SanDisk USB drive is used, so the
SanDisk “iXpand Drive” application was downloaded. The first time you plug your USB
drive into your iPad, it should give you a pop up prompting you to download their software.
2. Plug the USB drive into a computer and transfer the Base map Vector Tile Package (.tpk or
.vtpk) to the device from Teams (or other file location). When you are done, safely
disconnect the USB drive from the computer.
3. Plug the USB drive into your iPad and open your USB drives file management app (in my
case, SanDisk “iXpand Drive”).
4. Click “Copy Files” and on the following screen hit “Copy Files From iXpand Drive”
5. Navigate the file structure on your USB drive and locate the base maps you added.
6. Click the base map or maps that you want to transfer to your device and then click “Copy to
iPad” at the bottom of the screen. You will get a pop up that says it cannot transfer the base
map to your Photos app. Click Ok.
7. When your download is complete, it will give you another popup saying that it was
successful. You can now close this application.
8. Open the Files application on your iPad and make sure you have the “On My iPad” directory
open. There should be a folder called “iXpand Drive” in this directory along with the “Field
Maps” folder. Select the “iXpand Drive” folder and then the “Downloads” sub folder.
9. Click and hold the file for the base map you want to add to Field Maps. In the dropdown,
select “Move”. A popup will appear asking where you want to move the base map to. Select
the “Field Maps” folder and hit “Move.”
Option 2: Teams
1. Within the Teams app, locate the AIM Lotic Field Work Team.
2. Locate your state’s Channel and click the “Files” tab. Next open the “Base maps” folder.
3. Identify the base map you want to download.
4. Click the three dots to the right of the base map and select “Send a copy.” A popup will
appear saying “Downloading”. This might take 15-20 mins to download per base map. DO
NOT let your iPad go to sleep or the download will say it lost internet and quit.
5. When the download completes, a window will popup asking what you want to do with the
file. Select “Save to Files”.
6. In the next popup, it will ask you where you want to save your file. Under “On My iPad”
select the “Field Maps” folder. Save the Vector Tile Package base map (.tpk or .vtpk) here by
hitting the “Save” button in the upper right-hand corner of the popup.
7. Repeat steps 4-6 to add any additional base maps.
8. You now have a Vector Tile Package (.tpks or .vtpks) on your iPad for offline use.
Remove Base Maps
If the crew is working over a large geographic area and utilizing multiple base maps, storage space
on the iPad may become a concern. In order to remove maps, it is important to understand how Field
Maps stores base maps. Initially, when the Vector Tile Package (.tpk or .vtpk) is loaded into the
iPads “Field Maps Documents” folder, each tpk or vtpk will appear as its own file. Once you launch
Field Maps for the first time and open the loaded base maps, the files will be moved into a newly
15created folder called “base maps” and stored in folders with nonsense alpha numeric unique IDs.
Follow the instructions below to remove unnecessary base maps from the device.
Files App
1. Using your iPad, locate the Files App and open it.
2. By default, the app should launch and display content “On My iPad”. If it does not, locate the
blue “< Locations” button in the upper left-hand corner of the screen and select “On My
iPad”.
3. Select the “Field Maps” folder and then select the “base maps” folder.
4. Field Maps stores the Base maps you uploaded as .tpk’s or .vtpk’s in folders using a
nonsense alpha numeric unique ID style naming system. Click through each folder until you
locate the base map you want to remove. Remember the folder name and go back to the base
maps folder.
5. Locate the folder associated with the base map you just identified and hold down on the
folder for approx. 3 seconds until a popup window appears. Select delete.
6. You have now deleted your Base map from Field Maps but not the device.
7. Click the “< Locations” button and select “Recently Deleted”.
168. In the following window, click and hold the files you want to delete and select “Delete
Now”.
9. The base map has now been completely deleted from the device.
10. Alternatively, if you want to delete all of the base maps on the device, use the same process
in Step 5 to delete the “base maps” folder.
Create a Trip Map
Trip maps should display only the points that a crew intends to visit during a given field “trip”. Trip
maps should include at least the following layers so that they can be edited offline during the trip:
Points, Field Visits, and the AIM NHD layer used for your project. The Points and Field Visits will
help know which points are on your trip and tracking the field outcomes. The NHD is symbolized by
stream size category to help with moving the point or reach set up. There are two ways to prepare
trip maps. One can use a computer to access and edit the Office Webmap or one can use ArcGIS
Companion on a tablet to access and edit the webmap. The following guidance focuses on
Companion since most crews will not have access to a computer but the steps for a computer are
very similar. Guidance on how to use a computer to plan trips can be found in the FAQ section of
this document.
General Use of ArcGIS Companion
ArcGIS Companion is an ESRI application that allows users to view ArcGIS Online Content on a
tablet. This app can be visually overwhelming, so this guidance will focus only on what the user is
required to know in order to set filters on maps for use in Field Maps.
Below is a screenshot of the main screen of Companion once you are signed in.
17A B C D E
A. Companion home page
B. Content Page
C. Search
D. Groups Page
E. Geoplatform Organization Page
First, we will cover the Groups Page. Click the Groups Page icon at the bottom of whatever page
you are on in Companion. The Groups Page displays a list of every group your profile belongs to.
Click “BLM Natl Lotic AIM”. This opens a tablet version of the Lotic AIM AGOL group that you
may have interacted with on a computer.
Finding and Saving Webmaps in ArcGIS Companion
1. Users can also find the Webmaps by clicking “Content” in the blue ribbon on the top of the
Groups page, locating the “Filter” icon, and selecting a content type of “Maps”
182. Open the “BLM AIM Lotic 2021 Field Eval Map”. This will open the Webmap description
page. Click “Open” near the top of the page and in the popup select “Map Viewer”
3. The webmap will launch within the Companion application.
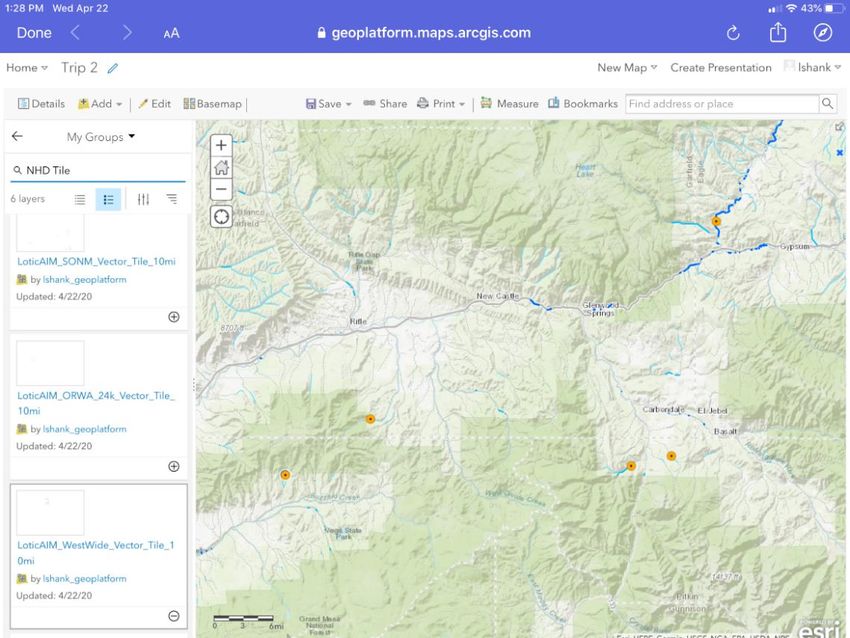
194. Locate the Filter button for the Points layer and set a filter for your desired trip. In the
example below, a filter was set so that only points that were identified for “Trip 2” were
displayed. Note that a second filter may need to be set on project if multiple crews are using
the same trip name.
5. Once a filter is set, hit “apply and zoom to”. This filters the map so that only the 5 points that
are on “Trip 2” are displayed.
6. Next identify and add your NHD and any additional layers that you want to take offline.
Click the “Add” button and select “Search for Layers”. Click “My Content” and switch to
“My Groups”. In the Layer Search Bar, type “NHD Tile”. Scroll through the list and add the
NHD Vector Tile associated with your project by clicking the “+” icon.
207. If you are done adding layers, proceed to the next step. If not, use the Layer Search Bar to
locate any additional layers that you will require while offline.
a. Note that layers must be offline enabled to be taken offline. (i.e. not every layer in the
Lotic AIM Group can be taken offline using Field Maps).
8. Hit “Save” at the top of the screen and select “Save as”
9. In the popup, name the filtered map something logical. In this example, the map is could be
called “Trip 2”. Make sure the “Save In Folder” is your Geoplatform Profile name.
a. Note: The same AGOL account used to save the filtered map in Companion should
also be used in Field Maps.
10. Hit “Save Map” and then hit “Done” to close the map. Hit the “X”s in the upper left hand
corner of the screen to exit back to the main page of Companion, or double click home and
swipe up to close the app.
21Take Your Trip Map Offline
Before a crew leaves service for a given trip, the crew should use Field Maps to take the trip map
they created with Companion offline so that they can navigate and record field visits without internet
connection. Creating an “offline area” or “offline map” essentially means creating a “cache” of the
Points and Field Visits services for a given area that can then be used offline and synced when
cellular service is obtained. For the lotic workflow presented in this document, the terms “offline
area”, “offline map”, and “trip map” can be used synonymously.
General Use of Field Maps for ArcGIS
Prior to taking a trip map offline, users should orient themselves to the layout of Field Map’s main
menu. When you are familiar with Field Maps layout, proceed to the following section.
o Above is a screenshot of the main screen of Field Maps once you are signed in.
• Current: This displays the last map that you opened in Field Maps.
• On Device: This is a list of all maps that you have downloaded onto your device
to take offline.
• My Maps: This is a list of maps that you have saved to your Geoplatform User
Account (in this case, lshank_geoplatform content). Examples of this include
maps filtered by trip and saved so that only a subset of Points are displayed on the
map within Field Maps.
• Groups: This is a list of all AGOL Groups that your profile belongs to. Clicking a
group, for instance the BLM Natl Lotic AIM Group, you will see all maps that are
part of the group. Note that only Field Eval maps are set to be taken offline.
22How to Take Your Trip Map Offline
1. To take a trip map offline, open Field Maps and locate the “My Maps” section on the main
page. Find the map that you just saved, and click the three dots. Next click “Add Offline
Area”.
a. Note: If this option is not available, it means you did not properly create your trip
map. Make sure you created your trip map based off the “FIELD EVAL” map and not
“Office Eval” map.
2. In the popup, ensure the points on the map are the points you intended to take offline. Next
click the “Level of Detail”. The smaller the level of detail, the larger the file size the map will
be on the iPad. If you plan to use side loaded base maps provided by the BLM, choose the
“metropolitan” level of detail for the default base map since you will be replacing it with a
better resolution map. Users can also take as many maps as they want offline, so if you have
3 clusters of points to visit during your trip, you can create 3 separate “offline areas” of the
same map.
3. Note that layers that are taken offline are controlled by the layers in the trip map that you
save using Companion not in the “Add Offline Area” Field Maps window. The layer stack in
this window turns on or off layers only for data visualization purposes. This does not control
which layers are taken offline.
a. Example: Even though Field Visits is turned off in the image below, if the user takes
that “area” offline, Field Visits will still appear in the offline map.
234. Select “Download Area” when you are ready.
5. To take more areas offline from that same map, find the three dots in the upper right-hand
corner of the screen and add another offline area.
Updating Offline Areas
You should update your offline area whenever you come across internet service if the project lead or
crew manager has made any edits to the points layer.
1. To do this, obtain internet service.
2. Then click the three dots next to the “Offline Area” you want to update
3. Click sync and your map should say it was updated “just now”.
Updating Offline Areas
You may want to rename your offline area to something more meaningful.
1. To do this, click the three dots next to the “Offline Area” you want to rename.
2. Click “Rename Area” and enter a new name for the area.
24Removing an Offline Area
You may remove offline areas after each trip to save space or to stay organized.
1. Launch Field Maps and locate your “Offline Areas” in the “My Device” section.
2. Click the “>” next to the map that you want to remove “Offline Areas” for.
3. Click the three dots next to the “Offline Area” you want to remove.
4. From the dropdown list, select “Remove Offline Area”. In the following popup, confirm that
you want to remove this offline area. Note that any un-synced edits will be lost.
5. You have now removed an “Offline Area” from your device.
Error Logging
If an issue is encountered while using Field Maps, for instance the app is not downloading offline
areas or is automatically closing, enable Error Logging and replicate the issue.
1. To do this navigate to the main screen of Field Maps and click your account icon in the upper
left-hand corner of your screen. In the following window, scroll down and select
“Troubleshooting”
252. Next go to “Logging” ensure that the slider bar is blue indicating “On”.
3. When Logging is turned on, go into Field Maps and replicate what you did to receive the
error the first time. Once you encounter your error, return to the “Troubleshooting” page and
click “View Logs”.
4. The “Log” page does what its name implies and keeps a log of Field Maps communications
with the server and its geodatabases. If you need the National AIM Teams assistance
interpreting the logs, click the “export” button, and specify to send the logs in an email to
Jacob Shipman (jshipman@blm.gov).
265. When you are done or if you are not encountering any errors, you should leave “Logging”
off.
Download, Update, or Delete Survey123 Forms
Before leaving on a trip, the crew will need to download each Survey123 form using the Survey123
application. In an ideal world, crews would download each form at the start of the season and never
have to update them. Unfortunately, situations may arise where crews need to update forms or
download new ones. The National AIM Team will utilize Teams to broadcast announcements to all
users when updates are required.
Downloading Survey123 Forms
1. Once you have successfully logged into Survey123 for the first time, click the “Download
Surveys” button at the bottom of the window. This button will only appear here if you do not
have any downloaded surveys.
a. You can also download surveys at any time by clicking your profile icon in the upper
right hand corner and selecting “Download Surveys”.
2. On the next page type “Lotic 2021” into the search bar. You should now see 9 forms for
Lotic 2021 (see list below). Download all 9 forms by clicking on the cloud icon on the right
side of each form. NOTE: once the form has been downloaded the icon changes from a cloud
to a refresh icon.
a. Lotic AIM Forms.
i. Verification
ii. Water Quality and Macroinvertebrates
iii. Photos
iv. Transects
v. Pools and Large Wood
vi. Floodprone Width
27vii. Slope
viii. Vegetation and Human Influence
ix. QC Comments
Updating Survey123 Forms
Periodically, small glitches may appear in the forms, or dropdown lists such as crew names might
need to be updated, causing everyone to need to update their form. These updates update your
existing form and do not require you to delete and redownload anything. It is important that you
check for updates to forms before leaving on each trip to the field.
1. In Survey123, click on the circle with the profile icon in the upper right corner of the screen.
2. Click “Download Surveys” and navigate to the form you would like to update.
3. Once you have found the correct form, click the refresh icon to the right of the form.
Alternatively, on the “Download Surveys” page at the bottom of the screen, you will see a
button appear stating “Download updates” if updates are available for your forms.
4. Sometimes using this method causes the update process to freeze up. If this occurs and a
download takes more than a couple minutes, force close the Survey123 app. Relaunch it and
either download the updated forms manually or give the “Download updates” button another
try.
5. Sometimes you will see a notification at the top of the main survey screen letting you know
there are updates available, click this notification and to see all forms that have updates
available. We will send a notification via Teams chat to ensure everyone sees that updates are
available.
28Deleting Survey123 Forms
Ideally users will NEVER delete forms or data/photos from their device unless advised by the
National AIM Team to do so. Even if a new form is released, users should keep all data from the old
from on their tablet until advised to remove it. This does not replace backing up data manually to a
USB device as this is still required. The National AIM Team will broadcast a message on Teams
alerting users if they need to delete a certain form and use a new one.
1. On the My Surveys page, click the form you want to delete.
2. From the form page, click the menu icon in the upper right corner.
3. Click “Delete Survey”.
4. In the following popup, select Delete. Note that deleting a form will delete all associated data
so ensure everything has been backed up before proceeding.
Deleting Sent Survey123 Forms and Drafts
It is highly recommended that users try to keep all of their sent and draft forms in Survey123
throughout the entire season. Realistically however, some users may start to notice that they are
running short on storage space on their device later in the season. If this is the case, users can delete
sent forms to clean up Survey123. Note that users should ensure that all data has been sent and
backed up on their USB device prior to deleting any sent forms. Photos should never be deleted. If
you have unsent drafts ensure that they are junk data and not something outstanding that you forgot
about before deleting.
1. On the My Surveys page, click the form you want to delete.
2. From the form page, click either “Outbox” or “Drafts”.
3. Once you have found the correct form, click the trashcan icon to the right of the form.
4. On the warning page, click “Yes” to permanently delete the form.
5. Deleting a form will delete all associated data as well, be sure you have submitted/sent
everything associated with that form before deleting it.
29FIELD EVALUATE AND COLLECT DATA
Overview
Crews use Field Maps to navigate to points. Once at a point, the reach is evaluated to determine if it
is sampleable and this information is recorded as a field visit within Field Maps (see design
management step 5 for more information on sample statuses). These field visits can be edited at any
time. All field data is recorded in forms using Survey123. Survey123 forms should be launched from
Field Maps using hyperlinks located within the field visit record. Lotic AIM Survey123 forms have a
specific workflow and layout to facilitate data collection. Checks and warnings may prevent users
from moving on or entering data of poor quality.
Changing Base maps and Navigating to a Point in Field Maps
Crews can load the BLM provided base maps into Field Maps to navigate to a point and can also get
directions to a point if cell service can be obtained.
1. Open Field Maps and locate the map that contains the point you want to visit. Click it to open
it. The map will launch to the area that you took offline.
2. To turn on a base map, click the three dots in the upper right-hand corner of the screen and
select “base map” from the dropdown.
3. Click on one of the base maps to turn it on. You can also toggle back and forth between base
maps using this screen.
4. To get directions to the point, locate the Point that you want to visit and click it. In the Point
Attributes that pop up on the left side of the screen, scroll to the bottom. Click the
“Directions” button. This will send the Points coordinates to another app such as Apple Maps
or Google Maps for navigation. Note that this feature requires cell service to identify a route.
Create a Field Visit in Field Maps
Each time you visit a point in the field you will need to create a field visit in Field Maps.
1. While at the point, click the associated point on the map from the Points Layer. Scroll down
and click the “Field Visits” button.
302. Next hit “Add”.
3. Choose a status from the available options. Ensure you are standing in the middle of the
stream at the F transect and ensure your location displayed on the map matches. If not, you
can move the crosshairs manually. However, the user should use the GPS coordinates by
default.
314. Fill out all of the required information to document your field visit.
5. DO NOT hit “Update Point” after you have recorded your F transect coordinates. This will
move your Field Visit point away from the F transect to wherever you are when you click the
button.
6. When you are done recording your Field Visit, hit the “Submit” button in the upper right-
hand corner of the screen.
Editing a Field Visit in Field Maps
You may need to edit a field visit. For example, you may have selected the wrong project from the
dropdown when it was created, or forgot to update your Field Eval Status to Partial Sample when a
late afternoon thunderstorm cut your sample short a transect and a half from finishing a reach.
1. Launch the map containing the Point that you visited. Click the point and scroll down to the
bottom of the attribute list and click “Field Visits”.
2. Click the recorded Field Visit. Scroll to the bottom of the attribute list and locate the “Edit”
button.
3. Click the “Edit” button and make the edit. When you are finished hit “Submit”. If this is in an
offline map, be sure to sync changes to push them to the webmap.
32Collect Data Using Survey123
Field Crews will be using Survey123 for all Lotic AIM data collection. Survey123 is a form based
data collection application developed by ESRI that is fully integrated with their enterprise suite of
software products. Data collected in the Survey123 application is then synced to ArcGIS Online and
can be viewed in our webmaps and dashboards. The following sections walk new users through the
general use of Survey123 and form layouts, and things to note about each of the eight Lotic AIM
Survey123 forms.
General Use of Survey123
Launching Survey 123 Forms from Field Maps
1. Once you have created and submitted a Field
Visit using Field Maps, you can begin launching
forms. Always launch forms from Field Maps
and not Survey123.
2. To launch a form, click on the Field Visits on
the map you want to open, in the popup there
will be a list of forms you can launch.
3. Click on the form you want to launch. The form
will automatically open in Survey123 and
populate PointID and other needed information.
4. The first page of every form is the Form Setup
page. This page is where PointID is recorded,
and where a user can set up certain sampling
parameters that dictate how the data collection
section of the form is configured (e.g., whether
your collecting core or contingent Thalweg
Depth Profile). Most of these fields should be
pre-populated based off the Field Visit that you
launched the form from. Ensure that everything
populated correctly and correct it if it is wrong
by manually making a choice.
5. Also while on the first page of the form, check
that your location is correct and update your GPS if needed.
a. To update your GPS, click the target like symbol to the left of the coordinates.
b. To ensure your GPS is working properly and to check accuracy, click the Location
Status button in the upper right.
6. Each form should be fully completed before moving on to the next form and you cannot have
multiple forms open at once. In general, you should NOT save forms in drafts and jump
to another form. This will break the form!! Exceptions are: Verification,
Macroinvertebrates and Water Quality, and, with caution, Floodprone Width and Photos and
Reach Coordinates, and Vegetation and Human Influence.
33Layout and Form Elements
The following screenshots highlight commonly referred to terms and sections of forms that users
should be aware of while using Survey123.
Current Repeat Label
Groups Bank Stability
Repeat Label
Proceed to next Bank Stability
Thalweg Repeat Repeat Bar
Add Repeat
Thalweg
Repeat Delete
Repeat
Transect
Repeat
Bar
Page Bar
34You can also read